
How do I allocate markers to a Moodle assignment?
Marker allocation
This can be set up if more than one marker is needed for an assignment. This guide allows you to divide the students cohort so that each tutor marks a selection of the total. These groups can be set up after the students have submitted.
To setup groups, see this article .
Marker allocation by Group
This section looks at creating groups to aid marker allocation when marking.
To use groups for marker allocations you will already need to have set up groups, if you haven’t already done so, at the course (module) level. To do this follow the steps shown above in the setup groups link.
Linking your marking allocation grouping to your online assignment
- Go to your online assignment and click ‘edit settings’.

- Scroll down to common module settings
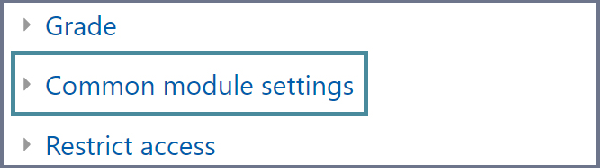
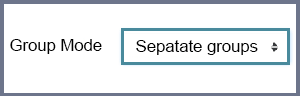
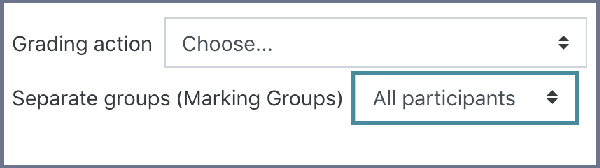
- If you’re using groups to define marking allocations you will need to set the ‘Group mode’ field to ‘separate groups’. This will add a filter to the grading table.
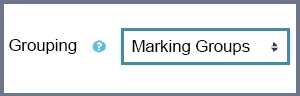
- Set the grouping to the correct set of groups where you have previously defined your marking allocations. Do this in the ‘Grouping’ field.
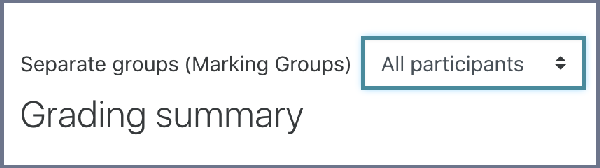
- Back on your DLE module page click the link to your assignment and under name, you will see a drop-down list which allows you to select ‘All participants’ or by Group.
- You can also go into the grading table, by clicking ‘view all submissions’ and select the marking group from the drop-down at top of page.
Manual Marker Allocation
It is also possible to make a manual allocation of markers from within the Grading Table. This method can work adequately for small cohorts, where you wish to allocate markers in an ‘ad hoc’ way, however we do not normally recommend it for normal use, where the ‘group’ method described in previous chapters works better.
Method A – within Grading Table
- Method A – within Grading Table.
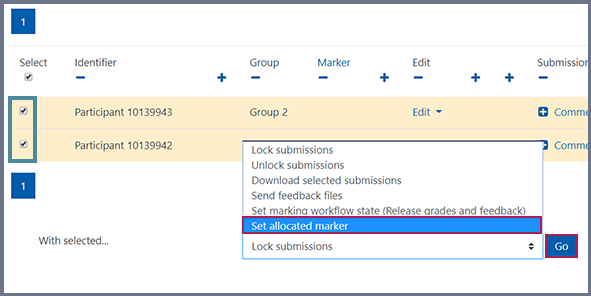
- Select the student(s), which requires an allocated marker and tick the checkbox in first column.
- Once student(s) have been selected, go to dropdown menu below table: With selected… ‘ and choose ‘ Set allocated marker ‘ and then ‘ go ‘.
Method B – within Grading Window
- Find the student in grading table and click on Blue Grade button.
- In Grade section, find box called ‘Allocated Marker’ and choose the teacher from the drop-down list.
Finding your marking allocations
To show your marking allocations, go down to the bottom of the submission list and use the ‘Marker’ filter where you can select your names from the drop-down list.

About The Author

Digital Education
Related articles.
- How to create a formative quiz in Moodle that uses pass/fail marking?
- How to automatically update marks for a Moodle quiz?
- How to upload exam grades using Moodle Assignment
- How to check for non-submissions in Moodle
- How to manage Participants in Moodle
- Moodle Calendar
Academic Technology
- Allocate markers to specific submissions
Where a course has multiple markers, it is possible for course leaders and editing teachers to allocate individual markers to specific assignment submissions.
This could be used to ensure that subject specialists are assigned to mark questions about their specialism or where assignments relate to specific projects.
Please note that it is only possible to allocate in this way to Non-editing teacher and Marker roles . Course leaders and editing teachers will see all assignments.
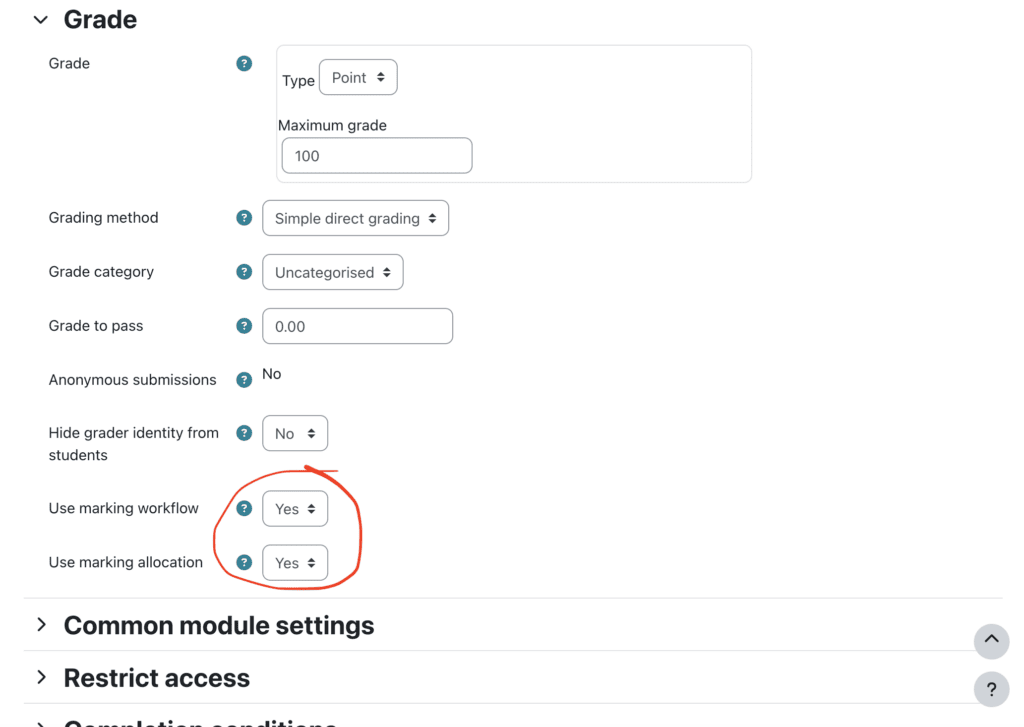
Turn on marking workflow and marker allocation
- Turn editing on in your Moodle space.
- Add your assignment using Add activity or resource

- Set Use marking workflow to yes.
- Set Use marking allocation to yes.
- Click Save and Display.
Allocate Markers
- Go to the assignment where you wish to allocated specific participants submissions to markers.

For more information see use marking allocation Link opens in a new window on Moodle.org.
Get started with Moodle
- Introduction to Moodle
- Visitor access to Moodle
- Academic year rollover
Manage your participants
- Enrolment methods and managing access permissions
- Roles and their functions in Moodle
- Use groups and groupings
- Import and populate groups
Structure your course
- Introduction to structuring your course
- Add a course header and other visual elements
- Restrict access to sections and activities
Add content to your course
- Introduction to adding content
- Moodle activity types
- Moodle resource types
- Import content from one Moodle space to another
- Restore deleted content
- Share Stream videos in Moodle
- Accessibility in Moodle
- Moodle Accessibility Quick Guide
Communicate and collaborate
- Introduction to communication and collaboration
- Moodle - Teams Synchonisation
Assessment and feedback
- Introduction to assessment and feedback
- Create a custom certificate
- Create and manage badges
Assignments
- Create an assignment activity
- Assignment submission types
- Assignment settings
- Create an assignment for group submission
- Use Turnitin for an assignment
- Create and grade a submission using a rubric
- Blind marking
- Hide or show grades and feedback
- STACK and CodeRunner on MoodleX
- Plan and set up a lesson
Tracking progress
- Completion tracking
- Reports and logs
Rollover, upgrades & known issues
- Known issues
Get started with Mahara
- Introduction to Mahara
- Login to Mahara
- Navigate the dashboard
- Search for people and content
Add reusable content (artefacts)
- Introduction to artefacts in Mahara
- Add personal information to your profile
- Add personal information using a CV
- Add files and images to Mahara
- Use plans and tasks for organisation
- Use journals and journal entries to record development
Create pages and add content
- Create a page
- Add content (artefacts) to a page
- Add written content using text and notes
- Add videos and external media
- Edit the page layout
- Remove content from a page
Structure and showcase your portfolio
- Use Tags in Mahara
- Create a page from Tags
- Create a collection
- Delete a page or collection
- Share a page or collection
Assessment in Mahara
- Copy a page or collection
- Comment and peer review in Mahara
- Create a template for others to work from
- Create a Mahara assignment in Moodle
Working with Groups
- Create a group and add members
- Manage a group homepage
- Share a group portfolio to group members
Manage your portfolio
- Save a snapshot of work using Timeline
- Export all or part of a portfolio
- Report and remove objectionable content
- Vevox at Warwick
- Information about Vevox for students
- Introduction to Echo360
- Getting started with Echo360 Lecture Capture
- Lecture Capture enabled spaces
- Schedule a lecture capture
- Getting started with Universal Capture (Personal)
Echo360 automated lecture capture
- Teaching modes in Lecture Capture-enabled rooms
- Use a lecture capture camera
Manage Echo360 content
- Access and manage Echo360 content
- Share Echo360 content
- Reuse Echo360 content
- Use collections to share recordings
- Upload external media to Echo360
- Edit Echo360 content
- Echo360 Automated Transcripts and Closed Captions
- Echo360s Active Learning Platform
- Echo360 Accessibility
- Echo360 Analytics
- Video assignments (via Moodle)
Student Module Feedback
- Introduction to Student Module Feedback
- 6 core questions
- Who can access responses?
- Step 1: Moodle template
- Step 2: Publish to students
- Step 3: Preview responses s
- Step 4: Reports
- Introduction to Padlet at Warwick
Get started with QMP
- Introduction to QMP
- The eAssessment lifecycle
Plan and design your assessment
- Plan your assessment
- Assessment types
Create question bank and questions
- Working with questions and questionbanks
- Question types
- Drag & drop
- Fill in blanks
- Select a blank
- Multiple response question (Right / Wrong)
- Pull-down list
- Multiple choice question
- Knowledge matrix
Build your assessment
- Assessment design
Deliver your assessment
- Verification / peer review
- Schedule an assessment
- Deliver to students
QMP Administration
- Unblock the user
- Reset password manually
- QMP Reports
- Filters in reports
- Assessment review
Other tools, guides and services
- Academic Technology Super User Guide
- Teaching in Teams Guides
- Use Microsoft Stream to create, stream and caption video
- Use Microsoft Bookings for office hours
- TurningPoint
- Plagiarism and Technology
- Use of software and services for teaching and learning
- Rapidmooc Green Screen Studios
- Podcasting in Rapidmooc Studio Westwood
- LEaD events
- IT Self Service Portal
Choose an online assessment type
- Get started - online assessment
- Choose the right assignment activity
- Design out plagiarism
Facilitate multiple markers
Set up groups, marking workflow, external examiners & marking allocation, external examiners & marking workflow.
- Request an External Examiner account
- External Examiners' ed tech guidance
- Marking templates
- Related guidance
You can facilitate multiple markers by either using Group mode under Common module settings for Turnitin Assignment, Moodle Assignment and Video Assignment. Marking workflow is available for Moodle assignments.
We recommend using the Groups method as the Marking workflow method is more complex to setup and requires additional steps to release the final grades and feedback to students.
- Students must first be added to groups. You can find out more about how to do this on our Manage groups guide .
- In your assignment settings, scroll to Common module settings and set Group mode to Separate groups .
- To save the assignment settings, click on the Save and Display button. You will then be taken to the assignment submission area page.
- On the assignment submission area page, click on View all submissions .

If you enable Marking workflow then marks will go through a series of workflow stages before being released to students. You can then use the Marking allocation feature to allocate markers to particular students.

- Scroll to the end of the assignment and select Save and display .

- Scroll down the page and check the boxes alongside the students who you want to allocate to a specific marker.
- Scroll down to With selected ... and select Set allocated marker .

- If a pop-up appears, select Ok.

- Alternatively, scroll down to the bottom of the page and select your name from the Marker filter.

If Marking allocation is set to yes from within a Moodle assignment settings, someone with External Examiner enrolment can only view submissions to which they have been assigned. If the programme wants to use the Marking allocation feature, they must allocate all students to the External Examiner, once they are ready for external review.
To re-allocate the submissions to External Examiners
- Keep marking workflow enabled, set workflow back to "Marking in progress", allocate all assignments to the External Examiner. They will be able to change any previously awarded grades.
- Turn off marking allocation once the original marking has been done. This will allow the External Examiner to see all submissions rather than having to allocate them to each one. Make a record of which submissions the first marker graded in case the External Examiner asks them to remark or take another look.
- To turn off marking allocation, open the assignment settings > Grade and select No next to Marking allocation.
If Marking workflow is set to yes from within a Moodle assignment settings, and the marks have been released , the External Examiner cannot view the submissions unless marking allocation has been used.
- Allocate external examiners to assignments Details on allocating external examiners to assignments
- << Previous: Design out plagiarism
- Next: Request an External Examiner account >>
- Last Updated: Aug 21, 2024 12:33 PM
- URL: https://city-uk-ett.libguides.com/staff/moodle/assessment

.css-1lrpez4{margin-top:unset;}.css-1lrpez4:hover > span,.css-1lrpez4:focus-within > span{opacity:1;-webkit-transform:none;-ms-transform:none;transform:none;-webkit-transform-duration:0.1s;-ms-transform-duration:0.1s;transform-duration:0.1s;} Facilitating multiple markers .css-14vda7h{font-size:15px;margin-inline-start:0.5rem;opacity:0;position:absolute;-webkit-transform:translateX(-4px);-ms-transform:translateX(-4px);transform:translateX(-4px);-webkit-transition:opacity 0.2s ease-out 0s,-webkit-transform 0.2s ease-out 0s;-webkit-transition:opacity 0.2s ease-out 0s,transform 0.2s ease-out 0s;transition:opacity 0.2s ease-out 0s,transform 0.2s ease-out 0s;}
You can facilitate multiple markers by either using Group mode under Common module settings for Turnitin and Moodle assignments or Marking workflow for Moodle assignments.
We recommend using the Groups method, as the Marking workflow method is more complex to setup and requires additional steps to release the final grades and feedback to students.
Students must first be added to groups.
Step 1 - Open the assignment you want to edit, click on the icon and click on edit settings

Step 2 - Set Group mode (under Common module settings ) to Separate groups. You may also first try directly proceeding to step 5 as this setting should be the default already
Step 3 - Scroll down to Restrict access
Step 4 - Click on Add restriction and select Group
Step 5 - Select the group you wish to give exclusive access to
Step 6 - Click Save and return to course or Save and display.
Marking workflow
If you enable Marking workflow then marks will go through a series of workflow stages before being released to students. You can then use the Marking allocation feature to allocate markers to particular students.
Step 1 - When setting up your assignment, scroll down to Grade.
Step 2 - Set Use Marking workflow , and Use marking allocation to Yes.
Step 3 - Click Save and return to course or Save and display.
Step 4 - When setting up your assignment under the Grade settings, set Use Marking workflow , and Use marking allocation to Yes .
Step 5 - Click Save and return to the course or Save and display
Step 6 - Open the assignment you wish to adjust and select View all submissions.
Step 7 - Check the boxes alongside the students who you want to allocate to a specific marker. Scroll down to With selected… and select Set allocated marker and then click Go.
Then click OK.
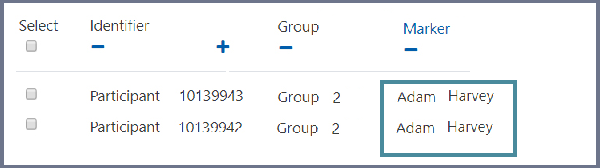
The marker’s name then appears in the Marker report area.
Related articles
- Page: Moodle gradebook
- Page: LDB setup Guidelines for lecturers Only :
- Page: The 15-Minute Guide for Teachers on Getting Started with Moodle
- Page: How to add Team for class specific course (folder) in Moodle to Microsoft Teams?
- Page: How to Create a Moodle Quiz: Step-by-Step Guide
Copyright © Asia Pacific University. All Rights Reserved.
Learning and Teaching
- Assessment & Feedback
How to mark a Moodle Assignment offline and upload feedback
Published on: 30/08/2023 · Last updated on: 02/09/2024
Preparing to grade an Assignment
Before beginning marking it’s important to understand how your assignment has been setup, so that you can ensure that you are not showing marks and feedback to students before you are ready for them to see them . By default, Moodle assignments hide grades and feedback from students through the ‘Marking Workflow’ option. To get started please read the ‘Preparing to Mark’ guidance below .
When you create an Assignment, the ‘Marking Workflow’ setting will be enabled. This automatically hides any marks and feedback that you upload for students until you take specific steps to release the marks and feedback. This is a ‘safer’ option for the requirements of most Teachers .
Guidance on releasing Marks and Feedback, and sending a notification to students with a few clicks, using marking workflow can be found below.
If you prefer instead to turn off the marking workflow option you can do so within the Assignment’s settings, under the ‘Grade’ settings. Note that doing this will mean that any marks and feedback added to Moodle will be immediately visible to students!
If you have turned off Marking Workflow, but you also don’t want students to see marks and feedback as soon as they are uploaded, you will need to hide the Assignment link and Gradebook item until you are ready to reveal the marks and feedback.
The guidance below shows how to turn off Marking Workflow (if you wish) and how to hide the Assignment link and Gradebook item:
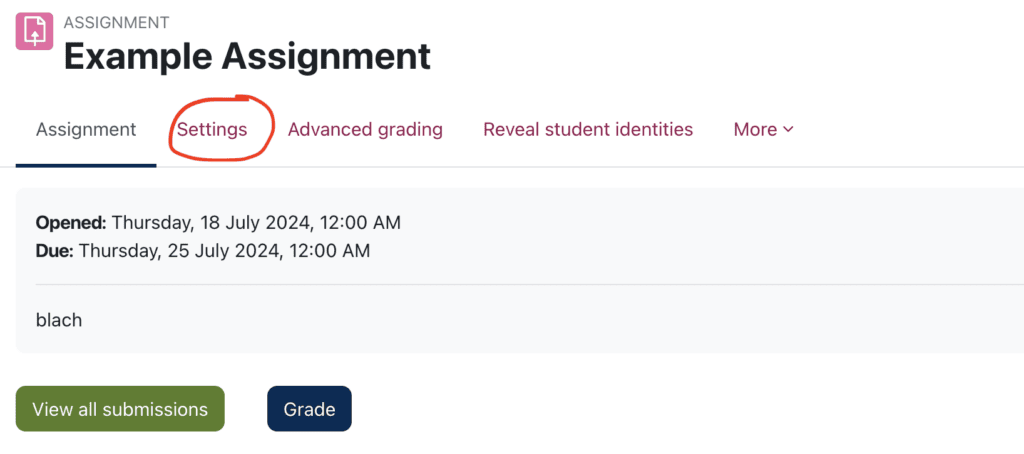
- Find your Assignment and click the Settings tab.
- Scroll down to ‘Grade’ settings and expand them
- Set use marking workflow to no
- Save changes

Note: Any marks and feedback you add will now be immediately visible to students!
To manually hide marks and feedback from students you will need to hide the Assignment’s Gradebook item and the Assignment link (which is often not practical where there are late submissions)
To hide the Gradebook item:

- Go to the Course Homepage and choose Grades :
- From the Grader Report dropdown, choose Gradebook Setup

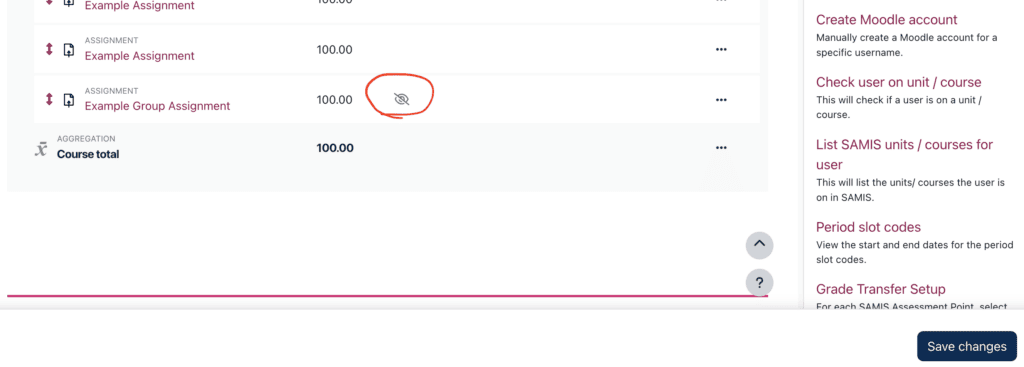
- In the row for the Assignment that you wish to hide, in the Actions column, choose Edit then Hide .
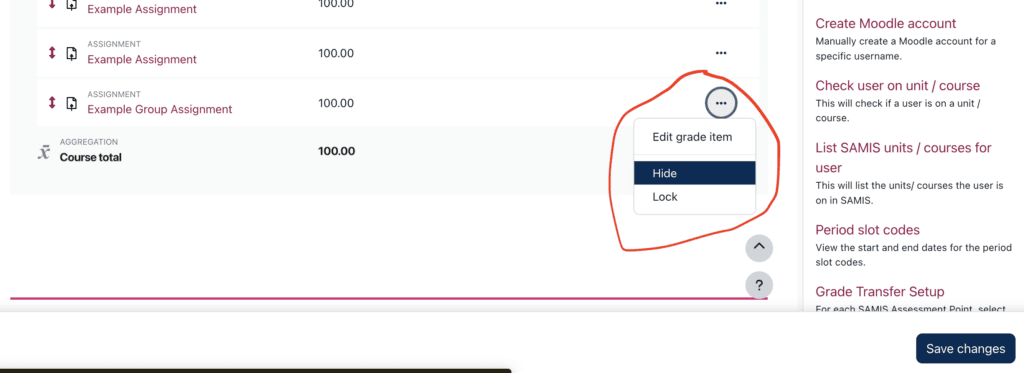
- Save Changes
- The Gradebook item will now have a crossed through eye icon to show that it is not visible to students.
To hide the Assignment link from students:
- Navigate to the Assignment and, from its Edit menu, choose Hide on course page :
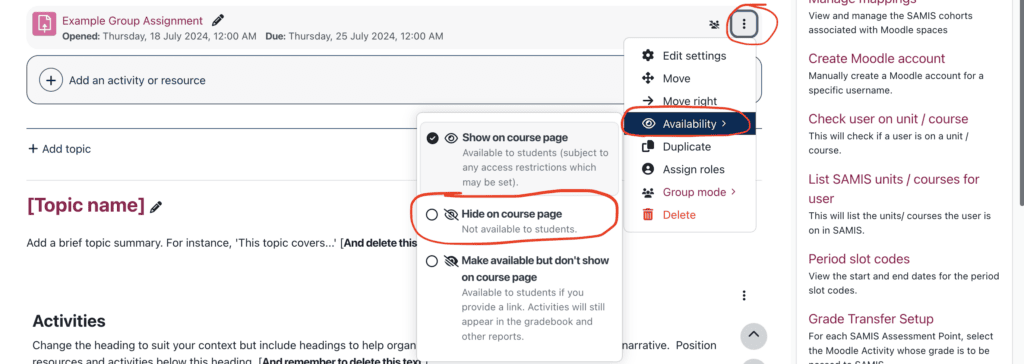
- You can now begin marking
- When are ready to release marks and feedback to students, don’t forget that you’ll need to make the Gradebook item and Assignment link visible again.
Lock submissions to prevent changes
Before you begin marking it’s a good idea to lock submissions. This will prevent students from making any changes to their submissions once marking is underway. To do so, navigate to your Assignment and View all submissions, then:
- Tick the box at the top of the ‘select’ column to select all user submissions
- From the With selected… dropdown choose Lock Submissions

NB: If you have a large number of students you will need to select the option under the table to ‘show all students on one page’.
Download submissions/Mark offline/Upload Annotated submissions
It is possible to download student submissions in order to annotate them offline. Moodle allows all submissions to be downloaded in a single zip file and to be returned after annotation, with any additional files if desired, in the same manner. You can also download the Grading Worksheet, add marks to it, and re-upload to Moodle to award marks to all students. Please see the video below for full details, or follow the steps underneath it:
To download student scripts and the Grading Worksheet:
- Navigate to your assignment and select it.
- Click the View all submissions button.
- if the submission is more than a single file, or if you have a feedback form to return to students, tick the box.
- if the submission is only one file, which you will annotate and return to students, leave unticked.
- From the Grading action menu at the top choose Download all submissions .
- A Zip folder will be downloaded to your machine. Right click the folder and choose ‘Extract all’ (or similar), then click ‘Extract’. Files will be extracted.
- You can now open the files to read and annotate them. Important! When saving annotations DO NOT rename the files.
- Return to Moodle, and from Grading action menu, choose Download Grading worksheet (Bath version) .
- Save the file, noting that it is a .CSV file, not a standard Excel document.
- Open the file from your Downloads folder (if using a Mac you may need to right click on it and specify ‘open with Excel’) and add grades to the Grade column as desired. Important! DO NOT change any column headings.
- You may optionally add short comments for students in the Feedback comments column.
- Save changes ensuring the file type is .CSV
To return summary comments and the completed Grading Worksheet to Moodle:
- Navigate to your Assignment and select it.
- From the Grading action menu at the top choose Upload Grading worksheet .
- Select the .CSV file you saved (drag and drop, or ‘choose a file’) and click Upload grading worksheet and confirm. Grades and any summary feedback comments that you included will now be shown in the Grading table.
To return annotated scripts to Moodle:
Before returning the annotated scripts as feedback files, you must add them to a .zip folder.
If you downloaded all of the submissions in a single .zip file:
- Navigate to the folder that you have stored the annotated files in, and open it so that you can see all the file thumbnails.
- Select all of the files (CTRL+A on Windows or Command+A on Mac).
- Right-click and choose Send to… then Compressed (Zip) folder (on Windows) or right-click and choose Compress (on Mac).
- The new .Zip folder will be automatically named after one of the files, this isn’t a problem, but rename it if you wish (right-click and Rename ).
- Return to the Moodle Assignment, and from the Grading Action dropdown menu (where you downloaded the files from) choose Upload multiple feedback files in a Zip
- On the next page, Choose a file or drag and drop the .zip file into the file upload area on-screen.
- Click Import feedback file(s) , then Confirm and Continue .
- The annotated feedback files will now be displayed in the Feedback files column in the Grading Table.
If you downloaded the student submissions in folders:
- Navigate to the folder containing the folders of annotated files (and any additional feedback files you are returning to students) and open it.
- Select all of the folders (CTRL+A on Windows or Command+A on Mac).
- The new. Zip folder will be automatically named after one of the folders, this isn’t a problem, but rename it if you wish (right-click and Rename ).
- Return to the Moodle Assignment, and from the Grading Action dropdown menu (where you downloaded the files from) choose Upload multiple feedback files in a Zip.
- On the next page, Choose a file (or drag and drop) to get your .zip file into the file upload area on-screen.
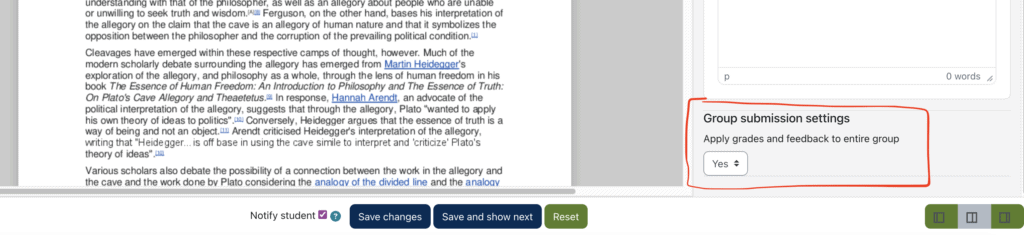
Marking a Group Assignment
Where one student has uploaded a file on behalf of her Group, the file will appear against all Group members, and any of these can be marked. On the individual student grading page, an option to ‘apply grade and feedback to all members of group’ will appear. If ticked the grades and feedback will be applied to all group members.
Allocate Assignments to another Marker
You can use the Marking Allocation feature to assign student submissions to another marker in your course.
- Marking allocation – this allows allocation of markers to work after the deadline. Marking allocation depends on Marking workflow being enabled.
Marking Workflow and Marking Allocation must be enabled in your assignment settings:
Once these have been enabled, to allocate assignments to a marker.
- Click on your Assignment link.
- Click on View all submissions .
- Tick the box to the left of the student whose assignment you want to allocate, then choose Set allocated marker and click Go (see image above).
- At the prompt click Ok , then on the next page select your allocate marker from the dropdown and click Save Changes .
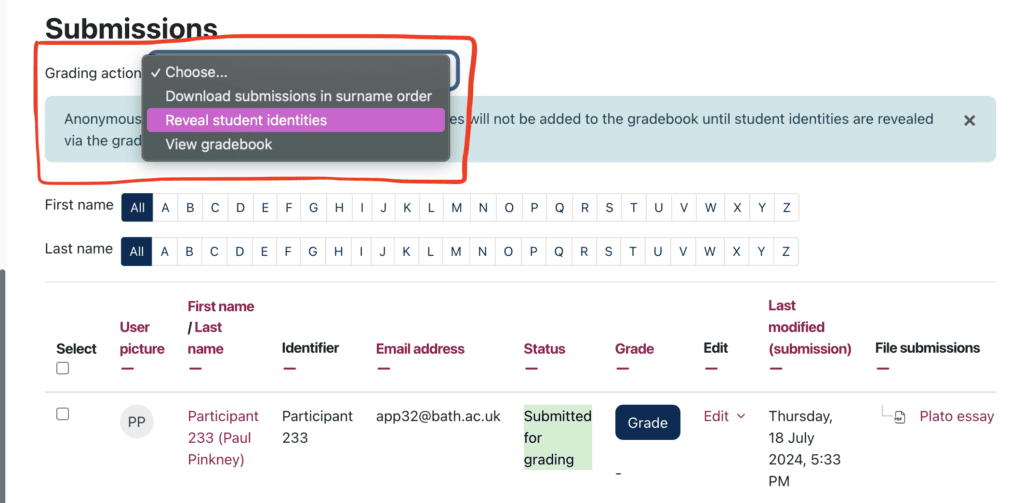
How to lift anonymity in an Assignment
If you are using Anonymous Marking (blind marking) in Moodle, once you have completed marking, it is necessary to lift anonymity in order to release grades to the Gradebook. Please note that lifting anonymity can only be done once, (you cannot return the assignment to an anonymous state once it has been lifted), so ensure that you have completed all marking before going ahead.
To lift anonymity:
- Click on the assignment link, then click on View all submissions .
- From the grading actions menu choose Reveal student identities .
Lift Anonymity
Related Articles
- Anonymous marking in Moodle
- Advanced Grading in Moodle
- Moodle Group Peer Review for Teachers
- Introduction to Ouriginal
- How to create an Assignment in Moodle
- How to release grades and feedback in Moodle
Article Contents
- Turnitin Guides
- Administrator hub
- Release notes and known issues
- Welcome to Turnitin Guides
Welcome to Turnitin’s new website for guidance!
In 2024, we migrated our comprehensive library of guidance from https://help.turnitin.com to this site, guides.turnitin.com. During this process we have taken the opportunity to take a holistic look at our content and how we structure our guides.
This page is here to help you orientate yourself with these changes and update your resources
What's new?
We have restructured the content to help you navigate it more efficiently.
We are consolidating numerous pages to make our individual guides more valuable as well as removing duplicated content.
For example, our Similarity Report guidance on help.turnitin is repeated in numerous places to cater for each individual integration and license type. On guides.turnitin this content will exist in a single place to allow for users of all integrations and licenses to find it easily. We have made slight modifications to these guides to help you understand which guides are pertinent to you and your institution.
Our guidance search has greatly improved
As a result of our content restructure, the search functionality for guides.turnitin has improved. Use the search bar at the top of any page to locate the guidance you’re searching for.
Dedicated student and administrator guidance hubs
Visit the Student hub area to locate student guidance. For students who access Turnitin via an LMS or VLE, check out the subsection Submitting to Turnitin .
Visiting the Administrator hub area to locate administrator guidance and release notes.
iThenticate and Crossref Similarity Check guidance is now located on a separate site
To improve the experience for our iThenticate and Crossref Similiarity Check customers we have move their help content onto a separate help site, guides.ithenticate.com . This will improve the search for all users.
We have also created an orientation page for this site to help users become acclimatised.
Some guidance is no longer grouped within the LMS umbrella
Some guidance which was previously provided under each LMS has been moved to sections that reflect those workflows’ outcomes. Use the table below as a cheatsheet to quickly locate guidance.
| Student guidance | |
| LMS guidance for administrators and instructors | |
| Similarity Report and AI Writing guidance | |
| Creating PeerMark assignments guidance | |
| Creating and managing QuickMarks, rubrics and grading PeerMark assignments guidance | |
| User profile guidance for administrators and instructors |
|
| Administrator account settings and migration help | |
| Release notes and known issues |
Articles in this section
- Turnitin release notes
- Integrations release notes
- Known issues
- Integrations known issues
Moodle and assessment
Experience enhanced flexibility and accessibility with Moodle’s assessment tools. For educators and learners in search of comprehensive online assessment platforms, Moodle offers solutions tailored to your specific diverse educational needs.
Summative assessment
Summative assessment provides a conclusive evaluation of student performance, typically quantified through grades. It serves to inform students whether they have met the required standards and passed the examination. This assessment method involves grading students based on predetermined levels of performance. In Moodle, Rubrics can be used for more detailed assessments, where specific criteria are matched with levels of achievement, and the grading with a rubric can be visually presented to the learner, together with individual feedback. Assessors assign numeric grades to each level based on how well the work fulfills the criteria. Summative assessment offers a clear snapshot of student achievement at a specific point in time.

Formative assessment
Formative assessment tends to be qualitative and involves sharing insights with students about what they need to know and where they currently stand in their learning journey. Formative assessment is closely related to feedback and feed-forward, and it should be constructive and related to the learning goals. Moodle helps facilitate meaningful communication between instructors and students through various approaches . For example, a Workshop Activity allows students to assess their own work or that of their peers, while self-assessment encourages independent reflection on progress. Within Moodle’s framework, feedback is seamlessly integrated into various assessment formats, such as quizzes and assignments , allowing the instructor to offer automatic or personalised feedback tailored to individual needs. This feedback loop not only helps students learn but also provides instructors with insight into the effectiveness of their teaching methods.
Make online assessment accessible with Moodle
Moodle’s commitment to accessibility ensures equitable access to assessment tools across diverse devices.
- Summative assessment tools streamline grading processes, while H5P content integration enhances learner engagement through interactive elements.
- Formative assessment fosters ongoing improvement through feedback and observation, promoting student growth and autonomy.
- Learning analytics offer valuable insights, empowering instructors to refine teaching strategies based on student progress and engagement.

LMS assessment integration with Moodle
Moodle offers a user-friendly interface that streamlines educators’ tasks, allowing them to efficiently create, grade and manage assessments and set up diverse assessment activities that cater to unique learning preferences. The platform facilitates co-assessment and collaborative marking systems, enhancing engagement and interaction among students. Moodle’s automated grading system simplifies assessment processes, while collaboration with colleagues ensures thorough evaluation, especially for open-ended questions. Moreover, educators can effortlessly collaborate in crafting exercises, building a comprehensive question bank over time.
Moodle enables a seamless transition between paper-based and digital exams, providing students with a variety of assessment options to suit their individual needs. Whether for formative or summative purposes, Moodle empowers educators to comprehensively evaluate student progress, promoting a dynamic and effective learning environment.
Key features of Moodle’s online assessment tools
Flexibility.
Moodle’s flexibility extends to its customisable assessment setups, catering to diverse teaching styles and learner preferences. Educators can tailor assessments to suit different instructional approaches, ensuring optimal engagement and effectiveness. With a wide range of assessment types available, including quizzes, assignments, forums, and workshops, Moodle provides educators with versatile tools for evaluating student learning. This variety enables comprehensive assessment that addresses any learning objectives and outcomes. Moreover, by offering diverse assessment formats, Moodle enhances the learning experience, allowing students to demonstrate their understanding and skills in multiple ways. This adaptability fosters a supportive and inclusive learning environment where every student can thrive.
Efficient grading
Moodle offers efficient grading through marking guides, rubrics, and marking workflows to streamline assessment processes. With marking guides and rubrics, criteria for evaluation are clearly defined, ensuring consistency and transparency in grading. The grading workflow feature allows for structured assessment steps, from initial marking to final review, optimising efficiency. Grades are conveniently accessible in the course gradebook or ‘Grader Report’ , providing a comprehensive overview of student progress. When adding assessed items, Moodle automatically generates space for grades, simplifying the grading process further and ensuring seamless integration of assessment results.
Customisation
Customisation in Moodle is vital for aligning assignments with course objectives. Moodle’s Assignment activities allow educators to tailor assessments to specific learning outcomes and skills. Easy to set up, they not only offer diverse possibilities for creating unique learning experiences but also serve both formative assessment and summative evaluation purposes. With various submission types and settings, educators can efficiently manage classes while achieving teaching and learning goals. Moodle’s flexibility ensures assignments reflect the course’s objectives, enhancing student engagement and success.
Interactivity
Moodle provides a range of assessment activities that promote student engagement and interactivity. These activities include several features that help students stay engaged during the learning process. Peer review, discussion forums, and multimedia submissions encourage active participation. Peer review allows students to assess peers’ work, promoting collaboration and mutual learning. By evaluating classmates’ submissions, students gain insights into strengths and weaknesses, enhancing their own understanding and skills. Discussion forums encourage meaningful interactions, fostering a sense of community and knowledge sharing. Multimedia submissions offer creative expression, further enriching the learning experience. Through these interactive elements, Moodle promotes a dynamic and engaging learning environment where students actively participate and learn from each other.
Find out more about Moodle Certified Integrations
Documentation
| If you want to create a new page for developers, you should create it on the site. |
Assignment/Draft Features/Marker Allocation and Management
- 1 Marker Allocation and Management
- 2 Goals and rationale
- 4.1 Changes to assignment settings
- 4.2 Changes to the grading table
- 4.3 Capabilities
- 4.4 User Interface mockups
- 4.5 Database changes
- 5 Use cases
Marker Allocation and Management
This is a proposal for additional features to allow marker allocation and to allow marks to be reviewed and approved before released to students.
Goals and rationale
The main goals of this feature are to :
- Allow markers to be allocated to individual students.
- Control when marks are released to students.
- Allow markers to use a review cycle when marking submissions before students receive their marks.
This feature would enable a workflow for marking in the assignment module. The grades would transition through 1 or more stages of marking and review.
The feature has been implemented in Moodle 2.6
Changes to assignment settings
The module settings page would have the additional settings: “Use marker allocation” which is on or off. "Use marking workflow" which is on or off. The “Use marker allocation” setting would force the option “Use marking workflow” option to be enabled as marker allocation requires the use of the workflow. These settings should be grouped on the assignment settings page and it would be good to make sure it is very clear to the teacher what these settings do.
Changes to the grading table
If "Use marking workflow is enabled", the grading table would indicate the current workflow step for each submission in the grade column. The list of steps are:
- Not marked (the marker has not yet started)
- In marking (the marker has started but not yet finished)
- Marking completed (the marker has finished but might need to go back for checking/corrections)
- In review (the marking is now with the teacher in charge for quality checking)
- Ready for release (the teacher in charge is satisfied with the marking but wait before giving students access to the marking)
- Released (the student can access the grades/feedback)
When using marker allocation a marker can only be allocated/changed if the workflow state is set to “not marked”, “in marking”, “marking completed” – to change the marker in any other state the state must be reset to “not marked”, “in marking” or “marking completed”
Notes: This is a lot of steps and this is a reasonable complicated feature for graders to understand. It has been suggested to show a subset of these steps when there is only one marker - but "only one marker" is not clearly defined and providing 2 sets of workflows and making the teacher choose between them would make this feature more complicated - not less. Instead it seems better to show all the steps and allow anyone with permission to skip any steps they are not interested in using.
It has also been suggested that we could allow the allocated marker to be changed regardless of workflow state and automatically modify the workflow state when the marker is changed like the following: Current state before marker change -> state after change. “not marked” -> “not marked” "in marking" -> “in marking” “marking completed” -> “in marking” "in review" -> “in marking” "ready for release" -> “in marking” "released" -> “in marking”
In the cases where a change in marker will result in a workflow state change a warning should be displayed.
Capabilities
There would be separate capabilities to control the transition of marking through the workflow assign:manageallocations capability would allow assigning markers to student submissions. assign:managegrades capability would allow transitioning to any state.
assign:grade capability When “use Marker Allocation” is set to yes, users with this capability may be assigned to a student as a marker – this capability would allow transitioning to these states:
- Marking completed
When a marker has transitioned to the 'in review' state they are unable to downgrade status unless they also have the assign:managegrades capability. When “use Marker Allocation” is enabled only the allocated marker will be able to edit the grade. If a user with the assign:managegrades capability wishes to modify the grade they must allocate the submission to themselves first.
assign:reviewgrades capability would allow transitioning to these states:
- Ready for release
assign:releasegrades capability would allow transitioning to these states:
- Ready for release.
User Interface mockups

Database changes
assign 2 new fields markingworkflow, markerallocation to save the assignment specific settings. assign_grades 2 new fields: “workflowstate” to store the current workflow state of this user. “allocatedmarker” to store the id of the currently assigned marker.
One marker, Marker wants to release all grades at the same time
- Marker enables "Use marking workflow"
- Marker marks each submission and transitions the grading to "Marking completed" as each submission is graded.
- Marker then uses the batch operations to transition all grades to "Released" at the same time.
Multiple markers,
IMAGES
VIDEO
COMMENTS
The Marker administration block should now appear either at the left or right side of page. Now click to the configuration icon of this block and configure the settings as here: How to use Multiple markers assignment. In creating/modifying an assignment form you can now check "Allow Multiple Markers" box which is found in the Markers section.
Multiple markers, Marker enables "Use marking workflow" Marker marks each submission and transitions the grading to "Marking completed" as each submission is graded. ... For Feedback types, ensure that the Moodle Assignment settings, Feedback comments, Feedback files, and Offline grading worksheet are ticked. ...
Re: Multiple Markers on an Assignment by T K - Wednesday, 12 May 2021, 1:39 PM this is interesting, can anyone share how to install this coursework module in moodle 3.5? i cant seem to find any documentation online
Go to the course where you want the assignment; turn on the editing, and in the section you want the assignment, click 'Add an activity or resource'. From the Activity chooser, click the Assignment button and click 'Add'. (If you want to edit an existing assignment, click the Edit link to its right and choose the action you wish to take, eg ...
Go to your online assignment and click 'edit settings'. If you're using groups to define marking allocations you will need to set the 'Group mode' field to 'separate groups'. This will add a filter to the grading table. Set the grouping to the correct set of groups where you have previously defined your marking allocations.
Learn how to allocate markers to a Moodle assignment
Go to the assignment where you wish to allocated specific participants submissions to markers. Click on View all submissions. Select all or some of the submissions using the check boxes and then use the drop down list to select Set allocated marker and click Go. Click OK to confirm you wish to continue with allocating markers.
The first step to using the marking workflow is to enable it on your assignment activity. This setting can be found in the Grade Section. The default for "Use marking workflow" is No, change ...
You can facilitate multiple markers by either using Group mode under Common module settings for Turnitin Assignment, Moodle Assignment and Video Assignment.Marking workflow is available for Moodle assignments.. We recommend using the Groups method as the Marking workflow method is more complex to setup and requires additional steps to release the final grades and feedback to students.
Organising markers. One way to allocate markers to work is to put students and markers into Groups. However, if you want to allocate markers on the fly e.g. based on area of expertise, or if dates for each marking stage are a bit more fluid, you can use Marking Workflow - see this Workflow video for an overview; guidance on Workflow is available from Moodle Docs.
You can facilitate multiple markers by either using Group mode under Common module settings for Turnitin and Moodle assignments or Marking workflow for Moodle assignments. We recommend using the Groups method, as the Marking workflow method is more complex to setup and requires additional steps to release the final grades and feedback to students.
Short demo of the Moodle 2.6 Marking workflow and allocated markers feature.
Enabling marker allocation and marking workflow allows you to track stages of marking for student submissions. This can be useful if there are multiple tutors and lecturers involved in marking student assignment submissions. ... Enable the academic integrity notice in Moodle Enable the academic integrity notice in Moodle
You can facilitate multiple markers by either using Group mode under Common module settings for Turnitin and Moodle assignments or Marking workflow for Moodle assignments. We recommend using the Groups method, as the Marking workflow method is more complex to setup and requires additional steps to release the final grades and feedback to students.
Multiple Markers (Beta) introduces the ability for integration users to allow multiple instructors to mark an assignment. If your account has Multiple Markers enabled then the Multiple Markers functionality will appear within the Feedback Studio. If your LMS or learning portal allows multiple instructors to be added to a class, Multiple Markers ...
Moodle.org Home; Documentation; Downloads; Demo; Tracker; Development; Translation; Home; Communities; Moodle in English; Welcome to Moodle in English!
2.3.6 Multiple markers which to separately mark the same set of students and then a moderator either takes an average or chooses one of the marks to be released; 2.3.7 Multiple markers mark one student in sequence; 2.3.8 Separate release of grades and feedback; 2.4 User Interface. 2.4.1 Assignment settings screen; 2.4.2 Submission menu in ...
Learn about Moodle's products, like Moodle LMS or Moodle Worplace, or find a Moodle Certified Service Provider. MoodleNet Our social network to share and curate open educational resources. Moodle Academy Courses and programs to develop your skills as a Moodle educator, administrator, designer or developer.
Enabling multiple markers. Multiple Markers (Beta) introduces the ability for integration users to allow multiple instructors to mark an assignment. If your account has Multiple Markers enabled then the Multiple Markers functionality will appear within the Feedback Studio. If your LMS or learning portal allows multiple instructors to be added ...
Return to the Moodle Assignment, and from the Grading Action dropdown menu (where you downloaded the files from) choose Upload multiple feedback files in a Zip; On the next page, Choose a file or drag and drop the .zip file into the file upload area on-screen. Click Import feedback file(s), then Confirm and Continue.
Currently in the assignment module, when dealing with large class sizes it is desirable to share the workload of marking among multiple markers. The current methods for doing this rely on process outside of Moodle (e.g. spreadsheet) to allocate students to markers to ensure that multiple markers do not mark the same piece of work.
Multiple Markers (Beta) introduces the ability for integration users to allow multiple instructors to mark an assignment. If your account has Multiple Markers enabled then the Multiple Markers functionality will appear within the Feedback Studio. If your LMS or learning portal allows multiple instructors to be added to a class, Multiple Markers ...
Solutions. Moodle LMS Engage your learners with flexible, secure, and accessible online learning spaces.. Explore Moodle LMS Improve your teaching and student outcomes with our feature-rich LMS platform.; Certified Integrations Extend your online learning ecosystem with powerful and trusted add-ons.. Become a Certified Integration Partner; Moodle App Access Moodle from anywhere, on any device ...
Changes to assignment settings. The module settings page would have the additional settings: "Use marker allocation" which is on or off. "Use marking workflow" which is on or off. The "Use marker allocation" setting would force the option "Use marking workflow" option to be enabled as marker allocation requires the use of the workflow.