Search for: Search Button

PowerPoint presentations in a window not full screen
PowerPoint presentations don’t have to be full-screen, that’s the default and normal way to show a deck, but a window option is also there. A windowed presentation lets you display the slides in other software like virtual cameras or desktop capture.
Go to Slide Show | Setup Slide show and choose ‘Browsed by an individual (window)’.

The options are the same in PowerPoint for Windows or Mac.
Start the slide show (Slide Show | From Beginning or From Current Slide) as usual except now it appears in a resizable window.
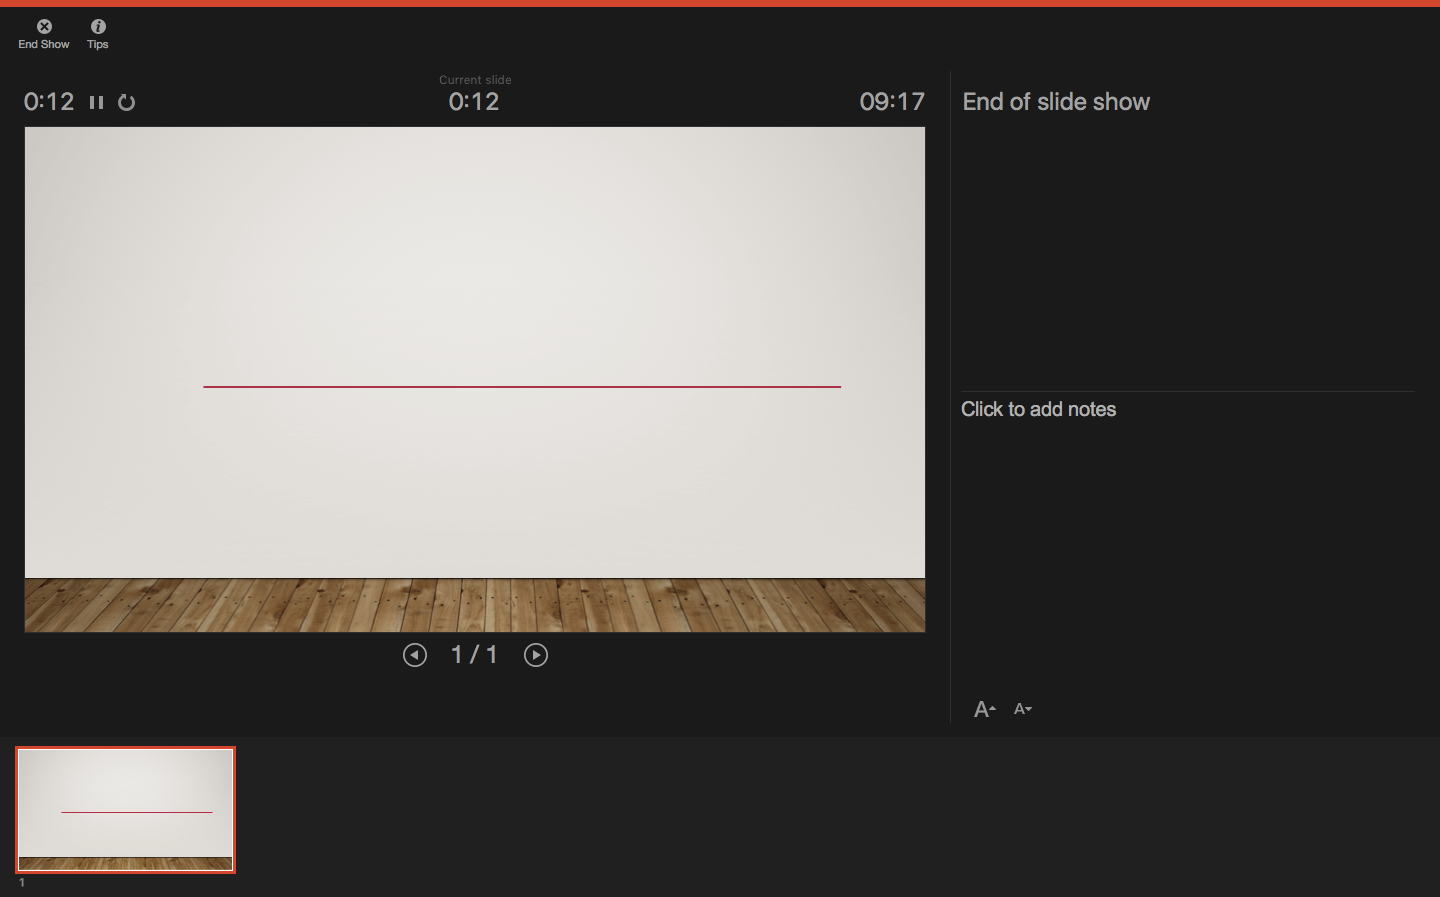
Windowed presentation controls
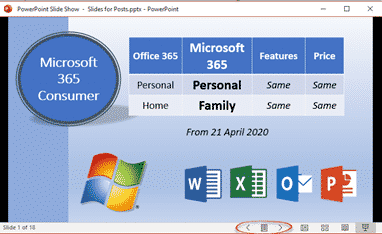
There are back and forward slide buttons on the bottom status bar (see above).
Click on the icon between those two buttons to see some more options.

The same options appear if you right-click in the presentation while windowed.
- Next / Previous
- Go to Slide – choose a slide from the flyout list.
- Go to Section – for decks in Sections
- Zoom In / Zoom Out
- Print Preview and Print
- Edit Slides
- Full Screen
It would be really nice if Presenter View could appear in a second window – but alas it’s not an option. That would let the use control the presentation properly while the slides appear in another window (which could be visible via a third-party tool).
Switching Full Screen and window slide show
Starting from a windowed presentation means you can switch between Full Screen and the window presentation without showing the entire PowerPoint menus etc. It’s a little neater and more professional.
Go to Full Screen from the menu option.
In Full Screen mode press Escape to return to the windowed presentation.
Why use a windowed PowerPoint presentation?
Having the slides in a resizable window gives you options not available when the deck is taking up the whole screen.
Perhaps you’re demonstrating some software? Have the presentation in one window and the software in another? See A better Side-by-Side document view for Windows and Mac to see how to use windows controls in Windows or Split View on a Mac.
A windowed presentation can be selected as an input option for a virtual camera or other service which lets you choose to display a selected running program. Full screen PowerPoint can’t be selected but the same slide can be chosen from a windowed presentation.
Blur and Virtual Background choices for any online meeting
Clever tricks with Zoom
Adding Virtual Background or blurred video to Teams
About this author

Office-Watch.com
Office 2021 - all you need to know . Facts & prices for the new Microsoft Office. Do you need it? Office LTSC is the enterprise licence version of Office 2021.
Office 2024 what's known so far plus educated guesses. Microsoft Office upcoming support end date checklist.
Latest from Office Watch
- Quicker ways to Zoom in Microsoft Office
- Change Word Zoom to custom fixed settings
- British Isles, United Kingdom etc. explained in a simple diagram
- Don’t trust Excel’s Linked Data Types, always verify
- UK vs Great Britain and problems with Excel’s Geography
- What I’m looking forward to at this year’s Edinburgh Festivals
- Get the most for less money (and hassle) at the Edinburgh Festivals
- BBC TV backgrounds for PowerPoint and online meetings
- How to fix an imported appointment in Outlook
- Zoom Docs adds a word-processor with a Magical Key
- Straight lines and neater drawn shapes in Word for Windows
- Outlook (new) is NOT ready, ignore what Microsoft says
- Beware the privacy trap in the Outlook (new)
- Does Microsoft Word think ‘Walz’ is a spelling error?
- Olympic medal comparisons in Excel
- Use your free Skype minutes to save on overseas phone calls
- Microsoft Office highlights in latest company results
- Excel for Mac gets PowerQuery 'from folder' updates
- Dictation leaves Outlook mobile apps
- Major benefit removed from Copilot Pro
How to Play a PowerPoint Slideshow in a Small Window instead of Full Screen
Last updated on April 10th, 2024

PowerPoint was originally intended for the purpose of presenting slideshows in a projector. However, over time, the software has evolved and is now being utilized for a range of other purposes. For example, PowerPoint is now commonly used for presenting online webinars or training employees remotely using software such as TeamViewer, GoView, or GoToMeeting. Additionally, PowerPoint can also be used to record screen or screencasts using free tools such as Screenr .
For presenters who prefer to play their slideshows in a small window that can be easily controlled in Windows, rather than in full screen mode, the following tip may prove beneficial. By configuring PowerPoint to play slideshows in a resizable window, presenters can have a greater control over their presentations, especially when dealing with online meetings, sharing screen with teammates or presenting online.
To configure PowerPoint to play a slideshow in a resizable window, rather than in full screen mode, follow these steps:
How to Configure PowerPoint Slideshow to play in a resizable window instead of full screen mode?
So, how can I view a PowerPoint show without using full screen? Go to SlideShow and then Setup Slide Show.

Now, in the Set Up Show dialog, make sure to select Browsed by an individual (window) . By default you will see that the Presented by a speaker (full screen) is selected.

Now, every time you start the slideshow for example using the keystroke F5 then you will see that the slideshow opens in a regular window instead of full screen.

This configuration can be useful for a range of purposes, including:
- Recording screencasts using PowerPoint and including animations and transitions in a resizable window.
- Conducting online webinars using tools such as TeamViewer for presentations and GoToMeeting without entering full screen mode.
- Sharing a window online with the presentation while working on other windows simultaneously.
- Playing the slideshow in multiple monitors.
In conclusion, while PowerPoint was originally designed for presenting slideshows in a projector, it has evolved to offer a range of other uses, including online webinars, remote employee training, and screen recording. By configuring PowerPoint to play slideshows in a resizable window, presenters can have greater control over their presentations and offer a more personalized experience for their audience. This feature can be particularly useful for those looking to record screencasts or conduct online webinars. Overall, PowerPoint’s versatility continues to make it a valuable tool for a variety of industries and purposes.
If you enjoyed this article, and you want to learn more tips on how to deliver your presentations, we recommend reading how to set up PowerPoint in presentation mode via Presenter View and set up the slideshow in PowerPoint.
Leave a Comment Cancel reply
Your email address will not be published. Required fields are marked *
Save my name, email, and website in this browser for the next time I comment.
Sign up to our newsletter
We will send you our curated collections to your email weekly. No spam, promise!
Support from FASE's Education Technology Office
- How can I view a PowerPoint show without using full screen?
Updated on Apr 27, 2020
This guide provides instructions on how to set your PowerPoint (for Windows) application to play your slide show in a window, not in full screen. This is particularly useful if you are participating in a video call and might want to see the presentation, your notes, and the webinar interface.
Please note: To display your presenter notes, you will need a two monitor set up.
How to display a slide show in a window:
- Select "Set up Slide Show" on the "Slide Show" tab
- Select the radio option, "Browsed by an individual (window)"
- Start your PowerPoint show
- To exit the show, use the "Normal" button to return to the file editing interface .
1. Select "Set up Slide Show" on the "Slide Show" tab.

- Navigate to the " Slide Show " tab.
- Select on " Set up Slide Show ."
2. Select the radio option, "Browsed by an individual (window)"

- Select "Browsed by an individual (window)" radio button option.
- Select on "OK" to save your changes.
3. Start your PowerPoint show (as per normal).

4. To exit the show, use the "Normal" button to return to the file editing interface.

Microsoft Office 365
- Login to your Microsoft Account
- Access your O365 Applications using the Microsoft Application Launcher
- How do I request a Microsoft Team?
- How Do I Get Support for Microsoft Teams?
- How do I schedule a webinar in MS Teams?
- How do I create an anonymous survey (form)?
- How do I collaborate with others on a form?
- How do I embed a Microsoft Office Form in a Quercus Page?
- How can I apply a template to an existing presentation?
- Set your presentation slide size to a widescreen (16:9) aspect ratio
- Can I record my PowerPoint presentation?
- How can I add an MS Form as an add-in to PowerPoint?
- How can I add Microsoft Forms and Callouts to a video in MS Stream?
- How do I create automatic captions for my uploaded videos?
- How to download videos from Microsoft Stream (Classic)
- How to upload videos to Stream (on SharePoint)
- How to add a co-owner to your Microsoft Stream (Classic) videos
- How to embed a video hosted in Stream on SharePoint into Quercus
- How to create a playlist for Stream videos
- How do I remove the date and time from a OneNote notebook?
- How to create a shared, editable folder
Running Powerpoint in Windowed Mode
This is by far one of the best PowerPoint tips I've ever gotten in a very long time. Full credit to Adam Cook who showed me this one day.
I'm fortunate enough to have a single 44" ultrawide screen as my daily monitor when I'm docked. Unfortunately, however, this means that when I'm presenting a slide deck, I lose access to other applications, notes, etc. Enter Window Mode for PowerPoint!
What is Window Mode?
Did you know that instead of your presentation taking up the full screen when in presentation mode, or worse yet, presenting your deck in edit mode, you can display your slides in a resizable window? Here is what that looks like:
Now instead of sharing my whole screen, I can share just this window, and continue to work around it to look at at my Teams chat, interact with participants, launch virtual machines that I'm preparing to share, etc.
How to Setup Window Mode
If this sounds like something that'll be useful in your next presentation, you can set this up as follows:
- From the Slide Show ribbon in PowerPoint, select Set Up Slide Show.
- In the dialog box, select "Browsed by an individual (windows)" and click OK.
- Next, launch your presentation and you'll now present in a window you can share instead of going full screen!
No comments
Critical PowerPoint Shortcuts – Claim Your FREE Training Module and Get Your Time Back!
How to Present a PowerPoint Slideshow (w/ Shortcuts)
- PowerPoint Tutorials
- Shortcuts & Hacks
- May 11, 2019
There are a variety of ways to start a PowerPoint presention, depending on:
- Where you start your presentation (from beginning or from current)
- Which PowerPoint view you prefer to present in (Slide Show view or Presenter view)
- How comfortable you are with keyboard shortcuts
Why would Microsoft include so many ways to present a presentation? My guess is that everyone learns PowerPoint differently, and has personal presentation styles. The more options you have, the easier your life will be as there will always be a way to start your presentation the way you want to (or jump back into it when you need to).
See all the options below and find the method that works best for you and let the slide show begin !
NOTE: If you are running two presentations side-by-side, each presentation needs to be started as it’s own slide show. To see how to set up two PowerPoint presentations to run side-by-side like this before you start your slide show, read my guide here .
Table of Contents
Start slide show from beginning.

To start a slideshow from the beginning of your presentation using the ribbon, simply.
- Navigate to the Slide Show tab
- Select From Beginning
Selecting From Beginning starts your presentation from the very first non-hidden slide in your presentation, regardless of which slide you are currently inside of your deck.

You can also start your slide from the beginning of your presentation by hitting the Slideshow From Beginning keyboard shortcut, F5 .
Regardless of which method you use, this is the classic way to start your presentation in full screen from your first title slide (regardless of where you are in your slide deck).
Let the slide show begin!
NOTE: To expand your knowledge and learn how to use PowerPoint’s FREE and HIDDEN built-in laser pointer to point things out during your presentation, read my guide here .
Take your PPT skills to the next level
Start slide show from current.

To begin your slide show from the slide you are currently on using the ribbon, simply
- Navigate to the Slide Show tab
- Select From Current Slide
Selecting From Current Slide starts your slide show from whatever slide you are currently on, even if the slide is hidden.

You can also start your slide from the current slide you are on by hitting the Shift+F5 keyboard shortcut.
Because it’s often easiest to catch errors when building your slides in this full screen mode, I highly recommend learning the Shift+F5 shortcut and using it frequently as you build your slides to spot them for errors.

If you don’t want to bother learning the From Current Slide shortcut, you can also start your slideshow by clicking the Slide Show icon at the bottom of your screen.
This is a fantastic way to spot check your slides as you are building them. On top of that, it’s a fast and uncomplicated way to re-start your presentation from where you left off after demoing something on screen.
Start a mini-slide show in PowerPoint
You can also use the following hidden PowerPoint shortcut to run a mini slide show over the top of your current deck.

To run a mini slide show, simply:
- Hold down the Alt key on your keyboard
- With your mouse, click the Slide Show icon
Doing so starts a small slide show of your presentation that you can see below, from the current slide you are on.

Presenter View
The Presenter View is an alternate way to run your presentation in PowerPoint. In this view, your slides are projected on screen, and the details of your presentation are displayed on your computer as pictured below.

The presenter view includes your next (non-hidden) slides that is coming up, your current slide projected on screen, how long you’ve been talking and your speaker notes.

To launch the Presenter View from the beginning of your presentation using your Ribbon, simply:
- Navigate to the Slide Show tab
- Hold down the Alt key on your keyboard
- Click From Beginning
Holding down the Alt key and clicking From Beginning , the Presenter View will launch from the very first (non-hidden) slide in your presentation.

You can also launch the presenter view from the beginning of your presentation at any time by clicking Alt + F5 on your keyboard.
Start Presenter View in PowerPoint From Current Slide

Did you know that you can access different views in PowerPoint by adding keys as you click commands in the PowerPoint ribbon?
To start the Presenter view from your current slide using your Ribbon, simply:
- Hold down the Alt key on your keyboard
- Click From Current Slide
Holding the Alt key and clicking From Current Slide launches the Presenter View from your current slide. So, this is another way you can quickly practice your presentation, see your speaker notes and see what’s coming up next.

You can also launch the Presenter View from the beginning of your presentation at any time by hitting Alt+F5 on your keyboard.
Showing and Hiding Presenter View
Regardless of which view you start your PowerPoint slide show; you can switch between the two different slide show views without exiting presentation.

To switch between the two slideshow views (while giving your presentation), simply:
- Right-click your slide in whichever presentation view you are currently in
- Select either Show Presenter View or Hide Presenter View
When would you use a feature like this during a presentation? One example is if you want to view your notes without leaving the slide show mode.
NOTE: The letter r for both Show Presenter View and Hide Presenter View is underlined. This means that it is a keyboard shortcut. So, if you want to quickly flip between these two presentation views, you can simply right-click your slide and hit the letter r on your keyboard. Doing so automatically switches the view you are in.
Controlling how your presentation runs
Another way to control how your presentation runs (including the default laser pointer and pen color), is the Set Up Slide Show dialog box.

To open the Set Up Slide Show dialog box, simply:
- Select the Set Up Slide Show command
Doing so, opens all your PowerPoint slide show settings and options as pictured below.
Inside the slide show settings dialog box, you can select:
- How your presentation runs (full screen, window or in kiosk mode).
- Your default pen and laser pointer color options ( see our laser pointer article here ).
- Which slide you want start from, or which slides you want to show. You can also setup a custom show here.
- How your slides progress (manually or using slide timings).
- Which of your computer monitors (or screens) your slide show runs on.
The Set Up Slide Show dialog box is also the secret to running multiple presentations at the same time in PowerPoint. To expand your knowledge and learn how to set this up, read our guide here .
Setup Slide Show SECRET Shortcut

To use the SECRET shortcut to open the Set Up Slide Show dialog box, simply:
- Hold down the Shift key on your keyboard
- With your mouse, click the Reading View icon at the bottom of your screen
This is useful when you need to quickly cycle through lots of PowerPoint presentations and change how those presentations run. Instead of wasting time clicking through the Ribbon, simply hold the Shift key and click the Reading View icon. This is also a friendly conversation starter with a fellow PowerPoint enthusiast at Happy Hour.
NOTE: The color of your Reading View icon might be different than in the picture above, as it is dependent on the Office Theme you selected for PowerPoint.
How to exit a PowerPoint presentation early?

Regardless of how you start your full screen presentation, you can end your presentation at any time by hitting the Esc key on your keyboard.
Hitting Esc immediately takes you out of the PowerPoint presentation mode and back to the normal editing view of your slides, on whatever slide you were last presenting.
Here is how you can use a combination of all the different keyboard shortcuts to spot check and practice your presentation in full screen before you finalize your presentation.
- Hit F5 on your keyboard to start your presentation in full screen from the very first slide in your presentation. You can then use your arrow keys to advance, spot checking your slides for errors.
- When you find an error, simply hit Esc key to return to the normal PowerPoint editing view to fix your slide.
- When you are done, hit Shift + F5 to return the full screen presentation mode from the slide you just updated. You can then continue spot checking your presentation (without having to start over from the beginning).
In this way you can quickly work your way through your slides and practice your presentation, fixing and adjusting your content as you go.
Understanding how to run your presentations is CRITICAL to the success of your presentation. Not only in presenting them live, but also in knowing how to spot check your slides as you build them.
I personally find it easiest to spot check your slides and quickly fix errors by running your presentation in slide show mode (or full screen). The last place you want to discover an error is during your presentation.
Using the commands and shortcuts above, you can quickly start, exit and step back into your slide show. Once you have these commands and features down, you will also look like a whiz during your presentations.
If you enjoyed the depth of this article, you will love our other PowerPoint training courses and free resources. To learn more, visit us here .
🔒 Unlock the PowerPoint Shortcuts Trusted by Industry Leaders KKR, American Express, HSBC, and More!
Join over 114,880 professionals from diverse fields including consulting, investment banking, advertising, marketing, sales, and business development who have supercharged their PowerPoint game with our proven methods.
✅ Customize compelling presentations effortlessly.
✅ Master time-saving techniques for faster deck creation.
✅ Boost your career prospects with top-notch PowerPoint skills.
Get FREE access to the Critical PowerPoint Shortcuts module of our premium training course by entering your name and email below.
DISCLAIMER: PC Users Only!
We respect your privacy and will keep your info safe and confidential.
Related Articles
About the author.

Popular Tutorials
- How to Strikethrough Text (l̶i̶k̶e̶ ̶t̶h̶i̶s̶) in Word, Excel & PowerPoint
- How to Make Animated Fireworks in PowerPoint (Step-by-Step)
- Strikethrough Shortcut (l̶i̶k̶e̶ ̶t̶h̶i̶s̶) for Word, Excel & PowerPoint
- How to Create a Flash Card Memory Game in PowerPoint (Like Jeopardy)
- Keyboard Shortcuts Not Working: Solved
PowerPoint Tutorial Categories
- Strategies & Opinions
- Presentation Design
- Pictures, Icons, Videos, Etc.
- New Features
- Miscellaneous
- Charts & Data Viz
We help busy professionals save hours and gain peace of mind, with corporate workshops, self-paced courses and tutorials for PowerPoint and Word.
Work With Us
- Corporate Training
- Presentation & Template Design
- Courses & Downloads
- PowerPoint Articles
- Word Articles
- Productivity Resources
Find a Tutorial
- Free Training
- For Businesses
We help busy office workers save hours and gain peace of mind, with tips, training and tutorials for Microsoft PowerPoint and Word.
Master Critical PowerPoint Shortcuts – Secure Your FREE Training Module and Save Valuable Time!
⌛ Master time-saving expert techniques.
🔥 Create powerful presentations.
🚀 Propel your career to new heights.
We value your privacy – we keep your info safe.
Discover PowerPoint Hacks Loved by Industry Giants - KKR, AmEx, HSBC!
Over 114,880 professionals in finance, marketing and sales have revolutionized their PPT skills with our proven methods.
Gain FREE access to a full module of our premium PowerPoint training program – Get started today!
We hate spam too and promise to keep your information safe.
You are currently viewing a placeholder content from Facebook . To access the actual content, click the button below. Please note that doing so will share data with third-party providers.
How to Play PowerPoint Slides Automatically

The PowerPoint autoplay feature is an amazing tool for creating slideshows that advance automatically . Self-running PowerPoint presentations are great for leaving in kiosks or publicity booths. You can even show them with recordings or voiceovers to make sure your audience gets the most out of it.
Forget worrying about clicking from slide to slide, today we will teach you how to play PowerPoint slides automatically!

We’ll cover the following topics:
Why should you use the automatic slideshow PowerPoint feature?
- How to Play PowerPoint Slides Automatically without Clicking - Option 1
- How to play slideshow in PowerPoint automatically - Option 2
How to make PowerPoint slides advance automatically with audio
- How to loop slides in PowerPoint
- Check out some experts’ best practices for Automatic slideshows in PowerPoint
How to automatically play PowerPoint presentations across devices
How to play powerpoint slides automatically without clicking on mac, elevate your presentation with professional designs: try 24slides today.
Using the automatic slideshow feature has many benefits . The main one is its practicality; it is a tool you can set up in advance so that you eliminate the need for ongoing attention and your presentation flow is better.
And that’s not all, you can even add voiceovers, recordings, and even laser pointer gestures to make sure your audience gets the most out of your presentation.
It becomes particularly beneficial in the following scenarios:
- Business presentations: An automatically progressing presentation can help you focus on your content without worrying about going slide by slide, which can often be distracting and disrupt your rhythm.
- Publicity: Self-running presentations can be great if you use them for publicity. For example, if you have a kiosk or booth, a self-running PowerPoint slideshow can help you reach more people without them having to speak one-on-one with a salesperson.
- E-Learning: In e-learning modules or training presentations, autoplay can help learners progress through the material while listening to your lecture. However, they can also pause and rewind to go to the specific section they wish to revisit.
- Photo or Video Slideshows: Autoplay is commonly used in photo or video slideshows for events such as weddings or birthdays. It can serve as a background loop, or you can present it at a special moment along with music or narration to enhance the experience.
How to Play PowerPoint Slides Automatically without Clicking: Option 1
There are a couple of different ways to make your slides run automatically, and we'll go over both options. This first option is for when you need a really customized presentation: personalized timing for each slide, voiceovers, or laser pointer gestures .
If this is your case, go ahead with this section, but if you’d like something a bit simpler, proceed to Option 2.
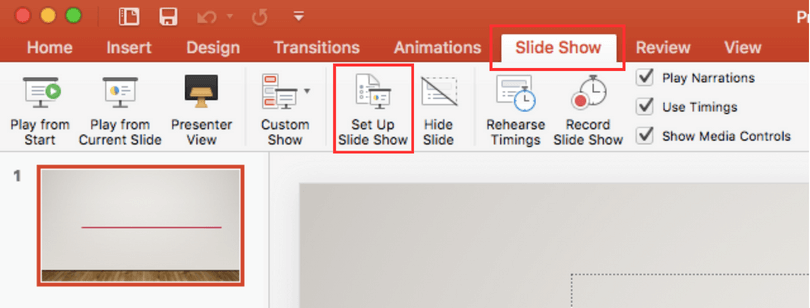
- The first step is to go to the Slide Show Tab. On the Set Up group, you’ll find the Set Up Slide Show option to start customizing your self-running presentation.

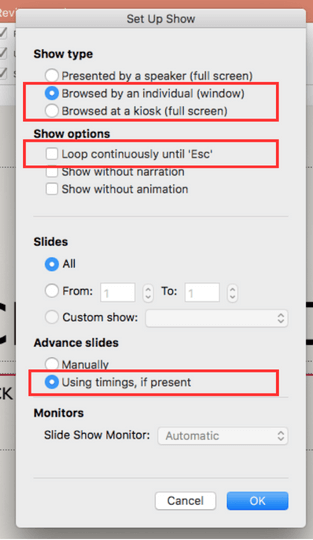
- Once the Set Up Show Window opens, deselect the Presented by a speaker option, as it refers to manually advancing your slides, either by clicking or using keys. Next, consider several options for the automatic slideshow:
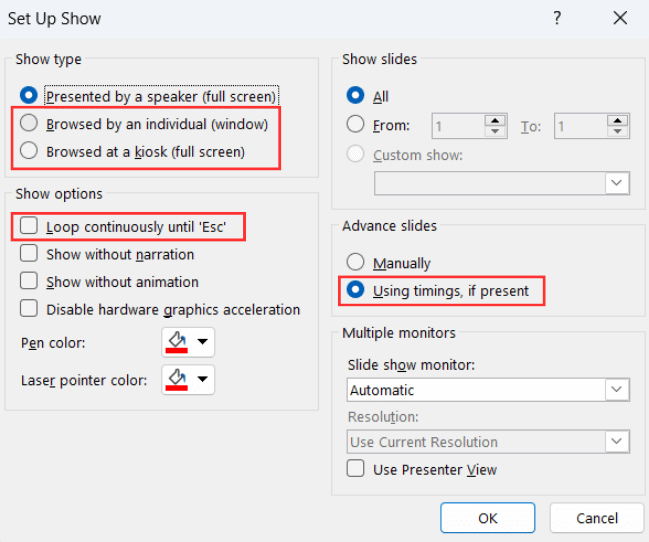
- Browsed by an individual is one choice for creating a self-running PowerPoint presentation. This option permits you to deliver your slides within a window, as opposed to the typical full-screen mode. Ensure that the Use timings, if present option is enabled for this feature to function correctly.
- Another option is the Browsed at a kiosk , which allows you to run a full-screen, continuous slideshow automatically. This option locks in both the looping and timing settings, ensuring that your slideshow will continue until you press the ESC key.
If you’re not sure what option is the best for you, remember you can always select manually the loop and timings option . Try different options with these and try out how your presentation will look like with the different settings.
- The next step is to set your timings. This means defining how much time you want your PowerPoint slideshow to spend on each slide before automatically advancing to the next one.
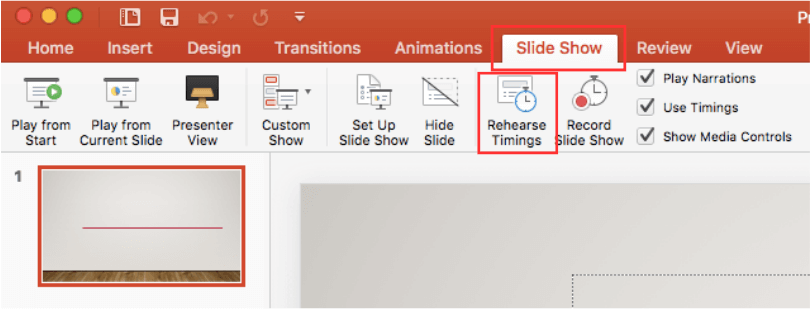
To set your timings, click on Rehearse Timings , which will allow you to go through your presentation slide by slide, and it’ll record how much time you spend on each one.

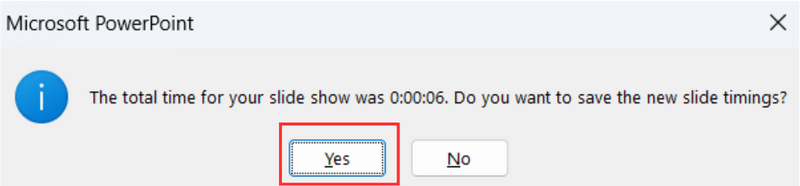
After you finish going through all your slides, a message will pop up to save your timings. Click yes so you can save the time spent on each slide.
How to play slideshow in PowerPoint automatically: Option 2
Let’s take a look at a different way of using the PowerPoint autoplay feature. This option is great if you’re looking for something simple and just want your slides to advance automatically at regular intervals.
- First, open the Transitions Tab and locate the Timing Group.

- Go to the After option and manually add how much time you want to spend on each of your slides.

Select the Apply To All option so all your slides have the same timing.
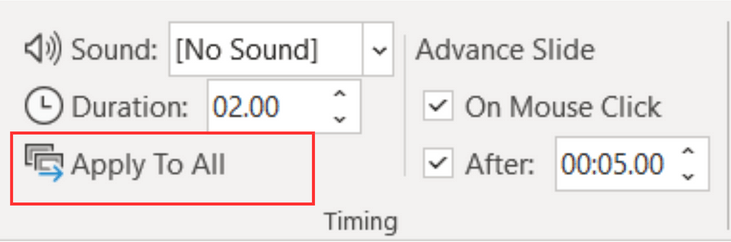
You can also deselect the On Mouse Click option, depending on whether you want to be able to advance your slides by clicking or not.
Adding audio to your automatic PowerPoint is a fantastic feature to enhance your professional image and communicate your content without needing to be present. Let’s take a look at how to do it:
- Go to the Slide Show Tab and select Record Slide Show . Choose Record From Beginning to start with the first slide.
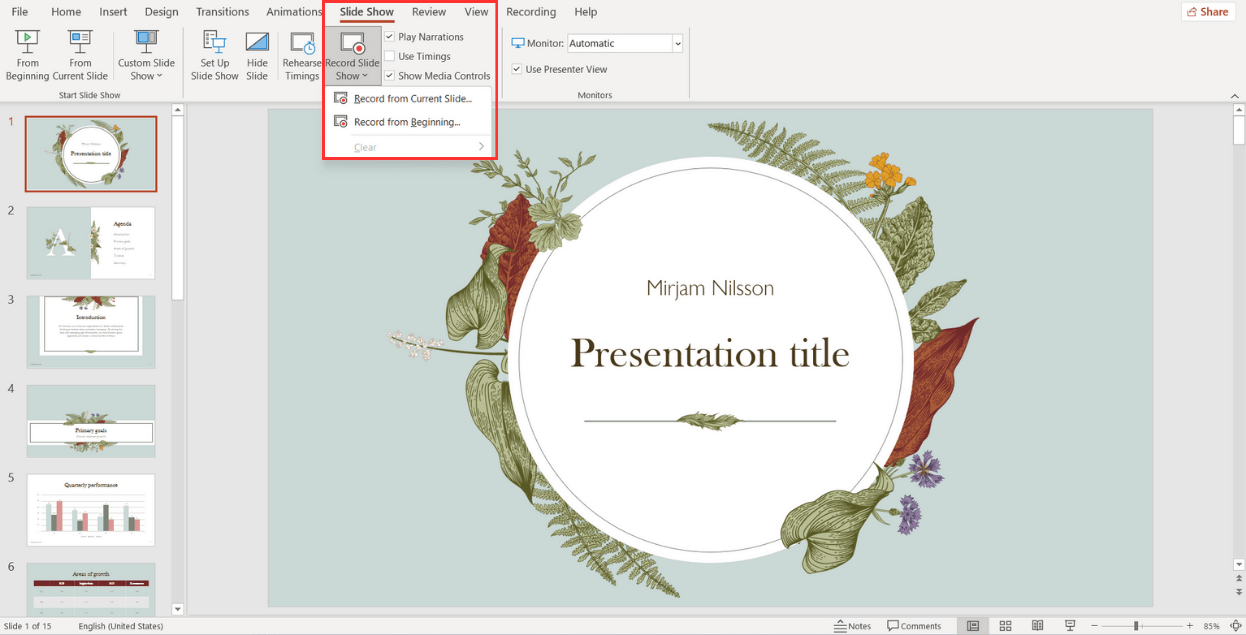
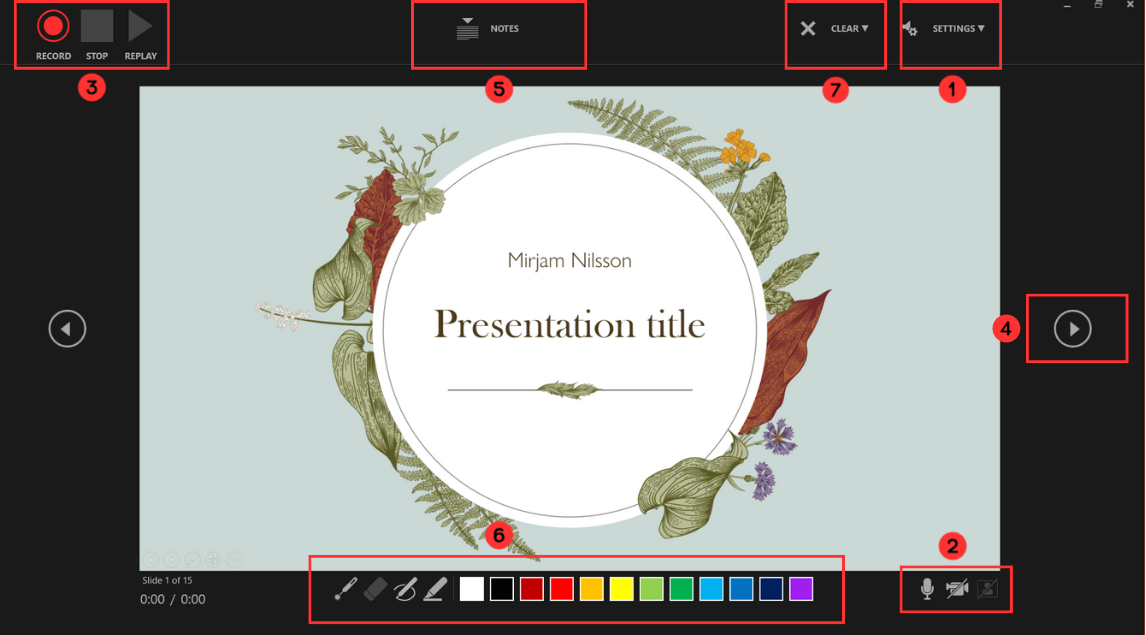
When the fullscreen opens, you will be able to see your first slide along with several options:
- Start in Settings (1) and select the tools you will be using. You have the option to use a microphone, or you can record yourself talking on camera. Choose your microphone and/or camera for recording.
- Next (2) , decide whether you want to have the microphone or camera you selected turned on. You can also choose to have a video preview.
- When you're ready to start recording, go to the top left corner (3) and click Record to start, Stop to pause, and Replay to review how it went.
- Once you finish with a slide, click on the right arrow (4) to move to the next slide.
- If you have Speaker notes in your slides, you can view them in (5) while you record.
- In the Pens and Markers section (6) , you can draw on the screen and make any annotations you want.
- Finally, the Clear option (7) allows you to clear existing recordings on the current slide or on all slides if you are unsatisfied and want to redo your recording.
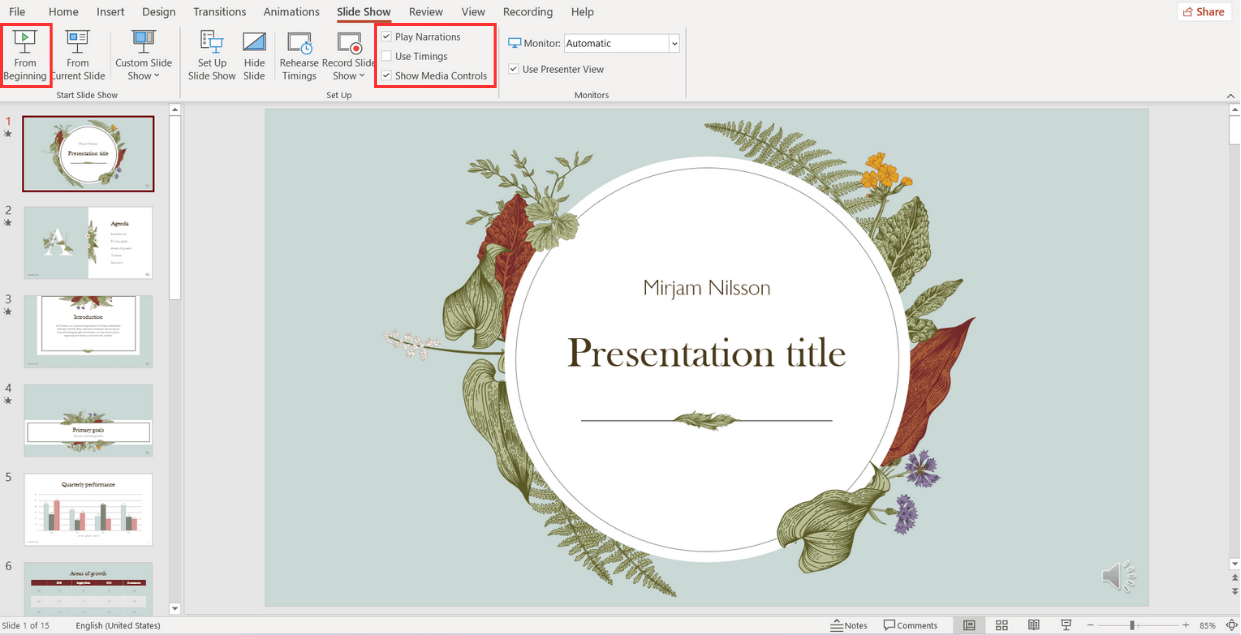
- Now, to review what you've recorded, go to Set Up and make sure Play Narrations and Use Timings are checked. Then, click on From Beginning to start the presentation.
How to loop slides in PowerPoint
If you want to learn how to loop your slides in PowerPoint, follow these steps:
- Go to the Slide Show tab and select Set Up Slide Show .

- When the Set Up Show window appears, go to the Show options group and tick the Loop continuously until ‘Esc’ option. Don’t forget to click OK to apply the new setup!
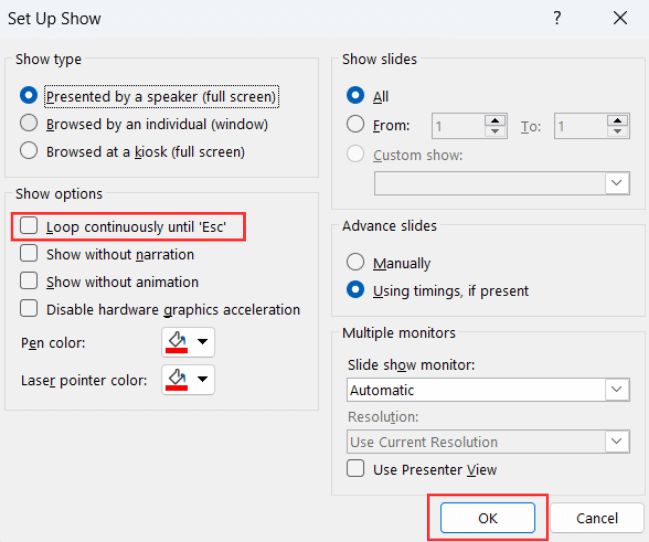
And all done! Now, your presentation will loop until you select ‘Esc’.
Check out some expert best practices for Automatic slideshows in PowerPoint
Now that you've learned how to make a PowerPoint slideshow run automatically, we'll give you the secrets to make your presentation stand out . Let's take a look at some insights from our expert designers .
Avoid too much text
Remember that your time per slide is limited , so it is important not to put too much text since your audience will not have time to read it. Try to express your message in the shortest possible text, and if necessary, revise and rewrite it as many times as necessary to synthesize it.
Limit interactive elements
Limit or avoid interactive elements such as hyperlinks that rely on user interaction since they may not function in PowerPoint autoplay mode.
However, if you want your audience or potential clients to take a specific action, consider using a QR code. Only make sure to leave the slide displayed for enough time for them to use it.
Practice, practice, practice
Keep in mind that your speech needs to fit perfectly with your timings for each slide. So, practicing your presentation multiple times is crucial to ensure a seamless and synchronized delivery.
First, go to the Slide Show Tab and select Set Up Slide Show .
- When the Set Up Show Window opens, deselect the Presented by a speaker option and consider the following options to set up your automatic slideshow:
- Browsed by an individual : With this option, you can show your slides within a window instead of the typical full-screen mode. Make sure that the Use timings, if present option is selected.
- Another option is the Browsed at a kiosk : This option locks in both the looping and timing settings, ensuring that your slideshow will continue until you press the ESC key.
- Next, you need to set your timings. This involves determining the duration for each slide so that it advances automatically to the next one when you have finished presenting it.
To set your timings, go to the Slide Show Tab and click on Rehearse Timings.
A window will open, allowing you to go through your presentation slide by slide, and it will record how much time you spend on each one . As you progress through each slide, it will confirm the time spent, and you can either agree or choose to re-record.
After you finish going through all your slides, a message will pop up to save your timings . Click yes so you can save the time spent on each slide.
If you’re looking to create a presentation that truly wows your audience, you might want to consider professional design assistance for your PowerPoint. Lucky for you, we’re here to help. Check out the fantastic designs 24Slides can help you create today!

You might also like
- How to Add a Timer to Your Powerpoint Presentations
- 11 Time-Saving PowerPoint Hacks For Creating Quick Presentations
- How To Loop a PowerPoint Presentation
- Add a PowerPoint Real-Time Clock to Your Presentations
Create professional presentations online
Other people also read

Tutorial: Save your PowerPoint as a Video
How To Convert Google Slides To PowerPoint and Vice Versa

How To Add Animations To PowerPoint

How to Run a PowerPoint Slide Show Automatically (Set Up a Self-Running Presentation)

Easily Create a Self-Running PowerPoint Slide Show
by Avantix Learning Team | Updated November 12, 2021
Applies to: Microsoft ® PowerPoint ® 2013, 2016, 2019 and 365 (Windows)
You can set up self-running PowerPoint slide shows to run automatically at trade shows, conventions, events or as web-based presentations. Prior to setting up a self-running presentation, you'll need to apply your preferred animations to text and objects as well as any slide transitions to be be included in the show (unless specified otherwise in the Set Up Show dialog box). When you create automatic slide shows, you also have the option of including specific slide timings, narrations or voice over and ink annotations.
Recommended article: How to Draw on PowerPoint Slides on the Fly During a Presentation (Using Ink)
Do you want to learn more about PowerPoint? Check out our virtual classroom or in-person PowerPoint courses >
Setting up a self-running presentation
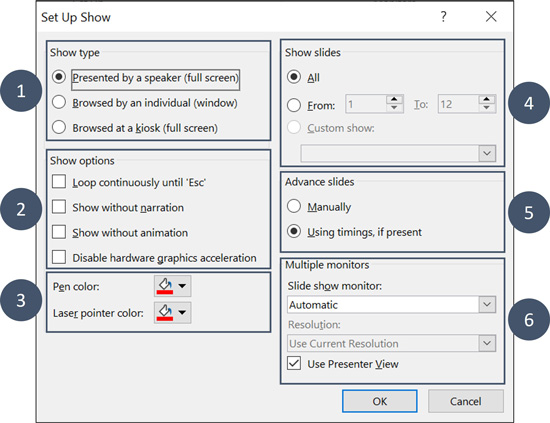
When you set up a self-running presentation, you can choose 3 options in the Set Up Show dialog box depending on your audience:

To set up a PowerPoint presentation to run automatically, but allow those watching the slide show to have control over when they advance slides:
- Click the Slide Show tab in the Ribbon and then click Set Up Slide Show. A dialog box appears.
- Under Show type, select Presented by a speaker (full screen). This is the default setting for slide shows.
To set up a presentation to run automatically, but those watching the slide show do NOT have control over when slides advance:
- Under Show type, select Browsed by an individual (window).
To set up a presentation to run automatically, but those watching the slide show do NOT have control over when slides advance and the presentation repeats until the people watching press Escape (ESC):
- Under Show type, select Browsed at kiosk (full screen).
Setting slide timings manually
You can choose to rehearse slide timings or you can manually set the slide timings for your PowerPoint slides using the Transitions tab in the Ribbon.
To set slide timings manually:
- Click the View tab in the Ribbon and then click Slide Sorter.
- Select the slide for which you want to set timing.
- Click the Transitions tab in the Ribbon.
- In the Timing group, under Advance Slide, select the After check box and then enter the number of seconds indicating how long the slide should appear on the screen. If you want the next slide to appear either when you click the mouse or automatically after the number of seconds that you enter (whichever comes first), select both the On Mouse Click and the After check boxes.
- Repeat the process for each slide for which you want to set timing.
Rehearsing and recording slide timings
If you choose Browsed by an individual (window) or Browsed at a kiosk (full screen) in the Set Up Show dialog box, you can rehearse and record timings for animations, transitions and advancing slides.
To rehearse timings, you'll use the Rehearsal toolbar shown below:
The toolbar includes the following buttons from left to right:
- Next (advance to next slide)
- Total presentation time
Click the buttons in the Rehearsal toolbar to perform the following actions:
- Click Next to advance to the next slide.
- To temporarily stop recording the time, click Pause.
- To restart recording the time after pausing, click Pause.
- To set an exact length of time for a slide to appear, type the length of time in the Slide Time box.
- To restart recording the time for the current slide, click Repeat.
To rehearse timings:
- Click the Slide Show tab in the Ribbon and then click Rehearse Timings. The Rehearsal toolbar appears and the timer begins immediately. The presentation appears in full screen recording mode.
- Click the desired buttons. Click Next to advance to the next slide or press the right arrow on your keyboard. To temporarily stop recording the time, click Pause. To restart recording the time after pausing, click Pause. To set an exact length of time for a slide to appear, type the length of time in the Slide Time box. To restart recording the time for the current slide, click Repeat.
- Continue clicking on the appropriate buttons until you are satisfied with the timings. The total presentation time appears on the top right of the Rehearsal toolbar.
- After you set the time for the last slide, a dialog box displays the total time for the presentation and another dialog box appears.
- To keep the recorded slide timings, click Yes. To discard the recorded slide timings, click No.
The presentation appears. If you view the presentation in Slide Sorter View, the slide timing is displayed below each slide.
Recording a slide show with timings
Instead of using the Rehearse Timings button, you can record timings (and narrations or voice over) as you record a show. The Record Slide Show button appears on the Slide Show tab in the Ribbon. When you record a slide show, you can start from the beginning or the current slide:

After you choose to record a slide show, you will have the option of including slide and animation timings as well as narrations, ink, and laser pointer (2010 users will not have the option of recording ink annotations):

If you select Slide and animation timings, PowerPoint automatically records the time you spend on each slide, including animations and triggers on each slide. If you have already rehearsed timings, they will be replaced.
If you use the pen, highlighter, eraser or laser pointer, those will also be recorded. Pen, highlighter, and eraser recording are available only if you have PowerPoint 2013 (and run updates) or a later version of PowerPoint. In earlier versions of PowerPoint, pen and highlighter strokes are saved as ink annotation shapes. To learn more about including ink, check out the article How to Draw on PowerPoint Slides on the Fly During a Presentation (Using Ink) .
To record a slide show and include animations and timings:
- Click the Slide Show tab in the Ribbon and then click the arrow beside Record Slide Show. A drop-down menu appears.
- Select Start Recording from Beginning or Start Recording from Current Slide. A dialog box appears.
- Select the option to include slide and animation timings.
- Click Start Recording. The Rehearsal toolbar appears and the timer begins immediately. The presentation appears in full screen recording mode.
- If you want to record timings, click the desired buttons. Click Next to advance to the next slide or press the right arrow on your keyboard. To temporarily stop recording the time, click Pause. To restart recording the time after pausing, click Pause. To set an exact length of time for a slide to appear, type the length of time in the Slide Time box. To restart recording the time for the current slide, click Repeat.
- To end your recording at any time, right-click on a slide and select End Show from the menu.
The presentation appears. In Slide Sorter view, the slide timing is displayed below each slide.
Recording narrations or voice over
In addition to timings, you may want to add narrations or voice over. You can record narrations before you run a presentation or you can record narrations during a presentation and include audience comments. When you add narrations, PowerPoint automatically records your slide timings. Alternatively, you can set the slide timings first. Be sure to test the microphone first. If you do not want narrations throughout your entire presentation, you can record separate sounds or comments on selected slides or objects.
To record narrations, your computer requires a sound card, microphone, speakers and a webcam (optionally). You will also need a microphone connector if the microphone is not part of your computer.
It's not a bad idea to create a script first in Microsoft Word to improve flow and avoid filler words such as "um". You may also want to practice before recording although you can always re-record narration.
To record a slide show with narrations:
- In the Record Slide Show dialog box, select the check box for Narrations and laser pointer and, if required, select or deselect the Slide and animation timings check box.
- Click Start Recording. A Rehearsal toolbar appears.
- Speak into the microphone to record a narration.
- To pause the narration, in the Rehearsal toolbar, click Pause. To resume the narration, click Resume Recording.
- To end your slide show recording at any rime, right-click on the slide and then select End Show.
The recorded slide show timings and narrations are saved. If you view the presentation in Slide Sorter view, timings appear beneath each slide. A sound icon also appears in the lower-right corner of each slide that has narration.
If you re-record your narration (including audio, ink, and laser pointer), PowerPoint erases your previously recorded narration (including audio, ink, and laser pointer) when you start recording again on the same slide.
To use ink, eraser, or the laser pointer during your recording, right-click on the slide, select Pointer options and choose the laser pointer, pen, highlighter or eraser. Ink is not available for 2010 users. If you want to display a laser pointer while you're recording, press Control and your pointer will appear as a small red circle on your screen.
Previewing narration
If you want to listen to the narration on a slide:
- In Normal View, click the sound icon in the lower-right corner of the slide.
- Click Play.
Running a recorded slide show
To run a recorded slide show in Normal View:
- If necessary, on the Slide Show tab in the Ribbon, click Set Up Slide Show. A dialog box appears.
- Under Show type, select the desired option.
- On the Slide Show tab, click From Beginning or From Current Slide. During playback, your animations, inking actions, laser pointer, audio and video play in sync.
- To end the show, press Escape.
Turning timings or narrations off
You can turn off timings and narrations and then turn them on again at any time.
To turn off recorded slide timings, on the Slide Show tab, deselect the Use Timings check box.
To turn off recorded narrations, ink, and the laser pointer, on the Slide Show tab, deselect the Play Narrations check box.

Deleting timings or narration
You can use the Clear command to permanently delete timings or narration from your slide show recording. You have 4 options:
- Delete timings on the current slide
- Delete timings on all slides
- Delete narration on the current slide
- Delete narration on all slides
To clear timings or narrations:
- On the Slide Show tab, click the arrow below Record Slide Show. A menu appears.
- Select Clear and then the appropriate clear option.
Once you have recorded a presentation, you can later save it as a video if you'd like.
Subscribe to get more articles like this one
Did you find this article helpful? If you would like to receive new articles, join our email list.
More resources
A Beginner's Guide to Video Formats in PowerPoint
How to Hide and Unhide Slides in PowerPoint (with Shortcuts)
How to Insert Video in PowerPoint (from a File on Your PC or a Shared Drive)
PowerPoint Keyboard Shortcuts to Play and Control Video During a Slide Show
How to Add Animation in PowerPoint (Animate Images, Text and Other Objects)
Related courses
Microsoft PowerPoint: Intermediate / Advanced
Microsoft PowerPoint: Design for Non-Designers
Microsoft PowerPoint: Animations Bootcamp
Microsoft Excel: Intermediate / Advanced
VIEW MORE COURSES >
Our instructor-led courses are delivered in virtual classroom format or at our downtown Toronto location at 18 King Street East, Suite 1400, Toronto, Ontario, Canada (some in-person classroom courses may also be delivered at an alternate downtown Toronto location). Contact us at [email protected] if you'd like to arrange custom instructor-led virtual classroom or onsite training on a date that's convenient for you.
Copyright 2024 Avantix ® Learning
You may also like

10 Keyboard Shortcuts in PowerPoint's Outline View
The outline has been an integral part of Microsoft PowerPoint for many years. It is dynamically linked to slide placeholders and is organized in a hierarchical way.

How to Change the Thumbnail for a Video in PowerPoint (using the Poster Frame Tool)
If you have inserted a video on a PowerPoint slide, you can display a custom thumbnail (or Poster Frame) for the video during a slide show. The thumbnail will display when you run a PowerPoint slide show and disappears when you start the video. For most videos, the thumbnail that displays is the first frame of the video clip. You can use the Poster Frame command to display a different frame in the video clip or a picture from another source as a thumbnail. A picture thumbnail could be either an image or an icon.

How to Use the Built-in Laser Pointer in PowerPoint (with Shortcuts)
During a PowerPoint slide show, you can change your mouse into a laser pointer to focus attention on a specific area on your slide. You can show or hide the built-in laser pointer using keyboard shortcuts or by using the context menu.
Microsoft, the Microsoft logo, Microsoft Office and related Microsoft applications and logos are registered trademarks of Microsoft Corporation in Canada, US and other countries. All other trademarks are the property of the registered owners.
Avantix Learning |18 King Street East, Suite 1400, Toronto, Ontario, Canada M5C 1C4 | Contact us at [email protected]

Our Courses
Avantix Learning courses are offered online in virtual classroom format or as in-person classroom training. Our hands-on, instructor-led courses are available both as public scheduled courses or on demand as a custom training solution.
All Avantix Learning courses include a comprehensive course manual including tips, tricks and shortcuts as well as sample and exercise files.
VIEW COURSES >
Contact us at [email protected] for more information about any of our courses or to arrange custom training.
Privacy Overview
Pin it on pinterest.
- Print Friendly
Your current User-Agent string appears to be from an automated process, if this is incorrect, please click this link:
Stack Exchange Network
Stack Exchange network consists of 183 Q&A communities including Stack Overflow , the largest, most trusted online community for developers to learn, share their knowledge, and build their careers.
Q&A for work
Connect and share knowledge within a single location that is structured and easy to search.
How do I launch a Power Point slide show on startup?
I want to launch a Power Point presentation on startup - in slide show mode (I don't want to simply open the file).
This is to run on a kiosk.
- microsoft-powerpoint
- microsoft-powerpoint-2007
2 Answers 2
From Microsoft's list of command line switches , you can use the /S switch to start a presentation:
To get the slideshow to start on boot-up create a shortcut to the path given above and put it in the Startup folder in the Start menu.
you can also rename the file to pps or ppsx. this should make the presentation go immediately in presentation mode.
You must log in to answer this question.
- The Overflow Blog
- How we’re making Stack Overflow more accessible
- Featured on Meta
- We've made changes to our Terms of Service & Privacy Policy - July 2024
- Introducing an accessibility dashboard and some upcoming changes to display...
Hot Network Questions
- Is there a reason SpaceX does not spiral weld Starship rocket bodies?
- How many kinds of contradictions are there?
- apply shift to nodes defined in foreach loop
- Clarification on Vector Space Definition
- What does it mean to echo multiple strings into a UNIX pipe?
- Is the license name and the URL to full license text sufficient for distributed software?
- Should I include MA theses in my PhD literature review?
- She's a black belt in judo
- Is threatening to go to the police blackmailing?
- A funny Fantasy short story about a telekinetic who loses his power when he thinks about it
- How to make a case based on factual evidence that my colleague's writing style for submitted manuscripts has got to be overhauled?
- What's so embarrassing in two wearing the same jacket?
- Lightning protection for steel tower
- Is there such a thing as icing in the propeller?
- MPs assuming office on the day of the election
- Short story probably in Omni magazine in the 1980s set in a cyberpunk bar… but it's 1899 or so
- In Norway, when number ranges are listed 3 times on a sign, what do they mean?
- Self-employed health insurance deduction and insurance just for my kids
- I'm 78 and 57 years ago I was a 1 dan. Started karate at 5. I quit karate at 21 for reasons. Want to start again. Do not remember much. What do I do.?
- Why don't programming languages or IDEs support attaching descriptive metadata to variables?
- Can light be somehow confined to create a kugelblitz?
- How to find a simplified sinogram in a paper dictionary
- Decimal expansion definition of real numbers, constructively
- How do I rigorously compute probabilities over infinite sequences of coin flips?
- Create and open Article
- Share and collaborate Article
- Add and format Article
- Design Article
- Give a presentation Article

Create and open
Create and open a powerpoint presentation.
Start collaborating with these quick instructions on how to create, share, and edit presentations on your own or with your team.
To convert your Google Slides to PowerPoint, go to File > Download > Microsoft PowerPoint (.pptx). Then open the file in PowerPoint. See more at Get started with Sheets .
Note: Features and information in this guide apply to PowerPoint as available through Microsoft 365.
Create a new presentation
Open PowerPoint.
Select Blank presentation , or select one of the themes.
Select More themes to view the gallery and search for more.

Add a slide
Select the slide you want your new slide to follow.
Select Home > New Slide .
Select Layout and the you type want from the drop-down.

When you save your files to the cloud, you can share and collaborate with others.
Select File > Save As .
Select a OneDrive folder and name the file.
After you save once to OneDrive, AutoSave is enabled that saves your file automatically, every few seconds, as you work.

Rename a presentation
Select the file name on the title bar.
In the menu that appears you can rename the file, select a new location to move it to, or see the version history for the file.

When you're online, AutoSave is always on and saves your changes as you work. If at any time you lose your Internet connection or turn it off, any pending changes will sync as soon as you’re back online.

At the top of your Microsoft Office apps on Windows you'll find the Search box. This powerful tool helps you look up PowerPoint commands, get Help, or search the Web.

Need more help?
Want more options.
Explore subscription benefits, browse training courses, learn how to secure your device, and more.

Microsoft 365 subscription benefits

Microsoft 365 training

Microsoft security

Accessibility center
Communities help you ask and answer questions, give feedback, and hear from experts with rich knowledge.

Ask the Microsoft Community

Microsoft Tech Community

Windows Insiders
Microsoft 365 Insiders
Was this information helpful?
Thank you for your feedback.
How to Run PowerPoint From a Command Line
- Small Business
- Business Technology & Customer Support
- ')" data-event="social share" data-info="Pinterest" aria-label="Share on Pinterest">
- ')" data-event="social share" data-info="Reddit" aria-label="Share on Reddit">
- ')" data-event="social share" data-info="Flipboard" aria-label="Share on Flipboard">
How to Copy a List of Files in a Windows Folder Into an Excel List
How to convert eml to mbox for a mac, how to save in powerpoint using the function keys.
- How to Bulk Insert CSV Into SQL
- How to Delete a Registry Entry to Reconfigure Office PowerPoint
When you open a program on your computer by double-clicking its icon, you are activating that program's .exe file and, thus, launching the program. When you launch PowerPoint, for example, you're likely to see the PowerPoint splash screen before the program opens the default window, from which you can select a file you've been working on or a new file.
Double-clicking an icon, however, isn't the only way to open a program. In days of old, before Windows, Microsoft made the DOS operating system, which didn't even have clickable icons. If you wanted to open a program, you typed commands in a command line. This takes a bit more time, but has a few advantages in that you can tell your computer exactly how you want the program to open and what you want it to do when it does.
Command line entries have always been a part of Microsoft's operating systems, including Windows 10. You can launch PowerPoint using a command line, and customize what it does by using subcommands, or switches.
Understanding Commands
In older versions of Windows, if you wanted to type out commands, you would first have to open the Command Prompt utility, or CMD. In Windows 10, you can still open CMD and use it to type commands. To do this, just type "cmd" in the Start menu and press Enter.
As you might have guessed, if you can run the CMD.exe file from the Start menu, you can also run PowerPoint from the Start menu by typing "powerpoint." To be more precise, you can also type the name of PowerPoint's .exe file, either in the CMD window or in the Start menu: powerpnt.exe (that's "pnt" instead of "point"). Typing "powerpnt" without the .exe also opens the program.
Commands are not case-sensitive. You can use uppercase, lowercase or a combination of the two.
Office File Names and Locations
Before you can run a program from a command line, you need to know its name and, if you use the CMD utility, its location. Files for Office 2016 are located in the following nest of folders, provided you installed Office in its default location:
- Windows 32-bit: C:\Program Files (x86)\Microsoft Office\root\Office16\
Windows 64-bit: C:\Program Files\Microsoft Office\
root\Office16\
If you have an older version of Office, it's likely in the Office15 or Office14 folders. Future releases of Office will likely be in a folder with a higher number.
The .exe files for each of the office programs are:
- PowerPoint: powerpnt.exe
- PowerPoint Viewer: pptview.exe
- Word: winword.exe
- Excel: excel.exe
- Outlook: outlook.exe
- Access: msaccess.exe
Typing any of these file names in the Windows Start menu will launch the program.
Opening PowerPoint from the CMD utility is just a bit more complicated because CMD goes to a specific folder when it opens – your user folder. Your PowerPoint program isn't in that folder so you need to open the right folder first. In CMD, folders are called directories.
How to Get to PowerPoint's folder in CMD
Open a File Explorer window and type "powerpnt.exe" in the Search menu in the top of the window. After a few moments, File Explorer will show you the file with its location below it, such as: C:\Program Files (x86)\microsoft office\root\Office 16
In the command prompt, type "cd\" and press Enter. This is a change directory command that puts you in the computer's C: drive, rather than your user folder.
- Type "cd" followed by a space, followed by the first folder, such as "cd program files," and press Enter to change to that folder.
- Continue going through the folders until you get to the one that PowerPoint is located, such as "cd program files (x86)" and then "cd microsoft office," etc.
- Type "dir" to see the contents of your current folder (known as the directory), and press Enter to see if powerpnt.exe is in this folder. Once you're in the right folder, typing "powerpnt.exe" will open PowerPoint.
Understanding Start Command Switches
A command line switch or sub-command adds one additional instruction, telling your computer exactly how you want the program to open. A switch follows the primary command and a space, beginning with a forward slash. For example, to open PowerPoint and have it immediately create a new blank file, you would type: powerpnt.exe /b
You can also use a switch to open a specific file. However, you will need to specify exactly where that file is so PowerPoint can find it. PowerPoint files you create are normally given the .pptx extension. So, if your files are in your Documents folder, the location of a file called "presentation" would be: C:\Users\YourName\Documents\presentation.pptx
Anything you type after a switch is called a parameter. Unlike commands, parameters are sometimes case-sensitive.
Using PowerPoint Commands and Switches
Following are several of the most commonly used commands with PowerPoint switches.
/B: Launches PowerPoint with a new blank presentation.
Example: "powerpnt.exe /b
/C: Launches PowerPoint with the specified file and also opens Microsoft Windows NetMeeting conferencing.
Example: powerpnt.exe /C C:\Users\YourName\Documents\netmeetingfile.pptx
/EMBEDDING: Launches PowerPoint without showing you the Office PowerPoint program window. This is usually used by developers when testing add-ins.
Example: powerpnt.exe /EMBEDDING
/M: This switch runs a macro in a specified presentation file.
Example: powerpnt.exe /M C:\Users\YourName\Documents\test.pptx MyMacro
In this example, the macro "MyMacro" is used in the test.pptx file.
/N: Opens PowerPoint and creates a new presentation based on a template you specify.
Example: powerpnt.exe /N Path\customtemplate.potx
In this example, "Path" represents the template's location.
/O: Launches PowerPoint and specifies a list of files to open, rather than just one.
Example: powerpnt.exe" /O File presntation1.pptx, File presentation2.pptx
/P: This print switch prints the presentation to your default printer. The print dialog box opens.
Example: powerpnt.exe /p MyFile.pptx
/PT: This print-to switch prints the presentation to a printer you specify without opening a dialog box.
Example: powerpnt.exe" /PT "PrinterName" "" "" "MyFile.pptx"
Note that you should include the empty quotation marks.
/RESTORE: If PowerPoint crashed, you can use this switch to restore PowerPoint to the way it was before it closed. PowerPoint will attempt to restore the presentation you were working on.
Example: powerpnt.exe /RESTORE
/S: This switch opens a file you specify as a slide show.
Example: powerpnt.exe /S C:\Users\YourName\Documents\show.pptx
Creating Command Line Shortcuts
If you plan to use a command line switch more than once, you can create a shortcut for it and place it on your desktop.
- Right-click the Windows desktop. Select "New" and then click "Shortcut" to open the Create Shortcut Wizard.
- Click "Browse" and locate the POWERPNT.EXE file, or type its location and file name inside quotation marks. This must be case-sensitive: "C:\Program Files (x86)\Microsoft Office\root\Office16\POWERPNT.EXE"
- Type a space and then type the switch you want to use and any parameters needed. For example, to open a new blank presentation you would use: "C:\Program Files (x86)\Microsoft Office\root\Office16\POWERPNT.EXE" /b
- Click Next and then enter a name for the shortcut.
- Double-click the shortcut to open PowerPoint with your switch.
- Microsoft Office Support: Command-Line Switches for Microsoft Office Products
- Digital Citizens Life: Command Prompt: 11 Basic Commands You Should Know
- Microsoft Office Support: Description of the Startup Switches for Excel
- Laptop Mag: How to Make Desktop Shortcuts in Windows 10
- Microsoft Office: Command-Line Switches for PowerPoint 2007 and the PowerPoint Viewer 2007
- Press the Windows key and "R" to launch the Run dialog box from your keyboard. Test your shortcut command using the run or command prompt first. Launch PowerPoint from the Run dialog by simply typing "powerpnt" (without quotation marks here and subsequent commands) and pressing "Enter." You can also launch PowerPoint from the Start menu by clicking "Start" and typing "PowerPoint" and then pressing "Enter." You can use many of the same switches for the PowerPoint Viewer application.
A published author and professional speaker, David Weedmark has advised businesses on technology, media and marketing for more than 20 years. He has taught computer science at Algonquin College, has started three successful businesses, and has written hundreds of articles for newspapers and magazines and online publications including About.com, Re/Max and American Express.
Related Articles
How to write a cmd script, how to use command line parameters in microsoft excel, can i run python from notepad, how to restart outlook 2007 when it has stopped working, how to search ppt, how to disable wordpad, how to mount a program to dosbox, how to create an autoexec.bat file, how to transfer from powerpoint to flash drives, most popular.
- 1 How to Write a CMD Script
- 2 How to Use Command Line Parameters in Microsoft Excel
- 3 Can I Run Python From Notepad?
- 4 How to Restart Outlook 2007 When It Has Stopped Working
How-To Geek
Everything you need to know about animations and transitions in powerpoint.

Your changes have been saved
Email is sent
Email has already been sent
Please verify your email address.
You’ve reached your account maximum for followed topics.
6 Ways to Improve Your Microsoft Word Formatting
If your pc won't run windows 11, here are 5 great linux operating systems to try instead, microsoft office apps provide a new path for hackers, quick links, what are animations, what are transitions, things to note before you begin, how to add, amend, and remove an animation, how to add, amend, and remove a transition, using the morph transition.
PowerPoint's animations and transitions can help you grab your audience's attention, present information in bite-sized chunks, and—when used sparingly—deliver a more professional presentation. In this article, we'll run through the nuts and bolts of these useful PowerPoint tools.

Animations are effects you can add to your slides' text, pictures, shapes, graphics, tables, and other elements. There are four different types of animations:
- Entrance animations—These are the effects you can add to make an object appear on your slide in different ways.
- Emphasis animations—You can add an emphasis animation to an object already visible on your slide, such as changing its size or color.
- Exit animations—The opposite to entrance animations, exit animations make objects disappear from your slide through different effects.
- Motion paths animations —You can make an element on your slide move to a different place, with your audience seeing this movement from where it started to where it ends up.
You can use more than one animation on a single object. For example, you can apply an entrance animation to some text, followed by an emphasis animation.

A transition effect dictates how your presentation progresses from one slide to the next, and you can choose from three different levels of complexity:
- Subtle—These are the most basic types of transitions in PowerPoint, aiding speed and slickness as you jump from one slide to the next.
- Exciting—You can make your transitions more visually entertaining.
- Dynamic—A dynamic transition applies to all parts of a slide, except for the background, giving the illusion that the content is rolling through on a single page.
Only one transition effect can be added to each slide, and it's important that you apply the transition to the slide that will be visible once the transition is complete. For example, if you have two slides and want to create a transition effect as you move from slide 1 to slide 2, you will need to apply the transition to slide 2.
Before you add animation and transition effects to your PowerPoint presentation, bear in mind the following tips:
- Don't add too many animations and transitions . Overusing these features can distract your audiences in ways you didn't intend to, and they can also look tacky and unprofessional. Ask yourself, "Does this make my presentation better?" If the answer is no, don't add it.
- Another issue with using too many animations and transitions is that it could significantly slow down your PowerPoint file's processing speed , as it adds volume to your file size.
- Keep things professional in the right contexts. For example, if you're presenting a formal business plan, you don't want to add funky transitions that take ten seconds to complete. Try sticking to slick effects that last less than a second.
- Use the same transition effect for each slide and, if you can, the same animation for each item.
It's a widely shared opinion that Microsoft 365's desktop apps offer more flexibility and functionality than their web-based counterparts. However, the exact opposite can be said for adding animations, which is significantly easier to do on PowerPoint for the web than via the subscription-only app. So, to create the animations for screenshots in this section, we have used PowerPoint online, rather than the desktop app, and we recommend that you do the same.
Before you add any animations, click "Animation Pane" in the Animations tab on the ribbon. This will open a pane on the right side of your window, which will make seeing and managing your animations much easier.

Now, select the item you want to animate. If you want several items on a slide to animate in the same way at the same time, hold Ctrl while clicking them all. Then, click the down arrow in the Animations tab, and choose the appropriate effect.

You will then see an animation card in the Animation Pane for the effect you just added. Here, you can change the animation type, how it is activated (whether via a click, with the previous animation, or after the previous animation), and the duration and delay.

If you have more than one animation on a slide and want to reorder them, click and drag the six dots next to the relevant animation card upwards or downwards.

Finally, to remove an animation, click the trash icon on the appropriate animation card.
You can also animate paragraphs of text within a text box. To do so, select the relevant text, and follow the same process.
Whether you're using PowerPoint's desktop app or the online version of the program, adding transitions involves a very similar process.
First, select the slide you want to transition to (for example, you'll select slide 2 if you want to create a transition from slide 1 to slide 2) in the slide thumbnail pane, and then click the "Transitions" tab on the ribbon.

To see more transitions, click the down arrow on the right-hand side of the Transition To This Slide group.
Clicking any of the transition effects on display will do two things—first, it will show you a preview of what that transition will look like, and second, it will apply that transition to that slide.
You can then amend the options (such as the direction of the transition) and timing of the transition using the settings on the right side of the Transitions tab. This is where you can also add a sound effect to the transition, or decide whether the transition effect occurs when you click your mouse or automatically after a given length of time.

If you want to apply the same transition effect and options to all slides, click "Apply To All" in the Timing group of the Transition tab when you have finished setting up your transition's parameters. You can then select individual slides to make further adjustments if needed.
To remove a transition, select the slide in the slide thumbnail pane, and click "None" in the Transitions tab.

PowerPoint's Morph is a transition effect that recognizes differences between the same items on two slides, and smoothly transitions between them when you proceed from one slide to the next. For example, you might have an image on slide 1, and the same image in a different position on slide 2. The morph transition gives your audience the impression that you're still on the same slide, but the objects are merely moving and resizing.
This is different to the motion path animation, which you can set for different items and activate at different times on your slide. The morph transition, however, moves all items together as you move from one slide to the next, saving you from having to apply motion path animations to individual objects. Any objects on the first slide but not the second will simply fade away during the morph transition. Similarly, any new items on the second slide will appear gradually.
In this example, we have a title and an image on slide 1, and the same objects on slide 2 but in different places and different sizes. We created this scenario by copying and pasting the whole of slide 1, and then changing the text and image on slide 2. However, you can also create a blank slide, and then copy and paste the different elements you want to morph.

Then, we need to select slide 2, and click "Morph" in the Transitions tab on the ribbon.

Then, press F5 to see your presentation, and witness the smooth morph transition from one slide to the next. You can also use this transition effect to zoom into an image or fade an image into the background. Just ensure that you copy and paste from one slide to the next before you create the transition, so that PowerPoint recognizes them as the same.
If animations and transitions are new to you, check out these other tips that you should also know before you design your next presentation.
- Microsoft PowerPoint
- Microsoft 365
- DemoCreator > Easy video recorder and editor for PC & Mac
- DemoAir > Online screen recording tool for everyone
- Visual Assets > NEW Creative video/audio effects for DemoCreator
- Virbo > Easily convert text into spokesperson videos
- Screen Recorder >
- Webcam Recorder >
- Game Recorder > HOT
- Virtual Avatar Recorder > NEW
- Video Presentation >
- Video Editor >
- Cut/Merge Video >
- Resize Video >
- Change Video Speed
- Audio Editing
- Online Screen Recorder >
- Online Voice Recorder >
- Online Webpage Screenshot >
- Screen Recorder for Chrome >
- Online Video Presentation Maker >
- HOT Video Editor > Take your videos to the next level
- NEW DemoCreator > Easily make a visual video presentation
- AI Subtitle Generator > HOT
- AI Voice Generator > HOT
- AI Denoise >
- AI Voice Changer >
- AI Beauty Filter > NEW
- AI Video Object Remover > NEW
- AI Background Remover >
- AI Teleprompter >
- AI Video >
- AI Voice >
- AI News >
- Hot Spot >
- Best AI Avatar Generators >
- AI Audio to Video >
- AI Virtual Friends Apps >
- Best AI Face Generators >
- Online Course >
- PPT Recording >
- Demo Video >
- Game Recording >
- Record on Windows >
- Record on Mac >
- Record on Mobile >
- Game Recording >
- YouTube Videos >
- Creative Effects >
- Audio Editing >
- Video Conference >
- Zoom Recording >
- Remote Work >
- Demo Video Tips >
- Online Class > NEW
- Teacher Skills >
- Elearning Tips >
- Lectures Recording >
- HOT DemoCreator Camp Take your videos to the next level

- User Guide >
- Video Tutorial >
- Tech Specs >
- What's New >
- Download Buy Now Download Buy Now Download Buy Now
How To Fix the PowerPoint Not Recording Audio Issue

- How to Record Webcam on Windows and Mac
- How to Take a Scrolling Screenshot in Windows 11/10 [7 Best Ways]
- Top Tips on How to Record Video on Windows 11
- How to Use a Screen Video Recorder in Windows 7
- Steps on How to Record Videos on Windows 8
- 7 Most Efficient Screen Video Recorders for Windows 10
- 10 Best Free Screen Recorders for PC To Capture Every Moment
- 10 Best Voice Recorder Apps for PC To Enhance Your Recording
- How to Use the Built-in Screen Recorder on Windows 10
- Top 5 Full Screen Recorder Tools for Windows 10
- What is an HD Screen Recorder?
- How to Use VLC to Record Screen With Audio
- How To Screen Record Netflix Shows
- How to Screen Record With the New Sound Recorder in Windows 11?
- Top 10 Fixes for Laggy OBS Recordings 2024
- How to Record Training Videos on PC?
- How To Record From Webcam on Windows 10?
- How to Record a Stream with VLC | Windows, Mac, Linux
- How Can You Choose A Screen Recording Software For Tutorials?
- Top 10 PC & Mobile Apps for Split-Screen Video Recording
- A Quick and Easy Guide for a Video Resume: How to Write a Script and Record a Video
- Simplifying Video Creation: Record MP4 on Windows Like a Pro
- What Are The Best Screen Recorders For Low-End PC?
- Guide to Choosing a Product Demo Video Maker
- How To Screen Record on Amazon Prime Video With DemoCreator?
- How To Record Zoom Meetings Without Permission – Legal & Ethical Ways
- How to Record a Video on Zoom: Tips and Tricks
- A Simple Online YouTube Screenshot Tutorial: 5 Tools to Consider
- [7 Ways] How to Capture Streaming Video on Windows 10?
- Top Offline Screen Recorder for Mac OS (Free & Paid)
- How To Record a YouTube Video on a Mac – All Methods
- The Ultimate Race: Top 10 Skype Call Recorders for Mac
- How To Record the Screen With Audio on macOS
- How To Screen Record on Mac – 3 Best Methods
- The 10 Best Tools for Recording GIFs on Mac [2024]
- How To Record Videos on Mac: All Methods
- Top 10 Screen Recorders for Mac in 2024
- QuickTime Screen Recording With Audio: Full Guide
- Top 10 Video Recording Software for Mac of 2024
- How To Record MP4 on Mac [Step-by-Step]
- Full Guide | Record Streaming Video On Mac in 5 Ways
- How To Record Spotify on Mac: Easy Guide
- Screen Recorder App for PC, Android, iPhone, and Chrome
- Top 9 Best Android Apps for Screen Recording
- How To Screen Record on iPhone 13
- How To Screen Record on iPhone 14: Everything You Need to Know
- The 10 Best iOS Screen Recorders for iPhone and iPad
- How To Use Huawei Sound Recorder: Simple Steps
- How To Record Audio From an iPad – A Comprehensive Guide
- 6 Best Free Webcam Recorders
- [2024 Updated] A Detailed Review of Acethinker Free Online Screen Recorder
- 2024 | 9 Best Online Screen Recorders for Chrome
- Top 10 Free Online Screen Recorders Without Download
- Top 5 Online Screen Recorders Without Watermarks | 2024 Updated
- How to Pick a High-Quality Online Voice Recorder
- How To Record Console Gameplay
- How to Take screenshots in Windows 11
- How to Record a Zoom Meeting
- Top 11 Zoom Recording Apps in 2024 [ Desktop / Mobile / Online]
- 2024| Top 10 Streaming Video Recorders for All Devices
- Best Webcam Recorder with Facial Beauty Function
- How To Record Yourself on a Mac: 6 Methods
- New Surroundings – Recording Videos With Virtual Backgrounds
- How To Record Screen and Webcam at the Same Time on Mac
- How To Record With a Webcam on Mac – 5 Best Webcam Recorders for Mac
- Top Online Sound Recorders
- Audio Extractor: 8 Best Software to Extract Audio from Video
- Top 2 Methods for Screen Recording With Audio on Windows 10
- The 10 Best Audio Recorders for Mac [2024]
- How To Record Internal Audio on a Mac
- How to Record Audio From YouTube Videos
- How To Record Audio on a Chromebook in 4 Ways
- The 10 Best Free Audio Recorders for Mac [2024]
- Best Ways to Record Audio From Websites on Mac in 2024
- How To Record MP3 on Mac - 6 Best Ways
- Everything You Need to Know about Browser Audio Recorders
- Top 5 Methods to Take Audio From YouTube Videos [All Platforms]
- Top 7 Free Audio Stream Recorders for PC and Mobile
- 2024 Updated | 3 Ways to Add a Voiceover to Google Slides
- 3 Easy Ways to Record Streaming Video
- Windows 11 Screen Recorder
- Best OBS Settings for Low-End PC
- Best Windows Game Capture Programs
- 12 Best Android Screen Recorders with Internal Audio
- 10 Best 60 FPS Screen Recorders for Windows/Mac
- Top14 HD 1080P Screen Recorders for PC
- 3 Best Ways to Record on Hulu
- Cost-Free Sports Extravaganza: Top 10 Free Live Sports Streaming Sites
- Top 10 Free Streaming Services for Watching Hit Movies and TV Series
- 2024 | 10 Best Game Streaming Platforms
- Top 15 Live Streaming Platforms of 2024 [Game, Social Media, and Education]
- 3 Ways to Record a Facebook Live Video in 2024
- 2024 | Top 8 Live Streaming Video Software
- Top 5 Twitch Streaming Software [2024 Updated]
- 2024 | How to Make an Engaging Demo Video with Wondershare DemoCreator
- Best Facial Recognition Software
- How To Record Audio in PowerPoint on Mac - Full Guide
- How To Record a Powerpoint Presentation With Audio and Video on Mac
PowerPoint is a popular presentation software that helps you create slides with text, images, and multimedia elements like audio recordings. While convenient, the audio recording feature isn’t foolproof. Sometimes, you may encounter issues where PowerPoint doesn’t record audio at all or the recorded audio is choppy or distorted.
This can be frustrating when you need to deliver a presentation with voice-over narration. Don’t worry; this article will guide you through different methods to troubleshoot and fix the PowerPoint audio not recording problem so you can flawlessly capture your voice within the slides.
In this article
Restart powerpoint, enabling app permissions through settings, disable hardware graphics acceleration, run windows recording audio troubleshooter, restart windows audio services, update microsoft powerpoint, run office repair tool, enable mic permission on mac, use safe mode, remove cache files, check user profile permissions, part 3: when all else fails: using a third-party screen recorder tool, part 1: common methods for audio not recording in ppt on windows.
Let’s start by looking at some of the most common methods to fix PowerPoint not recording audio in Windows 10 or other versions. These simple troubleshooting steps can often resolve the problem without much hassle.
The first thing to try is simply restarting the PowerPoint application. Sometimes, PowerPoint may encounter a temporary glitch that prevents audio recording; a restart can clear that up. This method is best used when the issue occurs randomly.
PowerPoint needs permission to access your computer’s microphone for audio recording. If permissions were revoked or not granted initially, you’ll need to enable them through your Windows Settings. This method is ideal when you suspect permission issues are causing the problem.
If permissions were revoked or not granted initially, go to your Windows Settings > Privacy > Microphone and ensure PowerPoint can access the microphone.

Graphics acceleration can sometimes cause the audio to not work in PowerPoint screen recording. Disabling this feature may allow PowerPoint to record audio correctly. Try this method if other basic troubleshooting steps have yet to work. Go to File > Options > Advanced in PowerPoint and uncheck the “Disable hardware graphics acceleration” option.

Windows has a built-in audio recording troubleshooter that can diagnose and fix common issues related to recording audio on your PC. Running this troubleshooter is a good step when the cause of the problem is unclear. Go to Start > Settings > System > Troubleshoot > Other troubleshooters. Select Recording Audio and run the built-in troubleshooter.

The audio services running in the background on your Windows system may have become stuck or encountered an error, preventing PowerPoint from recording audio correctly. Restarting these services can get things working again smoothly. Search for “Services” in the search bar, open it, and find and restart the “Windows Audio” and “Windows Audio Endpoint Builder” services.
Updating Microsoft PowerPoint or Office365 can work as a quick fix. Sometimes, there are underlying issues with updates that can be fixed through hotfixes released by software developers. In this case, updating the latest PowerPoint version can work wonders for audio problems.
If updating Word doesn’t work, your next step should be to run the Office repair tool. This utility can detect and fix corrupted or missing files that may cause problems with PowerPoint’s functionality, including audio recording. Go to Control Panel > Programs > Uninstall a program . Right-click on your Microsoft Office product and select Change . Then, choose the Online Repair option.

These are the most common methods to try when PowerPoint is not recording audio on your Windows computer. Start with the most straightforward steps, like restarting the app or enabling permissions, and then move on to more advanced troubleshooting if needed. Most of the time, one of these methods should get the audio recording working correctly again in PowerPoint.
Part 2: Common Methods To Resolve Audio Not Recording in PPT on Mac
Here are tips to fix the PowerPoint not recording audio on Mac. You can try several troubleshooting methods to get the audio recording functionality working again, as follows:
Just like on Windows, the first essential step is to restart the PowerPoint application on your Mac. A simple reboot can often fix the PowerPoint not recording audio issue.
PowerPoint needs permission to access your Mac’s microphone to record audio. Go to System Preferences > Security & Privacy tab. Click Microphone and ensure PowerPoint is checked in the list of allowed apps.

The Parameter RAM (PRAM) stores settings that may sometimes conflict with apps like PowerPoint. Resetting the PRAM can resolve such issues. Restart your Mac and hold “Command + Option + P + R” until you hear the second startup chime.

Starting your Mac in Safe Mode can eliminate software conflicts by only allowing essential kernel extensions and programs to load. If PowerPoint records audio in Safe Mode, you know a third-party app is likely causing interference.
PowerPoint cache files can become corrupted and cause problems. You can delete these by going to ~/Library/Containers/com.Microsoft.Powerpoint and removing the Data folder.
Incorrect permissions on your user profile folder can sometimes lead to PowerPoint audio issues. Open Terminal and run these commands to reset permissions: sudo chmod -R 755 /Users/YourUserName sudo chown -R YourUserName /Users/YourUserName.

These are some of the top methods Mac users can try when facing PowerPoint audio recording issues. Start with restarting the app and enabling permissions, then move to more advanced steps like resetting PRAM if needed. Following this troubleshooting process should help get audio capturing working smoothly again.
If you’ve tried all the standard troubleshooting methods and PowerPoint is still not recording audio properly, consider using a third-party screen recorder tool. These dedicated applications are designed to capture on-screen activities and often provide more advanced features than PowerPoint’s built-in recording capabilities.
One such powerful screen recorder is Wondershare DemoCreator . It’s a comprehensive solution for screen, webcam, and even game recordings on both Windows and Mac. When giving presentations in PowerPoint, DemoCreator can be an ideal alternative for ensuring flawless audio and video recordings.
Its screen capture capabilities allow you to record your entire presentation smoothly, including any areas PowerPoint may struggle with. For a detailed look at some of its key features, here are some of them:
- Flexible recording modes. DemoCreator allows you to capture full-screen, specific areas, or webcam feeds.
- High-quality recordings up to 4K 60fps. Ensure crystal-clear video quality by recording at resolutions up to 4K at 60 frames per second.
- Integrated editing tools. Trim, annotate, and enhance your recordings using DemoCreator’s powerful editing capabilities.
- Cross-platform availability. The software is available for Windows and Mac devices.
- Easy sharing options. Once your recording is complete, you can conveniently share it via email, cloud storage, or social media.
While PowerPoint’s built-in audio recording may sometimes falter, using a dedicated third-party tool like DemoCreator can ensure you always get high-quality recordings of your presentations without any audio issues.
How To Record PowerPoint Presentations With DemoCreator
Here’s how to use DemoCreator for recording PowerPoint presentations:
Step 1: Install, download, and launch Wondershare DemoCreator.
Step 2: From the homepage, click New Recording .

Step 3: Click the drop-down menu under Zone Capture . Then, select Capture a window and choose your PowerPoint window. Click the red REC button to start recording, and hit F10 on your keyboard to stop recording.

Having PowerPoint not recording audio can be a frustrating experience, especially when you need to capture voice-over narration for a presentation. This guide covered various methods to troubleshoot and fix the issue on both Windows and Mac, from enabling the correct permissions and resetting services to running repair tools and removing cache files.
While those built-in troubleshooting steps are worth trying, a dedicated third-party screen recorder like Wondershare DemoCreator can provide a more robust and reliable solution. Its flexible recording modes, high-quality output, editing capabilities, and cross-platform availability make it an ideal tool for flawlessly capturing PowerPoint presentations along with clear audio narration every time.
You May Also Like

IMAGES
COMMENTS
Starting from a windowed presentation means you can switch between Full Screen and the window presentation without showing the entire PowerPoint menus etc. It's a little neater and more professional. Go to Full Screen from the menu option. In Full Screen mode press Escape to return to the windowed presentation.
Go to SlideShow and then Setup Slide Show. Set up a PowerPoint Slideshow. Now, in the Set Up Show dialog, make sure to select Browsed by an individual (window). By default you will see that the Presented by a speaker (full screen) is selected. Now, every time you start the slideshow for example using the keystroke F5 then you will see that the ...
However, when I right-click the attachment and select Edit, it opens in actual edit mode within PowerPoint itself. Also, when I save the attachment and open it directly from the drive, it also opens in edit mode. This will suffice for now, but it would be nice to be able to switch a full screen presentation to windowed.
How to display a slide show in a window: Select "Set up Slide Show" on the "Slide Show" tab; Select the radio option, "Browsed by an individual (window)" Start your PowerPoint show; To exit the show, use the "Normal" button to return to the file editing interface.
You can use a self-running presentation to run unattended in a booth or kiosk at a trade show or convention, or you can save it as a video and send it to a client. On the Slide Show tab, select Set Up Slide Show. Presented by a speaker (full screen) Allows the people watching your slide show to have control over when they advance the slides.
How to Setup Window Mode. If this sounds like something that'll be useful in your next presentation, you can set this up as follows: From the Slide Show ribbon in PowerPoint, select Set Up Slide Show. PowerPoint Slide Show Ribbon. In the dialog box, select "Browsed by an individual (windows)" and click OK. PowerPoint Slide Show Setup Box.
In the Set Up Show dialog box, in the Show Type section, choose Browsed by an Individual (Window). Click OK. Go into Slide Show view. Instead of taking up the entire screen, your presentation is in a resizable window. You can easily switch among other applications
Inside the slide show settings dialog box, you can select: How your presentation runs (full screen, window or in kiosk mode). Your default pen and laser pointer color options (see our laser pointer article here).Which slide you want start from, or which slides you want to show.
Open the presentation that you want to play as a slide show. Select the slide that you want to start the slide show from. On the. button, and then click Custom Slide Show on the menu. In the Custom Shows screen, click the custom slide show you want to present. To end the slide show when you finish presenting, press ESC .
If you want to learn how to loop your slides in PowerPoint, follow these steps: Go to the Slide Show tab and select Set Up Slide Show. When the Set Up Show window appears, go to the Show options group and tick the Loop continuously until 'Esc' option. Don't forget to click OK to apply the new setup!
I believe I have found somewhat of the answer, while it doesn't do exactly what I'm looking for.. Navigating to Slide Show ribbon, then selecting Set Up Slide Show allows you to select Browsed by an individual (window). This will allow you to be in presentation mode, but there is still a window . It would be nice to have a view of full screen ...
In this article I am using the Teams app in Windows 10. The seven options are: Share your entire screen/desktop. Share the Slide Show window. Share the editing window with a clean look. Run the Slide Show in a window and share that window. Use the PowerPoint sharing option in Teams. Use Presenter View to show the audience your slides while you ...
Click OK. To set up a presentation to run automatically, but those watching the slide show do NOT have control over when slides advance: Click the Slide Show tab in the Ribbon and then click Set Up Slide Show. A dialog box appears. Under Show type, select Browsed by an individual (window). Click OK.
In this article I am using the Zoom app in Windows 10. The six options are: Share your entire screen/desktop. Share the Slide Show window. Share the editing window with a clean look. Run the Slide Show in a window and share that window. Use Presenter View to show the audience your slides while you see Presenter View.
Six steps for creating a slide show. 1. Plan your slide show. Before getting too deep into your slide show project, it's a good idea to select and save the photos and videos you want to use. This helps you create a slide show more efficiently and purposefully, ensuring a better outcome. 4.
From Microsoft's list of command line switches, you can use the /S switch to start a presentation: C:\path\to\POWERPNT.exe" /S "Presentation.pptx". To get the slideshow to start on boot-up create a shortcut to the path given above and put it in the Startup folder in the Start menu. Share. Improve this answer.
Start a Slideshow in PowerPoint's Web App. To play a slideshow on the web, launch your preferred web browser and access PowerPoint on the web. Then, open your presentation. From PowerPoint's ribbon at the top, select the "Slide Show" tab. In the "Slide Show" tab, start your slideshow from the first slide by clicking the "From Beginning" option.
Create a new presentation. Open PowerPoint. Select Blank presentation, or select one of the themes. Select More themes to view the gallery and search for more. Add a slide. Select the slide you want your new slide to follow. Select Home > New Slide. Select Layout and the you type want from the drop-down.
In this video, you will learn how to begin your slideshow presentation from the beginning or current slide, as well as customization.0:06-0:12Open the PowerP...
How to Get to PowerPoint's folder in CMD. Open a File Explorer window and type "powerpnt.exe" in the Search menu in the top of the window. After a few moments, File Explorer will show you the file ...
Whether you're using PowerPoint's desktop app or the online version of the program, adding transitions involves a very similar process. First, select the slide you want to transition to (for example, you'll select slide 2 if you want to create a transition from slide 1 to slide 2) in the slide thumbnail pane, and then click the "Transitions ...
Open Task Scheduler and click "Create Basic Task" in the right (Actions) pane. Give the task a name and optionally add a short description; click Next. Select the trigger; click Next. Select the start time; click Next. Select "Start a program" as the Action; click Next.
Step 2: From the homepage, click New Recording. Step 3: Click the drop-down menu under Zone Capture.Then, select Capture a window and choose your PowerPoint window. Click the red REC button to start recording, and hit F10 on your keyboard to stop recording.. Conclusion. Having PowerPoint not recording audio can be a frustrating experience, especially when you need to capture voice-over ...