How to Send a PowerPoint Through Email When It’s Too Big
Sending a PowerPoint presentation through email can be a headache when the file is too big. But fear not, there’s a simple workaround to sharing that hefty file without clogging up someone’s inbox. All you need to do is compress the file, use a cloud storage service, or send it as a link. After reading this paragraph, you should have a basic understanding of how to accomplish the task specified by the prompt.

Step by Step Tutorial on Sending a Large PowerPoint Through Email
Getting that oversized PowerPoint file to its destination doesn’t have to be a battle with your email’s file size limit. The following steps will guide you through the process smoothly.
Step 1: Compress the PowerPoint file
Right-click on the file, select ‘Send to’, and then choose ‘Compressed (zipped) folder’.
Compressing the PowerPoint file can significantly reduce its size, making it easier to send through email. This method works well for files that are just slightly over the limit, as compression can only reduce the size so much without affecting the quality of the content within the presentation.
Step 2: Upload the file to a cloud storage service
Services such as Google Drive, Dropbox, or OneDrive allow you to upload and share large files.
Cloud storage services are incredibly useful when dealing with large files. Once uploaded, you can share a link to the file or even set permissions for who can view or edit the document.
Step 3: Send the link through email
Instead of attaching the file, paste the link to the file in your email.
Sending a link is a quick and efficient way to share a large PowerPoint file. The recipient can simply click on the link to view or download the presentation, without it taking up space in their email.
After completing these steps, your recipient should receive an email with either a compressed file or a link to the PowerPoint presentation. They’ll then be able to download or view the file without any issues related to file size.
Tips for Sending a Large PowerPoint Through Email
- Always check the file size limit of your recipient’s email provider.
- Compress images and videos within the PowerPoint before trying to send it.
- Remove any unnecessary slides or content to reduce the file size.
- Consider breaking the presentation into smaller parts if it’s still too large.
- Always inform the recipient to expect a large file or link, so they know to look for it.
Frequently Asked Questions
What is the maximum file size that i can send through email.
Most email providers have a limit of 20-25MB for attachments.
Can I compress a PowerPoint with embedded videos?
Yes, but the video quality may be reduced, and it may not compress enough to meet email size limits.
How do I compress images in PowerPoint?
You can use the ‘Compress Pictures’ feature under the Picture Format tab to reduce the file size.
Is it safe to use cloud storage services to share presentations?
Yes, reputable services like Google Drive and Dropbox have security measures to protect your files.
What do I do if my PowerPoint is still too large after compression?
Consider using a cloud service or breaking the presentation into smaller parts.
- Compress the PowerPoint file.
- Upload the file to a cloud storage service.
- Send the link through email.
Sending a large PowerPoint through email doesn’t have to be a daunting task. With a few simple steps, you can ensure your comprehensive, visually stunning presentations reach their intended recipients hassle-free. Whether you choose to compress the file or opt for the convenience of cloud storage services, the key is to find the method that works best for you and your recipient. Always remember to double-check file sizes, compress content where possible, and communicate with your recipient about the impending large file. By following the steps outlined in this article, you’ll become a pro at circumventing those pesky file size limits and ensure your presentations are delivered effectively and efficiently every time.

Matt Jacobs has been working as an IT consultant for small businesses since receiving his Master’s degree in 2003. While he still does some consulting work, his primary focus now is on creating technology support content for SupportYourTech.com.
His work can be found on many websites and focuses on topics such as Microsoft Office, Apple devices, Android devices, Photoshop, and more.
Share this:
- Click to share on Twitter (Opens in new window)
- Click to share on Facebook (Opens in new window)
Related Posts
- How to Compress Audio and Video in Powerpoint 2010: A Step-by-Step Guide
- How to Compress Pictures in Powerpoint: A Step-by-Step Guide
- How to Download a Google Slides Presentation as a Powerpoint File
- How Do I Access My Google Cloud? A Step-by-Step Guide
- How to Send an Entire Folder of Files as an Attachment in Outlook
- Creating a Word Cloud in PowerPoint on Windows 11: A Step-by-Step Guide
- How to Create a Zip File in Windows 10: A Step-by-Step Guide
- Can You Save a Powerpoint as a Video in Powerpoint 2013? Find Out Here!
- Windows 7 Default ZIP Program: A Comprehensive Guide
- Troubleshooting Powerpoint Designer Not Working on Windows 11: Fixes and Tips
- How to Insert an Excel Spreadsheet Into Powerpoint: A Step-by-Step Guide
- How to Zip a Powerpoint File: A Step-by-Step Guide
- How to Do a Powerpoint Google Slides Presentation Conversion
- How to Send a Picture Through Email on an iPhone: Easy Steps
- How to Save Powerpoint as PDF with Notes: A Step-by-Step Guide
- How to Rotate a Powerpoint Slide Presentation
- How to Loop a Powerpoint Presentation: Step-by-Step Guide
- How to Cloud Game on iPhone: A Step-by-Step Guide
- Keeping Track of Word Counts in PowerPoint: Tips and Tricks
- How to Merge Files in Powerpoint: A Step-by-Step Guide
Get Our Free Newsletter
How-to guides and tech deals
You may opt out at any time. Read our Privacy Policy
How-To Geek
How to reduce the file size of a powerpoint presentation.

Your changes have been saved
Email is sent
Email has already been sent
Please verify your email address.
You’ve reached your account maximum for followed topics.
Quick Links
Convert your presentation to the pptx format, insert your pictures—don’t copy and paste, do image edits in an image editor—not in powerpoint, compress all of the images in your presentation, don’t use embedded fonts, link to files instead of embedding them, don’t store a thumbnail for the presentation, remove personal and hidden information from your presentation, turn off autorecover, copy everything into a new presentation, a possibility: unzip the presentation and compress it.
Considering that Microsoft PowerPoint presentations are generally accompanied with tons of images, gifs , embedded videos , charts , graphs, and other content, it’s no surprise that you get some pretty big files. Here are a few steps you can take to reduce a presentation's file size.
Large files can be annoying. They take up loads of precious disk space, slow down playback performance, and can cause emails to bounce back due to exceeding the file size limit. You can prevent all of these things by reducing the file size of your presentation.
We’ve mentioned it before, but the first thing you’d think of when considering file size reduction is images—and for a good reason. Image files can be quite large. There are steps you can take to reduce the size, such as compressing the images in the presentation. If you suspect the reason your PowerPoint file is so large is due to images, then be sure to read the article we’ve written on how to reduce the size of Office documents that contain images .
Related: How to Reduce the Size of a Microsoft Word Document
We do have some additional tips to add if you followed these steps but still need to reduce your presentation’s file size.
Microsoft released the PPTX format in Office 2007. Still, it’s not uncommon to see PPT files floating around. So what’s the difference between a PPT and PPTX file? The PPTX version compresses all of the content within the presentation. If you have a PPT file and convert it into a PPTX file, you’ll notice a decrease in the file size.
Converting the file is as simple as pressing a button and choosing the file type. Go ahead and open your PPT file, head over to the “File” tab, and then click “Convert.”

Windows File Explorer will appear. You’ll notice the Save As type is set as "PowerPoint Presentation." This is the PPTX file type. Click “Save.”

Your PPT file will now be converted to a PPTX file. As you can see, the size of the file has been reduced.
HTG Presentation 2 is our PPT file, and HTG Presentation 3 is our PPTX file. Merely converting the file type reduced the size by 335 KB.
While this isn’t a breathtaking drop in file size, we managed to reduce a Word document file size from 6,001 KB to 721 KB. It all depends on what’s inside the file. With any luck, this will be the only step you need to take. If not, keep reading.
It’s tempting to copy and paste an image in PowerPoint instead of using the insert function. This won’t be an issue if you’re not concerned about file size, but if you are, then beware of copy and paste—it may reformat your image to BMP or PNG. Why is this an issue? Both of those file formats are larger than JPG.

You can see in the above screenshot that the PNG file is 153KB compared to the 120KB JPG file of the same image. Each time you copy and paste a JPG file to PowerPoint, and it gets converted to PNG, you’re adding a bit of unnecessary file size to the presentation. Using the insert function will ensure your images are inserted as intended.
When you insert an image in PowerPoint, it’s best to make sure that it doesn’t need any edits. If it does require edits, you’re better off doing it in an image editor. Why? When you use PowerPoint to edit your image, it stores all of those edits as part of the presentation. For example, when you change an image to black and white, PowerPoint retains the full-color image as well. That’s a lot of extra bites being stored.
If you don’t have an image editor ( you do ) or you simply must use PowerPoint, be sure to tell PowerPoint to discard all of that excess data saved from the edits . It won't save you as much space as working in a dedicated editor, but it will help.
You can compress images in PowerPoint one at a time or all at once. If you’re looking to do the latter, here’s how.
Open your presentation, head over to the “File” tab, and then select “Save As” in the left-hand pane.

Next, select “More Options,” which you'll find under the area where you would name your file and choose the file type.

The “Save As” window will appear—this time with a few extra options available to you. Next to the “Save” button, click “Tools.”

In the drop-down menu that appears, select “Compress Pictures.”

The “Compress Pictures” window will appear. Here, you can choose the resolution type of the images (based on PPI) in the presentation. You’ll also notice that you’re not able to select the “Apply only to this picture” option in the “Compression Options” group. That’s because, due to the way we accessed this tool, this option isn’t available.
Note: If you do want to compress a single picture, select it and then head to Picture Tools Format > Compress Pictures.
Once you’re happy with your selection, click “OK.”

Be sure to save your presentation afterward.
We get why you might want to embed fonts—you might be making a Star Wars themed presentation and, as a result, anyone you may be sharing the presentation with is not likely to have those special fonts available to them. Embedding the fonts in your presentation could prevent issues down the line, but it comes at the cost of increased file sizes.
In general, unless you are sure you need to display a particular font, we recommend turning off font embedding.
Head over to the “File” tab and select “Options” at the bottom of the left-hand pane.

On the “Save” tab, untick the “Embed fonts in the file” checkbox and then click “OK.”

We saved a copy of our presentation with all fonts embedded, without fonts embedded, and with only the fonts used in the presentation embedded. Look at the difference if file sizes:

Convinced yet?
Consider the difference in file size if you embed an entire YouTube video in your presentation instead of linking back to it. Embedding an entire video will significantly increase the size of your presentation. There are certainly some valuable benefits when embedding a file vs. linking to it (such as when the recipient might not have internet access to play the video), but if the file size is an issue, just don’t do it.
Way back when Office let you save thumbnail images of your presentation so that you could get a sneak preview of the file when searching for it in File Explorer. Windows has grown to be more sophisticated, so it no longer requires the help of Office applications to do this. But, the option is still available.
We ran a little test to see the difference in file size with and without this option enabled. Here are the results:
With the thumbnail option enabled, our file size was 2,660 KB. Without the option enabled, the file size was reduced to 2,662 KB, saving a total of 7 KB.
This is a pretty small save, but when we tested it with a Word document, the difference was significant, showing 721 KB without the option enabled, and 3,247 KB with the option enabled.
While this is a large gap between applications and it’s not exactly clear why the difference is so large, it’s still an option worth exploring. To disable the feature, open your presentation, head over to the “File” tab, and then select “Properties” found on the right-hand side, then “Advanced Properties.”

You’ll now be in the “Summary” tab of the “Properties” window. At the bottom of the window, uncheck the box next to “Save preview picture,” and then click “OK.”

Microsoft Office will store your personal information (such as author name) and hidden properties within your presentation. Getting rid of this information can save you a bit of space.
Open your presentation, head over to the “File” tab, select the “Check for Issues” option, then select “Inspect Document."

The “Document Inspector” window will appear. Make sure the “Document Properties and Personal Information” box is checked, and then click “Inspect."

In the next window, select “Remove All.” The information will now be removed, saving you a few KB of space.
We don’t necessarily recommend this, and it should only be used as a last resort effort. AutoRecover is an essential tool in Office, and if you’ve ever lost a document before saving, then you understand precisely what we mean.
Each time Office uses AutoRecover, it adds a little to the size of the file. To turn AutoRecover off, head over to the “File” tab and select “Options” found at the bottom of the left-hand pane.
In the “Save” tab of the “Options” window, uncheck the box next to “Save AutoRecover information ever xx minutes.”

If you save and exit out of the presentation immediately, you won’t notice a difference. Over time though, as you continue to progress through the presentation, the AutoRecover feature will add KB to your file.
While you’re creating your presentation, PowerPoint will save various things in the background to help you out. We’ve mentioned how to turn off a lot of these features, delete data PowerPoint saves, and so on, but there’s always a chance something slipped through the cracks, and PowerPoint stored some information you don’t need. Copying your content over to a new presentation may be a good solution to the problem.
This may be a bit of a hassle though as, with PowerPoint, you’ll need to copy and paste each slide (and master slides). Once you do though, the new presentation won’t have any of the previous background saves, AutoRecover information, or previous versions of the file. As a result, you should see a change in file size.
While we can’t tell you exactly how much this will reduce your file size since each presentation will be different, it’s worth a shot.
As we mentioned earlier, a PPTX file is a compressed file (which is why the size is much smaller than an old-school PPT file). This means you can open it with a tool such as 7-Zip or WinRar, extract all the files from your PPTX, add them to a compressed archive, and then rename the archive to a PPTX file extension.
We had some issues here, though.
In Rob’s testing with his Word document, it successfully reduced the size of the file from 721 KB to 72 KB. However, it corrupted the file in the process. In my testing with my 2,614 KB file, it didn’t corrupt it, but it only reduced it to 2,594KB—a total of only 20 KB. We’re unsure what’s at play here, so if you want to give this a go, be sure to have a backup copy of your file before doing so.
That’s all the tips we've got for reducing the size of your PowerPoint presentation. We’re always looking for new and interesting ways to reduce the size of our files, so if you have any tips, let us know in the comment section, and we’ll be happy to test them out!
- Microsoft Office
- Office 2016
How to Email a PowerPoint Presentation That Is Too Big to Send?
Have you ever tried to email a PowerPoint presentation only to get an error message saying the file is too large to send ? Many email providers have file size limits , often around 20-25 MB, which can be too small for PowerPoint files containing a lot of slides, images, videos, or other media. Fortunately, there are several ways you can work around this issue and successfully send large PowerPoint presentations via email .
Why Your PowerPoint File Might Be Too Big to Email
PowerPoint presentations can easily become too big to email due to:
- High-resolution images
- Embedded video or audio files
- Detailed charts and graphs
- Large numbers of slides
- Inefficient compression of media within the file
All of these elements take up file space and can quickly push your presentation over the typical 20-25 MB email attachment size limit. But don’t worry – there are solutions!
How to Reduce the File Size of Your PowerPoint Presentation
Here are some ways to make your PowerPoint file smaller so it can be emailed:
1. Compress Images
One of the most effective ways to reduce your PowerPoint file size is to compress the images within it. High-resolution images can take up a lot of space. To compress them:
- Select an image in your presentation
- Go to the “Picture Format” tab
- Click “Compress Pictures”
- Choose your desired resolution and compression options
- Click “OK”
Repeat this for each image in the presentation. But be careful not to over-compress images to the point that they look bad – aim for a balance between file size and visual quality.
2. Link to Videos Instead of Embedding Them
Video files can dramatically increase the size of your PowerPoint presentation, especially longer, high-resolution videos. Instead of embedding videos into your presentation, upload the video to a streaming platform like YouTube or Vimeo and then link to it within the presentation.
To do this:
- Upload your video to YouTube, Vimeo, or your preferred video hosting platform
- Copy the URL of the uploaded video
- In your PowerPoint presentation, go to the slide where you want to link the video
- Go to the “Insert” tab and click “Video”
- Choose “Online Video”
- Paste in the URL of your uploaded video
- Click “Insert”
Now your presentation will display the linked video without significantly increasing the file size.
3. Save as a PowerPoint Show (.ppsx) File
PowerPoint offers a file format called PowerPoint Show (.ppsx) which is optimized for presentations. PPSX files tend to be more compressed than regular PowerPoint (.pptx) files.
To save as a .ppsx file:
- Click “File” then “Save As”
- Next to “File name” click the dropdown arrow
- Select “PowerPoint Show (*.ppsx)”
- Click “Save”
Your presentation will now be saved in the more compressed .ppsx format. Note that this format opens directly into presentation mode.
4. Delete Unused Slides, Images, and Assets
Go through your presentation and delete any slides, images, videos, audio clips, or other assets that aren’t absolutely necessary. Be judicious – you probably don’t need that third photo on the “About Us” slide. Paring down your content can significantly reduce file size.
How to Send a PowerPoint Presentation When It’s Still Too Big
If you’ve compressed images, linked videos, saved as a .ppsx, and deleted unnecessary assets but your PowerPoint file is still too large for email , you have a few more options:
1. Use a Cloud Storage Service
Cloud storage services like Google Drive, Microsoft OneDrive, and Dropbox allow you to upload large files and then share access with others via a web link.
Here’s how you can use Google Drive to send a large PowerPoint file:
- Go to drive.google.com and sign in
- Click “New” and then “File upload”
- Select your PowerPoint presentation and click “Open”
- Once uploaded, right-click the file and select “Share”
- Enter the email addresses of the people you want to share with
- Choose their access permissions (view, edit, etc.)
- Click “Send”
Recipients will get an email with a link to view the PowerPoint in their web browser or download it.
2. Use a File Compression Tool
File compression tools like WinZip, WinRAR, and 7-Zip can further compress your PowerPoint file so it’s within the email size limit. These tools work by efficiently encoding the data in your file to take up less space.
To use WinZIP to compress a PowerPoint file:
- Right-click your PowerPoint file
- Hover over “WinZip”
- Select “Add to Zip file…” (Name the zip file)
- Click “Add”
A new zip file will be created containing your compressed PowerPoint presentation, which you can then attach to an email.
3. Split the Presentation into Multiple Files
As a last resort, you can split your PowerPoint into multiple smaller files , each containing a portion of the presentation. This works well when different parts of the presentation will be presented by different speakers.
- Open your presentation in PowerPoint
- Select the slide where you want the first section to end
- Go to “File” then “Export”
- Choose “Create Handouts” then “Create Handouts in Microsoft Word”
- In the “Send to Microsoft Word” dialog box, select “Paste” then click “OK”
- In Word, delete slides until you’re left with the first section
- Save the Word document
- Open the original PowerPoint file and delete the slides you just put in the Word doc
- Save this as a new PowerPoint file
Repeat this process for each section. You’ll end up with multiple PowerPoint files small enough to attach to an email.
While PowerPoint files can often be too large for email due to high-resolution images, embedded media, and large numbers of slides , there are many solutions:
- Compress images to reduce resolution while maintaining quality
- Link to videos instead of embedding them
- Save as a .ppsx file for better compression
- Delete unnecessary content to slim down your presentation
- Use cloud storage services like Google Drive to upload and share large files
- Compress the PowerPoint file using tools like WinZIP
- Split the presentation into multiple smaller files as a last resort
With these techniques, you can make sure your well-crafted PowerPoint presentations always reach their intended audience, no matter how large the files become. Don’t let email size limits be a barrier to sharing your great work!
What makes a PowerPoint file too big to email?
How can i reduce the size of my powerpoint presentation, what is the best way to send a large powerpoint presentation, can i use file compression tools to make my powerpoint smaller, what if i can’t get my powerpoint small enough to email, what is the typical email attachment size limit.
- Recent Posts

- How to Get Icons in PowerPoint: Easy Methods - September 16, 2024
- How to Stretch Text in PowerPoint: Simple Techniques - September 16, 2024
- How to Get PowerPoint on Chromebook: Step-by-Step - September 16, 2024
Similar Posts
How to remove footer in powerpoint: a comprehensive guide.
Learn how to remove or hide the footer in PowerPoint. Easily delete footers from all slides, specific slides, or individual elements like date and slide number.
How to Lock PowerPoint Presentation | Secure Steps
Protect your PowerPoint slides with our guide on how to lock PowerPoint presentation, ensuring your content remains secure and unaltered.
How to Ignore All Red Lines in PowerPoint: A Complete Guide
Disable red lines in PowerPoint with this easy guide. Learn how to remove spell check for cleaner presentations without distractions.
How to Clear PowerPoint Font Cache: A Complete Guide
Learn how to clear the PowerPoint font cache on Windows and macOS to resolve font-related issues and improve performance in your presentations.
How to Share PowerPoint on Zoom from iPad
Effortlessly present your slides during virtual meetings. Learn how to share PowerPoint on Zoom from your iPad with our quick guide.
How to Align Objects in PowerPoint Using Shortcuts?
Master PowerPoint alignment shortcuts with this guide. Learn to efficiently align objects for professional, organized presentations. Save time & improve design!
Leave a Reply Cancel reply
Your email address will not be published. Required fields are marked *
Save my name, email, and website in this browser for the next time I comment.
© 2024 pptbliss.com - All Rights Reserved
How to Email a PowerPoint Slideshow: A Step-by-Step Guide
Emailing a PowerPoint slideshow is as simple as attaching a file to an email. But to do it correctly, you need to save your presentation in the right format, choose the right file size, and ensure that your recipient can view it. After completing these steps, your PowerPoint slideshow will be successfully sent and accessible to your intended audience.
After you complete the action, your recipient should receive an email with your PowerPoint slideshow attached. They will be able to download and view the presentation on their own device, provided they have the necessary software or app to open PowerPoint files.
Introduction
In our digital age, sharing information has never been easier. Whether you’re a student presenting a project, a professional sharing a business proposal, or someone just looking to spread ideas, PowerPoint slideshows are a go-to method. But what good is a stunning presentation if you can’t get it in front of your audience? Emailing your PowerPoint slideshow is a quick and efficient way to do just that. This simple action is relevant to almost everyone in the digital workspace. It saves time, resources, and allows for instant sharing of information.
Emailing a PowerPoint slideshow seems straightforward, right? Well, it is, but there are a few tips and tricks that can ensure your presentation arrives just as impressively as it leaves your outbox. It’s crucial to know the ropes to avoid any hiccups, such as large file sizes causing your email to bounce back, or the recipient not being able to open the file. Let’s dive into the know-how of emailing a PowerPoint slideshow, ensuring your hard work gets seen and appreciated.
Step by Step Tutorial: Emailing a PowerPoint Slideshow
Before jumping into the steps, understand that following them will help you send a PowerPoint slideshow via email. This process is handy for sharing presentations with colleagues, friends, or anyone who needs to view your slides.
Step 1: Save Your PowerPoint Slideshow
Save your PowerPoint presentation in a format that’s suitable for email.
When saving your PowerPoint presentation, choose a format that maintains the quality of your slides while keeping the file size manageable. The standard .ppt or .pptx formats work well, but if you’re concerned about compatibility, a PDF format is a universal option.
Step 2: Compress Your Presentation
Compress your PowerPoint file if it’s too large to email.
Large files can be troublesome to send via email. If your presentation is too large, consider compressing it to reduce the size. PowerPoint has built-in tools that can help you compress images and media within your slides to make the file smaller.
Step 3: Open Your Email Client
Open your preferred email client to compose a new message.
Whether you use Gmail, Outlook, or any other email service, start by opening your email client and clicking the option to compose a new email. This will be the vehicle to deliver your PowerPoint slideshow to your recipient.
Step 4: Attach Your PowerPoint Slideshow
Attach your saved PowerPoint presentation to your email.
Look for the ‘attach file’ icon (usually represented by a paperclip) in your email client. Click on it and navigate to the location where your PowerPoint presentation is saved. Select the file and attach it to your email.
Step 5: Compose Your Email
Write a brief message to accompany your PowerPoint slideshow.
Don’t just send an email with an attachment and no context. Write a short message explaining what the presentation is and why you’re sending it. This will provide your recipient with the necessary information and entice them to open your slideshow.
| Benefit | Explanation |
|---|---|
| Convenience | Emailing a PowerPoint slideshow is incredibly convenient. You can send your presentation from anywhere, at any time, to anyone with an email address. It eliminates the need for physical meetings or mail, saving you time and effort. |
| Efficiency | This method is efficient because it allows for instant sharing. There’s no waiting around for your recipient to receive a physical copy. As soon as you hit send, your presentation is on its way. |
| Versatility | Email is a universal communication tool. Almost everyone has an email address, making it a versatile way to share your PowerPoint slideshow with a wide audience. It doesn’t matter where your recipient is in the world, they can access your presentation. |
| Drawback | Explanation |
|---|---|
| File Size Limitations | Many email services have a limit on the size of files you can send. If your PowerPoint slideshow is too large, you may need to use a file-sharing service or compress your presentation, which can reduce quality. |
| Dependency on Internet | You need an internet connection to send an email. If you or your recipient has connectivity issues, sharing your PowerPoint slideshow could be delayed. |
| Compatibility Issues | Not everyone uses PowerPoint. If your recipient doesn’t have the right software or app to open the slideshow, they won’t be able to view your presentation. Always check with your audience beforehand. |
Additional Information
When it’s time to share your PowerPoint slideshow, there are a few additional things to consider. First, think about the accessibility of your presentation. Will your recipient need any special software to view it? It’s always a good idea to ask ahead of time or provide options, such as saving your slideshow as a PDF, which can be opened on almost any device.
Another tip is to use file-sharing services for particularly large presentations. Platforms like Google Drive, Dropbox, or WeTransfer allow you to upload your PowerPoint slideshow to the cloud, and then send a link via email. This way, you avoid the file size limits of email services and ensure your recipient can download the presentation at their leisure.
Also, be mindful of the security of your content. If your PowerPoint slideshow contains sensitive information, consider password-protecting it before sending. You can also use encrypted email services for added security.
Remember, the goal is to make sure your PowerPoint slideshow is received and can be viewed with ease. The last thing you want is for your hard work to go unseen due to a technical hiccup.
- Save your presentation in a suitable format.
- Compress your presentation if it’s too large.
- Open your email client and compose a new message.
- Attach your PowerPoint slideshow to the email.
- Write a message to accompany your presentation and hit send.
Frequently Asked Questions
Can i email a powerpoint slideshow from my phone.
Yes, you can email a PowerPoint slideshow from your phone using your mobile email client. Just ensure that your presentation is saved on your phone or accessible through a cloud service.
How can I make my PowerPoint file smaller to email?
You can compress images within PowerPoint or use a file compression tool. Also, saving your presentation in PDF format can sometimes reduce the file size.
What’s the maximum file size I can email?
This depends on your email provider. For example, Gmail has a limit of 25MB for attachments. If your presentation is larger, you’ll need to use a file-sharing service.
Can I password-protect my PowerPoint slideshow before emailing it?
Yes, PowerPoint allows you to add a password to your presentation. This can be done in the ‘File’ menu under ‘Info’ and then ‘Protect Presentation.’
What if my recipient doesn’t have PowerPoint?
If your recipient doesn’t have PowerPoint, consider saving your presentation as a PDF. Alternatively, they can view it using free software like PowerPoint Viewer or Google Slides.
Emailing a PowerPoint slideshow is a crucial skill in the modern world of digital communication. It’s a simple yet effective way to share your ideas, projects, or proposals with anyone, anywhere. While there are some hurdles like file size limits and software compatibility, a little preparation and foresight can overcome these challenges.
Remember to save your presentation in an accessible format, keep the file size manageable, and always double-check with your recipient for any specific requirements they might have. With these tips and tricks up your sleeve, you’re ready to share your PowerPoint masterpiece with confidence and ease. So go ahead, hit that send button, and let your slideshow make the impact it deserves!

Matthew Burleigh has been writing tech tutorials since 2008. His writing has appeared on dozens of different websites and been read over 50 million times.
After receiving his Bachelor’s and Master’s degrees in Computer Science he spent several years working in IT management for small businesses. However, he now works full time writing content online and creating websites.
His main writing topics include iPhones, Microsoft Office, Google Apps, Android, and Photoshop, but he has also written about many other tech topics as well.
Read his full bio here.
Share this:
Join our free newsletter.
Featured guides and deals
You may opt out at any time. Read our Privacy Policy
Related posts:
- How to Save Powerpoint as PDF with Notes
- How to Compress Audio and Video in Powerpoint 2010
- How to Loop a Slideshow on Powerpoint 2013
- Can I Convert My Powerpoint to Google Slides?
- Can You Save a Powerpoint as a Video in Powerpoint 2013?
- How to Change Hyperlink Color in Powerpoint 2010 (An Easy 5 Step Guide)
- How to Convert PowerPoint Presentations to HTML: A Step-by-Step Guide
- How to Set Time for Slides in Powerpoint
- How to Make a Powerpoint Slide Vertical in Powerpoint 2013
- How to Use a Mac With PowerPoint: A Step-by-Step Guide
- How to Compress an Excel File: Step-by-Step Guide
- How to Turn a Presentation into a Video in Powerpoint 2010
- How to Make a Powerpoint Into a Video
- How to Check Word Count on Powerpoint 2010
- How to Hide Background Graphics in Powerpoint 2013
- How to Insert Slides from Another Presentation in Powerpoint 2010
- How to Print an Outline of the Presentation in Powerpoint
- How to End Powerpoint on Last Slide in Powerpoint 2010
- View Your Powerpoint 2010 Slideshow in Grayscale
- How to Make Curved Text in Powerpoint 2013
You’re using an older browser version. Update to the latest version of Google Chrome , Safari , Mozilla Firefox or Microsoft Edge for the best site experience. You are using an outdated browser, so there may be issues with displaying the page. To make the website work correctly, use the latest version of one of these browsers: Google Chrome , Safari , Mozilla Firefox or Microsoft Edge .
- Corporate Training
- Course Selling
- Academic Learning
- Learning Basics
- Instructional Design
- Online Training Tools
- Manufacturing
- Products iSpring Suite iSpring Learn
- Use Cases Training organizations Onboarding Compliance Training Induction Training Product Training Channel Partner Training Sales Training Microlearning Mobile Learning
- Company About Us Case Studies Customers Partnership Course Development Contact Us
- Knowledge Hub Knowledge Hub Academy Webinars Articles Guides Experts on iSpring
- Language EN English Français Deutsch Español Italiano Nederlands Português Polski 中文 日本語 العربية Indonesia
- Shopping Cart
How to Email a PowerPoint Presentation: 5 Proven Ways

content creator
Helen Colman See full bio →

After you’ve finished creating a PowerPoint presentation – assembling the content, perfecting the design, and adding animations and other special effects – you may want to email it to your students, employees, or clients. There are several ways to email PowerPoint slides, and the one you choose may depend on a few things: the file’s size, security concerns, and whether you want users to be able to edit the presentation. Let’s look at each of the 5 methods in detail.
1. Send as an Email Attachment
Sending a file as an email attachment is perhaps the first thing that comes to mind when there’s a need to email a PowerPoint presentation.
To do this:
- Save your completed PowerPoint presentation on your hard drive.
- Open your email program.
- Add recipients’ email addresses.
- Click on the attach button (usually represented by a paperclip icon), and navigate to the file on your hard drive.
- Once you’ve found the file on your computer, double-click on the file name or icon and it will upload to your email server.
- All that’s left to do is write the subject and body of your email and click Send .

This method is quick and easy, but:
- It would make the sender vulnerable to plagiarism, as the receiver could copy the content at will.
- Most popular email services cannot attach files greater than 25MB.
- PowerPoint files won’t open on Macs without an additional tool.
- Files created using newer versions of PowerPoint won’t open in older versions of the software.
2. Convert and Share Files in PowerPoint
PowerPoint comes with a host of built-in features to help facilitate the sharing of presentation files. You can send your presentation as an attachment, a link, a PDF file, an XPS file, or as an Internet Fax. To access these features, click File > Share > Email .

Under Email , select between the following options:
- Send as Attachment , to attach your slides to your email.
- Send a Link , to create an email with a link to your slideshow. But to use this option, you need to have access to a shared location, such as a SharePoint or OneDrive, and save your presentation there. (We’ll address this method in greater detail later in the article.)
- Send as PDF , to save your slides as a .pdf file, and then attach it to an email.
- Send as XPS (Microsoft’s alternative to PDF), to save your presentation as an .xps file and then attach it to an email message.
- Send as Internet Fax , to send your presentation as an Internet fax. For this option, you first need to sign up with a fax service provider.
3. Make It an HTML5 File
You can also convert a presentation that you want to share into an HTML5 file. In this way, your users will be able to open the slides in a browser and view them online. There are numerous advantages to this method:
- In presentations converted into the HTML5 format, all images and videos look the same as they do in the original and all PPT effects and transitions are preserved.
- HTML5 presentations work flawlessly in all operating systems and on all devices, and don’t require any software to open them. Users can view HTML5 slides right in their browsers.
- HTML5 slides are easy to upload to websites or Learning Management Systems .
- Your slides will be safe behind a wall of protections – watermarks, passwords, and time and domain restrictions. Users will only see your presentation when you allow them to.
- Presentations cannot be corrected by outside sources after conversion, meaning that copyrights will be protected.
You can turn your presentations into HTML5 format by using iSpring Converter Pro , which is shipped as a PowerPoint add-in. After installation, the iSpring tab will appear on your PowerPoint ribbon, so you can perform a conversion in a few clicks. Here’s how to do this:
- Download and install iSpring Converter Pro.
- Open a PowerPoint presentation.

- Click on Publish .

Start your free iSpring Converter Pro trial now →
4. Make It Into a Video
Another way to share your email presentation easily is to convert it into an MP4 file. This is an especially useful method if you want to share your ideas via video by uploading it to a platform like YouTube.
And this is where iSpring Converter Pro will fit nicely again. As with the HTML5 file, after conversion, a video will preserve all animations, effects, formatting, and audio embedded in the source files. iSpring lets you manage presentation specifics like video quality and size, as well as publication to YouTube from within the software itself.
To turn presentation into a video , perform the same steps we covered above but, when publishing, choose Video instead of HTML5.

Then you can click the Email button to send the output via email.

If you want to upload your video presentation to YouTube, go to the YouTube tab in the iSpring publishing window.

Log in to your YouTube account by clicking Sign In in the Account field, enter information about the video – title, description, and category in the relevant fields – and configure the settings if needed. Then, click the Publish button. After that, you can watch the published video in your YouTube account. The only thing you need to do now is email the link to the video to your users.
See a comprehensive guide on how to publish a PPT to YouTube →
5. Share via a Link
If converting a PPT file to another format is not what you want, but the presentation is too big to email as an attachment, you can always compress it into a .zip file before sending it. Or, instead of emailing the file directly, you can upload it to a file hosting service, like Google Drive or Dropbox, and share it by sending the link to recipients.
To compress large presentations into zip files:
- Right-click on the file in your computer.
- Choose Send to .
- Select the compressed (zipped) folder.
- Log in to your file hosting service and follow the steps required to upload a file and share it via a link. When recipients receive your email, they can click on your link and view the file online or download it to their computers and watch it using the PowerPoint slide show viewer.

Choose the handiest method from among these five for your line of work and presentation needs. Plus, consider the security of the method you use and decide how much control you would like to maintain over the intellectual property in the presentation.
Do you have any other ideas for sharing PowerPoint presentations? Tell us in the comments below!
Useful Resources on PowerPoint
Are you a PowerPoint lover? If so, here are some other helpful articles for you:
- How to Share a PowerPoint Presentation Online
- How to Protect PowerPoint Presentations
- How to Add Narration to a PowerPoint Presentation
- How to Add Youtube Video Into PowerPoint Presentation
- How to Structure a PowerPoint Presentation
- How to Convert PowerPoint Presentation to an eLearning Module
- How to Remove the Background From a Picture in PowerPoint
Table of Contents
iSpring Converter
Create online courses and assessments in record time.

Content creator
Helen Colman
She enjoys combining in-depth research with expert knowledge of the industry. If you have eLearning insights that you’d like to share, please get in touch .
You Might Also Like This
How to Create a Video Presentation in PowerPoint

The Top 10 PowerPoint (PPT) to MP4 Video Converters
How to Create a Quiz in PowerPoint
The Best Interactive Presentation Software and Tools in 2024

We use cookies to collect info about site visits and personalize your experience. See our Cookie Policy for more details.
Manage your cookies
Essential cookies are always on. You can turn off other cookies if you wish.
Essential cookies
Analytics cookies
Social media cookies
How to send a powerpoint that is too big in few simple clicks
We might often encounter to send some large PowerPoint files via any platform to be difficult to send, here are few possible solutions…
Create PPT using AI
Just Enter Topic, Youtube URL, PDF, or Text to get a beautiful PPT in seconds. Use the bulb for AI suggestions.
character count: 0 / 6000 (we can fetch data from google)
upload pdf, docx, .png
less than 2 min
Sanskar Tiwari
Founder at MagicSlides
How to group shapes in PowerPoint
30 April 2024
What do text boxes allow you to do in a PowerPoint Presentation?
How to use copilot in PowerPoint
29 April 2024
How to change master slide in PowerPoint
5 AI PowerPoint Generators Who Are Transforming Presentation Creation
How to flip a shape in PowerPoint?
26 April 2024
How to create flow chart in PowerPoint
How to remove all animations from PowerPoint
24 April 2024
How to change border color in PowerPoint
Stunning presentations in seconds with AI
Install MagicSlides app now and start creating beautiful presentations. It's free!

Get AI-Generated Presentations Ready in Seconds
Free AI PPT Tools
- Presentation
How to send a PowerPoint through email that is too big?

- February 27, 2022

If you are a user of the PowerPoint presentation, this blog post will be a big help for you. Imagine you just finished creating your PPT and want to email it. Too much content, animation, pictures, and other design elements for your PPT can result in a big presentation file at the end. PowerPoint too large to email is a real deal if you want to share your PowerPoint presentation design services via email to others. But how to send a PowerPoint through email that is too big? There are various methods for sharing big PowerPoint that are too large via email, and we are going to explore them in our article.

Table of Contents
How to send a large PowerPoint through email?
You can send your PowerPoint through email attachment; it’s almost the first way that will come into your mind to email presentation but you may ask why is my PowerPoint file so large and how to email a large PowerPoint via attachment.
Method 1 – Compress your PowerPoint file
You are able to compress PowerPoint file for email via the built-in feature of PowerPoint without losing much quality.
Step 1- Open your PowerPoint application at first.
Step 2- On the File tab, choose Save As
Step 3- You will see a dialog box after choosing Save As, click Tools and Compress Picture.
Step 4: In the opened dialog box, choose the Apply only to this current picture option and click on OK.
Step 5: To finalize the process, click on Save to save the compressed presentation.
Method 2 – Convert it to PDF
Another method is converting your presentation to PDF. PDF files are much smaller than PowerPoint files, in this case, you need to know how to convert PDF to PowerPoint and send a PowerPoint too large to email with this method.
Step 1: On your desktop, open your PowerPoint presentation file.
Step 2: Now on the File tab, click on the Export option.
Step 3: You should see the Export dialog box; now, choose Create PDF/XPS Document.
Step 4: To take the final step, click on Publish to create the PDF file of your presentation and email it.
Method 3 – Upload it to Cloud storage service
One of the recent and practical methods in how to send a PowerPoint that is too big , is using a cloud storage service. Just upload your PowerPoint file to a cloud storage service such as Google Drive, Dropbox or OneDrive and then share the link with others to whom you want to give them access to your file.

Method 4 – Use a file transfer service
There are many file transfer services to send your files with them. If you still have trouble with how to send a large PowerPoint through email , you can use file transfer services, which allow you to send your large PowerPoint presentation file to others so easily. Some notable transfer services are WeTransfer, Send Anywhere, and Smash.
Tips for sending large PowerPoint presentations through email
Before emailing your PPT file, check about the size limitations of your email account.
If you want to send your PowerPoint presentation to multiple recipients, use BCC (blind carbon copy) in your email to keep their addresses hidden.
Sometimes, you want to convert your PPSX to PPT and then share it with a group of people; in these situations, you should consider using an email list instead of sending individual emails.
Always double-check and test your PowerPoint presentation on your email account before sending it to others.
How do you send PPT as an email attachment?
The simplest way to email a PowerPoint presentation is to save it as a file and attach it to your email. In this method, recipients can download the PPT file on their own devices. To send a PowerPoint presentation as an attachment:
- Open the PowerPoint presentation that you want to send.
- Click File and then choose Save As.
- Under Save as type, select PowerPoint Presentation (*.pptx).
- Click Browse, choose a location for the presentation, and click Save.
- Open your email account and compose a new message.
- Click Attach and Attach File to add your file.
- Select the PowerPoint presentation you want to attach, then click Open.

Nowadays, you are required to have in-depth knowledge of send large PowerPoint presentation emails , so our guide provides everything needed to deliver the presentation to its intended recipients successfully. When a PowerPoint is too large to email , you need to compress images, save, and attach the file to an email. tips will help you confidently present your PowerPoint presentation and deliver your message quickly to your audience.
How can I reduce the ppt file size of an email?
You can compress a file on Windows by right-clicking it, selecting “Send To” and clicking “Compressed (zipped). It will appear in the exact same directory as the original compressed file. The compressed file will be smaller than the original.
How do you send a PowerPoint that is too big in Gmail?
can be used to send large files through Gmail by using cloud storage like Dropbox, OneDrive or WeTransfer. These services have more generous file limits and make sharing easier. These services allow you to upload a file and then send a simple link so that your recipient can retrieve it.

- Graphic Design , UI-UX
How to Become a Motion Graphic Designer?

A Brief Overview of Lean UX

UX Strategy and Its Components
you'r more than welcome
7 days a week, 9:30 AM – 5:30 PM
contact info
[email protected] +971581974748
- LB07129, Jebel Ali Freezone, Dubai, UAE
Got a Project?
We’re a team of creatives who are excited about unique ideas and help companies to create amazing identity by offering wide range of digital services
© 2021 All rights reserved.
Be the first one who knows about updates!
enter your email address 📩
Welcome to the club 🎉.
From now on, Temis will inform you of its most valuable content and offers. You can also subscribe to this list at the moment. We will also protect your privacy
How to Compress a PowerPoint Presentation

PowerPoint is an amazing audiovisual tool for presentations. It allows you to add images, graphs, videos, and pretty much everything you might need in order to craft the perfect complement. But precisely because of this, sometimes PowerPoint documents can end up taking a lot of space. So, how do you share your presentation when it’s just too big? Here you’ll learn how to easily compress a PowerPoint presentation to share it with whomever you want.

How to compress a PowerPoint presentation directly
Thankfully, PowerPoint has some compress options built into it, so learning how to compress a PowerPoint presentation is a very straightforward business. You have 2 main options.
1- How to compress images in a PowerPoint presentation
a. Select the image you want to compress. Once you do this, the Picture Format tab will appear at the end of your tools ribbon.

b. Select Compress Pictures

c. A new window will pop up. Now you just need to choose how much you want to compress your PowerPoint images accordingly to your needs:

Take into consideration that if you untick the Apply only for this picture option, all of the PowerPoint presentations images will be compressed. If you’re looking for how to compress a presentation will a lot of images, then this one is a great option for you.
2- How to compress a PowerPoint with a video
If your presentation has a video in it, chances are it’s a pretty big file! To compress your PowerPoint document just follow these steps:
a. Go to File > Info
b. Choose the Compress Media option. Just like with images, it will give you quality options, and pick the one that fits better your needs.

c. A new window will pop up to show you the compressing progress. Once it’s completed, it will also tell you how much space are you saving by compressing your PowerPoint media. Just click Close when the process is completed, and you can go back to work on your presentation.

Other options for sharing your presentations
However, if you compress a PowerPoint presentation you’ll probably lose some quality. The more you compress an image, the more quality it will lose. This is especially important to take into consideration if you’re planning to use a big projector, as it will make bad quality images pretty noticeable.
If compressing your PowerPoint presentation it’s just not doing it for you, of you don’t want to sacrifice some of its quality, here are some alternative options for sharing your files:
1- ZIP Files
A pretty straightforward way on how to compress a PowerPoint presentation is simply to use a ZIP File. ZIP files allow you to compress many documents into one directory. Windows 10 has built-in an option for file compressing. You just need to go to your File Explorer and right-click the PowerPoint presentation to compress. Select Send to > Compressed (zipped) folder . And that’s all!
If you’re not working with Windows 10, you can download a file archiver and compressor software, like WinZip or WinRAR (for earlier Windows versions). These will allow you to easily compress PowerPoint presentations, and pretty much everything else. There are many free compressors available, so it’s just a matter of finding the one that suits you the best.
Take into consideration that, when sending a compressed PowerPoint presentation in this way, the receiver must also have a compressor software, like the ones mentioned above. This will allow them to decompress the document and get access to it. It’s also important to know that ZIP Files might not compress a PowerPoint presentation enough for it to be sent by e-mail. It depends mainly on the size of the original file. Thankfully, there are other options for sharing your presentations!

2- Cloud Sharing
Cloud sharing is an excellent way to share files that are otherwise too big to send by e-mail. You don’t even need to know how to compress a PowerPoint to use this method. You just need to register in a cloud storage service, like Google Drive or Dropbox , and upload your presentation. Once it’s uploaded, you can send the link to whoever you want, and they will instantly gain access to it.
If it’s a particularly big document, you can even mix this option with the previous one. You can compress your PowerPoint presentation in a ZIP file, and upload the compressed version. This will make it easier and quicker for you to upload it, and for your receivers to download it.
3- PDF format
Converting your presentation to a PDF document is one of the easiest ways to compress your PowerPoint presentation in order to share it. It will immediately lower your file size and allow you to share it through all kinds of means, including e-mails.
However, one very important thing to take into account when using this method to compress a PowerPoint presentation is that you’re changing the file’s format. And this had both its ups and downs. For starters, this means that whoever receives it will not be able to access it as a PowerPoint presentation. Your slides will be converted to PDF pages, and while images and graphs will likely remain, any videos or voice notes in your presentation will not be added in the converted document.
But this also has an ad additional advantage. This means the receiver will not be able to edit it. If you’re sending a PowerPoint presentation and you don’t want it altered or copied in any way, sending it as a PDF file is a good option. It all depends on what you’re looking for!

Hopefully, you have now learned how to compress your PowerPoint presentations. Now you can share them with whomever you like, whether it is team members, coworkers, or your audience. Good luck!
Create professional presentations online
Other people also read

Tutorial: Save your PowerPoint as a Video
How To Convert Google Slides To PowerPoint and Vice Versa

How To Add Animations To PowerPoint
Byte Bite Bit
How to Send a PowerPoint Through Email That Is Too Big: Effective Solutions
Emailing an oversized PowerPoint presentation can be a real headache, especially when you’re racing against the clock to meet a deadline. We’ve all been there—perfecting your slides, only to find out they’re too big to send. The solution lies in a few clever tweaks and some handy tools that can make your file manageable.

One trick is to compress the PowerPoint file . This can significantly shrink its size and allow it to slip through email attachment limits. Compressing files is as easy as right-clicking the PowerPoint file, selecting “Send to,” and then choosing “Compressed (zipped) folder.” It feels almost magical how it condenses without compromising much quality!
Another lifesaver is using cloud storage services like Google Drive or Dropbox. You can upload your hefty presentation and share the link instead of the entire file. This not only bypasses email size limits but also adds a layer of security. Simply upload the file, generate a shareable link, and drop it into your email. It’s that simple and ensures your content reaches its destination without a hitch.
- 1.1 Compressing Files
- 1.2 Choosing the Right Format
- 1.3 Managing Email Size Limits
- 2.1 Using Cloud Services
- 2.2 Sharing Options and Permissions
- 3.1 Reducing File Size of Multimedia
- 3.2 Mastering PowerPoint Tools
- 4 Conclusion
Optimizing Email Attachments
When sending large PowerPoint presentations via email, optimizing the attachment process can help ensure your file reaches its recipient without a hitch. We’ll cover compressing files, choosing the best format, and managing email size limitations.
Compressing Files
Compressing files is a straightforward method to shrink your PowerPoint presentation. By reducing the file size, you can often bypass email size restrictions.
To start, right-click the PowerPoint file and select ‘Send to’ > ‘Compressed (zipped) folder’. This creates a ZIP file, which takes up less space.
For images and media within your presentation, consider compressing them as well. In PowerPoint, you can use the ‘Compress Pictures’ tool to reduce image resolution, which saves more space.
Remember, while file compression helps, its effectiveness varies. Larger multimedia components, like videos and audio, may not compress as significantly. In such cases, further adjustments might be needed.
Choosing the Right Format
Sometimes the format you choose for your presentation impacts its size. PowerPoint tends to create large files, especially with heavy multimedia use. Converting the PPT file to a PDF or XPS might reduce its size if high interactivity isn’t essential.
For instance:
- PDF : Maintains good quality and is universally accessible.
- XPS : Offers a lightweight alternative, particularly for text-heavy content.
Both of these formats often result in smaller file sizes while preserving most of your content’s integrity. Just remember, format conversion strips away any live animations or interactive features present in your original PowerPoint.
Managing Email Size Limits
Email providers, like Gmail and Outlook, impose specific file size limits. Gmail typically allows email attachments up to 25 MB, while Outlook has a 20 MB limit.
To tackle these restrictions:
Use cloud storage services : Upload your presentation to OneDrive, Google Drive, or Dropbox. Then, share a link instead of attaching the file directly.
Break down your presentation : Split the presentation into smaller sections and send multiple emails.
Compress images and media : As mentioned, reducing the size of images and removing unnecessary media can make a significant difference.
Although these tips require a bit of extra effort, they can be effective in sending your large PowerPoint presentation without hassle.
By applying these strategies, we can optimize our email attachments and ensure our PowerPoint presentations reach their destination, no matter their size.
Cloud Storage and File Sharing
Using cloud storage services can streamline the process of sending PowerPoint files that are too large for standard email attachments. Employing these methods ensures that your recipient can access your presentation without issues.
Using Cloud Services
Cloud storage services like Google Drive , Dropbox , and OneDrive are excellent for sharing large PowerPoint files. Upload the presentation to your preferred service and, once uploaded, the service will generate a shareable link . This link can then be shared with your email recipient, allowing them to view or download the file.
For example, with Google Drive , after uploading the file, you can right-click and select “Share.” You can adjust permissions to control who can view or edit. This is particularly useful for ensuring the right people have the correct level of access.
Other services like WeTransfer and Smash also allow you to send large files directly by email without requiring account sign-ups. They generate a temporary link that expires after a set period. Whether you opt for Google Drive or WeTransfer, both provide reliable ways to bypass email attachment limits.
Sharing Options and Permissions
When you’re setting up file sharing, permissions are crucial. Depending on the sensitivity of the PowerPoint presentation, it may be necessary to restrict who can view, edit, or download the file. Services like Dropbox and OneDrive allow you to set these permissions during the sharing process.
For example, you might send a view-only link if the recipient only needs to look at the presentation. Alternatively, an editable link might be suitable if you require collaborative input from coworkers. Password protection can add an extra layer of security to ensure that only the intended recipients can access the file.
Ensuring your link is secure can help prevent unauthorized access. Some cloud services also offer internet fax capabilities, where you can send documents via fax through your email or cloud service provider. This can be useful if you need to send a presentation to a recipient who prefers fax over email.
Regularly reviewing and updating these permissions can help maintain the security and integrity of your shared documents.
Enhancing Presentations for Email
Sending large PowerPoint presentations via email can be challenging. We need to reduce the file size of multimedia and master PowerPoint tools to make this task easier.
Reducing File Size of Multimedia
Shrinking file sizes starts with handling multimedia elements like images, videos, and audio. For images, using PowerPoint’s Compress Pictures tool is crucial. Navigate to File > Compress Pictures , select the desired resolution, and apply changes to all pictures.
Videos can quickly bloat file sizes. Instead of embedding high-resolution videos directly, compress these files or use lower resolutions. External links to videos hosted on platforms like Microsoft 365’s OneDrive can also be effective.
Mastering PowerPoint Tools
PowerPoint offers tools that make presentations more email-friendly. Under File > Save As , choose PDF to dramatically reduce file size while maintaining a professional look. It’s a great way to ensure recipients view presentations as intended, even if they don’t have PowerPoint.
Using features from PowerPoint 2021, 2019, and 2016 such as adjusting animations and transitions can also help. Simplify or remove these elements to cut down on unnecessary data. Avoid embedding fonts, which can add bulk; instead, use standard fonts available on most systems.
By strategically using these tools, we enhance the email compatibility of our presentations.
Sending a large PowerPoint via email can be challenging, but we have several reliable solutions.
First up, compressing the file. Simply right-click on your PowerPoint, hit ‘Send to’, and choose ‘Compressed (zipped) folder’. This can shrink your file size remarkably.
Next, consider converting the PowerPoint to a PDF. PDFs are often smaller and can preserve the layout well. This works like a charm.
Another route is cloud storage . Platforms like Dropbox, Google Drive, or OneDrive allow us to upload and share the presentation via a simple link. No size worries here. 🎈
A clever option is file transfer services . Tools like WeTransfer or FileZilla can handle even massive files. Perfect for when other methods fail.
Students and professionals often need these techniques. Students sharing projects or professionals sending client pitches, we’ve all been there. These approaches can help our work reach its destination, hassle-free.
Here’s a quick summary of key methods:
| Built-in file explorer | Easy to use | |
| Adobe Acrobat, online converters | Reduces size, preserves layout | |
| Google Drive, Dropbox | Shareable link, no size limit | |
| WeTransfer, FileZilla | Handles large files easily |
Deploying these methods ensures our presentations reach recipients without any hiccups. No more “attachment too large” error messages! 🙌
Related posts:
- How to Record a PowerPoint Presentation: Step-by-Step Guide for Professionals
- How to Crop a Picture into a Circle in PowerPoint: A Step-by-Step Guide
- How to Print PowerPoint with Notes: A Step-by-Step Guide
- How to Convert PowerPoint to PDF: A Step-by-Step Guide
- How to Change Slide Size in PowerPoint: A Step-by-Step Guide
- How to Save a PowerPoint as a Video for Smooth Presentations
- How to Change Font on All Slides in PowerPoint: A Step-by-Step Guide
- How to Save a PowerPoint as a Video: Step-by-Step Guide
- Where is Word Art in PowerPoint: Quick Guide for Users
- How to Rotate Ruler in PowerPoint: Step-by-Step Guide
- How to Blur an Image in PowerPoint: A Step-by-Step Guide
- How to Add Footer in PowerPoint for Professional Presentations
Leave a Comment Cancel reply
Save my name, email, and website in this browser for the next time I comment.
Blog > Compress PowerPoint to reduce the file size
Compress PowerPoint to reduce the file size
02.12.20 • #powerpointtips.
Sometimes, the file size of your PowerPoint presentation can get very big. In some cases, that can be annoying, e.g. when trying to send the slides via email, but not being able to do so because the file is too large. Usually, pictures and videos are the reason why presentations become too big. The good news are that you can easily compress pictures and embedded media files by following the steps listed below.
Compress images
Compress videos and audios.
- Convert PPT into a PDF file
- Get rid of 3D-models
Compress PPT as ZIP- file
PowerPoint offers the option to compress all images at once or choose single pictures to reduce their file size. Keep in mind, that compressing an image will automatically reduce its quality as well. If you don't need to reduce the file size, better use the highest quality resolution as possible.
There are two ways to compress images within your PPT file which nearly work the same way:
Compress selected pictures
- Select the image you want to compress or any picture if you wish to reduce the size of all graphics
- Navigate to the Picture Tools Format tab and select Compress Pictures

- A new menu pops up. Choose your compression options and make sure to check "Delete cropped areas of pictures" and uncheck "Apply only to this picture" (if you want to compress all images)
- High fidelity: preserves quality of the original picture
- HD (330 ppi): good quality for high-definition (HD) displays
- Print (220 ppi): excellent quality on most printers and screens
- Web (150 ppi): good for web pages and projectors
- E-mail (96 ppi): minimize document size for sharing
- Use default resolution
Compress all images while saving the PPT file
- Open your presentation. Go to File in the PowerPoint menu
- Click Save as and then Browse
- In the window that opens, click on Tools (right beside Save )
- Select Compress Pictures and choose the resolution you need To save even more space, you can additionally choose Delete cropped areas of pictures to remove the parts of pictures which you cropped in PowerPoint.
- Click OK and then Save

Video and audio files can increase your PPT size a lot. It's a good idea to compress those if you want to make some space. Some PowerPoint versions make it possible to decrease the media size in PPT but if this option is missing in your program, online video compressors are the solution.
Compress videos and audios in PPT
- Go to File in the PowerPoint menu
- Open the Compress media drop down
- Choose a compression file size. Don't reduce the quality too much and check if the appearance of your media doesn't look too grainy on the actual projector you will be presenting on

Online video compressor
There are plenty of online video compressors which you can use to reduce the video size in advance. For example, the website FreeConvert makes it easy to decrease the file size without having to download anything. This way you can integrate a smaller media file into PPT.

Links instead of videos
Instead of importing a video to your PPT slides, including a link to your PowerPoint presentation can save a lot of space. If your video is somewhere on YouTube or other online video-sharing platforms, include a link and use it when you're presenting. But notice: a link can only be used, if you're connected with wifi. Watching videos online, can take time and a bad connection might give you some unwanted breaks during your presentation. In this case, saving the video on your disk and opening it separately can save time and still reduce the size of the PPT.

Convert PPT to PDF
By converting a PowerPoint file into a PDF, the size will reduce automatically. During the process, images get compressed and some media (audio, videos, 3D models..) get removed. If you want to change the PowerPoint slides at all time, this method might not be the right one for you, as PDF files can't get edited the way a PowerPoint can. Hence, converting PPT into PDF only makes sense if your presentation will work as a handout and if the PDF files options are enough for you.
- Click Export
- Hit the Create PDF/XPS button
- Choose a location in which you want to save your PDF file
- Click Publish

Get rid of 3D models
The Office 365 subscription makes it possible to add 3D models to your PowerPoint slides. Nevertheless, those media require much space since they transport a lot of information. In order to minimize the PPT file, exchanging the 3D model with a normal image will easily reduce the size of your PowerPoint file.

If you need to share your PPT with someone, a ZIP- file format might help you to reduce the size of the PowerPoint. Even though, this method can save some place temporally, it might not be enough to send it via email. Uploading it to file-sharing platforms, such as GoogleDrive, DropBox, OneDrive or other websites and sharing its link to download the PPT, can be the better option. (Using an USB for sharing the presentation without the need to decompress anything would be the best solution)

Here's how to convert a PPT into a ZIP- file format:
- Select the file you want to minimize in the File Explorer
- Right-Click the file and hit Send to
- Choose the Compressed (zipped) folder option

If you want to decompress a ZIP- file into its original PowerPoint format:
- Right-Click on your ZIP- folder
- Select Extract All... or the similar operation of your program
- Choose a File Location to extract your file to, or extract it at the place you are currently at

How can I reduce the size of a PowerPoint file?
There are several ways to reduce the file size of a PowerPoint. You can compress images, videos and audios, convert your presentation into a PDF file, get rid of 3D models or compress the PowerPoint as a ZIP-file. We explained for you how all of this works in our blog.
How do I compress a video in PowerPoint?
To compress videos in PowerPoint, go to "File" in the PowerPoint menu and then click on "Info". Then open the drop-down menu "Compress media" and select the size of the compression file. Be careful not to reduce the quality too much and check that the quality of your video on the projector you will be presenting on is not too bad.
Related articles
About the author.

Pia Lehner-Mittermaier
Pia works in Marketing as a graphic designer and writer at SlideLizard. She uses her vivid imagination and creativity to produce good content.

Get 1 Month for free!
Do you want to make your presentations more interactive.
With SlideLizard you can engage your audience with live polls, questions and feedback . Directly within your PowerPoint Presentation. Learn more
Top blog articles More posts

Multilingual Polls, Quiz Ranking & Open Text Polls: SlideLizard 2.3 Update

Embed poll results, Quizzes & Attendee notes: SlideLizard 2.0 Update

Get started with Live Polls, Q&A and slides
for your PowerPoint Presentations
The big SlideLizard presentation glossary
Face-to-face.
If you are talking to someone face-to-face you are directly facing each other.
Animated GIF
An animated GIF enables images to be played in a specific order. It is created when several individual images are saved in a GIF file.
Vertical Communication
Vertical communication means that information is passed from one person to the next according to a linear system based on their titles. This type of communication is used when a company follows a hierarchical structure or for important, sensitive information.
Manuscript Speech
For a manuscript speech, the speaker has an entire manuscript to read from. The benefit is that, as every single word is scripted, no important parts will be missed. However, speeches that are fully written down often seem unnatural and may bore the audience.
Be the first to know!
The latest SlideLizard news, articles, and resources, sent straight to your inbox.
- or follow us on -
We use cookies to personalize content and analyze traffic to our website. You can choose to accept only cookies that are necessary for the website to function or to also allow tracking cookies. For more information, please see our privacy policy .
Cookie Settings
Necessary cookies are required for the proper functioning of the website. These cookies ensure basic functionalities and security features of the website.
Analytical cookies are used to understand how visitors interact with the website. These cookies help provide information about the number of visitors, etc.
- PRO Courses Guides New Tech Help Pro Expert Videos About wikiHow Pro Upgrade Sign In
- EDIT Edit this Article
- EXPLORE Tech Help Pro About Us Random Article Quizzes Request a New Article Community Dashboard This Or That Game Happiness Hub Popular Categories Arts and Entertainment Artwork Books Movies Computers and Electronics Computers Phone Skills Technology Hacks Health Men's Health Mental Health Women's Health Relationships Dating Love Relationship Issues Hobbies and Crafts Crafts Drawing Games Education & Communication Communication Skills Personal Development Studying Personal Care and Style Fashion Hair Care Personal Hygiene Youth Personal Care School Stuff Dating All Categories Arts and Entertainment Finance and Business Home and Garden Relationship Quizzes Cars & Other Vehicles Food and Entertaining Personal Care and Style Sports and Fitness Computers and Electronics Health Pets and Animals Travel Education & Communication Hobbies and Crafts Philosophy and Religion Work World Family Life Holidays and Traditions Relationships Youth
- Browse Articles
- Learn Something New
- Quizzes Hot
- Happiness Hub
- This Or That Game
- Train Your Brain
- Explore More
- Support wikiHow
- About wikiHow
- Log in / Sign up
- Computers and Electronics
- Presentation Software
How to Reduce Powerpoint File Size
Last Updated: March 29, 2022
This article was co-authored by wikiHow staff writer, Jack Lloyd . Jack Lloyd is a Technology Writer and Editor for wikiHow. He has over two years of experience writing and editing technology-related articles. He is technology enthusiast and an English teacher. This article has been viewed 980,895 times. Learn more...
This wikiHow teaches you how to lower a PowerPoint presentation file's size by compressing its images on a Windows or Mac computer, or by clearing the editing data on a Windows computer. There is currently no option to delete the editing data of PowerPoint presentations on a Mac.
Compressing Images on Windows

- If your PowerPoint file isn't yet open, first open it by double-clicking it.
- It doesn't matter which picture you double-click, since all of them will open the appropriate tab.

Compressing Images on Mac

Removing Edit Data on Windows

Expert Q&A
- Using JPEG files rather than other file formats will cut down on your presentation's overall size. Thanks Helpful 0 Not Helpful 0
- When formulating a presentation, using the default plain backgrounds in your slides will make your file smaller than if you upload detailed backgrounds. Thanks Helpful 0 Not Helpful 0
- If you can't get your PowerPoint file to shrink down enough to send it via email, you can upload it to a cloud service (e.g., Google Drive) and send an email with a link to the file instead. Your recipient will be able to download the file from Google Drive. Thanks Helpful 0 Not Helpful 0

- Reducing your images' quality will make a noticeable difference in your PowerPoint's overall quality. Thanks Helpful 1 Not Helpful 1
You Might Also Like

- ↑ https://support.office.com/en-us/article/Reduce-your-file-size-631d1d48-a56b-4fd4-ad66-091dd201db10?ui=en-US&rs=en-US&ad=US&fromAR=1#bmpp
- ↑ http://www.isumsoft.com/it/reduce-powerpoint-file-size-in-office-2016/
About This Article

1. Double-click an image. 2. Click Compress Pictures . 3. Remove the check mark from “Apply only to this picture.” 4. Select a lower DPI. 5. Click OK . 6. Click File . 7. Click Options . 8. Click Advanced . 9. Click Discard editing data . 10. Click OK and save the file. Did this summary help you? Yes No
- Send fan mail to authors
Is this article up to date?

Featured Articles

Trending Articles

Watch Articles

- Terms of Use
- Privacy Policy
- Do Not Sell or Share My Info
- Not Selling Info
wikiHow Tech Help Pro:
Level up your tech skills and stay ahead of the curve

10 Ways to Compress PowerPoint Presentations to Reduce File Size

10 Strategies to Compress or Reduce the Size of Large PowerPoint Presentations
by Avantix Learning Team | Updated September 11, 2024
Applies to: Microsoft ® PowerPoint ® 2016, 2019, 2021 and 365 (Windows)
You can compress or reduce the size of large PowerPoint presentations in several ways. The most common strategy to reduce the size of a PowerPoint file is to compress pictures, video and audio. However, you can also use other methods to make files smaller including saving media and PowerPoint files in other formats and converting or removing embedded objects.
In this article, we'll look at 10 ways to compress or reduce the size of a PowerPoint presentation:
- Compress pictures
- Insert pictures instead of copying and pasting
- Use smaller image files
- Convert images to a different file type
- Save a copy of images with artistic effects
- Compress audio and video
- Link to audio or video files
- Convert Excel charts and other embedded objects
- Save a copy of large PowerPoint files
- Save a copy in PDF format
Note: Buttons and Ribbon tabs may display in a different way (with or without text) depending on your version of PowerPoint, the size of your screen and your Control Panel settings. For PowerPoint 365 users, Ribbon tabs may appear with different names. For example, the Picture Tools Format tab may appear as Picture Format.
To view file size in PowerPoint:
- Click the File tab in the Ribbon.
- Click Info. In the Properties area, file size is listed beside Size.

Once you've completed the following strategies, close and save the PowerPoint file, reopen it and check the file size again. You can also view file size in Windows 10 File Explorer or Windows Explorer in older versions of Windows.
Recommended article : How to Embed a YouTube Video in PowerPoint
Do you want to learn more about PowerPoint? Check out our virtual classroom or live classroom PowerPoint courses >
1. Compress pictures
One of the most common ways to reduce file size is to compress one or all of the pictures in your PowerPoint file. You may want to try this with one picture at a time to be sure you are satisfied with the result after compression.
To compress a picture:
- In Normal View, select a picture on image on a slide.
- Click the Picture Tools Format or Format Picture tab in the Ribbon.
- In the Adjust group, click Compress Pictures. A dialog box appears.
- Select the check box to Apply only to this picture if you want to compress only the current picture or uncheck this option if you wish to compress all pictures in the presentation.
- Select the check box to Delete cropped areas of pictures if you have cropped images and want to permanently delete the areas you have removed by cropping.
- Choose the desired document resolution.

Don't forget to check pictures in Slide Master View (click the View tab in the Ribbon and then click Slide Master) as you may want to compress or delete those images as well.
Also, be sure to check image(s) after you compress them to be sure to are satisfied with the quality of the image(s). If you create a copy of the presentation before compressing the image(s), you can revert to the original if necessary.
2. Insert pictures instead of copying and pasting
It's best to insert pictures, rather than copying and pasting (or dragging and dropping) into the PowerPoint file. When you copy and paste (or drag and drop) an image into a presentation, it can lose compression, change file type and also bring in other data that can increase file size.
To insert a picture onto a PowerPoint slide:
- In Normal View, display the slide where you want to insert a picture.
- Click the Insert tab in the Ribbon and click Pictures (2013 and later versions) or Picture (2010). You can also click the Pictures or Picture icon in a placeholder on a slide. A dialog box appears.
- Navigate to the location of the picture.
- Select the picture and click Insert or double-click the picture.
You also have the option of linking to a picture file by clicking the arrow beside Insert in the Insert Picture dialog box and then choosing Link to File. However, the picture is not actually "in" the file (which reduces file size) and if you email the document, the pictures will not be included. If you use this strategy, it's best to copy the picture to the same folder as the PowerPoint presentation and be sure to bring the entire folder with you when you deliver the presentation.
3. Use smaller image files
It's best to insert pictures in smaller sizes to reduce the size of your PowerPoint files. For example, if you are inserting pictures from a phone taken at a high resolution, this will result in larger PowerPoint decks. Create, save or send images at a lower resolution and insert the lower resolution images into your PowerPoint files.
If you're using stock images, select images at the lowest resolution (at the quality level you require). You can also open an image in an image editing program (such as Microsoft Picture Manager or Adobe Photoshop) and then save it at a lower resolution.
In PowerPoint 365, one of the biggest culprits causing inflated file size is 3D models. Although 3D models are not inserted as pictures but rather as 3D models, they are images. One 3D model we inserted took up 17 MB of space. You can't compress 3D models like other types of images so you may need to delete 3D models or use a picture instead of a 3D model if file size is an issue.
4. Convert images to a different file type
Prior to inserting an image in PowerPoint, you can open it in an image editing program (such as Microsoft Picture Manager or Adobe Photoshop) and then use Save As to save the image in another format.
The format that will result in the smallest size is usually JPEG (Joint Photographic Experts Group format) or JPG. The JPEG compression algorithm significantly reduces the file size of images.
You can also save images in PowerPoint in different formats:
- Right-click the picture. A drop-down menu appears.
- Select Save As Picture. A dialog box appears.
- Navigate to the folder where you want to save the image.
- Enter a name for the file and select a format such as JPG or PNG.
- Click Save.
- In the PowerPoint presentation, delete the original image.
- Click Insert and then click Picture(s).
- Navigate to the location with the image you saved.
- Double-click the image.
5. Save a copy of images with artistic effects
When you apply an artistic effect to an image, PowerPoint retains two copies of the image (the original and a copy with the artistic effects). This allows the user to reset the image but can significantly increase file size. Compressing pictures also doesn't normally have any effect on images where you have applied artistic effects.
If you have applied an artistic effect (such as blur) to an image, you can reduce file size using the following method:
- Right-click the image with the artistic effect. A drop-down menu appears.
- Enter a name and select a file type (usually JPG or PNG).
- In the PowerPoint presentation, delete the image with the artistic effect.
- Navigate to the location with the image you saved with the artistic effect.
6. Compress audio and video
In 2010 and later versions of PowerPoint, audio and video files are copied into presentations rather than linked to the original files. You can improve playback performance and reduce PowerPoint file size by compressing audio and video files in your presentation.
Files can be compressed at different quality levels.
In PowerPoint 2013 and 2016, you can compress to the following quality levels:
- Presentation Quality – select this option to save space but maintain overall audio and video quality.
- Internet Quality – select this option and quality will be comparable to media which is streamed over the web.
- Low Quality – select this option if space is limited, such as when you are sending presentations via e-mail.

In PowerPoint 2019 and 365, you can compress to the following quality levels:
- Full HD (1080p) – select this option to save space while maintaining overall audio and video quality.
- HD (720p) – select this option to save space and the quality will be comparable to media which is streamed over the Internet.
- Standard (480p) – select this option when space is limited, such as when you are sending presentations via e-mail.
The following compression options appear in PowerPoint 2019 or 365:

Note: Some older video file formats may not compress or export properly. Embedded subtitles and alternate audio tracks will be lost in the compression process.
To compress media in PowerPoint:
- Open the presentation that contains the audio or video files you want to compress.
- Save a copy of the presentation so you can retain a copy of the file with the original media.
- In the copy, click the File tab in the Ribbon.
- Click Info.
- In the Media Size and Performance area, click Compress Media. A dialog box appears.
- Select the desired compression option. A dialog box appears indicating that media compression is in progress. PowerPoint will indicate how much space is saved.
- When compression is complete, click Close.

7. Link to audio or video files
You also have the option of linking to audio or video files. When you insert an audio or video file, click the arrow beside Insert in the Insert dialog box and then choose Link to File. Linked audio or video is not actually "in" the presentation (which reduces file size) and if you email the presentation, the media files will not be included if you have linked to audio or video files. Linking was the default behavior in PowerPoint 2007 and earlier versions for video and larger audio files.
If you choose to link to audio or video files, t's best to copy the media files to the same folder as the PowerPoint presentation and be sure to bring the entire folder with you when you deliver the presentation.
Note: You cannot apply certain types of formatting to linked video files.
8. Convert Excel charts and other embedded objects
Embedded objects such as Excel charts or worksheets can also increase file size. If you convert embedded objects to images, it can impact the size or your presentation. You can also reduce file size by breaking links to Excel files.
If you want to convert embedded objects into pictures, you can ungroup them or cut and paste them back into PowerPoint.
To ungroup an object:
- Select the chart or embedded object.
- Click the Format tab in the Ribbon. This tab may appear as Drawing Tools Format, Drawing Format or Shape Format.
- Select Group and then Ungroup. A dialog box appears asking if you want to convert the object to a PowerPoint object.
To cut an object and paste it back into a presentation as a picture:
- Select the embedded chart or object.
- Press Ctrl + X to cut it.
- Click the Home tab in the Ribbon.
- Click the arrow below Paste to display the drop-down menu and then choose Paste Special.
- Select an image type (such as JPEG) and click OK.

If you have links to Excel files, you can reduce file size using Edit Links to Files. Check out How to Break, Update or Change Links to Excel Charts or Worksheets in PowerPoint for more information on how to break links.
9. Save a copy of large PowerPoint files
It's a good idea to save a copy of a large PowerPoint files periodically using Save As and give the file a different name (i.e. Sales Presentation and the date). If you save a copy using Save As, version history and some editing data is removed during the process and this will reduce file size. This can also help avoid corrupted files.
To save a copy of a PowerPoint presentation:
- Choose Save As. If necessary, click Options or More Options. A dialog box appears.
- Navigate to the desired location.
- Enter a new name for the presentation.
10. Save a copy in PDF format
It's also common to save a copy of a presentation as a PDF (portable document format) file to reduce the size and then share it with others. You can compress images during the process.
To save a PowerPoint presentation as a PDF (and compress images):
- Choose Save As and then click Options or More Options if necessary. A dialog box appears.
- Navigate to the desired location and enter a name for the file. You can use the same name since the extension will be different (PDF).
- Under File Type, select PDF.
- Click Tools on the bottom right of the dialog box. A drop-down menu appears.
- Select Compress Pictures. A dialog box appears.
- Click the desired compression option.
Large file size is a common problem in PowerPoint and you can use these strategies to reduce the size of your PowerPoint presentations. Compressing the size of your decks should also help to improve speed and avoid crashes.
This article was originally published on November 6, 2016 and has been updated for clarity and content.
Subscribe to get more articles like this one
Did you find this article helpful? If you would like to receive new articles, JOIN our email list.
More resources
How to Change Slide Size in PowerPoint
How to Get Slide Design Ideas Using PowerPoint Designer
How to Morph in PowerPoint to Design Engaging Presentations
How to Break, Update or Change Links to Excel Charts or Worksheets in PowerPoint
Where to Find Free Images for Your PowerPoint Presentations (10 Great Stock Photo Sites)
Related courses
Microsoft PowerPoint: Introduction
Microsoft PowerPoint: Intermediate / Advanced
Microsoft PowerPoint: Design for Non-Designers
Microsoft PowerPoint: Accessible PowerPoint Presentations
Microsoft PowerPoint: Animations Bootcamp
VIEW MORE COURSES >
To request this page in an alternate format, contact us.
Our instructor-led courses are delivered in virtual classroom format or at our downtown Toronto location at 18 King Street East, Suite 1400, Toronto, Ontario, Canada (some in-person classroom courses may also be delivered at an alternate downtown Toronto location). Contact us at [email protected] if you'd like to arrange custom instructor-led virtual classroom or onsite training on a date that's convenient for you.
Copyright 2024 Avantix ® Learning
You may also like

How to Insert or Type E with an Accent Mark in PowerPoint (È, É, Ê, Ë, è, é, ê, or ë)
You can insert or type e with an accent mark in PowerPoint using built-in tools or keyboard shortcuts (including Alt code shortcuts). The letter e can be inserted with an accent in both upper or lower case in text boxes or placeholders on slides, the slide master or layouts. The following are common accents in upper or lower case – È, É, Ê, Ë, è, é, ê, or ë.

How to Fade a Picture or Part of a Picture in PowerPoint (Using a Gradient)
You can fade a picture in PowerPoint by drawing a rectangle shape on top of the picture and then filling the rectangle with a gradient from opaque to transparent. This technique is often used to fade an image into the background of a slide. Since the rectangle is placed on top of the image and then text may be placed on top of the rectangle, you may need to reorder the objects.

How to Lock an Image, Shape or Other Object in PowerPoint
You can now lock an image, shape or other object in PowerPoint. Objects can be locked in Normal View or Slide Master View. Only PowerPoint 365 users can lock objects to prevent moving and resizing. This is helpful if you want to select and move other objects on the slide or prevent others from moving or resizing an object. You can lock items using the context menu or the Selection Pane.
Microsoft, the Microsoft logo, Microsoft Office and related Microsoft applications and logos are registered trademarks of Microsoft Corporation in Canada, US and other countries. All other trademarks are the property of the registered owners.
Avantix Learning |18 King Street East, Suite 1400, Toronto, Ontario, Canada M5C 1C4 | Contact us at [email protected]
Our Courses
Avantix Learning courses are offered online in virtual classroom format or as in-person classroom training. Our hands-on, instructor-led courses are available both as public scheduled courses or on demand as a custom training solution.
All Avantix Learning courses include a comprehensive course manual including tips, tricks and shortcuts as well as sample and exercise files.
VIEW COURSES >
Contact us at [email protected] for more information about any of our courses or to arrange custom training.
Privacy Overview
Pin it on pinterest.
- Print Friendly
How to send a large powerpoint through email?

Your ppt is too large to be sent by mail? In a few seconds, upload it with Smash and send a download link to your recipient, for free.
See plans & features →
IN THIS GUIDE, YOU’RE GOING TO READ THE 4 OPTIONS TO SEND A LARGE POWERPOINT BY EMAIL:
2. Send as PDF
3. Compress or ZIP the File
4. Send a Link to the File in the Cloud
PowerPoint files often start out simple: a little text, a couple of images, and a little animation.
But they get out of control just as often. You opt for high quality images and only crop them within the deck, you add some video, you add a little audio and suddenly your simple PowerPoint presentation is a monster. Sure, it looks amazing, but how can you share a large file like that with your team? Most email services won’t let you send a large file through email , so how do you get it where it needs to be?
Here are the four best ways to email a large PowerPoint file.
1. Send your big powerpoint with an online file transfer service like Smash

If you are looking for a way to email a large PPT file that is free, easy, fast, secure, and reliable, then Smash is your best bet (and clearly the best alternative to WeTransfer , too!).
The Smash file transfer service lets you upload your PowerPoint deck rapidly – here’s how:
Go to the Smash website
Click on the icon in the center of the page and select your file from the desktop
Enter your email address and click Get a Link
o You can also customize the link, password protect the file, and give it a title, too, if you like
Copy the link and send it on to your recipient
When the link arrives, they will only have to click on the link and download the files through the transfer link. File storage costs are saved for both sender and recipient, as neither will store the files on their email server.
There are no limits on the size of the file you are sending, and it is uploaded to a geographically close server so uploads and downloads are optimized. Finally, because you are sending the actual PPT file, you are going to be able to maintain all those transitions and animations you probably spent too long adding to the presentation late last night.
Smash is available on any browser, via dedicated iOS and Android apps for sharing a link to a deck on the go, and via an application for MacOS, too.
Since recently, Smash lets you send files of any size by email, without leaving Outlook, thanks to their Smash add-in for Outlook . No more attachments sizes restrictions!
There’s even an API for developers charged with making sure teams can share their PPT presentations easily via integrated workflows.
2. Convert your heavy PPT and send it as PDF

Microsoft makes it easy to export your PowerPoint presentation to different formats. Some of those, such as video formats, won’t necessarily help you get that file size down to something that an email service is going to be happy to attach for you. But exporting your presentation to a PDF? That can work.
To export as a PDF simply:
Click the File menu
Select Export As or Save As
Choose the PDF export option , a name for your file , and click export/save
There are a couple of downsides, though. For one, exporting to a PDF means losing all the action elements on your slides. Transitions, animations, and audio or video elements are all going to go missing once you export to a static file format like PDF. For another, if you export only the slides then you are going to miss out on the notes you’ve made to help to present the deck – and while you can export to PDF with notes, too, this can look far from enticing.
Maybe worst of all, though, all those high-quality images don’t necessarily make for small PDF exports, and you may have to run a filter on your export to get it down to something you can email with ease. When you reduce the quality of a file, then reduce that quality again , this can lead to low quality outcomes for your files – hardly the best look when you are trying to impress.
3. Compress your Powerpoint file

When a file is too big to email a lot of people will tell you to “zip it”. No, they aren’t being rude or telling you to shut up; instead, they are encouraging you to compress your file with the goal of getting it to be small enough to attach to an email. To get it done, follow these steps:
Select the file or files that you want to compress on your desktop
a. right click and select compress
b. drag and drop the selected files into your compression app, then hit compress/zip
3. Attach the compressed archive to your email or drop it into your instant message
Compressing a file can get you a smaller archive to attach to an email and send the way of your recipient. It’s fast, easy, and built in on operating systems like MacOS. But it is also a gamble: compressing a file, emailing it, and then unzipping it on another computer can impact the file, and it might even be unusable at the other end. When you’ve invested time, effort, and money in your presentations, do you really want to send a compressed version to someone and just hope it doesn’t end up corrupted? Probably not.
4. Send a Link to your large ppt with One Drive or others Cloud Storages

If you ask Microsoft, the people behind PowerPoint, this is the preferred means to share a PPT file when it is too large to attach to an email. Microsoft Office 365 users have access to One Drive where it is simple to store files whether they are created in the browser or on a desktop. Simply:
Open your One Drive or Sharepoint cloud storage folder in a browser window
Select the file and click Share
Copy the link and send to your recipient
Easy, right? Almost.
There are a couple of catches with all these cloud services, including One Drive: space and access.
If you are a heavy user of PPT and other products in the Office suite, then you are going to run into cloud storage space issues eventually. If you are creating big PPT files regularly, then ‘eventually’ is going to arrive sooner than you’d like. If you run out of space because your PPT files are too big, you’ll end up paying for more space or not being able to share at all.
And then there’s access. Microsoft warns that sending a link to a cloud-hosted file requires your recipient to have access to the file on that cloud server. You’ll have to adjust permissions and hope that you’ve ticked the right box – should your recipient be able to view, suggest, edit, or download the file?
In short, sending that cloud link can be easy, but it can also generate some headaches all its own.
How to email large Powerpoints : Conclusion
The easiest and fastest way to send a large PowerPoint file by email is Smash , hands down.
Smash doesn’t compress your file, rip away audio and video elements, remove animations and transitions, or present your notes as ugly byproducts of your deck. Smash gets your file to your recipient exactly as you built it, and it does it fast, securely, reliably, and without any fuss about a file being too big. If you can upload it, Smash will get it where it needs to go.
You can get started with Smash today for free – there are no file size limits and its available from any device. And if transferring or uploading large PowerPoint presentations is part of the regular workflow you are responsible, check out the Smash API : five lines of code, a few minutes of integration, and you’re set. Try it for 14 days free, we don’t even need a credit card to get started.
Need To Send Large Powerpoint Files?
Use Smash, it’s no file size limits, simple, fast, secure and free.
Related Articles

Send Large PDF Files Via Email
Send large files via outlook.

Send Large Files Via Gmail
Send large files via thunderbird.

Send Large Files Via Yahoo! mail
Send large vidéo files via email.
PowerPoint Won’t Attach to Email? Here’s How to Fix It!
By: Author Shrot Katewa

Sending a PowerPoint Presentations through emails is a common task that many of us perform. But, sometimes the file just won’t attach to the email! This can be frustrating especially if you are in a hurry.
In this article, I will help troubleshoot the problem for you. Plus, I will also provide some helpful tips on how to successfully send powerpoint presentations through Outlook and Gmail!
So, without any further delay, let’s get started!
Why Won’t PowerPoint Attach to Email?
Oftentimes it is found that a PowerPoint Presentation file doesn’t get attached to an email.
There are various reasons why this could happen. Unfortunately, there is no sure-shot way of confirming the exact reason why a PowerPoint file may not attach to your email client.
That said, I’m going to share with you some of the most common reasons along with the troubleshooting steps specific for those reasons that will help solve the issue for majority of the users.
Here’s why PowerPoint may not attach to your email –
1. Large File Size
One of the most common reasons why a PowerPoint file won’t attach to the email is because of its file size. If you are using Gmail, the typical limit for uploading a file size is about 25 Mb . Although Gmail will give you a prompt to upload the file to your Google Drive and attach a link to that file, this may sometimes not work.
An easy fix to that problem is to manually upload the file to your Google Drive. Simply click on drive.google.com and upload the file there. Once the upload is complete, you can right-click on the file and select “ Share “. A new window will pop up. Choose the option to “ share the file via a link “. You will be given a link. Copy this link and simply paste this in your email draft.
If you are using Microsoft Outlook, the permitted size for an attachment is about 10 Mb. This limit can vary significantly if you are using an enterprise version of Microsoft Outlook.
This means, if your Microsoft Outlook is linked to a corporate email account, there may be specific limitations in the size of the attachment. Some organizations limit the size of the file to about 4 Mb while others prefer it to be about 10 Mb. It is best to check with a software engineer of your company for the set limits.
Solution –
The best solution in this case is to decrease the file size of your PowerPoint presentation. You may want to compress the presentation, or even compress the images used in the presentation.
I have shared some awesome tips below in the article on how you can reduce the size of your PowerPoint presentation! Be sure to check it out!
2. Internet Connectivity Issue
At first, this might seem like an obvious reason. However, a lot of people tend to not notice when the internet connectivity has been lost.
A common reason for the internet connectivity issue (in addition to a bad internet service) could be that you are connecting using a VPN. This could be a personal VPN service or a corporate VPN setup for security purposes. Using a VPN can drastically slow down or sometimes even cause disruption to your internet services on your computer even though the wifi may be working fine.
Gmail will not let you attach your PowerPoint presentation when there is no connectivity available. If you are using Microsoft Outlook through the desktop version, you will be able to attach the file, but it won’t be sent until you have reconnected your computer to the internet.
The best solution in this case is to wait for the internet connectivity to be back. Alternatively, you can temporarily disable the VPN (if possible) and see if it helps. Restarting your computer may also sometimes fix the connectivity issue.
3. Using Older Version of Internet Explorer
If you are using a Windows Operating System, and you use Internet Explorer to access your email, you may not able to attach files including PowerPoint presentations.
This problem has been especially seen if your using an internet explorer browser version 9. However, in general, if your browser is not up to date, you can still face this issue.
The best method to fix this problem is to update to the latest version of your internet explorer. Click on this link to check out the latest version of the internet explorer available to download.
Alternatively, you can also use Google Chrome of Firefox browsers to access your email account and attach your presentation file.
4. Microsoft Silverlight Needs to be Installed or Updated
Sometimes you may notice that the “Attach File” button just doesn’t work. No matter how many times you try to click on it, it won’t allow you to attach the file! Furthermore, even if you try to drag and drop the file into your email on Outlook, it won’t get attached.
The problem is also visible in some of the internet browsers
I will like to add here – this is by far one of the most annoying problems listed here.
One of the primary reasons why this would happen is because of Microsoft Silverlight – a file that is required for your Microsoft-based email client to work.
It is possible that either the Microsoft Silverlight application on your computer has become corrupted or needs to be updated!
The solution to this problem is simple. You will need to first check if you are using the latest version of the Microsoft Silverlight application. To check the same, click on this link . Make sure you use the browser which is causing the issue to open the link to update the Microsoft Silverlight file.
If the file is missing, you will be prompted to install the Microsoft Silverlight.
Once the installation is completed and the Sliverlight file is up to date, don’t forget to restart your computer before checking again!
5. Windows Security Update not Installed
Sometimes, there may be bugs that may be causing the issue of the not being able to attach the PowerPoint file to your email.
Usually, Microsoft will roll out an update to fix the issues. If you notice that you have been prompted to update your Windows Operating System, make sure that you do that promptly.
Furthermore, Microsoft might roll out a security patch update sometimes instead of a complete operating system update.
The issue of your PowerPoint file not attaching to your email can also be caused due to the update not being installed.
Make sure your operating system is up-to-date and has the latest security updates installed.
6. Browser Cache Issues
Another reason why you may not be able to attach a PowerPoint presentation to your email is because of some caching issues with your browser.
Clear the cache of your browser. If you are using Internet Explorer, then follow these instructions .
If you are using Chrome, click on the 3 dots in the top right corner of your screen. Then, click on settings. This will open a new tab. Under “Privacy & Security”, click on “Clear Browsing Data”. Make sure the cache box is checked. Then, hit “Clear”.
If you are using Firefox, then following these instructions to clear cache of your browser .
7. Old Operating System
The final reason I will like to highlight is if you are using an old operating system. If you are a Windows user, make sure that you are using at least Windows 7. If you are using an older version, it is highly likely that you applications may not receive any support and it may not function correctly.
8. Other Reasons
While I’ve highlighted some of the most common reasons, it is definitely possibly that there may be other reasons for PowerPoint to not get attached to your email.
If you are not able to solve the problem despite going through the above reasons and recommended solutions, then it is time to reach out to the support team.
You may want to follow this conversation on the Microsoft Support thread that lists down additional points that you may want to consider.
In the remaining part of the article, I will be sharing some tips on how you can send the PowerPoint presentation over email.
How to Send a PowerPoint Presentation through Email?
Sending a PowerPoint Presentation through Email is very simple. It can be accomplished with just a few clicks! There are more than one ways to send your PowerPoint Presentation through Email. These are explained in detail below:
How to Send PowerPoint through Outlook?
Follow the steps as shown below to send a PowerPoint Presentation through Email using Microsoft Outlook.
Step-1: Go to “File” tab and click the “Share” option
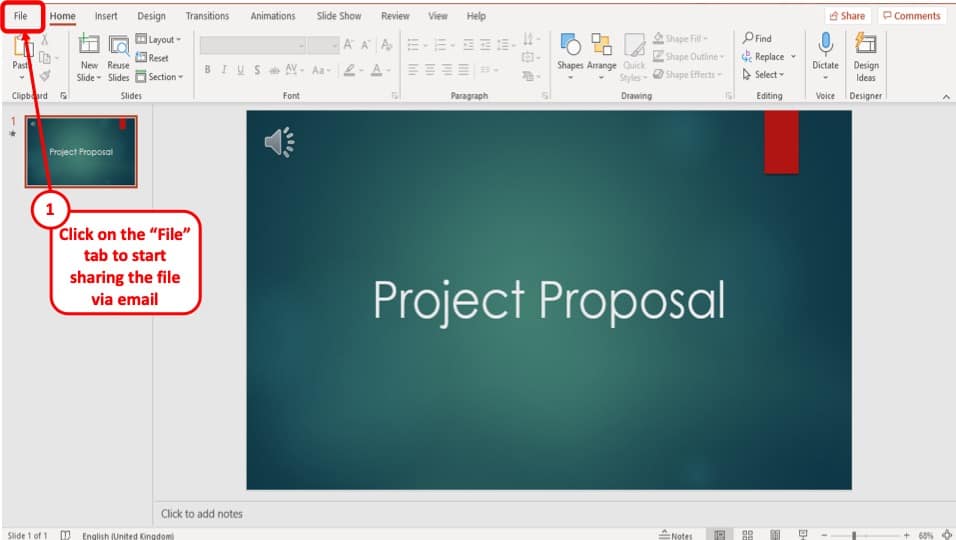
From the PowerPoint file, select the “ File ” tab from the top left corner.
This will take you to this page from where you have tp choose the “ Share ” option.
Step-2: Choose “Email” as the desired sharing option.
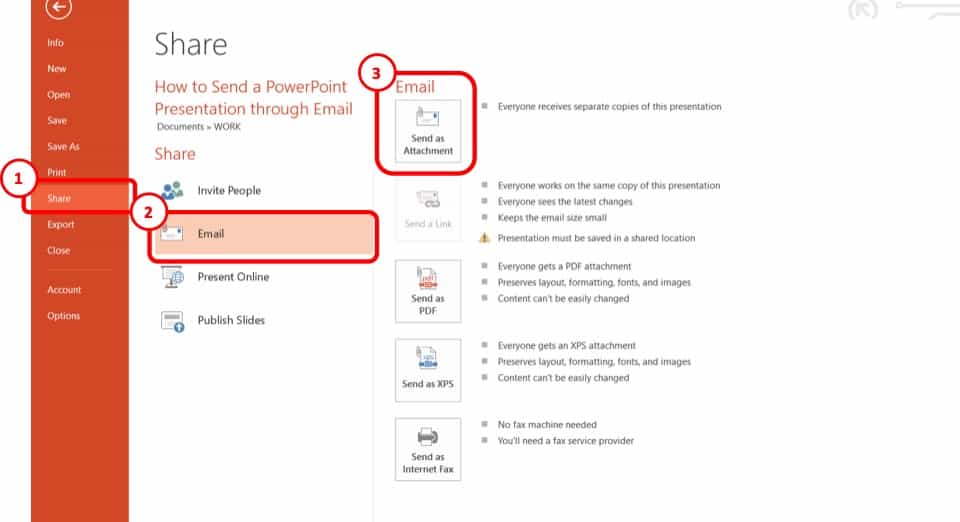
The “ Share ” option will present multiple ways in which you can share your PowerPoint file. Select “ Email ” from the options.
Step-3: Click on “Send as Attachment”
After clicking on “ Email ”, select “ Send as Attachment ”.
Step-4: Send from Outlook
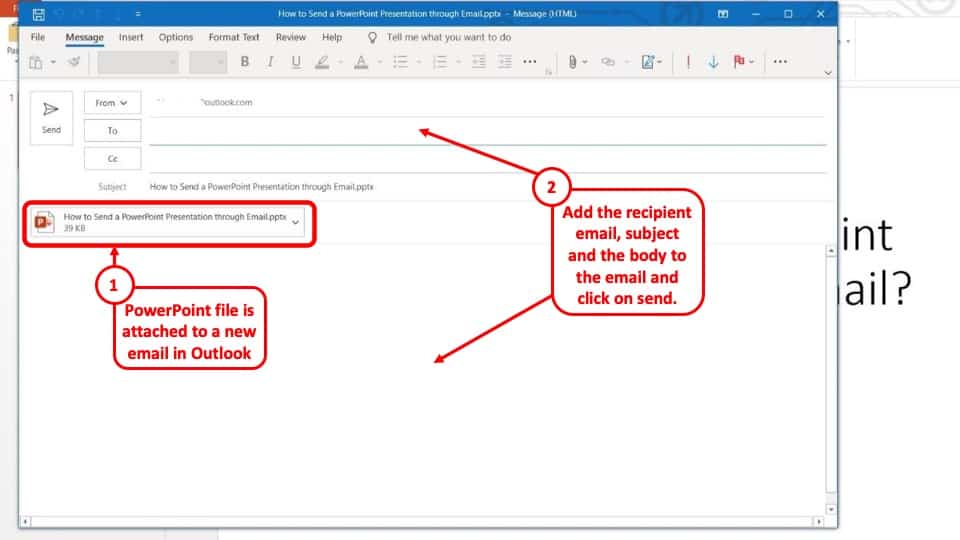
Clicking the “ Send as attachment ” option will automatically take you to your Outlook app on your computer, given that you are already logged in to your Outlook account on your device.
From here, you can type in the email address of the receiver, subject and then click send!
How to Send a PowerPoint through Gmail?
Sending through Gmail is the most commonly used form of sharing any files, since it is so easy and simple. Here is a step-by-step manual on how to send a PowerPoint Presentation through Gmail:
Step-1: Open Gmail on your internet browser and click on the “Compose”
First, go to Gmail on your internet browser and log in to your account. From the top left corner of the interface, choose the “ Compose ” option.
Step-2: Select the “Attach Files” Option
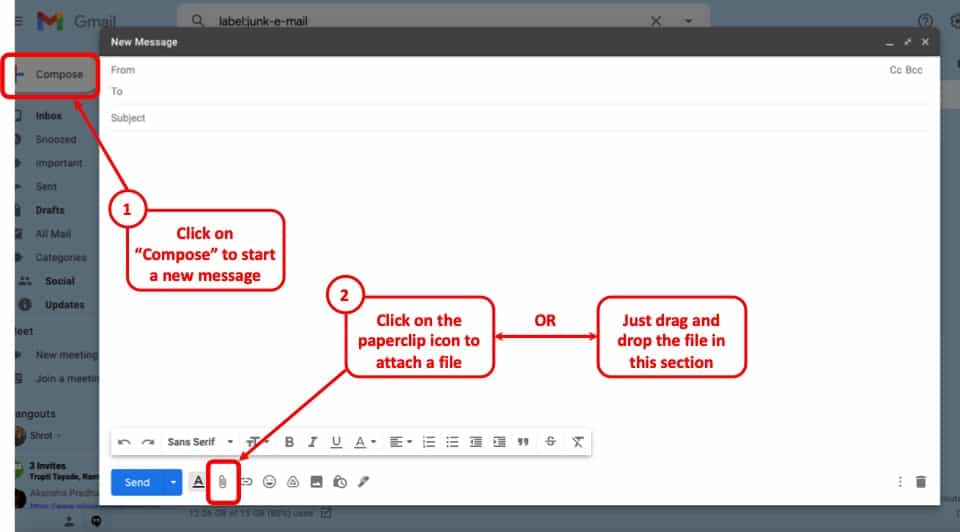
Clicking on the “ Compose ” option will open a pop-up where you can compose your email. From the bottom left corner of the pop-up, select the “ Attach Files ” option which is shown as a paper pin icon.
Step-3: Select the PowerPoint Presentation from your device
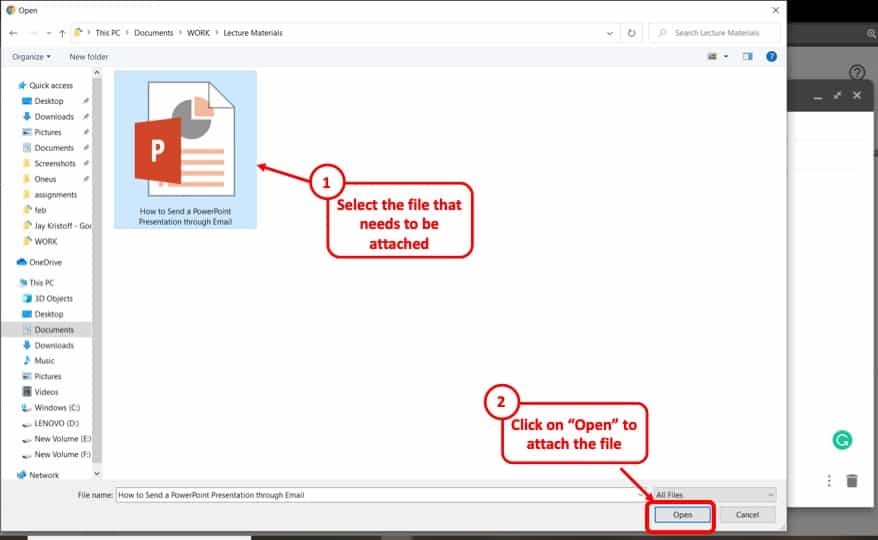
Browse your device for the saved PowerPoint Presentation file and click “ Open ”. This will start uploading the file to your Gmail.
Step-4: Send the Uploaded File
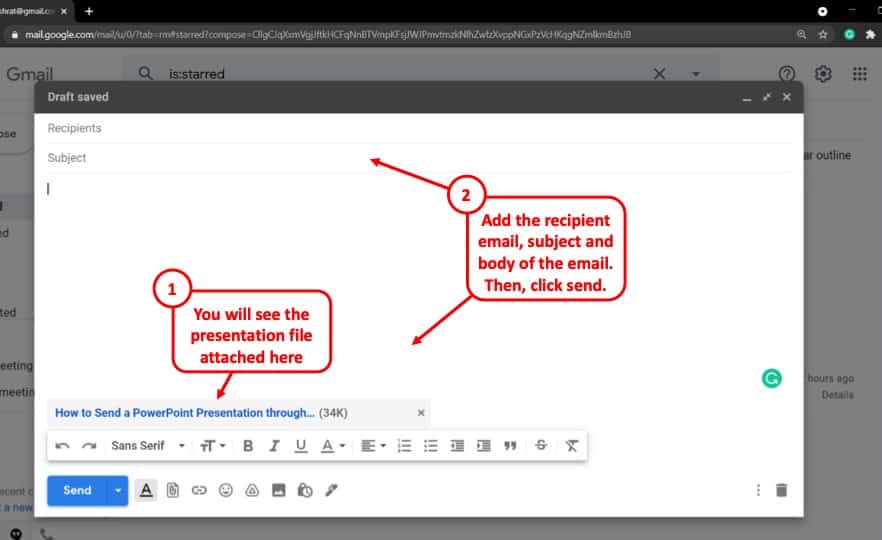
After the file has been uploaded, it will be shown blue. Type in the subject and recipient’s email address, then click “ Send ”!
How to Email a PowerPoint that is Too Large?
To send a PowerPoint Presentation through Email as an attachment, there is a size limit to the file. This size limit is 25 MB. Emails do not upload files larger than 25 MB. There are multiple ways to Email a PowerPoint Presentation that is too large. They are explained below:
Method 1 – Compress PowerPoint File Size through Advanced Options
Reducing the file size is the most appropriate way to make the file sharable to Email. Here is a step-by-step tutorial on how to reduce file size.
Step-1: Go to the “File” tab and select “Options”
From the top left corner of the PowerPoint file, select the “ File ” tab.
This will take you to this page from where you have to choose the “Options” menu.
Step-2: Select “Advanced” from the menu bar.
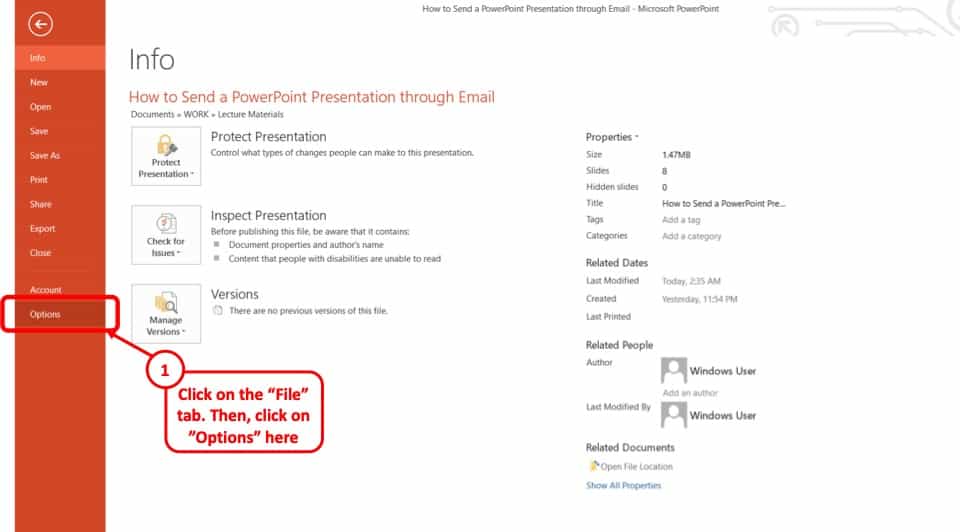
Clicking on the “ Options ” will open this pop up. From there, select the “ Advanced ” menu.
Step-3: Set the ppi to 96 in “Image Size and Quality”
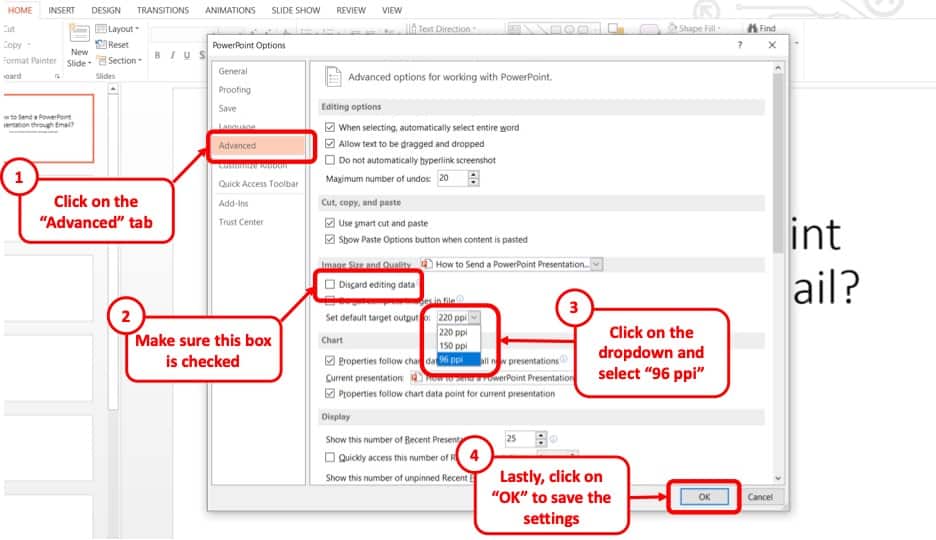
Inside the pop up, under the “ Image Size and Quality ” option, there is an arrow beside 220 ppi. Click the arrow and it will open a drop down menu bar. From there set the ppi to 96.
Step-4: Tick mark on “Discard editing data”
Just above the ppi drop down menu bar, tick mark on the “ Discard editing data ” box. Then click “ OK ”.
Then save the file. It will be reduced in size.
Method 2 – Using WeCompress (Free Online Tool)
If using the first method, you weren’t able to compress the file enough to send it as an attachment, I recommend using “ WeCompress “. WeCompress is a free online tool to compress your files including PowerPoint presentations, and it is pretty darn good at it!
Here’s how to compress your presentation using the WeCompress tool –
Step-1: Open WeCompress on your Browser and Add the File
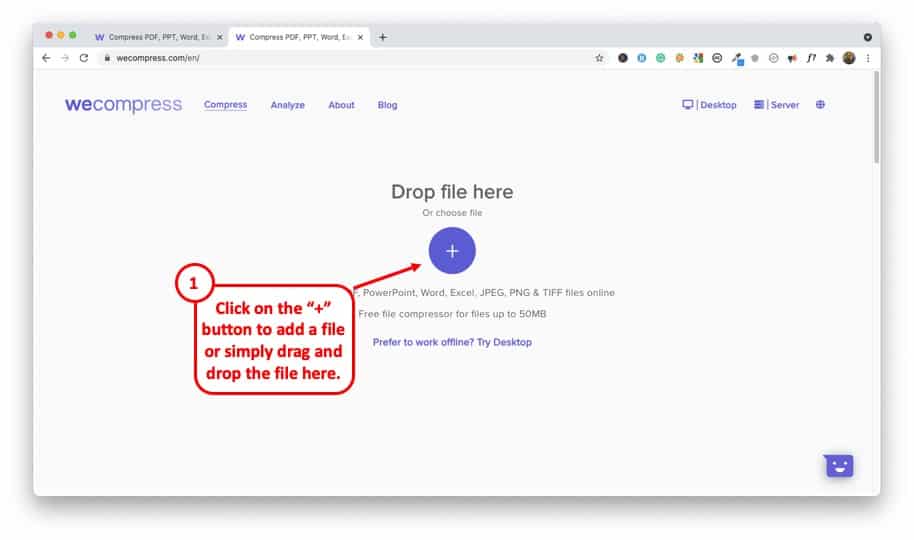
Visit the WeCompress website. Click on the “+” button to add the PowerPoint presentation that needs to be compressed. You can also simply drag and drop the file into the webpage for a quick upload.
Step-2: Wait for the File to be Uploaded and Compressed
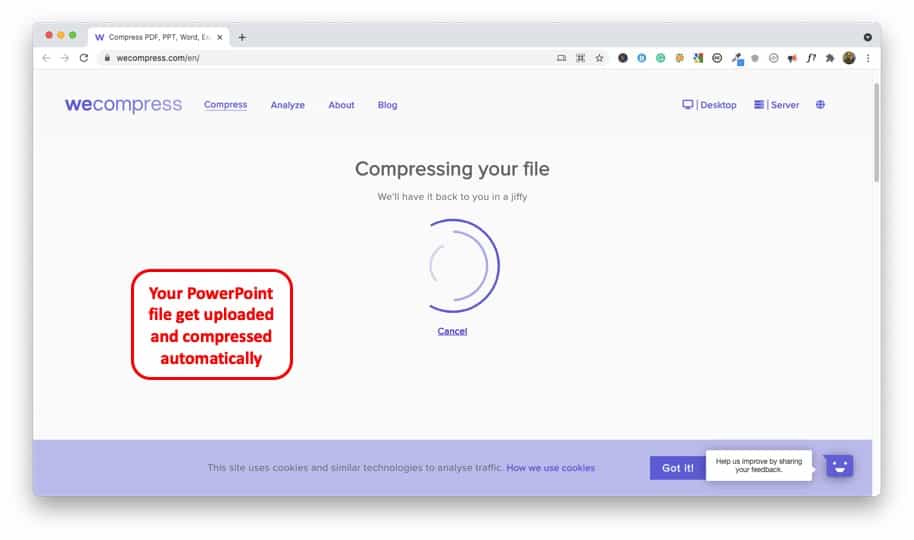
WeCompress will automatically start uploading the file. Once the uploading is complete, the application will automatically start compressing the file.
Step-3: Download the Compressed PowerPoint File
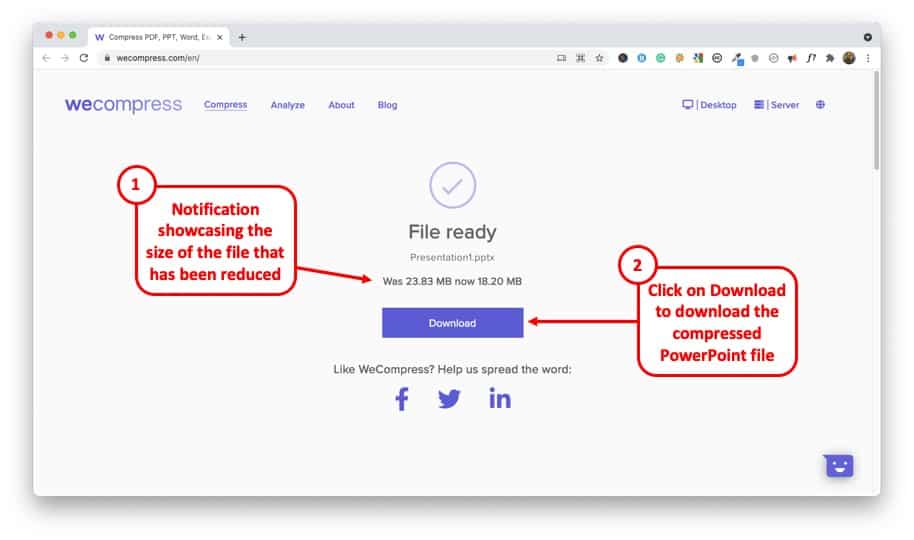
The last step is simply to download the compressed file. In the above example, I had used an already compressed PowerPoint presentation containing only images that had been compressed using method 1.
Even so, WeCompress was able to further compress the presentation.
Simply click on the download button to download the file. Then, you can easily attach the compressed PowerPoint presentation and send it via email as mentioned in the above sections of this article.
Method 3 – Using Google Drive
Another easy way to email a large PowerPoint presentation is to first upload it on Google Drive and then send the file via email. The whole process is described step-by-step below;
Step-1: Go to Google Drive and upload the file.

The first step is to log into Google Drive and then right click on any empty space in the browser. After that click on the “ Upload files ” button.
Step-2: Select the PowerPoint Presentation and hit “Open”
After pressing the “ Upload files ” button, select the PowerPoint presentation that you want to send and press the “ Open ” button.
Step-3: Hit the “Share” button
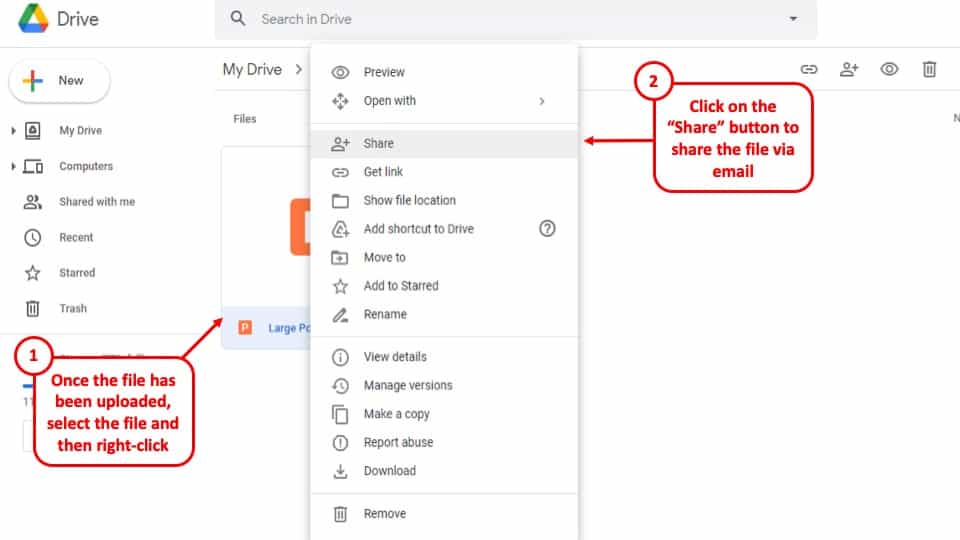
Once you’ve uploaded the file on your Google Drive, right-click on the file and press the “ Share ” button.
Step-4: type the Email address of your desired recipient in the box
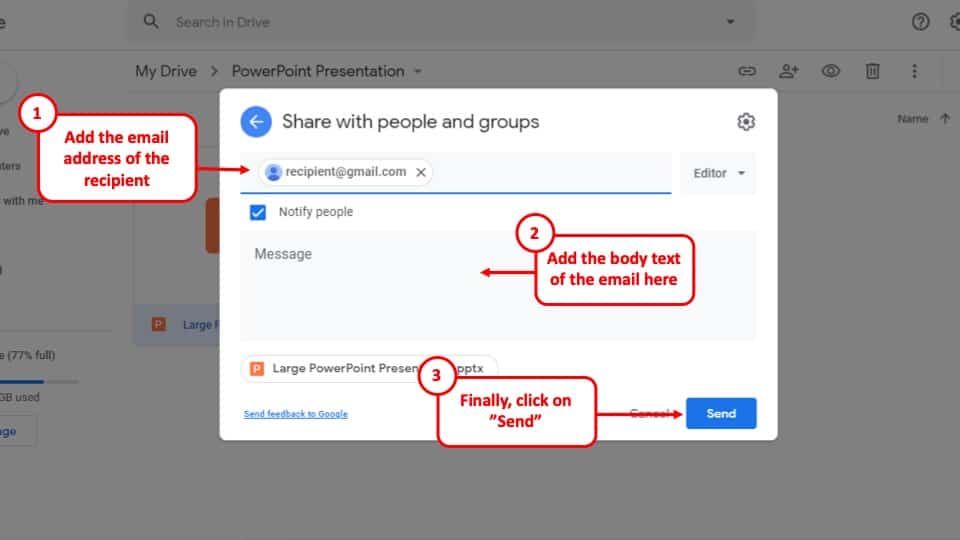
After clicking the “ Share ” button, type in the email address of your desired recipient to send them an email, which will give them access to you PowerPoint presentation.
Step-5: Hit “Send”
The final step of this process is to hit the send button, to send the email notification of their access to your PowerPoint presentation.
How to Send a PowerPoint with Audio or Video via Email
To send a PowerPoint presentation with audio or video, first, the multimedia file must be embedded in the presentation. A step-by-step of the whole process is described.
Step-1: Click on “Insert”
At first go to the “ Insert ” tab in the Ribbon of the PowerPoint document. This will open up an array of options.
Step-2: Click on the “Audio” button
To attach an audio file click on the “ Audio ” button to add audio or click on the “ Video ” option to add a video.
Step-3: Press the “Audio on my PC” button as shown in the screenshot
After opening the “ Insert ” tab and the “ Audio ” button, click on the “ Audio on my PC ” option to open the folder pop-up.
Step-4: Select your desired Audio file and press “Insert”
After opening the floder pop-up, select your desired audio file and hit the “ Insert ” button at the bottom right corner of the pop-up.
Step-5: Position the speaker icon on your presentation
After selecting and inserting the audio file, a speaker icon will appear on the presentation file. Position the icon at your desired space. The audio has been embedded to your PowerPoint Presentation.
Step-6: Save the PowerPoint Presentation
After embedding the audio or video file to your presentation, simply save the file to your computer.
Step-7: Send the email to your desired recipient
In the final Step simply email your PowerPoint presentation to your desired recipient.
Go to your Email account. Press “ Compose ” type the email address of your recipient, Attach the file from your PC by pressing the paper clip icon on the bottom of the composition box. Press “ Send ”
More Related Topics
- Why Do PowerPoint Files Get So Big? [And How to Reduce it Successfully!]
- Does ZIP Compression reduce the Size of a PowerPoint File?
- What is the Best Image Resolution for PowerPoint Presentations?
- How to Lock Aspect Ratio of Images in PowerPoint?
- How to Remove Background from Images in PowerPoint?
Credit to Cookie_studio for the featured image of this article

Email your presentation to others
In PowerPoint, you can use email to send your presentation to others. You can send your presentation as an attachment, a link, a PDF file, an XPS file, or as an Internet Fax.
Important: You won’t be able to email your presentation directly from PowerPoint on a Windows RT PC. Instead, you can open an email program, create your email, and attach the presentation to it.
If the presentation you're planning to send through email contains audio or video files, do one or both of the following:
Compress your media files to minimize the size of your presentation.
Optimize the media in your presentation for compatibility so that your presentation will play without fail when it is received.
Select File > Share > Email
Under Email , click one of the following:
Send as Attachment to attach your presentation to an email message.
Send a Link to create an email that contains a link to your presentation.
Note: To Send a Link , you must save your presentation in a shared location, such as a SharePoint document library that your recipients have permission to access, or OneDrive.
Send as PDF to save your presentation as a Portable Document Format (.pdf) file, and then attach the PDF file to an email message. For more information about PDF files, see File formats that are supported in PowerPoint .
Send as XPS to save your presentation as a .xps file, and then attach the file to an email message. For more information about XPS files, see File formats that are supported in PowerPoint .
Send as Internet Fax to send your presentation as a fax without using a fax machine. This option requires you to first sign up with a fax service provider. If you haven't already signed up with a fax service provider, click Send as Internet Fax , and you'll be directed to a website where you can select a provider.

Need more help?
Want more options.
Explore subscription benefits, browse training courses, learn how to secure your device, and more.

Microsoft 365 subscription benefits

Microsoft 365 training

Microsoft security

Accessibility center
Communities help you ask and answer questions, give feedback, and hear from experts with rich knowledge.

Ask the Microsoft Community

Microsoft Tech Community

Windows Insiders
Microsoft 365 Insiders
Was this information helpful?
Thank you for your feedback.
How to Share a PowerPoint
Last updated on September 11th, 2024

Sharing PowerPoint presentations is essential for collaboration, education, and communication in business and academic settings. Microsoft PowerPoint offers a built-in Share feature that makes it easier than ever to distribute your slides to colleagues, clients, or students; before, during or after the presentation. This guide will walk you through using the built-in sharing options in PowerPoint, along with additional methods for sharing your PPT presentation effectively.
The Share Option in PowerPoint
PowerPoint’s Share feature is designed to simplify the process of sharing presentations from inside the Microsoft PowerPoint interface.
To access it, open your presentation in Microsoft PowerPoint. Go to File menu, and look for the Share option. In some versions of PowerPoint, the Share option is typically located in the upper-right corner of the screen.
Clicking on this button will open up several options for sharing your presentation, tailored to suit different needs and preferences.

Step-by-Step Guide to Sharing a Presentation
Once you click on the “Share” button, PowerPoint provides different ways to share your presentation, starting with email. How to send a PowerPoint presentation through email? Go to File -> Share and click the Outlook icon (that says “Share this link to new Outlook message”). This will open the following interface and automatically attach the presentation file to the new email.

Alternatively, if you don’t use Outlook, you can still share a presentation by email. Save the presentation file and from your Email client (Mail, emClient, etc.) click to attach a new file. Now, you can select the .pptx file from your computer.
If you use a cloud based email like Gmail or Outlook, you can compose a new email and then drag & drop the file into the browser UI.
If you prefer to send a copy directly, you can choose to “Send as Attachment,” which allows you to email your presentation as a PowerPoint file or a PDF. This is a great choice if you want to give the recipient an editable or view-only copy.
Alternatively, if the presentation is too large for an email attachment, you can select the option to Send a Link or explore one of the ways to share large PowerPoint files over the Internet .
By sending a link, the method will save your PowerPoint presentation to OneDrive (Microsoft’s cloud storage service) and then generate a shareable link that can be sent to your contacts.
This link can be configured with specific permissions, such as view-only or edit access, to ensure that your content is secure.
If your presentation is already saved on OneDrive, the process becomes even more straightforward. After saving, simply click the “Share” button, select “Copy Link,” and adjust the settings to control who can access the file. This method is particularly useful when collaborating in real-time, as it allows multiple people to view or edit the presentation simultaneously.
For those using Microsoft Teams, PowerPoint offers direct integration, making it easy to share your presentation within a Teams chat or meeting. By selecting the “Share in Teams” option, you can instantly distribute your slides to all participants. Additionally, if you’re hosting a meeting in Teams, you can choose to present directly from PowerPoint by clicking “Present in Teams.” This feature is designed for seamless sharing during virtual meetings, enabling smooth, real-time collaboration.
Customizing Sharing Options when Sending a PPT Presentation to Others
One of the key advantages of using PowerPoint’s built-in sharing feature is the ability to customize your sharing settings.
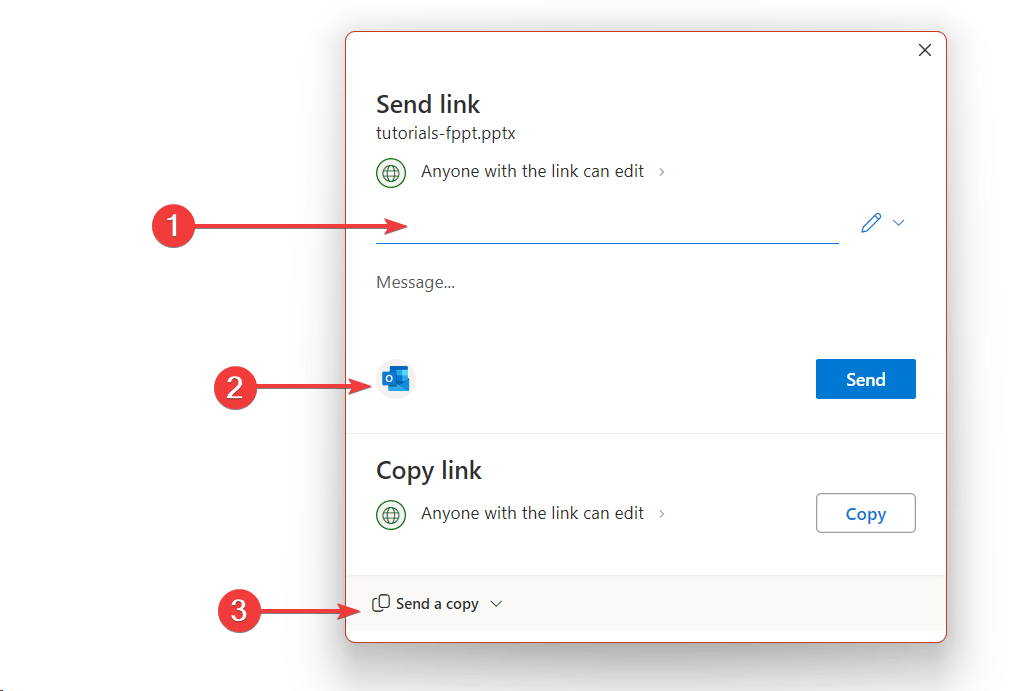
When you share via OneDrive or Teams, PowerPoint allows you to set specific permissions, such as who can view or edit the file. You can choose to make the presentation accessible to anyone with the link, restrict access to people within your organization, or limit it to specific individuals.

Furthermore, if you need to modify access settings after sharing, you can easily do so by navigating to OneDrive or Teams, locating the shared file, and adjusting the permissions. This control over your content helps prevent unauthorized access and protects your intellectual property.
Exploring Other Methods for Sharing PowerPoint Presentations
While PowerPoint’s built-in sharing feature is convenient, there are other methods you can use to distribute your presentations effectively.
How to Share a PowerPoint Presentation by Email
Sharing via email remains one of the most common approaches. You can attach your PowerPoint file directly to an email using your preferred email client.
However, keep in mind that email services often have size limits for attachments. For example, Gmail has a maximum attachment size limit of 25 MB for sending emails, Yahoo Mail allows attachments up to 25 MB per email, and Outlook has limit of 20 MB. Most of these limits are beyond the typical presentation size, unless you use too many images or big media inside the presentation. To mitigate this, consider compressing images and media files within PowerPoint or saving the presentation as a PDF to reduce the file size.
For large files, uploading them to a cloud storage service like OneDrive, Dropbox, or Google Drive and sending a shareable link is often a better solution.
How to Share a PowerPoint using Coud Storage
Cloud storage services offer an excellent alternative for sharing PowerPoint presentations, especially when dealing with large .pptx files.
Platforms like Dropbox, Google Drive, OneDrive, and iCloud allow you to upload your file, generate a sharing link, and control access permissions.
Each service comes with its own set of features and limitations, so it’s essential to choose the one that best fits your needs.
For instance, while OneDrive provides seamless integration with PowerPoint, Dropbox and Google Drive might offer better options for cross-platform compatibility.
Dropbox is a great option if you want others to see a preview of your presentation. By sharing a PDF or PPT presentation via Dropbox, the users will see a presentation preview. You can use Dropbox as a PDF Presenter Viewer in a browser.
How to Share Presentations via Microsoft Teams or Zoom
Collaboration tools like Microsoft Teams, Zoom, and Slack have also become popular for sharing PowerPoint presentations, especially in remote work environments.
These tools enable you to share and present your slides directly within their platforms, making real-time collaboration easier.
Presenting directly from PowerPoint during a virtual meeting allows for live interaction and feedback, which can be invaluable for brainstorming sessions, training presentations, or client presentations.
Sharing PowerPoint Presentations on Social Media
Social media and websites are another avenue for sharing presentations, particularly when targeting a broader audience. Uploading your presentation to platforms like LinkedIn, SlideShare, or your company’s website can increase its visibility and reach. However, it’s essential to consider privacy settings and the potential audience reach when sharing presentations publicly to protect sensitive information.
Alternative Methods for Sharing PowerPoint Presentations
If you prefer offline methods, sharing your presentation via USB drives, external hard drives, or direct device transfers can be effective.
Additionally, presentation-specific tools to host slides offer unique features tailored to hosting and sharing slides. These platforms can be an excellent alternative for those who want more control over their content’s distribution.
Troubleshooting Common Issues
When sharing presentations, you may encounter some common issues, such as links not working or permission errors.
To avoid these problems, ensure the link is correctly copied and that the recipient has the necessary permissions to access the file. If the recipient reports issues opening the presentation, double-check the sharing settings and adjust them as needed. In some cases, re-sharing the PPT again will solve it.
To prevent compatibility problems, consider saving your presentation in multiple formats, such as .pptx and PDF, to ensure it can be viewed on various devices and platforms. Remember to take special precaution with fonts used inside the presentation. Use safe-fonts whenever it is possible, so the other party does not necessarily need to have the custom fonts installed in the computer.
PowerPoint’s built-in Share feature provides a way for distributing presentations quickly and securely.
Whether you’re sharing via email, cloud storage, collaboration tools, or directly within a meeting, PowerPoint offers several options to suit your needs.
By exploring these tools, customizing your sharing settings, and understanding alternative methods, you can enhance your presentation-sharing experience and ensure that your message reaches its intended audience efficiently.
We will send you our curated collections to your email weekly. No spam, promise!
PDFelement: PDF Editor, Scanner
Edit, Convert, Annotate PDF
- PDFelement for Windows
- PDFelement for Mac
- PDFelement on Mac App Store
- PDF Reader for Windows
- PDFelement for iPhone/iPad
- Get from App Store
- PDFelement for Android
- Get from App Google Play
- PDF Scanner for iPhone
Cloud & SDK
- PDFelement Cloud
- PDFelement Pro DC
- PDFelement SDK
Online PDF Tools
- PDF to Word
- Compress PDF
- Word to PDF
Educational Users
- Annotate PDF
- Combine PDF
Personal Users
- Convert PDF
- Organize PDF
Professional Users
- eSign PDFs Legally
- Extract Data from PDF
- Password Protect PDF
PDF Solutions for
- Chat with PDF
- AI PDF Summarizer
- AI PDF Translator
- AI Grammar Checker
- AI Content Detector
- AI Rewrite PDF
- Explain PDF with AI
- Add Bookmarks to PDF
- Explain PDF
- Mac Software
- OCR PDF Tips
- Online PDF Tips
- Edit PDF like Word
- PDF Converter Tips
- PDF Compressor Tips
Why PDFelement
- Customer Stories
- PDF Software Comparison
- Contact Support
- PDFelement for iOS
- InstaScan for iPhone
Explore More
- Upgrade Get the best price to upgrade to the latest PDFelement 11.
- Reviews See what our users say.
- Free PDF Templates Edit, print, and customize free templates.
- PDF Knowledge PDF-related information you need.
- Download Center Download the most powerful and simple PDF tools.
- Download Download Pricing Pricing
- 6 Simple Ways to Send a PPT
Discover how to send a PPT with ease using various methods. Learn to streamline the process using Wondershare PDFelement’s innovative features.

- Send PDF to Kindle
- send photos as pdf
- Share a PDF as a Link
- Share a PDF on Facebook
- Share a PDF with Twitter
- Send PDF in Messenger
- Send PDF on Instagram
- How to Send PDF via Text
- Transfer PDFs to iPad
- Scan a Document Into an Email
- Beyond Compare
- Compare Two PDF Files
- Compare PDFs Adobe
- Foxit Compare PDF
- Compare PDF and Word Document
- 3 Methods of Using AI To Compare Two Documents: A Comprehensive Guide
- Top 12 Remote Work From Home Jobs
- Reasons You Should Go Paperless
- Digital Signature Vs. Electronic Signature
- Show the Power of Teamwork with these 6 Collaboration Tools
- Team collaboration and how to incorporate it in workplace
- Why is Self-management Important to Achieve Success?
- 5 Tips to Improve Adaptability Skills for Workplace Success
- Personality Traits: The Big 5 Model and other examples
- Tips and Tricks for Self-Confidence and Self-Esteem Building
- Why Goal Setting Is So Important
Sharing a PowerPoint presentation (PPT) is essential in today’s digital landscape. Whether for business, education, or collaborative projects, you need reliable methods to send your presentations quickly and efficiently. Wondershare PDFelement offers innovative solutions to enhance your sharing experience, including QR code sharing and PDFelement Cloud. This guide covers various methods for sending PPTs, ensuring you have the necessary tools for every situation.
In this article
How to send a ppt via email, how to send a ppt via dropbox, how to send a ppt on google drive, how to send a ppt from your phone, how to send ppts in batch, how to convert ppt to pdf before sending.

Sending a PPT via email is straightforward but challenging if the file is too large. Here's how to do it seamlessly:
- Open Your Email Client: Launch your preferred email client, Gmail or Outlook.
- Compose a New Email: Click 'Compose' or 'New Email.'
- Attach the PPT File: Click the attachment icon, navigate to your PPT file, and select it.
- Add Recipient and Message: Enter the recipient’s email address, subject, and a brief message.
- Send the Email: Click 'Send.'
Handling Large Files:
- Compress the PPT: Reduce the file size by compressing images and removing unused slides. Go to 'File' > 'Compress Pictures' in PowerPoint and choose your compression options.
- Use File Compression Tools: Tools like WinRAR or 7-Zip can compress the file into a ZIP folder. Right-click your PPT file, select 'Add to Archive', and choose 'ZIP'.
- Upload to PDFelement Cloud: Upload your presentation to PDFelement Cloud. This cloud storage solution allows you to bypass size limitations by simply sharing a link to the file. Here’s how:
- Open PDFelement and upload your PPT file to PDFelement Cloud.
- Generate a shareable link or QR code and include it in your email.

Dropbox is an excellent tool for sharing large files. Here's how to leverage it for your PPT:
- Upload the PPT to Dropbox:
- Open Dropbox and sign in.
- Click on 'Upload Files' and select your PPT file.
- Wait for the upload to complete.
- Share the File:
- Once uploaded, hover over the file and click 'Share'.
- Enter the recipient’s email address and add a message if desired.
- Click 'Send' or 'Copy Link' and paste the link in an email.
Using PDFelement with Dropbox:
- Integration: PDFelement integrates seamlessly with Dropbox. You can save your PPT to Dropbox from PDFelement and generate a shareable link or QR code.
- Secure Sharing: PDFelement provides options to add passwords and expiration dates to your Dropbox links, enhancing security.

Google Drive is another popular cloud storage service for sharing files. Follow these steps:
- Upload the PPT to Google Drive:
- Open Google Drive and sign in.
- Click 'New' > 'File Upload' and select your PPT file.
- Right-click the uploaded file and select 'Get Link'.
- Choose the sharing settings (e.g., view only, edit access).
- Copy the link and share it via email or other messaging platforms.
Using PDFelement with Google Drive:
- Integration: PDFelement integrates with Google Drive, allowing you to upload and share files directly. Open PDFelement, upload your PPT to Google Drive, and generate a shareable link or QR code.
- Enhanced Features: PDFelement allows you to annotate and add comments to your PPT before sharing, making it easier for recipients to understand your notes and revisions.
Sending a PPT from your phone is incredibly convenient when you’re on the move. Here’s how:
- Open your email app.
- Compose a new email and attach the PPT file from your phone’s storage.
- Send the email.
- Dropbox/Google Drive:
- Open the Dropbox or Google Drive app.
- Upload the PPT file.
- Share the link via email or messaging apps.
- Using PDFelement Mobile App:
- Open the PDFelement app on your phone.
- Upload your PPT to PDFelement Cloud.
- Generate a shareable link or QR code.
Advantages of Using PDFelement Mobile:
- Convenience: Access your PPTs anytime, anywhere.
- QR Code Sharing: Instantly generate a QR code for your file and share it with others for quick access.
- Secure Cloud Storage: Store your files in PDFelement Cloud and ensure they are safe and accessible.
When you need to send multiple PPTs, batch processing can save time. Here’s how:

- Compress all PPT files into a single ZIP folder. Right-click the selected files, choose 'Send to', and select “Compressed (zipped) folder.”
- Attach the ZIP folder to your email.
- Cloud Storage:

- Upload all PPT files to a single folder in Dropbox or Google Drive.
- Share the folder link with recipients.
- Using PDFelement:

- Open PDFelement and create a ZIP file containing all your PPTs.
- Upload the ZIP to PDFelement Cloud.
- Generate a shareable link or QR code and share it with your recipients for easy access.
Batch Processing with PDFelement:
- Efficiency: PDFelement allows you to batch convert PPTs to PDFs and upload them to PDFelement Cloud in one go.
- Organization: Keep all your presentations organized and easily accessible in one place.
- Security: Add password protection to your ZIP file or individual PDFs before sharing.
Converting PPT to PDF can make your presentation easier to share and view. Here’s how:
- Using PowerPoint:

- Open the PPT file.
- Go to 'File' > 'Save As'.
- Choose PDF from the file format options and save.
- Share the PDF via email or cloud storage.

- Open PDFelement and select 'Create PDF'.
- Choose the PPT file and convert it to PDF.
- Save and share the PDF via email or cloud storage.
Benefits of Using PDFelement:
- High-Quality Conversion: PDFelement ensures your PPT is converted to PDF without losing quality.
- Annotation Tools: Before sharing, add comments, highlights, and annotations to your PDF.
- Security Features: Add passwords and permissions to your PDF for secure sharing.
- Use QR Codes: PDFelement 11 allows you to share files using QR codes, making it easier for recipients to access the presentation. Simply generate a QR code for your file and share it.
- Utilize PDFelement Cloud: Store and share your presentations securely using PDFelement Cloud. Access your files from anywhere and share them with ease.
- Compress Before Sharing: Always compress your PPT files if they are too large. This helps in faster uploading and downloading.
- Annotate and Comment: Use PDFelement’s annotation tools to add comments and highlights to your presentations before sharing.
Thanks to the wide array of options available today, sharing a PowerPoint presentation has never been simpler. Whether emailing your presentation, storing it in the cloud, or converting it to PDF, Wondershare PDFelement elevates the process with innovative features. With QR code sharing, you can provide instant access to your presentation, allowing recipients to view it with a scan. Additionally, PDFelement Cloud ensures your presentation is always accessible and easily shareable from anywhere. These powerful tools not only make your presentation more accessible but also ensure it looks polished and professional, enhancing the overall impact of your work.
People Also Ask
How do i send a large powerpoint file via email, can i send a ppt directly from my phone, how do i convert a ppt to a pdf, what are the new features of pdfelement 11 for sharing ppts, how do i ensure my ppt is secure when sharing, can i batch process ppts using pdfelement, you may also like.
- How to Share a PDF as a Link
- How to Share a PDF on Facebook
- How to Share a PDF on Twitter
IMAGES
VIDEO
COMMENTS
Step 1: Compress the PowerPoint file. Right-click on the file, select 'Send to', and then choose 'Compressed (zipped) folder'. Compressing the PowerPoint file can significantly reduce its size, making it easier to send through email. This method works well for files that are just slightly over the limit, as compression can only reduce ...
Lowering the default resolution for images also reduces your overall file size. Go to File > Options > Advanced. Under Image Size and Quality, do the following: Select Discard editing data. This option removes stored data that's used to restore the image to its original state after it's been edited. Note that if you discard editing data, you ...
Converting the file is as simple as pressing a button and choosing the file type. Go ahead and open your PPT file, head over to the "File" tab, and then click "Convert.". Windows File Explorer will appear. You'll notice the Save As type is set as "PowerPoint Presentation." This is the PPTX file type. Click "Save.".
Here's how you can use Google Drive to send a large PowerPoint file: Go to drive.google.com and sign in. Click "New" and then "File upload". Select your PowerPoint presentation and click "Open". Once uploaded, right-click the file and select "Share". Enter the email addresses of the people you want to share with.
Step 2: Compress Your Presentation. Compress your PowerPoint file if it's too large to email. Large files can be troublesome to send via email. If your presentation is too large, consider compressing it to reduce the size. PowerPoint has built-in tools that can help you compress images and media within your slides to make the file smaller.
To do this: Save your completed PowerPoint presentation on your hard drive. Open your email program. Add recipients' email addresses. Click on the attach button (usually represented by a paperclip icon), and navigate to the file on your hard drive. Once you've found the file on your computer, double-click on the file name or icon and it ...
To send a PowerPoint file that's too big to be attached or uploaded through a certain platform, you can consider the following solutions: Try s pliting the Presentation: If the PowerPoint file is extremely large, consider splitting it into smaller parts. Create separate PowerPoint files for different sections or slides.
When you want to send your PowerPoint presentation to others, it's easier to do when the file size isn't too big. You can compress, or zip, the file in Windows, which shrinks the size of the file but retains the original quality of your presentation.You can also compress the media files within the presentation so they're a smaller file size and easier to send.
Method 1 - Compress your PowerPoint file. Method 2 - Convert it to PDF. Method 3 - Upload it to Cloud storage service. Method 4 - Use a file transfer service. Tips for sending large PowerPoint presentations through email. Conclusion.
To compress your PowerPoint document just follow these steps: a. Go to File > Info. b. Choose the Compress Media option. Just like with images, it will give you quality options, and pick the one that fits better your needs. c. A new window will pop up to show you the compressing progress.
Sending a large PowerPoint via email can be challenging, but we have several reliable solutions. First up, compressing the file. Simply right-click on your PowerPoint, hit 'Send to', and choose 'Compressed (zipped) folder'. This can shrink your file size remarkably. Next, consider converting the PowerPoint to a PDF.
Compress all images while saving the PPT file. Open your presentation. Go to File in the PowerPoint menu. Click Save as and then Browse. In the window that opens, click on Tools (right beside Save) Select Compress Pictures and choose the resolution you need.
2. Click Reduce File Size. It's toward the bottom of the drop-down menu. 3. Click Picture Quality. Doing so will invoke a drop-down menu. 4. Click Best for sending in e-mail. This option will reduce the quality of all images in your PowerPoint file to 96 ppi, which is a generally lower resolution than most images' defaults.
10. Save a copy in PDF format. It's also common to save a copy of a presentation as a PDF (portable document format) file to reduce the size and then share it with others. You can compress images during the process. To save a PowerPoint presentation as a PDF (and compress images): Click the File tab in the Ribbon.
a. right click and select compress. b. drag and drop the selected files into your compression app, then hit compress/zip. 3. Attach the compressed archive to your email or drop it into your instant message. Compressing a file can get you a smaller archive to attach to an email and send the way of your recipient.
Click on the "New" button and select "File upload" to upload your PowerPoint presentation. Once the upload is complete, right-click on the file and select "Share.". Adjust the sharing settings to your preference and copy the shareable link. Compose your email and paste the link into the body of the message. Send the email to your ...
Method 1: Extract the file contents to a zip file. This method isn't for the faint-hearted, as it involves saving a copy of the file as a zip file and manually reviewing the extracted contents of the file. However, you do get an idea of what elements are the largest in your file. Make sure that you have Explorer set to show File name ...
Use a graphics editor to scale your pictures and insert smaller versions of them. Use a sound editor to make the audio files smaller. Use a video editing program to shrink the video files. Then delete the large versions and reinsert the smaller versions. Be sure to include the version number and OS version when asking your question.
Step-1: Go to "File" tab and click the "Share" option. From the PowerPoint file, select the " File " tab from the top left corner. This will take you to this page from where you have tp choose the " Share " option. Step-2: Choose "Email" as the desired sharing option.
Need to share a large PowerPoint that is too large to email? Don't want your audience stealing your images in your PowerPoint? The answer is to make a PPT Sh...
Select File > Share > Email. Under Email, click one of the following: Send as Attachment to attach your presentation to an email message. Send a Link to create an email that contains a link to your presentation. Note: To Send a Link, you must save your presentation in a shared location, such as a SharePoint document library that your recipients ...
Alternatively, if the presentation is too large for an email attachment, you can select the option to Send a Link or explore one of the ways to share large PowerPoint files over the Internet. By sending a link, the method will save your PowerPoint presentation to OneDrive (Microsoft's cloud storage service) and then generate a shareable link ...
Attach the PPT File: Click the attachment icon, navigate to your PPT file, and select it. Add Recipient and Message: Enter the recipient's email address, subject, and a brief message. Send the Email: Click 'Send.' Handling Large Files: Compress the PPT: Reduce the file size by compressing images and removing unused slides. Go to 'File ...