Avoid Death by PowerPoint with These 10 Engaging Presentation Tips
Avoid boring PowerPoint presentations by keeping slides simple and focused . Use one main idea per slide, limit objects, and choose clear fonts . Tell a story , use visuals wisely , and engage your audience with eye contact and questions . Practice your public speaking skills to deliver powerful presentations.
Did you know that people give 88 million PowerPoint presentations every day? Learn how to make your presentations stand out and keep people awake.
Bad presentations can hurt your chances, waste time , and damage how people see you at work. Boring slideshows can lead to death by PowerPoint , making people lose interest and miss your main points. Here, you'll find useful tips to make interesting talks that grab attention and clearly explain your ideas, helping you do well in business meetings .

Making Lively Presentations
People often call boring and unproductive presentations "Death by PowerPoint." To improve, presenters should focus on three main things: making content simpler , cutting down on distracting visuals, and using design features wisely. Getting good at these skills helps you create interesting presentations that clearly share your message and avoid death by PowerPoint.
Each Slide Should Contain One Main Idea
A common mistake in PowerPoint slides is putting too much information on them. Too much information confuses people and weakens your point. Stick to one main idea for each slide. This method keeps viewers interested and makes your key messages easier to understand.
Using short phrases instead of long sentences helps your slides support what you're saying without distracting listeners. Remember that your visuals should make your speech better, not replace it. As David Phillips, an expert in presentation techniques, says:
"Use PowerPoint for what it's supposed to be used for: short, sweet bits of text and an image." — David Phillips
Limit Objects on Slides
Studies show that the human brain can only handle a small amount of information at once. Keep each slide simple by using fewer elements to avoid confusing your viewers. According to presentation expert Don McMillan:
"The magical number is six. The correct number is six, not five or seven." — Don McMillan
Using more than six objects makes your audience work much harder to understand your slide. This extra work often leads to people losing interest. Clear, simple slides help people focus on what you're saying instead of struggling with busy visuals.
Use Differences in Appearance and Size
Using different sizes and contrasting elements helps guide viewers to important parts of your slides. Big text works well for main ideas and encourages brief content. But don't overdo it – extremely large fonts might look unprofessional.
You can highlight certain details by using contrast. One way is to show information step-by-step using PowerPoint features to control what the audience sees. This method helps keep listeners interested and focused on what you're talking about now. Your main goal should be to create slides that people can quickly understand.
Making Captivating Talks
A compelling presentation needs more than just good-looking slides. You need to organize your information well, choose suitable text styles, and add helpful images thoughtfully. These parts work together to create a unified and powerful presentation that connects with viewers.
Narrative Framework for Presentations
Good talks often use a story-like format similar to books and films. This layout has three parts: a beginning that shows the current situation, a middle that discusses problems and answers, and an end that reviews main ideas and suggests future actions.
For example, when proposing a new business, you could start by explaining a market problem, then show your solution and its benefits, and finish with costs and what you want people to do next. This layout keeps viewers engaged and makes your talk flow smoothly.
Pick Good Fonts
The text style you use can greatly affect how people understand your message. Simple fonts often look more relaxed and modern , while fancy fonts can seem more serious. It's important to use fonts that are easy to read and fit the mood of your talk.
Don't use fancy or curvy letters, as they can be hard to see, especially from far away. Pay attention to how big the letters are – if they're too small, people can't read them; if they're too big, it might look unprofessional. Generally, it's best to use letters at least 24 points big for the main text and 36 points for titles.
Use Pictures and Graphs Wisely
Images and charts can make your talk better, but you should use them carefully. Use pictures, graphs, or simple diagrams to explain your ideas instead of slides full of words. Websites like Unsplash offer free, good-quality images to make your slides look better.
If you use charts or graphs, make sure people can quickly understand them. Don't put too much information or complicated visuals on your slides. Remember that your slides should help your talk, not be a complete document on their own. According to presentation specialist Caya:
"Images are often more effective than text, so use visuals when possible." — Caya
Creating Impactful Talks
How you present is just as important as your slides and material for a successful presentation. Looking at your listeners, adding jokes and questions, and improving your public speaking can turn your presentation from good to great.
Maintain Eye Contact
Looking at your listeners directly helps build a strong connection and keeps them focused on you. Meeting people's eyes shows you're confident about what you're saying and makes them feel more involved. By watching your audience, you can see how they respond and change your talk if needed.
For good eye contact, try not to read everything from your presentation or paper. Know your topic well so you can talk freely and only look at your slides now and then. Look around the whole room, meeting the eyes of different people in your audience for a moment. Doing this makes all listeners feel part of your talk and keeps them interested.
Use Jokes and Ask Questions
Adding some funny comments and asking the audience things can really get them involved in your talk . A good joke or funny story at the right time can make people relax and help them remember what you said. Make sure your jokes fit the crowd and don't overshadow your main point.
Asking questions during your talk has several benefits. It helps listeners stay focused, gets them involved, and shows you if they're following along. You can use thought-provoking questions or ask directly to start conversations. After asking, wait a moment to let people think and answer.
Improve Your Public Speaking Skills
How you talk can significantly affect how well your presentation goes over. Work on speaking clearly and not too fast, changing your voice to highlight important parts. Try not to use words like "um" or "uh," as they can take away from what you're saying and make you seem less confident.
How you move and stand is also very important when giving a good presentation. Keep good posture, use normal hand movements, and walk around the stage when it makes sense. Your body language can support your words and make you seem more confident. Remember that practice helps you improve . Practice your talk many times to get better at giving it and feel more confident.
Learn to Give Powerful Talks
Using these tips, speakers can change their PowerPoint slides from boring to effective ways of sharing information . The key is to keep things simple, stay on topic, and connect with your audience. Don't forget to have a backup: bring paper copies or a PDF of your talk in case something goes wrong with the technology. Being ready like this shows you're professional and makes sure people hear what you have to say, no matter what happens. As you get better at presenting, try using fewer slides . See if you can share your main ideas using only three slides. When you try new things, you'll find better ways to engage people and make them remember you. Before your next talk, think about how you can make it really stand out and stick in people's minds, avoiding death by PowerPoint and creating a memorable experience for your audience.
MrBeast's tips for increasing YouTube views and creating successful content
How to study effectively by eliminating distractions and planning topics
Gamma vs. PowerPoint: Can this AI tool revolutionize your presentations?
How to improve focus and achieve success in meaningful projects
How to use emotional intelligence and fear control to influence others
15 Communication SMART Goals Examples to Improve Your Skills
Jordan Peterson's tips on improving communication skills
Was this article helpful?
How to Record a PowerPoint Presentation

Knowing how to record a PowerPoint presentation with audio and video can provide viewers with an engaging experience. Whether you're creating a tutorial , a lecture, or a business presentation, combining visuals with narration helps convey your message more effectively.
In this guide, we will walk you through the step-by-step recording process in PowerPoint . From setting up your equipment and recording your screen to editing the final video, you'll learn everything you need to know about creating narrated PowerPoint presentations.
Prepare everything
- Presentation . Ensure your slides are complete and in the correct order. Update PowerPoint to the latest version for the best performance and features.
- Microphone . Use a good-quality microphone to record clear audio . A USB or headset microphone is recommended.
- Webcam (Optional) . If you want to include a video of yourself, use a built-in or external webcam.
- Script . Outline what you want to say for each slide. This will help you stay on track during the presentation recording.
How to record a PowerPoint presentation?
1. set up a screen recorder.
Download and install the free screen recording software for Windows from the official website. Launch the video recorder on your computer.
Easy to use free screen recorder for PC. Record desktop, take screenshots, upload the created content to the cloud for easy and fast sharing.

2. Configure settings
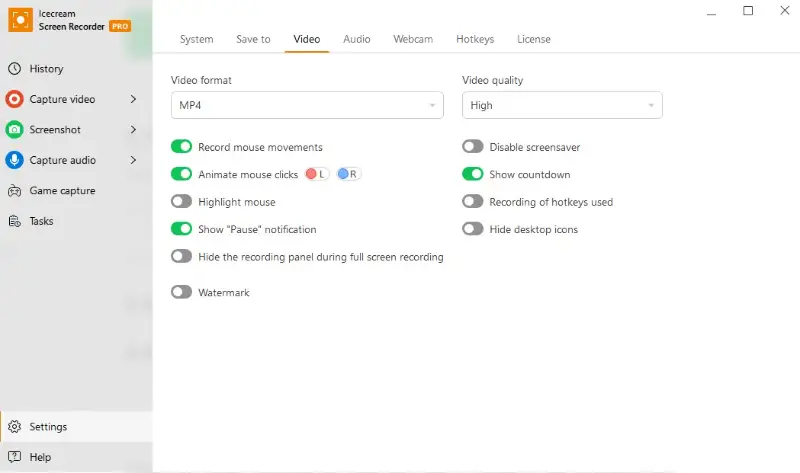
Go to " Settings " to set recording preferences .
- In " Video ", choose the desired output quality and format. Make sure the toggles next to " Record mouse movements " and " Animate mouse clicks " are enabled if needed.
- In the " Audio " tab, adjust the sound levels and select the desired input devices.
3. Record your presentation
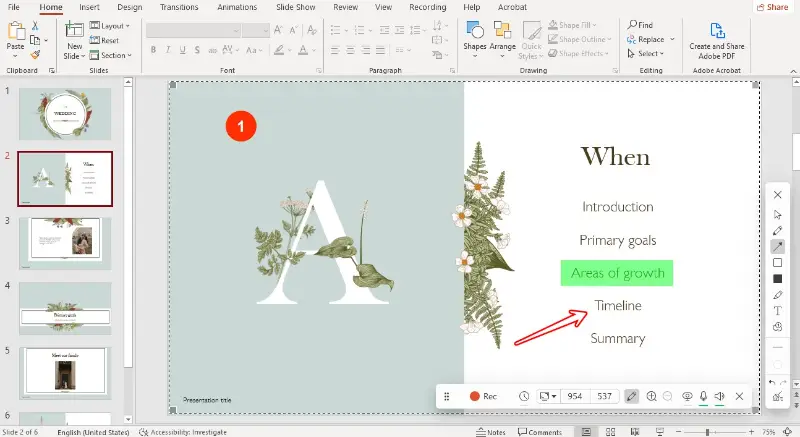
Click the " Capture video " option in the side menu and select the mode. Choose the entire display if your presentation is in full-screen mode. You can also manually adjust the screen recording area to show the desired content.
Open your PowerPoint and press the F7 hotkey or click the " Rec " button to record the presentation with audio . Navigate through your slides while speaking clearly into the microphone.
Use drawing tools in the presentation recorder to highlight key points during your narration.
If you need to take a break, use the pause button to temporarily stop the recording. When you've completed your presentation, press the F8 hotkey or click " Stop ".
4. Editing the final video
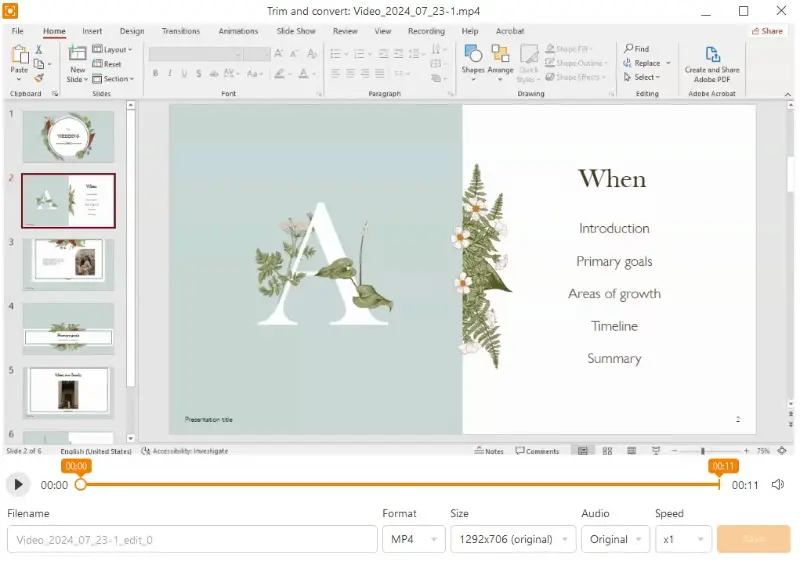
Use the built-in video editor to trim any unwanted parts of the presentation recording. You can also adjust the playback speed, change the format, and resize the video.
If you need to make more changes, you can import your recorded clip into third-party video editing software . Add transitions, effects, background music, or other enhancements as needed.
Save your edited video in the desired location. It is also possible to upload the recording to the cloud and share it via a link .
FAQ on how to record a presentation
PowerPoint screen recording with audio and video is a powerful way to enhance your message and engage your audience. By following the steps outlined in this guide, you can create professional and polished videos that combine your slides with a voice-over .
Whether you're an educator, business professional, or content creator, knowing how to narrate a PowerPoint presentation recording can significantly boost your impact. Remember to practice your delivery and utilize editing tools to refine your final product.

Expert Tech Writer
Like the article? Share it!
- Presentation Collections
How to Create a Timeline in PowerPoint? Step-by-Step Methods?
Now, the timeline in PowerPoint is indeed valuable if you have to organize data quickly and present it in a way that your audience will understand. Whether you are working on a business proposal, following up on a project, or just looking to point out some historical events, it can make things simple by making the data fit into a clear visual image. But how do you do this? Don’t worry, as it’s much easier than you might think. And that is just what I am here to walk you through.
Timelines are always powerful in the corporate world, education, or personal projects. PowerPoint offers you a flexible platform where you can create timeline slides that not only function great but are crafted in a great UI. In this step-by-step guide, learn how to create a timeline in PowerPoint.
Why Have a Timeline in PowerPoint?
Ever tried to describe a series of events without having something visual in front of you? It’s a bit like navigating a new city without a map. Timelines make crystal clear the linearity of events, and therefore, it becomes pretty easy for your audience to follow a timeline. Besides, a brilliant design of the timeline will make your presentation outstanding and keep your audience interested.
Choosing the Right Timeline PPT Template
The other thing you need to consider is choosing the right template before creating your timeline. PowerPoint has thousands of different timeline PPT templates at your service, all serving varied needs. From a very simple and clean template to a more detailed one, picking the right template will save you hours of work in the long run and set a tone for your entire presentation.
Clean Templates: Suitable for professional, clean presentations.
Storytelling Templates: Suitable if you are in a creative industry.
Project Management Templates: Great to represent your project milestones and deadlines.
Step-by-Step on How to Make Timeline
Building a timeline in PowerPoint is easy, seamless, and—without making a tall claim—a lot of fun. Here is what you need to do:
Open PowerPoint and open a new slide where you need to create a timeline
In the toolbar, click “Insert,” and then “SmartArt.”
Click “Process” in SmartArt. Here is where one can select, under “Process,” the style he/she wants or change the order of the elements. There are numerous SmartArt choices in here for processes. Select one you like, keeping in mind you need to create a timeline.
Click in the timeline graphic text placeholders to you enter your information.
Drag timeline elements to size and space the layout as needed.
Customizing Your Timeline
One of the real strengths of PowerPoint is its customizability. You can shape your timeline to suit your brand or taste. Here’s how:
Change Colors: Change to different colors that match your brand or theme by using the “Format” tab.
Change Fonts: Make sure your fonts match other slide content.
Resize shapes: Drag some of your elements to re-size them so that nothing is over-flown from your slide.
Milestones and Events
These are the main activities of the timeline. This can be when your project is due at a significant time in history or even personal accomplishments for that matter.
Click on the timeline to add new milestones or events
Ensure that every milestone is clearly labeled to let the audience know what it represents.
Visualization by icons or symbols will help set different milestones apart.
Adding Visual Elements
Visual elements enhance readability and the feel of a timeline. Follow these steps to add them:
Images: Add images relevant to the events or milestones being represented.
Icons: Add icons that describe what kind of events or actions were made for them.
Shapes: Add shapes to add a background to your timeline or to draw attention to some sections.
Best Practices while building a timeline
While building a timeline, ensure that you adhere to the best practices
Keep it Simple: Don’t put too much on your timeline.
Consistent Spacing: The space between milestones must be consistent
Key Events The key events should pop up. The color or size should be different to help the viewer see what’s what.
Common Mistake
It’s easy to fall into some of the typical pitfalls when working on a timeline. Here are a few to be on the lookout for:
Information Overload: More information is overwhelming to your audience.
Design Inconsistency: Keep a consistent look with color, font, and layout.
Forget Scale: Make sure the timeline represents the timeline intervals between the events.
Animating for Effect
Bring your timeline to life by adding some great animations. This is how you do it:
Animate Your Milestones: In the “Animations” tab you can see how to animate each of your milestones within your timeline.
Chronologize Them: Determine the proper chronology of animations so that your events appear in the chronology in which they happened.
Subtle Animations: They shouldn’t be too flashy, though. They should be subtle to not be overwhelming and take away from the content.
Saving and Sharing Your Timeline
Now that you have composed your timeline, it is time to save and share it. PowerPoint has some options for this:
Save as PDF: This is great for distributing your timeline on its own, like sending it via e-mail or distributing it in a handout.
Export as Image: This will save the timeline as an image so you can use it within another document or on the web.
Share from PowerPoint You can share your file from PowerPoint via email or cloud services.
Who said building a timeline in PowerPoint was supposed to be difficult? With the right template and some basic steps, you can present a timeline that pops up. A student, professional, or anyone who needs to visualize any information truly needs PowerPoint timelines because of just how versatile of a tool it is—you’ll use it over and over again.
1. Can I use a timeline ppt template for personal projects?
Yes. Timeline templates may be used in tracking personal goals, event planning, and anything else.
2. How do I make my timeline more interesting?
Display visuals in the form of images, icons, and subtle animations to serve further the desire of the audience.
3. How do you make a PowerPoint timeline without using a timeline template?
Of course, you could do all that manually with shapes and lines, but this template would let you do it much quicker, and it also makes sure that your timeline will follow a clear structure.
4. How do I share my timeline with others?
Save your timeline as a PDF or image, and then share your file just by sharing your PowerPoint file.
5. How do I update my timeline to include other events?
Just open your PowerPoint file and click on the top of the timeline to add or edit any milestones you would like back.
Spread Love
Related blogs.

Jerom is a presentation content strategist with over three years of experience writing engaging content and has worked in different niches. He has a strong background in PowerPoint and Excel, so he has learned how to compact complex ideas into simple, clean design visuals in slides. He loves teaching and is always ready to share his tips and ideas on mastering PowerPoint.
Recent Blogs

How to use Google Slides offline and Work Anywhere?
Google Slides is equally a perfect tool that can be used in the creation and sharing of presentations. Use is...

How To Make A Graph In Google Slides
Google Slides is a powerful tool for creating presentations, but it also offers a variety of features for visualizing data....

How to Include Business Report with Infographic Presentation
These days because we live in a data-driven business world, to be able to express complex information concisely and effectively...
SIGNUP FOR NEWSLETTER
Home Blog PowerPoint Tutorials How to Narrate a PowerPoint Presentation
How to Narrate a PowerPoint Presentation
Similar to doing a commentary to videos, you can also add narrations to your PowerPoint Presentation. It’s an interactive way to provide information to your audience instead of letting them read all points on the slide, with the added value that helps people with visual impairments.
This guide will cover how to create a narrated PowerPoint presentation using Microsoft PowerPoint on Windows. Before you start narrating your presentations in PowerPoint, it would worth to read some of the special considerations to set up the environment (reduce noises, configure the mic, etc.).
Method #1: Narrate a PowerPoint Presentation (Audio-Only)
This first method to narrate a PowerPoint presentation is ideal to add audio narration to those already-made presentations.
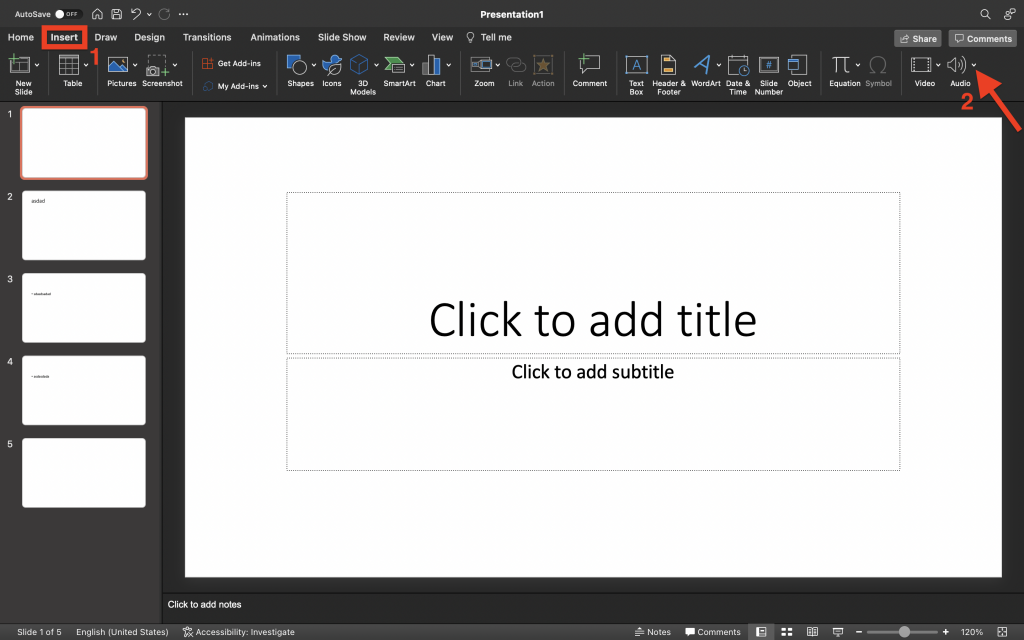
1. Open your PowerPoint presentation, navigate to the Insert tab, and click the Audio dropdown icon.
2. You can add audio using two ways; if your audio is pre-recorded and saved on your computer, select the Audio Browser option and select the narration recording. Whereas if you want to record a new narration, click Record Audio .
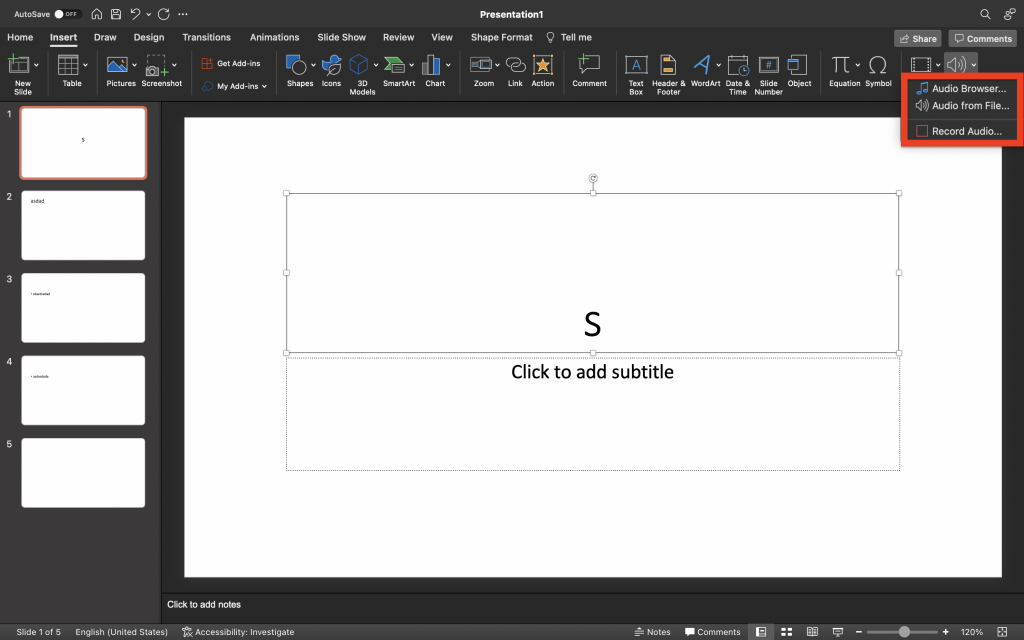
Note : You can only narrate one slide at a time using the Record Audio option, which makes it suitable for narrating key points.
3. After clicking Record Audio, a new window will appear on the right side of the screen.
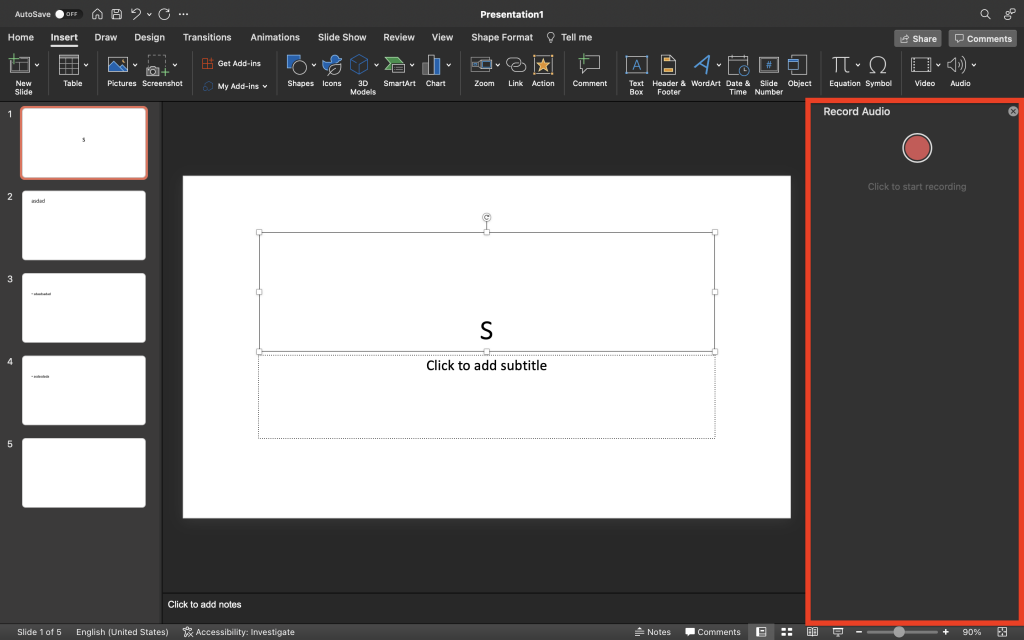
4. To record, click the red button; the audio bar will begin moving as you start narrating.
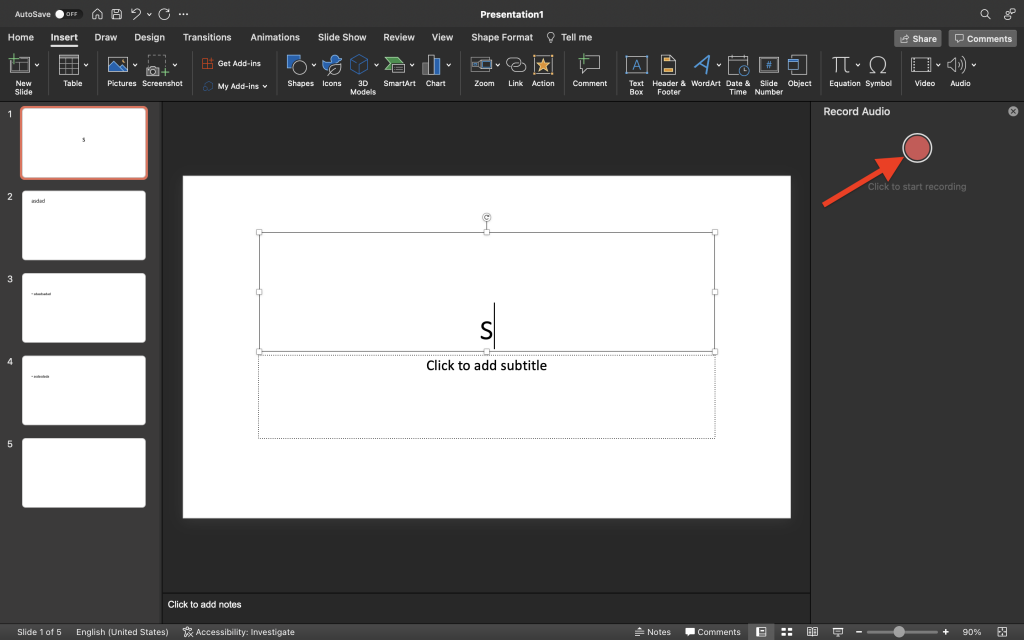
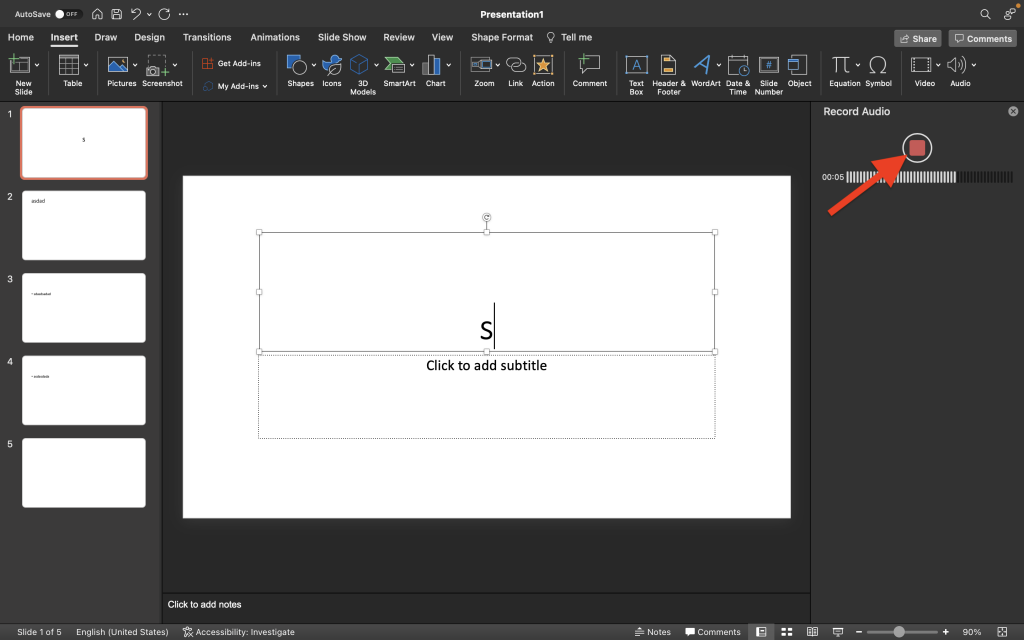
5. To stop the recording, click the Stop button. You can listen to the narration right after by selecting the Play icon.
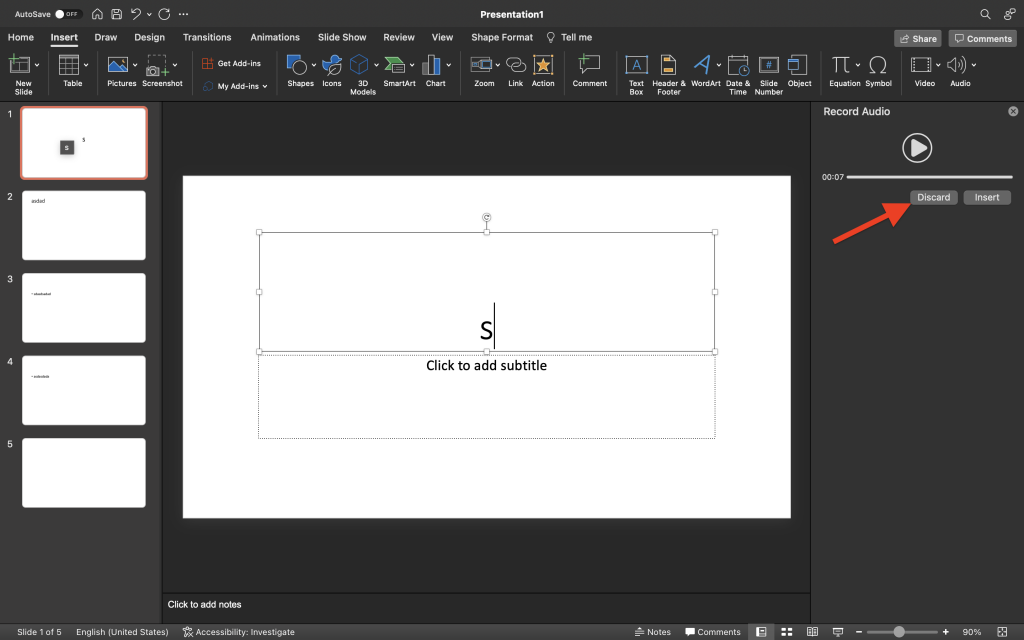
6. If you want to start over, click the Discard button.
7. When it’s ready, you can add it to the slide by clicking the Insert button.
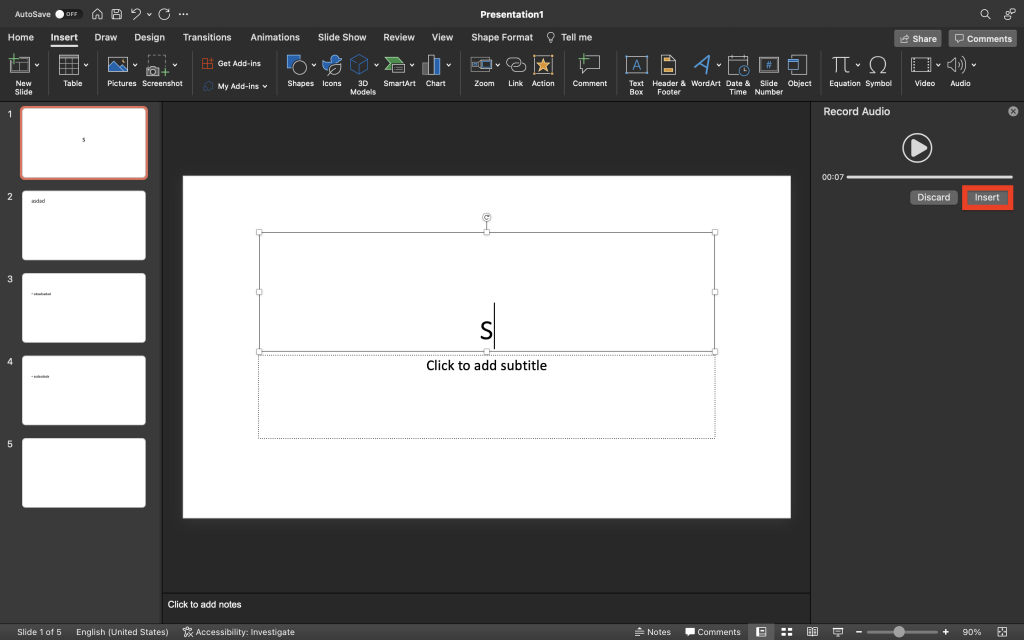
8. A white audio icon will appear on the slide. You can adjust the icon by selecting it and dragging one of the points on the border. You can also see the play, forward, backward, and volume icons on the playback bar.
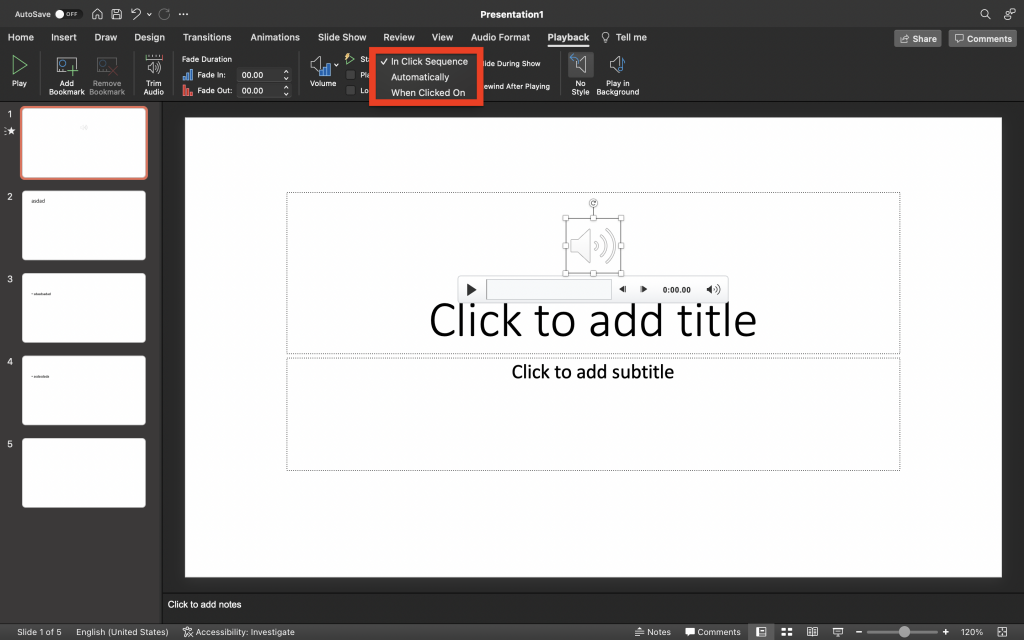
9. To set the timing of when the audio will play, go to the Playback tab and find the Start option ( Play icon with lightning ). By default, this will be set to In Click Sequence , but you can also change it to Automatically , or When Clicked On .
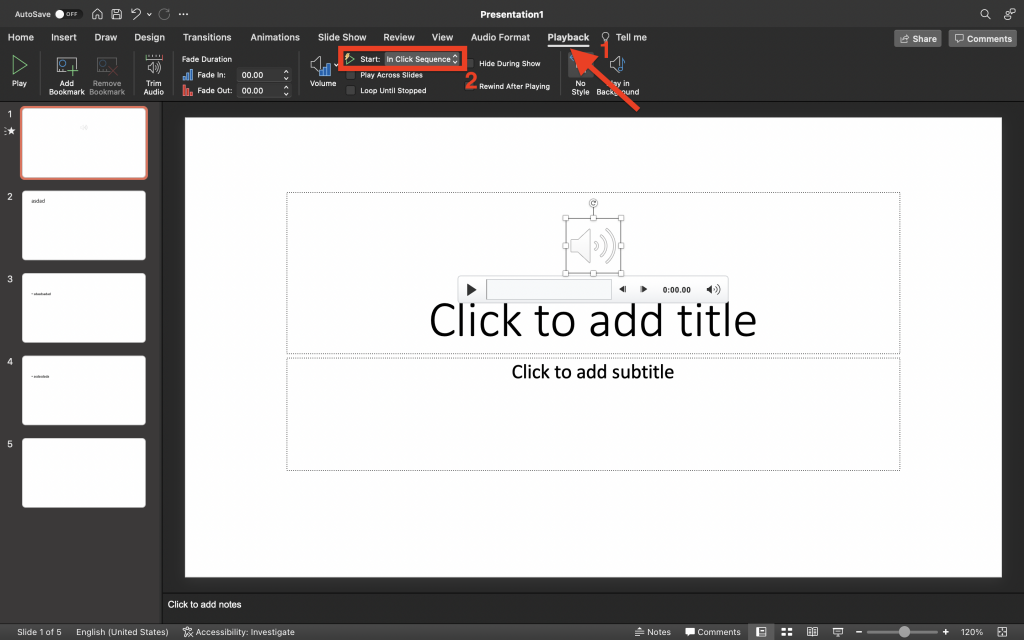
- In Click Sequence – The audio will play based on the click actions or animations that are set in the slide. You can adjust this by going to the Animation Panel . If you don’t have any animations on the slide, the narration will play before you advance to the next slide.
- Automatically – The audio will play as soon as you arrive on the slide.
- When Clicked On – The narration will only play once the audio icon is clicked on Slide Show mode . This works great for audio that’s only optional to listen to.
Method #2: Record SlideShow
The second method to narrate PowerPoint presentations may seem more taxing, but it can be done when creating the assets to include in the presentation.
1. Navigate to the SlideShow tab and select the Record SlideShow icon. This will let you record the presentation from the beginning.
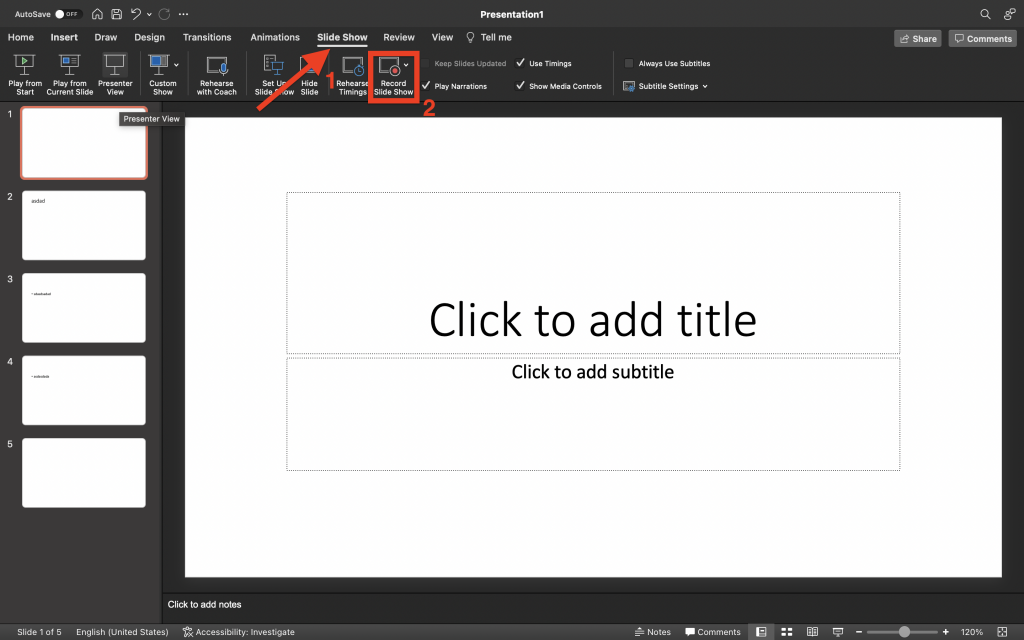
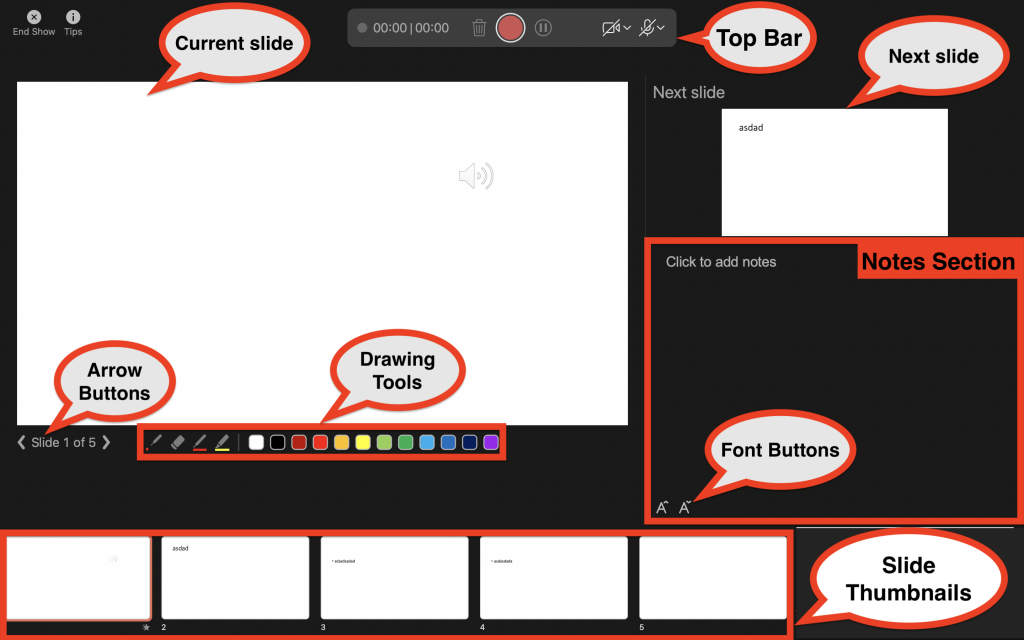
2. The Record SlideShow window will soon appear. Here are its parts:
- On the top bar, you’ll see the recording duration, the trash, record, and pause buttons. You can also toggle the camera and microphone by clicking their icons on the right edge of the bar.
To blur your background on the camera, click the Camera dropdown menu and select Blur Background .
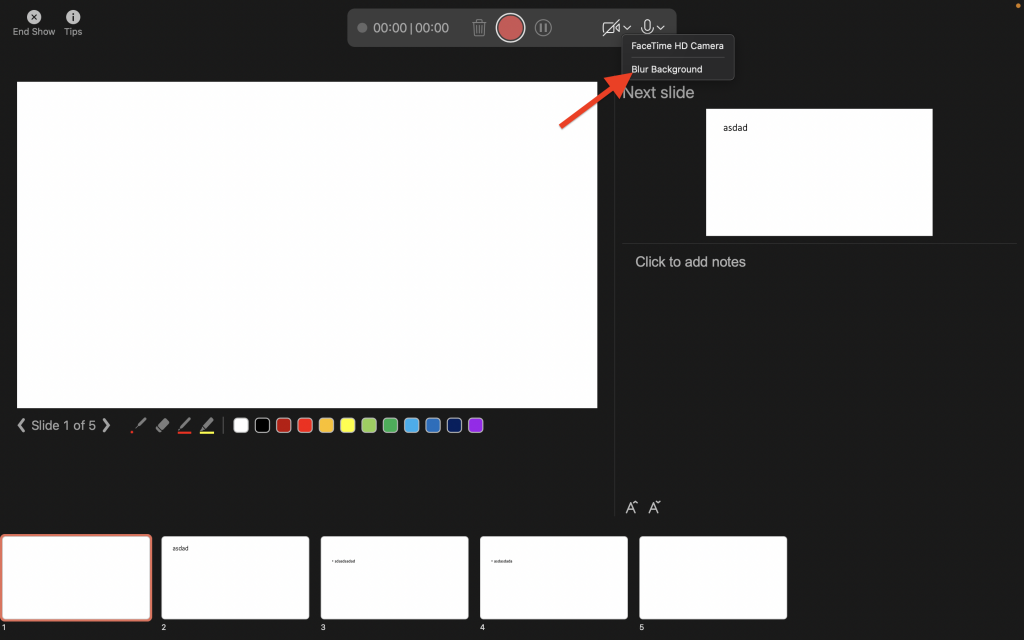
- Below, you’ll see the current and next slide previews. You can also add notes under the Next slide preview. You can adjust the font of the notes by clicking the buttons on the bottom-left.
- If you want to move to the next slide or go to the previous one, use the arrow buttons below the Current slide preview.
- To create illustrations or drawings, use the drawing tools that are beside the forward and previous buttons.
- You’ll see all slide thumbnails on the bottom of the screen.
Note : To know more about keyboard shortcuts on the Record SlideShow window, open the Tips button by clicking it.
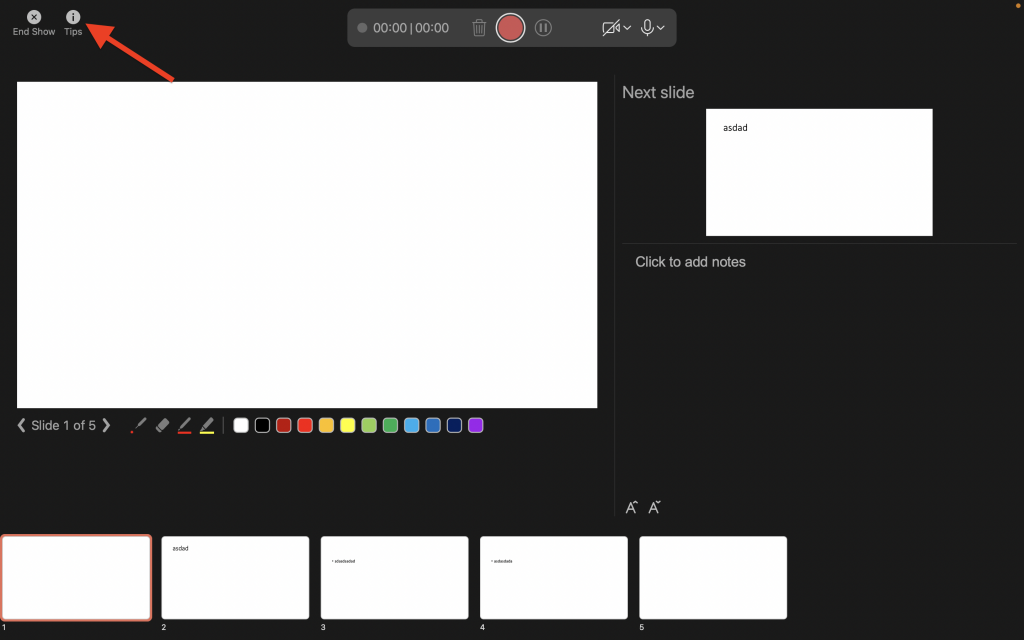
3. To record the entire presentation, make sure that the camera and microphone features are switched on. Then, press the Record button when you’re ready.
4. You can choose to pause the recording by pressing the Pause button.
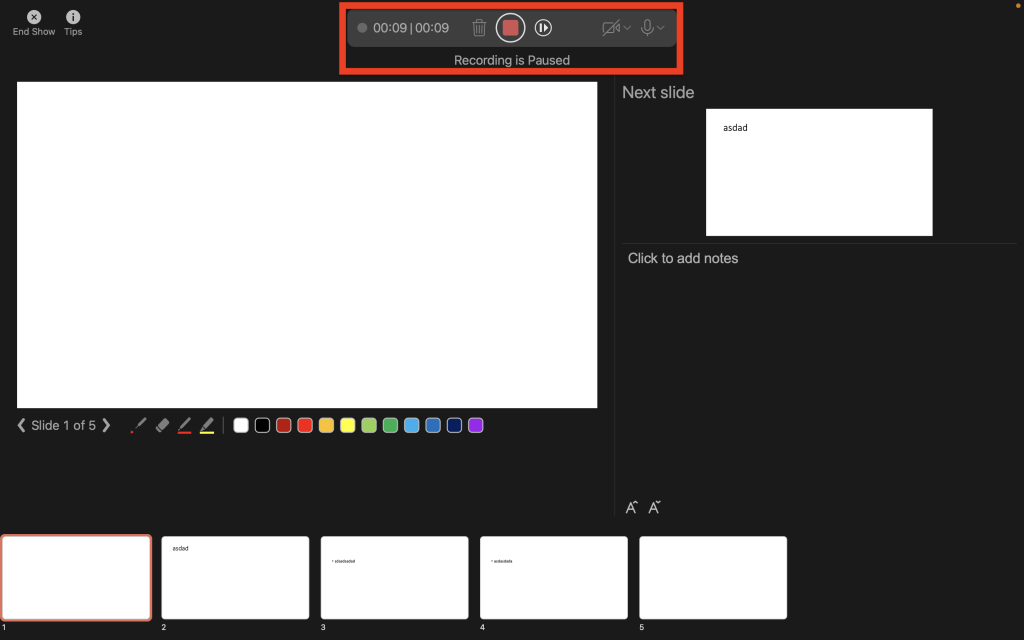
5. To stop the recording, click the Stop button. You can check the narration by pressing the Play button; once you want to delete it, click the Trash button.
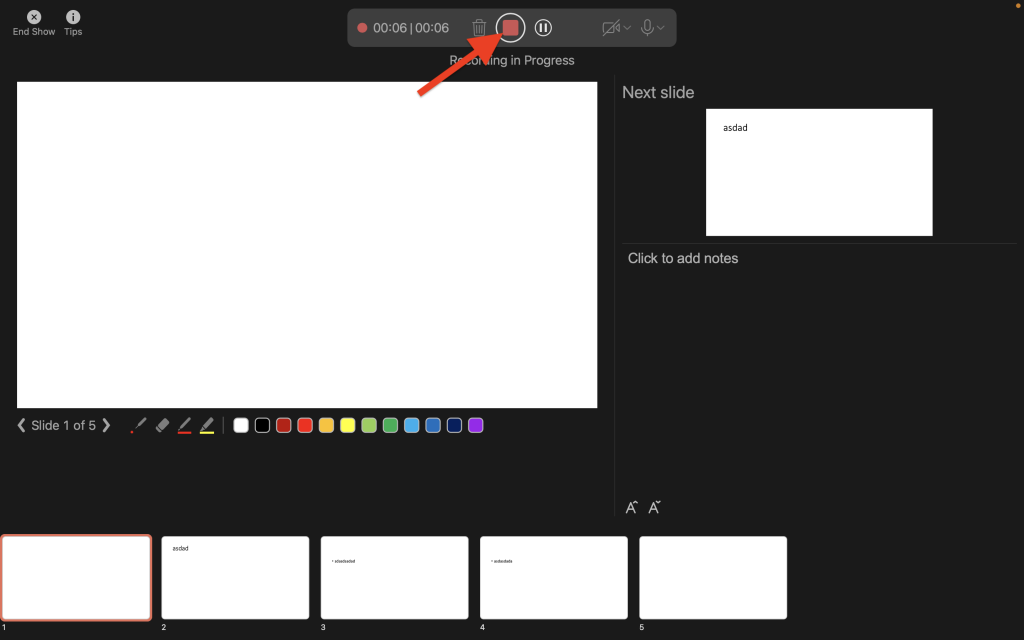
6. Once it’s ready, select End Show . You can see the narration on each slide, indicated on the slide thumbnails .
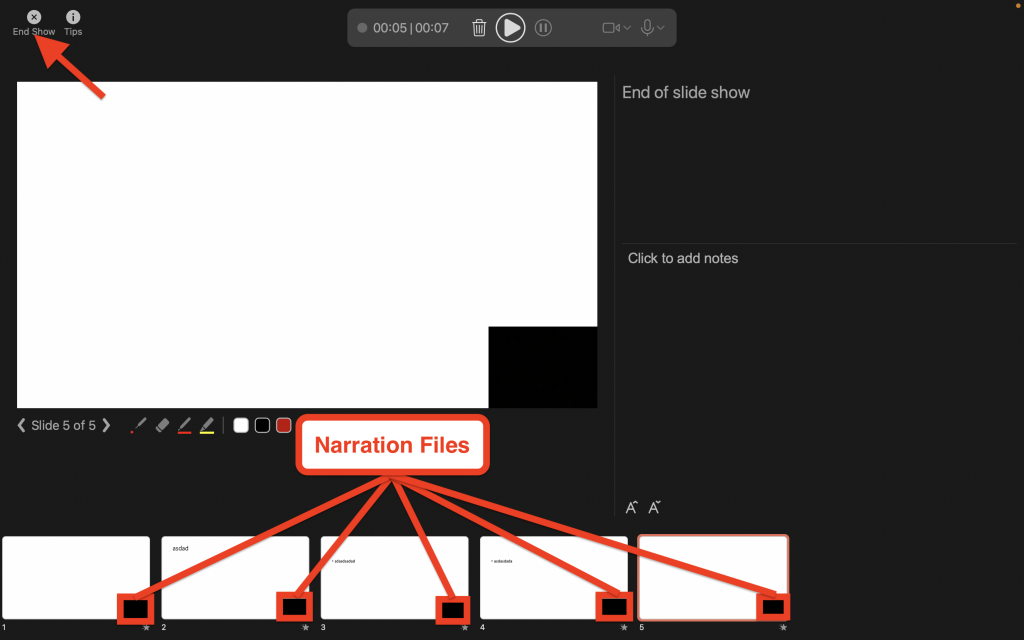
7. To set the timing of when the narration video will play, select the narration thumbnail on the bottom-right of the slide and go to the Playback tab.
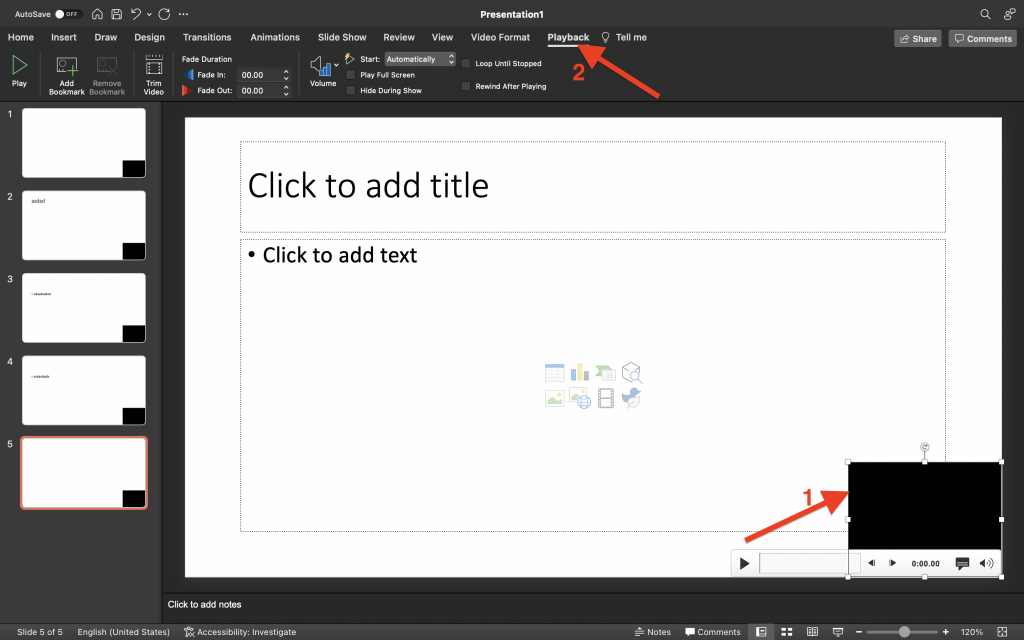
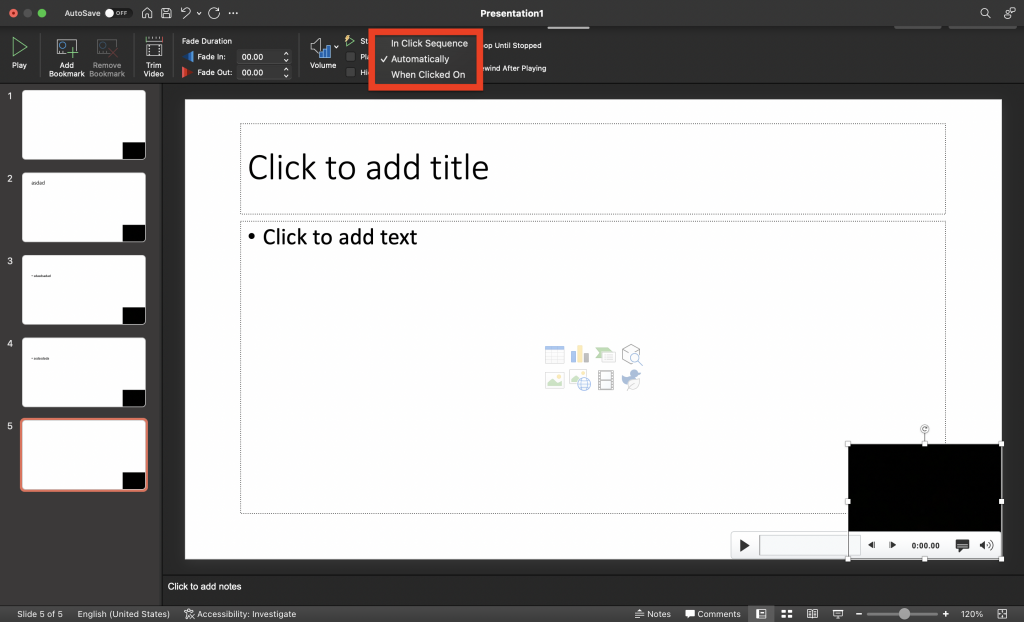
8. Similar to the first method, navigate to the Start options. By default, the timing is set to Automatic . You can also change this to In Click Sequence , or When Clicked On .
9. To clear timings and narrations on all slides, go to the SlideShow tab and select the Record SlideShow dropdown arrow.
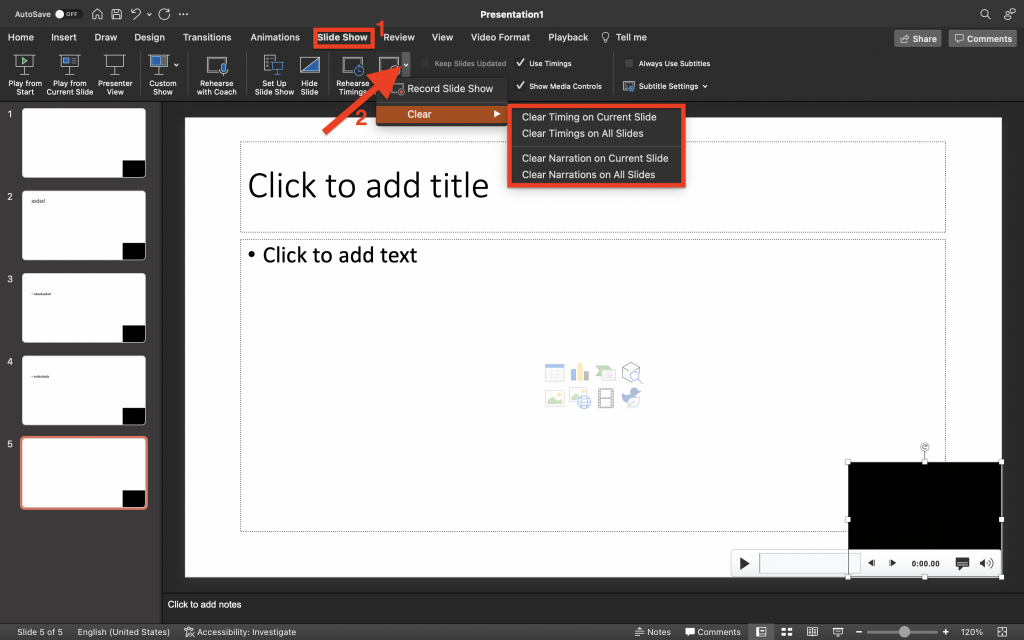
10. Under the Clear options, you can choose if you want to Clear Timings on Current/All Slides or Clear Narrations on Current/All Slides .
Considerations Preparing the Environment Before Narrating a PowerPoint presentation
Before narrating a PowerPoint presentation, make sure that you’re in a quiet environment and free from unnecessary background sound. Noises from air conditioners, fans, street noise, and people nearby can be heard on the narration recording, leading you to start over again. Investing in soundproofing foam for better sound insulation is an expenditure that pays itself over time, you won’t regret such action.
Another factor to look out for is checking if your computer’s microphone is working properly. To double-check the microphone on Windows, follow these steps:
1. Go to the Start menu and select Settings > System > Sound .
2. Under Input , make sure that it is set on your computer’s default microphone .
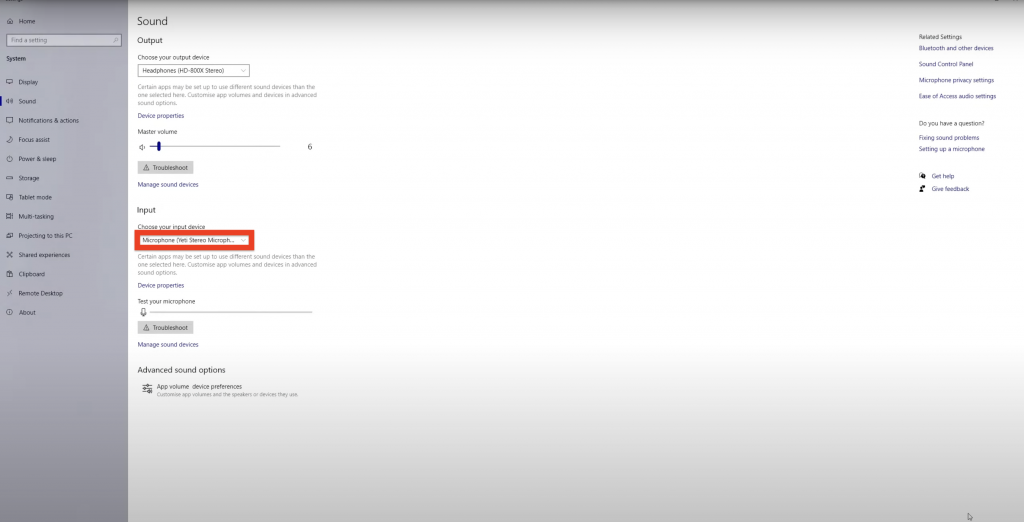
3. Also, try speaking near the microphone and check if the audio bar is moving (under Test your microphone ).
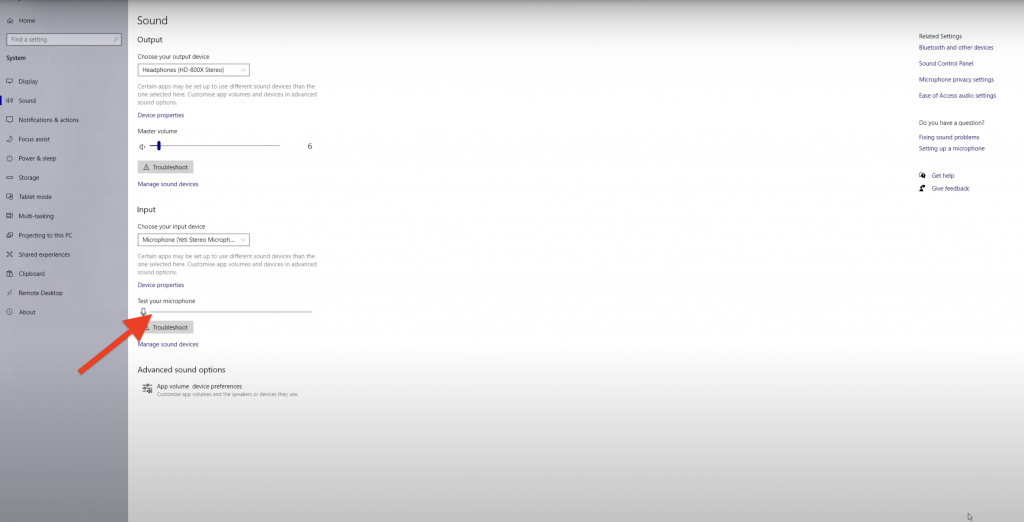
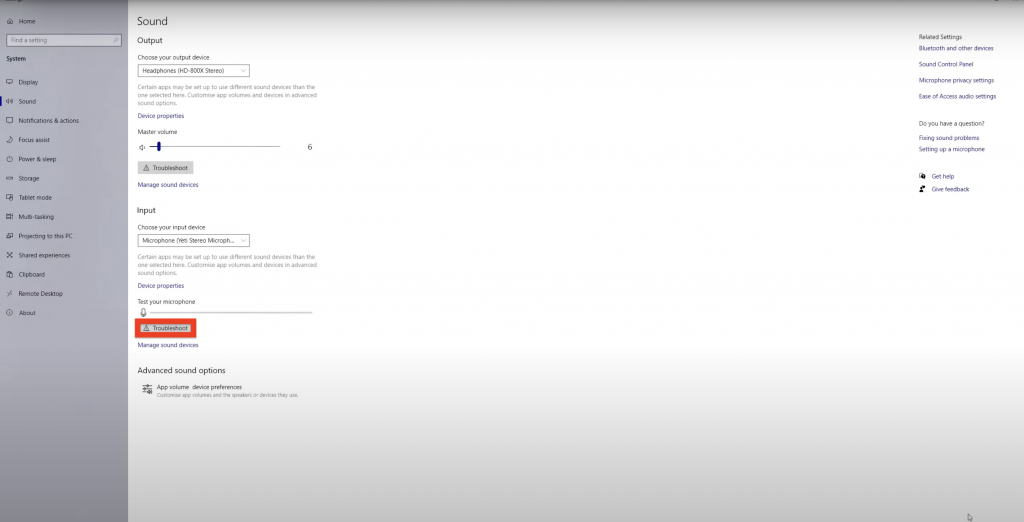
4. If you’re experiencing mic problems, click the Troubleshoot button and follow the on-screen steps. Then, restart your computer and see if the mic issue is solved.
Finally, and as extra caution, be sure to properly place your microphone in the scenario that you use an external microphone (not a handset). Dynamic microphones, thanks to their affordable price, are an option these days for many users, but they do count with a “recordable” side: this means that according to their polar curve, there is a side on the microphone that will record sound in proximity to it, and there’s a side that won’t capture sound at all. Refer to the manufacturer specs prior to blaming any potential issue. In this link , you can find more information about different microphones and their accessories to ensure the best result.
Final Thoughts
Adding narration to your PowerPoint presentations is a great strategy to keep your audience engaged . You can use these methods to point out the brief points on each slide, besides letting your audience read the content on the slide.
Keep in mind that narrating is not an alternative to inserting videos into your PowerPoint presentations since they target different objectives from a content perspective.
Like this article? Please share
PowerPoint Tips, PowerPoint Tools Filed under PowerPoint Tutorials
Related Articles

Filed under PowerPoint Tutorials • July 30th, 2024
How to Add a Timer to PowerPoint
Generate expectations for your presentation introductions by mastering how to add a timer to PowerPoint. Step-by-step instructions + templates.
Filed under PowerPoint Tutorials • July 24th, 2024
How to Find Quick Access Toolbar in PowerPoint
Easily customize PowerPoint’s UI by locating and editing the Quick Access Toolbar in PowerPoint
How to Translate in PowerPoint
Unlock the experience of PowerPoint translation! Learn methods, tools, and expert tips for smooth Spanish conversions. Make your presentations global.
Leave a Reply
Step-by-Step Instructions on Narrating PowerPoint Presentations
Let’s say you want to share a tutorial with new hires or some learning material with your colleagues. Do you think they will be able to grasp it completely from a static combination of texts and images?
Adding audio or video narration to your slides might be what you need to make your slides self-explanatory. PowerPoint lets you record your voice in an audio or video format to add more content and appeal to your slides.
This article is a step-by-step guide toward everything related to narration in PowerPoint. But before starting, let’s read about what narration is and its importance in a PowerPoint presentation.
What is a Narration in PowerPoint?
Narration in PowerPoint presentations means that you record your presentation. So, when someone is going through your slides, they can quickly understand the content better. It makes the presentation easily shareable and relatable for other people who are not a part of it.
Some examples where you can use narration –
- Sharing presentation slides with team members.
- Creating training materials for new joiners.
- Faculty members share slides ahead of a lecture.
- Building a library of best practices for the business.
How Will Narration Help Your PowerPoint Presentations?
Good narration will help you solidify the content of your slides . It will help you provide context to your content, explore deeper into the concepts, and enrich the material on your slides. Also, it enables you to share the material with whomever you want without having to lead through the presentation.
Note – Ensure that you are not reiterating the content of your slides in your narration.
Things to Keep in Mind When Recording Your Presentation
Before moving further on how to narrate your PowerPoint slides, let’s read about a few things you should consider before proceeding to record.
a). Record in a Quiet Spot
You might remember to tell people around to keep quiet while recording. But there are a lot of other noises you might forget to consider, such as loud ACs, refrigerators, phone buzzing, traffic noise in the background, etc. So, it’s better to find the quietest corner possible, or record at a time when you have the minimum disturbance possible.
b). You are Good Without Fancy Recording Equipment as Well
You don’t need fancy recording equipment or professional recording studios to add narration to your presentation. In most cases, the built-in microphone in your system is enough for recording. In cases where you wish to deliver a presentation on something important, you can go for USB microphones. The microphones are equipped to remove background noises making them a good choice for you.
Note – Check your microphones before starting. Make sure they are properly plugged in, and remember to test and troubleshoot. Your audio bar will fill up with color as you continue recording, so be mindful of that.
Now, let’s move forward to one of the most important parts of the guide, i.e., the type of PowerPoint narration tools. There are two narration tools you can use to record your presentation.
1. Record Audio
Record Audio is available in the older version of PowerPoint. The tool is faster to use and open and lets you record voice notes on a slide quickly and smoothly. You can use the tool for only voice narration, and it adds audio to one slide at a time.
Even if you don’t want to record the presentation using this tool, it is extremely useful when creating quick voice notes for the slides. You can add your thoughts or important messages without having to be bogged down with the editing details.
How to use the tool for narration?
a). Access the Record Sound Dialogue Box
To do that, click on the insert tab, open the audio drop-down, and click on record audio.
b). Record the Audio
You will now have access to the Record Sound Dialogue Box; type the name for your clip and click on the record button (to begin narrating). The stop button lets you pause, and the play button lets you listen to the presentation. Click ‘OK’ to save your narration.
c). Play the Narration
You can resize and move around the audio file and view it in the normal and slide show view of the presentation. The default setting (in click sequence) lets your audio file play when you move on to the next slide. You can also change the setting of when your file plays by selecting the file, clicking on the playback tab and then the start drop-down, and choosing the right option (In Click Sequence, Automatically, Then Click On). Let’s learn about these options-
(i). In Click Sequence
It means that your audio will play as part of the sequence of the actions that you have set for the slide, like any animation sequence, video, trigger actions, etc. If you don’t have anything in place, the audio will play before you move to the next slide.
(ii). Automatically
The audio file begins playing as soon as you get to the slide and not when you are about to move on to the next slide.
(iii). When Clicked On
The feature enables you to play the audio when you click on it. It lets you decide at the moment whether to play certain audio or not (keeping in mind time or other constraints).
d). Delete/Overwrite a Narrated File
If you want to delete an audio file, click on the object and select the delete tab. In case of overwriting/changing any existing narrated file, go to the Record Audio Dialogue Box again, as shown above, and you will be able to overwrite the existing file on the slide.
Note – You can’t have two narrated audio files on a single slide. If you decide to narrate again, the first file will get overwritten, meaning you have to start from scratch to change the narration on that particular slide. PowerPoint lets you trim an audio file but not split/merge, so in that case, you would need to use audio editing software.
2. Record Slide Show
PowerPoint incorporated this tool in a later stage with a lot of features and options. The tool offers features like voice narration, video narration (people get to see your face), narrating the entire presentation in one sitting, and setting slide timings to help convert the presentation into a video. The feature lets you use a laser pointer, pen, highlighter, etc., to give a command and capture it in the narration as well and lets you pause and restart the recording.
a). Access the Record Slide Show Dialogue Box
Click on the slide show tab and then the Record Slide Show button. You see two options when you click on the command; select the record from the beginning.
Note – If you click on the record slide show and not on the drop-down, it will start recording from the current slide.
b). Record the Narration
Choose the camera/microphone and remember to turn it on. Use the commands (record, stop, replay, arrow) to start, stop, and move to the next slides. You can also pause the recording to restart it whenever you are comfortable. You can find your individual narration file in the lower right-hand corner of each slide when you are done. That means you can review or record narrations on whichever slide you choose from your presentation.
Note – You get to have a single narration file per slide. If you choose to re-record your narration, the previous file gets overwritten automatically. However, you can have two different files on the same slide by recording one with record audio and another with the record slide show command.
Your audio/video narration automatically plays when you run your presentation (current slide or from the start). If you wish to change the feature, you can select the file, click on playback, then start the drop-down and select the option (In Click Sequence, Automatically, When Clicked On). The features are explained above in the Record Audio section.
d). Record Slide Show Tools and Options
Here is a list of all the tools and options that you have in the Record Slide Show.
(i). Recording
Record lets you start recording the narration. Pause and stop buttons help halt and end the narration. The replay button helps play the slide again after you are done recording the slide. If you click on record again (after clicking on stop), you will start recording again, rewriting the previous recording.
Note – Don’t click on stop when you want to stop recording on your current slide. Navigate to the next slide using the forward arrow/arrow keys.
(ii). Speaker Notes
Click on notes to open and close the speaker notes. Also, the action (open and close) will not show in your narration recording. Font size lets you change the font of your notes. However, the speaker notes panel is too small/inflexible to review speaker notes, so you can go for other options as well.
(iii). Clear Recordings
The features let you clear previous recordings on current or all slides as chosen. You can overwrite the recordings and slide timings by recording over the narrations.
Note – This feature clears both slide timings and narrations. If you want to, let’s say, keep the slide timings and remove the narrations, you can do so by clearing recordings outside the Record Slide Show.
(iv). Camera, Microphone, and Camera Preview
This feature will help you choose a microphone and camera for your slides. If you are choosing other than the computer’s built-in camera and microphone, this is where you get to select the option.
Camera preview lets you see what your camera is recording when you are in the process.
Note – The on/off feature lets you turn them on or off. You can add/remove video recording or mute it when needed.
(v). Advance Slide
The next slide lets you move forward in your presentation. If you have an animation sequence, music, etc., to be played, clicking on this will play those sequences and take you to the next slide later. Previous slides help you move back in the slides. However, you can only do that when you are not recording, as you can only move forward in that case.
(vi). Eraser, Highlighter, and Pen
You can draw, erase, and highlight things using this feature. You can change the color of your ink by selecting the colors. Also, your drawings get recorded, and anyone who sees the recording later will get to see the drawings.
(vii). Slide Timings
The feature lets you see how much time you have spent on each slide in your presentation and on which slide you are currently.
Note – If you convert your slides into video, slide timings will help you see the time that you spend on each slide.
(viii). Close and Minimize
It will help you minimize or exit out of (close) the record slide show box and go back to the normal view of your presentation.
Steps to Clear the Timings and Narrations
- Click on the slide show.
- Click on the record slide show dropdown.
- Click on clear.
- Choose the timings and narrations.
You can clear the timings and narrations on the current or all slides, depending on the option you choose.
Note – You can clear both things from inside the Record Slide Show box. Click on the X tab to clear recordings (current or all). It will remove both options (timings and narrations) from the slides.
Steps to Compress the PowerPoint Narrations
- Click on the file tab.
- Click on info.
- Click on the compress media dropdown.
- Click on the compression quality you wish to choose
The feature will let you compress your presentation, as adding audio/video narrations will increase the size of your slides.
PowerPoint uses 1080p (Full HD) in a recording. You can select other options according to the size and space options.
In a Nutshell
You can add a lot of versatility and content to your PowerPoint slides by going for audio and video narration. If you have the latest version of PowerPoint, Record Slide Show is a good option as it offers multiple features. Remember to compress your presentation as your file size greatly increases after narration.
Leave a Response Cancel reply
Save my name, email, and website in this browser for the next time I comment.
Please enter an answer in digits: 11 + 1 =
Ashish Arora
You might also like.

Essential Tips to Find the Right Audience for Your Next Presentation

Expert Tips to Handle Distractions When You Speak on Stage

9 Tips to Craft the Perfect Title for Your Next PowerPoint Presentation

Unleash the Power of Agile Communication in the Fast-Changing Digital Realm
Unsupported browser
This site was designed for modern browsers and tested with Internet Explorer version 10 and later.
It may not look or work correctly on your browser.
- Presentations
How to Record Narration in a PowerPoint Presentation (New Video)
- Bahasa Indonesia
You might think of PowerPoint as the app you use when you're speaking to an audience. But what if that audience can't be in the same room as you? You can do just that as we learn how to narrate a PowerPoint presentation.
You can record audio inside of PowerPoint. Then, your viewer can play it back at their convenience. Best of all, the audio stays synced to the slide timings you set while recording the audio.
If you send a presentation on its own, your audience may flip through the slides and miss the point. But if you can add narration to your presentation, you have the chance to reinforce your key points. In this tutorial, you'll learn how to record narration in PowerPoint.
Need Help? Download Our New eBook on Making Great Presentations (Free)
We also have a useful compliment to this tutorial. Download our FREE eBook: The Complete Guide to Making Great Presentations , which will help you write, design, and deliver the perfect presentation. Quickly grab it before you read on.

When you narrate PowerPoint presentations, your best bet is to use a premium template. With thousands of designs Envato Elements has you covered. Here are some of the very best:

Now let's learn all about how to record quality PowerPoint audio narration:
How to Quickly Record Narration in PowerPoint (Watch & Learn)
Watch this quick, two minute screencast below for a guided tour on recording narrations in PowerPoint. In it, you'll learn how to add narration to your presentation or on selected slides:

Prefer a written set of instructions for how to narrate a PowerPoint? Keep reading to walk through the steps to add narration to your PowerPoint presentation.
3 Audio Recording Best Practices for Proper PowerPoint Narration
With an affordable microphone you can add the commentary your audience should hear. It's easy to include it with the final PowerPoint presentation file so that your commentary follows the PPTX file.
You may not have access to a professional recording studio, but that doesn't mean that you can't improve the audio quality of your voiceover.

There are quick wins to improve the quality of your presentation narration. Great narrated PowerPoint examples have clear, easy-to-understand audio. Here are my favorite tips on how to narrate a PowerPoint presentation better:
- As a presenter, I always like to write an outline or script for my recorded audio. Use the speaker notes section in PowerPoint or print your notes to keep your audio on track.
- Purchase an inexpensive USB microphone as a major upgrade over your laptop's built-in microphone. I like this Samson Go Mic that clips to the top of my laptop. You can even use wireless headphones like Apple AirPods to narrate PowerPoint. Remember: the best microphone is the one that you have with you.
- As always, remove background noise when possible. Turn off fans, devices, and close the door to avoid distractions.
Record Narration for PowerPoint (Tutorial Steps)
Now, let's walk through how to set up for proper audio recording. You'll learn how to professionally record your narration. Then, you'll add it to your PowerPoint slides.
As you follow along with how to add narration to PowerPoint, it helps to have a great design. We’ll be using the beautiful Sora - Multipurpose Presentation from Envato Elements to demonstrate.

Download it today to follow along as we build a narrated PowerPoint example. Let's get started!
Step 1. Set Up Your Microphone
Before you start to record audio inside PowerPoint, start off by making sure that your microphone is plugged in and ready to record.
Whether you're on Windows or macOS, you'll want to access the audio device settings and set your default microphone at a system level. Select your external microphone to ensure it's utilized instead of the built-in mic.

Step 2. Press Record in PowerPoint
To record narrations in PowerPoint, start off by finding the Slide Show tab on PowerPoint's ribbon. Click on the Slide Show tab to change the available options.

Make sure that you start on the first slide in PowerPoint to record audio and timings for the entire presentation.
Now, find the Record button and click on it. PowerPoint launches the Recording menu. You’ll see thumbnails of your slides below, and a menu bar at the top.
This menu dashboard lets you control your recording settings. In a few clicks, you can set things up to narrate PowerPoint exactly how you want.
Make sure you're ready before you press Start Recording. As soon as you click on it, you can narrate PowerPoint as it records both audio and the screen.
Step 3. Start Recording Your Narration
When you click Record , PowerPoint won’t immediately be recording audio. Notice the round red Record button in the top center.
To capture audio, you’ll need to click this. When you do, a three-second countdown clock appears on your slideshow preview. Once it reaches zero, your microphone is live and all of your narration and audio records automatically.
At the top, you’ll see the Recording menu with a runtime counter. This is a handy way to keep track of time as you present.

Now, begin speaking and navigating through your slide deck. I like to use the arrow keys on my keyboard to move through my slides. Use the right arrow to jump to the next slide, or the left arrow to move to the previous PowerPoint slide.
PowerPoint is recording exactly what's on your screen along with the audio you speak into your microphone.
When you’re finished, click on the red Record button again. The recording stops.
It's ideal if you have a dual monitor setup and you can use Presenter View, which puts a preview of your next slide with your speaking notes on a second screen. Turn on Presenter View on the Slide Show tab by checking Use Presenter View.

Step 4. Use Annotations (Optional)
While you're recording your presentation, you can also add annotations to your PowerPoint. You can use a digital pen, highlighter or laser pointer to add markings.
To use annotations, go to the row of buttons below your slide previews. The annotation controls are on the left side: laser, pen, and more. Click on one of these to activate it.

After you select a tool, you can draw on the slide to add the annotation. Viewers will see these annotations drawn in while watching the recorded version of your presentation.
Step 5. Reset Presentation Timings as Needed
Let's say that you had the perfect audio take, but the timings of your slide changes were off by a bit. That's no problem. We can readily restart the process of setting your slide timings.
To do that, make sure that you're on the Slide Show tab and click on Rehearse Timings . Your presentation will go into full screen mode. Usese the arrow keys to change slides to set new timings.

Now that you're finished, you can send your presentation onto a viewer with your narration embedded. When they play the presentation, your recorded narration will play with it, timed how you've set it up while rehearsing.
How to Add Audio (Narration) for Selected PowerPoint Slides
If you don't want to record audio with timings for an entire presentation, another option is to add audio to a selected slide.
To do this, click on the Insert tab on the PowerPoint ribbon. On the right side of the ribbon, find the Audio button and click on it. Again, you'll want to make sure that your microphone is selected in your system settings before choosing this option.

On this drop-down menu, you can actually add audio clips that you've recorded in other apps using the Audio on My PC... option, or record audio right inside PowerPoint by clicking Record Audio.

If you choose to Record Audio , you'll see a new window. Press the red Record button to capture audio inside PowerPoint and place it on a slide directly.
Discover More Great PowerPoint Tutorials (On Envato Tuts+)
You've got a new skill in your tool belt: how to record voiceover on PowerPoint presentations. Why stop now that you know how to narrate PowerPoints?
We've built out a comprehensive learning resource, How to Use PowerPoint (Ultimate Tutorial Guide.) You can teach yourself PowerPoint with this deep set of tutorials. Check out a few of our favorites below:

More Top Templates for Microsoft PowerPoint
As you learned how to add narration to PowerPoint, we featured a premium template. But this is just one of many PowerPoint pre-built slide designs. Thanks to great templates, you'll have more time to build a narrated PowerPoint example!
We regularly feature top PowerPoint templates on Envato Tuts+. Check out more of the top templates below. They work perfectly with our steps to narrate PowerPoint slides, too!

Download Our New eBook on Making Great Presentations (Free PDF)
We have the perfect complement to this tutorial, which will walk you through the complete presentation process. Learn how to write your presentation, design it like a pro, and prepare it to present powerfully.
Download our new eBook: The Complete Guide to Making Great Presentations . It's available for FREE with a subscription to the Tuts+ Business Newsletter.

You Just Learned How to Record a Voiceover on PowerPoint
I love voiceovers as a way to share your commentary with viewers, even when you aren't in the same room. Add your audio to create professional, spoken versions of your presentation.
Now, it's your turn to practice how to add narration to PowerPoint. Re-open a slide deck you've built in the past, and narrate PowerPoint slides. Then, send your narrated PowerPoint example. I'll bet they understand the content better than ever!
Editorial Note: This post has been updated and a new video added with help from Andrew Childress . Andrew is a freelance instructor for Envato Tuts+.

How to Narrate a PowerPoint: A Step-by-Step Guide

Adding narration to your PowerPoint presentations can make them more dynamic, engaging, and accessible. Whether you are creating a presentation for work, school, or personal use, narration allows you to provide additional context and explanation beyond what simple slides with bullet points can offer.
Prepare Your Presentation
Before narrating your presentation, make sure your PowerPoint slides are complete. Outline the key points you want to cover on each slide. You don’t want to be creating slides or making major revisions while recording your narration.
Set Up Your Equipment
To record high-quality narration, you will need:
Record Your Narration
Rehearse your script to ensure smooth narration. Remember to speak slowly and clearly.
Save and Share
Tips for great narration.
With this easy guide, you can start narrating your PowerPoint presentations like a pro. Narration makes content more interesting, memorable, and inclusive.
About The Author
Vegaslide staff, related posts.

How to Run PowerPoint From a Command Line

How to Use the Slide Sorter View in PowerPoint
How to link or embed powerpoint ppt or pdf objects in word.

How to Share One Slide from PowerPoint in a Presentation
How-To Geek
How to record voiceover narration in powerpoint.

Your changes have been saved
Email is sent
Email has already been sent
Please verify your email address.
You’ve reached your account maximum for followed topics.
Microsoft Office vs. Google Docs, Sheets, Slides: Which Is Best?
32 useful microsoft outlook keyboard shortcuts for emails, how to connect an hdmi device to your meta quest headset, quick links, preparation, record a voiceover for your presentation.
If you’re sending out your presentation instead of giving it in front of an audience, but you feel adding a vocal explanation would better help to deliver the message, record a voiceover narration. Here’s how to do it.
Before you begin your PowerPoint narration, you’ll need to make sure you’ve made the proper preparations.
Set Up Your Mic
First, you’ll need a microphone. Most modern computers have a built-in microphone that gets the job done, but investing in a USB microphone will increase the audio quality of the narration by quite a bit.
The built-in microphone will be set as your input device by default, so if you plan on using it for the PowerPoint narration, you don’t need to take any additional steps in setting it up. However, if you plan to use a USB microphone for the narration, be sure to set it as the input device.
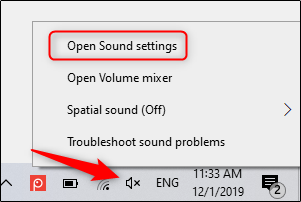
To do this on Windows, right-click the volume icon found on the right of the taskbar. In the menu that appears, select “Open Sound Settings.”
The “Sound Settings” window will appear. Here, scroll down to the “Input” section and click the box under “Choose your input device.”
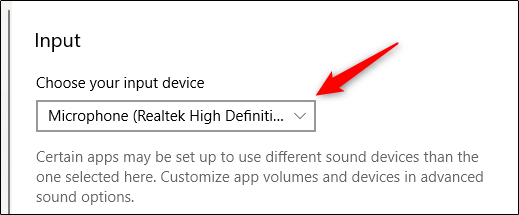
If you’re using a USB microphone, it will appear here. Select it to set it as the input device.
The steps for Mac users are extremely similar. The only difference is you should go to "System Settings" and select "Sound" instead of right-clicking the volume icon like on Windows. From there, the steps are the same.
Take Notes and Rehearse
With your mic set up, you’re ready to start recording, right? Well, not quite. While you may not be physically standing in front of the audience delivering this presentation, you still need to treat it as though you are. This means going through the basics---taking notes and rehearsing your delivery.
One thing you can do to help you record a successful narration is to write out a script. As with a live presentation, though, you don’t want to sound like you’re reading straight from your notecards. Practice reading through the script a few times so that it sounds natural and fluid.
Once you’re confident in your delivery, it’s time to start recording.
Open the PowerPoint presentation in which you would like to record a voiceover narration. Head over to the “Slide Show” tab and, in the “Set Up” group, select “Record Slide Show.” Once selected, a drop-down menu will appear. Here, you can choose to start the narration from the beginning or from the current slide. If you choose to start recording from the current slide, make sure that you’re on the slide you’d like to start recording from.
Related: How to Record Your Screen with Microsoft PowerPoint
In this example, we’ll choose “Record from Beginning.”
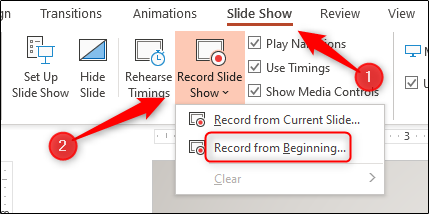
Now, you’ll be in full-screen mode. You’ll notice a few extra tools appear, including a record button at the top-left corner of the screen. When you’re ready to start recording, click this button.

When you select the record button, a countdown timer will appear, giving you a three-second delay between clicking the button and starting your recording.

You can now start recording your voiceover narration! Continue through the presentation by clicking the right arrow to go to the next slide.

You can pause the recording at any time by pressing the pause button in the top-left corner of the window. The recording will automatically end when you make it to the last slide. Alternatively, you can press the stop button, also located at the top-left corner of the screen.

If you want to play your narration back, you can select the replay button.

A speaker icon will appear at the bottom-right corner of each slide that has a recorded narration. You can also play your narration back on each slide by hovering over the icon and pressing the play button.
If you’re not satisfied with the narration, simply repeat these steps to re-record.
- Microsoft Office
- Microsoft PowerPoint
- office 2019
How to Narrate a PowerPoint Presentation (And Record Your Voice)
For a presentation that you aren’t actually giving in person, you can narrate it within PowerPoint, recording your voice so that others can play it back when they watch the presentation.
It’s a nifty trick that popular with slide shows and presentations on networks such as SlideShare, YouTube, and even individual websites. And it can even help you when rehearsing your presentation as well.
Here’s how to narrate a PowerPoint presentation by recording your voice, in a few quick steps!
How Does Unlimited PowerPoint Templates Sound?
Download thousands of PowerPoint templates, and many other design elements, with an Envato membership. It starts at $16 per month, and gives you unlimited access to a growing library of over 19+ million presentation templates, fonts, photos, graphics, and more.
Business PPT Templates
Corporate & pro.

Pitch Deck Templates
Startup pitch deck.

Ciri Template
Explore PowerPoint Templates
Create and Design Your Presentation
The first step to preparing a narrated or recorded PowerPoint presentation is to design the presentation and refine the content. During this step you may even want to think about how you will script the presentation so that you are designing with a flow in mind.
Make sure to include any specific transitions you want to use from slide to slide, and don’t forget to read our guide on how to design a professional presentation for tips and pointers.
Prepare for Recording
Before recording a narration, it is advised to write out a script and check your computer microphone to ensure that the sound is correct and that recordings will be at an appropriate volume. You can do this with a short test recording.
Now it is time to record the narration. You can record narration for all slides or select slides.
Open your presentation and navigate to the Slide Show tab.
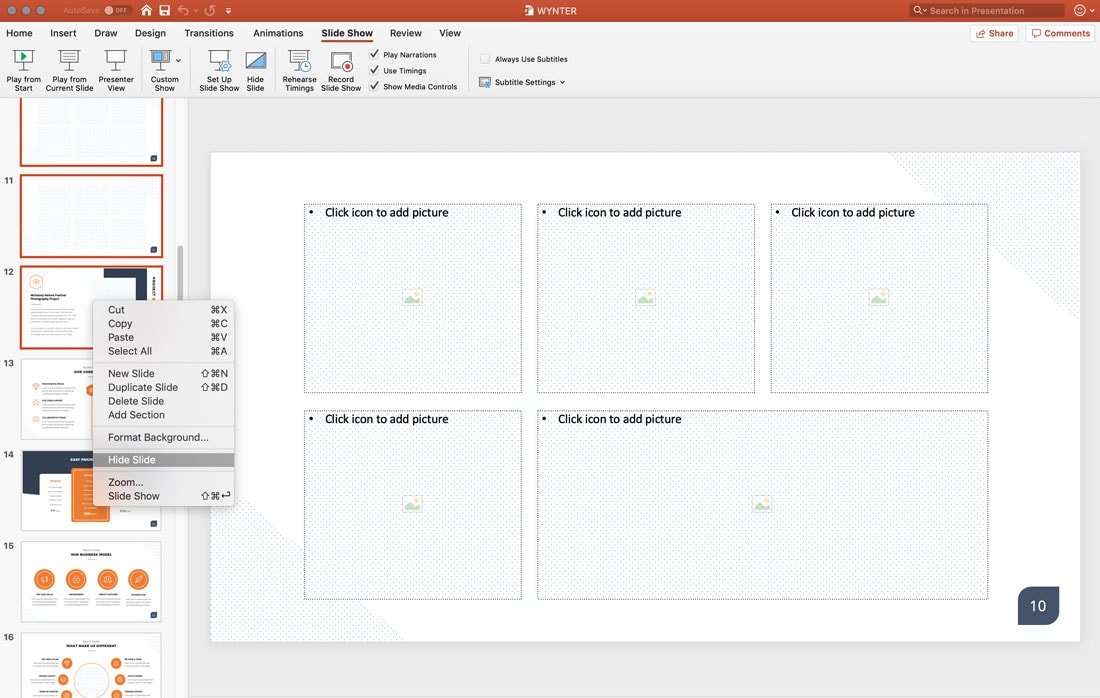
If you are recording narration for all of the slides, you are ready. If you plan to record a voiceover for only some of the slides, you want to hide the slides you won’t have a recording for.
You can do this by selecting the slides you don’t want to include, right- or ctrl-click and then Hide Slide.
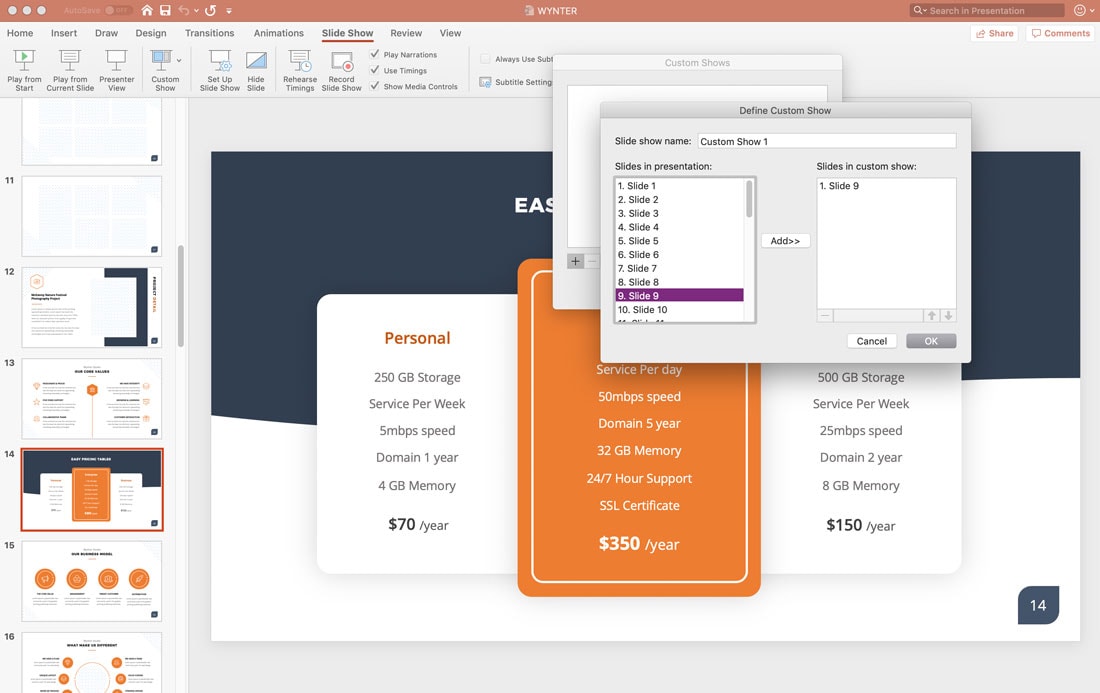
The other option is to create a custom show. From the menu select Custom Show > Custom Slide Show > use the + to add slides. You will need to know which slide numbers you want for this option because you can’t see previews.

Record the Narration
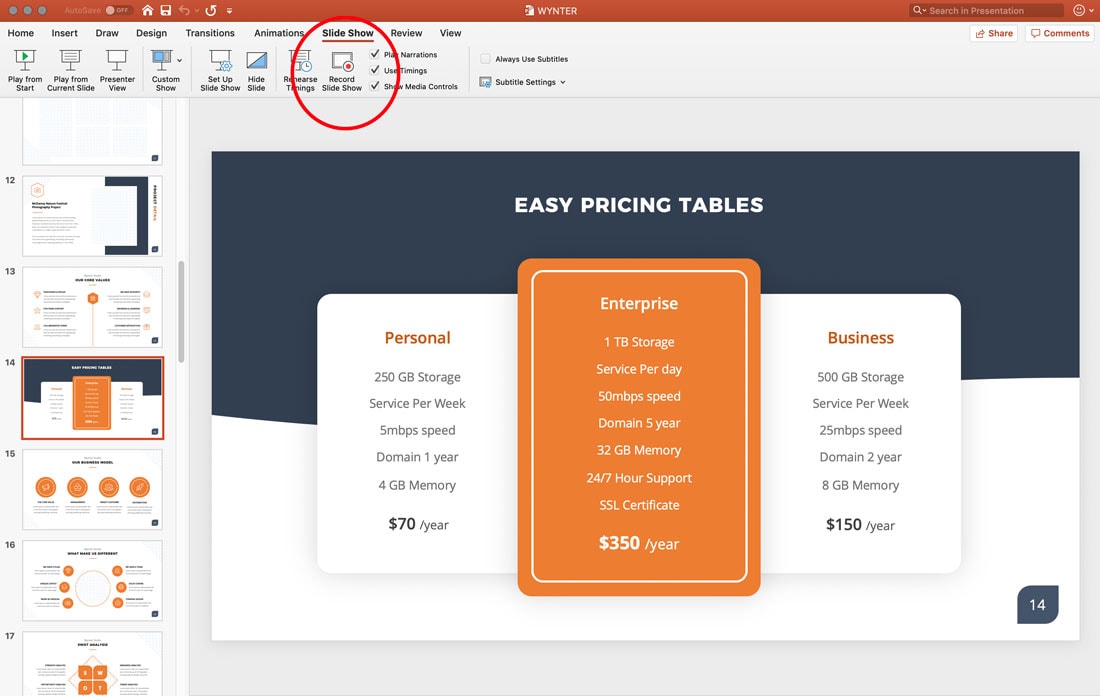
Now you are ready to record. (Good luck!)
In the Slide Show tab, click the Record Slide Show Button from the first slide in your presentation.
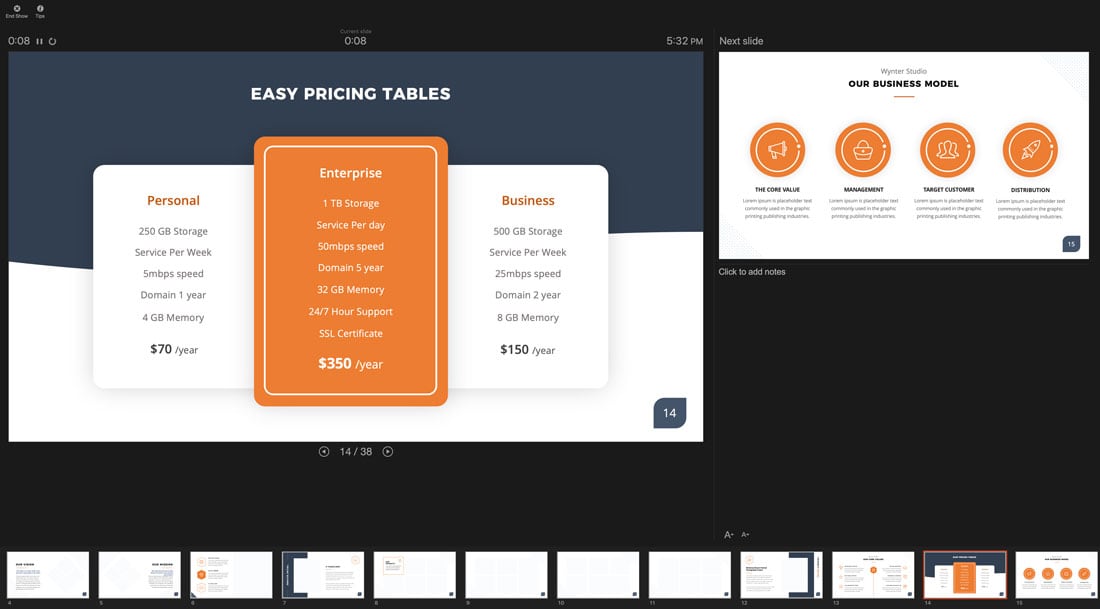
Recording starts automatically. (You’ll notice the screen shifts into full presentation mode.) As you record the narration, you can use the navigation tools on the screen to advance slides. This will override any previous timing settings so that slides advance in tandem with your voice narration.
When you are finished, click End and you will be prompted to save the recording. Only one recording can be saved at a time. A new recording will override any previously saved recorded narrations.
You can preview the recording using the start button.
Helpful Keyboard Shortcuts
Using keyboard shortcuts during recording can make it a little easier.
Some shortcuts you might use include:
- Click, spacebar or right arrow: Advance to the next slide
- Delete or left arrow: Go back one slide
- B: Toggle to black screen
- Esc: End slide show recording
Choose a Playback Option
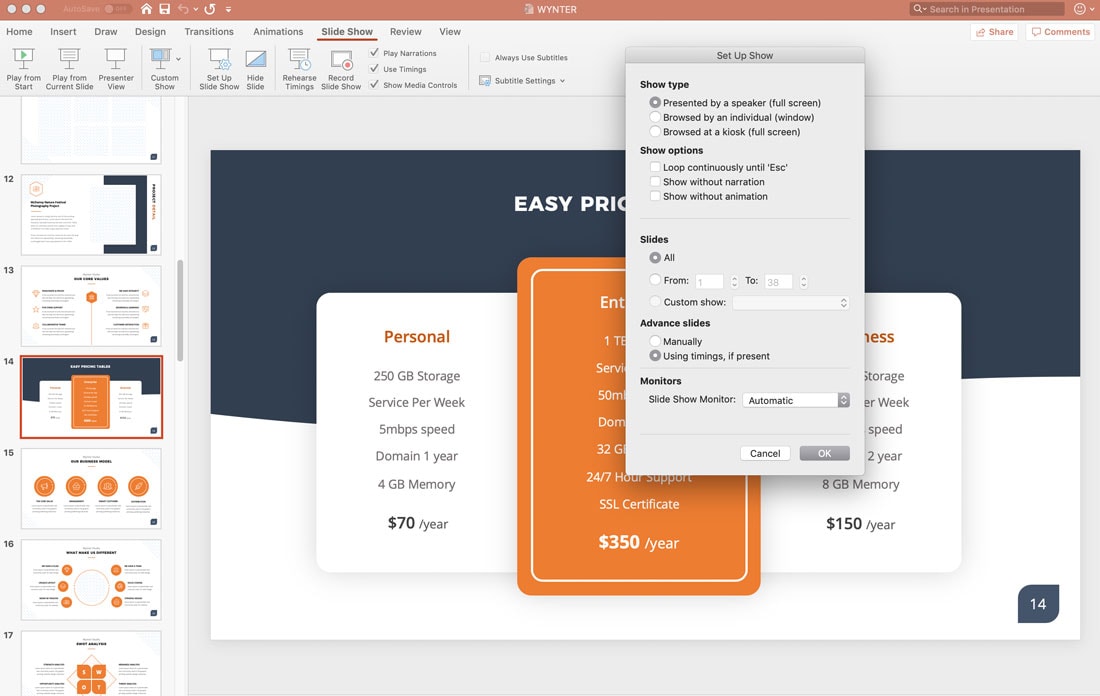
Finally, you’ll want to determine how the presentation will be played back for users.
Click on Set Up Slide Show from the menu and make your selections from the options on the screen. Then you can save or export to a desired file format.
A PowerPoint presentation with a narrated recording can be a useful tool to help get your information in front of more people. All you need to do it is a quiet room to record and a microphone attached to your computer.
Don’t forget to take a look at our full PowerPoint templates guide , or our collection of the best PowerPoint templates for your next project!
- Use Presenter View Video
- Add speaker notes Video
- Practice and time your presentation Video
- Record a presentation Video
- Print a presentation Video

Record a presentation

Record narration and timings for your presentation to give it a professional and polished feel.
Record narration and timings
Open the slide you want to start recording from.
Near the upper right corner of the PowerPoint window, select Record .
Choose from two options
When you're ready, select the round, red Record button, wait for the countdown, then start speaking. To record from a specific slide, go to it, and then select Record .
Note: Narration isn't recorded while the transition between slides happens, so pause during a transition, then resume speaking.
Manage narration and timings
There are different ways to manage recordings in your presentation:
Pause - to pause a recording
Stop - to end a recording
Replay - to replay a recording
Pen , Highlighter , or Eraser - use the pen, highlighter, or eraser tools to mark up your recording
Remove narration or timings
An audio icon appears on a slide when narration is available.
You can also remove narration or timings from your slide.
If you're in record mode, select Clear .
Choose from two options:
Clear Recording on Current Slide - to delete narration and timings on the current slide
Clear Recording on All Slides - to delete narration and timings from all slides at once
Save a recording
When you're done recording, save and share your presentation as a PowerPoint file or video.
Select File .
Choose an option like Save or Export . Your recording will automatically play when someone opens the presentation.
Record a slide show with narration and slide timings
PowerPoint training

Need more help?
Want more options.
Explore subscription benefits, browse training courses, learn how to secure your device, and more.

Microsoft 365 subscription benefits

Microsoft 365 training

Microsoft security

Accessibility center
Communities help you ask and answer questions, give feedback, and hear from experts with rich knowledge.

Ask the Microsoft Community

Microsoft Tech Community

Windows Insiders
Microsoft 365 Insiders
Was this information helpful?
Thank you for your feedback.

How to Record a PowerPoint Presentation with Narration
Can be helpful in creating a dramatic narrative
Microsoft PowerPoint has a built-in recording tool that allows you to narrate your presentations using recorded audio. You can export and share recorded presentations as video files.
This tutorial covers everything about recording PowerPoint presentations on Windows and Mac computers.

Record PowerPoint Presentation with Narration
Open the PowerPoint file/presentation you want to record and follow the steps below.
Record PowerPoint Presentation on Windows
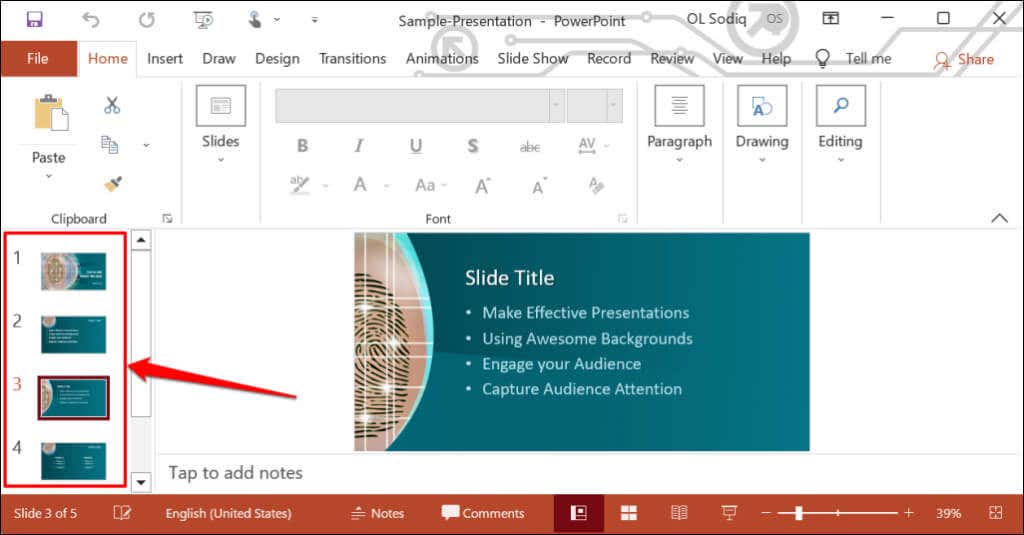
- Select the slide you want to start recording from on the slide thumbnail pane.
- Head to the Record tab on the ribbon and select the Record button to start recording from the current/selected slide.
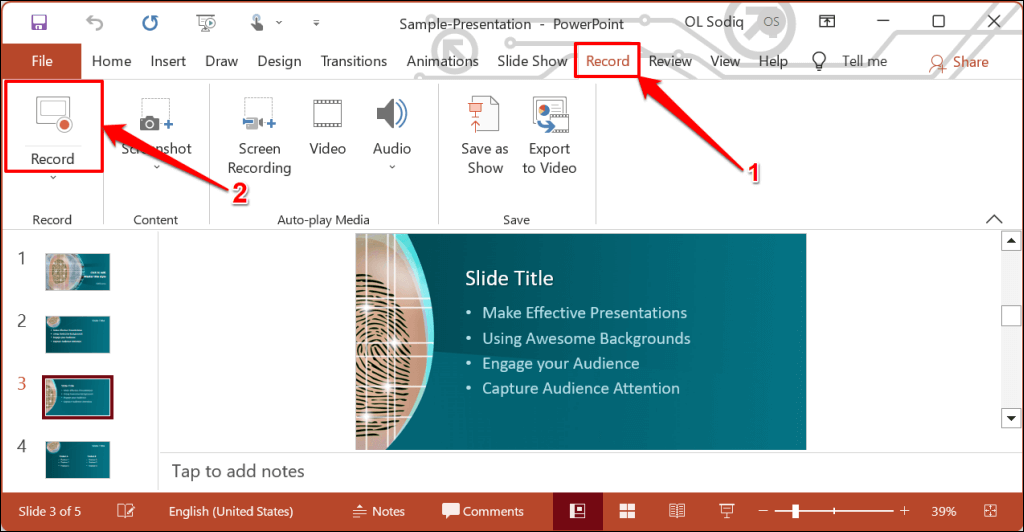
To record from the first slide, select the down-facing arrow icon below the Record button and select From Beginning .
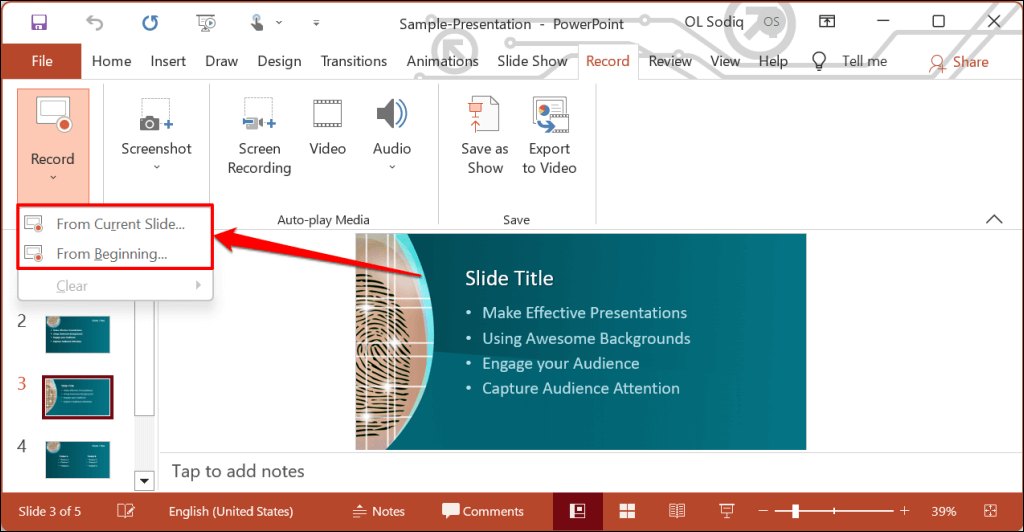
You can also record a presentation from the Slide Show tab. Select Slide Show on the ribbon and select Record , From Current Slide , or From Beginning .
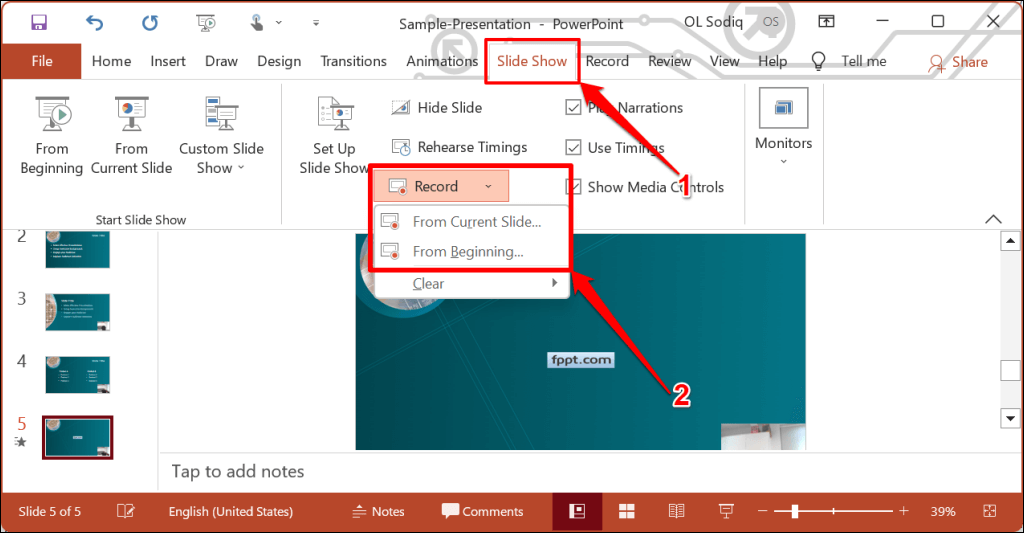
That’ll open PowerPoint’s presentation recorder in a fullscreen window.
- Select the Record icon and start speaking after the three seconds countdown.
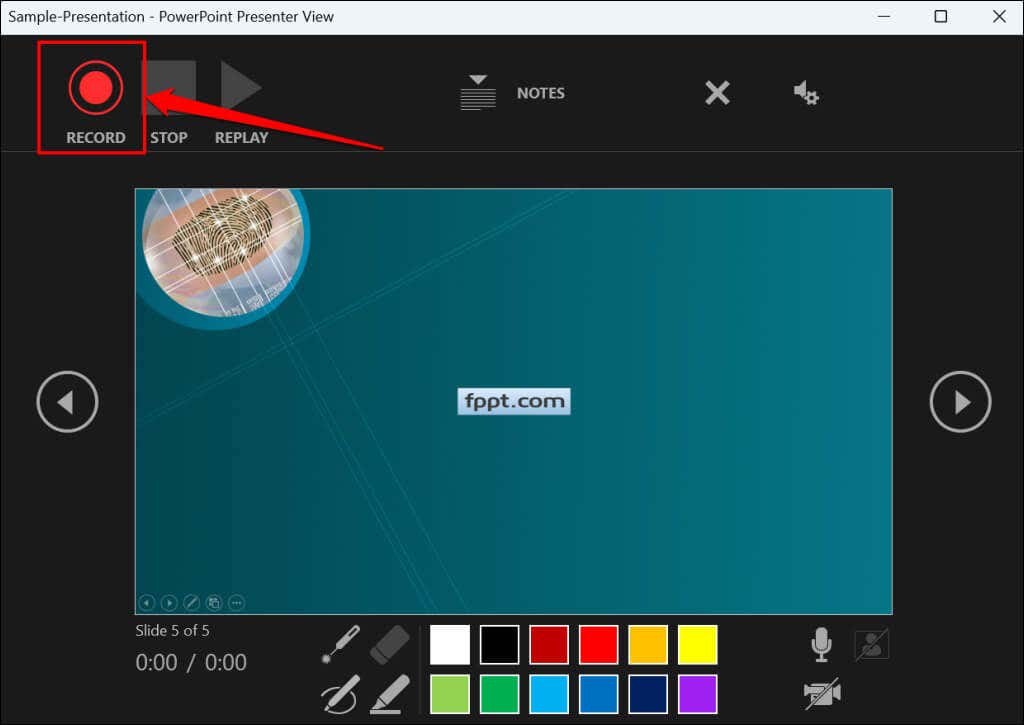
PowerPoint records the presentation window and captures your voice and webcam feed as you navigate the slides. Select the left-facing and right-facing arrows to move to the previous and next slides in the presentation.
Record PowerPoint Presentation in macOS
- Open the Slide Show tab and select Record Slide Show .
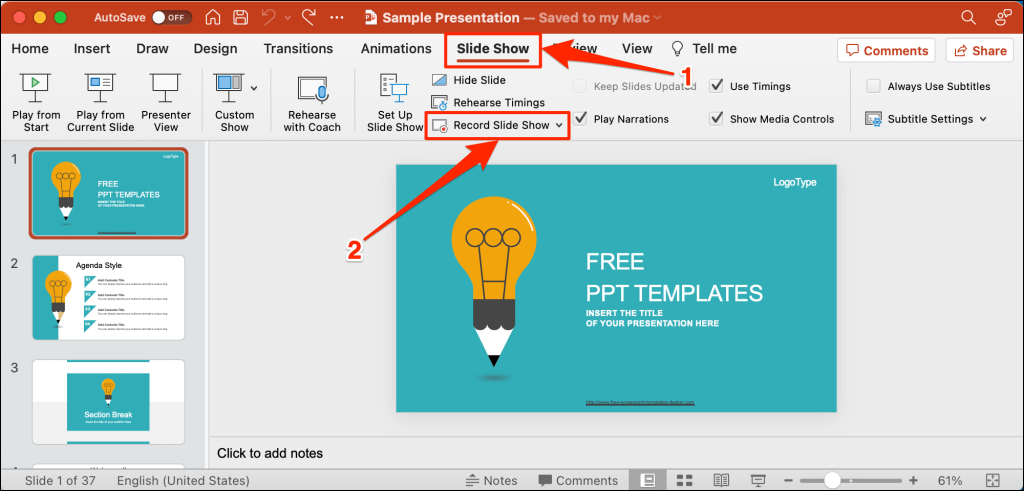
- Select the Record button on the toolbar to start recording your narration.
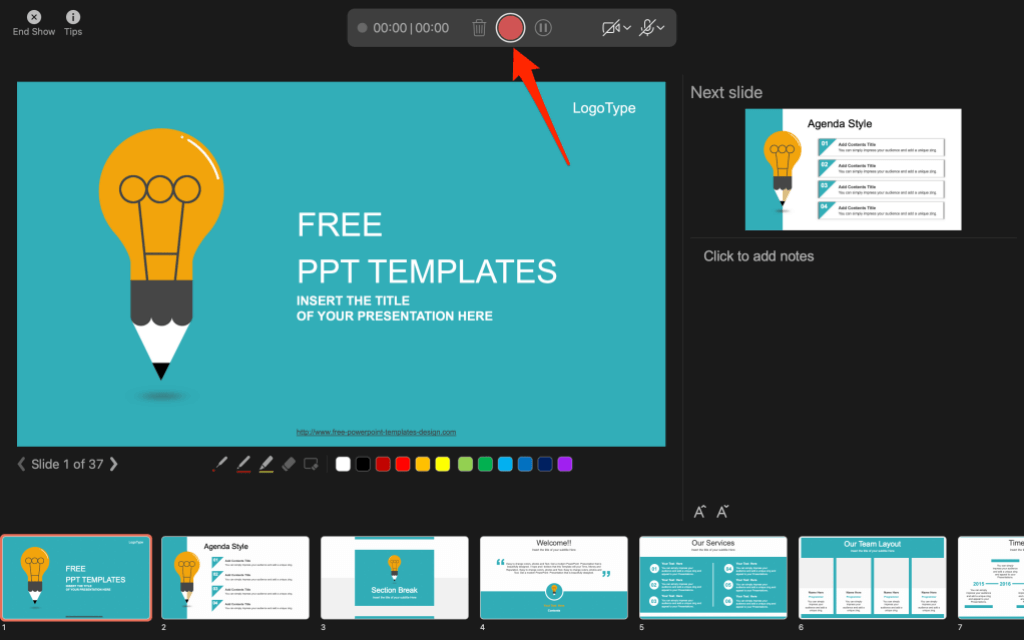
Use your keyboard arrow keys to move back and forth between slides. Press N or Space Bar to move to the next slide or animation in the presentation. Press P or Backspace to return to the previous slide or animation.
Select Tips in the top-left corner for more keyboard shortcuts and other presentation tips.
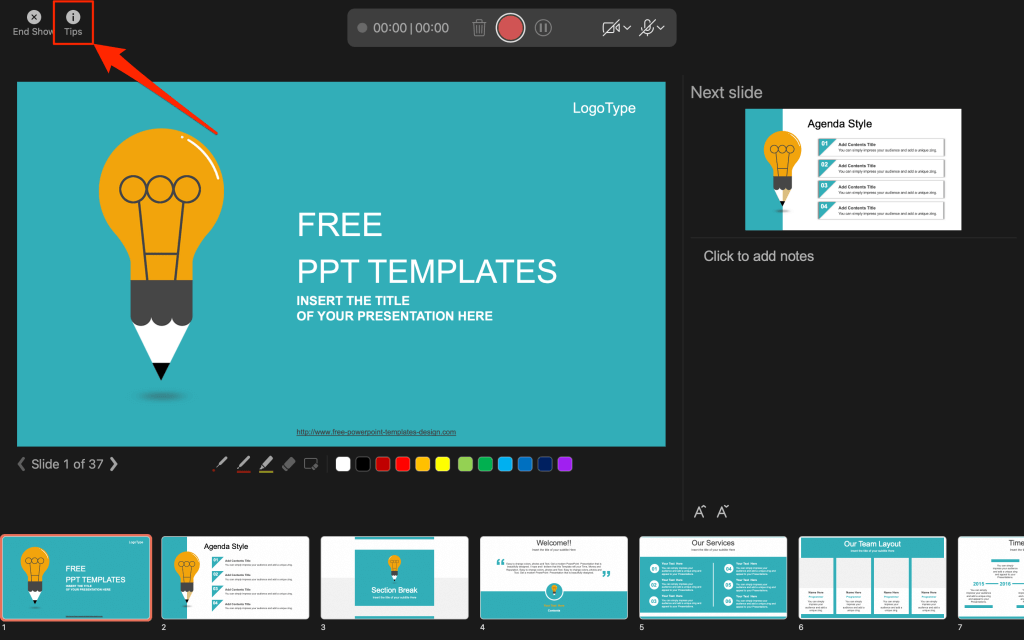
Note: The narration tool doesn’t record slide transitions. When moving between slides, wait for the destination slide to appear on the screen before speaking.
PowerPoint Recorder Control/Settings
You’ll find a handful of controls and options on the recording tool. We’ll show you how to use these controls to include voiceovers or audio recordings in your presentation.

Using Presentation Pointer Tools
PowerPoint provides several tools to mark up your slides when narrating your presentation. There’s a pen tool, eraser, laser pointer, and highlighter.
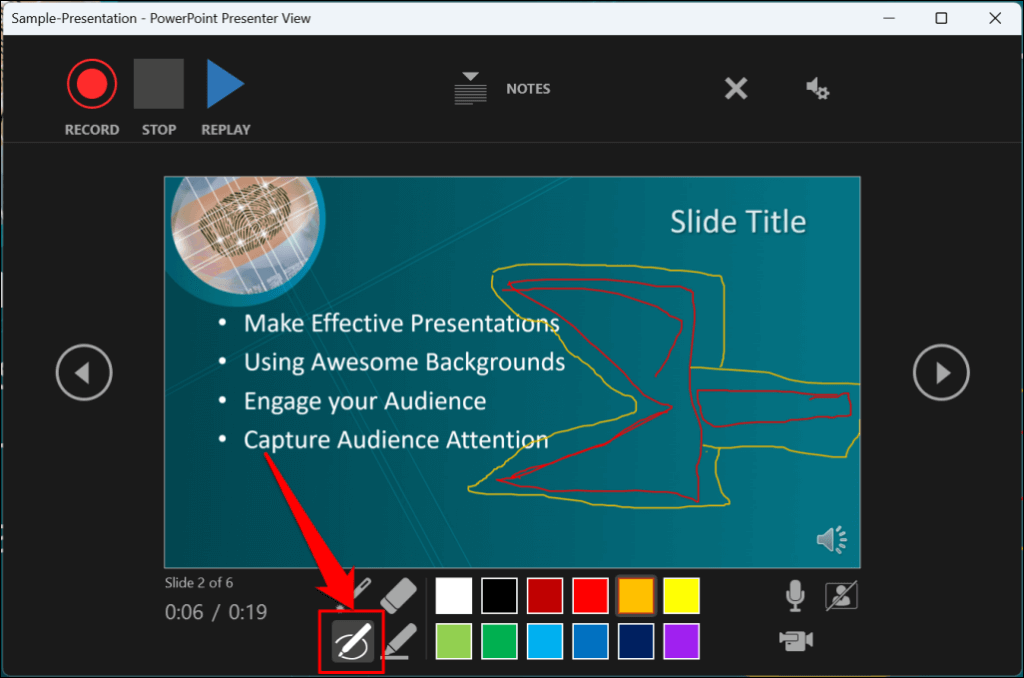
With the Pen tool, you can draw on slides during narration/recording. Press Ctrl + P (Windows) or Command + P (Mac) to use the pen tool. You can also select the Pen icon to convert the pointer to a pen.
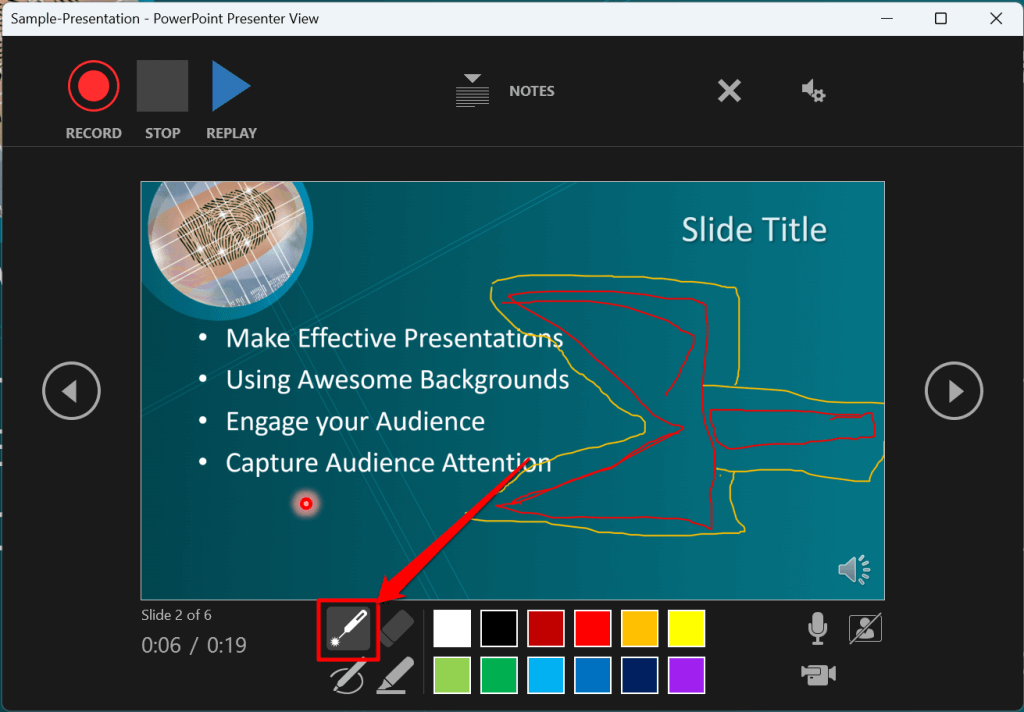
The Laser pointer tool converts your cursor to an onscreen laser. Use the laser pointer to draw attention to something on a slide/presentation.
Press Ctrl + L (Windows) or Command + L (Mac) to use the laser pointer. There’s also a Laser pointer icon on the toolbar.
Pressing Ctrl + I (or selecting the Highlighter tool ) converts your cursor to a highlighter.
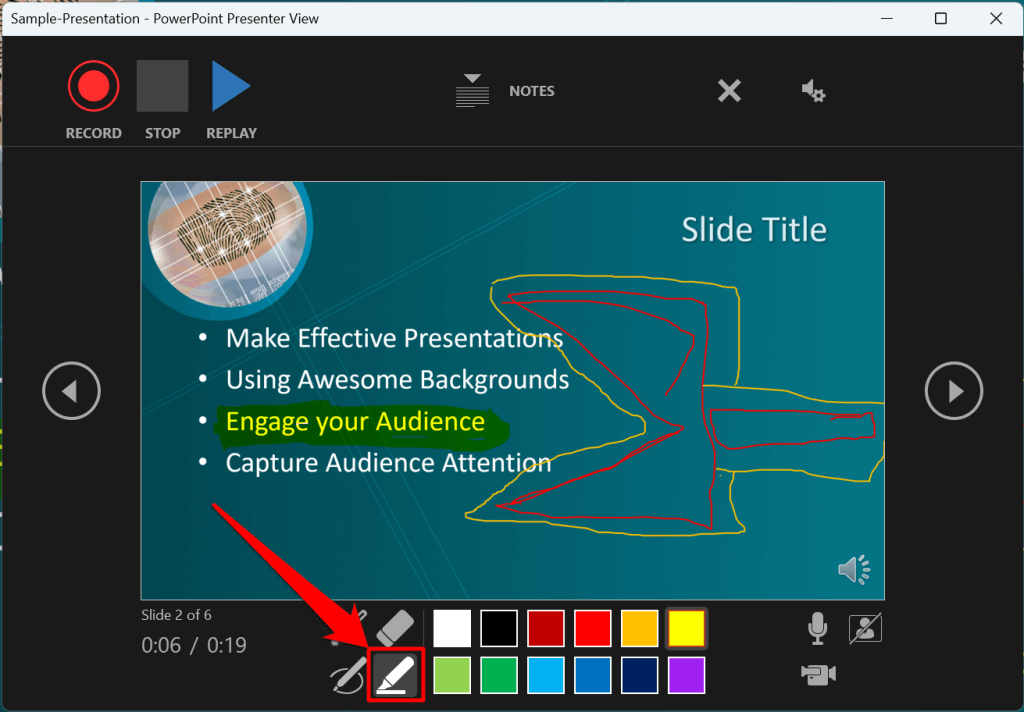
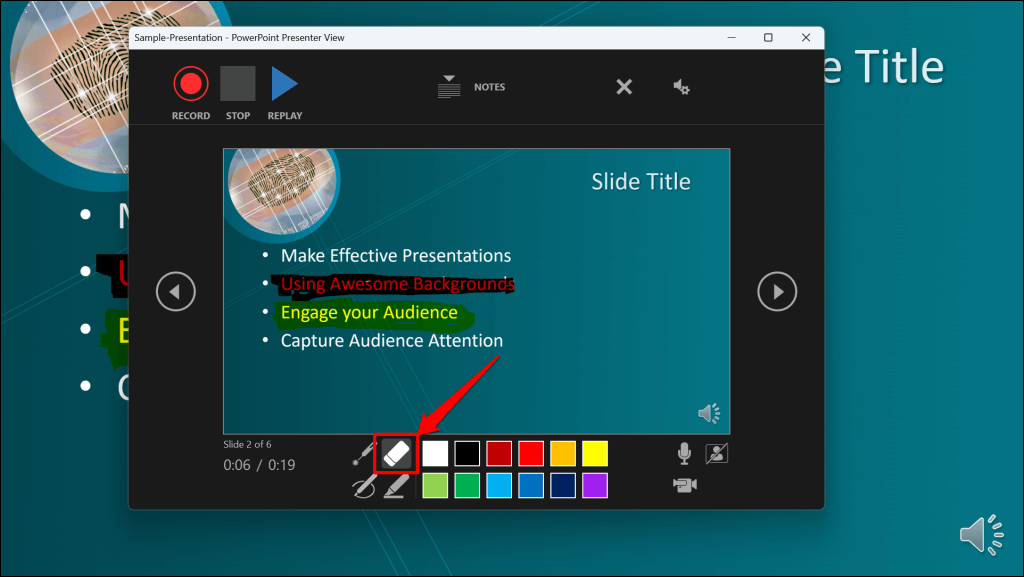
Use the Eraser tool to remove inks and highlight from slides. Select the Eraser icon or press Ctrl + E and select the ink to erase.
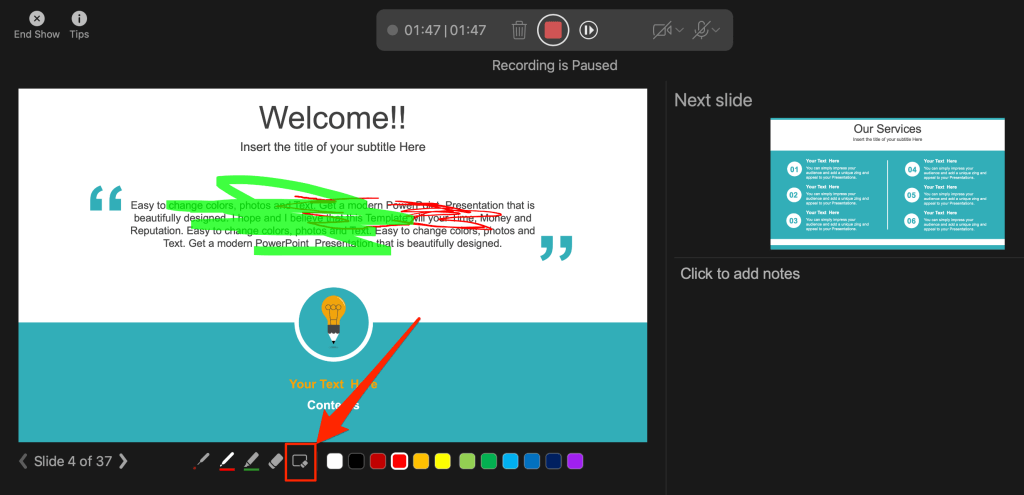
On macOS, select the Erase Pen icon (or press E ) to erase all drawings and highlights on the slide.
You can change the pointer tools ink from the color selection boxes. However, one major limitation is that you can’t change the size of these pointer tools.
Pause and Resume Your Recording
In Windows, press I on your keyboard or select the Pause button in the top-left corner to pause your recording.
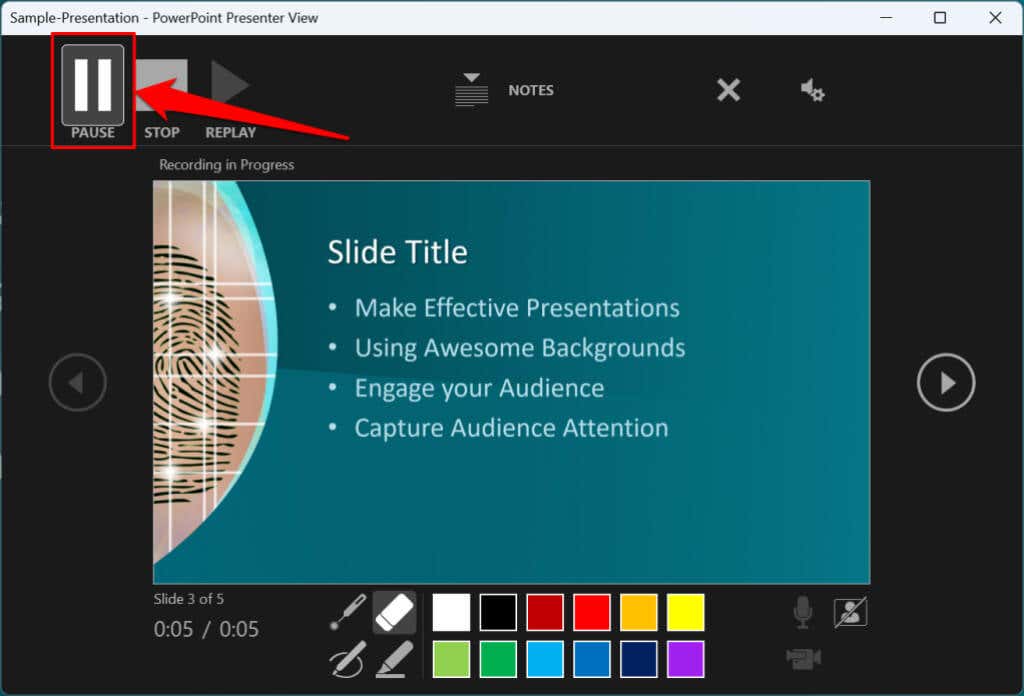
Press I again or select the Record icon to resume the recording.
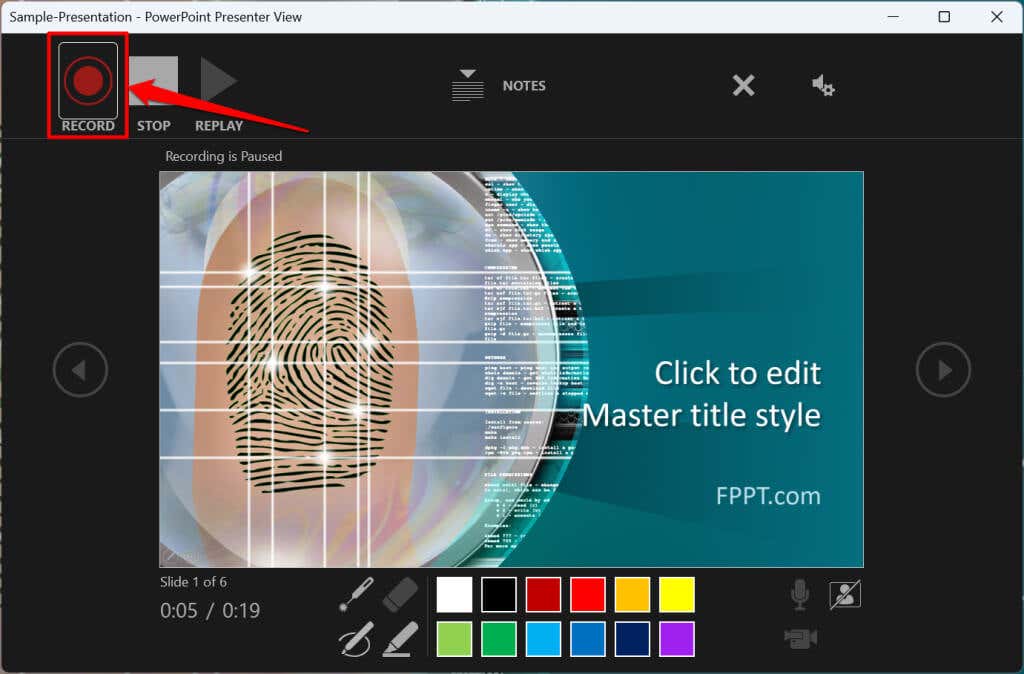
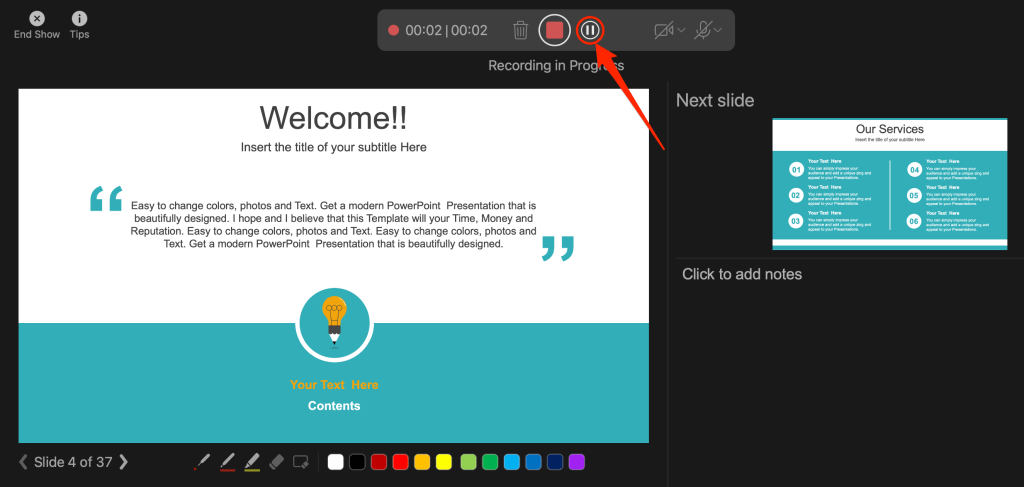
If you use a Mac, select the Pause icon in the top toolbar to pause the recording.
Unmute or Mute Microphone
Check that your microphone is unmuted before recording. Select the microphone icon in the bottom-right corner to mute or unmute your mic.
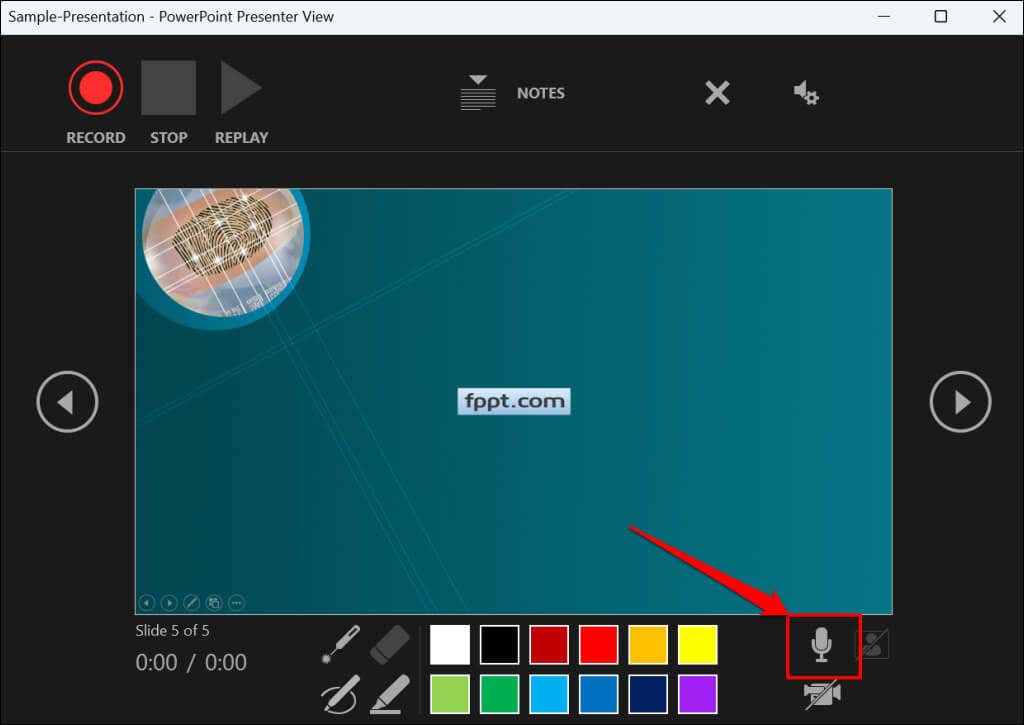
PowerPoint for Windows allows you to mute and unmute your microphone in real time while recording video/audio narrations. The macOS version of PowerPoint only lets you configure your camera and microphone settings before recording.
Switch Microphone or Camera
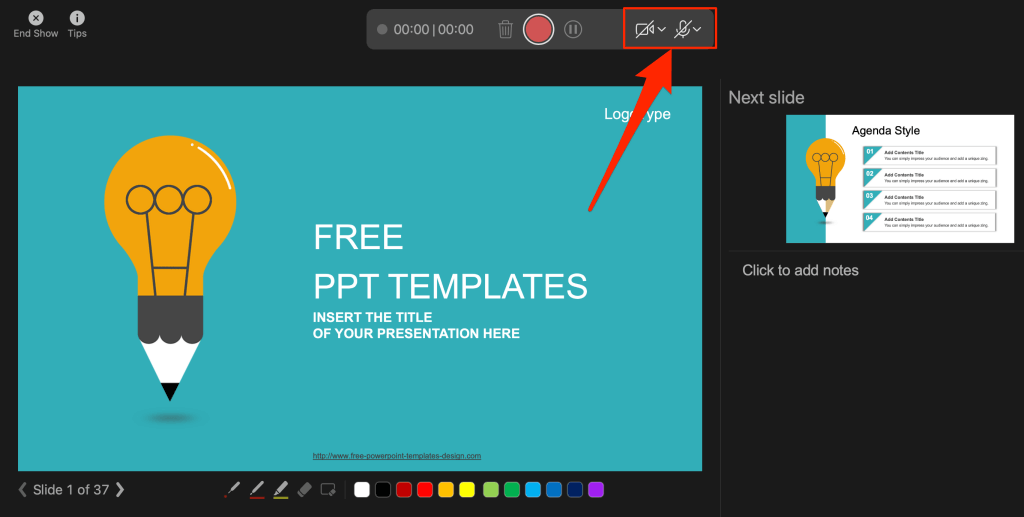
Want to record your presentation with an external microphone or camera? Press Ctrl + M or select the audio/camera settings icon in the top-right corner and choose your preferred microphone/camera.
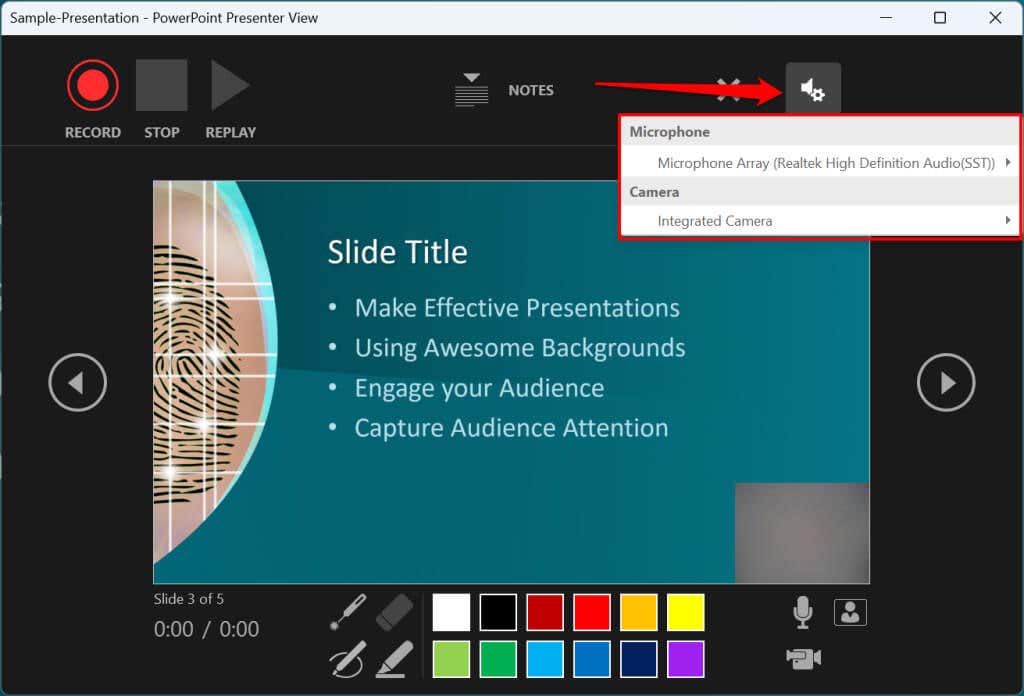
In macOS, select the microphone icon to mute or unmute your microphone. Select the arrow-down icon next to the microphone or camcorder icons to switch input devices.
Enable and Disable Camera
The recorder displays your camera or webcam feed in the bottom-right corner of the presentation slides.
Select the camcorder icon to remove your webcam feed from the recording. Select the icon again to display your webcam feed in the presentation.
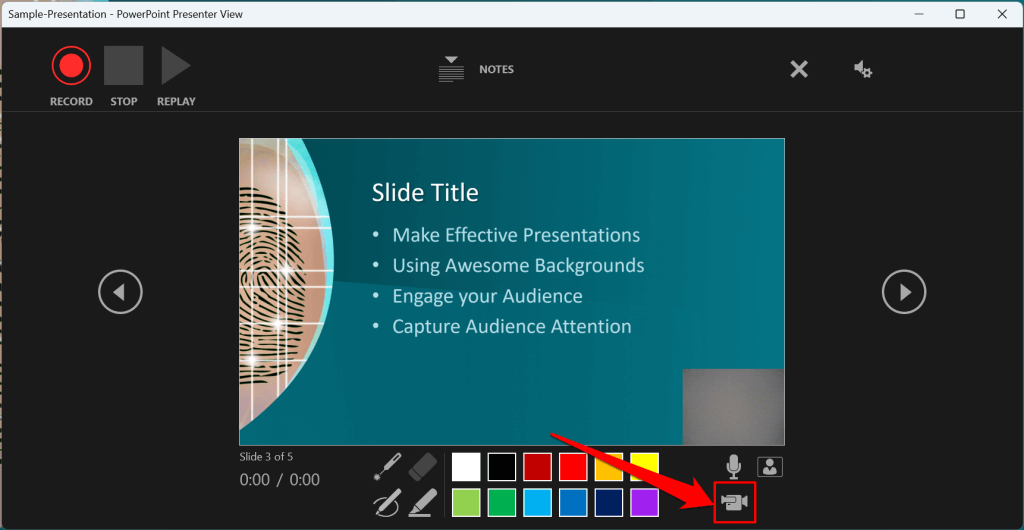
You can also use the Ctrl + K keyboard shortcut on Windows computers to enable or disable your camera.
On Mac computers, you’ll find the video control icon on the top toolbar.
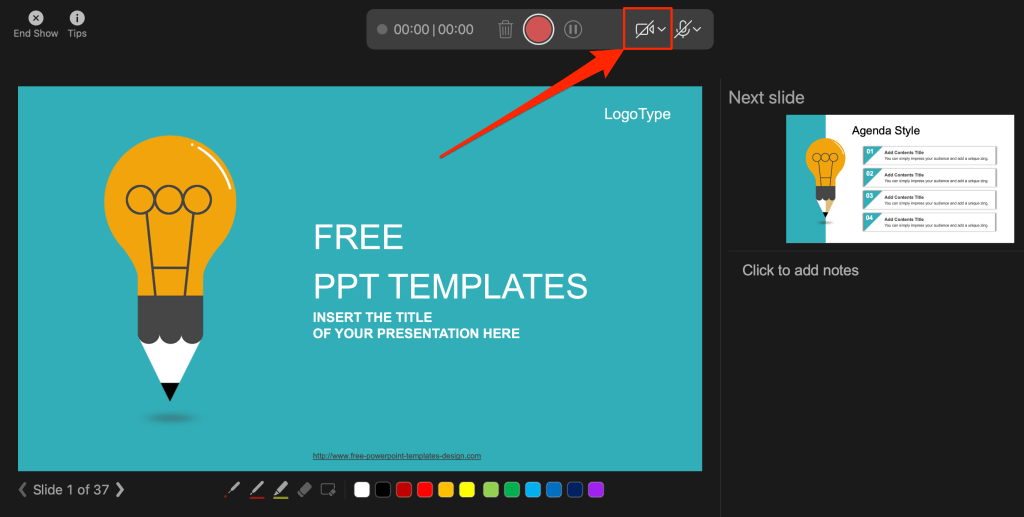
Note: The recording tool greys out the camcorder icon if your microphone is turned off.
Enable or Disable Camera Preview
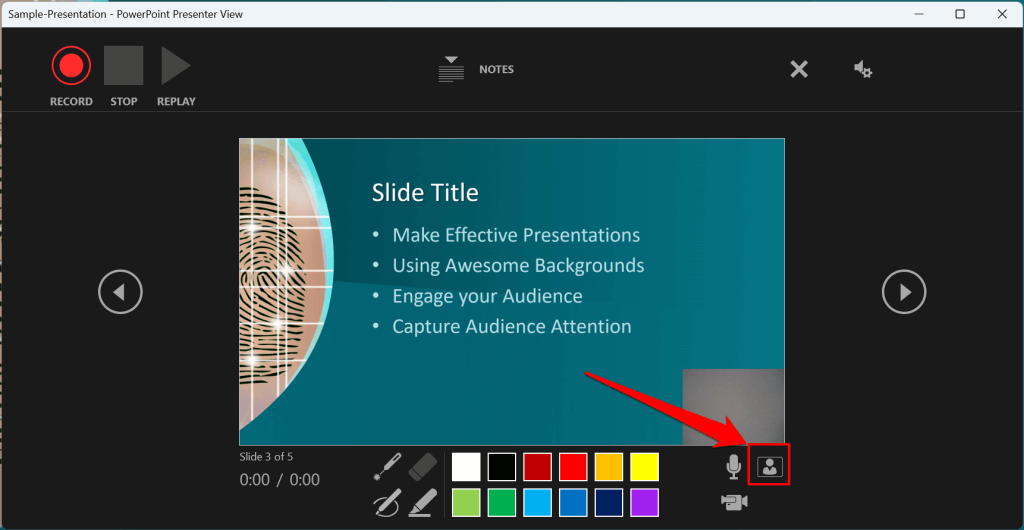
PowerPoint allows you to disable the camera preview without turning off your camera or webcam.
Press Ctrl + J (Windows) or select the Camera Preview icon in the bottom-right corner to disable or enable the camera preview.
End a Recording
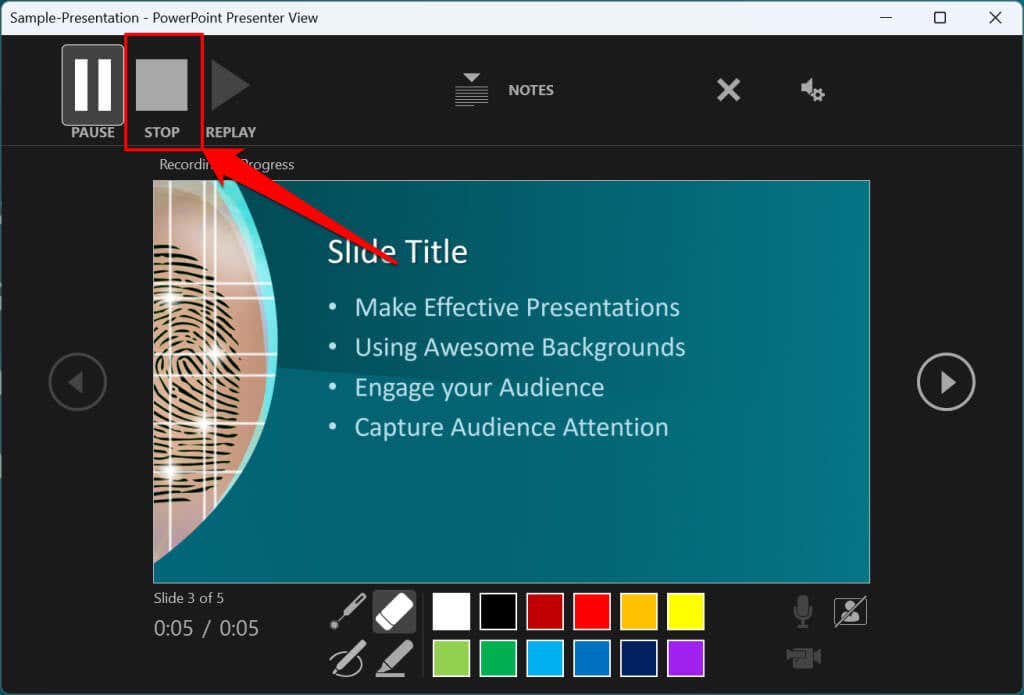
Press S on your Windows keyboard or select the Stop icon to end the recording.
Replay or Preview Your Recording
When you end a narration, press V on your keyboard or select Replay to preview or watch the recording.
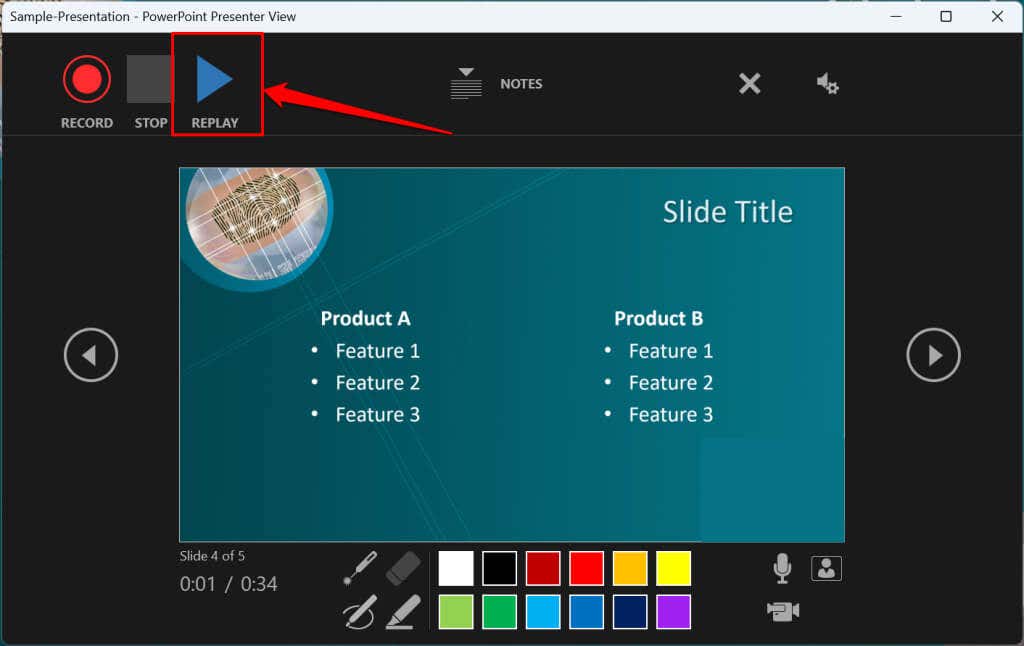
The recorded narration will include all pen inks, highlights, and laser pointer gestures made during the presentation.
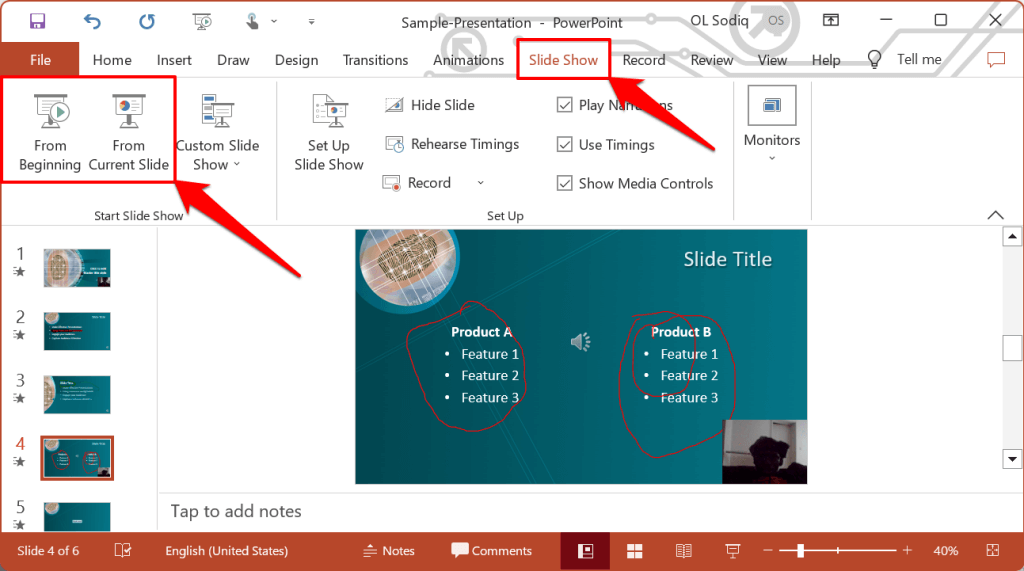
You can also preview/replay the narration outside the recording tool. Open the Slide Show tab and choose to watch the playback From Beginning or From Current Slide .
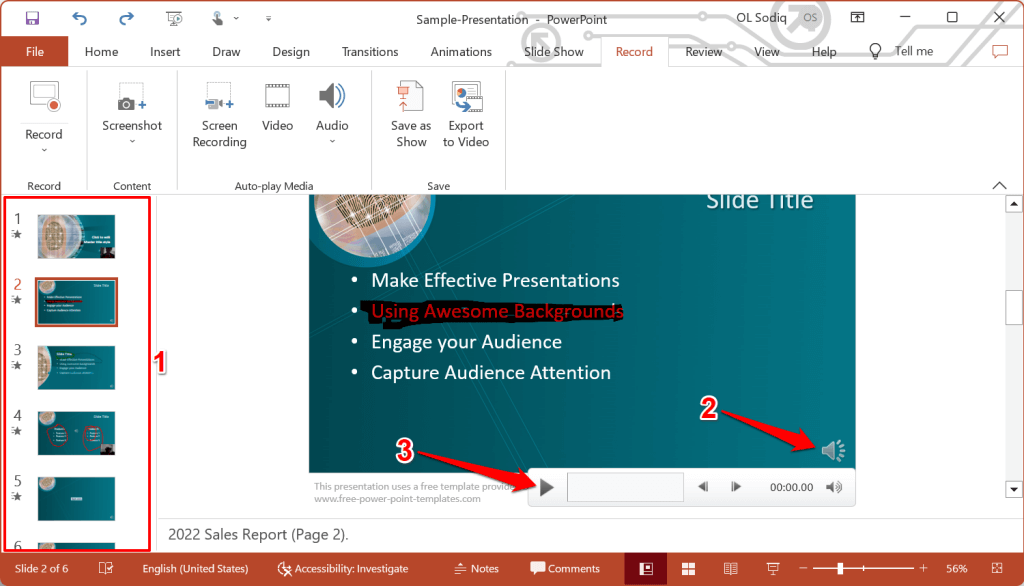
PowerPoint allows you to preview the playback on individual slides. A speaker/audio icon appears in the bottom-right of PowerPoint slides with narrations.
Choose the slide you want to preview, hover your cursor on the speaker icon in the bottom-right corner, and select Play .
Delete Current Narration/Recording
Did you spot an error when previewing your presentation? Want to delete the current narration and start from scratch?
Select the Clear existing recordings icon and choose whether to Clear Recordings on Current Slide or Clear Recordings on All Slides .
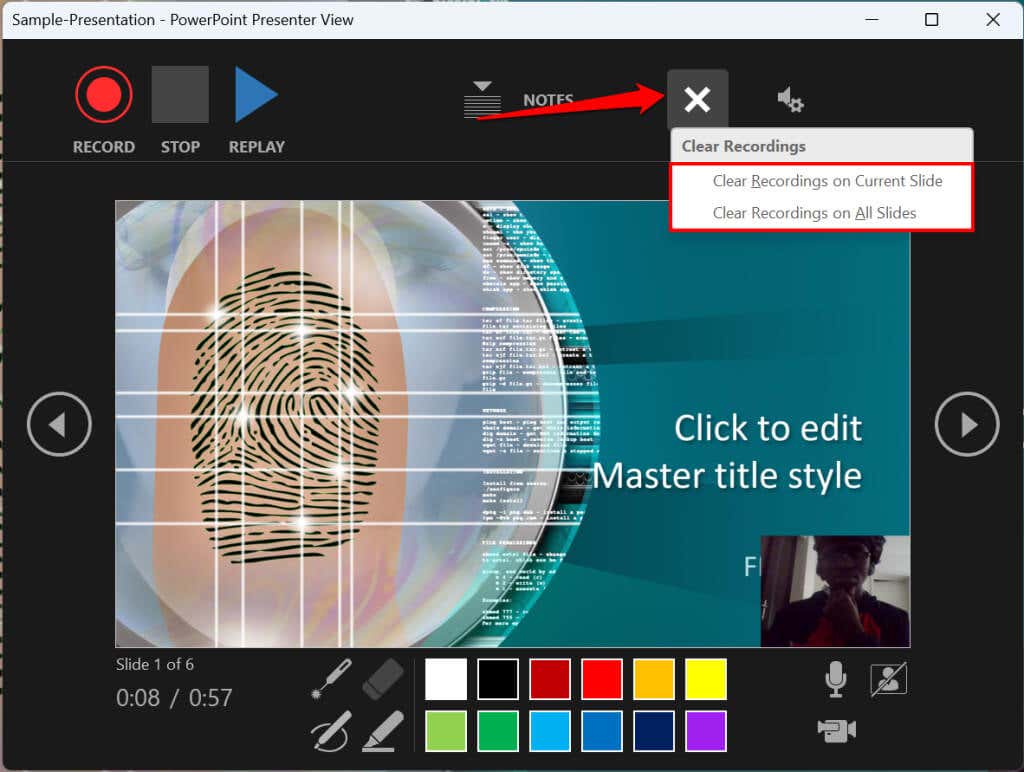
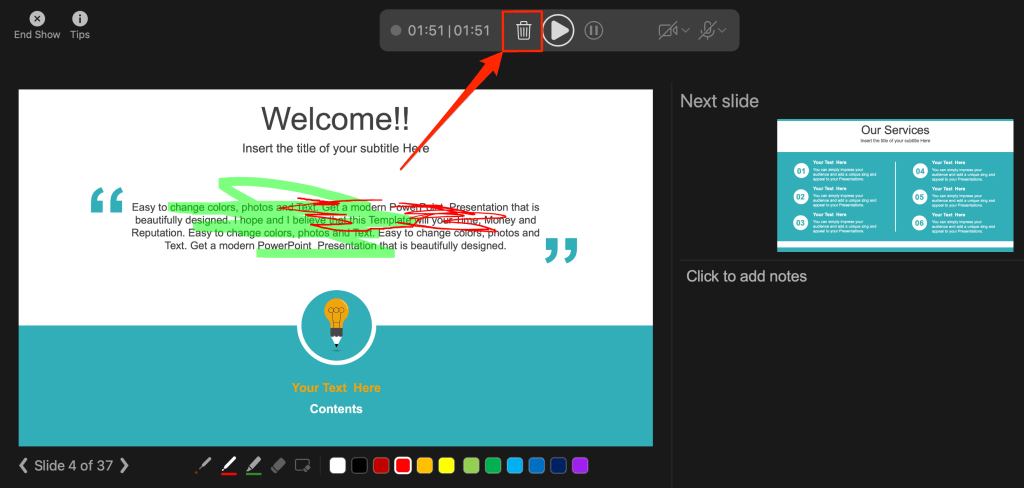
On Mac, select the Bin icon to delete the entire narration/recording.
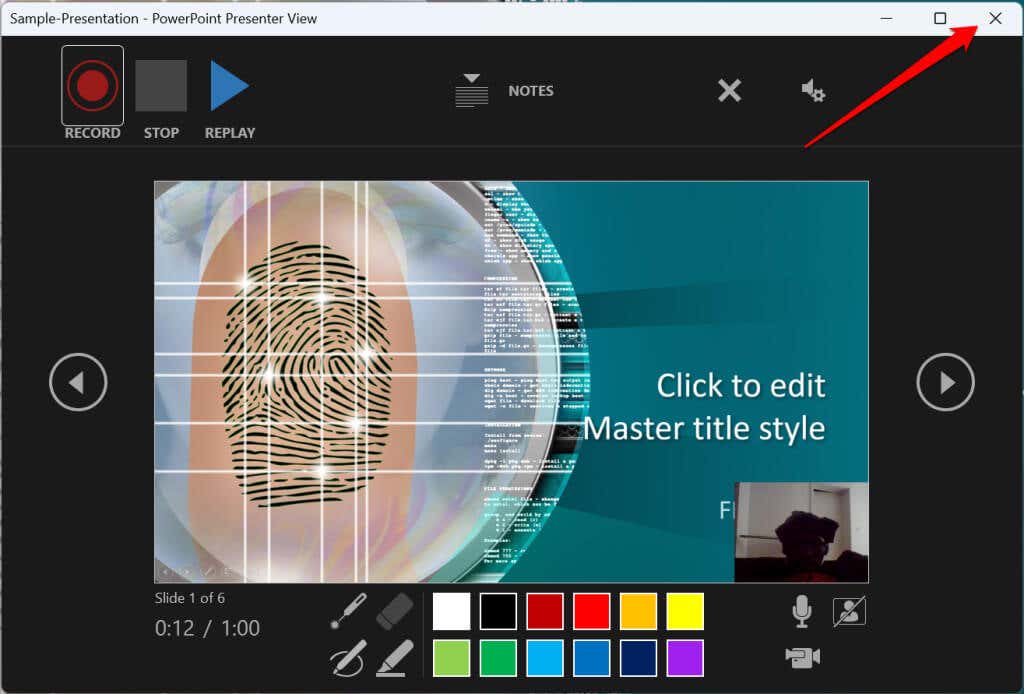
Close the Narration Tool
Select the X icon on the title bar to close the presentation narration tool and return to Powerpoint.
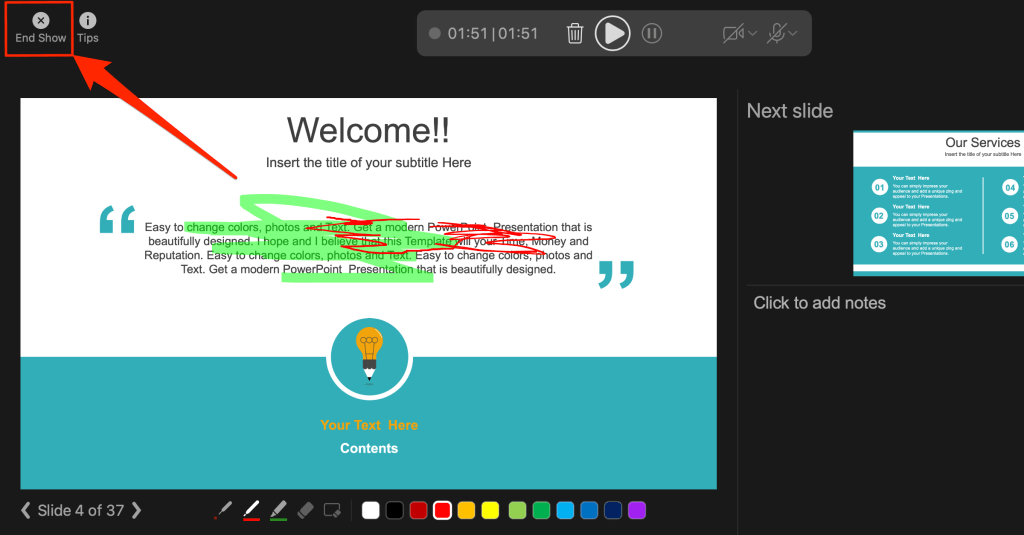
Select End Show in the top-left corner to close the recording tool on a Mac computer.
Delete Narrations from Slides
Want to delete the narration or timing on an individual slide or the entire presentation? Select the slide with the narration you want to delete and follow the steps below.
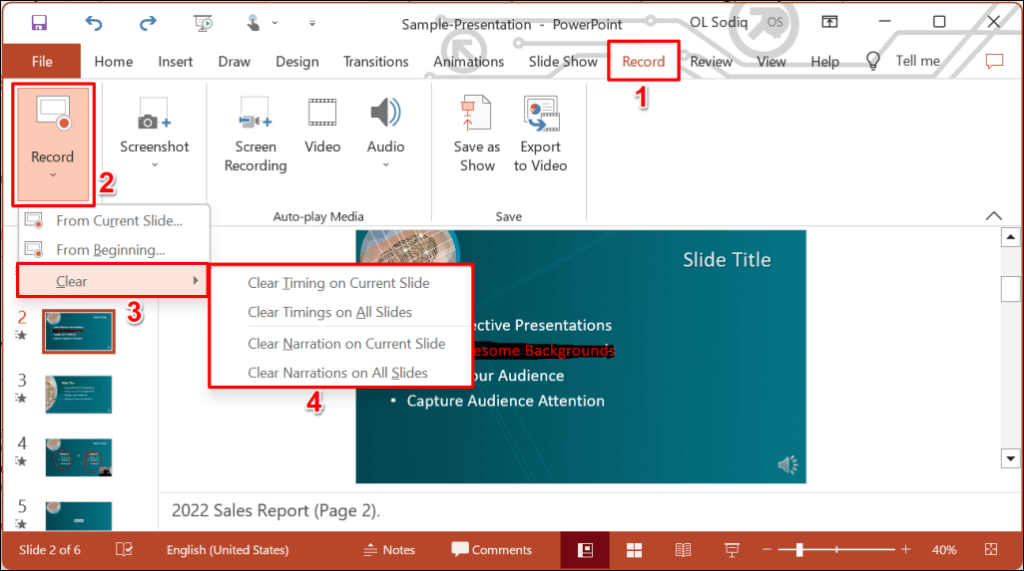
- Open the Record tab and select the down-facing arrow below the Record icon.
- Select Clear and choose to clear timing or narration on current or all slides.
Export Recorded or Narrated Presentation
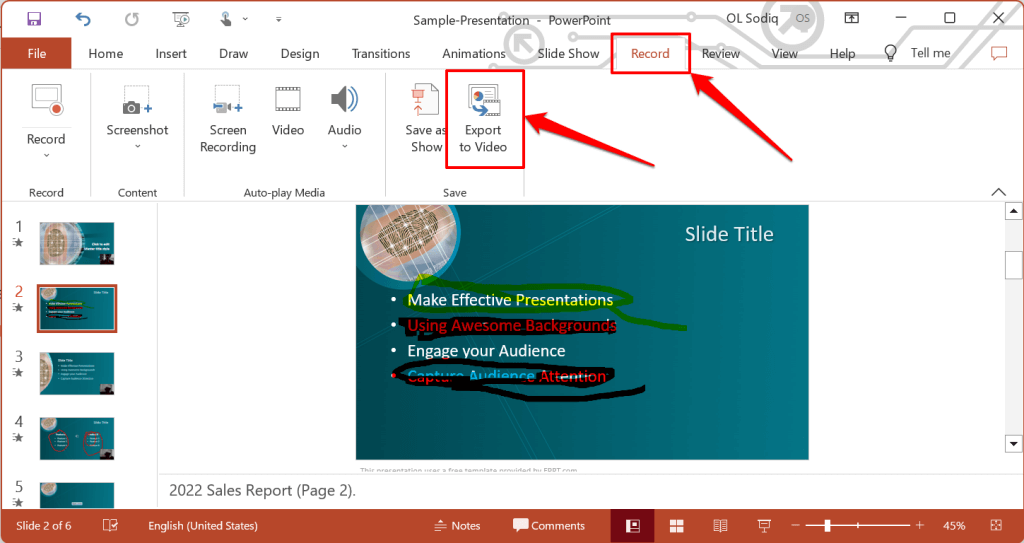
You can export a narrated PowerPoint presentation as a video file. The video output includes ink strokes, recorded audio/video, laser pointer gestures, and webcam/camera recording.
- Open the Record tab and select Export to Video .
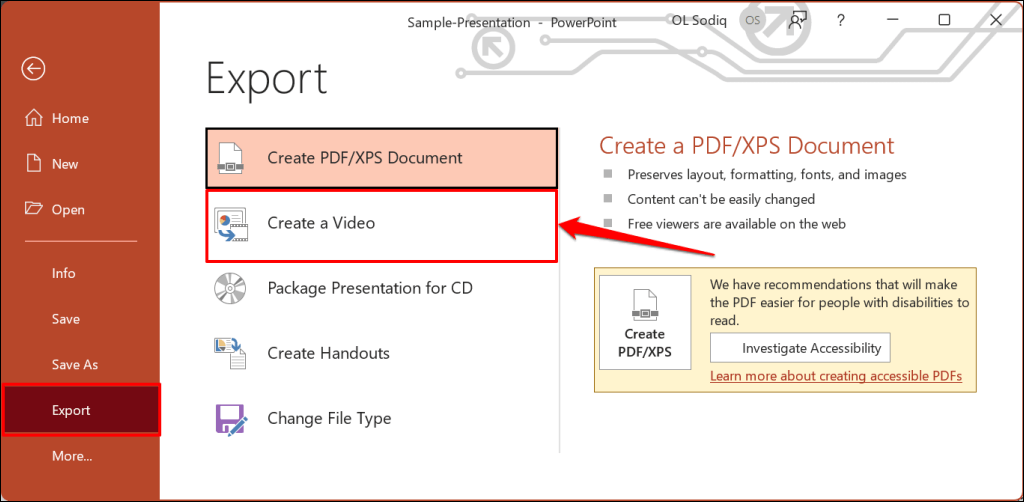
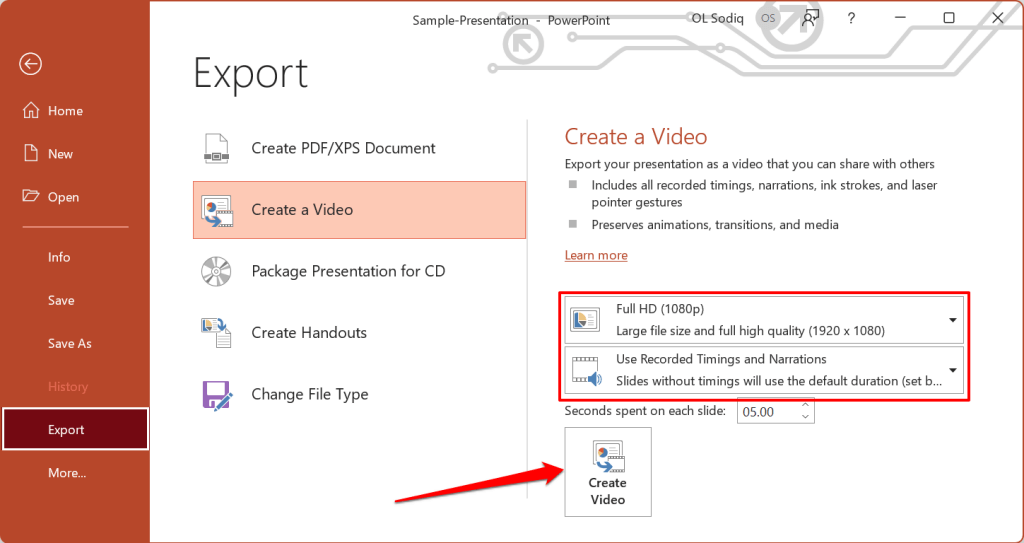
Alternatively, open the File menu, select Export on the sidebar, and select Create a Video .
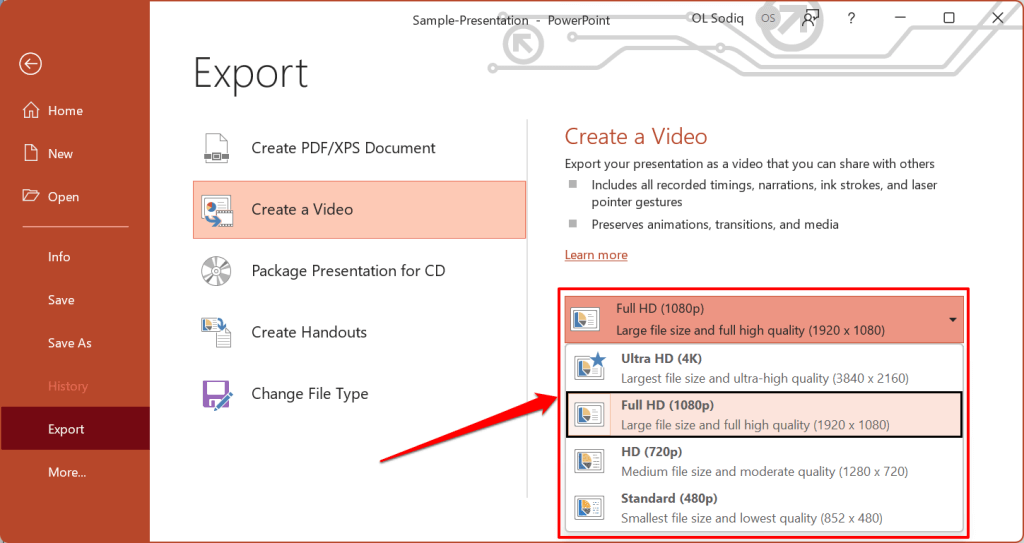
- Choose the quality of the video export in the first drop-down box—Ultra HD (4K), Full HD (1080p), HD (720p), Standard (480p).
- Choose Use Recorded Timings and Narrations in the next drop-down box and select Create Video .
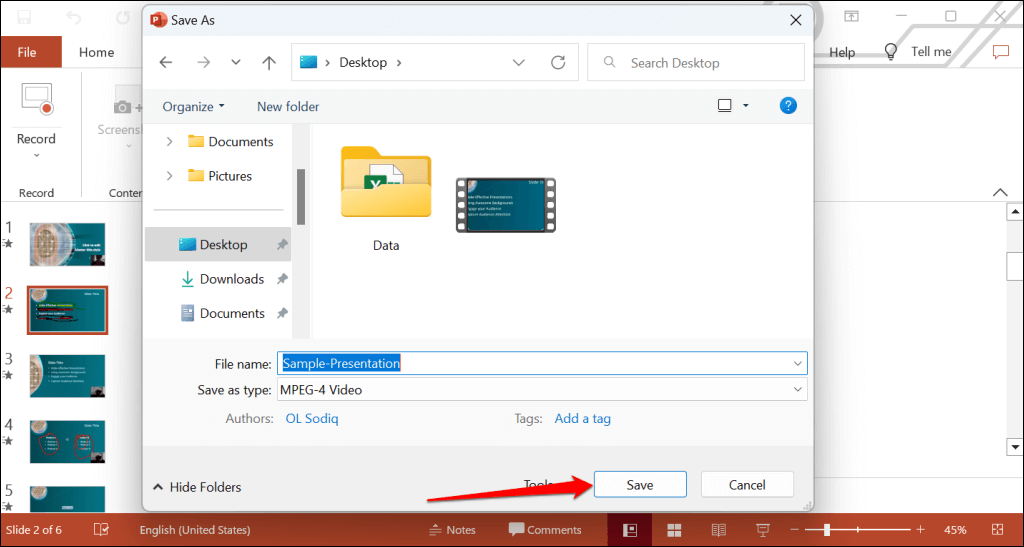
- Give the recorded presentation a file name and select Save .
Narrate Your PowerPoint Presentations
The Microsoft PowerPoint web app doesn’t have a recording tool. As a result, you can only record presentations with narrations using PowerPoint for Windows or Mac.
You might meet issues recording a slide show if you use an outdated version of PowerPoint. Also, the recording tool on older versions of PowerPoint has a different interface and lacks some controls. Update PowerPoint and restart your computer if you cannot record a slide show.
Sodiq has written thousands of tutorials, guides, and explainers over the past 4 years to help people solve problems with Android, iOS, Mac, and Windows devices. He also enjoys reviewing consumer tech products (smartphones, smart home devices, accessories, etc.) and binge-watching comedy series in his spare time. Read Sodiq's Full Bio
Read More Posts:


Presentation Storytelling Examples & Techniques (2024)
Learn techniques for telling a story in a presentation . Get narrative presentation examples and learn to apply storytelling in business presentations .

Joanne Camarce
8 minute read

Short answer
What should a presentation storytelling structure include?
Introduction
Rising Action
Falling Action
Storytelling in business presentations matters (a lot)
Stories convey a deeper meaning, idea, or lesson. They make us feel, experience, identify, and understand.
Most importantly for storytelling in business presentations, telling a story in a presentation makes people more likely to remember the message.
Researchers Dean and Chip Heath found that after a presentation, 63% of attendees could remember the story told by the presenter.
However, only 5% could recall specific statistics from the event.
Because stories allow audiences to visualize and imagine an idea or message, stories also make them better able to make decisions.
In other words, stories bring buyers, stakeholders, and decision-makers to better understand and remember your message. Which in turn enables them to make a decision and increases the chance they’ll act on it.
What is presentation storytelling?
Presentation storytelling is the art of using a narrative structure to convey information instead of dry facts. It delivers a story with a clear beginning, middle, and end that aligns with the presentation's objectives, making the content more relatable and memorable.
Storytelling in business presentations involves 2 complementing aspects: (1) textual presentation narrative, and (2) visual storytelling.
What is a narrative presentation?
A narrative presentation is a style of delivering information where the content is structured as a relatable story. It typically includes characters, a setting, a conflict, and a resolution, and weaves complex ideas, processes, and metrics into the narrative.
What is a visual storytelling presentation?
A visual storytelling presentation tells a story or multiple anecdotes using visual elements like videos, animations, and interactive content.
Modern storytelling presentations apply scrollytelling design which combines visuals and text seamlessly to let readers interact with the presentation as they scroll down the content.
How to use the 4 storytelling archetypes
Storytelling is the art of describing vivid ideas, beliefs, experiences, and life lessons through stories and narratives.
These stories stimulate a listener's imagination as you take them on an emotional journey. There are many ways to tell a story.
These story structures have been shown to work for narrative presentations and corporate storytelling, and they will work for you.
The Hero's Journey: Communicates a transformation from struggle to success
The Story Mountain: Builds tension and anticipation
Story loop: Joins multiple perspectives into a single narrative
In-Media Res: Grabs attention quickly
There are timeless narrative frameworks that have worked for storytellers throughout the ages from the methodologies of old, through Shakespearian plays to Apple commercials.
1) Hero's Journey
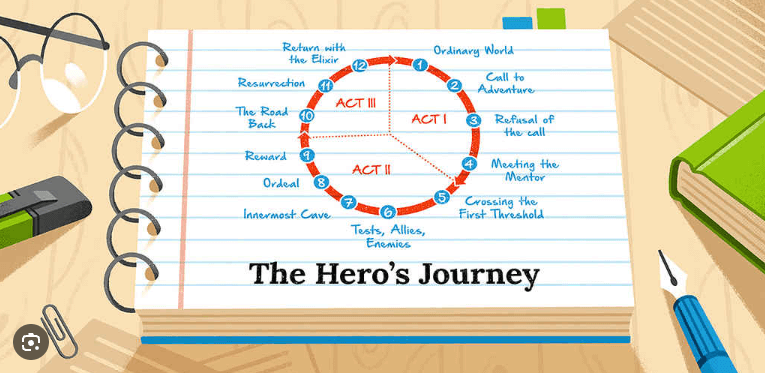
The hero's journey narrative archetype involves a hero who goes on a journey and returns as a changed person.
This storytelling template consists of three distinct parts, or "acts," that include a setup, confrontation, and resolution. It makes for a well-structured and engaging narrative.
2) The Mountain
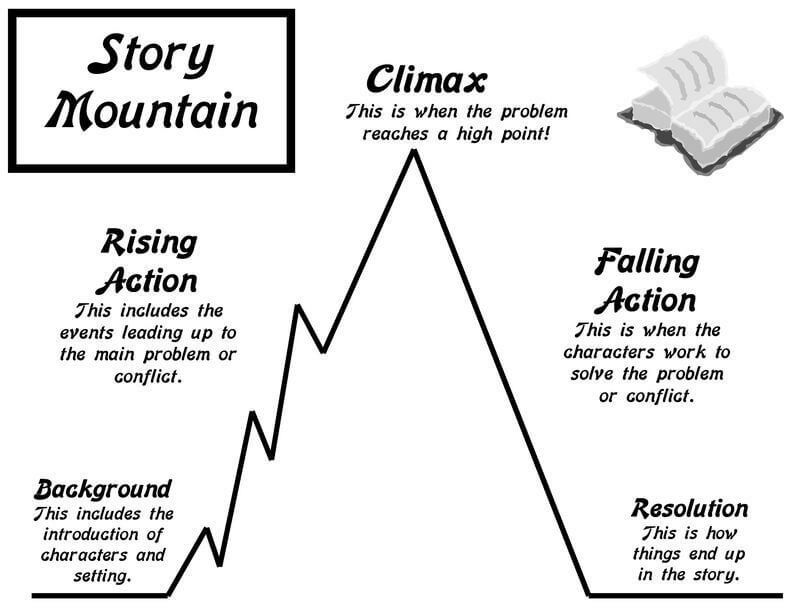
The mountain storytelling structure strategically maps the tension and drama in a story. This archetype is represented visually as a mountain, with each section building to a complex obstacle that characters need to overcome.
Think of the protagonist at the bottom of the mountain. They must climb the mountain to reach their goal (your business goals in this case). They face obstacles along the way, and they must overcome those obstacles before they can reach the top.
3) Story loop
The story loop structure contains stories within another story. However, they aren't standalone stories.
Your first story is the most important. It's the core of your message, and you use the other stories to elaborate or explain your central point.
But you stop some of the way through it, leaving the audience in suspense. Then, you share part of the second story before moving on to the last.
Eventually, in the end, you bring it all together to make one cohesive point. The purpose of this storytelling technique is to provide context, background, or a different perspective to a central narrative.
Types of anecdotes you can use in your story loop presentation
- Customer success stories
- Personal experiences by clients
- Inspirational stories
- Fictional or hypothetical stories
- Historical or factual stories
Here's a short video explaining how to use a story loop:

4) In medias res (begin from the middle)
In medias res is Latin for "in the middle of things." With this storytelling archetype, the narrative begins in the middle of a scene. It skips over the background of the story and gets straight to the action.
To choose the right type of story for your presentation, consider your audience, the purpose of the presentation, and the emotional impact you want to create.
No matter what narrative structure you choose, include visuals, sensory details, and precise language to bolster your message.
If you want to learn more about this storytelling archetype, check out the video below:

Effective presentation storytelling structure
A well-structured story can engage and persuade your audience, making your corporate presentation much more effective and memorable.
Stories can be applied in any type of business presentation, such as a pitch deck, sales presentation, white paper, report, or business proposal.
A single document can include multiple stories that make up a joint narrative.
5 basic elements of a story structure:
1. Introduction
- Sets a relevant context with background information.
- Introduces the protagonist (business or product) and the current problem or challenge.
2. Rising Action
- Builds tension by detailing the obstacles and complications faced.
- Engages the audience with the steps taken to address the challenge.
- The turning point where the main tension or conflict peaks.
- Highlights the moment of greatest challenge and the decisive action taken.
4. Falling Action
- Shows the aftermath of the climax.
- Begins to lead towards the resolution, detailing the business solution and results of actions taken.
5. Resolution
- Wraps up the story with the outcome of all actions.
- Provides a clear ending, showing how the challenge was overcome and what was learned.
After developing your story structure, be sure to connect it to your core message by creating parallels and reinforcing it with examples.
Most importantly, don’t leave your audience with the realization that they need to take action without offering them an immediate way to act.
Effective storytelling techniques for presentations
The beauty of storytelling is that the possibilities are endless. There are so many ways to tell a story in presentations. It's just a matter of finding the right one for your unique needs and goals.
1) Build your stories around your audience’s pain points
Stories establish connections. But don’t confuse your story with your audience’s story.
Your audience doesn’t care about your story, and they don’t care about your product.
But they will care if they feel you care about them.
Understanding the audience's pain points, values, and opinions can help you weave a story into a narrative that aligns with their interests. It gives you the chance to be part of THEIR story.
Stop talking about yourself. Do this and see engagement blow up, conversions increase, and greater brand loyalty .
2) Establish common ground with your prospects
One effective presentation storytelling technique is to find common ground and share experiences with your audience to establish a connection and make them care about what you say.
These commonalities are what resonate strongest with your target audience.
Common-ground stories tell your audience a satisfied client of yours overcame a particular challenge they are experiencing themselves, and offer the lessons learned while overcoming it.
3) Tell stories that foster peer envy
Peer envy is one of the strongest motivators you can flame in sales presentation storytelling.
Simply put it just means telling the story of a known industry player that achieved remarkable results with the help of your product or service.
A peer envy story should present the initial challenge, the journey to overcome it, and the final enviable outcomes. Yet the reader should feel they can attain similar or better results by following a similar journey.
Here's a fragment of a podcast where Michael Bosworth touches on this very topic:

Business presentation storytelling examples
Here are some examples of famous brands that incorporated personal stories to convey a powerful message in their business presentations.
Zuora sales deck
The Zuora sales deck was aptly named the best sales deck ever . It is truly a best-in-class example of a transformation narrative set within the story mountain framework.
It masterfully narrates the shift to a subscription economy, emphasizing evolving consumer behavior.
And by highlighting the challenges businesses face in this new economy, Zuora positions itself as the essential solution.
The deck's use of data, visuals, and testimonials weaves a compelling story of transformation, urging businesses to adapt and thrive with Zuora or stay behind and decline.
Mign sales deck
Mign’s sales deck highlights the digital shift in musculoskeletal injury recovery, emphasizing the transformation from mass production to personalized care.
Mign applies the hero’s journey story framework and positions itself as the trusted guide in this transformation.
The deck contrasts "winners," who embrace new technologies like additive manufacturing and virtual care, with "losers," traditional manufacturers stuck in outdated processes.
Tinder pitch deck
Tinder's pitch deck effectively narrates the universal challenge of meeting new people and the fear of rejection.
By introducing a hypothetical user named "Matt," Tinder gives the reader a peek into the mind of their target user - an everyday nice guy scared to approach a girl he's interested in.
This concrete personal experience gives life to a basic human need that investors can understand intuitively and even relate to.
Tinder leverages this emotional understanding to make a compelling case for its solution - a platform that eliminates the fear of rejection.
The deck also applied great data storytelling showcasing Tinder's impressive statistics, emphasizing its global reach and popularity among Gen Z.
They also nail the one-liner. Their slogan "It Starts With A Swipe™" encapsulates the simplicity and effectiveness of the app, positioning Tinder as the modern solution to traditional dating challenges.
Brothers Pub restaurant pitch deck
Brothers Pub's pitch deck presents a captivating local business story, emphasizing the need for a fresh, community-focused social pub venue.
The deck tells the story of the owners’ journey, from the initial concept to securing a prime location in Northampton, highlighting their dedication and vision for the future.
The deck outlines the challenges faced by traditional pubs, with 7000 closures in the last decade, and positions Brothers Pub as the innovative solution.
LKE proposal
Legends Kratom Co. (LKE) creates a narrative around the origins and benefits of kratom. By telling the exotic tale of the medicinal tropical evergreen tree and its transformation into a beneficial supplement, the deck creates a vivid backdrop.
They take the reader on their discovery journey to Indonesia to find a supplier for the coveted plant.
This adds authenticity and allure, while their commitment to education and community showcases a heartfelt mission.
Testimonials provide real-world validation, making LKE's story relatable and positioning them as a trusted leader in the supplement industry.
Genius Workshop Event pitch deck
Genius's pitch deck for their storytelling workshop is a masterclass in selling an experience. The deck introduces Gabrielle Dolan's expertise, setting a foundation of trust.
The workshop's structure is presented as a narrative journey, guiding attendees from novice to storyteller.
The deck mixes video, scrollytelling, and vivid language to give rich detail to the experience it promises to provide.
The 90-day follow-up program adds an element of continued growth, while alumni testimonials serve as real-world success stories.
By framing the workshop as a transformative experience, the deck engages and entices potential attendees, showcasing the power of storytelling in action.
Barbie recruitment pitch deck
Barbie's recruitment deck immerses candidates into Barbie's vibrant world. With playful greetings and whimsical descriptions, it sets a creative tone.
The deck focuses on Barbie’s story as a human being (doll in her case), her values, and her experience, instead of focusing on the recruiting company.
The deck lists attributes and responsibilities that align with Barbie's ethos, such as "spreading positivity" and "rocking a pink wardrobe."
Nokia brand guidelines
Nokia's brand guidelines deck uses visual storytelling to effectively communicate the essence of the brand. It lets the visuals tell the story since they speak louder than words.
The deck begins by anchoring the audience in Nokia's mission and values, creating a narrative foundation.
It then unfolds the brand's visual identity, from color schemes to typography, weaving a cohesive story of what Nokia represents.
By providing clear dos and don'ts, Nokia ensures that its brand story remains consistent and impactful across all touchpoints.
This storytelling approach not only educates but also engages, making it easier for stakeholders to internalize and adhere to the guidelines.
nSure one-pager
nSure's one-pager effectively uses visual data storytelling to convey the benefits of their AI fraud protection for digital gift card purchases.
Introducing the challenge of ambiguous transactions, nSure lets the numbers tell the story.
With impressive numbers like their AI solution’s 98% approval rate. They can afford to.
The deck's visuals, combined with endorsements from industry leaders like AXA, make a compelling narrative that instills confidence in nSure's expertise.
Healthy.io proposal
Healthy.io's proposal uses video storytelling with real practitioners who tell the story of their experiences using Healthy.io’s solution.
The video testimonial from a practice nurse adds a personal touch, showing the positive impact on patient care. This brings the user's experience to the front and adds credibility to the proposal’s claims.
The proposal uses a transformation narrative to showcase Healthy.io’s remote kidney screening solution.
They highlight the challenges of legacy ACR testing against their modern home-based test using a smartphone app.
Principles of visual storytelling in business presentations
Storytelling allows you to simplify complex or abstract information and address any objections or resistance. As a result, listeners can better retain and remember the message, which improves the decision-making process.
Here are the main principles that can transform your narrative:
Authenticity
Authentic visuals resonate more with audiences. In an era where people are bombarded with staged and polished images, authentic, candid photos that reflect the reality of your work can make your message stand out and be memorable.
Your visuals should evoke a sensory experience. The goal is to cut through the noise and trigger a stronger emotional response.
For example, you can make the experience more immersive by adding interactive clickable elements, embedding videos, or images that highlight details or visual textures.
Scrollytelling can also play a crucial role here, allowing the story to unfold through interaction, as the audience scrolls through the narrative, engaging them in a multi-sensory journey.
You can see the difference that interactivity makes below. Which presentation would you rather read?

The stories told by your images must be relevant to your audience. Personalized visual storytelling, supported by data to understand what motivates your audience, can turn your story into an experience that resonates deeply.
Every story has characters that fit certain archetypes, such as the caregiver, the explorer, and the creator. Identifying with these archetypes helps your audience connect with the story on a deeper level, making your organization's mission more relatable and memorable.
Make your own storytelling presentation
We've curated an extensive collection of templates to help you achieve effective storytelling for whatever business presentation you need to make.
The business storytelling presentation templates below have been rigorously tested across various devices and refined with insights gleaned from real-world feedback.
They were designed with interactive storytelling at their core. They’ll serve you as handy visual storytelling aids to make your presentations engaging, memorable, and highly converting.
Grab a template!
Why the human brain loves storytelling presentations
According to neuroscientist Uri Hasson , storytelling fosters deep social interactions through brain-to-brain connections.
He found that when we hear stories, our brains mirror each other, helping us understand what the storyteller is feeling.
Called neurocoupling or mirroring, this process occurs across many areas of the brain, including the ones that are responsible for processing and understanding narratives.
So the human brain loves stories. But why?
The short answer is that neural activity in the brain increases when we hear a captivating story. Our brains are made up of neurons, which are nerve cells that send messages throughout the body.
These neurons release neurotransmitters (brain chemicals) that transmit signals from nerve cells to target cells.
The most common neurotransmitters in the brain include:
When we hear a story, the neurons in our brain light up with activity. And according to neuroscientists, "neurons that fire together wire together."
This means that as we hear stories, the neurons in our brains are wiring together. As a result, we're more likely to remember the information we receive from a story.
Storytelling also triggers the release of dopamine ("the brain's form of candy") and oxytocin ("the love drug"). In other words, stories make us feel good.
Here's an infographic showing how storytelling affects the brain:

This can influence buying behavior because it helps to create an emotional connection with potential customers or buyers.
Telling a story, instead of making a sales pitch , is less intimidating to an audience.
The company or product you're describing is easier to understand, seems less complex, and provides relevant information in a format that's easy to digest and remember.
As a result, the buyer can relate to the product or service and will eventually want to purchase it.
Joanne Camarce grows and strategizes B2B marketing and PR efforts @ codeless.io . She loves slaying outreach campaigns and connecting with brands like G2, Wordstream, Process Street, and others. When she's not wearing her marketing hat, you'll find Joanne admiring Japanese music and art or just being a dog mom.

Found this post useful?
Subscribe to our monthly newsletter.
Get notified as more awesome content goes live.
(No spam, no ads, opt-out whenever)
You've just joined an elite group of people that make the top performing 1% of sales and marketing collateral.
Create your best presentation to date
Try Storydoc interactive presentation maker for 14 days free (keep any presentation you make forever!)
Weave a Compelling Narrative Through Your Slides (+ Free Templates)

By weaving a compelling narrative into your slides, you can transform your presentations into immersive experiences that resonate with your audience. This guide will take you through the process of understanding your audience, defining a key message, structuring the narrative, and crafting impactful text.
In addition to the expert guidance, this guide offers free presentation templates that align with the principles discussed, allowing you to put your newfound knowledge into practice easily. Whether you’re a business professional, educator, or presenter looking to captivate your audience, this guide will equip you with the tools and strategies to create memorable and persuasive presentations.
Below, we intentionally omitted the topic of slide design , as we dedicated a previous article to this important subject.
Table of Contents
Importance of a Compelling Narrative in Slides
Understanding the audience, defining the key message, introduction, building the story, creating a storyline, transitioning between sections, crafting compelling text, practicing and refining, weave your compelling narrative with our free presentation templates.
A compelling narrative goes beyond simply presenting information and engages the audience on an emotional and intellectual level. Incorporating a compelling narrative in your slides is vital for capturing attention, enhancing comprehension, creating a memorable experience, building emotional connections, making complex information accessible, and increasing your overall persuasiveness and influence.

By weaving a strong narrative throughout your presentation, you can transform it into a powerful tool for engaging and inspiring your audience.
Understanding your audience is crucial for crafting a compelling narrative that resonates with them. By tailoring your narrative to their specific interests and needs, you can create a more impactful and engaging presentation.

Here are the key aspects of understanding your audience:
Identifying the Target Audience
To create a compelling narrative, it’s essential to identify and define your target audience. Consider the following:
- Demographics: Determine the demographic characteristics of your audience, such as age, gender, occupation, and educational background. This information helps you tailor your language, examples, and content to suit their preferences.
- Psychographics: Understand the psychological aspects of your audience, such as their values, attitudes, interests, and motivations. This knowledge allows you to align your narrative with their beliefs and desires.
Analyzing their Interests and Needs
Once you’ve identified your target audience, it’s important to analyze their interests and needs. Consider the following strategies:
- Research: Conduct thorough research to gather insights about your audience’s interests and preferences. This can involve reviewing industry reports, conducting surveys, or analyzing social media trends. The more you know about their interests, the better you can tailor your narrative to capture their attention.
- Prioritize: Identify the primary interests and needs of your audience. Determine the key challenges they face or the goals they are striving to achieve. This understanding enables you to focus your narrative on addressing their specific pain points or providing solutions that meet their needs.
Tailoring the Narrative to Resonate with the Audience
Once you have a clear understanding of your audience, it’s time to tailor your narrative to resonate with them effectively. Here’s how you can accomplish this:
- Emotional Appeal: Identify the emotions that resonate with your audience and incorporate them into your narrative. Whether it’s excitement, inspiration, or empathy, evoking the right emotions can create a powerful connection and make your presentation more memorable.
- Relevance: Ensure that your narrative is relevant to your audience’s context. Use examples, anecdotes, or case studies that reflect their experiences or industry. By relating your narrative to their world, you increase its relatability and impact.
- Customization: Personalize your narrative whenever possible. Incorporate specific references or stories that directly address the interests, needs, or challenges of your audience. This customization demonstrates that you understand them and increases their engagement with your presentation.
By understanding your audience, analyzing their interests and needs, and tailoring your narrative to resonate with them, you can create a compelling presentation that connects with your audience on a deeper level. This understanding forms the foundation for crafting a narrative that engages, informs, and inspires your listeners.
Defining a clear and concise key message is essential for crafting a compelling narrative in your slides. It acts as the central idea or core theme of your presentation, guiding the development of your narrative.
Here are the key elements of defining the key message:
Identifying the Core Message or Main Idea
To define the key message, you need to distill the essence of your presentation into a single, focused statement. Consider the following:
- Central Purpose: Determine the primary objective of your presentation. Is it to inform, persuade, inspire, or entertain? Understanding the purpose helps you identify the main idea that aligns with your goal.
- Unique Value: Identify the unique value or proposition that your presentation offers to the audience. What sets it apart from other information or perspectives? This unique value becomes the foundation of your key message.
Ensuring Clarity and Focus
A compelling narrative requires clarity and focus to effectively communicate your key message. Consider the following strategies:
- Simplicity: Express your key message in simple and concise language. Avoid jargon or complex terminology that might confuse or alienate your audience. Aim for clarity and accessibility.
- Single Focus: Ensure that your key message has a single, central focus. Trying to convey too many ideas can dilute the impact of your narrative. Stay focused on the core message to maintain a coherent and powerful narrative.
Crafting a Strong Central Narrative that Supports the Key Message
Once you have defined your key message, it’s important to craft a narrative that supports and reinforces it. Consider the following approaches:
- Storytelling Structure: Structure your narrative like a story, with a clear beginning, middle, and end. The narrative arc should lead the audience from the introduction to the resolution, all centered around your key message.
- Supporting Points: Identify supporting points or sub-messages that contribute to the overall narrative. These points should align with and strengthen the key message, providing evidence, examples, or insights that support its validity.
- Consistency and Coherence: Ensure that every element of your narrative, including visuals, text, and examples, aligns with the key message. Consistency and coherence create a unified and persuasive narrative that resonates with the audience.
By defining a clear and focused key message, ensuring its clarity and focus, and crafting a strong central narrative that supports it, you create a solid foundation for a compelling presentation. The key message acts as the compass that guides the development of your narrative, helping you deliver a memorable and impactful presentation.
Structuring the Narrative
Structuring your narrative effectively is crucial for weaving a compelling story through your slides. A well-structured narrative engages the audience, maintains their interest, and delivers your key message in a coherent and impactful manner. Here are the key elements of structuring your narrative:
The introduction sets the stage for your presentation and captures the audience’s attention from the start.
Consider the following components:
- Setting the Context: Provide background information or context that establishes the relevance and importance of your topic. Help the audience understand why they should care about the subject matter.
- Grabbing the Audience’s Attention: Begin with a captivating hook or attention-grabbing statement. It could be a thought-provoking question, a startling fact, a compelling story, or a powerful quote. The goal is to pique the audience’s curiosity and make them eager to hear more.
The body of your presentation builds upon the introduction and develops the narrative. Consider the following strategies:
- Identifying Key Plot Points or Ideas: Determine the main ideas or plot points that support your key message. These ideas act as building blocks for your narrative and help guide the flow of information.
- Sequencing the Information Logically: Arrange the plot points or ideas in a logical sequence that creates a coherent and easy-to-follow storyline. Consider using a chronological order, cause-and-effect structure, or problem-solution approach, depending on what best suits your content.
- Establishing a Clear Beginning, Middle, and End: Ensure that your narrative has a clear structure with a beginning, middle, and end. The beginning introduces the topic and sets up the conflict or challenge. The middle elaborates on the main ideas, providing supporting details and evidence. The end offers a resolution, conclusion, or call to action.
To make your narrative engaging and relatable, consider incorporating elements of storytelling.
Here are some techniques:
- Incorporating Conflict or Challenges: Introduce a central conflict or challenge that your audience can identify with. This creates tension and keeps the audience invested in your narrative. It could be a problem faced by your target audience or an industry-wide challenge.
- Presenting Solutions: Offer solutions, insights, or strategies that address the conflict or challenges presented. Present them in a clear and actionable way, emphasizing the value they provide. Show how your key message and supporting points contribute to resolving the conflict or overcoming the challenges.
Smooth transitions are essential for maintaining a cohesive flow in your narrative. Consider the following approaches:
- Using Effective Transitions to Maintain a Flow: Use transitional phrases, such as “now,” “moving on,” or “next,” to signal transitions between sections. These cues help the audience follow the narrative and understand the progression of ideas.
- Creating Smooth Connections Between Ideas: Establish connections between ideas by using linking words or phrases that show the relationship between concepts. Examples include “similarly,” “in contrast,” “additionally,” or “consequently.” These connections ensure a seamless flow of information and enhance comprehension.
By structuring your narrative with a compelling introduction, building a coherent story with logical sequencing, creating engaging storylines, and incorporating smooth transitions, you can deliver a presentation that captivates and resonates with your audience. The structure acts as a framework for your narrative, ensuring that it flows smoothly and delivers your key message effectively.
In addition to a well-structured narrative, crafting compelling text in your slides is crucial for effectively conveying your message and engaging your audience. Here are key strategies for crafting compelling text:
Using Concise and Impactful Wording
To make your text more engaging and memorable, focus on using concise and impactful wording. Consider the following tips:
- Simplify Language: Use clear and simple language that is easily understood by your audience. Avoid jargon or complex terminology that might confuse or alienate listeners. Aim for brevity and clarity in your text.
- Be Direct and Specific: Communicate your ideas in a direct and specific manner. Avoid vague or ambiguous language that can dilute the impact of your message. Use concrete examples and precise wording to make your text more compelling.
- Emphasize Key Points: Highlight key points or important information using formatting techniques such as bolding, italicizing, or using larger font sizes. This draws attention to the essential elements of your text and makes them stand out.
Utilizing Storytelling Techniques
Storytelling techniques can add depth and engagement to your text. Consider the following approaches:
- Use Vivid Descriptions: Incorporate descriptive language that appeals to the senses and creates vivid mental images. This helps the audience visualize your ideas and connect with your message on a deeper level.
- Create Narrative Flow: Structure your text in a narrative format, with a clear beginning, middle, and end. Use storytelling elements such as exposition, rising action, climax, and resolution to create a compelling narrative flow in your text.
- Employ Metaphors and Analogies: Use metaphors or analogies to illustrate complex concepts or ideas. These figures of speech can make your text more relatable and help the audience grasp abstract or unfamiliar concepts by relating them to something familiar.
Incorporating Relevant Quotes, Anecdotes, or Statistics
Quotes, anecdotes, and statistics can add credibility and interest to your text. Consider the following strategies:
- Quotes: Include relevant quotes from experts, thought leaders, or influential individuals in your field. Quotes can provide insights, perspectives, or support for your key message. Ensure that the quotes align with your narrative and resonate with your audience.
- Anecdotes: Share personal anecdotes or stories that illustrate the ideas or concepts you’re presenting. Anecdotes make your text more relatable and engaging, allowing the audience to connect with your message on a personal level.
- Statistics: Incorporate relevant statistics or data to support your arguments or claims. Statistics provide evidence and credibility to your text, making it more persuasive. Ensure that the statistics are from reliable sources and presented in a clear and accessible manner.

By using concise and impactful wording, utilizing storytelling techniques, and incorporating relevant quotes, anecdotes, or statistics, you can make your text more compelling and captivating.
Remember to keep your text focused, clear, and aligned with your key message to effectively communicate your ideas to the audience.
Practicing and refining your presentation is essential for delivering a polished and impactful narrative. This section focuses on key steps to enhance your presentation through practice and feedback.
Rehearsing the Presentation
Rehearsing your presentation helps you become more familiar with the content and improve your delivery. Consider the following practices:
- Practice Timing: Time your presentation to ensure it fits within the allocated timeframe. This helps you maintain a steady pace and avoid rushing or going over time during the actual presentation.
- Use Visual Aids: Practice incorporating visual aids, such as slides or props, into your presentation. Familiarize yourself with the visual cues and transitions to ensure a smooth integration.
- Speak Out Loud: Practice speaking your presentation out loud to develop a natural flow and comfortable delivery. Pay attention to your tone, pace, and emphasis on key points to effectively engage the audience.
Seeking Feedback and Making Improvements
Feedback from others provides valuable insights and perspectives that can enhance your presentation. Consider the following feedback-seeking strategies:
- Peer Review: Share your presentation with colleagues or friends and ask for their feedback. Request their input on the clarity of your message, the organization of your content, and the overall impact of your narrative. Incorporate their suggestions to refine your presentation.
- Professional Guidance: Seek feedback from experienced presenters or mentors who can provide constructive criticism. They can help you identify areas for improvement and offer specific advice on enhancing your storytelling, visuals, or delivery.
Ensuring Coherence and Flow in the Narrative
A coherent and flowing narrative is essential for capturing and maintaining the audience’s attention. Consider the following approaches:
- Smooth Transitions: Pay attention to the transitions between different sections or ideas in your presentation. Practice using transitional phrases or visual cues to ensure a seamless flow and logical progression of information.
- Consistent Visual Design: Ensure visual consistency throughout your slides by using a cohesive design scheme, fonts, colors, and imagery. Consistency helps create a unified narrative and enhances the overall professional appearance of your presentation.
- Storyline Check: Evaluate the overall narrative structure to ensure coherence and clarity. Ensure that the story flows logically, the key message is reinforced consistently, and supporting points align with the central theme. Make necessary adjustments to strengthen the narrative.

By rehearsing your presentation, seeking feedback from others, and refining your content based on the feedback received, you can improve the coherence, delivery, and impact of your narrative. Practice and refinement allow you to fine-tune your presentation to resonate more effectively with your audience and deliver a compelling storytelling experience.
To assist you in crafting a compelling narrative for your slides, we offer a collection of free presentation templates . These templates are designed to enhance your storytelling and create visually engaging presentations.
Our templates come with pre-designed slide layouts that offer a well-organized structure for your content. These layouts include sections for introduction, main points, supporting visuals, and conclusion, making it easier for you to weave your narrative seamlessly.
Our templates feature visually appealing elements, such as high-quality images , icons , and graphics , that can enhance the visual impact of your slides. These elements help convey your message effectively and create a visually engaging experience for your audience.
By using our free templates, you can save valuable time that would otherwise be spent on designing your slides from scratch. Our templates provide a ready-to-use foundation, enabling you to focus more on crafting your compelling narrative and refining your content.

In conclusion, weaving a compelling narrative through your slides is crucial for capturing and maintaining your audience’s attention. By understanding your audience, defining a key message, structuring your narrative effectively, crafting compelling text, and practicing and refining your presentation, you can create a powerful and memorable storytelling experience.
With these tools and strategies at your disposal, you can weave a compelling narrative that captivates your audience, conveys your message effectively, and leaves a lasting impression. Embrace the power of storytelling in your slides and unleash the full potential of your presentations.

Find answers to your questions and learn more!
Get lots of tips and advice to get the most from typecast
- Customer Support
- Contact Sales
- August 23, 2022
Need a Voice Actor?
Recommended articles.
Typecast SSFM v1: The Next Generation in AI Voice Software

How to Use Vocaloid Text-to-Speech

How to Use an Android Text to Speech

Hear the Difference: Typecast SSFM Redefines Text-to-Speech
Are you nervous about using your voice to narrate PowerPoint presentation? Not to worry, you can use a cool voice generator to narrate your slides in various voices and accents. This can be a great way to add some personality to your presentation and make it more engaging for your audience. This post will discuss how to narrate PowerPoint without using your voice.
How to Narrate Powerpoint
Do you want to narrate PowerPoint presentation but don’t want to use your voice? Are you worried that your voice won’t engage your audience? Are you thinking about adding voiceover to powerpoint? Don’t worry, there are ways to narrate a presentation without using your voice. Of those ways, advanced text-to-speech software is the most effective.
There are many benefits to narrating a PowerPoint without using your voice. Here are some of the most notable ones:
- You can add more personality to your presentation by choosing different voices and accents for the text-to-speech software.
- This can be a great way to engage your audience and make your presentation more attractive.
- It can also be helpful if you’re not comfortable speaking in front of a large group of people.

Fortunately, some of the best advanced text-to-speech software programs can help make your presentation sound amazing! Best of all, PowerPoint has a narration feature that lets you add audio or voiceovers on slides or the whole production. Below we will discuss how to upload your PowerPoint audio on a Mac or a PC.
PowerPoint Narration For PC And Mac
The processes for PowerPoint narration for PC and Mac are similar. Here are the steps for each method.
PowerPoint Narration for PC
- First, open a new or existing presentation in PowerPoint.
- Using the top toolbar, select the “Insert” option.
- Scroll to the far-right side of the menu and select “Audio.” Using this option, you can insert voiceover audio from a reliable advanced text-to-speech software app.
- After adding the voiceover, a microphone icon will appear, indicating that the PowerPoint narration was successful.
PowerPoint Narration For Mac
- Open a new or existing presentation for PowerPoint for Mac.
- Find and select the “Insert” option in the top toolbar.
- Like the PC version, navigate to the far-right side and click “Audio.”
- Once again, you can use your favorite voiceover app to create the most engaging PowerPoint audio for your presentation.

Typecast – An Advanced Text-to-Speech Software For a PowerPoint Presentation
Typecast is an advanced text-to-speech software for narrating PowerPoint presentations. With Typecast, you can create fantastic audio for your PowerPoint slides in minutes. The software is simple to use, just paste your text into the app and click “Play.” Typecast will generate high-quality audio you can download and use for your PowerPoint presentation.
Typecast is also great for creating audio for eLearning courses, training materials, and marketing videos. If you need to create a narrated PowerPoint presentation for the office or a potential client, Typecast is the best text-to-speech software to use! Business owners can even hype up their presentations by adding the movie announcer voice to their audio.
Typecast offers many benefits, including:
- A wide range of voices and accents to choose from (over 260 and counting!)
- Quick and painless audio creation – just paste your text and click “Play!”
Typecast is the best advanced text-to-speech software for narrating pitches for small business owners looking to create more engaging content, launch a new product, or open a new business in their franchise. With Typecast, you can easily create audio for your PowerPoint slides in minutes without using your voice! Try it out today.
Type your script and cast AI voice actors & avatars
The ai generated text-to-speech program with voices so real it's worth trying, related articles.

Top 5 Virtual Voices for Business Videos

How Text to Speech Can Enhance Your Learning Videos

How to Set up a Business Voicemail with Proper Voices

- We're hiring 🚀
- Press/Media
- Brand resource
- Typecast characters
- Usage policy
- Attribution guidelines
- Talk to sales
- Terms of Use
- Privacy Policy
- Copyright © 2024 Typecast US Inc. All Rights Reserved.
- 400 Concar Dr, San Mateo, CA 94402, USA

Bringing you weekly presentation productivity pointers to help you finish that deck faster and deliver more impact at work.
Storytelling in Presentations: How to Weave a Compelling Narrative for Your Audience

In the world of presentations, storytelling is a powerful tool to engage and connect with your audience. By weaving a compelling narrative, you can make your message more memorable and persuasive. In this article, we'll explore how to use storytelling in presentations, focusing on presentation software such as Microsoft PowerPoint and Google Slides, and the structure of business stories, which typically revolve around a problem, the action taken, and the outcome or resolution.
1. Set the Stage: Introduce the Problem
Begin your presentation by introducing a problem or challenge that your audience can relate to. This sets the stage for your narrative and grabs your audience's attention. Make sure the problem is relevant to your audience and aligns with the overall objective of your presentation.
To create visually appealing slides that support your narrative, check out how to create the perfect picture with Stable Diffusion for your next presentation .
2. Present the Action: Describe the Steps Taken
Once you've introduced the problem, it's time to present the action or steps taken to address it. This is the core of your story and should be presented in a clear and engaging manner. Use your presentation software to create visually appealing slides that illustrate the actions taken, including any challenges or obstacles faced along the way.
For more tips on designing your slides, explore the best presentation design books .
3. Reveal the Outcome: Share the Resolution
After presenting the action, it's time to reveal the outcome or resolution. This is the moment your audience has been waiting for, so make it impactful and memorable. Share the results of the actions taken, and don't be afraid to include any lessons learned or insights gained throughout the process.
Learn how to use ChatGPT to quickly prepare any workshop presentation for guidance on creating a compelling conclusion.
4. Connect with Your Audience: Use Emotion and Relatability
To make your story more engaging, connect with your audience on an emotional level. Share personal anecdotes, use vivid language, and describe how the problem and resolution impacted people involved. By making your story relatable, you'll create a stronger connection with your audience, and they'll be more likely to remember your message.
5. Enhance Your Story with Visuals and Multimedia
Take advantage of your presentation software's features to enhance your story with visuals and multimedia. Use images, videos, and graphics to support your narrative and make it more engaging. Microsoft PowerPoint and Google Slides offer various tools to create visually appealing slides that complement your storytelling.
Discover how to use GPT-4 to create an entire PowerPoint presentation for more tips on using visuals and multimedia effectively.
6. Practice and Refine Your Delivery
Practice your presentation to ensure a smooth and engaging delivery. Pay attention to your pacing, tone, and body language to make your storytelling more captivating. The more you practice, the more confident and polished your delivery will be.
7. Adapt Your Story to Different Audiences
When telling your story, it's essential to adapt your narrative to suit different audiences. Consider the needs, interests, and backgrounds of your listeners to make your story more relevant and engaging. This might involve adjusting the level of detail, focusing on specific aspects of the story, or even changing the language you use.
To craft a presentation that appeals to a broad audience, read how to use ChatGPT to outline your next PowerPoint deck .
8. Use Analogies and Metaphors to Clarify Complex Concepts
If your presentation involves complex concepts or technical information, use analogies and metaphors to simplify these ideas and make them more accessible to your audience. By relating unfamiliar concepts to something your audience already understands, you can make your story more engaging and easier to follow.
9. Encourage Audience Participation
Involve your audience in your storytelling by encouraging participation and interaction. This can be achieved by asking open-ended questions, prompting reflections, or incorporating interactive elements into your presentation. Engaging your audience in this way not only helps maintain their attention but also allows for deeper understanding and connection with your story.
10. Learn from the Best: Study Great Storytellers
To improve your storytelling skills, study great storytellers, and learn from their techniques. Watch TED Talks, attend workshops, or read books on storytelling to gather insights and inspiration for your own presentations.
For a list of valuable resources, check out the best presentation design books and best AI presentation software .
By weaving a compelling narrative into your presentations, you can create a memorable and engaging experience for your audience. Remember to introduce a relatable problem, present the action taken, and reveal the outcome or resolution. Use emotion and relatability to connect with your audience, enhance your story with visuals and multimedia, and adapt your narrative to different listeners. With practice and dedication, you can become a master storyteller who leaves a lasting impact on your audience.

From Serif to Sans Serif: Understanding Font Families for Captivating Slides

Beyond Language Barriers: A Non-Native English Speaker's Guide to Powerful Presentations

How to Use Midjourney to Create the Perfect Image for a PowerPoint Presentation

IMAGES
VIDEO
COMMENTS
Learn how to avoid death by PowerPoint with 10 proven tips. Create clear, captivating slides that keep your audience interested. Improve your presentations today! ... Narrative Framework for Presentations. Good talks often use a story-like format similar to books and films. This layout has three parts: a beginning that shows the current ...
2. Configure settings. Go to "Settings" to set recording preferences.In "Video", choose the desired output quality and format.Make sure the toggles next to "Record mouse movements" and "Animate mouse clicks" are enabled if needed.In the "Audio" tab, adjust the sound levels and select the desired input devices.3. Record your presentation. Click the "Capture video" option in the side menu and ...
Building a timeline in PowerPoint is easy, seamless, and—without making a tall claim—a lot of fun. Here is what you need to do: Open PowerPoint and open a new slide where you need to create a timeline. In the toolbar, click "Insert," and then "SmartArt." Click "Process" in SmartArt.
Record your audio narration. Inside the Record Sound dialog box you can narrate your PowerPoint slide. Simply: Type in a Name for your Audio Clip. Select the Record button (the red dot) to begin narrating. Click Stop (the square) to stop your narration. Hit Play (the triangle) to listen to your narration.
In the Options dialog box, click the Customize Ribbon tab on the left. Then, in the right-hand box that lists the available ribbon tabs, select the Recording check box. Click OK. To get ready to record, select Record on either the Recording tab or the Slide Show tab of the ribbon.
Method #2: Record SlideShow. The second method to narrate PowerPoint presentations may seem more taxing, but it can be done when creating the assets to include in the presentation. 1. Navigate to the SlideShow tab and select the Record SlideShow icon. This will let you record the presentation from the beginning.
In this video I explain what Narration in PowerPoint is, and why you;d want to use it (if you're a teacher it's especially useful). I then go on to show you ...
Access the Record Slide Show Dialogue Box. Click on the slide show tab and then the Record Slide Show button. You see two options when you click on the command; select the record from the beginning. Note - If you click on the record slide show and not on the drop-down, it will start recording from the current slide. b).
Choose the slide that you want to start narrating on. From the Slide Show Tab, Click Record Slide Show. To finish recording, press the same button or the ESC key. When you record slide show narration, you can record audio for a particular slide or an entire presentation. Even if you only record slide show audio for one slide, it can ...
Have your students present like a pro!Tell your story with confidence with slide-by-slide notes only viewable by you. Easily translate your slides into the p...
Press Record in PowerPoint. To record narrations in PowerPoint, start off by finding the Slide Show tab on PowerPoint's ribbon. Click on the Slide Show tab to change the available options. On the Slide Show tab, click Record to start the recording process.
On Windows: Open your presentation and click on the Slide Show tab. Click on Record Slide Show > Record from Beginning. Click the round, red Record button and begin narrating when prompted. Advance slides and pause recording between slides. Press Esc or click the square Stop button when finished. On Mac:
Open the PowerPoint presentation in which you would like to record a voiceover narration. Head over to the "Slide Show" tab and, in the "Set Up" group, select "Record Slide Show.". Once selected, a drop-down menu will appear. Here, you can choose to start the narration from the beginning or from the current slide.
PowerPoint is a winning way to engage with an audience. But what if they can't be in the room with you in real time? No worries! In this video, you'll learn ...
If you have a microphone and camera then you can record voice narration and video capture with your slides. This tutorial will demonstrate the slide narrati...
Open your presentation and navigate to the Slide Show tab. If you are recording narration for all of the slides, you are ready. If you plan to record a voiceover for only some of the slides, you want to hide the slides you won't have a recording for. You can do this by selecting the slides you don't want to include, right- or ctrl-click and ...
Near the upper right corner of the PowerPoint window, select Record. Choose from two options. When you're ready, select the round, red Record button, wait for the countdown, then start speaking. To record from a specific slide, go to it, and then select Record. Note: Narration isn't recorded while the transition between slides happens, so pause ...
Adding narration to PowerPoint presentations is easier than it sounds. You can record your voice to narrate your slide show and then link to or embed the sou...
Open the Slide Show tab and select Record Slide Show. Select the Record button on the toolbar to start recording your narration. Use your keyboard arrow keys to move back and forth between slides. Press N or Space Bar to move to the next slide or animation in the presentation.
1) Hero's Journey. The hero's journey narrative archetype involves a hero who goes on a journey and returns as a changed person. This storytelling template consists of three distinct parts, or "acts," that include a setup, confrontation, and resolution. It makes for a well-structured and engaging narrative.
Make necessary adjustments to strengthen the narrative. Shakespeare Week Presentation - Free Google Slides theme and PowerPoint template. By rehearsing your presentation, seeking feedback from others, and refining your content based on the feedback received, you can improve the coherence, delivery, and impact of your narrative.
How to Narrate PowerPoint Slides. If you have a microphone and camera then you can record voice narration and video capture with your slides. This tutorial will demonstrate the slide narration interface, as well as how to save the presentation as a PowerPoint show or video. Sean Nufer.
PowerPoint Narration for PC. First, open a new or existing presentation in PowerPoint. Using the top toolbar, select the "Insert" option. Scroll to the far-right side of the menu and select "Audio.". Using this option, you can insert voiceover audio from a reliable advanced text-to-speech software app. After adding the voiceover, a ...
The story should make a point or lead to a conclusion. 5-sentence Narrative Stories. So far this year we have been working on writing five sentence narrative stories. Sentence 1- Topic Sentence introducing the main idea. Sentence 2- Beginning. Sentence 3- Middle. Sentence 4 -End. Sentence 5- Concluding Sentence.
Stick to a few key words to guide your presentation. Large blocks of text should only be used when quoting and should convey the entire message. Follow the "6 x 6" rule - Avoid more than six lines/bullets of text, or six words per line/bullet. Consider making your point with graphics instead of text.
1. Set the Stage: Introduce the Problem. Begin your presentation by introducing a problem or challenge that your audience can relate to. This sets the stage for your narrative and grabs your audience's attention. Make sure the problem is relevant to your audience and aligns with the overall objective of your presentation.