
How to Save a Slide in PowerPoint Individually? [Quick Tip!]
By: Author Shrot Katewa
![How to Save a Slide in PowerPoint Individually? [Quick Tip!]](https://artofpresentations.com/wp-content/uploads/2021/09/Featured-Image-Save-Just-One-Slide-in-PowerPoint.jpg "how to export presentation in powerpoint")
There are times when we want to either just print or share just a single slide from our PowerPoint presentation. It might seem a bit difficult to do so initially, but the process is actually quite simple!
To save a slide in PowerPoint, select the slide from the slide preview panel on the left part of your screen. Press “Ctrl+C” to copy it. Now, click on the “File” tab, and open a “Blank PowerPoint Presentation”. Press “Ctrl+V” to paste the slide. Press “Ctrl+S” to save the single slide presentation.
In this article, I will share with you how you can save just one slide from an existing PowerPoint presentation.
Plus, I will also show you how to save a single slide as an image so that you can avoid the changes in the color and the look of the slide when you move it to a new presentation.
So, without further adieu, let’s get started!
1. How to Save a Single Slide in PowerPoint?
There are actually two different ways in which you can save a single slide in PowerPoint. The first method is where you copy the slide into a new presentation and save it separately. Another method is where you can save a single slide as an image!
Let’s take a look at both the methods below –
Method 1 – Save a Single Slide Using a New Presentation
If you want to extract and save a single slide from an existing PowerPoint presentation, the best thing for you to do is to copy the slide and paste it into a blank PowerPoint presentation.
Related Read – Check out my other article on How to Copy and Paste in PowerPoint that provides you with tips to help retain the design and formatting of your original slide.
Then, save the Powerpoint presentation that contains the single slide that you just pasted in it.
This method allows you retain editing capabilities to the single slide that you move into a new presentation.
Here are the steps that you need to follow –
Step 1 – Copy the Slide
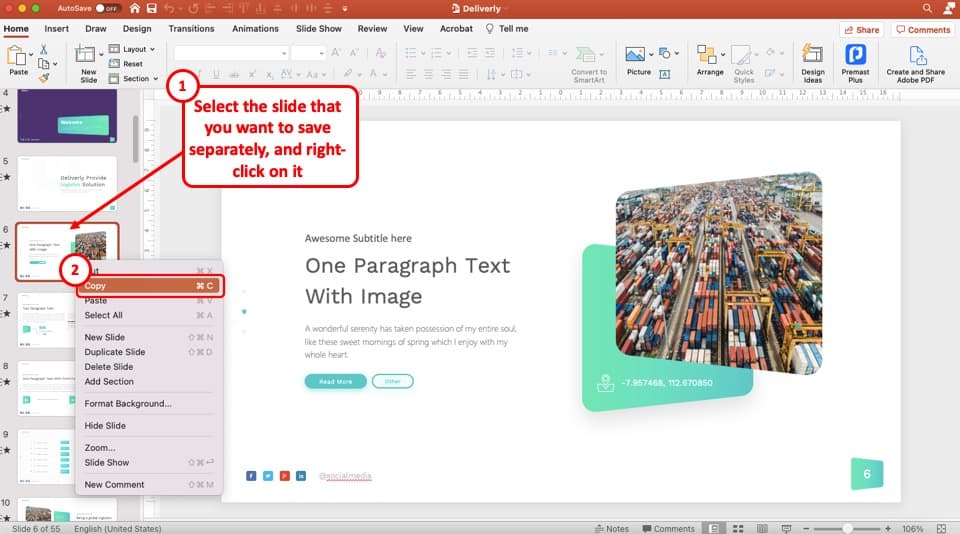
The first step is to copy the slide that you want to save as a presentation. To do that, first, select the slide from the “ Slide Thumbnail View ” on the left part of your PowerPoint window by clicking on it.
Then, “right-click” on the slide. From the options that are displayed in the menu, click on “ Copy “.
You can also use the keyboard shortcut “ Ctrl+C ” to copy the slide once it has been selected.
Step 2 – Open a Blank Presentation
The next step is to move this slide into a new presentation. For that, first, we will need to open a blank presentation.
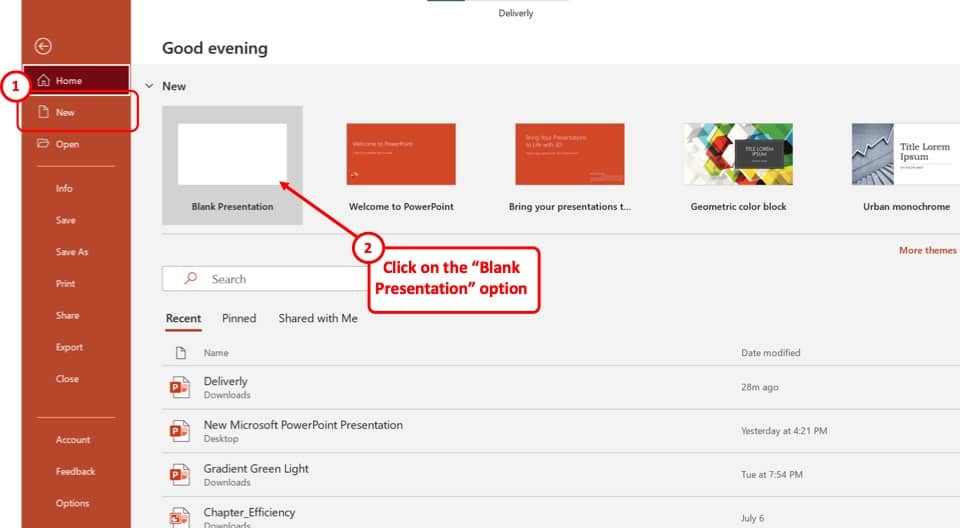
To open a blank presentation in PowerPoint, click on the “ File ” tab on the top. You will be taken to the backend view.
From the backend view, simply click on the “ New ” option on the left, and then select the “ Blank Presentation ” option.
This will open a new blank PowerPoint presentation.
You can also press “ Ctrl+N ” to open a new PowerPoint presentation and avoid all the above steps.
Step 3 – Paste the Copied Slide
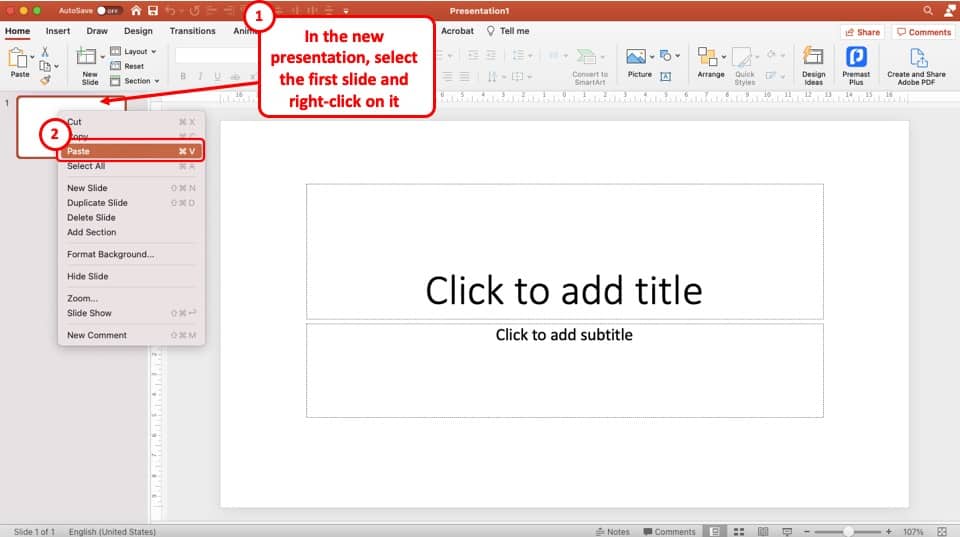
Once the new presentation is open, simply click on the first slide in the new presentation, and paste the slide that you have copied from the original presentation.
You can “ right-click ” on the first slide, and from the options that appear, click on “ Paste “.
Alternatively, you can also simply click on the first blank slide in the new presentation and press “ Ctrl+V ” to paste the copied slide.
Step 4 – Choose the “Keep Source Formatting” option
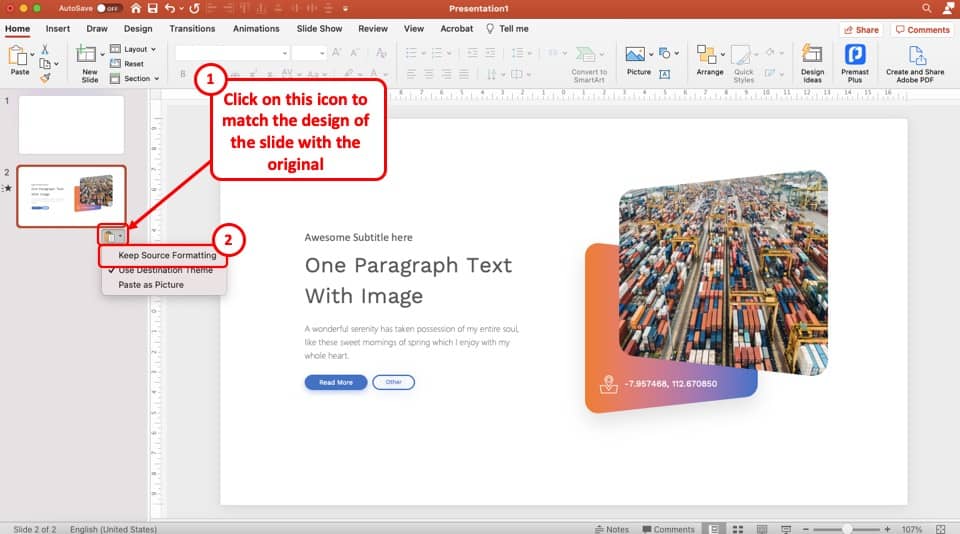
Once you’ve pasted the slide from the original presentation into a new blank presentation, you will notice that sometimes the formatting of the slide (meaning the color and font) doesn’t get carried over.
This can be annoying as you really don’t want to spend time recreating the slide!
To solve this problem, click on the small “clipboard” icon underneath the slide that you just pasted in the new presentation. A dropdown menu will appear.
Simply, choose the “ Keep Source Formatting ” option from the dropdown.
This option will basically retain the way text, image and other elements were formatted in the original presentation.
Step 5 – Delete Additional Slides
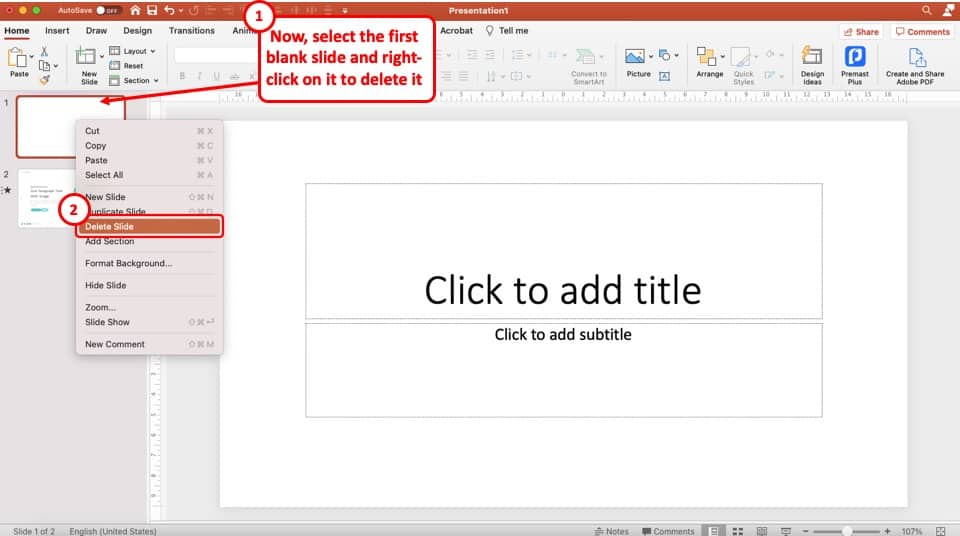
Now, all you are left to do is delete any additional slides that may be present in the new presentation.
To delete the slides from the presentation, select it by clicking on it. Then, right-click and choose the “ Delete Slides ” option.
You should be left with only a single slide that you copied from the original presentation.
Step 6 – Save the Presentation
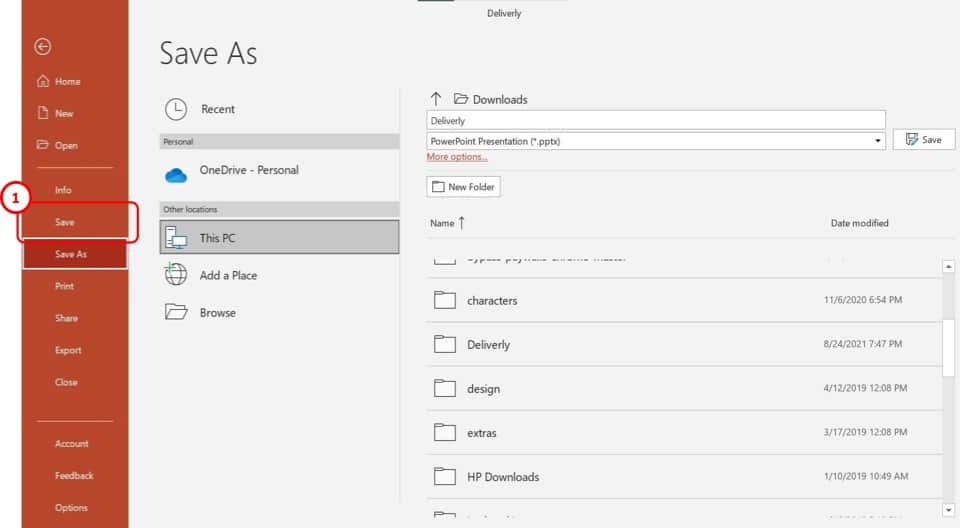
The last step of the process is the make sure that you save the presentation.
To save a PowerPoint presentation, click on the “ File ” tab. Then, from the backend view, click on “ Save “.
You can also use the keyboard shortcut “ Ctrl+S ” to save a PowerPoint presentation.
You will be prompted with a new window asking you to choose a destination to save the file. Navigate to the specific folder where you want to save the file. Then, click “ Save “.
Method 2 – Save a Single Slide as an Image
If you are in a hurry and don’t really care about being able to edit the slide once it has been moved separately, then perhaps you should use this method.
Saving an individual slide as an image in Microsoft PowerPoint is quite an easy process.
It requires 4 easy steps as follows:
Step-1: “Right-click” on the slide
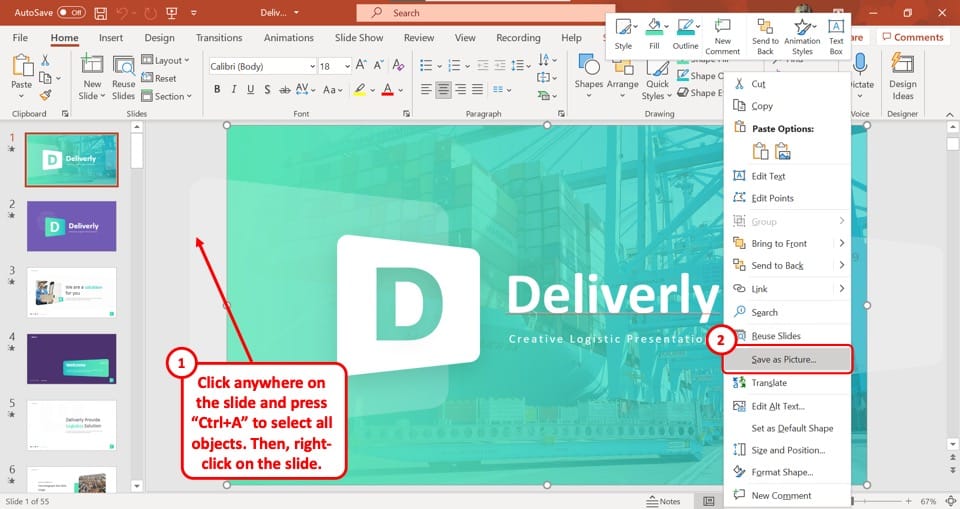
The first step is to go to the slide you want to save as an image and “Right Click” anywhere on the slide. This will open a drop-down menu.
Step-2: Select the “Save as Picture…” option
From the drop-down menu, click on the “Save as Picture…” option. This will open a new window.
In this window, you can select the folder you want to save the slide as a picture in. You can also rename the image by typing in the “File name” box.
Step-3: Select your preferred image format
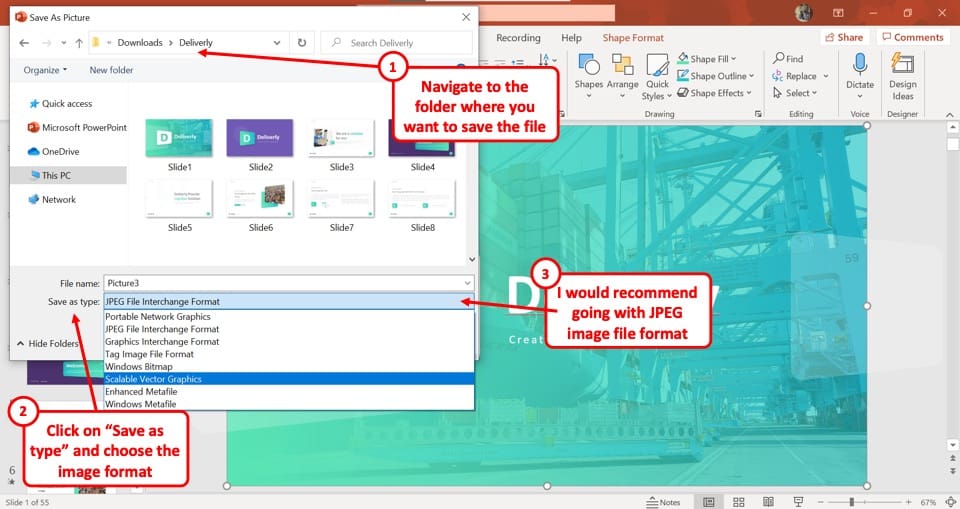
Below the “File name” box, click on the “Save as type” option. This will open a dropdown menu containing all the standard image format options. Click on your preferred format to select it.
I would recommend using the “ JPEG ” file format especially if you only plan to email this to a client or a team member.
If you plan to project it on a screen or print this slide on a huge paper, you would perhaps be better off going with the “PNG” file format.
Step-4: Click on the “Save” button
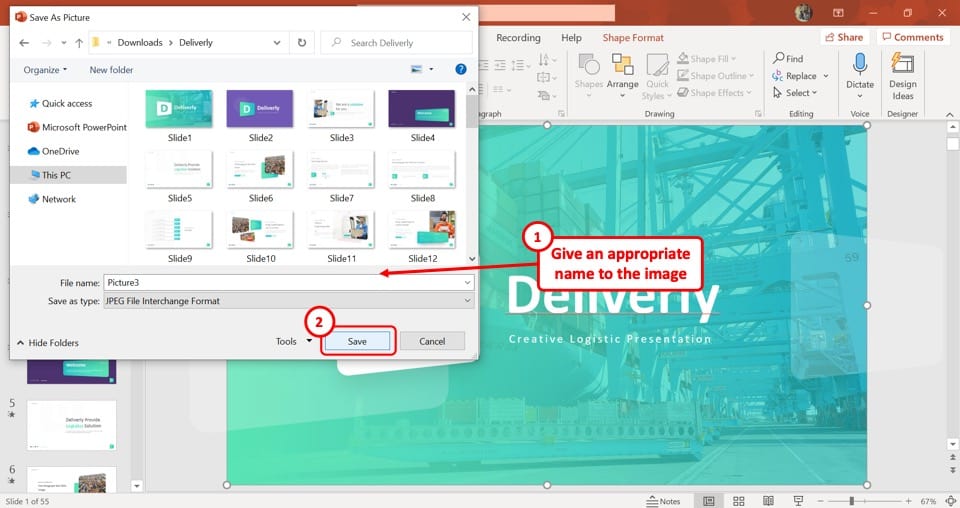
After naming your slide and selecting the image format, click on the “Save” button at the bottom of the new window. This will save the selected single slide as an image.
How to Save One Slide in PowerPoint as a Picture on Mac?
You can follow a similar process to the one mentioned in the previous section even on Mac. However, you can also use the export function and save just one slide as a picture in PowerPoint on Mac.
Here’s how to save just one slide as a Picture in PowerPoint on Mac –
Step-1: Select your preferred slide
First, click on the specific slide you want to save as a picture. Be sure to select the entire slide rather than a single element in the slide.
Step-2: Click on the “Export” option
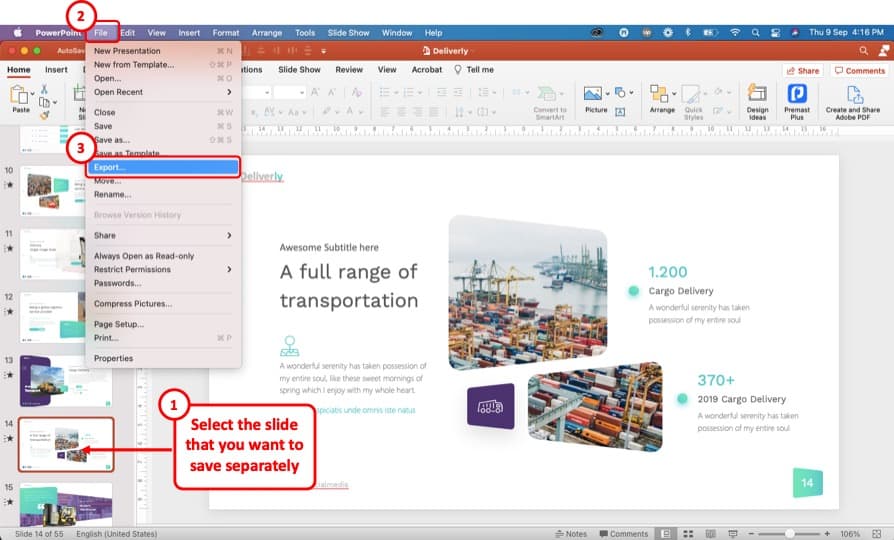
In the “Primary Menu” bar at the top of your screen, click on the “File” option, which will open a dropdown menu. From the dropdown menu, select the “Export” option.
Step-3: Click on the “File Format” box
Clicking on the “Export” option will open a pop-up menu. At the bottom of the pop-up menu, click on the “File Format” box. This will open a dropdown menu containing various file formats.
Step-4: Select the preferred file format
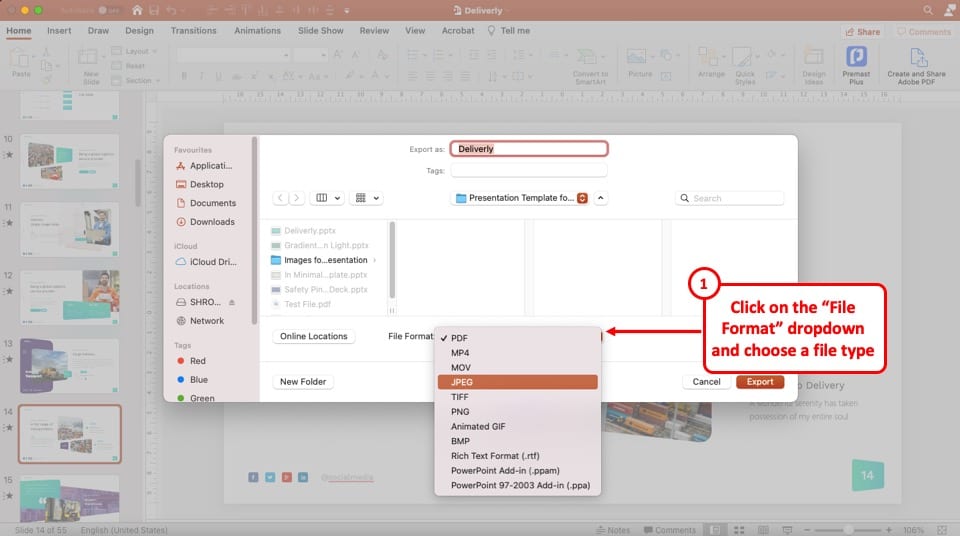
In the dropdown menu under the “File Format” box, there are three image formats which are “JPEG” , “TIFF” and “PNG.” Select your preferred image format.
My recommendation would be to choose the “JPEG” file format as that doesn’t significantly increase the size of the image and also maintains a decent quality for most purposes.
Step-5: Click on the “Save Current Slide Only” option
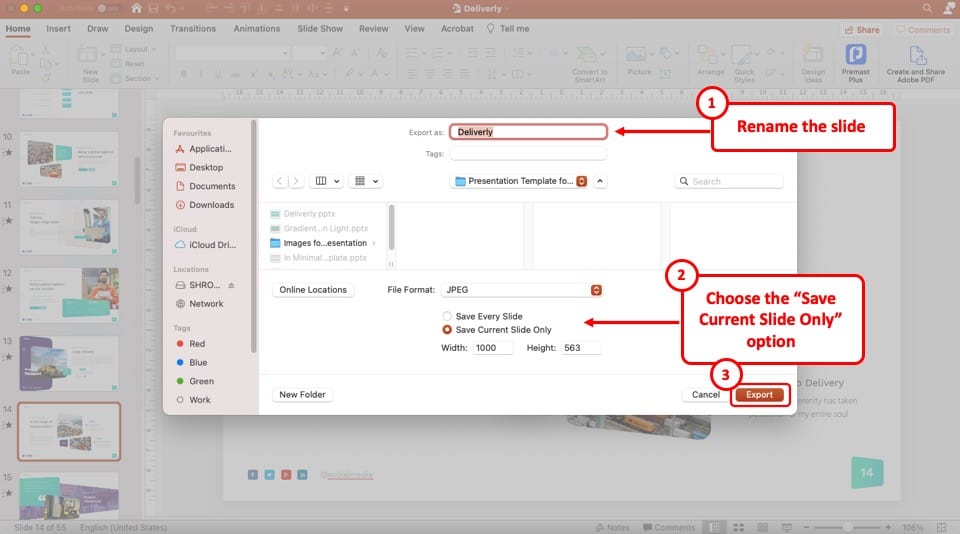
Once you select your desired file format, you will see two new options appear below the “File Format” box. Among the two options, click on “Save Current Slide Only.”
Step-6: Click on the “Export” button
To complete the process, click on the “Export” button which is located at the bottom of the pop-up window. Thus, the selected individual slide will be saved as a picture on your computer.
2. How to Save a Single Slide in PowerPoint as a PDF?
Another option is to save a single slide in PowerPoint as a PDF file. This is great especially when you want to send the slide to a client. Sending a file in a PDF format looks more professional.
Here’s what you need to do to save a single slide in PowerPoint as a PDF –
Step-1: Select the Slide
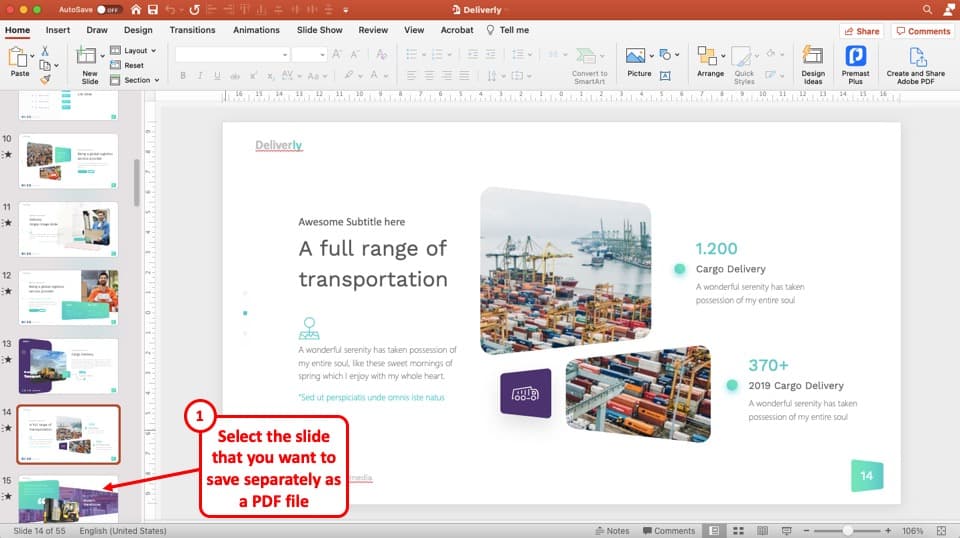
The first step is to select the slide that you want to save as a PDF file.
Step-2: Click on the “File” Tab and choose “Print”
At the top left corner of your screen, click on the “File” menu to open it. In the “File” menu, select the “Print” option from the sidebar at the right side of your screen.
Step-3: Select the “Microsoft Print to PDF” option
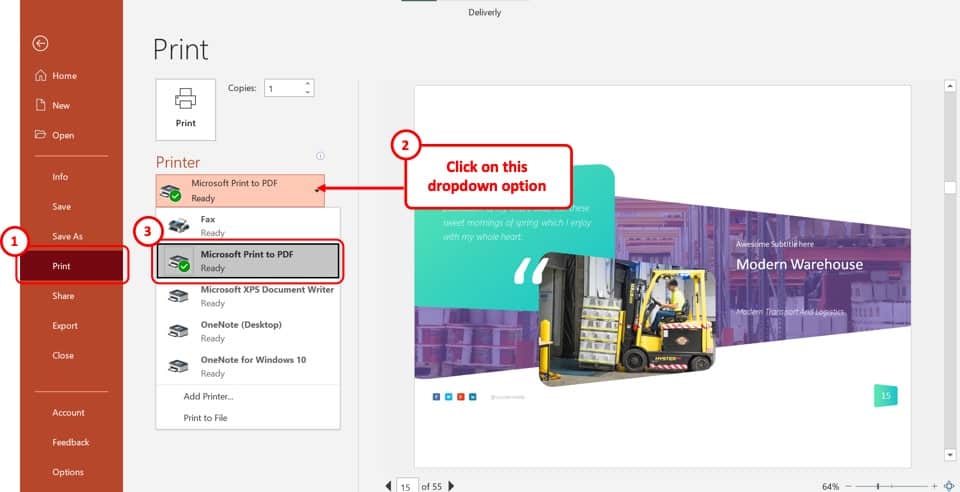
Once the “Print” option is open, click on “Printer” and select the “Microsoft Print to PDF” option from the dropdown menu.
Step-4: Click on the “Custom Range” button
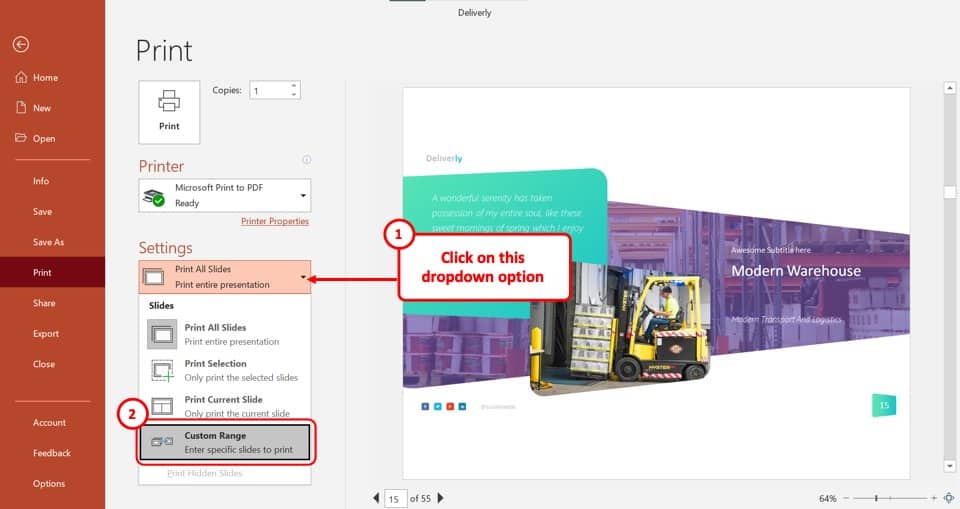
Now, under the “Settings” section, click on the top-most option which says “Print All Slides.” From the dropdown menu, click on the “Custom Range” button.
After that, click on the “Slides” box and type in the slide number of the slides that you want to save as PDF.
Step-5: Click on the “Print” button
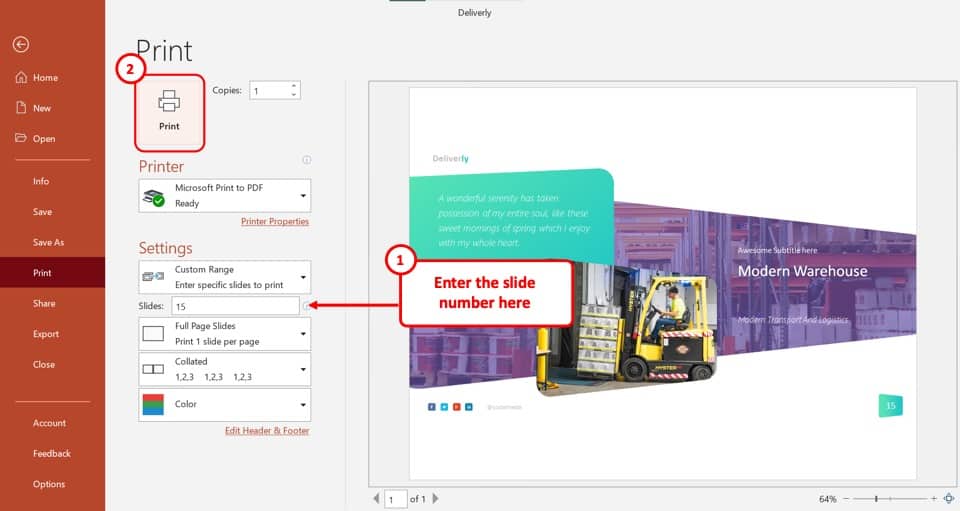
Now, click on the “Print” button to open a pop-up window. Type in the name of the PDF in the “File name” box and click on the “Save” button to save the selected slide as a PDF.
3. How to Save All Slides in PowerPoint as a Picture?
In Microsoft PowerPoint, you can save either an individual slide or an entire presentation as image files. Check out my other article where I’ve gone in-depth on how to save a PowerPoint as a picture . Make sure you check out the article for all the visual references and tips.
I’m also highlighting the process below but if you need to see the process with visual aids, check out the article linked above.
Step-1: Open the “File” menu
At the top-left corner of your PowerPoint window, you will find the “File” tab, which is the first option in the ribbon. Click on the “File” option to open a variety of options.
Step-2: Click on the “Save As” option
With the “File” menu opened, click on the “Save As” option from the sidebar located at the left side of your screen and select the folder where you want to save the pictures in.
To save the slides as pictures in a new folder, click on the “New Folder” button and type in the folder name.
Step-3: Click on “Save As Type”
The “Save As Type” drop-down menu is located in the text box that says “PowerPoint Presentation (*.pptx).”
Click on the text box to open a dropdown menu. Scroll down the menu and select your desired image format from “JPEG File Interchange Format (*.jpg)” , “PNG Portable Network Graphics Format (*.png)” , “TIFF Tag Image File Format (*.tif)” or “Scalable Vector Graphics Format (*.svg).”
After selecting your preferred image file format, click on the “Save” button beside the “Save As Type” box. This will open a new dialogue box.
Step-5: Click on the “All Sides” button
Now, all you have to do is click on the “All Slides” button from the dialogue box to save all the slides of your presentation as image files.
Please Note – Each slide will be saved as a separate image arranged serially by slide number in your selected folder when you save a complete PowerPoint presentation as an image.
4. How to Print a Single Slide in PowerPoint?
In Microsoft PowerPoint, the process of printing an individual slide is similar to the process of saving the slide as a PDF file. Open the “Print” option from the “File” tab and then follow the 3 basic steps:
Step-1: Select the “Add Printer…” option
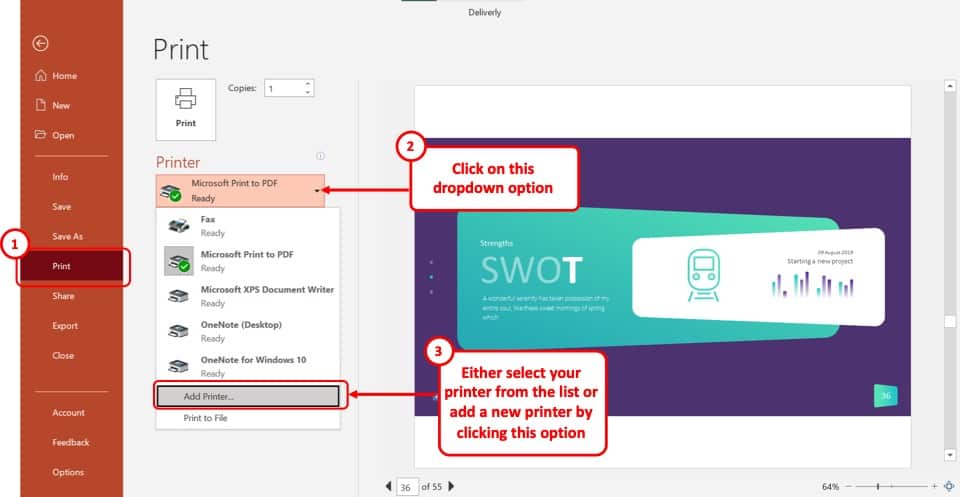
In the “Print” menu, click on the “Printer” box. From the dropdown menu, select the “Add Printer…” option.
This will prompt you to connect your printer to the computer. If your printer is already connected to your computer, click on it to select it.
Step-2: Select your preferred slide
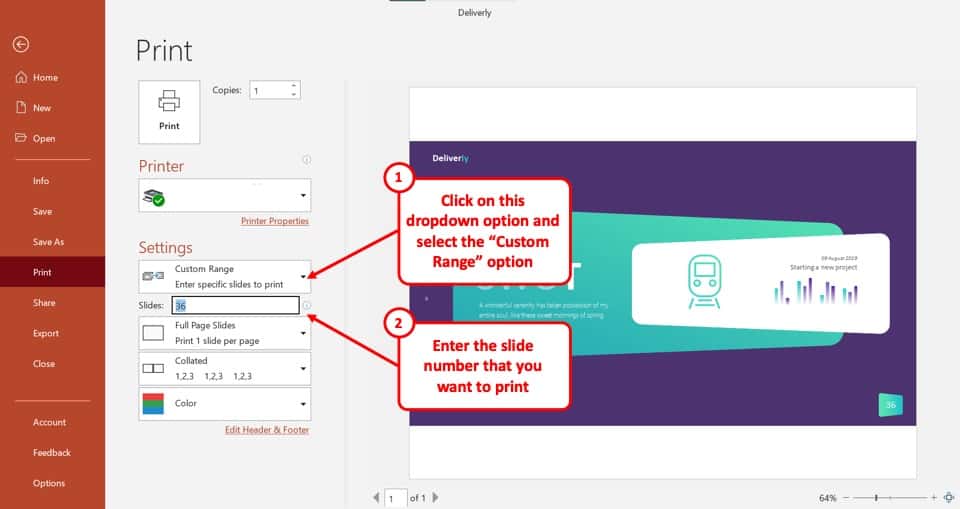
Next, click on the “Settings” button and select the “Custom Range” option from the drop-down menu. In the “Slides” box below, type in the slide number of your preferred slide.
Step-3: Click on the “Print” button

Now, all you have to do is click on the “Print” button for your printer to print the single PowerPoint slide you have selected.
Credit to cookie_studio (on Freepik) for the featured image of this article (further edited)
We explain and teach technology, solve tech problems and help you make gadget buying decisions.
3 Best Ways to Extract Images From a PowerPoint Presentation

Pankil is a Civil Engineer turned freelance writer. Since his arrival at Guiding Tech in 2021, he delves into the world of how-tos, and troubleshooting guides for Android, iOS, and Windows. Besides his new-found love for mechanical keyboards, he's a disciplined footfall fan and loves international travel with his wife.
When you create a PowerPoint presentation, you’re likely to add images to enhance the visual appeal and convey information effectively. But what if you want to save those carefully chosen images for later use? Fortunately, there are several ways to extract images from your PowerPoint presentation.

Whether you want to extract just one or two images from your PowerPoint file or all of them, saving images from your presentation is fairly straightforward. This guide will walk you through three different methods to achieve this. So, let’s get right to it.
1. Use the ‘Save as Picture’ Option
The ‘Save as Picture’ option is the quickest way to extract an image from a PowerPoint file. This method is useful if you only want to save one or two images from your PowerPoint presentation. Here are the steps for the same.
Step 1: Launch PowerPoint on your PC and open the PPT from which you want to save images.
Step 2: Locate and select the image you want to extract. Right-click on it and choose the ‘Save as Picture’ option from the context menu.

Step 3: In the Save As Picture dialog, specify where you want to save the image. Then, click the drop-down menu next to Save as type to select your preferred file format for the image.

Step 4: Click the arrow next to the Save button and select ‘Save Original Picture’ to export the high-resolution image.

You can repeat the above steps to extract more images if you like.
Alternatively, if you want to use the image in another program on your PC, right-click on the image in your presentation and select Copy. After that, move to the program where you want to use the file and press Control + V keyboard shortcut to paste the image.

2. Save the PowerPoint Slides as Images
While the ‘Save as Picture’ option makes it easy to save images from your PowerPoint file, it’s not the most efficient method if you are looking to extract all the images from your PowerPoint presentation. In that case, it’s better to save your PowerPoint slides as images (in JPEG or PNG format ) using the steps below.
Step 1: Open the PowerPoint file from which you want to save images.
Step 2: Click the File menu at the top-left corner.

Step 3: Select Save As from the left pane. Then, click the Browse button.

Step 4: Click the drop-down menu next to Save as type to select ‘JPEG File Interchangeable Format’ or ‘PNG Portable Network Graphics Format’ from the list.

Step 5: Click the Save button.

Step 6: Select All Slides when the prompt appears.

After you complete the above steps, all the images within your presentation will be saved separately in the specified location.
3. Add a ZIP Extension to the Presentation File and Extract It
Another way to save all the images from a PowerPoint file simultaneously involves converting the presentation into a ZIP file and then extracting the file on your computer . This method allows you to save all of the images in your presentation in their original format. Here are the steps you can follow.
Step 1: Press the Windows key + E keyboard shortcut to open File Explorer and locate the PowerPoint from which you want to save images.
Step 2: Right-click on your file and select the rename option.

Step 3: Replace the PPTX or PPTM extension with the ZIP extension. Select Yes when the confirmation prompt appears.

Step 4: Right-click on the renamed file and select Extract All.

Step 5: Use the Browse button to select a location where you want to extract the file and click on Extract.

Step 6: Navigate to the folder where you extracted the ZIP file and double-click the ‘ppt’ folder.

Step 7: Double-click the ‘media’ folder to view all the images extracted from your presentation in their original format.

Step 8: Once you have all the images, you can rename the ZIP file and add the PPTX or PPTM extension to recover your original presentation.

Saving the Heart of Your Presentation
PowerPoint presentations are excellent for sharing information and ideas. Sometimes, you only need the images from a presentation, not the entire thing. Fortunately, extracting images from your PowerPoint presentation is rather simple using the methods mentioned above.
Was this helpful?
Last updated on 04 August, 2023
The above article may contain affiliate links which help support Guiding Tech. However, it does not affect our editorial integrity. The content remains unbiased and authentic.
Leave a Reply Cancel reply
Your email address will not be published. Required fields are marked *
The article above may contain affiliate links which help support Guiding Tech. The content remains unbiased and authentic and will never affect our editorial integrity.
DID YOU KNOW

Pankil Shah
More in windows.

6 Ways to Fix Drag and Drop Not Working in Windows 11

Top 3 Ways to Disable or Enable Search Highlights in Windows 10 and Windows 11
Join the newsletter.
Get Guiding Tech articles delivered to your inbox.
- I Tried Both: Apple Watch 9 vs Fitbit Charge 6
- Best Places to Print Photos Online
How to Copy a PowerPoint Design Template to Another Presentation
It's quick and easy to copy over a design template
- Brock University
What to Know
- In the source presentation, select View > Slide Master . In the Slide pane, right-click the Slide Master and select Copy .
- Go to View > Switch Windows and choose the second presentation. Go to View > Slide Master . Right-click the Slide pane and select Paste .
- Choose Use Destination Theme (keeps colors, fonts, and effects) or Keep Source Formatting (copies the source's colors, fonts, effects).
This article explains how to copy a PowerPoint design template over to another presentation. Instructions apply to PowerPoint 2019, PowerPoint 2016, PowerPoint 2013, and PowerPoint for Microsoft 365.
How to Copy a Presentation's Design Template
It's often quicker to copy a design template from a presentation than to find it in the list of PowerPoint templates.
Go to View in the presentation that contains the design template you want to copy and select Slide Master .
Right-click the Slide Master in the Slide pane on the left side of the screen and select Copy .
The Slide Master is the large thumbnail image at the top of the Slide pane. Some presentations contain more than one slide master.
Go to View , select Switch Windows , and choose the presentation you want to paste the Slide Master into.
If you don't see the other PowerPoint presentation on this list, it means that the other file isn't open. Open it now and return to this step to select it from the list.
In the second presentation, go to View and select Slide Master to open the Slide Master .
To insert the Slide Master from the other presentation, right-click on the Slide pane to the left, select Paste , and do one of the following:
- Choose Use Destination Theme to keep the theme colors, fonts, and effects of the presentation you are pasting to.
- Choose Keep Source Formatting to copy the theme colors, fonts, and effects of the template you are copying from.
Select Close Master View .
Changes made to individual slides in the original presentation, such as font styles, do not change the design template of that presentation. Therefore, graphic objects or font changes added to individual slides do not copy over to a new presentation.
To copy PowerPoint slides to another presentation , right-click the thumbnail of the slide you want to copy and choose Copy . Right-click a blank area of the Slides pane where you want to place it and choose one of the pasting options.
To save a copy of a PowerPoint presentation on your computer, go to the File tab and select Download As > Download a Copy . Select Download to continue.
To embed YouTube videos in PowerPoint , select Share > Embed . Select the HTML code and choose Copy . In your PowerPoint slide, select Insert > Video > Insert Video From Website . In the dialog box, right-click the blank area and choose Paste > Insert .
Get the Latest Tech News Delivered Every Day
- Copy Slides to Another PowerPoint Presentation
- Change the Default Font in PowerPoint Text Boxes
- How to Use Copilot in Powerpoint
- Use This PowerPoint Template for a Multiple Choice Quiz
- How to Use PowerPoint Slide Master Layouts
- How to Add an Excel Chart to a PowerPoint Presentation
- How to Merge PowerPoints
- Replacing All the Fonts in a Presentation at One Time
- How to Increase PowerPoint Slide Number Size
- What Is a PowerPoint Placeholder?
- Definition and Uses for a PowerPoint Design Template
- 10 Free PowerPoint Game Templates
- Create a Default Presentation Template in PowerPoint
- Add, Delete or Change the Order of PowerPoint Slides
- PowerPoint Master Slide
- The 10 Most Common PowerPoint Terms

Feb 23, 2021
Export Word documents into PowerPoint presentations
Mohit Anand
- Add our blog to your RSS feed reader" href="/rss/blog.xml" data-bi-name="RSS Subscription" data-bi-id="rss_feed" data-bi-bhvr="120" data-bi-socchn="RSSSubscription" title="Microsoft 365 Insider Blog RSS" target="blank" class="d-inline-block">
Hi, Office Insiders, my name is Mohit Anand, and I’m a Program Manager on the PowerPoint team. I’m glad to share that a new scenario is now available in Word for the web . You can now export Word document s in to PowerPoint presentation s .
Word document s to PowerPoint presentation s
Have you ever wished you could easily export an existing Word document into a great PowerPoint presentation? If so, the wait is over!
When you use the Export command, it creates a presentation based on all the summarized sections of the document. It also adds imagery, icons, videos, themes, and fonts using AI.
How it works
To turn your Word document into a PowerPoint presentation:
- Open any document you want to convert into a presentation in Word for the web.
- Click File > Export > Export to PowerPoint presentation .
- When prompted , choose a design theme for your presentation.
- Click Open presentation to re view the results in PowerPoint for the w eb.
- The presentation w ill be created in the OneDrive root folder of the user who used this option.

Scenarios to try
- Open a Word document and explore the available PowerPoint themes.
- Open a Word document that is mostly text and see which AI-backed assets are added by clicking on Export .
Known Issues
- This feature is currently only available in English.
- It is not available in the Internet Explorer and Safari browser.
- We only support text content for the transformation to presentation, other media content support is not currently available. You can add your own media to the presentation after you have exported your Word document.
Availability
Export your document to PowerPoint presentation is rolling out to all Word for the web users shortly .
Features are released over some time to ensure that things are working smoothly. Therefore, we highlight features that you may not have because they’re slowly releasing to larger numbers of Insiders. Additionally, sometimes we remove elements to further improve them based on your feedback. Though this is rare, we also reserve the option to pull a feature entirely out of the product, even if you, as Insiders, have had the opportunity to try them.
Feedback
If you have any feedback or suggestions, you can submit them by clicking Help > Feedback.
Learn more about what other information you should include in your feedback to ensure it’s actionable and reaches the right people.
We’re excited to hear from you! Sign up for the Office Insider newsletter , and you’ll get the latest information about Insider features in your inbox once a month.
Sorry, JavaScript must be enabled to use this app.
How-To Geek
How to convert a word document to a powerpoint presentation.
You can get a great jumpstart on your next slideshow.
Quick Links
What you need to know, how to convert word to powerpoint on the web.
You might have converted a PowerPoint presentation to a Word document before so that you could edit it. But did you know that you can do the reverse? Take your Microsoft Word document and turn it into a Microsoft PowerPoint slideshow.
Related: How to Convert a PowerPoint to Word and Make It Editable
Maybe you want a jumpstart on creating your presentation using the text that you've saved in Word. Or maybe you've realized that your document would be better presented as a PowerPoint slideshow. With Word on the web, you can convert your document easily.
Here are a few things to keep in mind in terms of converting Microsoft Word documents to PowerPoint presentations. These points might be updated over time. The feature began rolling out in early 2021 :
- The ability to convert PowerPoint presentations is currently only available in Word for the web.
- The option is currently only available in English.
- The feature is not currently available when using Safari or Internet Explorer.
- At the time of writing, text content is available for export. If you have media content in your Word document, you'll need to add it to the PowerPoint presentation separately.
Now, if you're ready to give this feature a try, let's get to it! Head to the Microsoft Office online website, sign in to your account, and open your document in Word. You do not have to open PowerPoint in another tab or window.
Click File > Export and choose the "Export to PowerPoint Presentation" option.
You'll see a pop-up window with a collection of themes. Select the theme that you want to use and click "Export." You can change the theme in PowerPoint once it's exported if you like.
After several moments, you'll receive a notification that your newly converted presentation is ready. Click the "Open Presentation" button.
The slideshow will open in Microsoft PowerPoint for the web in a new tab.
The presentation will be saved to OneDrive automatically with the same name as your Microsoft Word document. If you haven't named your document, the slideshow will have a default name, such as Document 1. Click the name in the top-left corner and give it a new file name.
Styles like headings and bullet points should transfer as such. However, this could change depending on the theme that you select. Keep in mind that you might need to make some adjustments to the slideshow after you export it.
Check out some of our tips for making great PowerPoint presentations !
Related: 8 Tips to Make the Best PowerPoint Presentations
How To Export Canva Presentation Slides To PowerPoint
Here’s how to make awesome twitch emotes with canva in your browser..
Canva is an incredible online design software that allows you to create many things including stunning presentations.
But if you’re a PowerPoint user you might be wondering how to export your Canva slides as a PowerPoint presentation?
In this article, we’ll take you through the process step by step, including how to keep your animated elements from Canva.
Let’s dive right in.
Jump to a specific section:
Step 1: Download your Canva slides
Step 2: open the .pptx doc in powerpoint, step 3: copy or add animation.
If you haven’t created your presentation in Canva yet – check out these incredible Canva presentation slide templates to get started.
If you have, open up your Canva slides document, and once you’ve made all your updates and you’re happy with it you can now download it.
You can download as a PDF file, or publish it online, or if you want to export it as a PowerPoint presentation (.pptx) you can do that too. Here’s how:
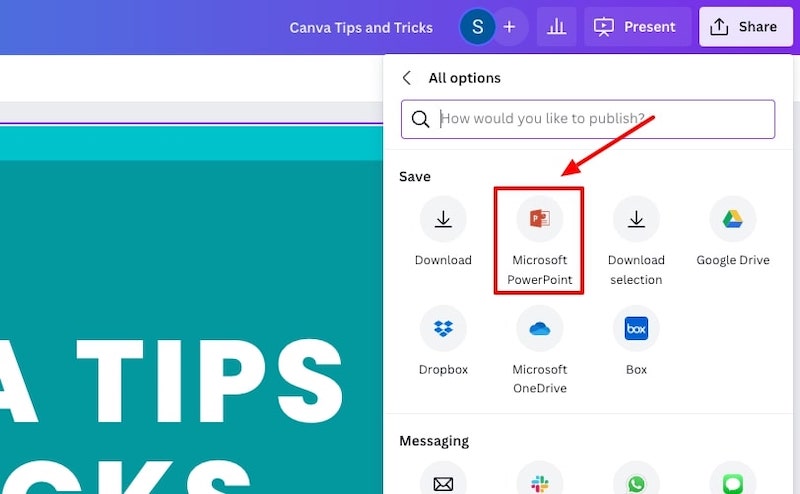
Go to the ‘Share’ button at the top right and click ‘More’:
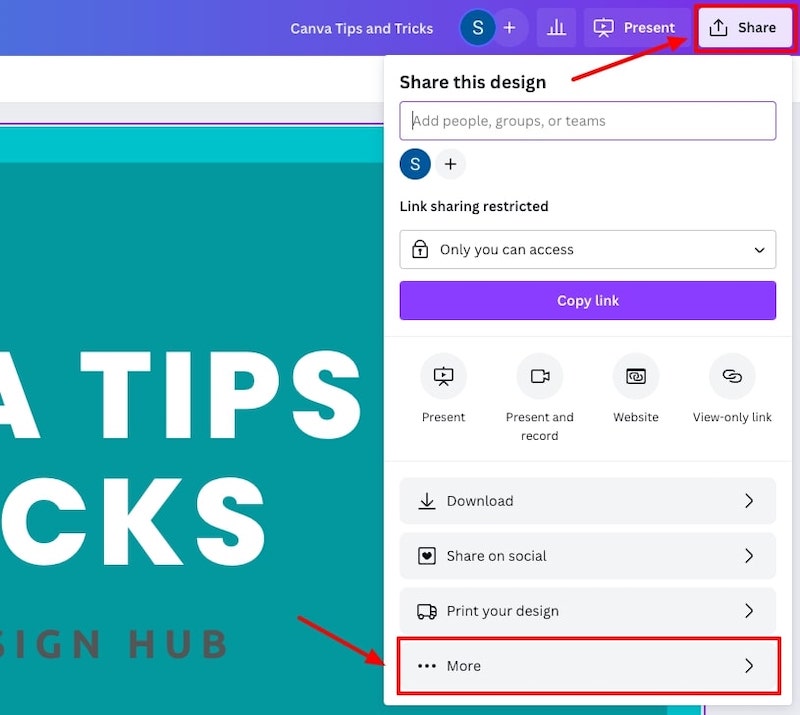
Scroll down to the ‘Save’ options and choose ‘Microsoft PowerPoint’:
Choose the slides you want to download, and hit the download button:
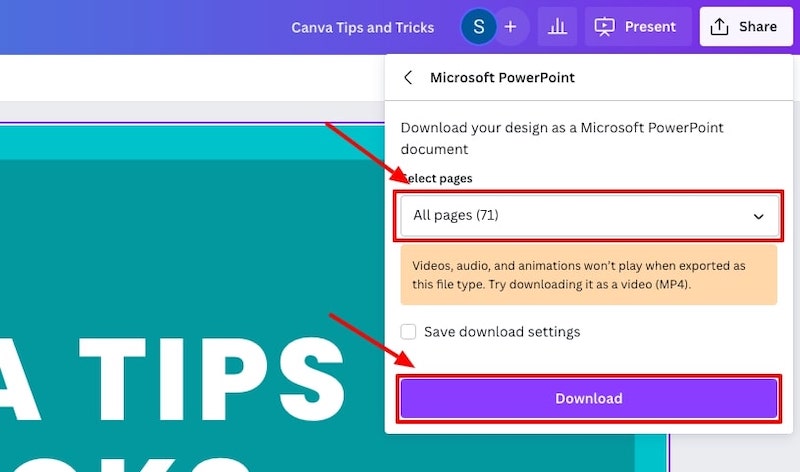
You will now have a PowerPoint presentation (.pptx) file in your downloads folder that you can open up.
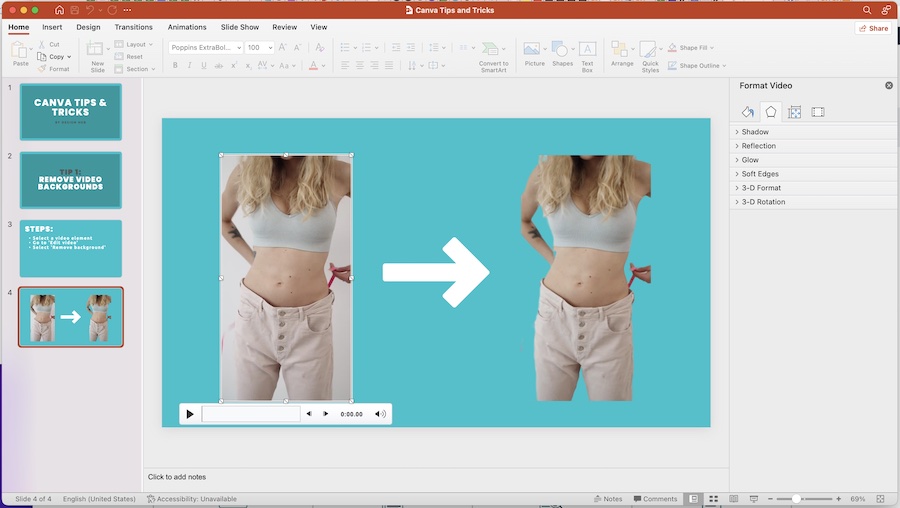
The next step is to check if everything in your presentation was exported from the Canva slides to a PowerPoint presentation correctly.
In the past, elements such as the text fonts, graphs, videos, and some graphics didn’t export correctly but Canva has mostly fixed these issues so your export will likely be completely fine.
It’s worth checking though!
As an example, our .pptx export contained a couple of videos in one of the slides. One of the videos remained in that format:
Whilst the other one was converted into an image element:
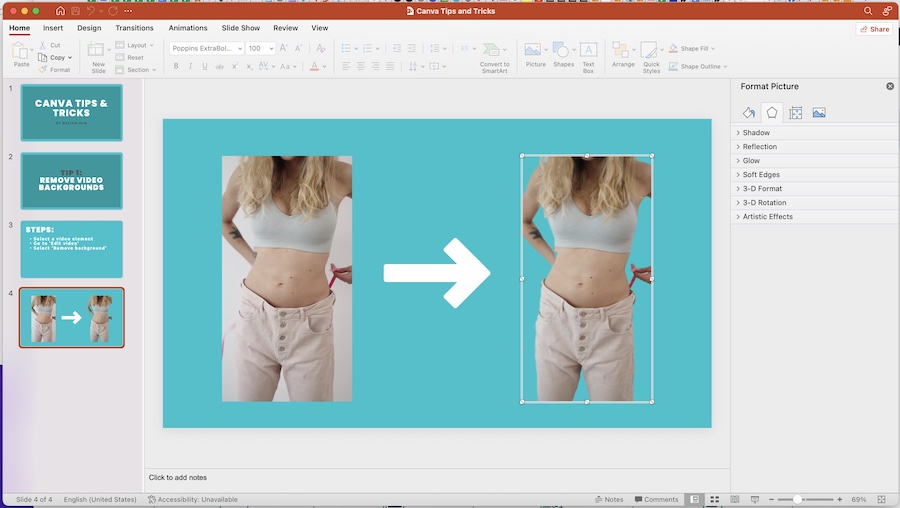
Most of the elements will be converted properly but as you can some elements such as animations and videos might not convert correctly.
There is a workaround for this, which we’ll cover in the next step.
To convert Canva slides with animation into PowerPoint presentation slides here’s what you have to do:
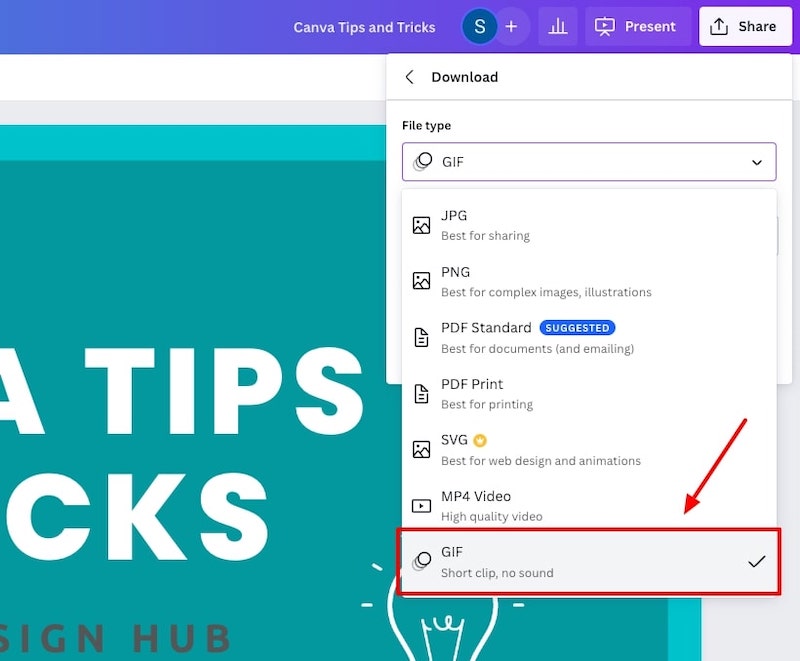
First, go back to your Canva presentation, and download the pages with animation as GIFs. Simply, go to ‘Share’ then ‘Download’ and select the page or pages that you want to download:
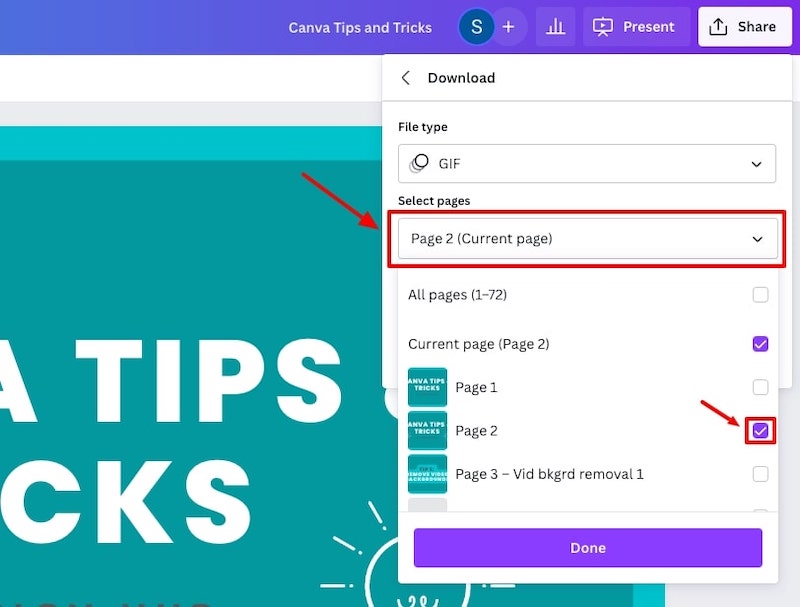
Then, select GIF as your file type, and hit the download button:
The last step is to add a blank slide in your PowerPoint presentation, upload the downloaded GIF image into that new blank slide and adjust it to cover the PowerPoint page and that’s it!
You’ll now have an animated slide in your PowerPoint presentation.
Adding animations in PowerPoint
You can also simply download the full Canva presentation and convert it to a PowerPoint presentation and then add animations within PowerPoint instead.
Here’s a great video showing you how to add animations in PowerPoint:
Related articles
If you’re new to Canva, here are some other articles that might be of interest to you:
- How to use Canva: Beginners tutorial
- Canva tips and tricks
- How to draw on Canva
Wrapping things up
So, there you have it, that’s how you can quickly and easily convert your Canva presentations into PowerPoint presentations, including how to keep your animations.
We hope this tutorial was helpful for you!
Enjoy creating! If you have any questions or suggestions leave a comment below.

Written by Sam McCraw
Leave a reply cancel reply.
Your email address will not be published. Required fields are marked *
Save my name, email, and website in this browser for the next time I comment.
By using this form you agree with the storage and handling of your data by this website. *

How to Use Canva: Tutorial For Beginners

How To Create A 3D Pop Out Effect in Canva
© 2024 by Design Hub
- Adobe Document Cloud
- Online Tools
- Convert PDF to PowerPoint
Convert PDF to PPT
Drag and drop a PDF file to use our PDF to Microsoft PowerPoint (PPT) converter. Select a PDF file to use our PDF to Microsoft PowerPoint (PPT) converter. Select a PDF file to use our PDF to Microsoft PowerPoint (PPT) converter. Select a file
How to convert PDF to PPT
Follow these easy steps to convert a PDF into a Microsoft PowerPoint presentation:
https://main--dc--adobecom.hlx.page/dc-shared/assets/images/frictionless/how-to-images/pdf-to-ppt-how-to.svg | A PDF document being converted to a Microsoft PowerPoint file
- Click the Select a file button above, or drag and drop files into the PDF drop zone.
- Select the PDF file you want to turn into a PPTX file.
- Watch Acrobat automatically convert your file from PDF to PPT.
- Download the converted PowerPoint file or sign in to share it.
Try our free PDF to PPT converter online
https://main--dc--adobecom.hlx.page/dc-shared/assets/images/shared-images/frictionless/seo-icons/ppt-pdf-converting.svg | A PDF file being converted to a PowerPoint file
Save a PDF as PPT
It’s easy to convert a PDF to a PowerPoint presentation with our online tool. Simply drag and drop your PDF, then download the converted PPTX file.
https://main--dc--adobecom.hlx.page/dc-shared/assets/images/shared-images/frictionless/seo-icons/fast-pdf.svg | Fast PDF Conversion
Fast conversion to PowerPoint
Go from a PDF to a PPTX file in record time. You can use any browser to convert from PDF to Microsoft PowerPoint online, so you can keep work moving wherever you are.
https://main--dc--adobecom.hlx.page/dc-shared/assets/images/shared-images/frictionless/seo-icons/reliable-pdf.svg | An Acrobat PDF file with a measurement bar demonstrating reliable PDF tools
Reliable tools from Adobe
You can trust the quality of Acrobat tools. When you convert a PDF file to PPT, your file will retain its original styling and formatting.
https://main--dc--adobecom.hlx.page/dc-shared/assets/images/shared-images/frictionless/seo-icons/reuse-files.svg | Multiple files with arrows representing reusing PDF content when converting to PPT
Recycle PDF file content
When you want to reuse PDF content, there’s no need to track down the source file. Save time by converting the PDF to PPT in just a few clicks.
https://main--dc--adobecom.hlx.page/dc-shared/assets/images/shared-images/frictionless/seo-icons/edit-ppt.svg | A Microsoft PowerPoint document with a pen showing how you can edit your file
Edit your PPT file for free
After you convert your PDF into a PowerPoint presentation, you can edit your file in Microsoft PowerPoint for the web right from Acrobat. Just sign in.
https://main--dc--adobecom.hlx.page/dc-shared/assets/images/shared-images/frictionless/seo-icons/best-pdf.svg | web browser with red checkmark representing that the JPG to PDF tool can be used on any platform.
The best PDF to PPT converter
Adobe invented the PDF file format , so you can trust that you’ll get high-quality results when you use the Acrobat PDF to PPT converter tool.
Questions? We have answers.
Use our Acrobat PDF to PowerPoint converter in any browser — you just need an internet connection to use the file conversion online service. Select the PDF you want to convert using the online PDF tool above. Each PDF page will be turned into a PowerPoint slide in the converted file. Our free PDF converter tool preserves the document formatting, so your content will look as expected on the Mac or Windows operating systems.
You can also try Adobe Acrobat Pro free for seven days to convert PDF files to and from Microsoft Word and Excel or to convert image files like JPG, PNG, or GIF. You can also convert HTML to PDF, edit PDFs using optical character recognition (OCR) functionality, merge PDFs, split PDFs, reduce file size, use PDF tools to annotate files, and more.
More resources
Content as a Service v2 - pdf-to-ppt - Tuesday, January 30, 2024 at 16:04
Use Acrobat tools for free
- Sign in to try 25+ tools, like convert or compress
- Add comments, fill in forms, and sign PDFs for free
- Store your files online to access from any device
Create a free account Sign in
Try these Acrobat online tools
Convert from pdf.
- https://main--dc--adobecom.hlx.page/dc-shared/assets/images/frictionless/verb-footer-images/pdf-to-word.svg PDF to Word
- https://main--dc--adobecom.hlx.page/dc-shared/assets/images/frictionless/verb-footer-images/pdf-to-jpg.svg PDF to JPG
- https://main--dc--adobecom.hlx.page/dc-shared/assets/images/frictionless/verb-footer-images/pdf-to-excel.svg PDF to Excel
- https://main--dc--adobecom.hlx.page/dc-shared/assets/images/frictionless/verb-footer-images/pdf-to-ppt.svg PDF to PPT
- https://main--dc--adobecom.hlx.page/dc-shared/assets/images/frictionless/verb-footer-images/convert-pdf.svg PDF converter
Convert to PDF
- https://main--dc--adobecom.hlx.page/dc-shared/assets/images/frictionless/verb-footer-images/word-to-pdf.svg Word to PDF
- https://main--dc--adobecom.hlx.page/dc-shared/assets/images/frictionless/verb-footer-images/jpg-to-pdf.svg JPG to PDF
- https://main--dc--adobecom.hlx.page/dc-shared/assets/images/frictionless/verb-footer-images/png-to-pdf.svg PNG to PDF
- https://main--dc--adobecom.hlx.page/dc-shared/assets/images/frictionless/verb-footer-images/excel-to-pdf.svg Excel to PDF
- https://main--dc--adobecom.hlx.page/dc-shared/assets/images/frictionless/verb-footer-images/ppt-to-pdf.svg PPT to PDF
Reduce file size
- https://main--dc--adobecom.hlx.page/dc-shared/assets/images/frictionless/verb-footer-images/compress-pdf.svg Compress PDF
- https://main--dc--adobecom.hlx.page/dc-shared/assets/images/frictionless/verb-footer-images/pdf-editor.svg Edit PDF
- https://main--dc--adobecom.hlx.page/dc-shared/assets/images/frictionless/verb-footer-images/merge-pdf.svg Merge PDFs
- https://main--dc--adobecom.hlx.page/dc-shared/assets/images/frictionless/verb-footer-images/split-pdf.svg Split PDF
- https://main--dc--adobecom.hlx.page/dc-shared/assets/images/frictionless/verb-footer-images/crop-pdf.svg Crop PDF
- https://main--dc--adobecom.hlx.page/dc-shared/assets/images/frictionless/verb-footer-images/delete-pdf-pages.svg Delete PDF pages
- https://main--dc--adobecom.hlx.page/dc-shared/assets/images/frictionless/verb-footer-images/rotate-pages.svg Rotate PDF pages
- https://main--dc--adobecom.hlx.page/dc-shared/assets/images/frictionless/verb-footer-images/rearrange-pdf.svg Reorder PDF pages
- https://main--dc--adobecom.hlx.page/dc-shared/assets/images/frictionless/verb-footer-images/extract-pdf-pages.svg Extract PDF pages
- https://main--dc--adobecom.hlx.page/dc-shared/assets/images/frictionless/verb-footer-images/add-pages-to-pdf.svg Insert PDF pages
- https://main--dc--adobecom.hlx.page/dc-shared/assets/images/frictionless/verb-footer-images/add-pdf-page-numbers.svg Number PDF pages
Sign & Protect
- https://main--dc--adobecom.hlx.page/dc-shared/assets/images/frictionless/verb-footer-images/sign-pdf.svg Fill & Sign
- https://main--dc--adobecom.hlx.page/dc-shared/assets/images/frictionless/verb-footer-images/request-signatures.svg Request e-signatures
- https://main--dc--adobecom.hlx.page/dc-shared/assets/images/frictionless/verb-footer-images/password-protect-pdf.svg Protect PDF
How to video record yourself presenting a PowerPoint

What type of content do you primarily create?
Recording yourself presenting a PowerPoint can be challenging, especially getting the technical aspects right. You need to capture your screen, webcam, and audio seamlessly while delivering your content naturally and avoiding awkward transitions between slides.
Finding a tool that integrates all these components can seem daunting. However, recording yourself presenting a PowerPoint doesn't have to be reserved for the tech-savvy or professional speakers.
Whether you're a teacher creating online lessons, a marketer producing a product demo, or someone looking to improve their presentation skills, this guide will walk you through user-friendly tools and strategies that will teach you how to video record yourself presenting a PowerPoint.
- Recording yourself presenting a PowerPoint can be challenging, but it doesn't have to be reserved for experts.
- Video recording offers unlimited reach, repurposing opportunities, and a more engaging experience.
- Use PowerPoint's built-in recording feature or tools like Descript for a polished presentation.
- Other tools like Zoom, Loom, OBS Studio, Clipchamp, and Quick Time Player can also be used for recording.
- Tips include practicing your script, using slide notes, ensuring high-quality audio and lighting, and incorporating storytelling techniques.
Why video record yourself presenting a PowerPoint?
Video recording your PowerPoint presentations offers several advantages:
- Unlimited reach : Unlike in-person presentations confined to a specific time and location, recorded videos allow your message to reach audiences globally at their convenience.
- Repurposing opportunities: Recorded presentations can be repurposed as evergreen content across multiple platforms, such as social media, online courses, webinars, and internal training materials, maximizing their value.
- Personal and engaging : Recording yourself narrating a presentation adds a personal touch and dynamic element that static slides alone cannot replicate. Your viewers can see and hear you deliver the content, creating a more immersive and engaging experience.
How to record your presentation with the PowerPoint app
Built-in recording feature in powerpoint.
1. Open the PowerPoint slide you want to record.
2. Click on the Record tab of the top toolbar.
3. Click on the Record button and choose from any of the following options:
- From Current Slide
- From Beginning
4. You'll see the PowerPoint screen recording window.
5. Select the microphone and camera from the icon on the top-right.
6. Click the Stop and Replay buttons to end or replay your recording.
7. To export your presentation's recording, click Export to Video within the Recording tab.
Benefits : Easy to use, no external tools needed
Limitations : Limited editing capabilities.
How to make a more polished recording of your presentation with Descript
While PowerPoint's built-in recording features are helpful, they may not produce the refined result you want for your presentation. That's where Descript comes in handy.
It’s a whole production studio at your fingertips, with video recording, transcription, and editing capabilities, ready to transform dull PowerPoint slides into an engaging experience for your audience. Descript also has a built-in screen recorder.
You can use Descript on Windows, Mac, or even straight from your web browser.
Here's step-by-step guide to recording your PowerPoint presentation with Descript.
Set up your screen recording
1. Install and open Descript. At the top of the editor, click and open the Record panel.
2. Select Screen.
3. Set Recorder settings:
Adjust the default recording settings to your liking, including the transcription language, the maximum recording resolution, and more.
4. Set recording options. Choose which audio and video sources to record (e.g., microphone, computer audio, camera). Remember to turn the camera on to capture your talking head video alongside your PowerPoint presentation.
5. Click the Additional Settings icon for
- Studio Sound (Optional): Enhance audio quality with noise reduction and background removal
- Transcription (Optional): Enable automatic transcription for easier editing
- Recording separate audio tracks
6. Add (optional) Speaker labels for each audio track (e.g., "Narrator," "Expert") by typing them in the text box next to your audio inputs.
Capture your screen recording
1. Select the right recording option:
- Recording into script : Choose this if you haven’t recorded anything yet.
- Replace selection : Choose this if you already have a script and want to replace a specific section with a new recording.
- Record new layer : Pick this for recording your video as a new layer on top of an existing recording.
2. Click Record at the bottom of the Record panel.
3. Drag over the area of your screen you wish to record. Click Start Recording. Press Space to start recording the full screen.
4. Click Stop to finish recording
Bonus: Descript creates separate tracks for camera, microphone, and computer audio. You can edit each track individually for more precise control.
- Do a short test recording to ensure everything is set up correctly.
- Set your recording to transibe for easier editing.
Editing and polishing your PowerPoint recording in Descript
Descript's AI video editing tool makes it a breeze to trim, cut, and splice your video footage, ensuring a seamless flow from start to finish. You can add smooth transitions and other visual effects to make your presentation pop.
Here’s a glimpse of how to edit and polish your PowerPoint recording in Descript:
Edit your recording like a doc
Did you make a mistake during a slide transition? No problem. Just delete those sections in the text transcript (created automatically by Descript) and the video will adjust to match.
Remove filler words
Sound smoother and more confident by easily removing filler words like "um" and "uh" from the transcript.
Fix voiceover mistakes by typing
Didn't nail your delivery on a specific slide? No need to start from scratch! Descript's Overdub feature lets you simply type in the correct narration and replace the audio on that slide with AI voice cloning.
Boost video quality and engagement :
- Crisp up audio quality by reducing background noise and room reverb with the AI-powered Studio Sound feature.
- Replace your background completely with the Green Screen Video Editor —look like you're presenting in a sleek studio or broadcasting from a beach.
- Enable Eye Contact simulation with AI, so it appears you're making direct eye contact with viewers, even if you’re looking or reading something off-camera.
Other ways to video record yourself presenting a PowerPoint
Use Zoom’s meeting recording feature to record yourself giving a PowerPoint presentation. Start a Zoom meeting with yourself, share your PowerPoint window, and enable recording
Loom is a handy screen recording tool that also offers a webcam overlay. Launch the Loom app or Chrome extension and set it to record your screen and webcam. Expect high-quality recordings but no advanced editing features. The free plan offers only five minutes of recording at a stretch.
3. OBS Studio
OBS Studio is a free, open-source screen recorder/streaming software with a steeper learning curve. It’s popular among advanced or tech-savvy users who need granular customization and control.
To record your presentation, add a "Screen Capture" source to capture your PowerPoint window and a "Video Capture Device" source for your webcam.
4. Clipchamp: Recording natively in Windows
You can use Microsoft’s Clipchamp , the built-in screen recorder and video editor for Windows, to simultaneously capture your computer screen, webcam, and audio for recording your PowerPoint presentation. It’s also available as a browser-based app. You can record up to 30 minutes on screen and webcam recordings.
Users can also adjust the screen and webcam recordings in the editing timeline separately.
5. Quick Time Player Recording natively in Mac
Use Mac’s Quick Time Player to record your PowerPoint presentation. It’s not as straightforward as the other options on this list, so here’s a quick guide to help you out:
- Launch Quick Time Player.
- Select File and go to New Movie Recording.
- You'll be recording your entire screen in addition to recording your face, so adjust the size and location of the recording window so that it's in a nonintrusive corner of your PowerPoint.
- Go to View and select Float on Top .
- Next, go to File and select New Screen Recording.
- On the menu that appears, select Record Selected Portion and drag a border around your PowerPoint and the webcam recording window.
- Press Record and start presenting.
- You can adjust the video quality and the audio source in the webcam recording window.
How to turn your PowerPoint presentation slides into a video
Did you know PowerPoint lets you save your presentation as a video, too?
Here's a breakdown of the two ways you can do so—keeping all the presentation elements (narration, animation, pointer movements, timings, and so on) intact in the presentation itself.
Save your PowerPoint presentation as a video
This creates a separate video file (MP4 or WMV) that anyone can play, even without PowerPoint.
Follow these steps:
- Save your presentation
- Go to File > Export > Create a Video
- Ultra HD (4K): Best for large screens (if you have Windows 10+)
- Full HD (1080p): Great for computers and TVs
- HD (720p): Good for streaming online or on DVDs
- Standard (480p): Smallest size, good for phones
4. Decide on narration
- If you haven't recorded yourself talking, choose "Don't Use Recorded Timings and Narrations" from the dropdown menu
- If you have a recording, choose "Use Recorded Timings and Narrations." You can also set how long each slide shows for (default is 5 seconds)
5. Click Create Video
6. Name your video, pick a folder to save it in, and choose a file type (MPEG-4 or Windows Media Video)
Creating the video might take a while, especially for longer presentations. You can even leave it running overnight. Once done, find your video in the chosen folder and double-click to play it.
Save your PowerPoint presentation as a slideshow
This saves your presentation as a special file (PPSX) that starts playing automatically on full screen when opened. It only works with PowerPoint.
Here’s how it works:
- Make sure your presentation is saved (regular PowerPoint file)
- Go to File > Save As .
- Pick a folder to save the slideshow in.
- Under Save as type, choose PowerPoint Show (*.ppsx) .
- Click Save .
Now when someone opens the file, it will automatically play the slideshow.
Pro tips for making better video PowerPoint presentations
Practice your script.
Recording a flawless PowerPoint video rarely happens in one take. The key is practice.
Record practice run-throughs and watch them back. Make notes on areas that need improvement or parts lacking clarity. The more you drill your script, the more confident and natural you'll sound in the final recording.
Take advantage of PowerPoint's built-in Speaker Coach . The feature shows you whether your pace is too fast or slow, your use of filler words like "um," and suggestions to improve your voice modulation.
Use slide notes for coherent delivery
Wouldn’t a personal teleprompter make presentations so much easier? That’s what slide notes are for.
Having your thoughts and talking points organized within your PowerPoint file lets you have all crucial information and prompts readily available when recording.
Go ahead and add detailed notes or even a full script for each slide. This will help you stay on track and provide a handy transcript reference if you need to do any editing or voiceover work in post-production.
Use high-quality audio equipment or turn on Studio Sound
Poor audio recording quality is a surefire way to make even the most visually polished video feel amateurish. Do your presentation justice by investing in a decent external or Bluetooth microphone and audio interface to capture clear voiceover audio.
If you must use a built-in mic, record in a quiet environment to minimize background noise pickup. Or better yet, pair up with an AI-powered audio enhancement tool like Descript's Studio Sound , which reduces background noise , reverb, and other artifacts.
Ensure a clean background and even lighting
Ditch cluttered backgrounds. You want people to focus on the content of your PowerPoint and not be distracted by the funny shapes and colors in your video.
Your video lighting and framing matters, too. Position yourself facing a natural light source or bring supplemental video lighting to eliminate weird shadows and squinting-level glare.
Look directly into the camera or turn on Eye Contact
Looking directly into the camera is essential to create a sense of connection with the audience. Position your webcam or camera at eye level and imagine you're talking to a friend. If you're using Descript, enable the Eye Contact feature to auto-adjust your gaze towards the camera.
- Dress professionally and maintain a good posture to project confidence and authority.
- Use visuals, animations, and multimedia elements to enhance your presentation and keep your audience engaged.
- Consider adding closed captions or subtitles to your video for better accessibility and engagement, especially for those watching without sound.
- Speak clearly and at a moderate pace, using vocal variety to emphasize key points and maintain interest.
- Incorporate storytelling techniques, real-life examples, or personal anecdotes to make your video presentation more relatable and memorable .
Take your PowerPoint presentations from amateur to amazing
Recording yourself virtually presenting a PowerPoint allows you to distribute your message using the most engaging type of content: video. And there are many screen recording tools out there that can capture your screen and web camera footage with just a few clicks.
But how do you stand out?
By focusing on the presentation's depth, your delivery, and the video's quality. The first two are the bare minimum to communicate your message effectively.
But the right screen capture software and all-in-one video creation tool like Descript can help you with third. Use the tool to improve the quality of your recorded PPT presentations.
With Descript, it's easier than ever to record your screen, polish up the audio, and create stunning visuals all in one place. So why wait?
Sign up for Descript today and simplify your workflow while creating a PowerPoint presentation video that sticks with your audience in the long term.
How do you make a presentation video with your face?
To create a presentation video with your face, follow these steps:
- Open your presentation in PowerPoint.
- Go to the Slide Show tab.
- Click on Record and choose From Current Slide or From Beginning .
- Choose your microphone and camera by clicking on a sound icon on the top-right.
- Start recording by clicking on the record button.
- Speak into your microphone to narrate the presentation.
- Your webcam will capture your face during the recording.
- Click Stop when you finish recording.
- Export your recorded presentation by clicking on File> Export>Create a video.
How do you present yourself in PowerPoint?
To present yourself effectively in PowerPoint, follow these steps:
- Determine the key information to include in your presentation.
- Design and prepare your PowerPoint slides with a cohesive theme.
- Craft a compelling introduction to engage your audience.
- Tailor your presentation to different time constraints for flexibility.
- Capture the audience's attention before you begin speaking.
Related articles

Featured articles:
10 excellent Loom alternatives to record your screen
Looking for the best ways to record your screen without Loom? Find out 10 Loom alternatives, their features, and pricing.

How to record a YouTube video: A guide for all devices
If you want to record a YouTube video for personal use or fair-use repurposing, here are the steps to get started.

For Business
Social media video marketing: Everything you need to know
Learn how to win over potential customers (and the algorithms) with the right social media video marketing tools, strategy, and optimizations.

How to record a podcast on Zoom: A beginner’s guide
Follow this step-by-step guide on how to record a podcast on Zoom, then learn about why it may not be your best recording option.

How to record a Microsoft Teams meeting: 5 easy ways
Learn how to record a Microsoft Teams meeting on any device and get answers to common problems.

10 effective how-to videos to engage your audience
How-to videos are a great way to educate your audience. Whether you’re recording a software demo or training instructions, here’s how to create a how-to video.

Articles you might find interesting
Dynamic vs. condenser microphones: What’s the difference?
A dynamic microphone uses a magnetic field to generate an electrical signal. A condenser microphone is a type that creates audio signals using a capacitor.

Product Updates
Season 2 updates: New ways to make shareable video for promoting your work, blazing-fast publishing, and more
Today we’re releasing our quarterly product update, with new features for making shareable video for promoting your work on social media, blazing-fast publishing, and more.

How to stop saying “um”: 6 tips for removing filler words
Want to stop saying um, like, you know, and other filler words? Learn tips for flawless speech—and how to edit out filler words afterward with Descript.

Case study: 2 podcasters who use SquadCast and Descript to simplify their podcast production workflow
We love showing off the creative folks in the SquadCast and Descript communities that have the art of recording and editing figured out with our integrated platforms.

Podcast livestream: How to stream your podcast live & engage your audience
Curious about what it takes to livestream a podcast? Learn the different types of podcasts and platforms to broadcast from in this guide.

Join millions of creators who already have a head start.
Get free recording and editing tips, and resources delivered to your inbox.
Related articles:
Share this article
- Summarize PowerPoints with AI
- Summarize Word documents with AI
- Summarize PDF with AI
- Generate PowerPoints with AI from text
- Create Presentation with AI
- GPT for Presentations
- Chat with Document Groups
- Import files from Cloud
- Request Demo
- May 13, 2024
- Comments Off on How to create PowerPoint from Excel
- Artificial Intelligence
- How to create PowerPoint from Excel

Creating PowerPoint presentations is essential for sharing ideas and results in business. Creating these presentations can be challenging and time-consuming (especially if integrating Excel data is needed). It involves researching, organizing information, and deciding how to present key points clearly. Designing presentation slides that are visually appealing and adding graphs, charts and tables can further complicate the process. Wouldn’t it be nice to create PowerPoints from Excel with just a few clicks? 👀
It’s very common for consultants, marketing managers or other people to create PowerPoints from Excel data. This can include data like statistics, research findings, or forecasts in your presentations, which might be stored in Excel files. Manually transferring this XLS data to create graphs and charts is a lot of work. Thankfully, Artificial Intelligence (AI) can help simplify this task. AI tools can automatically turn Excel (XLS) data into PowerPoint slides. This is especially useful for consultants and professionals in various fields who need to present complex data efficiently.
There are two types of tools that allow you to create PowerPoint presentations from Excel automatically:
- Tools that directly generate completed PowerPoint presentations.
- Tools that create presentation content that you then need to copy manually.
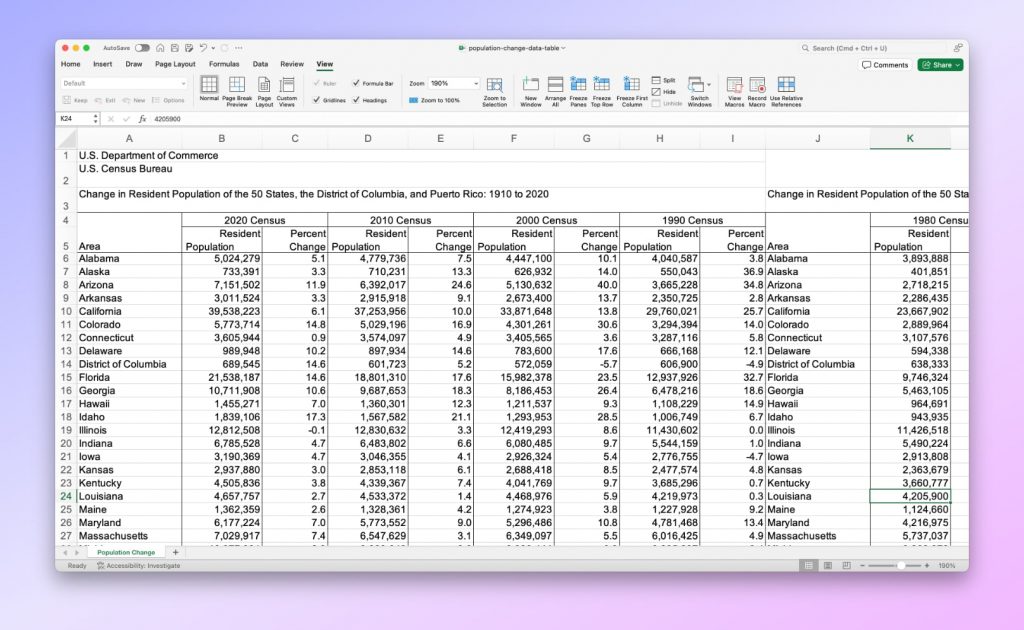
In this blog post, we’ll cover how to create PowerPoint from Excel using both types of tools (both powered by AI). As a test example, we will use an Excel file containing data on changes in the US population by state from 1910 to 2020.
Note: The file was downloaded from the US Department of Commerce: https://www2.census.gov/programs-surveys/decennial/2020/data/apportionment/population-change-data-table.xlsx
We’ll explore tools like SlideSpeak, Microsoft Copilot, Beautiful.ai, and ChatGPT and provide a comprehensive guide on leveraging their functionalities to create impactful presentations. Additionally, we’ll list the pros and cons of each tool so that you can make informed decisions based on your specific needs and preferences.
Method 1: Generating PPT from XLSX using SlideSpeak
Website: https://slidespeak.co
SlideSpeak is a powerful AI tool that allows you to automatically convert PDF, Word, and XLSX files into ready-made beautiful presentations in minutes.
To generate a presentation from an Excel (XLS) file using SlideSpeak, you need to perform the following steps:
- Select the Excel file: select the file based on which you want to create a presentation.
- Upload the file: upload the file to SlideSpeak.
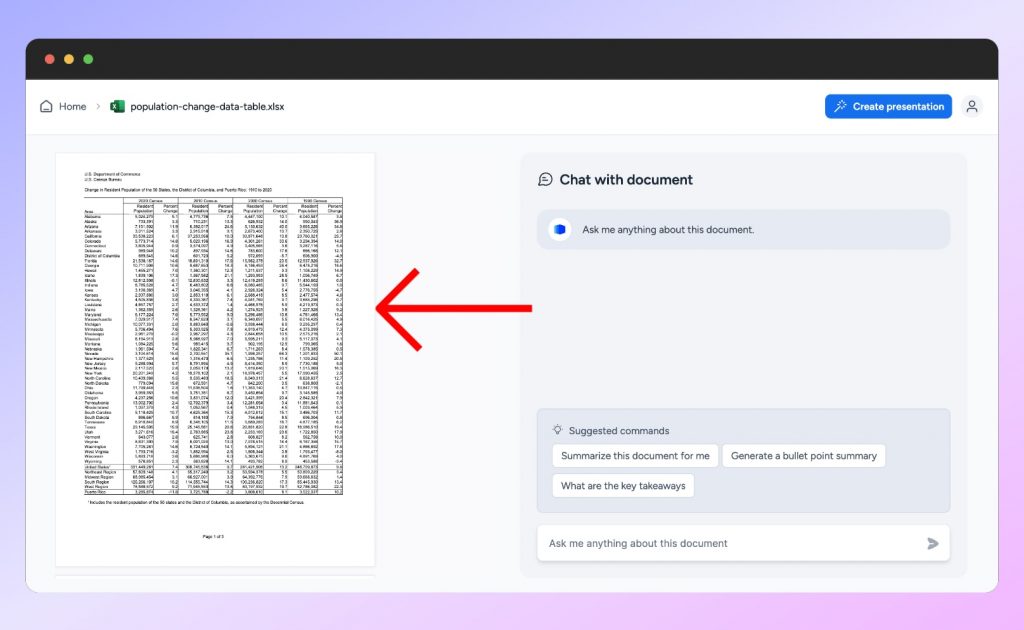
- Preview data: preview the uploaded data in SlideSpeak. You can also ask it questions about the uploaded data.
- Create a presentation: select the necessary parameters and start the process of creating the presentation.
- Review the table of contents: review the presentation’s table of contents that SlideSpeak suggests.
- Select a template: choose a presentation template.
- Review the presentation: review and download the finished presentation.
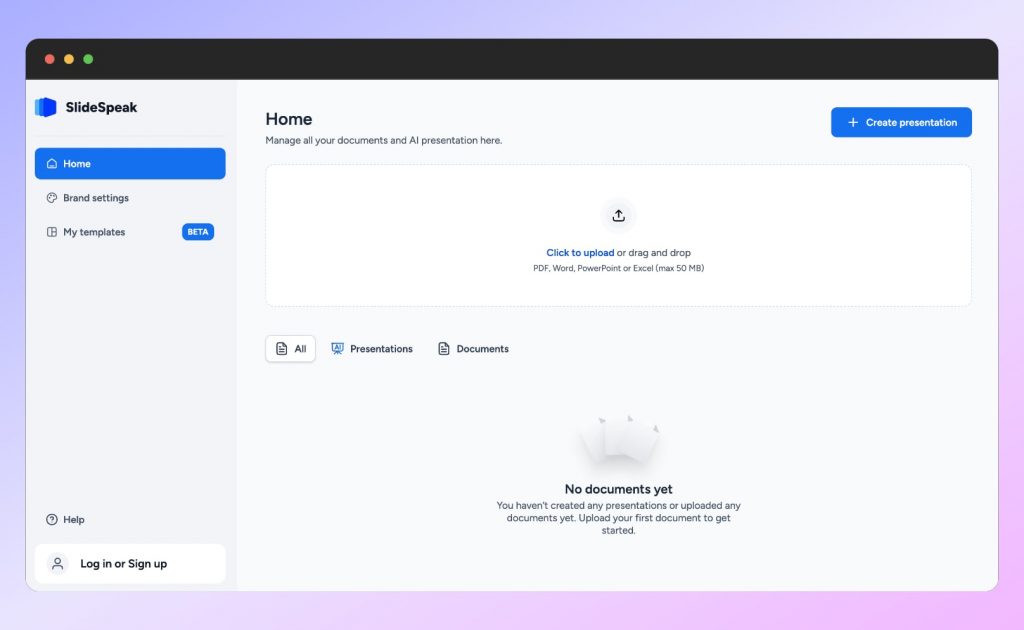
Step 1: Select the Excel file
Open SlideSpeak . Drag the Excel file from which you want to create a presentation into the box in the center of the screen, or upload this file using the Click to upload button.
Step 2: Upload a file
To upload a file, click the Upload button under the file name and wait a little.
Step 3: Preview data
After loading the data, it will be displayed on the screen. You can now also ask SlideSpeak questions about the uploaded data.
To start the process of creating a presentation, click the Create Presentation button in the upper right corner.
Step 4: Create a presentation
After starting the presentation generation process for your Excel file, SlideSpeak asks you to configure some presentation parameters. You can choose the desired number of slides, presentation language, and tone. In addition, you can add stock images to the presentation.
If you use the premium version of SlideSpeak, you can also use the brand logo, color, and fonts.
After setting all the presentation’s parameters, click the Next button at the bottom of the page and wait a few minutes for the presentation to be generated.
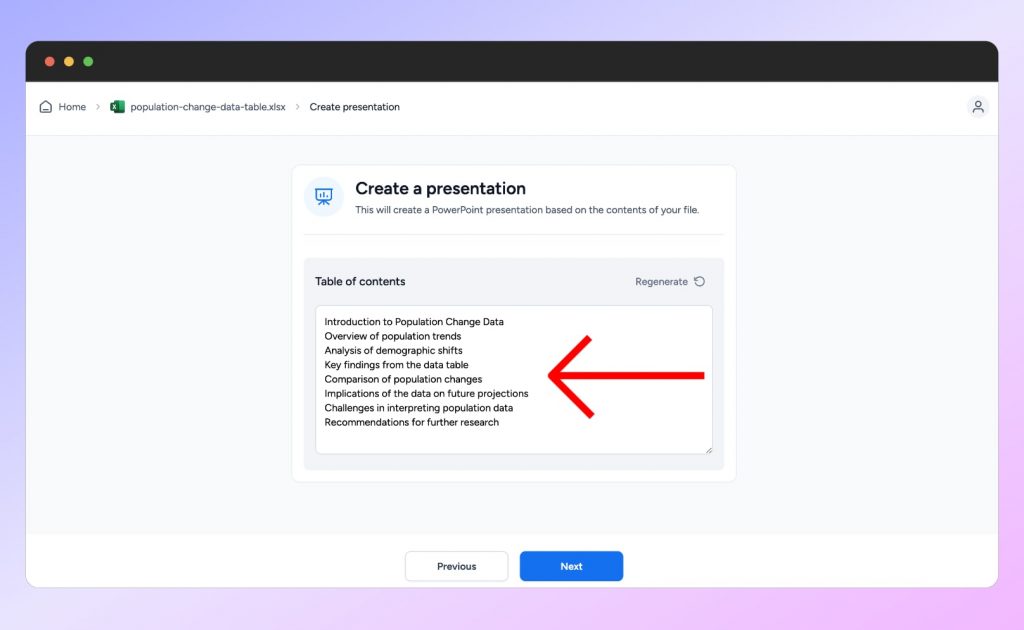
Step 5: Review the table of contents
Based on the data from the Excel file, SlideSpeak creates content for the presentation. Review it, and if you are satisfied with it, click the Next button to proceed to the next step of generating the presentation.
Step 6: Select a template
At this step, you will be prompted to choose a presentation template. Select one of the default templates or upload your own and click the Generate button. The presentation will be ready in a few minutes.

Step 7: Review the presentation
You can now review the finished presentation. Users with a paid subscription can also regenerate the presentation and download it as a PDF or PowerPoint file.

Pros and cons
- The ability to upload an Excel file to SlideSpeak without the need for manual copying and pasting;
- User-friendly interface;
- Automated and quick presentation generation process;
- Ability to customize the presentation according to the user’s needs and preferences;
- Ability to choose the presentation language;
- Additional features are available for users with a paid subscription.
- Limited customization options;
- There is no possibility to edit the finished presentation;
- Unlimited use requires a paid subscription.
SlideSpeak is a convenient and fast tool that allows you to automatically create PowerPoint from Excel. However, if you prefer to set up the presentation manually, you may miss some functionality. Therefore, before choosing a tool for creating presentations, it is important to define your needs and analyze the tool’s capabilities.
Method 2: Create PowerPoint from Excel using MS Copilot
Website: https://copilot.microsoft.com/
Microsoft Copilot is an AI-powered tool that integrates with Microsoft PowerPoint. Using advanced natural language processing techniques, it can summarize documents, generate content, and answer questions about content.
Copilot uses advanced AI to let you quickly create presentations based on the provided Excel data. Given that AI is not 100% accurate, you may need to manually edit the presentation after it is automatically generated. However, Copilot can do most of the hard work and significantly speed up the process to create a presentation. It is important to note that you need a paid subscription to use Copilot in PowerPoint.
Here is a brief overview of how to create PowerPoint from Excel using MS Copilot.
- Open Microsoft Copilot in PowerPoint: create a presentation and open the Copilot toolbar.
- Insert data into Copilot in PowerPoint: copy the data from your Excel file and insert it into Copilot.
- Review the presentation: generate and, if necessary, edit the presentation.
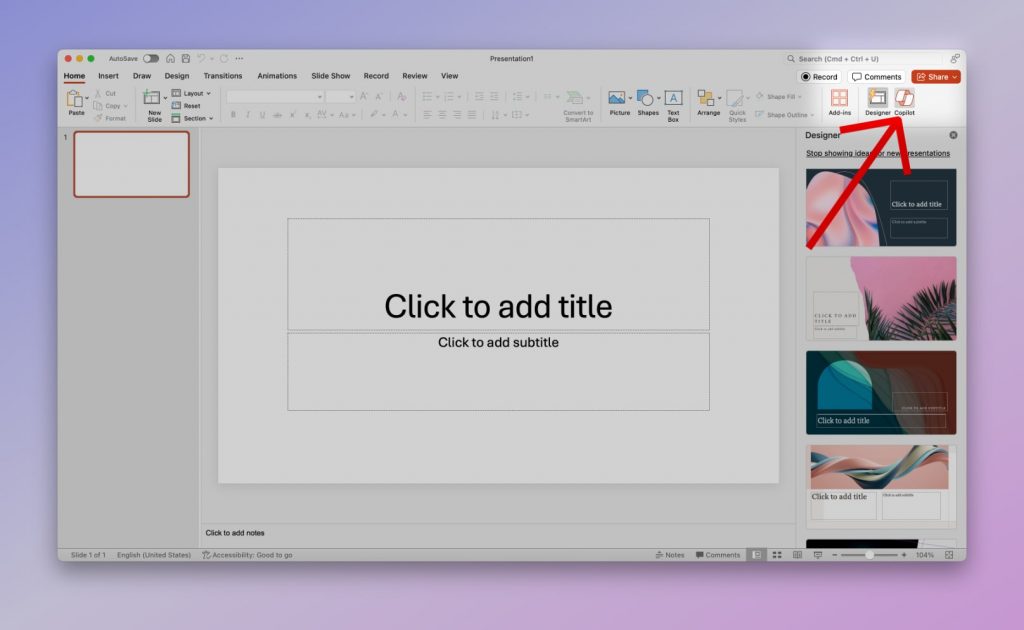
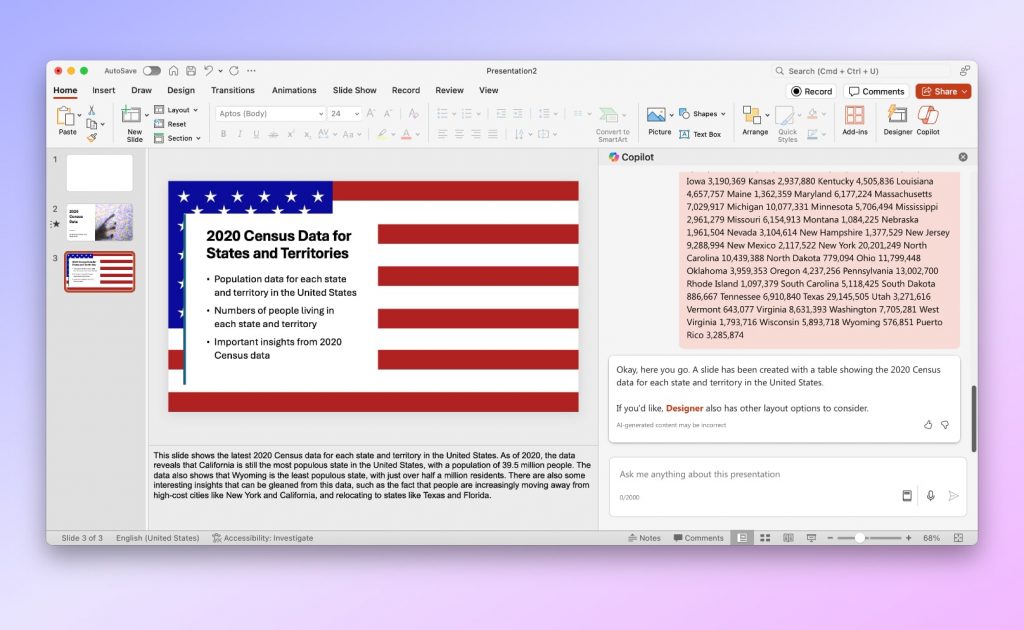
Step 1: Open Microsoft Copilot in PowerPoint
Create a new presentation in PowerPoint and click the Copilot button on the right side of the toolbar. A Copilot panel will then appear on the right. The Copilot button is only available to users with a paid Copilot subscription.
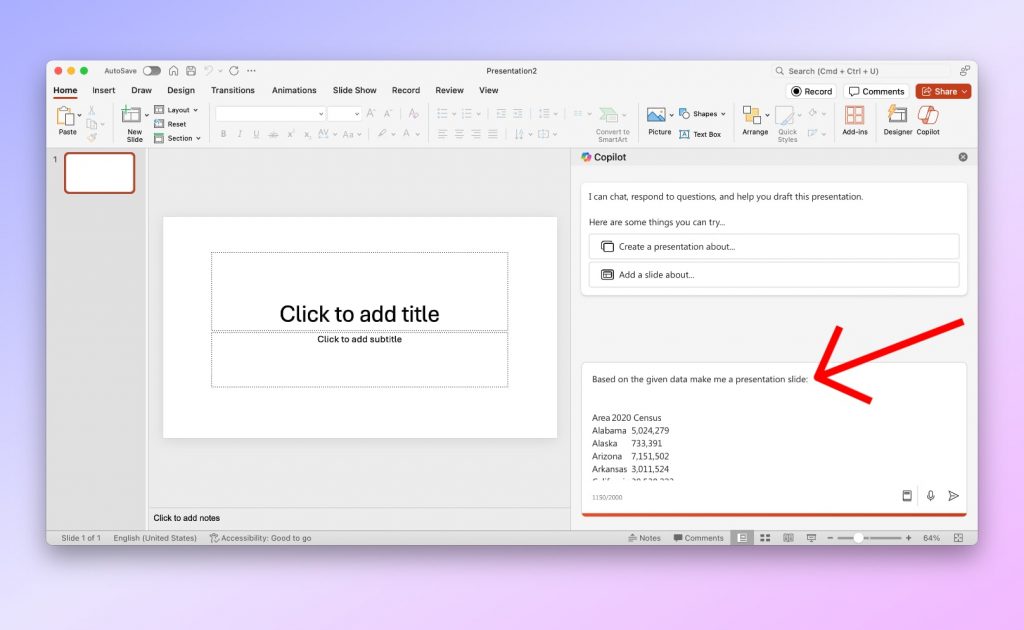
Step 2: Insert data into Copilot in PowerPoint
Unfortunately, Copilot does not allow you to upload an Excel file. Therefore, you need to copy the data from your Excel file and paste it into the Copilot chat to generate a presentation. Write the following command in Copilot: “Create a presentation using the following data” and paste the data copied from Excel. However, in Copilot at the moment, the maximum length of a request is 2000 characters. Therefore, when you try to insert data from a large Excel sheet, excess data is cut off and not considered during presentation generation.
Step 3: Review the presentation
Wait a few minutes, and the presentation will be generated and displayed on the screen. You can edit the finished presentation, change the design and text, add slides, and more.
In our experience the results based on copy pasted data from Excel were very poor in quality. So we decide to use Excel Copilot to see if it can create us some nice charts from our Excel file that we can then copy over into our PowerPoint presentation.
Step 4: Generate charts using Copilot in Excel
As you can see from the slides, Copilot in PowerPoint creates text analysis of the data and inserts images associated with the data into the presentation. However, if you want to automatically generate charts based on Excel data, you can do this using Copilot in Excel.
Open Copilot in Excel by clicking the Copilot button on the right of the toolbar.
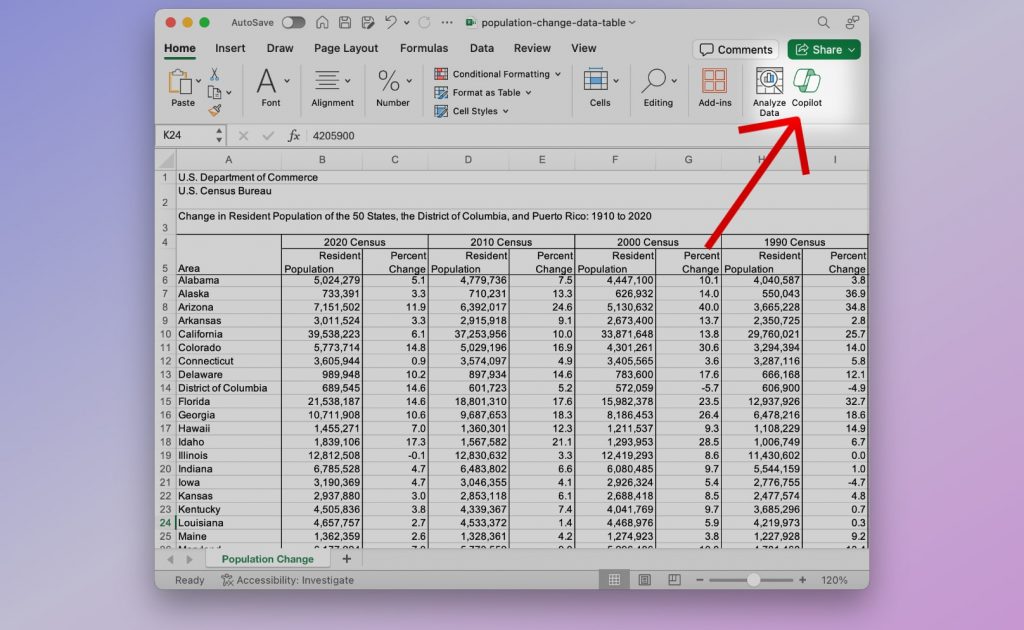
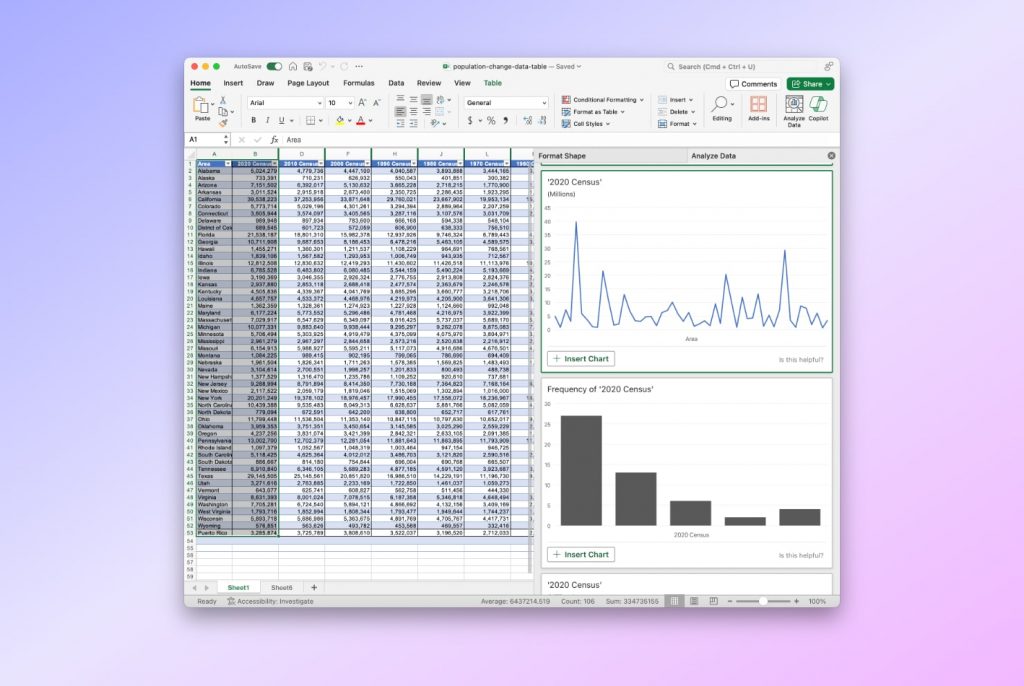
Select a table with data and write the following request in the Copilot chat: “Create a chart that shows the dynamics of population change in different states”. Wait for the chart to be generated. Then click the “ Add to a new sheet ” or “Insert PivotChart” button to insert the chart into a new Excel sheet.

After the chart opens in a new Excel sheet, you can edit it by adding new columns. Once the chart is ready, copy it into your PowerPoint presentation.
Pros and Cons
- Increasing the efficiency and productivity of creating presentations;
- Smart suggestions for slide layout based on analysis of its content;
- The ability to automatically generate charts;
- Wide possibilities for customization of the finished presentation.
- A paid subscription is required;
- Security and privacy risks of providing data access to an AI cloud service;
- The maximum length of the request is 2000 characters;
- The presentation may contain incorrect data as AI is not 100% accurate.
Copilot can fast and easily create PowerPoint from Excel. It also provides intelligent advice on the presentation’s content and design. However, users may still miss advanced features like the possibility of uploading Excel files. Additionally, a paid subscription is required even to use the limited features of Copilot.
Method 3: Create Presentation from Excel using Beautiful.ai
Website: https://www.beautiful.ai/
Beautiful.ai is cloud-based AI-powered presentation generation software. It provides customers with many professionally designed templates, layouts, and design elements that can be customized to match customers’ content and brand. Beautiful.ai simplifies and speeds up the process of creating visually attractive presentations. It saves users time and effort with design assistance and intuitive AI-driven tools.
Beautiful.ai is a paid tool, so you need to create an account and subscribe before you can get started. You can use a 14-day trial version for the preliminary study.
Below is a quick overview of the steps needed to create PowerPoint from Excel using Beautiful.ai.
- Open Beautiful.ai: go to Beautiful.ai and create a new presentation.
- Load data: load data from an Excel file into Beautiful.ai.
- Generate a presentation: check the uploaded data and initiate the process of creating the presentation.
- Review presentation: review and, if necessary, edit the finished presentation.
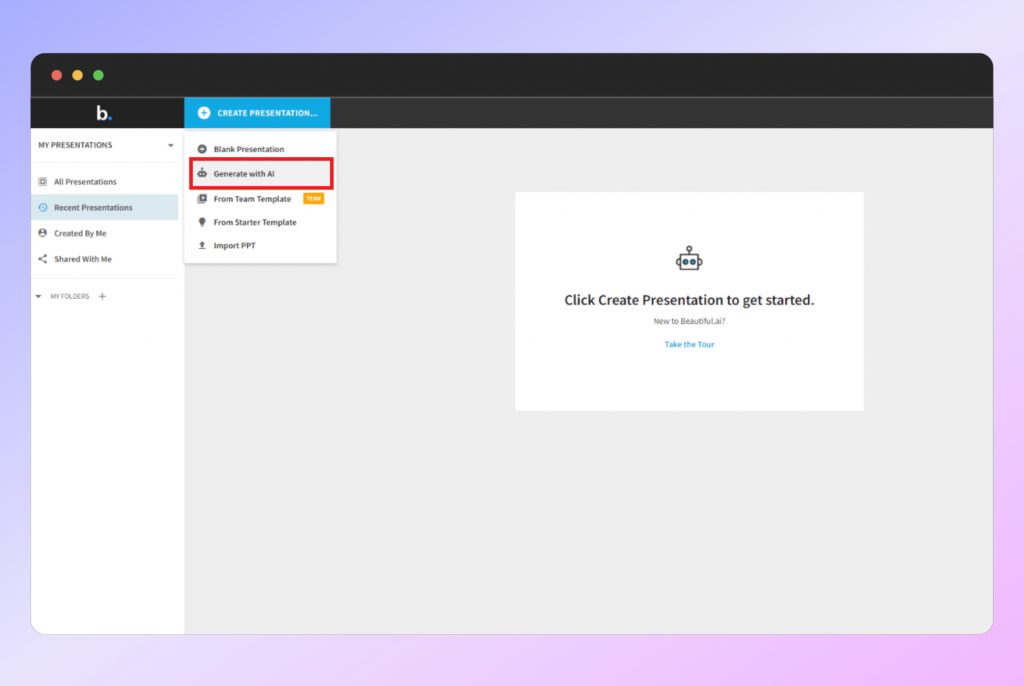
Step 1: Open Beautiful.ai
Open Beautiful.ai and ensure you are logged in to your account and have a subscription. After that, on the left side of the page, click Create Presentation -> Generate with AI .
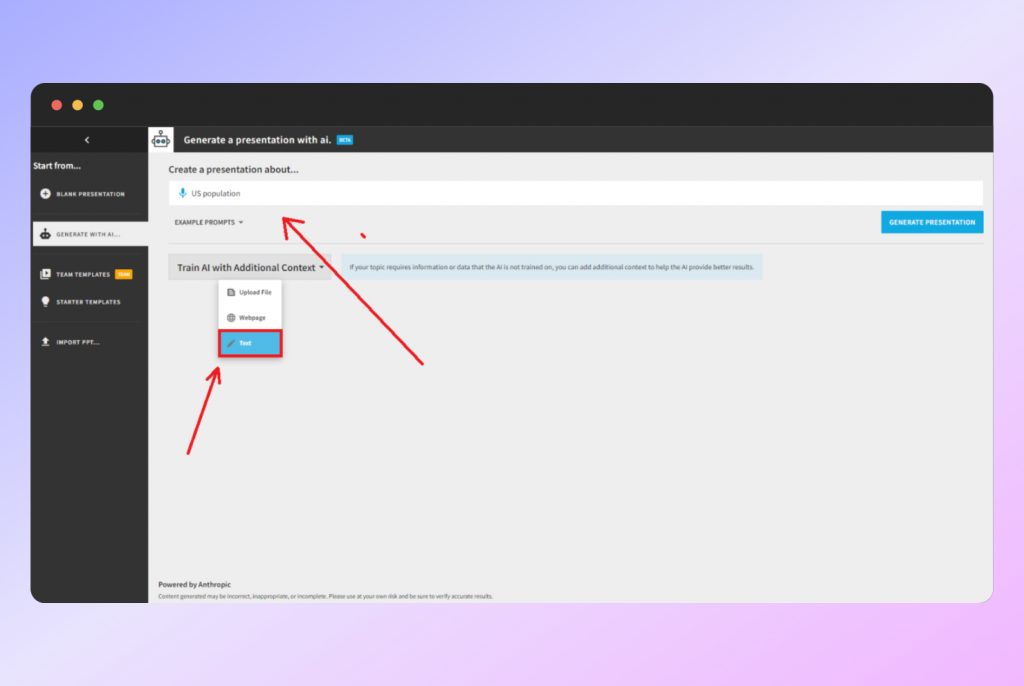
Step 2: Load data
At this step, you need to enter the presentation topic and upload data from Excel. Enter your presentation topic in the text box at the top of the page. After that, click on the Train AI with Additional Context button and select the data input method. Beautiful.ai does not provide the function of uploading Excel files, so in the drop-down list, select the Text option.
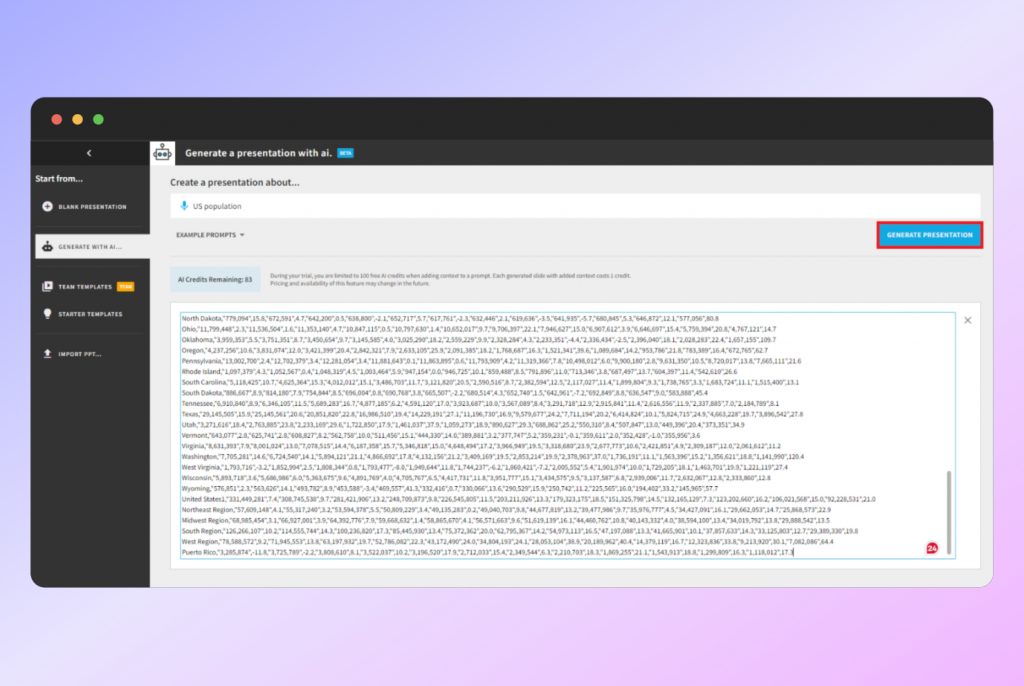
Step 3: Generate a presentation
Copy the data from your Excel and paste it into the text box that appears on the page. After that, click the Generate Presentation button.
Step 4: Review presentation
You can review and edit the created presentation. The presentation editor provides functions for changing colors, fonts, images, and layouts. You can completely change the content of the slides and add new ones.

You can export the final presentation as PowerPoint and PDF files or Google Slides.
- Simple and intuitive user interface;
- Visually attractive design;
- Integration with Google Slides, PowerPoint, and PDF;
- Ability to collaborate with team members in real-time and securely share presentations.
- It is not possible to import Excel files;
- A paid subscription is required to access Beautiful.ai features;
- Limited customization options compared to creating presentations manually. Users may find it difficult to create a custom design or include certain branding elements.
- There are possible errors, as the AI is not 100% precise.
Overall, Beautiful.ai allows customers to create visually attractive presentations, saving time and effort. However, it is worth analyzing all its pros and cons to determine whether it meets your needs.
Method 4: Create presentation content using ChatGPT
Website: https://chat.openai.com/
ChatGPT is an AI tool that can perform natural language processing and generate text based on input data. It can answer questions, create summaries, perform translation, and generate text that looks natural and fits the context.
It is important to note that ChatGPT does not currently provide the ability to create PowerPoint from Excel. However, you can use it to greatly simplify and speed up the process of creating a presentation. You can do this in two ways:
- Generate titles and slide content with ChatGPT that you can copy and paste into your presentation.
- Generate VBA code that you can use to create your presentation in PowerPoint.
To generate presentation content from Excel using ChatGPT, perform the following steps:
- Ask to create a table of contents for the presentation.
- Generate slides’ content.
- Review the proposed content.
- Copy the finished content in PowerPoint.
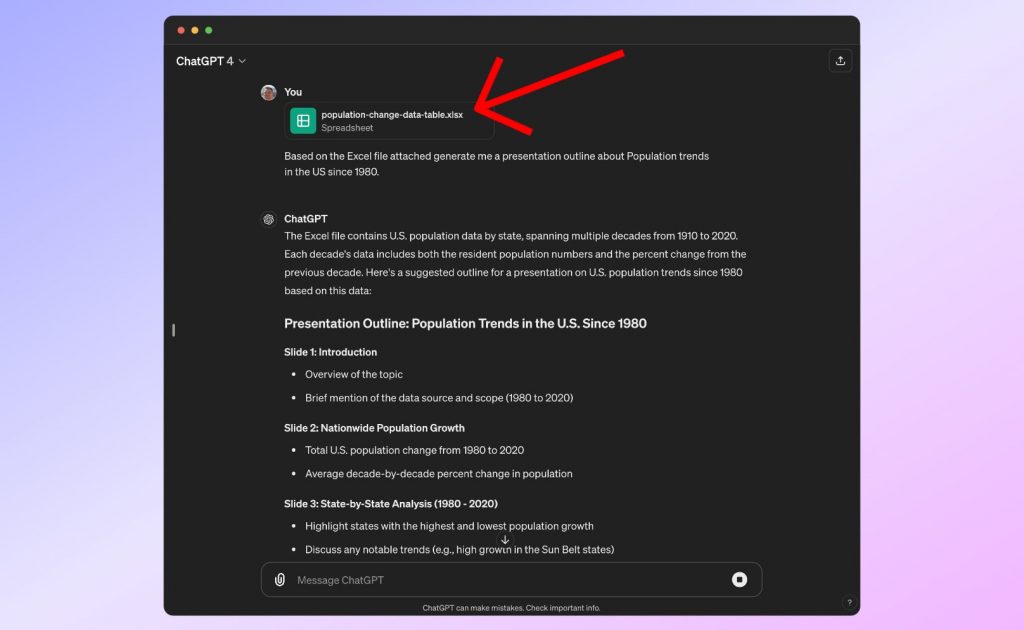
Step 1: Ask to create a table of contents for the presentation
Write the following request in the ChatGPT chat: “Please suggest a table of contents for 8 slides for a presentation for this data: ” and paste the data from your Excel file. With the paid version, you can directly upload XLS files in ChatGPT and let it generate stuff for presentations.
Review the proposed presentation structure and ask clarifying questions or request revisions.
Step 2: Generate slides’ content
Ask ChatGPT to generate a few key phrases for each slide. For example, write in the following request: “Please provide 3–5 bullet points about Population Trends in the United States.”
Step 3: Review the proposed content
Review suggested content for each slide. Ask for content to be corrected or clarified as needed. You can also adjust the content manually.
Step 4: Copy the finished content in PowerPoint
Create a presentation in PowerPoint. Copy the title and content to each slide separately. Customize the design and add images and your brand logo to suit your needs.
- On-demand generation of presentation content;
- Ability to send an unlimited number of requests for free;
- The possibility of improving the content of the presentation.
- It is not possible to generate a ready-made presentation;
- Unable to generate graphic content;
- You need to do many settings manually;
- To upload an Excel file, you need the paid version.
Using ChatGPT to create presentations can be helpful for efficiently generating ideas and content. However, you may also need to make manual edits and manually transfer content generated by ChatGPT to PowerPoint.
Therefore, AI-based tools, such as SlideSpeak, Microsoft Copilot, Beautiful.ai, and ChatGPT, provide powerful solutions for converting Excel files into PowerPoint presentations. These instruments allow you to create beautiful presentations, significantly saving time and effort.
However, before choosing the best tool for you, it is impotant to clearly define your needs and analyze the advantages and disadvantages of each instrument. You can utilize the trial version to try the functions of each tool and make an informed decision based on your individual needs.
Is it possible to convert Excel to PPT (with AI)?
Yes. There are free and paid AI tools that can upload data from Excel file, automatically analyze it, and create ready-made, visually attractive presentations customized to the content. Examples of such tools are SlideSpeak, Microsoft Copilot, and Beautiful.ai.
How to automatically create PowerPoint from Excel?
AI-based platforms like SlideSpeak, Microsoft Copilot, Beautiful.ai, and others allow you to create PowerPoint from Excel automatically. The step-by-step process of creating a presentation depends on the platform you choose. However, in general, to generate a presentation from an Excel file, you need to do the following:
- Select and upload an Excel file.
- Generation presentation.
- Review and adjust the finished presentation according to your requirements.
How to create PPT using ChatGPT?
ChatGPT cannot directly generate a PPT file. However, you can use it to generate the title and content of the slides and get advice on the visual design of your presentation. To do this, enter the appropriate requests in the ChatGPT chat and provide the data you need to generate a presentation. If you want a full AI solution to generate presentations with AI you can use SlideSpeak or design friendly tools like Canva.
Why don’t I have Copilot in PowerPoint?
For the Copilot button to appear in PowerPoint, you must have a paid Copilot subscription. Create a subscription and refresh PowerPoint. Then, the Copilot button should appear. You can find more info on this here: https://copilot.cloud.microsoft/en-us/copilot-powerpoint .
How can I create a PowerPoint with Copilot from an Excel file?
To create a PowerPoint presentation from an Excel file using Microsoft Copilot, make sure your Excel data is well-organized with clear column headings. Open Excel and then use Copilot to generate charts and graphs for your data. Afterwards copy the charts into PowerPoint. Microsoft Copilot in PowerPoint will then help you to figure out a suitable design for your slides. You have to use PowerPoint Copilot and Excel Copilot in combination to get good results.
Related Post

How to Generate Multiple-Choice Questions from a PDF with AI

- Comments Off on How to Generate Multiple-Choice Questions from a PDF with AI

Add Speaker Notes with AI to Presentations
- April 18, 2024
- Comments Off on Add Speaker Notes with AI to Presentations

The best ChatGPT Plugins for Students

- March 28, 2024
- Comments Off on The best ChatGPT Plugins for Students
AI generate presentations and summaries.
Summarize and generate PowerPoint files with ChatGPT. Upload, chat, and gain new insights from your presentations. Use SlideSpeak AI to boost your productivity.
- Help Center
- Affiliate Program 💵
- Call us: +1 (512) 777-1759
- Compress PowerPoint
- Convert PowerPoint to PDF
- Convert PowerPoint to PSD
- Convert PowerPoint to Figma
- Convert PDF to Word
- Terms of Service

Export a presentation
File > Export helps you change your presentation into a different format, such as PDF, video, or Word-based handouts. All these options are covered below.
If you simply want to "export" a file (in its current .pptx format) to a different storage system, such as a flash drive, plug that flash drive into your computer and use File > Save As (or Save a Copy ) to save to that new location.
Create a PDF
You can convert your presentation to PDF or XPS to share with others.
Click the Create PDF/XPS button.
In the File Name box, enter a name for the file, if you haven't already.
In the Save as type list, ensure that PDF (*.pdf) is selected.
If you want the file to open in the selected format after saving, select the Open file after publishing check box.
If the document requires high print quality, click Standard (publishing online and printing) .
If having a smaller file size is more important than print quality, click Minimum size (publishing online) .
Click Options to set the pages to be printed, to choose whether markup should be printed, and to select output options. Click OK when finished.
Click Publish .
Create a video
You can turn your presentation into a video file that can be watched without using PowerPoint.
See Turn your presentation into a video for the details.
Package a presentation for CD
You can create a package for your presentation and save it to a CD or USB drive so that other people can watch your presentation on most any computer.
See Package a presentation for CD or USB flash drive for the details.
Create handouts
If you want to use the editing and formatting features of Word, you can work on and print your handouts using Word.
See Edit or print PowerPoint handouts in Word for the details.
Change the file type
Change File Type is the same feature as the traditional Save As command. You select the underlying type of file you want, then click the Save As button. The original file is kept in its current format and closed, and a new copy of it is opened and saved in the format you've chosen.
Publish to Microsoft Stream
(This feature is available to Microsoft 365 subscribers who are part of an organization .)
After you save your presentation as a video, you can upload the video to a video-sharing site named Microsoft Stream that only people in your school or organization have access to. Those people can watch the video in a browser.
See Save a video to Microsoft Stream for more details.

Need more help?
Want more options.
Explore subscription benefits, browse training courses, learn how to secure your device, and more.

Microsoft 365 subscription benefits

Microsoft 365 training

Microsoft security

Accessibility center
Communities help you ask and answer questions, give feedback, and hear from experts with rich knowledge.

Ask the Microsoft Community

Microsoft Tech Community

Windows Insiders
Microsoft 365 Insiders
Was this information helpful?
Thank you for your feedback.
- PDFelement for Windows
- PDFelement for Mac
- PDFelement on Mac App Store
- PDF Reader for Windows
- PDFelement for iPhone/iPad
- Get from App Store
- PDFelement for Android
- Get from App Google Play
- PDF Scanner for iPhone
Cloud & SDK
- Document Cloud
- PDFelement Pro DC
- PDFelement SDK
Online PDF Tools
- PDF to Word
- Compress PDF
- Word to PDF
Educational Users
- Annotate PDF
- Combine PDF
Personal Users
- Convert PDF
- Organize PDF
Professional Users
- eSign PDFs Legally
- Extract Data from PDF
- Password Protect PDF
PDF Solutions for
- Chat with PDF
- AI PDF Summarizer
- AI PDF Translator
- AI Content Detector
- AI Rewrite PDF
- Proofread PDF
- Add Bookmarks to PDF
- Explain PDF
- Mac Software
- OCR PDF Tips
- Online PDF Tips
- Edit PDF like Word
- PDF Converter Tips
- PDF Compressor Tips
Why PDFelement
- Customer Stories
- PDF Software Comparison
- Contact Support
- PDFelement for iOS
- InstaScan for iPhone
Explore More
- Reviews See what our users say.
- Free PDF Templates Edit, print, and customize free templates.
- PDF Knowledge PDF-related information you need.
- Download Center Download the most powerful and simple PDF tools.
- Download Download Pricing Pricing
5 Ways To Add a Strikethrough in PowerPoint
Here, you will learn the different ways to add strikethrough in PowerPoint.

- Extract PDF Annotations
- How to Annotate PDFs on Linux Easily
- Weava Extension
- Free Markup Tools
- Annotate PDF on iOS
- PDF Annotator
- PDF Annotation Apps
- PDF Annotators
- Markup a PDF
- The Ultimate Guide to the 10 Best Cross-Platform Note-Taking Apps
- Add a Strikethrough in PowerPoint
- Add PDF Stamp
- Take PDF Notes on Windows
- Attach PDF Files
- View Comments in PDF
- delete all comments in pdf
- Measure in PDF
- Export Comments from PDF
- Annotate PDFs Online/Offline the Smart Way
- Add Lines to PDF
- Draw Lines on PDF
- Add Shapes to PDF
- Get the Most Out of Adobe Measure Tool: A Practical Guide and Alternative Tool
- How To Adjust PDF Scale Ratios for Better Object Measuring
- Apple Pencil to Annotate PDF Documents
- How to Circle Something in PDF
Just like in Microsoft Word or Excel, you can add a strikethrough in PowerPoint . You can use it to show that items are no longer needed or a piece of information is no longer accurate. It's a great indicator that your listeners or viewers will easily understand. The best thing is that there are multiple ways to do this.
In this article, you will find 5 different ways to add a strikethrough in PowerPoint. Furthermore, you'll learn how to add a strikethrough in presentations turned into PDFs using Wondershare PDFelement .
In this article
- Use the Strikethrough Shortcut in PowerPoint
- Use Strikethrough in PowerPoint Home Tab
- Activate Strikethrough in PPT Quick Access Toolbar
- Strikethrough Powerpoint in Mini Toolbar
- How To Add Double Strikethrough in PowerPoint
- How To Remove Strikethrough In PowerPoint
- When To Use Strikethrough in PowerPoints
- How To Do Strikethrough on Text in PDF
Part 1. How to Strikethrough in PowerPoint: 5 Methods
Here are five different ways to add a strikethrough to text in Microsoft PowerPoint.
Method 1. Use the Strikethrough Shortcut in PowerPoint
It is common knowledge that you can use keyboard shortcuts to make text bold, underlined, and italicized. But the keyboard shortcut for strikethrough is not well-known, perhaps because it varies from program to program. See the steps below to find out how to add strikethrough in PowerPoint using keyboard shortcuts.
Method 1.1. Short Method
- Highlight the text you want to strikethrough.
- Use the PowerPoint strikethrough shortcut: ALT + H + 4.
Method 1.2. Long Method
Perhaps you want to do other things besides adding a strikethrough. Or maybe one of your H or 4 buttons is broken. You can use this instead.
- Press Ctrl + T or Ctrl + Shift + F to open the Font dialogue box.

- Press ALT + 4 to activate the strikethrough feature.
- Press Enter to apply the changes.
Method 2. Use Strikethrough in PowerPoint Home Tab
You can also add a strikethrough to the text using the ribbon in PowerPoint. You can find this option in the Home tab ribbon. Here is a quick guide on how to do that.
- Select the text in the PowerPoint that you want to strikethrough.
- Click Home in the ribbon.

- Select Strikethrough under the "Font" section.

Method 3. Activate Strikethrough in PPT Quick Access Toolbar
As the name suggests, the Quick Access Toolbar in Powerpoint lets you access tools you repetitively use more easily. If you find yourself using the strikethrough option frequently, use this method. Follow the steps below.
Method 3.1. Quick Method - Put Strikethrough in PPT Quick Access Toolbar Using Right-Click
- Right-click the Strikethrough option under "Font" in the Home tab.
- Click Add to Quick Access Toolbar.

Method 3.2. Long Method - Put Strikethrough in PPT Quick Access Toolbar Using Right-Click
Suppose the quick method did not work. Follow these steps instead.
- Click the down arrow at the right-hand side of the Quick Access Toolbar. This toolbar is typically found at the top left corner of the interface.

- Click More Commands.
- A dialog box will pop up. Below "Choose commands from...", click Home Tab.
- Click Strikethrough > Add.

- Click OK or press Enter on your keyboard.
- Select the text you want to strikethrough and activate the feature using the Quick Access Toolbar.

Method 4. Strikethrough Powerpoint in Mini Toolbar
To strikethrough text, you can also use the mini toolbar that appears when you select it.
- Highlight the text in the PowerPoint that you want to apply strikethrough to.
- Right-click the text.
- Click Fonts.

- The Font Dialogue box will appear. Click Strikethrough > OK.

Method 5. How To Add Double Strikethrough in PowerPoint
If you want to emphasize that the text is no longer relevant, you can use double strikethrough. Two lines are more noticeable and prominent than just one. Below are the steps to using double strikethrough in PowerPoint.
- Highlight the text that you want to format.
- Click the Font Dialogue Box launcher in the Home tab.

- Click Double strikethrough.

Part 2. How To Remove Strikethrough In PowerPoint
So, that is how to strikethrough in PPT. But how do you remove it? It's just as simple. All you need to do is select the text and follow any of the methods that could apply strikethrough. For illustration, let's use the strikethrough option in the ribbon.
- Select the text that already has a strikethrough.
- Click Strikethrough under the "Font" section in the ribbon on the Home tab. If it's a double strikethrough, click the button twice.

That is one way to remove strikethroughs in PowerPoint. You can also use keyboard shortcuts, the Quick Access Toolbar, or the mini toolbar.
Part 3. When To Use Strikethrough in PowerPoints
When is it a good idea to use strikethrough in PowerPoints? Here are its best use cases.
- Correcting Errors or Inaccuracies
In your presentation, you may be highlighting some mistakes, misinformation, or inaccurate data. You can use a strikethrough in PowerPoint to emphasize that these are not correct. By crossing them out, you can tell the viewer not to believe in them without even saying a word.
- Providing Context or Showing Progress
Does the text describe a task that has been finished? You can add a strikethrough to indicate that. Is it the old name of a revamped product? Is it a belief that has been proven wrong by new knowledge? You can apply a strikethrough to them and add the updated version next to them. By doing this, you can utilize a strikethrough to provide context or show progress.
What is the tone of your presentation? Does it lean more towards the casual side than the formal side? If so, you can throw in some jokes and a bit of sarcasm in there. Making your listeners laugh is a very effective way to prevent them from being bored. You can use strikethrough to indicate that what's written was initially meant seriously. But then, it was humorously contradicted or amended. Here's an example:
Original Text: "I'm a morning person."
Revised Text with Strikethrough: "I'm a morning person." "Just kidding, I hit snooze 10 times."
Those are some scenarios when you can add a strikethrough to text in a PowerPoint presentation. Now, what if you had converted the presentation to a PDF before you realized you could do that? Do not worry. You can use PDF tools to apply strikethrough to the text.
Part 4. How To Do Strikethrough on Text in PDF

Wondershare PDFelement is a sophisticated PDF editor available on most platforms. It can open PDFs or just about any document. That said, you can use Wondershare PDFelement to apply strikethrough to text in PDFs .
Follow these steps to apply strikethrough to text in PDF using Wondershare PDFelement.
- Open your presentation or document with Wondershare PDFelement.

- Click Edit > Edit All.

- Select the text you want to apply strikethrough to.
- The Properties tab should open. If it did not, right-click on the text > click Properties.

- Select Strikeout.

You can use the same method to remove the strikethrough.
Bonus information: You can use Wondershare PDFelement for presentations using the AI Read mode. Alternatively, you can use the convert feature to convert the PDF file to PPT using AI .
Adding a strikethrough in PowerPoint is an easy task. You can choose from 5 different methods. Choose whichever you find the easiest. You can use this when correcting information, crossing out items from a list, or telling jokes.
You can also apply strikethrough to text in PDFs. The best tool for that is Wondershare PDFelement, which can open any document. It has powerful editing features and even offers OCR for scanned files. You can also use it for presentations or use the converter to turn the file back to PPT. Wondershare PDFelement is a very versatile tool that you can always count on.
You May Also Like
- Annotate PDF on iPad and iPhone Easily
- PDF Annotator vs. Wondershare PDFelement: Which is the best PDF annotator?
- How To Markup a PDF Like a Pro
IMAGES
VIDEO
COMMENTS
File > Export helps you change your presentation into a different format, such as PDF, video, or Word-based handouts. All these options are covered below. If you simply want to "export" a file (in its current .pptx format) to a different storage system, such as a flash drive, plug that flash drive into your computer and use File > Save As (or ...
In this Microsoft PowerPoint 2021/365 tutorial video, learn how to export a PowerPoint presentation to a different file type.To see the full course that this...
To turn a PowerPoint presentation into a video, first, open your presentation with the PowerPoint app on your Windows or Mac computer. In the top-left corner of PowerPoint, click the "File" option. From the sidebar that opens after clicking the "File" option, select "Export." In the "Export" menu, click "Create a Video."
In this Microsoft PowerPoint 2019 tutorial you are going to learn how to export and save a specific single Slide of your presentation in a file, so your sele...
Watch this video to learn how to convert your PowerPoint presentation into a video. When you make a recording of a presentation, all its elements (narration,...
First, open PowerPoint and, in the thumbnail pane, select the slide that you'd like to save as an image by clicking it. A box will appear around the slide once it's been selected. Next, click the "File" tab. In the left-hand pane, select "Save As." To the right of the screen, you'll see two text boxes.
Nevertheless, here's what you need to do to record your presentation as a .ppsx file. Step-1: Click on the "File" tab. In the menu ribbon located at the top of the screen, click on the "File" tab. This will open the "File" screen. Step-2: Click on the "Save As" option. In the menu sidebar on the left side of the "File ...
In this tutorial, you will learn how to save your Canva presentation as a PowerPoint presentation in a few simple steps. In this tutorial, you will learn how to save your Canva presentation as a PowerPoint presentation in a few simple steps. ... Convert videos to MP4. See more features. Explore. Design ideas. Custom prints. Font pairing. Colors ...
Step-1: "Right-click" on the slide. The first step is to go to the slide you want to save as an image and "Right Click" anywhere on the slide. This will open a drop-down menu. Step-2: Select the "Save as Picture…" option. From the drop-down menu, click on the "Save as Picture…" option. This will open a new window.
Here are the steps for the same. Step 1: Launch PowerPoint on your PC and open the PPT from which you want to save images. Step 2: Locate and select the image you want to extract. Right-click on ...
What to Know. In the source presentation, select View > Slide Master. In the Slide pane, right-click the Slide Master and select Copy. Go to View > Switch Windows and choose the second presentation. Go to View > Slide Master. Right-click the Slide pane and select Paste. Choose Use Destination Theme (keeps colors, fonts, and effects) or Keep ...
Thankfully, both programs have found a way to be compatible with each other's files, so converting your Google Slides to PowerPoint is easy and straightforward. To export your presentation to PowerPoint, click File, then Download and select Microsoft PowerPoint (.pptx).
To turn your Word document into a PowerPoint presentation: Open any document you want to convert into a presentation in Word for the web. Click File > Export > Export to PowerPoint presentation. When prompted, choose a design theme for your presentation. Click Open presentation to re view the results in PowerPoint for the w eb.
Head to the Microsoft Office online website, sign in to your account, and open your document in Word. You do not have to open PowerPoint in another tab or window. Click File > Export and choose the "Export to PowerPoint Presentation" option. You'll see a pop-up window with a collection of themes. Select the theme that you want to use and click ...
Go to the 'Share' button at the top right and click 'More': Downloading the presentation - Part 1. Scroll down to the 'Save' options and choose 'Microsoft PowerPoint': Downloading the presentation - Part 2. Choose the slides you want to download, and hit the download button: Downloading the presentation - Part 3.
Follow these easy steps to convert a PDF into a Microsoft PowerPoint presentation: Click the Select a file button above, or drag and drop files into the PDF drop zone. Select the PDF file you want to turn into a PPTX file. Watch Acrobat automatically convert your file from PDF to PPT. Download the converted PowerPoint file or sign in to share it.
Capture your screen recording. 1. Select the right recording option: Recording into script: Choose this if you haven't recorded anything yet.; Replace selection: Choose this if you already have a script and want to replace a specific section with a new recording.; Record new layer: Pick this for recording your video as a new layer on top of an existing recording.
You can review and edit the created presentation. The presentation editor provides functions for changing colors, fonts, images, and layouts. You can completely change the content of the slides and add new ones. You can export the final presentation as PowerPoint and PDF files or Google Slides. Pros and Cons. Pros. Simple and intuitive user ...
File > Export helps you change your presentation into a different format, such as PDF, video, or Word-based handouts. All these options are covered below. If you simply want to "export" a file (in its current .pptx format) to a different storage system, such as a flash drive, plug that flash drive into your computer and use File > Save As (or ...
After importing a PowerPoint template into Visme, it's easy to convert it into a ppt with animation by adding animated transitions to the slides. Here's how to do it: Click on the gear icon on the top left of a slide in the slide list on the right of the editor.
In this step by step tutorial you'll learn how to record your screen inside Microsoft PowerPoint (no additional screen recording software needed!), edit your...
Bonus information: You can use Wondershare PDFelement for presentations using the AI Read mode. Alternatively, you can use the convert feature to convert the PDF file to PPT using AI. Conclusion. Adding a strikethrough in PowerPoint is an easy task. You can choose from 5 different methods. Choose whichever you find the easiest.