
The 8-step graphic design process (from briefing to user testing)
April 22, 2024

The digital world we live in today made graphics part of our everyday language. That resulted in 55% of companies using creative graphic design to communicate with customers, 24% of them to drive engagement on social media, and 19% internally.
Yet, so many companies still struggle to create an efficient graphic design process for their communications.
Here is the eight–steps graphic design process:
- Design brief – setting out the goals and strategy of your design
- Research phase– learning about the market or users you’re designing for
- Concepts – brainstorming ideas for your designs
- Concept development – polishing and refining your ideas
- Design review – getting feedback on your design ideas
- Iterate – improving your designs and collecting more feedback
- Approve – getting sign-off from your stakeholders
- User testing – collecting feedback from real users or customers
Let’s go through each step of the creative design process, and look at how you can optimize them.
1. Design brief – setting out the goals and strategy of your design project
The first step of your design workflow is the design brief. This will be the cornerstone of your project, setting your digital design process up for success.
Here, you pre-define goals and strategies for executing your design project. It requires a lot of details and straightforward communication to do it right.
This document should be no longer than two pages and communicate the vision and key criteria for the project.
How to optimize the creative brief for your graphic design process
A bad brief can cost you time, money, and even your reputation. Yet, so many people neglect the importance of the brief and turn it into a phone call, a short meeting, or worse, a message on Slack or Microsoft Teams.
To optimize your creative brief, consider using design collaboration tools like Google Suite (Docs, Sheets, or Forms, depending on the brief type you’re creating). This way, you’ll be able to work together with your client or a teammate on essential aspects of the design.
2. Research phase – learning about the market or users you’re designing for
Like with everything else in the world, good research is half the work. Learning about the market, competitors, and the people consuming your design will make your job much easier.
Plus, good graphic design research can guide you in some new directions and yield great inspiration that will benefit you later in your design workflow.
How to optimize your design research process
Besides simply looking up your competitors, your design research process could use more extensive analysis.
Here’s how you can up your research design game:
- Come up with some key criteria to measure your competitors
- Chat to your competitors’ customers to see what they like and dislike
- Read reviews to see what people think of the competition
- See how your competitors’ look and feel on social media
The list goes on! But with these few steps, you’ll already have a great foundation to start designing.
3. Concepts – brainstorming ideas for your designs
Pen and paper or an online whiteboard – it’s time to kickstart the create part of your design workflow. This is where you can dream up as many ideas as possible. Brainstorming includes inspiration, colors, emotions, mood, images, and everything else that might contribute to your design.
Invite your colleagues or clients to throw their ideas in the mix and create some truly amazing designs.
How to optimize your creative process for graphic design
Organizing a live brainstorming session might take up a lot of time and complicate things when people aren’t in the same office or don’t have similar schedules.
Here are a few graphic design project management software you can use to organize asynchronous yet effective brainstorming sessions:
- Google Docs – its collaborative nature allows everyone to pitch in ideas whenever they want to. Add comments, attach images, ideas, and links, or add to someone else’s idea, and round up the conversation.
- Canva – this highly visual tool allows you to create a moodboard and have your collaborators comment on it.
- Miro – this online collaborative whiteboard platform is designed to help teams work together on projects from anywhere. You can create brainstorming boards and allow everyone to add their ideas.
4. Concept development – polishing and refining your ideas
Once the brainstorming is done, and everyone is set on the general idea for the design, it’s time to polish all the details. This is the stage where you can really show off your skills to create something that’s both beautiful and functional.
How to optimize the design development process
Here’s some inspiration to help you optimize your design development process:
- Become a mad professor – try a wide range of colors, layouts, and styles until you land on something you’re happy with.
- Keep your mockups – it’s tempting to delete things you don’t like as you go, but you never know what could come in handy later.
- Give it the overnight test – sleep on your ideas so you can look at them tomorrow with fresh eyes.
- Ask people for feedback – more on that in the next step!
5. Design review – getting feedback on your design ideas
A design review is a process of getting structured and meaningful feedback on a piece of design.
During the design review stages , designers present their ideas to all their stakeholders and get feedback on how they can be improved. By online proofing your graphic designs , you’ll get different perspectives from various colleagues, helping you to create the best design possible.
Less review rounds, better designs
Get quick and clear feedback right on top of your designs with Filestage.
How to optimize the design review process
One of the best ways to optimize your creative design review process is by implementing a design approval software for collecting and organizing everyone’s feedback. It’ll help you cut time spent chasing everyone for feedback and make it easier to improve your designs.
Here are a few ways Filestage makes it easy to review graphic designs:
- Annotations – draw on the content to add clarity to your comments
- Attachments – share references or important files like fonts and logos
- Highlights – select specific words and sentences that need editing
- Strikeouts – select which parts of a document you want to be deleted

6. Iterate – improving your designs and collecting more feedback
Every piece of design requires multiple review stages from different stakeholders until it’s ready for publishing.
But iterations can be slow and draining while waiting for everyone to review your design. In the meantime, you and your reviewers can get lost in the sea of design versions, making the whole process even more confusing.
For everything to run smoothly without frustration, it’s essential to make giving and receiving feedback as easy as possible.
How to optimize the design iteration process
The good news is that design review tools have come a long way in improving the iteration process!
Gone are the days of pulling up two windows and a bunch of old emails to collect and implement all client feedback.
Here are three ways Filestage makes design iteration easier:
- Compare two versions of your design side by side, including all the comments
- Make sure everyone knows which version is the latest
- Hop back to previous versions and feedback in seconds
By giving your reviewers a more convenient way to review your designs, you’ll make the iteration stage of your digital design process more fun and effective for everyone. Check out our full guide on design version control to learn more.

7. Approve – getting sign-off from your stakeholders
At the end of the day, all your stakeholders need to be on the same page about your final design before it can see the light of day. But sometimes it’s impossible to have your design approved in one or two steps.
Keeping track of who’s approved what and not losing track of which designs you still need to review will help you create a smooth approval process.
How to optimize the design approval process
In Filestage, you can organize your design review process by designing separate review steps for each type of reviewer. On top of that, you can choose whether you want your reviewers to submit review decisions or just add their comments.
Your reviewers then have a choice between two buttons every time they give feedback:
✓ Approve
↻ Request changes
This way, you can easily see which documents need more work and which ones can move on to the next review step. Plus, if something gets published that shouldn’t have, you can go through your document’s review history to see where it all went wrong.

8. User testing – collecting feedback from real users or customers
User testing is a helpful tactic to get your design approved by the group that matters the most – your users and customers.
Here are some key benefits of user testing:
- Discovering important pain points
- Higher chances of creating a successful design
- Getting approval for your solution to a problem
- Building relationships for a continuous stream of feedback
How to optimize the user testing process
Even though you might struggle to get many customers to leave feedback on your design, the effort will be worth it.
There are a couple of things you can do if you want to maximize the amount of feedback:
- For smaller companies with loyal customers, simply reaching out to them will be the winning method. In such an environment, most customers will be happy to help. You can consider social media if you need to spread the word to a broader audience.
- Running focus groups and inviting people to give feedback on new designs is a highly successful method for bigger companies.
If you’re still having trouble attracting customers to leave feedback on your designs, you can always introduce some incentives. The reality is that people are more likely to help if a reward is waiting for them at the finish line.
The typical design process and methods to help you create your best work
When you think about design, your mind can go from graphic design all the way to fashion design in moments. But these two actually have way more in common than it seems when it comes to the design process and methods.
A typical design process consists of three main stages:
Sketching ideas with pen and paper
Developing a rough draft or wireframes
- Developing the final design
Just like in the old days, every design process still starts with the designer sketching their initial concept with pen and paper (or, these days, with a stylus and tablet).
In this stage, the graphic designer has all the freedom in the world to express their wildest imagination. However, the idea is to put those ideas on the paper and make it presentable so everyone can agree on the initial plan for the design.
Once everyone working on the project has a good idea of what the design is going to look like, it’s time to put your sketches in digital and create rough drafts and wireframes. Here different types of designers use different tools to make their lives easier.
Developing the rough draft may be the hardest and most rewarding part of the design work because here you’re implementing your ideas into a more realistic environment.
In other words, you’re following the rules and limitations that come with the tools you’re using or the brand guidelines that you’re designing for.
Developing your final version of design
Typically, after sketching a couple of rounds of feedback and going back to the drawing board, graphic designers reach the stage of developing the final version of their design.
It’s important that in this part of the process you’ve collected enough feedback from all your stakeholders so that you’re able to produce your best work. By this point, you should know all the requirements from different stakeholders and find ways to implement them into your work.
How graphic design flow can make or break your designs
In graphic design you’re often combining several elements and information in a single image with a distinct goal in mind. And it’s important to know how the people looking at your design are going to consume all the information from it.
That’s where having a good design flow will help and erase any confusion.
Let’s say you’re creating an image for the next webinar that your company is hosting. You want to create a design that will grab visitors’ attention, get them to understand what the webinar is about, and then look for information like the date and time and where to register.
By respecting the visual hierarchy of information in your design, you’ll effortlessly guide people through your content and make sure you’re communicating everything properly.
How to stay focused during the graphic design process
As much fun as designing is, it’s also exhausting to handle multiple projects at once or work on the same piece for months at a time. And sometimes, your focus and sources of inspiration dry out.
Here are three things experienced graphic designers do to stay focused on designing:
- Make a list of all your daily tasks
- Dedicate focus time and time for breaks
- Get in the zone with a Focus on Design playlist
Final thoughts
Once you establish an excellent graphic design process from start to finish, you’ll soon start to pick the fruits of your labor. So, make sure to tick all the boxes, cover all eight ways to optimize your design process, and enjoy creating outstanding designs! If you’d like to start collecting feedback on your graphic design with Filestage, start a free trial here →

Design and creative

7 key questions for your design request form template
Design request forms stand as crucial tools for creative ventures, providing a structured bridge for the exchange of ideas and needs between professionals and their clients or colleagues.
Amber Howells

10 best design collaboration tools for every situation
Making the design process more efficient is essential for any business, and that's where design collaboration tools come in. This article is about how you can improve design collaboration with colleagues, partners, and clients. So if you’re looking for the best design collaboration tools for your team, keep on reading.
Muriel Skusa

10 best visual feedback tools for faster content reviews
For a successful and functional website or mobile app, it’s important that the website looks good. That goes without saying. But what’s a successful website without a top-notch user experience?
11 min read

30 powerful process tools to optimize your business operations
Whether you're running a growing company, or trying to manage your team as efficiently as possible, it's crucial to understand the importance of processes and how to set them up. But building processes is almost impossible without adequate process tools in place.

How to create a design feedback form + 20 example questions
Getting feedback on your designs is no easy task. And without a proper set of questions and techniques, you’ll likely miss the opportunity to maximize everyone's feedback. This article will shed some light on how design approval software and other tools can help you collect feedback. And you'll get 20 great questions to inspire valuable feedback on your designs!

Your guide to find the best catalog software in 2024
No matter what kind of marketing resource management tool you use, catalog management software can help you streamline your workflows through catalog design templates and automation features that reduce the time you spend on your projects.
12 min read

The 5-step design brief that delivers 5-star results
In the world of graphic design, success often hinges on the quality of the design brief itself. Whether you’re working with an in-house design team or external designers, a well-crafted design brief is the foundation of a successful project, aiding the design process.

12 AI tools for graphic design to test out in 2024
AI graphic design tools are revolutionizing the design world, providing creatives with innovative ways to create, edit, and enhance their designs.
Katie Garrett
Get marketing tips, trends, and inspiration in your inbox
Everything you need to create your best work, delivered from our brains to yours every other Wednesday.

The Graphic Design Process Explained: A Step-by-Step Guide
If you’ve ever wondered how creative solutions come into existence you’re in the right place! Buckle up as we explore the ins and outs of the design process.
Table of Contents
One-stop for all your designs. Flat monthly price, unlimited requests and revisions.
Where does design come from? What is the logo design process? How is it possible that after days, if not weeks, of work, all that a graphic designer has to present is one simple visual? Let’s explain the design process step-by-step.
Nobody questions the manufacturers of physical products about their process. And yet, the graphic design process is always a matter of discussion. For example, why something that looks like a matter of a few clicks or a bit of typing can take much longer to finalize.
What is the design process? Why does it take as long as it does? And what is the thinking behind it?
Strap on as we dive deep into these questions!
What is the design thinking process?
You may have heard the term floating around, but what exactly is design thinking?
In a nutshell, it’s creative problem-solving . It emphasizes viewing a specific problem in a broader context and providing custom-made products or services for real users.
In graphic design, design thinking makes sure each design solves a problem or has a clear purpose. How about an example?
Everyone knows that you must be present on at least one social media channel to run a business online. But is it enough to just post anything simply to maintain your presence?
Without a strategy in place, you’ll quickly find yourself wasting time and resources. Implementing the design thinking process means that every social media graphic is created to push your agenda further.
And what’s the agenda again? As Simon Sinek famously explained, it’s the “why” of your business . In other words, it’s why you do what you do, or the way you address a specific problem.
The design thinking process consists of these 5 steps:

- Empathize : Understand that certain people experience specific problems. Become invested in helping them.
- Define : FCreate a problem statement with details, such as scope, duration, and critical points.
- Ideate : Generate ideas to solve the problem. In graphic design, this is the creation of concepts.
- Prototype : Create prototypes or drafts.
- Test : In the context of graphic design, testing often means giving the drafts back to the clients and adding revisions. In some cases (e.g., landing pages or user experience design), designs will be tested or presented to a peer group for review before revisions are requested.
As you can see, design thinking means you continuously repeat the process with new problems that you solve for clients. So, before we get into the specifics of the process of design, it’s essential to understand why we’re here in the first place.
The answer is design thinking, and every design process should start with this problem-solving methodology in mind. Recent research has confirmed that companies with a strong focus on design thinking outperform the industry benchmark by two to one .
So, if you wish your design processes to be successful, get your design thinking mindset on. And if you want to have a smooth and effective design process, these are the steps to follow.
A 12-step guide to the design process
Now that you have the big picture, it’s time to get down to the details of the graphic design process steps.

Step 1: Market research
If you’re a client wondering, “what is the design process, and why does it take so long” this is one obvious answer we can give you.
Despite what you may think, designers never start working on a project off a “creative hunch” or sudden epiphany. Before they even come close to opening a design program, they have to understand who they are designing for .
And no, it’s not you, their client. Graphic design is made for a specific target audience . So, designers must know about your buyer personas to deliver quality results. Of course, you can significantly speed up this part of the design process by providing them with your own market research findings.
However, they will still need to dig a little deeper into the graphic design side. They will look at what your competitors are doing and what you’ve done in the past. Designers will then identify potential areas of improvement or significant trends in the industry .
Step 2: Get to know the client
Every business is unique, so it’s one of the most vital design process steps to understand what makes your design client different from their competition.
Usually, it’s a good idea to organize an interview . This is an opportunity for the designer to ask questions about your mission, vision, and values. Although it may seem like chitchat to you, it’s an incredible source of information for the designer.
Step 3: Define the problem
After they’ve grasped the big picture, it’s time to understand what you want them to do and why you need this design.
Let’s say you’ve requested some versatile illustrations that you can use across the board. Pretty simple, right? However, here are some questions that your designer might ask you:
- Where will the illustrations be used?
- Have you used any illustrations before, and if yes, what were they?
- Why haven’t you used illustrations before?
- How can illustrations help your audience?
- What problem(s) are you trying to solve by incorporating illustrations into your designs?
Perhaps you haven’t even thought this through yourself. However, brainstorming on these questions together is one of the most crucial design process steps, as it can also help you create a quality design brief .
Step 4: Analyze the creative brief
You’ve done your part and provided the designer with all the information they need to start designing. So now they jump right into the work, correct?
However, a designer needs to study the brief carefully first. This helps them spot potential inconsistencies with the previously defined problem, or the general design strategy .
Truthfully, it’s not the longest of the graphic design process steps. Still, it is valuable for helping you to establish the optimal workflow
Step 5: Set up a timeline & agree on deliverables
We’re almost ready for the creative part, I promise. But if celebrity marriages have taught us anything, it’s that setting up expectations is beneficial for everyone involved.
If you’re creating a contract with the designer, this is the time to do it. The contract should include any hard or soft deadlines and the key deliverables in the design process. You might also want to specify how and how often your designer should report on the ETA (estimated delivery time).
Step 6: Create a mood board
Finally, we come to the step where the design team is “off to work.” Creating a moodboard helps a designer visually take in everything they’d previously researched and learned. They compile examples of design from your competition and graphics that match the design style or needs.
Of course, mood boards are never a compilation of just one medium. Many designers also create physical moodboards where they can include textured materials, while others prefer to keep things digital and include materials such as videos or GIFs.

In any case, it’s that final brainstorming step before a designer can grab their sketchbook or open a design software and start developing the concept and first draft.
Step 7: Develop a concept
Ok, this is it. The designer will finally create a piece of design. Bear in mind that this will only be a rough draft in most cases.
If you find yourself googling “what is the logo design process,” then this is the step to note. A quality designer will be able to tick all the boxes with different visual solutions. So, it’s your task to choose whichever you think is best or simply the one you like better.
Although there’s much more to it than that, design is subjective, so you shouldn’t ignore your gut instinct.
Step 8: Get feedback
If you feel a designer is incessantly bugging you with questions - there’s a good chance you’ve come across a terrific one.

This suggests that they are eager to move in the right direction and avoid delays and multiple revisions later. As a result, the designer will likely be able to stick to the agreed workflow and deliver results promptly.
Of course, it’s not unheard of that a graphic design project is still overhauled entirely mid-way. But the chances of that happening are minor if you study the concept correctly and provide actionable feedback.
Step 9: Start designing
Hooray! The designer finally gets to work! So now you must be wondering: what is the design process like in a single working day ?
Naturally, there’s no straightforward answer here, as it greatly depends on the person and project at hand .
With over 125k projects under our wings, here’s what we estimate our designers at our unlimited design company will deliver within 1 day:
- 2-3 social media graphics
- or 1-2 custom illustrations (more if they are not too complex)
- or 2-3 display ads
- or 4-5 pages of a brochure, e-book, report, or slide deck
- or 1 GIF draft (2-3 sec)
- or 1-2 flyers
- or 1 logo draft
- or the first draft of a landing page
Of course, bear in mind that our designers usually work with 2-3 clients at a time . So if a designer is working exclusively for you, this output should be doubled .
On the other hand, freelancers probably deliver results at a similar pace since they usually manage a few clients simultaneously.
Step 10: Review
Before submitting work for the client to review, professional designers will establish a process of internal quality control and assurance.

In simple terms, quality assurance is determining whether a design meets the specified requirements. This is usually done by a design project manager . Here are some criteria that they might take into consideration:
- adherence to the creative brief;
- observance of brand guidelines & fundamental design principles ;
- submission of all required file formats;
- copywriting & spellcheck.
The latter isn’t necessarily within the scope of service of a designer, but it does show a level of professionalism that is usually expected.
Step 11: Make revisions
The designer has now submitted the first draft for review. The next step in the design process is for clients to provide their two cents and request revisions.
No matter how well you try to define design process steps, there will almost always be room for some tweaks . Luckily, if you have followed the proper course of the design process so far, the alternations should be minor.
In this case, the trickiest part of this process step is finding a way to communicate your views. If you’re not physically in the same room as a designer, moving something “a little to the left” might take several tries.
You can always record a video on a platform like Loom . Or, you might ask the designer to provide you with a format you can work with. For example, you might be able to leave comments on a PDF more easily, or even a source file of some sort if you have the necessary design program.
Ideally, you can find a way to leave comments directly on the design . Some platforms for collaborative design might allow you to do this.
Step 12: Deliver the final design
Twelve steps later and you’ve got the finished product. The client has given their final approval, so all left for the designer is to pour themselves that well-deserved glass of wine. Not quite.
Wrapping up everything neatly is the last of the design steps, but one no professional designer will ignore. Usually, they should submit all source files and the ready-to-use file formats such as JPG, PNG, or PDF. All the files should be named appropriately, especially if designers submit older or alternative project versions.
An extra optional step is for the designer and client to discuss the project and potential challenges they've overcome. This step is usually a necessary part of the design thinking process , as it paves the way for future collaboration and moving on to the next problem that needs tackling.
We hope this gives you a better idea of what a layered process graphic design is. If you’re a design client, remember a lot is going on behind the scenes for a single visual to be produced.
If you feel that the design is taking too long, go back to these steps and figure out what could have realistically been completed. Alternatively, approach your designer directly and inquire about the stage of the graphic design process that they’re at.
If you’d like to learn more about how our design company handles this process, check out this article . In it, we explain how we’ve automated design briefs and made the design process easier for our clients.
You can also discover more about our quality assurance processes that help us make sure each piece of design, whether the first draft or the final product, meets expectations and high professional standards.

Having lived and studied in London and Berlin, I'm back in native Serbia, working remotely and writing short stories and plays in my free time. With previous experience in the nonprofit sector, I'm currently writing about the universal language of good graphic design. I make mix CDs and my playlists are almost exclusively 1960s.
A design solution you will love
Fast & reliable, fixed monthly rate, flexible & scalable, pro designers, get a taste of what we do.
Get inspired with some of ManyPixels best designs. Download our portfolio to check them out!
Wait... there’s more!
Enjoyed the read? Subscribe to our mailing list for all the latest tips, how-tos and news on graphic design and marketing.

Continue reading
.jpg "research graphic design process")
Typography Design: How to Create an Impact with Fonts

What’s the Difference Between Graphic Design & Branding?
.jpg "research graphic design process")
The History of Graphic Design: From Cave Paintings to AI Art
This 6-Step Graphic Design Process Drives Results (Infographic)

You’ve probably come across a few brands that seem to nail it with their graphic design, every single time. How do they make it look so easy, while you’re facing workflow bottlenecks and creative blocks?
The truth is, incredible design work doesn’t just *happen* for some people and not others. Every successful designer follows a tried-and-true graphic design process they know will help them achieve results — and you can, too, especially if you incorporate design thinking into each phase of your project.
We’re demystifying the creative process to show you exactly what works.
What Is the Graphic Design Process?
Graphic design is a critical visual communication tool marketers use to convey key messages about a brand that resonate with target audiences. It’s all about producing visual assets that are eye-catching, on-brand, and aligned with specific messaging. When it comes to user experience in design, the impact of well-executed graphic design cannot be overstated, as it directly influences how users interact with your brand.
The graphic design process, then, is what a designer follows to bring design ideas to life while serving a client’s end goals. This process often involves using tools like Adobe Photoshop to create and manipulate design elements, ensuring that the final design is polished and professional.
As a creative process, designing graphics involves equal parts of “creative” and “process.” In other words, a graphic designer will adhere to logical, step-by-step procedures all the way to completion. Creative ideation and original design work fit into this process. But they’re not the only skills or considerations that result in successful design. The graphic design process involves a great deal of communicating, critical thinking, and problem solving, too, and often requires access to unlimited graphic design resources to achieve the desired outcome.
The Graphic Design Process in 6 Steps
Whether you produce the graphics for an in-house marketing team, or you’re a graphic designer serving a big book of clients, you and your collaborators will benefit from a clear production and approvals process. No matter how skilled you are at creating visuals, refining your graphic design process can streamline cross-team workflows and help you arrive at a more successful end result, faster.
Here’s how to turn a concept into a compelling visual communication tool, from the creative brief to the finished product:

1. Build Out the Creative Brief
Before you get going with digital drawing tools, the first step in your graphic design process should be establishing the creative brief. Also called a design brief, this document will capture all of your client’s wants and needs and other key project specifications.
Anyone who wants to work with a graphic designer should be able to articulate what they’re looking for and what goals the design asset needs to meet. You may receive a complete design brief from your colleague or client. Or, you may be the one asking questions and filling out the brief.
Either way, your creative brief should address:
- Company information (e.g., mission, offerings, unique value proposition).
- Brand guidelines.
- Target audience.
- Asset type (e.g., logo design, UX design , eBook design).
- Purpose of the asset and how it fits into the overarching marketing campaign.
- Initial design concept or creative direction.
- Production-related design specifications.
- Delivery format and file type.
- Project timeline , with key milestones.
- Budget or cost of the design work.
Review the project intake form with all key stakeholders to ensure all the important details are captured and everyone is on the same page. It may take a few tries to make your brief as clear and comprehensive as possible.
When establishing the timeline, make sure you’ll have the final copy in your hands before you start designing. Any changes to the text could set you back significantly. After all, you don’t want to end up putting together a clever infographic design only to find out half of the data points will be thrown out and rewritten! Since form follows function, it’s essential to lock in any text you’ll be using before it ends up in the design asset.
2. Research the Design Ecosystem
Now that you know your creative mission, it’s time to start your preliminary visual exploration. During the research stage, spend time:
- Understanding the specific product or service you’re representing.
- Examining competitors’ design work.
- Assessing your brand’s market positioning and differentiating qualities.
- Exploring other visual content your target audience consumes, beyond your niche.
- Considering how you might apply color theory and design trends.
- Gathering inspiration images and building out a moodboard.
Research is an important part of what a graphic designer does . You’ll use your findings to inspire original ideas, solidify the overall design approach with other stakeholders and back up the design decisions you make later on. This stage is where the design thinking process really begins to take shape, as you start to synthesize your research into actionable design principles.
Subscribe to The Content Marketer
Get weekly insights, advice and opinions about all things digital marketing.
Thank you for subscribing to The Content Marketer!
3. Develop and Refine the Graphic Design Concept
Armed with your design brief and a wealth of information from the research process, it’s time to start building out the framework for what the asset will ultimately look like.
Depending on what you’re working on, the concept development and refinement stage may involve sketching out thumbnails, mockups or graphic elements. Larger and more significant projects, like an abstract or text logo development and web design, may require more fine-tuning and several iterations before moving into production.
Regardless of the scale of your project, it’s important to present your initial concepts to the rest of the team. A good graphic design rule of thumb is to pitch 3 ideas:
- Provide exactly what the client asked for.
- Offer your interpretation of what you think they’ll like, based on everything you know.
- Pitch a new concept or idea that could still meet the brief.
Have your client or colleagues pick one of the three, and continue refining it. Ask for feedback about your general approach and the rough framework for your project, to see if anything is missing or should be tweaked to better support the ultimate project goals. This way, you won’t spend all your energy and time designing down the wrong path.
During this stage, you might use Adobe Illustrator to create vector-based graphics , ensuring that every visual element is scalable and versatile for the final product. The rough sketch you start with will evolve, and through brainstorming with your design team or design firm, you will develop a comprehensive visual language for the graphic design project.
4. Create the Design
Once all stakeholders are in agreement and you have all that you need to proceed with the design, it’s time to execute the project.
During the design stage, a graphic designer will be expected to implement best practices related to the use of color, typography, the hierarchy of information and positive and negative space. They’ll also put technical skills to the test, using the right graphic design software and other applied productivity tools to get the job done in the most efficient way possible. For instance, Adobe Creative Cloud offers a suite of applications that can streamline the graphic design workflow and provide an array of tools for different design needs, whether it’s UI design for an app or package design for a new product. Tools like Photoshop and Lightroom enable powerful image editing capabilities.
Before sending off your design, conduct a self-critique and examine your work with an editing eye. Are there any design elements that seem out of place? Does your visual hierarchy support the goals outlined in the creative brief? This is the time to make any edits of your own — but this isn’t the end of the revision process.
5. Collect and Implement Feedback
The feedback stage involves a series of smaller steps that ensure quality control and perfect alignment with your stakeholders’ vision.
Depending on what type of team you’re working with, this part of the graphic design process may look something like this:
- Submit the design work for internal review.
- Make any requested changes.
- Present the updated design to your client or other decision-makers.
- Explain how your design decisions align with the creative brief and the direction you agreed on.
- Gather feedback from all stakeholders.
- Confirm your next steps.
- Make the requested changes.
- Present this new version to the rest of the team.
From there, rinse and repeat until you’ve reached the final version and there are no outstanding change requests.
The feedback stage is also where web developers and other stakeholders can weigh in on the usability and effectiveness of the design, ensuring that the final product isn’t just visually appealing, but also functional and user-friendly.
6. Finalize and Deliver the Design Assets
Now that you’ve gotten final approval from all stakeholders, you’re ready to deliver the assets in the appropriate formats. Package them up so they’re ready for production and can be easily implemented into whatever digital or print format your recipients need.
Your creative brief should articulate what deliverables you should share. For instance, you should make sure to send the asset in the correct file types and sizes so no changes are needed later on. Helping your recipients avoid the hassle of modifying the files or asking for further support can make for a better design experience for everyone involved.
How Following a Graphic Design Process Drives Results
Graphic design and marketing go hand in hand — and generating marketing results isn’t easy without a solid strategy in place for communicating across teams and producing visual assets that meet your specifications.
Once your creative brief is approved, this serves as both your instruction manual as well as your contract for this particular design project. It’s a tool you as the designer can use to keep your efforts on track. If you ever feel stumped, you can turn to this resource.
Additionally, using a design brief and following an agreed-upon feedback and revisions process helps with managing the expectations of key stakeholders and collaborators. If there’s any question of whether or not you delivered on time or on brand, you can point back to the goals and specifications outlined in the creative brief and show how you met them.
Listening closely to client feedback and making the necessary updates can help you become a better graphic designer . For instance, you might think of clarifying questions to ask during the design brief stage. And you’ll get better at translating abstract feedback into actionable design edits.
Graphic design is a critical component of your marketing strategy , so following a consistent process is the first step toward success. By adhering to this process, you’re more likely to achieve a better design that resonates with your audience and fulfills the project’s objectives. Whether you’re taking a graphic design course or are a seasoned professional, remember that each step in this process is an opportunity to refine your skills and deliver a final product that stands out in the crowded marketplace.
Editor’s note: This article was updated on Dec. 15, 2023.
Jessica Barker
Share this article
Get our weekly newsletter

Jessica Barker is a Chicago-based content writer and Director of Editorial at Brafton. When she's not mixing work and wordplay, you'll find her curled up with a cat and a cuppa, dreaming up her next creative project.
Recommended Reading

How To Choose Brand Colors That Pop
The golden arches. The red-and-white bullseye. These ultra-iconic logos wouldn’t be quite the same without a splash of color. And neither would yours. But the endless spectrum of options can be pretty overwhelming when it comes time to build your brand color palette. And when you’re competing in a kaleidoscope of Technicolor marketing, it’s not… Read more »

The 5 Best eBook Examples You Should Be Following
B2B companies aren’t always seen as the paragons of creativity. But when you’re looking to generate as many high-quality leads as possible, creativity comes in handy. These B2B eBooks exemplify exactly what we mean.
The Content Marketer
Get the latest content marketing updates delivered directly to your inbox with our weekly newsletter.

The Only 7-Step Graphic Design Process You'll Need

Top-notch design awaits
Whether you're a team of graphic designers , a solo designer, or someone who works with designers, following an established graphic design process is key to keeping everyone on the same page. Having one will result in less friction, improved designs, and overall alignment along the entire design process for everyone involved.
Without one, you'll be winging projects and crossing your fingers saying: "This time it will go better."
The good news? A solid graphic design process is easy to set up. Even better? I've done all the hard work for you.
Follow along and copy the 7-step graphic design process steps below that we've used with our design service for thousands of designs without fail.
Quick Links
What is a graphic design process, why is a graphic design process important.
The 7-step Graphic Design Process
The Basic Principles of Graphic Design

A graphic design process is a structured approach that graphic designers follow to create designs in a low-friction way. Typically, it will include a series of steps from design conception to final delivery, aimed at producing effective and aesthetically pleasing designs at scale.
While the specific stages may vary depending on the project and designer, a graphic design process usually includes steps such as research, brainstorming, sketching, conceptualization, design iteration, feedback, refinement, and final delivery.
A graphic design process can make or break a graphic designer's ability to produce impactful design at scale. Let's say you're creating a singular logo design for your brand with no plans for further designs after. Who knows, this might be the only design you take care of all year! In this situation, you might think a graphic design process is a bit overkill; and I don't blame you.
But let's switch it up a little. Imagine today, you'll need to create 3 different designs for 3 different brands. There are multiple stakeholders and needs involved, along with some tight deadlines. Could you see how having a reliable and repeatable process might help the latter situation not become a gigantic mess?
Let's dive into 3 further reasons why a graphic design process is necessary in most graphic design situations:
Fewer Review Rounds, Better Designs
With a proper process in place, you'll be communicating effectively across the entire design process. A graphic design won't make it to the final design stage without having been looked at a few times by those involved. Plus, with everything clearly communicated, graphic designers will know what success looks like from the get-go.
Think about it - have you ever had a tough time completing a project when you didn't know what 'done' or 'success' looked like? Completely normal. This addresses that common headache head-on.
Alignment from Graphic Designer to Manager
Alignment in any business setting is crucial for success. We as humans love to be complicated, and without proper guardrails in place, we do a fantastic job at it. By following a creative design process, the guardrails are put in place for you. There isn't any room for a he-said she-said debate as everything has already been decided and agreed upon at every step along the way.
Higher Graphic Design Project Delivery Cadence
If you're in the design business, you probably aren't completing projects whenever you feel like it between coffees. In the world of marketing design , teams need to move fast. Needs are always changing and CEOs are always losing their mind about the latest trends they need to take advantage of.
The 7-Step Graphic Design Process

Tired of design ideas turning into design messes? Consider these 7 steps in the graphic design process and forget about stressful nights on your Adobe Creative Cloud programs:
1. Define Objectives and Goals 2. Start Your Creative Brief 3. Conduct the Research Phase 4. Brainstorm and Concept Development 5. Design Iteration and Refinement 6. Reviews and Approval 7. Finalize and Deliver the Design Assets
1. Define Objectives and Goals
Always a great starting point, first ensure you have objectives and goals defined. This will make the remaining steps easier and give everyone involved a better understanding of what a successful design should look like.
Every graphic design project has been created for a reason. To ensure a smooth design process, make sure that reason is well-communicated and well-known for all stakeholders. The last thing you want is to find out someone has a different definition of success while the design is in its final stages.
2. Start Your Creative Brief
Use the objectives and goals you set out in step one to put together a creative brief. The creative brief is the foundation and rough framework that a successful final design relies on.
Your creative brief should be robust, detailed, and have all the information a graphic designer would need to achieve the vision. The creative brief could include:
- Information about the company or customer
- Brand guidelines and brand assets
- Goals and Objectives from Step One
- Target audience or ICP
- Description of the request and what the final product should be
- Expectations for timeline and deadlines
- Budget caps and constraints
- The purpose the design will serve
- Inspiration and examples of work you do and don't like
I know this can be a lot, so I created the Ultimate Creative Brief Playbook , which includes a free downloadable template for you to pass around your team and use. If things still get a little too complicated, I recommend using a tool like Loom to support the creative brief with a video and screen recording.
3. Conduct The Research Phase
Research the topic, target audience, competitors, and design trends. Collect all necessary materials such as images, text, and brand guidelines.
The creative design brief that you developed in Step Two will provide a solid foundation for you to conduct your market research. Look at what the competitor designs look like, are they pushing the bounds of anything that you can take inspiration from?
It's good practice to put yourself in the shoes of the target audience. What sort of content would you engage with on social media and other channels if you belonged to that group? What would you resonate with?
Overall, this step in the graphic design process is a perfect opportunity to get everything on the table to support the next step: The initial concept, development, and brainstorming process.
4. Brainstorm and Concept Development
Before you go any further in the graphic design process, you need the graphic designer to brainstorm and present various ideas and options to see if anything clicks. Performing this step can save time, as this can usually be decided now and not two steps down the road.
Providing rough options will also give the customer various directions to choose from. We as people naturally feel more comfortable with choice. By getting various design ideas out in the open, the choice is up in the air for client feedback before continuing further and risk wasting time.
5. Design Iteration and Refinement
Now that the whole design thinking process is underway, you'll need to make sure you're checking in at the proper times while setting milestones that make that make it easy to do so. While the brainstorming process serves as the first milestone, you'll want to check in on the design at the halfway mark.
The halfway mark throws all the design direction debates out the window and leaves you focused on the direction at hand. Think back to the direction you decided on - is that vision being achieved? If not, get back to the drawing board and find another way to approach things. Keep iterating and refining until the design is where it needs to be.
The last stop for refinement and iterations is at the 99% mark. This is where the final tweaks are made, and where you can guarantee all the basic graphic design principles are applied. If all else fails, use our handy graphic design principles list at the bottom of this article as a checklist for final delivery.
6. Reviews and Approval
Now that most of the creative process is complete, it's time to make your final reviews and get approvals. Send off the previews of the design and get feedback. Make any edits if necessary. It's time to wrap up the creative process!maybe end with !
7. Finalize and Deliver the Design Assets
With client approval from all stakeholders, it's time to finalize the design and deliver the final product. Note the formats from the creative brief that were asked to be included. Export the design in those formats, name the files something easy to organize, and send it off.
Congratulations, you've just completed a design in the most organized and repeatable way possible using the graphic design process!
Even with the world's most robust graphic design process, if the basic principles of design aren't followed, you might not get very far. Following these principles will help ensure you flow through each step naturally, instead of spending time on the brainstorming or iteration phase.
Most good design practice comes down to a few basic principles. A framework alone won't create a show-stopping design; but when combined with basic principles, you'll save loads of time on revisions and iterations. Check out these basic principles for design below and combine them with the graphic design process for a surefire shot to design success.

Balance in graphic design refers to the distribution of visual weight within a composition. It creates a sense of equilibrium, making the design feel stable and aesthetic. Balance can be achieved through symmetry, where elements are evenly spaced in a mirrored fashion, or through asymmetry, where different values of elements are used to create an overall balance without mirroring. The key is to ensure that no single part of the design overpowers the others, leading to a unified and harmonious outcome.

Contrast is a powerful principle that involves placing opposing elements next to each other to highlight their differences. This can include contrasting colors, sizes, shapes, or textures.
Effective use of contrast can make certain aspects of the design stand out, draw attention to key elements, and enhance the overall readability of the content. Not only does contrast add visual interest to a design, but it also aids in organizing information, making the message clearer and more dynamic.

Alignment brings order to a design by lining up elements systematically. Each element should have a visual connection with another, creating a clean, organized look. Proper alignment not only enhances the professionalism of the design but also improves readability. Whether it's text, images, or other design elements, alignment ensures cohesive, logical, and visually appealing compositions.

Proximity involves grouping related items and creating associations between them. This principle helps organize information, improves readability, and guides the viewer's eye through the design. By logically arranging elements that are related, designs become more structured and easier to comprehend. Proximity can turn a chaotic design into an orderly and effective piece of visual communication.
Visual Hierarchy

Visual Hierarchy is about arranging elements of visual representation in a way that signifies their importance, guiding the viewer's attention to the most critical information first. Using size, color, contrast, and spacing, designers can create a clear visual order, leading the viewer's eye through the design in a predetermined sequence. Hierarchy is crucial in all types of design work, from posters to websites, ensuring that the message is received in the intended order of importance.

Typography is the art of arranging type to make copy legible and visually appealing. It involves choosing typefaces, adjusting font sizes, and spacing letters and lines to enhance the reading experience. Effective typography can significantly impact a design's tone, readability, and perception. By carefully selecting and applying appropriate fonts, designers can convey mood, reinforce the message, and ensure that their work leaves a lasting impression.

Using color in your design allows you to add emphasis and mood where it's beneficial to the intention of the design. From warm tones to cool hues, designers strategically leverage color to create visual interest, convey brand identity, and send the intended message to their target audiences. While color psychology is still taught in most graphic design courses today, understanding how to interpret a color wheel, determine complimentary or contrasting shades, and appreciate the cultural nuances behind some hues before incorporating them into a design are seen as more valuable skills.

Repetition in graphic design is a powerful tool used to establish consistency, rhythm, and unity within a composition. By repeating visual elements such as colors, shapes, patterns, or typography throughout a design, designers can create a sense of cohesion and reinforce branding. Repetition helps to guide the viewer's eye, establish visual patterns, and strengthen the overall message of the design.
Frequently Asked Questions (FAQ)
What are the steps of the graphic design process.
The seven graphic design process steps are: defining objectives and goals, starting a creative brief, conducting research, brainstorming and concept development, design iteration and refinement, reviews and approval, and the delivery of the finalized design assets.
What is process in graphic design?
In graphic design, a process is the structured approach that designers take to create visual solutions, involving steps from initial conception to final delivery. It includes stages such as research, brainstorming, design iteration, feedback, and refinement, ensuring that designs effectively communicate the intended message to the audience.
Use our top-notch design talent and get noticed.
- Ad Creative Eye-catching designs that perform
- Social Media Creative Engaging assets for all platforms
- Email Design Templates & designs to grab attention
- Web Design Growth-driving designs for web
- Presentation Design Custom slide decks that stand out
- Packaging & Merch Design Head-turning apparel & merch
- eBook & Digital Report Design Your digital content supercharged
- Print Design Beautiful designs for all things printed
- Illustration Design Visual storytelling for your brand
- Brand Identity Design Expertise & custom design services
- Concept Creation Ideas that will captivate your audience
- Video Production Effortless video production at scale
- AR/3D Design New creative dimensions that perform
- AI-Enhanced Creative Human expertise at AI scale

- Sep 13, 2022
A road map to scientific illustrations: 6 step graphic design process

As a scientist we love a good method — a step-by-step process we can follow. It is ordered and logical and familiar.
But what do you do when there is no method to follow? Like when someone says “be creative”… Cue FREAK OUT!!
Well, you have come to the right place! Let’s talk about visual communication and the process of graphic design.
Here is your method to being creative and designing stunning scientific illustrations. 😉
Visual Communication
Here at Animate Your Science we are all about science communication , and advocate for scientists to tell a story . 📖
We have strategies to make complex scientific concepts easy to read , 🦠 and tips on how to give an elevator pitch , 🎤 we even go through 7 tips to boost your manuscript’s impact . 🚀
But often researchers forget that visual communication is a crucial part of the story !
That graphic design is an important and often overlooked piece of the puzzle. We can use scientific illustrations to convey key messages and keep your target audience engaged.
After all, a picture is worth a thousand words. 😉
So, what is a Design Process?
A design process is a methodical approach which breaks down a large design project into manageable and logical steps.
Design might sound scary!
But graphic design actually involves a lot of critical thinking and problem-solving, much like science.
In reality, most graphic designers have a design process they follow, a set of logical steps to get a design to move from an idea... to a beautiful graphic!
Sound familiar, a bit like a scientific method or protocol.
Hello researchers! 👋 Now we know you are listening, after all this is our forte. 😉
Here we are going to uncover 6 key design steps for researchers . Want to learn how to bring your idea to life and create stunning scientific illustrations? Then read on.👇
Let’s be methodical about creating!!
Step 1: The Idea
This step may seem obvious! However, it is arguably one of the most important steps. Without an idea, we have NOTHING!
Here we want to refine the concept details to keep you on track. We want to keep the end goal in mind, for instance the end goal of a scientific method might be to extract RNA. The end goal here is to produce an eye-catching scientific graphic that conveys your main message and targets your key demographic.
Don’t rush this step, as it will set the tone for the entire project.
To iron out the details, use the following questions to guide you.
What are you creating? What is the scope of the design? Are you creating a single scientific icon or an entire poster? Or maybe a manuscript figure or a detailed infographic?
What is your key message? What is your main point? What is the graphic trying to convey to the reader? This could be a very specific or a very broad message. For instance, a methodology graphic would have a distinctly different key message than a summary figure.
Who is your target audience? Who is your graphic aimed at? Researchers, general public, stakeholders, children? Your target audience will affect the design style, degree of jargon and overall approach. For example, an infographic for young children will have a different level of detail to a figure for a manuscript.
What is the timeline for the project? Do you have any strict deadlines for this project? A conference deadline looming, a manuscript revision date, or a presentation at the next lab meeting? Having a clear idea of your timeline will help you plan your time effectively.
Now that we have the concept outlined, we move to a researcher’s favourite part… RESEARCH! 🎉🎉
Step 2: Research
Now for some fun!! Let’s research 🙌🏼
The point of the research stage is to gather inspiration, and sample graphics . Technically, nothing is original, everything man-made is inspired by something. So go get inspired!! 🤩
As the saying goes, “ Steal like an artist”. 🧑🎨
Not sure where to start? We have outlined below some ideas of what to look for:
Scientific Research This part you could do in your sleep. 😴 If the topic is unfamiliar, you may have to conduct some scientific research, to ensure you have a good understanding of the topic first. Most likely though you will be creating a graphic for your own research, which you are already an expert in, 😉 in which case you can skip this bit.
Examples of similar work Search for graphics, illustrations or figures or similar work. This will help you identify what you like and don’t like and will aid in forming your vision for the final product.
Scientific Schematics Check out some scientific illustrations . The large variety of graphical representations will inform the level of detail and stylistic choice.
Audience-specific content Have a look at the types of graphics your audience is engaging with. This will help you decide on the type of illustration to best target your audience.
Graphical details This one is not its own dedicated search, but rather a combination with the above. When you are gathering your examples, take note of what colour schemes stand out, which styles you are drawn to, the typography you like, or if you prefer no text?
There is no wrong way to research. Save anything and everything that captures your eye. Once you have a range of sample images, arrange them and label them, so you can quickly and easily refer to them down the track.
In the design world, this step is known as “ Mood boarding ” and it inspires the visual direction of the graphic.

Moodboard Example
Step 3: The Style & Look
Now that you have created your Mood board you will probably already have a rough idea of the style and look you are going for, now it’s time to really nail down these aspects.
Always remember to keep your concept at the forefront of your mind.
There are a multitude of styles to choose from when you are designing a graphic; Abstract, Minimalist, Conceptual, Flat, Playful, Geometric, Organic, Photorealism the list goes on. Whilst these terms probably don’t mean much to the average academic, the idea is to select a style that will engage your audience, whilst delivering your key message .
Once you have selected your style, ensure you stick with it and be consistent, or you will end up with a graphic that looks like a patchwork of styles.
Here are some different design style examples of a Bluebird, to help you understand the importance of choosing the right style.

I mean c’mon how cute is the cartoon bluebird 😍 perfect for a presentation for preschoolers.
When considering the style aesthetic of your design, you should also consider how detailed and accurate the final product should be. Striking the perfect balance between accuracy and aesthetics is a fine art!
This is a good example of how to balance the two together. 🤩

As always your concept outline will help guide this balance. For instance, a scientific graphic for children can teeter more towards aesthetics, as their attention span is shorter, and they won't comprehend the scientific details, in fact it may cause confusion and disengagement.
On the other hand, a graphic for experts in your field can slide towards accuracy to convey the details and get the key point across.
Colour scheme
When considering style and accuracy, you should also consider the colours used. For example, a blue bird coloured red wouldn’t convey the same information, as if it were coloured blue.
We always recommend picking a consistent colour scheme for your designs . 🎨 By limiting the number of colours in an illustration to 3 or 5, it gives a professional, cohesive feeling. However, sometimes this is not always possible without losing accuracy.
Not familiar with colour schemes ? Check out our detailed blog which covers this very topic.

Disclaimer: Some companies and institutes have branding guidelines that you may need to adhere to, which can include colour palettes, logos and stylistic outlines.
Typography is just a fancy way to say that the text is arranged in a legible and visually appealing way.
This can include the typeface, font colour, font size, spacing and arrangement. Scientific figures often have unnecessary text, at the expense of negative space and aesthetics.
Less is more.
Ask yourself, is it necessary? Can I phrase this more succinctly? We want to avoid cluttering the design with text.
With that in mind, we also recommend sticking to just two fonts, a title font and a body text font. You can use bold and italics to provide different variations for subtitles and emphasis if needed.
Copyright licensing
Alright, let’s quickly touch on the boring stuff. 🙄
Now I mentioned in Step 2, to steal like an artist, but I didn’t mean literally. Copyright licensing is an important aspect of design. You can use anything for inspiration, however there are only some images that you can reuse, modify or adapt.
Let’s talk Creative Commons (CC) licenses , these are similar to Open Access licensing for papers! Depending on where you are using your creation's they may be subject to different copyright.
Check out the table below for all the deets!

Creative Commons licenses by Foter ( CC-BY-SA )
Step 4: Mock Up
Now you finally get to start seeing your design come together. 👏🏼
Depending on the software you are using to design your graphic, there may be some limitations to the complexity of the design. So keep this in mind during the previous steps.
Our favourite design platforms are Canva and Adobe Illustrator .
If you want to design your own graphic from scratch with complete freedom, we recommend Adobe Illustrator. ✍🏼 Don’t have access? Try a free trial now .

Not sure how to transition to free form illustrations? Check out our blogs on How to draw in Illustrator and How to draw your research . 🎉
If you are not quite up to the challenge, try Canva instead.
Canva has a range of free stock images, called “Elements” inbuilt into the software that you can just drag and drop into the workspace. You can even change the colour of the images, just not the style.
The purpose of this step is to “sketch” out your design, like a first pass of a research paper. The idea is to just put pen to paper and get something down, you can refine from there.
Step 5: Experiment
Okay, maybe THIS is a scientist’s favourite part… 👩🏻🔬 EXPERIMENTING 🥼🧪🔬
No safety glasses needed for this step though! 😉
Now that you have your mock-up, start to build up your design. 🎨 Add colour, add depth, a background, or shadowing. Experiment with different ways to visualise your data . 📊 Want to get fancy? Turn your illustrations into 3D . 🤯 Have a play around with the layout. Why not try out the rule of thirds?
The rule of thirds is a composition strategy that places your subject in either the left or right third, leaving the other two thirds of the image more open.

You want your design to strike a balance of unique, memorable and engaging. Oh, and aesthetically pleasing, that’s just a no-brainer. 🙃
So keep experimenting until it looks right to you!
Step 6: Feedback & Polish
Last but not least, make sure to look over your design with objective eyes as if you are the target audience. What do you see? What would you change? Is the message clear? Is the graphic appropriate for your audience?
It is always a good idea to get a second pair of eyes to look over your work too if you can. Sometimes they will catch things you have missed. 👀
And then tweak, polish and revel in your beautiful design. 😇
With just 6 easy steps you too can transform an idea into a beautiful scientific graphic.
The Idea - Outline your concept including design scope, key message, target audience and timeline.
Research - Use those scientific research skills, and find some inspo for your design.
The Style and Look - Decide on the style, colour scheme and look of your graphic. 🎨
Mock up - Create your first pass at the design! ✍🏼
Experiment - Play around with background, layout, and fonts.
Feedback and Polish - Incorporate any feedback and finish your design. 🙌🏼
Strapped for time?
You’ve got us at the ays team..
We completely understand that designing your own scientific graphic can be a huge time commitment, especially for busy researchers. We’ve been there and totally sympathise.
So leave the hard work to us! We have professional graphic designers who can create the perfect scientific illustration for you. 😍
Contact us today to discuss how we can help you unleash your impact!
Until next time!

Related Posts
How to draw your research with simple scientific illustrations
5 science illustrators you need to follow on Twitter
How to draw in Illustrator: a step-by-step tutorial for researchers
Comentarios

Find the images you need to make standout work. If it’s in your head, it’s on our site.
- Images home
- Curated collections
- AI image generator
- Offset images
- Backgrounds/Textures
- Business/Finance
- Sports/Recreation
- Animals/Wildlife
- Beauty/Fashion
- Celebrities
- Food and Drink
- Illustrations/Clip-Art
- Miscellaneous
- Parks/Outdoor
- Buildings/Landmarks
- Healthcare/Medical
- Signs/Symbols
- Transportation
- All categories
- Editorial video
- Shutterstock Select
- Shutterstock Elements
- Health Care
- PremiumBeat
- Templates Home
- Instagram all
- Highlight covers
- Facebook all
- Carousel ads
- Cover photos
- Event covers
- Youtube all
- Channel Art
- Etsy big banner
- Etsy mini banner
- Etsy shop icon
- Pinterest all
- Pinterest pins
- Twitter all
- Twitter Banner
- Infographics
- Zoom backgrounds
- Announcements
- Certificates
- Gift Certificates
- Real Estate Flyer
- Travel Brochures
- Anniversary
- Baby Shower
- Mother’s Day
- Thanksgiving
- All Invitations
- Party invitations
- Wedding invitations
- Book Covers
- Editorial home
- Entertainment
- About Creative Flow
- Create editor
- Content calendar
- Photo editor
- Background remover
- Collage maker
- Resize image
- Color palettes
- Color palette generator
- Image converter
- Contributors
- PremiumBeat blog
- Invitations
- Design Inspiration
- Design Resources
- Design Elements & Principles
- Contributor Support
- Marketing Assets
- Cards and Invitations
- Social Media Designs
- Print Projects
- Organizational Tools
- Case Studies
- Platform Solutions
- Generative AI
- Computer Vision
- Free Downloads
- Create Fund

What Does a Graphic Designer’s Process Look Like?
Every freelancer has their own daily routine and rituals that help them feel productive and creative, whether it’s a morning cup of tea or a half-hour of sketching outside.
While little rituals like these vary from person to person, you’ll find that the work process followed by freelance designers is largely consistent across the board. Once that cup of tea’s been drained, every professional has a step-by step process for completing their design work to a high standard.
Here we take a look at the process freelancers employ to bring a design brief into reality for their clients. From building mood boards and mock-ups to assessing print proofs and consumer testing, these are the building blocks of any pro’s work process. Read on to discover how to make your own workflow smoother and more efficient every time.
Stage One: The Brief
When a client contacts you with a job in mind it is your opportunity to extract as much information from them as you can. No designer is a mind-reader, so it’s important at this early stage of the graphic design process to assess exactly what the client is hoping for, and for you to communicate what they can expect from you within the timeframe.
Step 1: Client Meeting and Brief Analysis

A client might get in touch with you over email or phone proposing a design project. If the client is new, they may expect an initial face-to-face meeting before proceeding to the quote stage. Agreeing to meet for a quick coffee will help you to assess whether the client is serious about commissioning a project. Take along portfolio items that are relevant to the project the client has in mind. This helps the client see if your style and approach will suit them, as well as give some food for thought in terms of the direction of the project.
Following this first meeting you can send the client a contract and quote and request a written brief. It’s very important to get these documents in writing, preferably as stand-alone Word or PDF documents rather than simply in email format. This will help set a professional tone from the very outset of the project, and allows both parties to refer to what was quoted or briefed if any dispute later arises. For designers a written contract is particularly important to have to hand, as it’s not unheard of for clients to change their minds about what they want later down the line. This in itself is not a problem, but you do need to ensure that the client is willing to pay for extra hours if the brief is altered.
You can provide the client with a design brief form for them to fill in, including sections on the details of the project, the deadline and their own ideas for the style or direction they would like for the design (if they have any). If they are able to provide information about their business’ brand ethos and competitors within their sector this is also very helpful, and access to brand guidelines, if available, is essential for brand-centric projects. Even simple brand elements, like a color palette or fonts, can be a fantastic starting point for developing your ideas.
Step 2: Market Research

Once you have a clear brief in place you might be tempted to dive straight into designing. But hold up! Market research is an often neglected stage of the freelancer’s work process, but one that’s really worth your time.
Do some online research into your client’s industry and their competitors. Can you spot common traits between brands in a particular sector? Do they employ certain colors more frequently than others? Do they usually opt for san-serifs over serif fonts? You’ll find that some industries will share design traits in common — tech companies love clean sans serif typography, for example, while building and machinery companies love the punchy color pairing of black and yellow. You don’t need to mimic these designs, but you should be aware of the mood employed by your client’s competitors.
Doing a little market research will also give you valuable context for your design. By spending just an hour or so researching, you can begin to think about how your design will stay relevant to the sector while occupying a unique niche in the market. You can also avoid any unfortunate duplicate logo scenarios (these happen more often than you think ), which is a frustrating end to any logo design project.
Step 3: Mood Boarding
Designers have their own preferred ways of sourcing and compiling inspiration. If you like to have your inspiration in front of you while you work, a mood board is the perfect inspiration reference to have on hand. Some designers prefer to create a physical board using clippings, print-outs, sketches, and color samples. Alternatively, creating a simple grid-based board in Photoshop or InDesign is a convenient way to drop in images sourced from online. Mix with fonts and color swatches to create a handy reference that is ready for applying to digital work.
There are also several online tools for creating mood boards that are great for sharing with clients or collaborators. Pinterest is an oldie but a goodie, allowing you to create secret boards that you can share with clients. The images generated on the Pinterest home page are also more trend-driven than Google Images, allowing you to check out what consumers are pinning and buying within your client’s sector. If you’re working in a team, a collaborative whiteboarding tool like MURAL allows you to share inspiration and ideas collaboratively for a $12 per month fee.
Step 4: Sketching

Perhaps your mood boarding exercise has given you a spark of inspiration for your project, or maybe you’re still unsure of the direction to go in. Either way, this is when it’s time to step away from the computer, pick up a pencil and paper, and start sketching. There’s something intrinsically creative about sketching by hand; when you’re away from the screen you have no other distractions and your brain can really have the freedom to wander and explore the ideas that pop into your head.
Every designer has their own preferred method for sketching, and with practice you’ll soon find your groove. I personally like working on a large sketchpad (at least A3 in size), with a fine-tipped ink pen. I tend to sketch outside or at least away from my office to give me a break from any distractions. Give yourself a defined slot of time to simply sketch and resist temptations to go online or check emails. Don’t worry about refining your sketches or making them look good; at this stage your focus should simply be on generating lots of rough ideas. If you have thoughts about mood, branding, or colors, write them down as annotations on the page. Aim to fill up a few pages of your pad with lots of diverse ideas. Don’t dwell on a single concept for too long — once you’ve explored one idea in a couple of sketches, force yourself to move onto something different.
Step 5: Concept Refinement

When your time is up, step away from your sketchpad and take a break. You’ll come back to your sketches feeling refreshed and ready to assess them impartially. If you’re working collaboratively, grab one of your teammates to review your sketches alongside you. It’s worth asking for outside opinion: You might be attached to a particular idea, but they might find something special in a different sketch.
Take a pen and circle the three ideas that you feel have the most potential for development. Even if you’re not completely sure about one or even two of these ideas, you should always refine at least three concepts. This gives the client plenty to think about and helps create a better, more thoughtful design by the end of the process.
It’s time to refine your designs, but don’t move back to the computer just yet. Take a fresh sheet of paper for each of your three sketches, and redraw out the designs by hand. You might want to bring in colored pens or paints, and spend a little longer cultivating the details of the designs.
Once you have a trio of refined sketches, you can digitize them. At this stage, you don’t want to spend undue time refining the three designs digitally. After all, two of your designs will end up on the drawing room floor after presenting to the client. Focus on digitizing the bones of your three designs, whether that’s through simplified vector versions of logo designs in Illustrator , or drafting quick poster layouts in InDesign .
Stage Two: Presentation
When you’ve got your trio of refined designs, it’s time to touch base with the client. Designers are often hesitant to reveal their ideas to clients before they have been perfected, but checking in with the client at this stage will actually save you a lot of heartache and time down the line.
Step 1: Three-Concept Presentation to the Client

There’s an art to presenting your ideas to clients and, believe me, it’s not always simple to do. If you find presentations a little nerve-wracking, your best approach is to simply be prepared. Present your three design concepts in a nicely composed document — Adobe InDesign is my go-to software for producing high-quality presentation documents. Set out the document on landscape A4 or Letter-sized pages, making it easy for a client to print in-house, and keep the pages simple and free of clutter, allowing your designs to take center-stage. You can send over the presentation on email, or bring a few printouts with you to a meeting.
Step 2: Client Review and Further Refinement

Many designers struggle to hear criticism about their designs, even if it is constructive. Keep in mind that the client knows their business inside and out, and while they may not know what is best in terms of design for their brand, they will have a fine-tuned sense of what has worked for them in the past.
You may have a strong attachment to one of your designs, and there are techniques you can employ to subtly push your client in the right direction, such as placing your favored design at the end of your presentation (to ensure a lasting impression) and being open to suggestions about adjustments.
Presenting your ideas to the client might seem scary, but remind yourself that both parties want a good outcome to the project. It’s very unlikely the client won’t warm to any of your ideas, and if you’re open to suggestions, there’s always opportunity for a lukewarm idea to develop into something fantastic. With the client’s backing you can make headway on refining the approved design. This might involve a few days working on your software of choice, reviewing drafts at various stages, and seeking outside opinion from collaborators and even friends or family.
Step 3: Final Review and Edits

It’s likely you’ve spent the last few days completely absorbed in refining your design. As every designer knows there’s always room for improvement and it’s a wise idea to periodically print out your drafts, take a break from them and review them with a fresh eye. It’s amazing what you can spot when you’ve had a half hour break away from your work. Suddenly it seems completely obvious that a piece of text needs some kerning improvement, or your choice of colors is a little too brash.
When you’ve produced a near-perfect draft of your design, it’s once again time to touch base with the client. They may have lots to suggest, or very little, and it’s up to you to decide if the amount of edits required is covered comfortably by your original quote. If not, you should consider asking for the client to pay for extra hours. This is also the right time to outsource help for issues that are not design-focussed, such as copywriting and copyediting.
Stage 3: Technical Production
One of the most satisfying stages of a freelancer’s work process is seeing their work go from paper or screen to reality. As this stage often requires skills and equipment that only others can provide it’s essential you put the time into building your little black book of resources. Whether it’s a reliable print shop or a great-value web developer, much of a freelancer’s time is spent locating and contacting these key people.
Step 1: Sourcing Production

If you’re new to freelancing, building your little black book of helpful contacts is an essential step that will put you in good stead for tackling any client project with confidence. No man is an island, and often it will be more economical, practical, and time-efficient for you to outsource production rather than learning certain skills yourself from scratch.
Printing is one such production method which is simply impossible for most in-house designers to do themselves. You can search online for local print shops (which are great for smaller jobs, like brochures and posters) and more sophisticated print labs (which are better suited to high-end work, like magazines, exhibition materials or photography printing). Not all printers are created equal, and you may find that some are cheaper and/or more reliable than others, so shop around to get the best deal. If you end up doing print work regularly for clients, some print shops will allow you to open accounts with them, which offer prioritization when time is short and sometimes better deals on print jobs.
If you dabble in web design, it’s always good to have a reliable web developer on hand as well. Sure, you may know how to set up a WordPress template, but you’ll need coding expertise when launching websites or apps.
Step 2: Creating a Mock-up and/or Testing

Once you’ve sourced a printer or web developer, you’re ready to move onto the pre-launch stage of your design process.
For print design, this might involve creating a mock-up to discuss with your chosen printer. If you’re adding multiple post-print effects to your design, such as foiling, embossing or die-cutting, explaining exactly what you want to the printer in person is also a wise move. You can create a rough mock-up quickly from a home or office printer – it doesn’t need to be to size. Annotate it with instructions if required, and pay a visit to the printers to talk it over. Your printer will find this to be incredibly helpful, so don’t be shy about specifying exactly what you want done
After specifying what you want from the printer, you should request a pre-print proof, which should be provided for you free of charge. You can use this to assess whether colors are printed to your satisfaction, if multi-page documents have been arranged correctly and also whether post-print processes like trimming have been done well.
If you’re working on a website or app design, it’s essential to have a testing phase before launching. Your developer can help you do this in order to fix any irregularities that pop up. Clients will expect your website design to work equally well across all browsers and all devices, but it can be tricky to get hold of numerous tablets, phones, and desktops to test across. This is where cross-browser testing tools come in handy. CrossBrowser Testing tests your design across over 1500 browsers and devices, ensuring your design is optimized for every visitor.
Step 3: Time to Launch!

Whether you’ve received a box full of printed posters or pressed the ‘Publish’ button for your website design, the feeling of finally sharing your design with the client or the world is simultaneously terrifying and exhilarating. All your hard work has condensed into this design, and you should take a moment to appreciate it. Give yourself a well-deserved pat on the back!
Once the design is completed, and all relevant files have been handed over to the client, it’s time to submit your invoice. If all has gone well you shouldn’t have any problems, and you can get yourself ready to move onto the next exciting design brief.
Step 4: Heading Back to the Drawing Board

Unfortunately, not all design projects have a completely happy ending. You may need to be involved in the project even after completion, depending on your initial agreement with the client.
This may be something as minor as fixing small faults in an app design that only became apparent after launching, or it could be as extreme as a complete reassessment of a design from scratch. Sometimes consumers simply don’t warm to a rebrand, or the client decides that a book cover needs revising to work in a different market.
The realisation that your hard work might not have led to the perfect design can be disappointing for both the designer and the client, but it’s something that every freelance designers needs to become accustomed to. What is truly important is the way in which you approach revisions. Heading back to the drawing board with an open mind and renewed enthusiasm can be difficult at first, but it really will show your client that you’re an adaptable professional, and will also lead to greater long-term development for you as a designer.
The freelance designer’s work process comes full-circle if revisions are called for, but this certainly shouldn’t be seen as a failure. By sticking to a failsafe work process, from analyzing a brief to presenting ideas to overseeing the production of your design, you can minimize the possibility of revisions on your designs, and create something you’re truly proud of.
All Images by PureSolution
Recently viewed
Related Posts

Free Download: Fall Watercolor Illustrations
Find cute autumn illustrations and clip art to get you into the fall spirit! Download free fall watercolor illustrations today.

Beauty Through the Lens of Diversity and Inclusivity
Shutterstock Studios partnered with The DREAM Initiative® to advance inclusive representation on both sides of the camera.

Visual Dos and Don’ts for Powerful and Effective Presentations
Whether you’re designing a PowerPoint presentation for a business meeting or a class project, try these tips to keep your audience engaged.

Body Neutrality Is the Next Body Movement
Body positivity can create a toxic culture. That’s why we’re…
© 2023 Shutterstock Inc. All rights reserved.
- Terms of use
- License agreement
- Privacy policy
- Social media guidelines
Logo & Identity
- Logo Design
- Business Card Design
- Stationery Design
- Letterhead Design
- Envelope Design
- PowerPoint Design
- Word Doc Design
- Wordpress Design
- Landing Page Design
- Banner Ad Design
- Facebook Design
- Email Design
- Newsletter Design
- Graphic Design
- Infographic Design
- Photoshop Design
- Vector Design
- Icon Design
Print Design
- Flyer Design
- Brochure Design
- Poster Design
- Postcard Design
- Invitation Design
- Card Design
- Greeting Card
Product & Merchandize
- T-shirt Design
- Apparel Design
- Merchandize Design
- Cup and Mug Design
- Bag and Tote Design
- Label Design
- Packaging Design
Art & Illustration
- Illustration Design
- Book cover Design
- CD cover Design
- Character Design
- Car wrap Design
- Tattoo Design
Find a designer...
- Graphic designer
- Logo designer
- Web designer
- Brochure designer
- Flyer designer
- Stationery designer
- T-Shirt designer
- Poster designer
Design Jobs
- Logo & Branding Jobs
- Web & App Design Jobs
- Print Design Jobs
- Graphic Design Jobs
- Product & Merchandise Jobs
- Art & Illustration Jobs
- How it works
- Design Blog
- Designer Insights
The Graphic Design Process In 6 Steps

Developing a design process is essential for graphic designers, whether you're creating a logo , a website or a brandcrowd business card. Using a process allows you to maintain creativity and boost your efficiency with time and budget constraints.
Step 1 - Review the Design Brief
Read through the design brief several times. Ascertain the client's budget and deadline for delivering the project assets. Completing the work by the due date is an essential character attribute for a professional designer.
Look for and highlight keywords related to industry, market, form factor, tone, and style. Learn more about this process: How to interpret and respond to a logo design brief .
If you have the ability to speak to the client (verbally or online) then ask as many questions as you can. You want to fully understand the brief.
Wine label and logo design brief for an Australian vineyard:

While continuing with the next five design process steps, always refer back to the brief as a reference point. You always be referring back to the brief to ensure your designs answer the brief. Remember you're the designer with the job to solve the brief.
At this point in the process your mind be moving in circles thinking of the many designs you can create. Stop. Breathe. Continue to step 2.
Step 2 - Research and Discovery

Research will make you a better designer , saving you a lot of thinking time. This step is crucial. You'll become more engaged with the client's needs, making your design far superior than the rest. Don't skip this step if you're entering a freelance design contest , as some time spent on research (up to 30 mins) will give you an advantage.
- Understanding the business
- Target demographic (age, gender, location)
- History & culture of the brand
- Understanding the brand value and vision
- The client's industry and main competitors
Step 3 - Brainstorm and Sketch Concepts

Now is the time to pull all your ideas together. Start by creating symbols or motifs. Explore and test typefaces and keep in mind the latest logo and graphic design trends when you're working. Make sure to jot all your ideas down.

Your first go-to should be pencil on paper. Depending on your time restraints, sketch quickly or in detail. If you hand draw design elements , it will save time on digitally producing it.

The benefits of sketching allows you to create designs quickly. You're also more free to create and there are no limits. (Programs like Adobe Illustrator can be very limiting, when you want to produce quick sketches.) You might find this guide to setting up digital illustrations useful.

Step 4 - Build On Your Concepts

Develop 3 to 5 different finished concepts to give your client some choice. They should be easy to digitalise since you created the sketches.
If you can, explain your concepts to the client in a design rationale, which explains the reasons behind each concept. PRO TIP: You'll look more knowledgable if you've done some research.
Remember to love all your concepts. Don't create something you don't like and get upset when the client chooses it.
Listen to and analyse your client's feedback when they share their view or perspective on your concepts. From here, you can further develop and be more attentive to one design.

Step 5 - Evolve and Iterate Your Concept

The client may want you to mix and match from all concepts you have presented or come up with something entirely.
It's not unusual for clients to make requests for little design tweaks. In reality, as a designer, it's part of the job to do design amendments. Again, keep in mind the time restraints and budget. Think if it's worth creating many changes, if not then communicate this to your client.
If you've won a design contest then, it's a reasonable client expectation that you will finalize the design during the handover phase. The key is to keep up the communication with the client. DesignCrowd's support team is on hand to help add some grease to this process if required.
Don't be afraid to give your expert opinion on what looks best. You're the creative lead in this relationship. Don't be passive, be assertive. There is a fine balance to strike between keeping the client happy as well as your creativity. Successful designers know how to walk this line.
Step 6 - Finished

You're done. In traditional agencies, designs can take months to develop and finalize with a client. Here at DesignCrowd, it takes a few hours to a few days to complete the handover phase . Now it's time to send the finished files to the client!

After submitting your finished design , start pitching to new clients and repeat the entire process again!
We hope you can see how important it is to develop a design process so as to work efficiently as a designer and build a base of happy clients.
Try BrandCrowd's logo maker , or check out these additional resources:
[Infographic] What Does It Take to Create a Logo?
Guide to Submitting Original Designs and Avoiding Generic Design Cliches
Learn the Design Basics With Our Designer Tutorials
Workflow Guide For Professional Designers
- designer insights
Written by Divya Abe on Thursday, September 20, 2018
Divya Abe is an expert graphic designer ready to share her knowledge with the crowd. Besides spending quality time on the internet she enjoys anything to do with cats. Get in touch via Google+.
Want more? You might like these articles
40 T-Shirt Logos to Wear on Your Sleeve

5 Creative Ways to Brainstorm A Print Design Project

Five Common Mistakes Graphic Designers Make

CreaTiveDesigner-BD | 24 Sep 2018
Hello, Helpful Article , Thank's

artistecom | 27 Sep 2018

youssefM21 | 27 Sep 2018
very helpful Article , Merci
janfabz | 27 Sep 2018

Tasnuba 2 | 07 Jan 2019

Mahbub_Muttaki | 31 Jul 2019
Thanks for your helpful Article, great!!
minisakshi82 2 | 08 Oct 2019
Plz guide about how to submit my design...after making on my sight ...how should i send that. To client

Rachit designer point | 15 Jan 2021
How apps to make professional logo

hadewa | 19 Jul 2021
Thank you very much.

@im | 24 Oct 2021

Lalanthika | 09 Nov 2022
thank you. I Learned something else.

Featured Articles
- 40 Iconic Logo Examples For Influential Brands
- Gucci Logo History
- 118 Logo Design Ideas For 2019: A Beginner's Guide
Hi Creative Entrepreneurs!
Follow us socially, featured tags.
- color theory
- graphic design
- inspiration
Need a Logo?
Make a beautiful logo in seconds.
With the World's #1 logo maker
Try it for FREE!
Money back guarantee
Get the design you want or your money back
Conditions apply - see our refund policy
🔥 Get access to 150+ illustration library | Ssstt.. It is no secret that it’s 100% FREE for everyone! 👉 [Get started]
[Guide] Graphic Design Process: Things You Need to Know

In a nutshell, the graphic design process describes all the steps in a design project that graphic designers need to go through in order to get a design to move from idea to finished product.
Every graphic design process—whether it’s 5 steps or 10 steps—should always include the following: the creative brief of the project, the creation phase, the client’s feedback, and the final delivery.
5 Steps of the Graphic Design Process

1. Understanding the creative brief
The first stage of the design process is understanding the creative brief. Remember, the creative brief is the foundation of the graphic design process.
A creative brief is a short but detailed summary used to explain the strategy of a specific creative project— it contains all the project details such as the purpose of the design, requirements, content to be added, and the complete demographics of the audience.
This document will help guide the graphic designers to have a clearer idea of who the client is, what their project expectations are, and what the design will be used for.
In order for your creative brief to be effective , it should have the following information:
- Business assets: This should include your clients business logo, the complete details of their branding, and the links to their website and social media channels.
- Project brief: What are they looking for in terms of deliverables?
- Target market: Who are their primary and secondary targets? What are their age and where do they live? What do they do in their daily life?
- Project objective: What is the main goal of this project? What is the design for?
- Content or text: What is their brand’s tone of voice? What message do they want to include in the design?
- Competitor list: A summary of who their competitors are.
- Due date: To plan your tasks for the day properly, checking the reasonable due date is always required .
2. Do a thorough design research
Now that you have all the information you need to know about your client, it’s time to do your research.
The best source for design inspiration is always your client’s competitors. Of course, this is different from plagiarizing a design. When you scroll through the competitor’s website, all you need to do is analyze what elements in their design worked such as the font they used, the color palette they chose, and even the layout and overall tone of their website. Use that information to create your design.
3. Create your first design
After researching, it’s time to create your first draft. This part is important and it should always be done as a team. Generating your own idea is great, but having several minds to contribute to the design is much better .
When you’re brainstorming with your team, answer the following questions:
- What is the message of the design?
- What emotions should the design evoke and provoke?
Once you’ve answered these questions, you can start drafting your design in Adobe Illustrator or whichever tool you prefer. If you’re a beginner, we recommend using Wepik to design your first design because its library of icons, fonts and graphics can be used for free.
4. Send your design to your client for feedback
Before finalizing your design, it’s always important to ask your clients for their initial feedback. It’s also advisable to create two design drafts so that your client can choose what they like best.
In this stage, you can coordinate more with your client if you’re on the correct design path or if you need to change your strategy a bit. To be honest, the clients would always have plenty of design changes and unstructured feedback so don’t get discouraged.
Refine and structure your design to improve it further and then ask your Art Director or co-workers to provide you with their honest feedback before sending it back to your client.
5. Approval of the final output
Once the design is approved, you can now move forward with your tasks!

Unlimited Graphic Design with DotYeti
There is no doubt that having an effective graphic design process will help you create industry-quality designs.
That’s why here at DotYeti, we have a graphic design process that is proven to generate amazing designs that has helped our clients increase their sales and establish their identity online.
If you want graphic designs like no other, visit our pricing page to start your creative journey with us!
Is it possible to get a team of dedicated graphic designers at a cost less than hiring someone full time?
YES! We discovered how...

- Advertisements (27)
- Animations (6)
- Books & magazines (2)
- Branding (67)
- Breaking News (8)
- Business Cards (1)
- Cornerstone (1)
- Designer Spotlight (21)
- Digital (33)
- Digital Marketing (141)
- DotYeti.com (38)
- EOI Digital (3)
- Featured (24)
- Graphic Design (16)
- Illustrations (20)
- Infographics (10)
- Letters and Invitations (1)
- Local News (4)
- Marketing (36)
- Packaging (10)
- Promotional materials (3)
- Sales sheet (1)
- Social Media Marketing (5)
- Social media posts (19)
- T-shirts (1)
- Typography (13)
- Web Development (12)

Top 5 Graphic Design Services in Bangkok 2024
Looking for an inexpensive alternative to a freelance graphic designer in the city of angels? Look no further. In this article, we’ll talk about the top graphic design services in Bangkok 2024. Marketing agencies, businesses, and even startups can take advantage of...

Top 5 Graphic Design Services in London 2024
London is the land of opportunity for brands looking to get noticed. Its rich heritage and commercial hub status make it ideal for startups and long-running businesses looking to grow even more. Campaigns that catch on here have a high chance of going viral, thanks to...

Is Design Pickle The Best Unlimited Graphic Design Firm?
What are you looking for when you hire a graphic design agency? We’re here to help you find the answer to that question. Is this top-rated unlimited graphic design platform really the best for you? Find out below as we compare the prices, services, and benefits of...
Creativity is all that you need!
Stop living a dull life and fill it up with color. Subscribe to our newsletter and give your creativity a boost.
- Name This field is for validation purposes and should be left unchanged.
🔥Want to improve your design quality and spend way less money ?

MEOW… Purrfect!
📍Join our 100% FREE live platform demo
Trying something new never hurts.
- Privacy Overview
- Strictly Necessary Cookies
- 3rd Party Cookies
- Additional Cookies
- Cookie Policy
This website uses cookies so that we can provide you with the best user experience possible. Cookie information is stored in your browser and performs functions such as recognising you when you return to our website and helping our team to understand which sections of the website you find most interesting and useful.
Strictly Necessary Cookie should be enabled at all times so that we can save your preferences for cookie settings.
If you disable this cookie, we will not be able to save your preferences. This means that every time you visit this website you will need to enable or disable cookies again.
This website uses Google Analytics to collect anonymous information such as the number of visitors to the site, and the most popular pages.
Keeping this cookie enabled helps us to improve our website.
Please enable Strictly Necessary Cookies first so that we can save your preferences!
This website uses the following additional cookies:
(List the cookies that you are using on the website here.)
More information about our Cookie Policy

The 5-step Graphic Design Process
There are some important steps to get a design to move from idea, to finished product..

There’s a lot that goes into the design process to make it smooth and effective. Whether you’re creating a campaign or marketing piece for the first time, or looking to refine an existing one, here are 5 graphic design process steps to consider:
1. The Creative Brief - an important first step.
The creative brief sets the tone for the entire project. It's the first and arguably one of the most important steps in the visual design process.
A creative brief is a document that helps the designer and his/her team understand the scope of the project and what’s needed from the client . You’ll want to include as much relevant information as possible to reduce any confusion.
Be sure you include the following in your brief:
- Company details including your values and vision;
- Brand guidelines;
- Target audience;
- What the final product should be (I.e. brochure, print advertisement, social media graphics, etc);
- Timeline expectations;
- What you intend viewers to do when they see the final product;
- Examples of similar work you like (and don’t).
I highly recommend going over creative briefs in person or over video chat if the project is more complex. This allows both parties to iron out any uncertainties to ensure everyone is on the same page.
2. Conduct Research.
Depending on the scope of the project, you’ll want to include as much valuable information in your creative brief to minimize the time spent in this step. However, it’s still extremely valuable for the design team to go through the researching phase themselves to build a better understanding of the audience they’re designing for and how to bring your voice to your targeted audience.
The research phase of the graphic design process often involves things like:
- Looking at competitor designs;
- Looking at what the intended audience is engaging with;
- Taking all of the knowledge they’ve learned and applying it to the project at hand.
3. Brainstorm, Brainstorm & more Brainstorm.
Before a designer goes full speed into a project, have them brainstorm some ideas and present them to you. This will minimize any frustration throughout the creative process. If the client has strong ideas on how the final designs should look, it’s best for them to add in any relevant links or inspiration into the brief for optimal clarity.
Once the designer presents 3-5 ideas from their brainstorming session, decide on which one you want to move forward with. This will make for a smooth workflow process that gets you the best results.
4. Review at the 10/50/90 Stages.
When determining your milestones in your creative brief, be sure to check in with designers throughout the design process. The 20/50/90 feedback process ensures that you’re checking in at the most crucial parts of a project, allowing you to give the right feedback at the right time:
- 20% done — A skeleton, outline or wireframe of the final design. At this stage, you can give feedback on the vision and direction that the work is headed in.
- 50% done — The core components are coming together. The direction is no longer at debate so leave that feedback at the door. Instead, focus on whether or not the vision you determined is being visualized in the design.
- 90% done — The nitty-gritty design tweaks. Now you can finally start tweaking things like spacing, colors, you name it.
Often, people will break these review rules and start giving feedback on things like color choice or fonts at a stage where the designer has only outlined a skeleton. This is not only frustrating for the designer, it can be very unproductive. Follow the above design review stages to keep your projects moving along smoothly.
5. The Final Product.
Whoo Hoo! The design is complete. It’s time to get the final files and put the designs into action. Over time, you’ll be able to scale your design process effectively.

Why White Space Is Important

How Do I Give Good Design Feedback?

5 Reasons Why You Should Hire A Graphic Designer
I'm a senior art director with over 30 years experience helping clients build their brands., art direction & consulting graphic design website development digital design video editing, contact info, 602-399-7170, 820 n. 8th ave. #22, phoenix, az 85007.
- Reviews / Why join our community?
- For companies
- Frequently asked questions
Design Research
What is design research.
Design research is the practice of gaining insights by observing users and understanding industry and market shifts. For example, in service design it involves designers’ using ethnography—an area of anthropology—to access study participants, to gain the best insights and so be able to start to design popular services.
“We think we listen, but very rarely do we listen with real understanding, true empathy. Yet listening, of this very special kind, is one of the most potent forces for change that I know.” — Carl Rogers, Psychologist and founding father of the humanistic approach & psychotherapy research
Service design expert and Senior Director of User Research at Twitch Kendra Shimmell explains what goes into good design research in this video.
- Transcript loading…
Get Powerful Insights with Proper Design Research
When you do user research well, you can fuel your design process with rich insights into how your target users interact—or might interact—in contexts to do the things they must do to achieve their goals using whatever they need on the way. That’s why it’s essential to choose the right research methods and execute them properly. Then, you’ll be able to reach those participants who agree to be test users/customers, so they’ll be comfortable enough to give you accurate, truthful insights about their needs, desires, pain points and much more. As service design can involve highly intricate user journeys , things can be far more complex than in “regular” user experience (UX) design . That’s where design research comes in, with its two main ingredients:
Qualitative research – to understand core human behaviors, habits and tasks/goals
Industry and Market research – to understand shifts in technology and in business models and design-relevant signs
An ideal situation—where you have enough resources and input from experts—is to combine the above to obtain the clearest view of the target customers of your proposed—or improved—service and get the most accurate barometer reading of what your market wants and why. In any case, ethnography is essential. It’s your key to decoding this very human economy of habits, motivations, pain points, values and other hard-to-spot factors that influence what people think, feel, say and do on their user journeys. It’s your pathway to creating personas —fictitious distillations that prove you empathize with your target users as customers—and to gain the best insights means you carefully consider how to access these people on their level. When you do ethnographic field studies, you strive for accurate observations of your users/customers in the context of using a service .
© Interaction Design Foundation, CC BY-SA 4.0
How to Leverage Ethnography to Do Proper Design Research
Whatever your method or combination of methods (e.g., semi-structured interviews and video ethnography), the “golden rules” are:
Build rapport – Your “test users” will only open up in trusting, relaxed, informal, natural settings. Simple courtesies such as thanking them and not pressuring them to answer will go a long way. Remember, human users want a human touch, and as customers they will have the final say on a design’s success.
Hide/Forget your own bias – This is a skill that will show in how you ask questions, which can subtly tell users what you might want to hear. Instead of asking (e.g.) “The last time you used a pay app on your phone, what was your worst security concern?”, try “Can you tell me about the last time you used an app on your phone to pay for something?”. Questions that betray how you might view things can make people distort their answers.
Embrace the not-knowing mindset and a blank-slate approach – to help you find users’ deep motivations and why they’ve created workarounds. Trying to forget—temporarily—everything you’ve learned about one or more things can be challenging. However, it can pay big dividends if you can ignore the assumptions that naturally creep into our understanding of our world.
Accept ambiguity – Try to avoid imposing a rigid binary (black-and-white/“yes”-or-“no”) scientific framework over your users’ human world.
Don’t jump to conclusions – Try to stay objective. The patterns we tend to establish to help us make sense of our world more easily can work against you as an observer if you let them. It’s perfectly human to rely on these patterns so we can think on our feet. But your users/customers already will be doing this with what they encounter. If you add your own subjectivity, you’ll distort things.
Keep an open mind to absorb the users’ world as present it – hence why it’s vital to get some proper grounding in user research. It takes a skilled eye, ear and mouth to zero in on everything there is to observe, without losing sight of anything by catering to your own agendas, etc.
Gentle encouragement helps; Silence is golden – a big part of keeping a naturalistic setting means letting your users stay comfortable at their own pace (within reason). Your “Mm-mmhs” of encouragement and appropriate silent stretches can keep your research safe from users’ suddenly putting politeness ahead of honesty if they feel (or feel that you’re) uncomfortable.
Overall, remember that two people can see the same thing very differently, and it takes an open-minded, inquisitive, informal approach to find truly valuable insights to understand users’ real problems.
Learn More about Design Research
Take our Service Design course, featuring many helpful templates: Service Design: How to Design Integrated Service Experiences
This Smashing Magazine piece nicely explores the human dimensions of design research: How To Get To Know Your Users
Let Invision expand your understanding of design research’s value, here: 4 types of research methods all designers should know .
Literature on Design Research
Here’s the entire UX literature on Design Research by the Interaction Design Foundation, collated in one place:
Learn more about Design Research
Take a deep dive into Design Research with our course Service Design: How to Design Integrated Service Experiences .
Services are everywhere! When you get a new passport, order a pizza or make a reservation on AirBnB, you're engaging with services. How those services are designed is crucial to whether they provide a pleasant experience or an exasperating one. The experience of a service is essential to its success or failure no matter if your goal is to gain and retain customers for your app or to design an efficient waiting system for a doctor’s office.
In a service design process, you use an in-depth understanding of the business and its customers to ensure that all the touchpoints of your service are perfect and, just as importantly, that your organization can deliver a great service experience every time . It’s not just about designing the customer interactions; you also need to design the entire ecosystem surrounding those interactions.
In this course, you’ll learn how to go through a robust service design process and which methods to use at each step along the way. You’ll also learn how to create a service design culture in your organization and set up a service design team . We’ll provide you with lots of case studies to learn from as well as interviews with top designers in the field. For each practical method, you’ll get downloadable templates that guide you on how to use the methods in your own work.
This course contains a series of practical exercises that build on one another to create a complete service design project . The exercises are optional, but you’ll get invaluable hands-on experience with the methods you encounter in this course if you complete them, because they will teach you to take your first steps as a service designer. What’s equally important is that you can use your work as a case study for your portfolio to showcase your abilities to future employers! A portfolio is essential if you want to step into or move ahead in a career in service design.
Your primary instructor in the course is Frank Spillers . Frank is CXO of award-winning design agency Experience Dynamics and a service design expert who has consulted with companies all over the world. Much of the written learning material also comes from John Zimmerman and Jodi Forlizzi , both Professors in Human-Computer Interaction at Carnegie Mellon University and highly influential in establishing design research as we know it today.
You’ll earn a verifiable and industry-trusted Course Certificate once you complete the course. You can highlight it on your resume, CV, LinkedIn profile or on your website.
All open-source articles on Design Research
Adding quality to your design research with an ssqs checklist.

- 8 years ago
Open Access—Link to us!
We believe in Open Access and the democratization of knowledge . Unfortunately, world-class educational materials such as this page are normally hidden behind paywalls or in expensive textbooks.
If you want this to change , cite this page , link to us, or join us to help us democratize design knowledge !
Privacy Settings
Our digital services use necessary tracking technologies, including third-party cookies, for security, functionality, and to uphold user rights. Optional cookies offer enhanced features, and analytics.
Experience the full potential of our site that remembers your preferences and supports secure sign-in.
Governs the storage of data necessary for maintaining website security, user authentication, and fraud prevention mechanisms.
Enhanced Functionality
Saves your settings and preferences, like your location, for a more personalized experience.
Referral Program
We use cookies to enable our referral program, giving you and your friends discounts.
Error Reporting
We share user ID with Bugsnag and NewRelic to help us track errors and fix issues.
Optimize your experience by allowing us to monitor site usage. You’ll enjoy a smoother, more personalized journey without compromising your privacy.
Analytics Storage
Collects anonymous data on how you navigate and interact, helping us make informed improvements.
Differentiates real visitors from automated bots, ensuring accurate usage data and improving your website experience.
Lets us tailor your digital ads to match your interests, making them more relevant and useful to you.
Advertising Storage
Stores information for better-targeted advertising, enhancing your online ad experience.
Personalization Storage
Permits storing data to personalize content and ads across Google services based on user behavior, enhancing overall user experience.
Advertising Personalization
Allows for content and ad personalization across Google services based on user behavior. This consent enhances user experiences.
Enables personalizing ads based on user data and interactions, allowing for more relevant advertising experiences across Google services.
Receive more relevant advertisements by sharing your interests and behavior with our trusted advertising partners.
Enables better ad targeting and measurement on Meta platforms, making ads you see more relevant.
Allows for improved ad effectiveness and measurement through Meta’s Conversions API, ensuring privacy-compliant data sharing.
LinkedIn Insights
Tracks conversions, retargeting, and web analytics for LinkedIn ad campaigns, enhancing ad relevance and performance.
LinkedIn CAPI
Enhances LinkedIn advertising through server-side event tracking, offering more accurate measurement and personalization.
Google Ads Tag
Tracks ad performance and user engagement, helping deliver ads that are most useful to you.
Share Knowledge, Get Respect!
or copy link
Cite according to academic standards
Simply copy and paste the text below into your bibliographic reference list, onto your blog, or anywhere else. You can also just hyperlink to this page.
New to UX Design? We’re Giving You a Free ebook!

Download our free ebook The Basics of User Experience Design to learn about core concepts of UX design.
In 9 chapters, we’ll cover: conducting user interviews, design thinking, interaction design, mobile UX design, usability, UX research, and many more!
- Get Started
- Discovery Kit
- Certification
- Code Gallery
- Open Source
- Inspiration
- Marketplace Account
- Marketplace Requirements
Latest CMS Developer Posts
Hubspot cms blog, design process: tips from an expert graphic designer.
Written By Sylvia Lewis on Jun 23, 2015 8:00:00 AM
Splattering colors and shapes all over the canvas is a painter’s way to create whatever comes to mind. A graphic designer is similar to a painter in a way that they are both creative expressions, yet graphic designers creations tend to be more strategically driven.
An astute graphic artist follows a series of steps before (s)he can begin the actual design work. This system, standard procedure, process, series of steps, or whatever you coin it is a way to ensure that you are delivering exactly what the client needs. A design for a client has to fit a specific set of requirements, so it's only natural that the process to figure out what client needs to produce an effective output is based on a logical flow.
In this post, we'll cover the seven steps needed to deliver a graphic, including:
Let's get going!
Briefing the Project With Your Client:
The first critical step to a well-thought out design process is a briefing . The client is going to give you a “brief” overview of what he needs. At this point, a graphic designer is expected to gather as much information as (s)he can about the client’s expectations, their company's mission, vision, and goals, as well as their products or services. It's worth noting that designers need to go beyond the surface level of what the company does and dive into the benefit for their customers so that this critical component can be translated in the resulting designs.
Some designers require their prospects to fill out a questionnaire to gather some basic information and provide them an estimated price rate. Providing a design brief allows the designer to set the tone for what fundamental information is needed to begin the project, with an emphasis on the "need to know" over the "nice to have" information.

If you're looking for some questions to form your own design brief, check out " 55+ Questions to Ask When Designing a Logo " by web designer Preston D Lee. While this post is specific to logo design, the questions are a great starting point that can be modified for your needs.
Researching Your Client's Ecosystem:
Once you have received a brief overview from the client, you can dig into every possible material you find and start researching. During this phase, an expert designer would seek information on the competitors, point of differentiation (POD), market, audience, trends, and future prospects.
The idea behind researching the client’s competitors is to ensure that you don’t copy or make anything too similar. The objective is not to steal a competitor’s idea, as this takes away from any differentiation the company may offer in their market, rather, to understand the lay of the land. Once you have insight into their market and point of differentiation, you can begin to dig into their current and potential customers to understand who you are designing for.
Overall, the purpose of this research is to give you a 360° view of the client's ecosystem and generate ideas that fit the market, industry trends, and the client's customers.
Brainstorming on the Message:
The combination of the briefing and research will open a path to producing relevant ideas. So, put the pen to paper start brainstorming design ideas.
It's important to remember that each and every element of a design is sending out a message to viewers, from colors and typography to the tagline and symbols. Each element should be given considerable thought before making any hard decisions. The brainstorming process should allow for a creative exploration of how these different elements can work together to support the message. Generate a list of ideas that can be used in the next step, the sketching phase.
Sketching out Mockups:

At this step you can start drawing rough sketches of your ideas. The method you use to capture your sketches depends on the tools you are comfortable. I highly reccomend starting with a paper and pencil, as you'll be able to quickly iterate on rough designs. Once you feel comfortable with your progress, take your mockup to the computer. Remember, you don’t want to make anything final or perfect at this point. In this stage, you are just beginning to materialize the ideas in your imagination.
Once you have finally quenched you creative exploration, you can start sharing your sketches with the client . Although this process might seem lengthy and unnecessary, it is extremely important! It saves you an immense amount of time resulting from redo's and rejections after you have completed the design on the computer. Providing these early sketches gives you have a fair idea of whether or not you are headed in the right direction. If not, you can quickly pivot and make further variations because you've only entered the sketching phase. From here, pick the sketch you and your client both agree on.
Building the Design:
Now it’s time to get cranking with your designs! This is where the meat and potatoes of graphic work comes into play, so it's time to have fun.
Get busy with your design software and start creating several versions of your selected sketches. Creating several variations of the design will allow you to present options to the client so they can pick the most suitable design. Try mixing and matching color palettes, typographic pairings, and a grid structure to create variation.
At this point, it is really important to receive client feedback as you work. Show your “draft” designs to the client and ask for his feedback. It isn’t uncommon to try several rounds of this step before finalization.
Tip : Don’t restrict feedback to just the client’s thoughts and opinions. You can also ask a friend or family member with a keen eye for design and ask them what they think. They could possibly provide valuable feedback, especially if they are the target audience.
Presenting and Refining the Work:
With a final design in hand, you can start the implementation phase by presenting your final piece. A printed graphical work would require a print-ready file format . A design intended for a website should take the use case into consideration when choosing the right file type .

Tip : To avoid changes to your final works, you should spend as much time as you can during the drafting and preliminary work process. Details of author’s corrections and additional charges should be included in the initial quote. Most graphic artists specify how many revisions of the first draft are allowed before they start charging extra in the initial quote.
Putting the Design Into Production:
Finally, the design has been approved and you are all set to deliver the design! At this point, a designer will hand over the final product to the client or a third party, like a printing press. Be sure to include any special instructions that the client or third party may need.
A Job Well Done!
If all goes to plan, you have produced something that has satisfied your client! Now, you can receive the fruits of your hard work . The final bill or invoice is usually transferred online using online invoicing software. Hiveage , FreshBooks , and Invoiceable are great starting points for free invoicing software that ensure a fast, efficient, and secure transaction.
A well-defined, systematic procedure nails down the project with a guarantee that all the parties involved are fully satisfied with the result. Remember, where there is more than one party involved, it is a matter of give-and-take. There is no hard and fast rule to what “system” works best. What works well for you may not be the best method for another. Try to come up with your own methods in ways that make your end product even more effect and effective.
Need more design tips or insight into design process? Check out How To Reduce Client's Design Revisions .

Topics: Design

Sylvia Lewis Sylvia Lewis is a UI designer and front-end developer at Logo Pearl with 4 years of experience. She loves blogging about designing, development and writing tips. Follow Sylvia on Twitter.
Stay up to date 👇.

- There are no suggestions because the search field is empty.

Designers Blog Topics
- Website Design (55)
- Design (33)
- Website Development (27)
- Tutorial (22)
- Product Updates (21)
- Best Practices (16)
- Inspiration (15)
- Free Resources (12)
- Customer Story (7)
- Examples (4)
- web development (4)
- UX Research (3)
- Productivity (2)
- Conversion Rate Optimization (1)
- Infographic (1)
Recommended Posts
Subscribe to the designers blog, learn how to work with our api, chat with designers in the cms forum, get the hubspot cms for developers certification, try hubspot's website platform for free.
- What is HubSpot?
- Executive Team
- Deutsche Website
- International
Learn Inbound
- Marketing Resources
- Inbound Marketing Blog
- Deutscher Inbound Blog
- HubSpot Academy
- INBOUND Conference
- Open a support ticket
- Submit a feature request
- Join a local user group
- Help & support home
Contact Sales
- Request a call
- North America
- 888.482.7768
- United Kingdom
- +44.20.36847648
- +353.1.5187500
- +49.69.299571918
- +61.28.22.81902
- Copyright © 2017 HubSpot, Inc.
- Legal Stuff
- Privacy Policy
- Site Map
- Toggle Logins
- Toggle Search
- Renew books
- Interlibrary Loan
- Electronic Resources
- People Finder
Graphic Design
Beginning your research process.
- Databases for Graphic Design
- Copyright and Fair Use of Images
- Art Education Organizations
- Evaluating Resources for Graphic Design
- Citation Help For Graphic Design
Head of the LADC

Database Research Tips
Your search strategies will depend partly on the research tools you use. Search engines like Google tend to be less picky about your terms. However, Google search results also usually require more careful evaluation of source credibility, since it includes a larger number of sources from a wider range of places.
Library databases allow for advanced searching and include high-quality content. They often, however, are more challenging to search than Google. These database search tips will help:
- Limit the number of search terms that you use.
- Use key words that best express your topic. Avoid non-essential terms like "the" and "of."
- Try multiple searches. Experiment with related terms, including broader or narrower terms.
- Explore the database's Advanced Search options.
- On the search results page look for ways to refine your search.
Keyword Searching
1. Be concise.
Begin with only 2-3 essential terms, and avoid long phrases. The more terms you enter the fewer results you’ll get. (For example, a search for environmental consequences of fracking may yield 0 results, while fracking environment yields over 2,000.)
2. Use synonyms and related terms.
If your first term doesn’t work, try a synonym. You may have to try out several related search terms to find the types of resources you're looking for. ( Example: environment INSTEAD OF environmental consequences )
3. Identify keywords with background research.
To identify valuable keywords, do some quick background research. Note terms that are often used to discuss the topic. Of course, remember to evaluate information in Wikipedia with particular care since almost anyone can edit it.)
4. Identify keywords from search results.
Do a quick database search and view the search results page to identify relevant terms.
- Titles and article abstracts (summaries) often include helpful terms.
- “Subject” terms are used in library databases describe what a source is about. Look in a database for relevant subject terms - they can help you locate more records on the topic.
5. Combine search terms.
In most databases you can refine results using the search functions AND , OR , and NOT .
- AND : shows results that include both terms (e.g., government AND policy)
- OR : shows results that include one or more terms; used for related terms (e.g., civic OR government)
- NOT : removes results that include a term (e.g., Julius Caesar NOT Shakespeare)
Search Tip Examples
Keep it simple! Start by typing the name of a relevant thing, place, or concept:
- [puppy training tips]
- [london dinner cruise]
Add relevant words if you don't see what you want after doing a simple search:
- First try: [puppy]
- More precise: [puppy training]
- Even more precise: [large breed puppy training class]
It may take several attempts to find the right words to describe your topic.
Try other words to describe what you're looking for:
- Not ideal: [my head hurts]
- Not ideal: [why is my head killing me]
- Better: [headache]
Use only the important words . Too many words will limit your results:
- Not ideal : [country where bats are an omen of good luck]
- Better: [bats good luck]
Use quotation marks to search for an exact phrase to narrow results. Example : A search for [medical error] without quotations retrieves results with those two words anywhere in the document. ["Medical error"] finds results only for that exact phrase.
Use an asterisk (*) to search for all endings to a word. (This works in most databases and in Google.) Example : [mexic*] searches for Mexico, Mexican, and Mexicans
Too Many or Too Few Results?
Too Many Results
Start Small! Begin with just one or a few search terms. Add additional terms if you have too many results.
Use good search terms . Use terms that are more specific. Do not use OR between terms that mean different things (for example, do not search [women OR salary]
Too few search terms. If you only have one general term in the search box, consider adding another word that expressed what aspect of that term you are interested in.
Use limiters. Limiters (such as date, format, language of publication) give you more targeted results.
Topic is too broad . Narrow the scope of your search. Think about the different aspects of your topic you will address and search for them separately. Then synthesize the information. You may need to narrow your topic if it is too large to cover in a short paper.
Too Few Results
Is this the best database for your topic? If you are using a subject-specific database (Architecture, Art, etc), Be prepared to try several different databases.
Use good search terms . Check spelling and brainstorm synonyms or related terms. You can use OR between synonyms (for example, salary OR pay OR compensation ).
There are too many search terms. If you have three or more search terms, try removing one to see if your results improve.
Too many limiters . Use only limiters that are necessary.
Your topic is too narrow. What is the broader theme of your topic? Break your topic down and search for different parts separately. For example, if you are comparing primary school education in China and Spain, search for articles about each country separately. Then synthesize the information you find.
- << Previous: Home
- Next: Articles >>
- Last Updated: Mar 7, 2024 10:08 AM
- URL: https://libguides.auburn.edu/graphicdesign
How to develop a graphical framework to chart your research
Graphic representations or frameworks can be powerful tools to explain research processes and outcomes. David Waller explains how researchers can develop effective visual models to chart their work

David Waller

You may also like

Popular resources
.css-1txxx8u{overflow:hidden;max-height:81px;text-indent:0px;} Analytical testing is the key to industry collaborations
Is it time to turn off turnitin, use ai to get your students thinking critically, taming anxiety around public speaking, emotions and learning: what role do emotions play in how and why students learn.
While undertaking a study, researchers can uncover insights, connections and findings that are extremely valuable to anyone likely to read their eventual paper. Thus, it is important for the researcher to clearly present and explain the ideas and potential relationships. One important way of presenting findings and relationships is by developing a graphical conceptual framework.
A graphical conceptual framework is a visual model that assists readers by illustrating how concepts, constructs, themes or processes work. It is an image designed to help the viewer understand how various factors interrelate and affect outcomes, such as a chart, graph or map.
These are commonly used in research to show outcomes but also to create, develop, test, support and criticise various ideas and models. The use of a conceptual framework can vary depending on whether it is being used for qualitative or quantitative research.
- Using literature reviews to strengthen research: tips for PhDs and supervisors
- Get your research out there: 7 strategies for high-impact science communication
- Understanding peer review: what it is, how it works and why it is important
There are many forms that a graphical conceptual framework can take, which can depend on the topic, the type of research or findings, and what can best present the story.
Below are examples of frameworks based on qualitative and quantitative research.

As shown by the table below, in qualitative research the conceptual framework is developed at the end of the study to illustrate the factors or issues presented in the qualitative data. It is designed to assist in theory building and the visual understanding of the exploratory findings. It can also be used to develop a framework in preparation for testing the proposition using quantitative research.
In quantitative research a conceptual framework can be used to synthesise the literature and theoretical concepts at the beginning of the study to present a model that will be tested in the statistical analysis of the research.
It is important to understand that the role of a conceptual framework differs depending on the type of research that is being undertaken.
So how should you go about creating a conceptual framework? After undertaking some studies where I have developed conceptual frameworks, here is a simple model based on “Six Rs”: Review, Reflect, Relationships, Reflect, Review, and Repeat.
Process for developing conceptual frameworks:
Review: literature/themes/theory.
Reflect: what are the main concepts/issues?
Relationships: what are their relationships?
Reflect: does the diagram represent it sufficiently?
Review: check it with theory, colleagues, stakeholders, etc.
Repeat: review and revise it to see if something better occurs.
This is not an easy process. It is important to begin by reviewing what has been presented in previous studies in the literature or in practice. This provides a solid background to the proposed model as it can show how it relates to accepted theoretical concepts or practical examples, and helps make sure that it is grounded in logical sense.
It can start with pen and paper, but after reviewing you should reflect to consider if the proposed framework takes into account the main concepts and issues, and the potential relationships that have been presented on the topic in previous works.
It may take a few versions before you are happy with the final framework, so it is worth continuing to reflect on the model and review its worth by reassessing it to determine if the model is consistent with the literature and theories. It can also be useful to discuss the idea with colleagues or to present preliminary ideas at a conference or workshop – be open to changes.
Even after you come up with a potential model it is good to repeat the process to review the framework and be prepared to revise it as this can help in refining the model. Over time you may develop a number of models with each one superseding the previous one.
A concern is that some students hold on to the framework they first thought of and worry that developing or changing it will be seen as a weakness in their research. However, a revised and refined model can be an important factor in justifying the value of the research.
Plenty of possibilities and theoretical topics could be considered to enhance the model. Whether it ultimately supports the theoretical constructs of the research will be dependent on what occurs when it is tested. As social psychologist, Kurt Lewin, famously said “ There's nothing so practical as good theory ”.
The final result after doing your reviewing and reflecting should be a clear graphical presentation that will help the reader understand what the research is about as well as where it is heading.
It doesn’t need to be complex. A simple diagram or table can clarify the nature of a process and help in its analysis, which can be important for the researcher when communicating to their audience. As the saying goes: “ A picture is worth 1000 words ”. The same goes for a good conceptual framework, when explaining a research process or findings.
David Waller is an associate professor at the University of Technology Sydney .
If you found this interesting and want advice and insight from academics and university staff delivered direct to your inbox each week, sign up for the THE Campus newsletter .
Analytical testing is the key to industry collaborations
A framework to teach library research skills, contextual learning: linking learning to the real world, how hard can it be testing ai detection tools, chatgpt’s impact on nursing education and assessments, how to tackle the phd dissertation.
Register for free
and unlock a host of features on the THE site
More From Forbes
Artificial intelligence and human expertise in graphic design.

- Share to Facebook
- Share to Twitter
- Share to Linkedin
Vikas Agrawal is the CEO of Infobrandz , a Full Service Visual Marketing Company and has been a Project Manager in Fortune 500 companies.
Journeying through the evolution of AI in the creative industry, I witnessed firsthand how AI transformed from a helper to a valuable collaborator for designers. And I’ve found that the convergence of AI and human creativity is not a duel for dominance but a duet for excellence. It’s also apparent that AI is here to stay, with a recent study by Canva revealing that over 69% of marketing leaders find AI tools boosting their graphic design team’s creativity.
So, I’ve put together a guide on the growth of AI in graphic design and its positive synergy with humans to help you understand and leverage the strengths of AI in graphic design.
What’s New With AI?
Technology has long been a key part of graphic design, but modern AI-powered tools are going beyond traditional tools by leaps and bounds. AI in graphic design has evolved from a rigid set of design support tools to an intelligent companion that vibes with your creative frequency. Some of its growing advanced applications include:
• Website layout and composition design.
• Color and typography suggestions.
Samsung Issues Critical Update For Millions Of Galaxy Users
How to watch real martha baby reindeer interview with piers morgan, how to get arena breakout infinite beta keys from twitch drops.
• Automated image editing.
• Personalized design recommendations.
• Direct design, asset or image generation.
Here’s the fascinating bit: AI didn’t just evolve; it has started to “understand” and envision. With the power of generative AI and machine learning, AI tools process large sets of design data to understand our preferences and styles, and then create surprisingly creative outputs. Like a sketch evolving with every stroke, AI has begun to understand and contextually replicate the nuances of line, color and texture.
The Power Of AI In Graphic Design
The numbers reflect the prowess of AI in graphic design. In fact, the survey by Canva in 2023 found that 75% of global marketing and creative leaders agree AI is an essential part of their creative tool set. To understand this popularity, I’m sharing the key benefits of integrating AI tools into your design process:
• AI excels at repetitive tasks with its superior efficiency and speed. Imagine needing hundreds of variations on a theme—AI churns these out at lightning speed.
• AI can sift through mountains of data, analyzing trends and preferences with tenacity to make informed suggestions.
• AI embodies the term “machine-like consistency,” maintaining uniformity across designs that is key for brand identity.
• AI can be your savior when you run out of creative ideas or struggle to understand complex requirements. Its creative outputs can be used as a guide or foundation for completing the design.
Some popular AI design tools that boast these benefits include Adobe Firefly, Midjourney, Canva and even DALL-E 3 through Bing Copilot or ChatGPT Plus.
AI In Action
With its evolving capabilities and benefits, AI is becoming an important collaborator for humans to amplify their creativity and speed. Here’s how you can make this partnership flourish:
1. Embrace AI as a collaborator and not as a threat or replacement. AI isn’t going anywhere, and you must upskill now to leverage its powers.
2. Use AI tools to automate routine tasks like resizing images or generating basic layouts, and you’ll find yourself with more time to focus on the creative aspects of your project.
3. Combine AI analytics with human insights for targeted design solutions. Use AI-generated insights as your foundation, and build upon them with your creativity.
4. The key is balance. Start small if you need to—introduce AI tools in bite-sized chunks, learn as you go and gradually increase their role in your process.
Take, for example, the creation of an infographic. Using AI, you can cut down the brainstorming times by allowing the AI to analyze the data and suggest a design narrative that encapsulates the essence perfectly.
I’ve personally found it handy for fast personalized designs of diverse types. Take the example of logo design, where personalization is urgent. I guide AI through the ethos of a brand, and it spins out options that resonate with the brand’s voice—some even I could not have conceptualized in such a short span.
Another standout instance is how AI can pull from historical design data to predict and suggest layout trends for media kits. This predictive power lets designers stay ahead of the curve, giving burgeoning businesses an edge in their marketing efforts.
Why Human Designers Are Here To Stay
The unforeseen power of AI in graphic design naturally makes designers uncomfortable, but human designers and AI tools are forming a profitable synergy that opens up great opportunities for faster and smarter design. So, why is human guidance and editing still important when generative AI has advanced greatly?
Human designers weave empathy into their work to evoke human emotions due to superior and authentic emotional intelligence. Secondly, they have unmatched creative agility. Humans can adapt their design strategy on the fly, tackle unforeseen challenges and tweak their creations based on nuanced feedback or even subtle shifts in their client’s tone.
Also, AI tools are still tools. I remember when I noticed a major difference in output quality between two designers who tried out AI. That’s when I realized that designing the prompts, providing follow-up prompts for refinement, and then manually perfecting and enriching the outputs are key places where human competence makes a big difference. Proper human contributions make the AI output stand out from the growing crowd of standard AI content.
The Future Of The AI-Human Alliance In Design
The nuances of taste, the stroke of insight, the gut feeling of “this is it”—AI is yet to master these quintessentially human sparks. But when led correctly, it becomes the perfect partner for innovation and efficiency in graphic design. So, the future belongs to designers and agencies who can successfully augment human ingenuity with artificial intelligence to provide fast and affordable yet exceptional designs. The partnership between AI and human creativity isn’t just about working side by side; it’s about elevating each other’s capabilities to create something neither could achieve alone.
Forbes Communications Council is an invitation-only community for executives in successful public relations, media strategy, creative and advertising agencies. Do I qualify?

- Editorial Standards
- Reprints & Permissions
Purdue Online Writing Lab Purdue OWL® College of Liberal Arts
Welcome to the Purdue Online Writing Lab

Welcome to the Purdue OWL
This page is brought to you by the OWL at Purdue University. When printing this page, you must include the entire legal notice.
Copyright ©1995-2018 by The Writing Lab & The OWL at Purdue and Purdue University. All rights reserved. This material may not be published, reproduced, broadcast, rewritten, or redistributed without permission. Use of this site constitutes acceptance of our terms and conditions of fair use.
The Online Writing Lab at Purdue University houses writing resources and instructional material, and we provide these as a free service of the Writing Lab at Purdue. Students, members of the community, and users worldwide will find information to assist with many writing projects. Teachers and trainers may use this material for in-class and out-of-class instruction.
The Purdue On-Campus Writing Lab and Purdue Online Writing Lab assist clients in their development as writers—no matter what their skill level—with on-campus consultations, online participation, and community engagement. The Purdue Writing Lab serves the Purdue, West Lafayette, campus and coordinates with local literacy initiatives. The Purdue OWL offers global support through online reference materials and services.
A Message From the Assistant Director of Content Development
The Purdue OWL® is committed to supporting students, instructors, and writers by offering a wide range of resources that are developed and revised with them in mind. To do this, the OWL team is always exploring possibilties for a better design, allowing accessibility and user experience to guide our process. As the OWL undergoes some changes, we welcome your feedback and suggestions by email at any time.
Please don't hesitate to contact us via our contact page if you have any questions or comments.
All the best,
Social Media
Facebook twitter.
- Guidelines to Write Experiences
- Write Interview Experience
- Write Work Experience
- Write Admission Experience
- Write Campus Experience
- Write Engineering Experience
- Write Coaching Experience
- Write Professional Degree Experience
- Write Govt. Exam Experiences
- Accenture Interview Experience for ASE
- Accenture Interview Experience For ASE 1
- Accenture Interview Experience for ASE Intern
- Accenture Interview Experience for ASE 2023
- Accenture Hack Diva Interview Experience
- Accenture Interview Experience for ASE 2024
- Accenture Interview Experience For ASE & AASE
- Accenture Interview Experience for Software Engineer
- Accenture Interview Experience For Software Engineer
Accenture Interview Experience For Graphic Designer
Graphic design is a field that intertwines creativity with technical expertise, making it a sought-after skill in various industries. Companies like Accenture, renowned for their innovative solutions, often seek talented graphic designers to elevate their brand identity and communication strategies. Landing a job at Accenture as a graphic designer entails a rigorous interview process that assesses both your artistic capabilities and problem-solving skills. Here’s a glimpse into what you can expect from a graphic designer interview experience at Accenture.
Preparing for the Interview:
Before stepping into the interview room, thorough preparation is key. Research Accenture’s design philosophy, recent projects, and their approach to visual communication. Understand the role you’re applying for and how your skills align with Accenture’s requirements. Additionally, review your portfolio and be ready to discuss your design process, conceptual thinking, and any relevant projects you’ve worked on.
The Interview Process:
- Phone/Initial Screening: The process often begins with a phone interview or an initial screening to gauge your interest, experience, and basic skills. Expect questions about your background, previous projects, software proficiency, and your understanding of design principles. This stage is crucial for Accenture to assess if you meet the minimum requirements for the position.
- Technical Assessment: Following the initial screening, you may be required to complete a technical assessment. This could involve a design task where you’re given a brief or a problem to solve within a specified time frame. The task is designed to evaluate your creativity, attention to detail, and ability to work under pressure.
- In-person/Panel Interview: If you successfully pass the initial stages, you’ll be invited for an in-person or virtual panel interview. This interview typically involves meeting with senior designers, managers, or HR representatives. Be prepared to discuss your portfolio in-depth, explain your design decisions, and showcase how you’ve solved design challenges in the past. Accenture values candidates who can articulate their ideas clearly and demonstrate a strong understanding of design principles.
- Behavioural Interview: In addition to assessing your technical skills, Accenture also evaluates your fit within their culture and team dynamics. Expect behavioural questions that delve into your problem-solving abilities, collaboration skills, and how you handle challenges or feedback. Highlight examples from your previous experiences that demonstrate your adaptability, teamwork, and resilience.
- Cultural Fit: Accenture places a significant emphasis on cultural fit, looking for individuals who align with their values and ethos. Be prepared to showcase your passion for design, your eagerness to learn and grow, and your ability to thrive in a fast-paced and collaborative environment.
Tips for Success:
- Research Accenture: Understand their design approach, recent projects, and company culture.
- Prepare Your Portfolio: Showcase a diverse range of projects that highlight your skills and versatility as a designer.
- Practice Interview Questions: Rehearse common interview questions and prepare concise, articulate responses.
- Demonstrate Problem-solving Skills : Accenture values candidates who can think critically and creatively to solve design challenges.
- Showcase Collaboration: Highlight your ability to work effectively in a team and communicate your ideas.
- Be Yourself: Authenticity is key. Let your passion for design and your personality shine through.
Conclusion:
Securing a role as a graphic designer at Accenture is a rewarding opportunity to work on exciting projects, collaborate with talented individuals, and contribute to innovative solutions. By understanding the interview process, preparing effectively, and showcasing your skills and personality, you can increase your chances of success and embark on a fulfilling career journey with Accenture.
Please Login to comment...
Similar reads.
- Graphic Designer
- Write It Up 2024
- Experiences
- Interview Experiences
Improve your Coding Skills with Practice
What kind of Experience do you want to share?
Optimizing Process Parameters for Controlled Drug Delivery: A Quality by Design (QbD) Approach in Naltrexone Microspheres
- Research Article
- Published: 09 May 2024
- Volume 25 , article number 105 , ( 2024 )
Cite this article

- P. Lakshmikanth Reddy 1 &
- Sangeetha Shanmugasundaram ORCID: orcid.org/0009-0001-0287-4006 1
Explore all metrics
The formulation of microspheres involves a complex manufacturing process with multiple steps. Identifying the appropriate process parameters to achieve the desired quality attributes poses a significant challenge. This study aims to optimize the critical process parameters (CPPs) involved in the preparation of naltrexone microspheres using a Quality by Design (QbD) methodology. Additionally, the research aims to assess the drug release profiles of these microspheres under both in vivo and in vitro conditions. Critical process parameters (CPPs) and critical quality attributes (CQAs) were identified, and a Box-Behnken design was utilized to delineate the design space, ensuring alignment with the desired Quality Target Product Profile (QTPP). The investigated CPPs comprised polymer concentration, aqueous phase ratio to organic phase ratio, and quench volume. The microspheres were fabricated using the oil-in-water emulsion solvent extraction technique. Analysis revealed that increased polymer concentration was correlated with decreased particle size, reduced quench volume resulted in decreased burst release, and a heightened aqueous phase ratio to organic phase ratio improved drug entrapment. Upon analyzing the results, an optimal formulation was determined. In conclusion, the study conducted in vivo drug release testing on both the commercially available innovator product and the optimized test product utilizing an animal model. The integration of in vitro dissolution data with in vivo assessments presents a holistic understanding of drug release dynamics. The QbD approach-based optimization of CPPs furnishes informed guidance for the development of generic pharmaceutical formulations.
Graphical Abstract
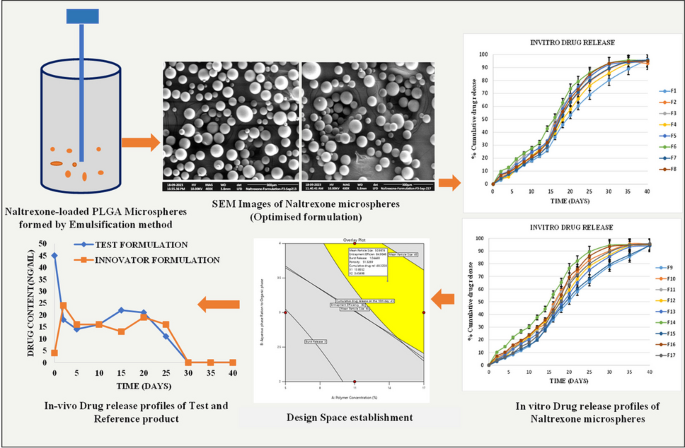
This is a preview of subscription content, log in via an institution to check access.
Access this article
Price includes VAT (Russian Federation)
Instant access to the full article PDF.
Rent this article via DeepDyve
Institutional subscriptions
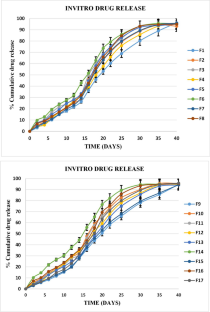
QBD Approach for Design and Characterization of Pramlintide Microspheres for Controlled Drug Release

Understanding the Effects of Associated Factors in the Development of Microsponge-Based Drug Delivery: a Statistical Quality by Design (QbD) Approach Towards Optimization

Utilizing Quality by Design to Develop and Evaluate Extended-Release Upadacitinib Tablets Incorporating a Biosynthesized Polymer
Data availability.
All data analysed during this study are included in this published article.
Abbreviations
Critical process parameters
Quality be design
Critical Quality Attribute
Quality Target Product Profile
Poly Lactate co glycolate
Food and Drug Administration
Design of Experiments
Dichloromethane
Polyvinyl chloride
Boc Behnken Design
Particle Size
Entrapment efficiency
Burst Release
Drug Release
Tetrahydrofuran
Drug Loading Content
Differential scanning calorimetry
Surface electron microscopy
Phosphate-buffered saline
Mean Residence Time
Prajapati SK, Jain A, Jain A, Jain S. Biodegradable polymers and constructs: A novel approach in drug delivery. Eur Polym J. 2019;120:109191.
Article CAS Google Scholar
Patel M, Jha A, Patel R. Potential application of PLGA microsphere for tissue engineering. J Polym Res. 2021;28:214.
Butreddy A, Gaddam RP, Kommineni N, Dudhipala N, Voshavar C. PLGA/PLA-based long-acting injectable depot microspheres in clinical use: production and characterization overview for protein/peptide delivery. IJMS. 2021;22(16):8884.
Article CAS PubMed PubMed Central Google Scholar
Jain A, Kunduru KR, Basu A, Mizrahi B, Domb AJ, Khan W. Injectable formulations of poly(Lactic acid) and its copolymers in clinical use. Adv Drug Deliv Rev. 2016;107:213–27.
Article CAS PubMed Google Scholar
Jin S, Xia X, Huang J, Yuan C, Zuo Y, Li Y, et al. Recent advances in PLGA-based biomaterials for bone tissue regeneration. Acta Biomater. 2021;127:56–79.
Kohno M, Andhariya JV, Wan B, et al. The effect of PLGA molecular weight differences on risperidone release from microspheres. Int J Pharm. 2020;582:119339.
Andhariya JV, Shen J, Choi S, Wang Y, Zou Y, Burgess DJ. Development of in vitro-in vivo correlation of parenteral naltrexone loaded polymeric microspheres. JCR. 2017;255:27–35.
Hales D, Vlase L, Porav SA, et al. A quality by design (Qbd) study on enoxaparin sodium loaded polymeric microspheres for colon-specific delivery. Eur J Pharm Sci. 2017;100:249–61.
Hua Y, Su Y, Zhang H, et al. Poly(Lactic-co-glycolic acid) microsphere production based on quality by design: a review. Drug Deliv. 2021;28(1):1342–55.
Lakshmikanth Reddy P, Shanmugasundaram S. QBD approach for design and characterization of pramlintide microspheres for controlled drug release. J Pharm Innov. 2023;18:2325–47.
Article Google Scholar
Haidar A, Tsoukas MA, Bernier-Twardy S, Yale J-F, Rutkowski J, Bossy A, et al. A novel dual-hormone insulin-and-pramlintide artificial pancreas for type 1 diabetes: a randomized controlled crossover trial. Diabetes Care. 2020;43:597–606.
Dhamecha D, Movsas R, Sano U, Menon JU. Applications of alginate microspheres in therapeutics delivery and cell culture: Past, present and future. Int J Pharm. 2019;569:118627.
Lengyel M, Kállai-Szabó N, Antal V, Laki AJ, Antal I. Microparticles, microspheres, and microcapsules for advanced drug delivery. Sci Pharm. 2019;87:20.
Su Y, Zhang B, Sun R, Liu W, Zhu Q, Zhang X, et al. PLGA-based biodegradable microspheres in drug delivery: recent advances in research and application. Drug Deliv. 2021;28:1397–418.
Park H, Ha E, Kim J, Kim M. Injectable sustained-release poly(Lactic-co-glycolic acid) (Plga) microspheres of exenatide prepared by supercritical fluid extraction of emulsion process based on a design of experiment approach. Bioeng Transl Med. 2023;8(3):e10485.
Gu B, Burgess DJ. Prediction of dexamethasone release from PLGA microspheres prepared with polymer blends using a design of experiment approach. Int J Pharm. 2015;495(1):393–403.
Jhawat V, Gulia M, Gupta S, Maddiboyina B, Dutt R. Integration of pharmacogenomics and theranostics with nanotechnology as quality by design (QbD) approach for formulation development of novel dosage forms for effective drug therapy. JCR. 2020;327:500–11.
Grangeia HB, Silva C, Simões SP, Reis MS. Quality by design in pharmaceutical manufacturing: A systematic review of current status, challenges and future perspectives. EJPB. 2019;147:19–37.
Google Scholar
Shah M, Patel N, Tripathi N, Vyas VK. Capillary electrophoresis methods for impurity profiling of drugs: A review of the past decade. JPA. 2022;12:15–28.
PubMed Google Scholar
Soni G, Kale K, Shetty S, Gupta MK, Yadav KS. Quality by design (QbD) approach in processing polymeric nanoparticles loading anticancer drugs by high pressure homogenizer. Heliyon. 2020;6:e03846.
Article PubMed PubMed Central Google Scholar
Andhariya JV, Choi S, Wang Y, Zou Y, Burgess DJ, Shen J. Accelerated in vitro release testing method for naltrexone loaded PLGA microspheres. Int J Pharm. 2017;520(1–2):79–85. https://doi.org/10.1016/j.ijpharm.2017.01.050 .
Naltrexone long acting formulation and method of use. https://patentimages.storage.googleapis.com/76/11/01/48ba9849b5c1fd/US7919499.pdf
Rapalli VK, Banerjee S, Khan S, et al. QbD-driven formulation development and evaluation of topical hydrogel containing ketoconazole loaded cubosomes. Mater Sci Eng C. 2021;119:111548.
Park H, Ha E, Kim J, Kim M. Injectable sustained-release poly(lactic-co-glycolic acid) (PLGA) microspheres of exenatide prepared by supercritical fluid extraction of emulsion process based on a design of experiment approach. Bioeng Transl Med. 2023;8:e10485.
Gu B, Burgess DJ. Prediction of dexamethasone release from PLGA microspheres prepared with polymer blends using a design of experiment approach. Int Pharm. 2015;495:393–403.
Dorati R, DeTrizio A, Genta I, et al. An experimental design approach to the preparation of pegylated polylactide-co-glicolide gentamicin loaded microparticles for local antibiotic delivery. Mater Sci Eng C. 2016;58:909–17.
Wu Z, Zhao M, Zhang W, Yang Z, Xu S, Shang Q. Influence of drying processes on the structures, morphology and in vitro release profiles of risperidone-loaded PLGA microspheres. J Microencapsul. 2019;36(1):21–31.
Ronkart SN, Paquot M, Fougnies C, Deroanne C, Van Herck JC, Blecker C. Determination of total water content in inulin using the volumetric Karl Fischer titration. Talanta. 2006;70(5):1006–10.
Han J, Fitzpatrick J, Cronin K, Maidannyk V, Miao S. Particle size, powder properties and the breakage behaviour of infant milk formula. J Food Eng. 2021;292:110367.
Caputo F, Vogel R, Savage J, Vella G, Law A, Della Camera G, et al. Measuring particle size distribution and mass concentration of nanoplastics and microplastics: addressing some analytical challenges in the sub-micron size range. J Colloid Interface Sci. 2021;588:401–17.
Varia U, Patel A, Katariya H, Detholia K. Formulation and optimization of polymeric agglomerates of Bosentan monohydrate by crystallo-co-agglomeration technique. Bull Natl Res Cent. 2022;46:156.
Fang Y, Zhang N, Li Q, Chen J, Xiong S, Pan W. Characterizing the release mechanism of donepezil-loaded PLGA microspheres in vitro and in vivo. JDDST. 2019;51:430–7.
CAS Google Scholar
Hsu M-Y, Huang Y-T, Weng C-J, Chen C-M, Su Y-F, Chu S-Y, et al. Preparation and in vitro/in vivo evaluation of doxorubicin-loaded poly[lactic-co-glycol acid] microspheres using electrospray method for sustained drug delivery and potential intratumoral injection. Colloids Surf. 2020;190:110937.
Hasan ML, Kim B, Padalhin AR, Faruq O, Sultana T, Lee B-T. In vitro and in vivo evaluation of bioglass microspheres incorporated brushite cement for bone regeneration. Mater Sci Eng C. 2019;103:109775.
Li H, Xu Y, Tong Y, Dan Y, Zhou T, He J, et al. Sucrose acetate isobutyrate as an in situ forming implant for sustained release of local anesthetics. CDD. 2019;16:331–40.
Vishwa B, Moin A, Gowda DV, Rizvi SMD, Hegazy WAH, Abu Lila AS, et al. Pulmonary targeting of inhalable moxifloxacin microspheres for effective management of tuberculosis. Pharmaceutics. 2021;13:79.
Pervaiz F, Ahmad M, Li L, Murtaza G. Development and characterization of olanzapine loaded poly(lactide-co-glycolide) microspheres for depot injection: in vitro and in vivo release profiles. CDD. 2019;16:375–83.
Liang B, Zhao D, Liu Y, Guo X, Zhang H, Zhang L, et al. Chemoembolization of liver cancer with doxorubicin-loaded CalliSpheres microspheres: plasma pharmacokinetics, intratumoral drug concentration, and tumor necrosis in a rabbit model. Drug Deliv and Transl Res. 2020;10:185–91.
Vugmeyster Y, Xu X, Theil F-P, Khawli LA, Leach MW. Pharmacokinetics and toxicology of therapeutic proteins: Advances and challenges. World J Biol Chem. 2012;3:73–92.
Sharifi F, Otte A, Yoon G, Park K. Continuous in-line homogenization process for scale-up production of naltrexone-loaded PLGA microparticles. JCR. 2020;325:347–58. https://doi.org/10.1016/j.jconrel.2020.06.023 .
Wang Y, Burgess DJ. Influence of storage temperature and moisture on the performance of microsphere/hydrogel composites. Int J Pharm. 2013;454(1):310–5. https://doi.org/10.1016/j.ijpharm.2013.06.012 .
Guideline IH. Impurities: Guideline for residual solvents Q3C (R5). Current Step. 2005;4:1–25.
Zeng W, Hui H, Liu Z, Chang Z, Wang M, He B, et al. TPP ionically cross-linked chitosan/PLGA microspheres for the delivery of NGF for peripheral nerve system repair. Carbohydr Polym. 2021;258:117684.
Lee J, Sah H. Preparation of PLGA Nanoparticles by Milling Spongelike PLGA Microspheres. Pharmaceutics. 2022;14:1540.
Zhou J, Walker J, Ackermann R, Olsen K, Hong JKY, Wang Y, et al. Effect of Manufacturing Variables and Raw Materials on the Composition-Equivalent PLGA Microspheres for 1-Month Controlled Release of Leuprolide. Mol Pharmaceutics. 2020;17:1502–15.
Jia Z, Ma C, Zhang H. PLGA coatings and PLGA drug-loading coatings for cardiac stent samples: degradation characteristics and blood compatibility. Coatings. 2021;11:1427.
Hua Y, Wang Z, Wang D, Lin X, Liu B, Zhang H, et al. Key factor study for generic long-acting PLGA microspheres based on a reverse engineering of Vivitrol®. Molecules. 2021;26:1247.
Kumskova N, Ermolenko Y, Osipova N, Semyonkin A, Kildeeva N, Gorshkova M, et al. How subtle differences in polymer molecular weight affect doxorubicin-loaded PLGA nanoparticles degradation and drug release. J Microencapsul. 2020;37:283–95.
Ochi M, Wan B, Bao Q, Burgess DJ. Influence of PLGA molecular weight distribution on leuprolide release from microspheres. Int J Pharm. 2021;599:120450.
Vardhan H, Mittal P, Adena SKR, Mishra B. Long-circulating polyhydroxybutyrate-co-hydroxyvalerate nanoparticles for tumor targeted docetaxel delivery: Formulation, optimization and in vitro characterization. Eur J Pharm Sci. 2017;99:85–94.
Baghaei M, Tekie FSM, Khoshayand MR, Varshochian R, Hajiramezanali M, Kachousangi MJ, et al. Optimization of chitosan-based polyelectrolyte nanoparticles for gene delivery, using design of experiment: in vitro and in vivo study. MSEC. 2021;118:111036.
Ramireddy AR, Behara DK. QbD Based Formulation Development and Optimisation of Ozenoxacin Topical Nano-Emulgel and Efficacy Evaluation Using Impetigo Mice Model. AAPS PharmSciTech. 2024;25:90.
Article PubMed Google Scholar
Download references
Acknowledgements
The authors specially acknowledge SRM College of pharmacy to perform all type of work for providing his valuable insights in drafting the article.
The authors declare that no funding has been received for research.
Author information
Authors and affiliations.
Department of Pharmaceutics, SRM College of Pharmacy, SRM Institute of Science and Technology, Kattankulathur, 603203, India
P. Lakshmikanth Reddy & Sangeetha Shanmugasundaram
You can also search for this author in PubMed Google Scholar
Contributions
Lakshmikanth Reddy P conducted experimental design, prepared the materials, collected the data, interpreted the results, and written the initial version of the manuscript. Sangeetha Shanmugasundaram supervised and corrected the manuscript. The final manuscript has been reviewed and endorsed by all authors.
Corresponding author
Correspondence to Sangeetha Shanmugasundaram .
Ethics declarations
Ethics approval and consent to participate.
Ethical approval is available for animal trials.
Consent for Publication
Not applicable.
Conflict of Interest
The authors declare no Conflict of interests.
Additional information
Publisher's note.
Springer Nature remains neutral with regard to jurisdictional claims in published maps and institutional affiliations.
Supplementary Information
Below is the link to the electronic supplementary material.
Supplementary file1 (DOCX 3071 KB)
Rights and permissions.
Springer Nature or its licensor (e.g. a society or other partner) holds exclusive rights to this article under a publishing agreement with the author(s) or other rightsholder(s); author self-archiving of the accepted manuscript version of this article is solely governed by the terms of such publishing agreement and applicable law.
Reprints and permissions
About this article
Reddy, P.L., Shanmugasundaram, S. Optimizing Process Parameters for Controlled Drug Delivery: A Quality by Design (QbD) Approach in Naltrexone Microspheres. AAPS PharmSciTech 25 , 105 (2024). https://doi.org/10.1208/s12249-024-02830-w
Download citation
Received : 11 January 2024
Accepted : 01 May 2024
Published : 09 May 2024
DOI : https://doi.org/10.1208/s12249-024-02830-w
Share this article
Anyone you share the following link with will be able to read this content:
Sorry, a shareable link is not currently available for this article.
Provided by the Springer Nature SharedIt content-sharing initiative
- in vitro and in vivo drug release
- microspheres
- Polylactic-co-glycolic acid
- Find a journal
- Publish with us
- Track your research
IMAGES
VIDEO
COMMENTS
Here is the eight-steps graphic design process: Design brief - setting out the goals and strategy of your design. Research phase- learning about the market or users you're designing for. Concepts - brainstorming ideas for your designs. Concept development - polishing and refining your ideas. Design review - getting feedback on ...
Graphic design involves a lot of principles that allow designers to create high-quality, customized designs. While there are many more, these are the basic principles of graphic design: 1. Balance. Balance refers to the distribution of graphic design elements. It can be either symmetrical or asymmetrical. Symmetrical balance is when the weight ...
Graphic design is made for a specific target audience. So, designers must know about your buyer personas to deliver quality results. Of course, you can significantly speed up this part of the design process by providing them with your own market research findings. However, they will still need to dig a little deeper into the graphic design side.
The graphic design process, then, is what a designer follows to bring design ideas to life while serving a client's end goals. ... Research the Design Ecosystem. Now that you know your creative mission, it's time to start your preliminary visual exploration. During the research stage, spend time: Understanding the specific product or ...
The seven graphic design process steps are: defining objectives and goals, starting a creative brief, conducting research, brainstorming and concept development, design iteration and refinement, reviews and approval, and the delivery of the finalized design assets. ... It includes stages such as research, brainstorming, design iteration ...
Whether you're creating a solid process for the first time or looking to refine an existing one, here are 5 graphic design process steps to consider: Start with a creative brief. Conduct graphic design research. Brainstorm design ideas. Review process at the 10/50/99 stage. Present final product. 1.
With just 6 easy steps you too can transform an idea into a beautiful scientific graphic. The Idea - Outline your concept including design scope, key message, target audience and timeline. Research - Use those scientific research skills, and find some inspo for your design. Experiment - Play around with background, layout, and fonts.
Graphic design is typically a visual problem solving field concerned with communication of specific messages to specific audiences. It is ever changing, as societies and technologies evolve. This makes it a compelling field of study. The term graphic design is somewhat problematic and may be better represented as visual communication.
Step 1: Go over the brief. The brief of a graphic design project helps you understand the scope of the project and the desired outcome. It should include all the relevant information to prevent errors and confusion. Here is the information you need to have in a comprehensive brief: Type of product (e.g., logo).
Step 1: Client Meeting and Brief Analysis. A client might get in touch with you over email or phone proposing a design project. If the client is new, they may expect an initial face-to-face meeting before proceeding to the quote stage. Agreeing to meet for a quick coffee will help you to assess whether the client is serious about commissioning ...
Step 3 - Brainstorm and Sketch Concepts. Now is the time to pull all your ideas together. Start by creating symbols or motifs. Explore and test typefaces and keep in mind the latest logo and graphic design trends when you're working. Make sure to jot all your ideas down.
5 Steps of the Graphic Design Process. 1. Understanding the creative brief. The first stage of the design process is understanding the creative brief. Remember, the creative brief is the foundation of the graphic design process. A creative brief is a short but detailed summary used to explain the strategy of a specific creative project—it ...
useful in the process of constructing interpretations of an artwork or collection of works. VA:Cn10.1.IIa: Utilize inquiry methods of observation, research, and experimentation to explore unfamiliar subjects through art making. Guiding Questions • Why are learning and research important to the design process? • Knowledge is power. How does ...
Whether you're creating a campaign or marketing piece for the first time, or looking to refine an existing one, here are 5 graphic design process steps to consider: 1. The Creative Brief - an important first step. The creative brief sets the tone for the entire project. It's the first and arguably one of the most important steps in the visual ...
a user-centered design process that London-based Wire Design (in consultation with Lebbon) used to design a knife safety campaign for a community in South London. Elizabeth Throop, in her essay, advocates for a more rigorous research-driven design process beyond merely asking the audience what they think of a design prototype. The section
What is Design Research? Design research is the practice of gaining insights by observing users and understanding industry and market shifts. For example, in service design it involves designers' using ethnography—an area of anthropology—to access study participants, to gain the best insights and so be able to start to design popular ...
Delivery Stage. The graphic design process steps. Step 1 - The creative brief. Step 2: Graphic design market research. Optimize your market research. Step 3 - Mood boarding and brainstorming. Optimize the brainstorming process. Step 4 - Idea sketching. Step 5 - Design creation.
A design for a client has to fit a specific set of requirements, so it's only natural that the process to figure out what client needs to produce an effective output is based on a logical flow. In this post, we'll cover the seven steps needed to deliver a graphic, including: 1. Briefing the Project With Your Client.
A research design is a strategy for answering your research question using empirical data. Creating a research design means making decisions about: Your overall research objectives and approach. Whether you'll rely on primary research or secondary research. Your sampling methods or criteria for selecting subjects. Your data collection methods.
Database Research Tips . Your search strategies will depend partly on the research tools you use. Search engines like Google tend to be less picky about your terms. However, Google search results also usually require more careful evaluation of source credibility, since it includes a larger number of sources from a wider range of places.
How to develop a graphical framework to chart your research. Graphic representations or frameworks can be powerful tools to explain research processes and outcomes. David Waller explains how researchers can develop effective visual models to chart their work. Outreach and communication. Writing tips.
Graphic design research is often key to provide different kinds of evidence of the way that design decisions are made, of the way that graphic devices are used, interpreted and situated. There is a strong historical dimension to graphic design research: studies about people or movements, associated with particular locations.
Graphic design as a knowledge domain is deeply rooted in arts, crafts, and the cultural history of human civilization. However, the research in graphic design is a recent phenomenon and it has ...
3. Combine AI analytics with human insights for targeted design solutions. Use AI-generated insights as your foundation, and build upon them with your creativity. 4. The key is balance. Start ...
Mission. The Purdue On-Campus Writing Lab and Purdue Online Writing Lab assist clients in their development as writers—no matter what their skill level—with on-campus consultations, online participation, and community engagement. The Purdue Writing Lab serves the Purdue, West Lafayette, campus and coordinates with local literacy initiatives.
The Interview Process: Phone/Initial Screening: The process often begins with a phone interview or an initial screening to gauge your interest, experience, and basic skills. Expect questions about your background, previous projects, software proficiency, and your understanding of design principles. This stage is crucial for Accenture to assess ...
The introduction of genome engineering technology has transformed biomedical research, making it possible to make precise changes to genetic information. However, creating an efficient gene-editing system requires a deep understanding of CRISPR technology, and the complex experimental systems under investigation. While Large Language Models (LLMs) have shown promise in various tasks, they ...
The formulation of microspheres involves a complex manufacturing process with multiple steps. Identifying the appropriate process parameters to achieve the desired quality attributes poses a significant challenge. This study aims to optimize the critical process parameters (CPPs) involved in the preparation of naltrexone microspheres using a Quality by Design (QbD) methodology. Additionally ...