
How to Insert a Timer in PowerPoint? [Step-by-Step Guide!]
By: Author Shrot Katewa
![How to Insert a Timer in PowerPoint? [Step-by-Step Guide!]](https://artofpresentations.com/wp-content/uploads/2021/10/Featured-Image-How-to-Insert-a-Timer-in-PowerPoint-optimized.webp "how to set up a timed powerpoint presentation")
Having a timer in your PowerPoint presentation can be extremely useful. There are many use cases for it for instance when you are conducting a workshop, you may want to insert a timer for break time. Likewise, you can also add a timer before the first slide to let your audience know when the presentation will start!
Whatever the case may be, the important question is – how to insert a timer in PowerPoint?
To insert a timer in PowerPoint, you can use add-ins such as “Easy Timer”, “Breaktime”, or “Slice Timer”. You can also create your own timer using the animation feature within PowerPoint using the “Fly out” or “Wheel” animation depending on the type of timer you want to add in PowerPoint.
In this article, we shall do a deep dive on this subject. I will share with you a few easy suggestions first to add a timer to your PowerPoint presentation. Plus, I will also show you how you can build your own timer later in the article!
So, let’s get started!
1. How to Add a Timer in PowerPoint?
In Microsoft PowerPoint, you can add a countdown timer to a slide either through add-ins or by creating a timer yourself. We shall take a look at the easier process first i.e. using the add-ins.
Then, I will also help you understand how to create your own timer in PowerPoint using animations.
Method 1 – Insert a Timer in PowerPoint Using Add-ins
Using add-ins is the quickest way to insert a timer in a Microsoft PowerPoint slide. These are mostly easy to insert and provide your slides with a professional look.
There are quite a few add-in options for adding a timer to your slides in PowerPoint. I’ve found the following add-ins to be the most effective.
In the Easy Timer add-in, you can access three different types of countdown timers. You can add either the analog clock, the digital clock, or the bar countdown timer to your slide. All you need to do is insert the timer and set your preferred time.
Slice Timer
The Slice Timer add-in has a very clean look and is easy to use. All you have to do is click on the add-in and it will appear in the opened slide. You can put in your preferred duration for the timer.
The Breaktime timer is specifically designed for taking a presentation break. All you have to do is insert the timer in the slide and select your preferred break time. It also allows you to customize the timer background with various design options.
How to Insert a Timer Add-in in PowerPoint?
To insert a timer add-in in PowerPoint, first click on the “Insert” tab. Then, from the ribbon, click on “Add-in”. From the dropdown, click on “Get Add-in”. A new window will pop up. Search for “timer” using the search bar. Finally, click on “Add” to install the add-in to your PowerPoint.
The complete process is described in a step-by-step process below –
Step-1: Click on the “Insert” menu
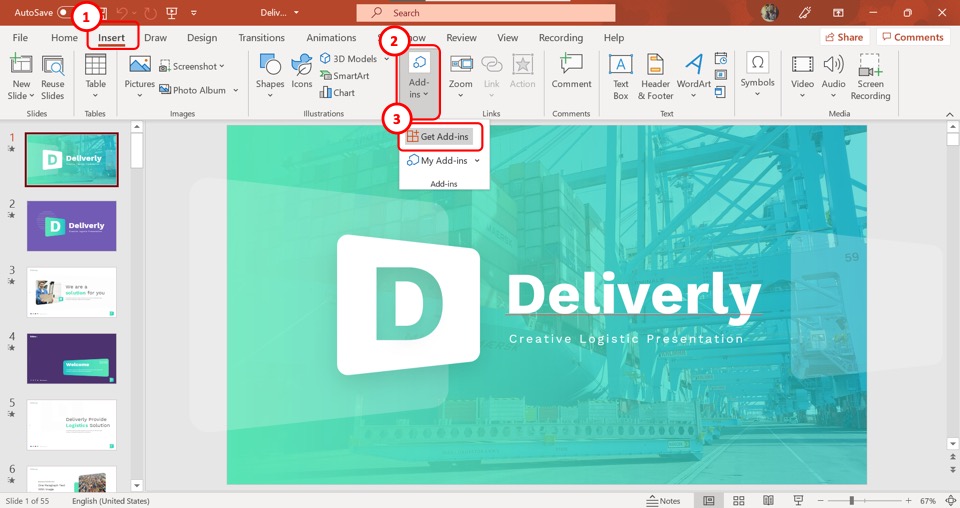
The first step is to open the “Insert” menu. To do so, click on the “Insert” tab in the menu ribbon located at the top of the screen.
Step-2: Click on “Get Add-ins”
In the “Insert” menu, click on the “Add-ins” button to open a dropdown menu. Click on the “Get Add-ins” option. This will open a dialogue box.
Step-3: Click on the “Search box”
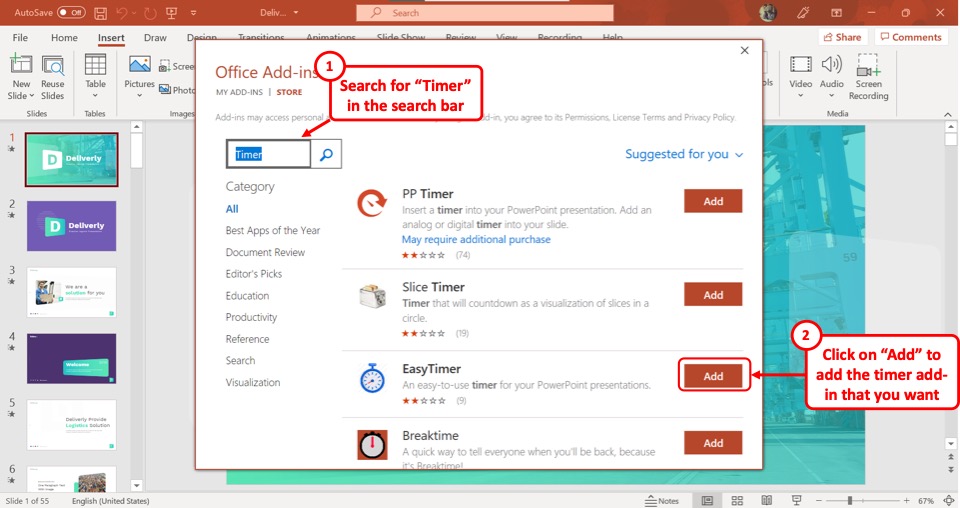
In the “Office Add-ins” dialogue box, click on the “Search box” on the upper left side. Type in “Timer” and click on the search icon beside the “Search box” .
You can alternatively search for a specific timer by typing in “Slice Timer” , “Easy Timer” , “Breaktime” , etc.
Step-4: Click on the “Add” button
Now you can click on the “Add” button beside your preferred timer. This will prompt another dialogue box.
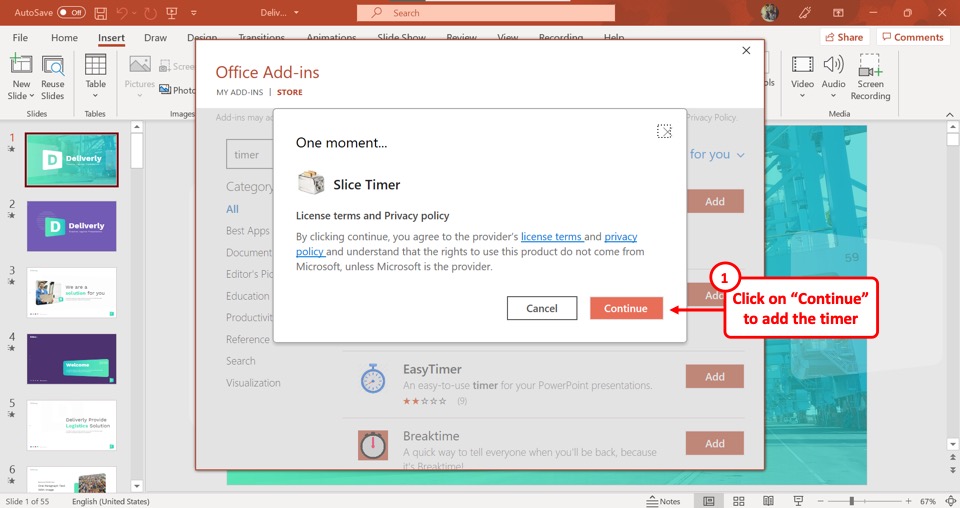
Click on the “Continue” box to add the timer add-in.
After this, once the process is complete, the add-in will be loaded to your PowerPoint presentation.
How to Insert a Countdown Timer Using an Add-in?
Now that you have installed the timer add-in in PowerPoint, the next step really is to simply insert a timer on your slides.
Step-1: Click on the “My Add-ins” option
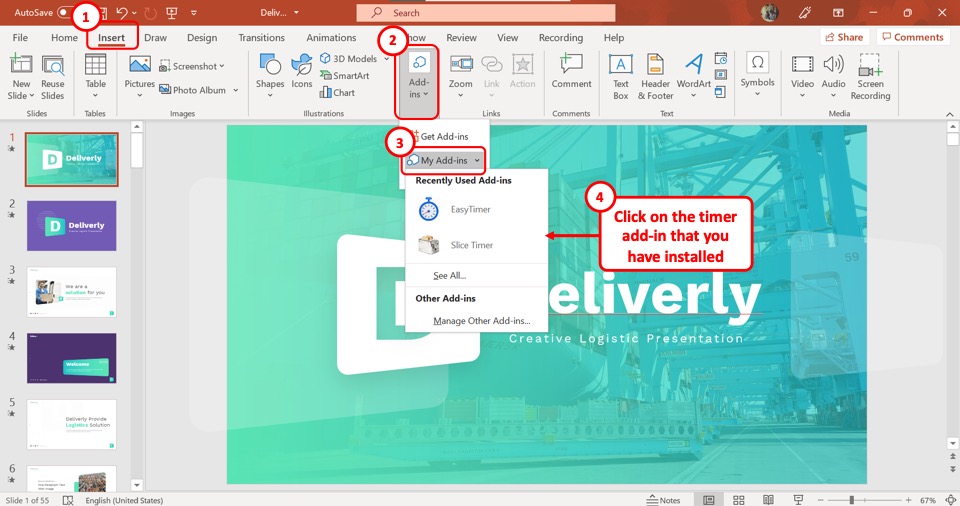
In the “Insert” menu, click on the “Add-ins” option again. Click on the “My Add-ins” option from the dropdown menu.
In the secondary dropdown menu, click on the newly added timer add-in to insert it in the slide.
Step-2: Add the duration to the timer
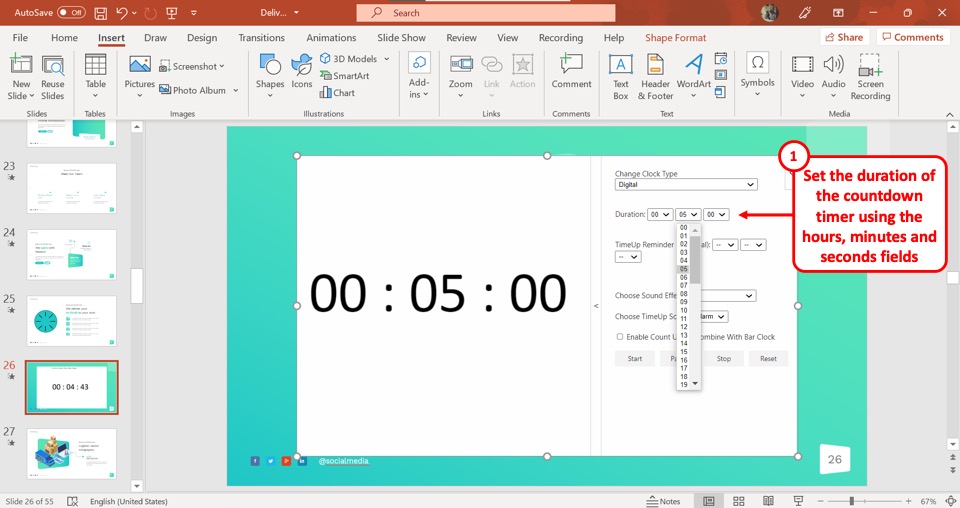
The next step is to simply add the duration that you want to set for the timer!
Remember, most timer add-ins will have a separate field for hours, minutes, and seconds. So, the right-most field is usually for seconds.
To add a 5-minute timer, click on the middle field, and from the dropdown, click on “5”. Finally, click on “ Start “.
And that’s it! You will see the timer doing a reverse counting from 5 minutes!
2. How to Create Your Own PowerPoint Timer?
In Microsoft PowerPoint, you can also make your own timer, apart from inserting a timer from Add-ins.
To create a custom timer in PowerPoint, first, insert a bar shape on the slide. Then, using the “Fly Out” animation, set the bar shape to disappear from the slide slowly. Adjust the duration of the animation to match the duration of your timer for the best effect.
You can insert a shape from the “Shapes” option and use the “Animation” menu to turn the shape into a “Bar Countdown Timer” or a “Clock Countdown Timer” .
2.1 Method 1 – Bar Countdown Timer
Here’s what a typical bar countdown timer looks like –
Let’s make a similar bar countdown timer which is easier than the above slide to create. Follow the easy steps mentioned below.
Step-1: Click on the “Shapes” option
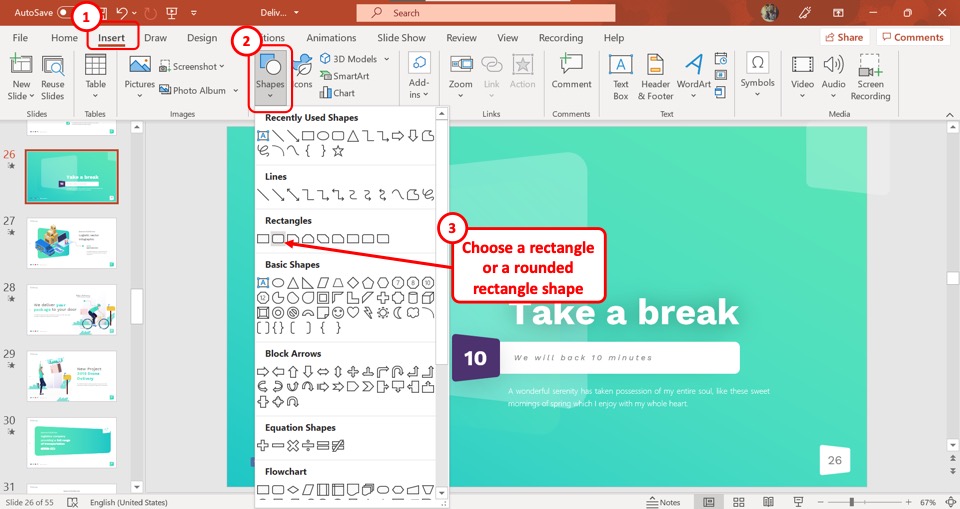
The first step is to click on the “Insert” tab in the menu ribbon located at the top of the screen. Then click on the “Shapes” option to open a dropdown menu and select a shape under the “Rectangles” option.
Draw the rectangle bar touching the border of the slide on both sides.
Step-2: Remove the Shape Outline
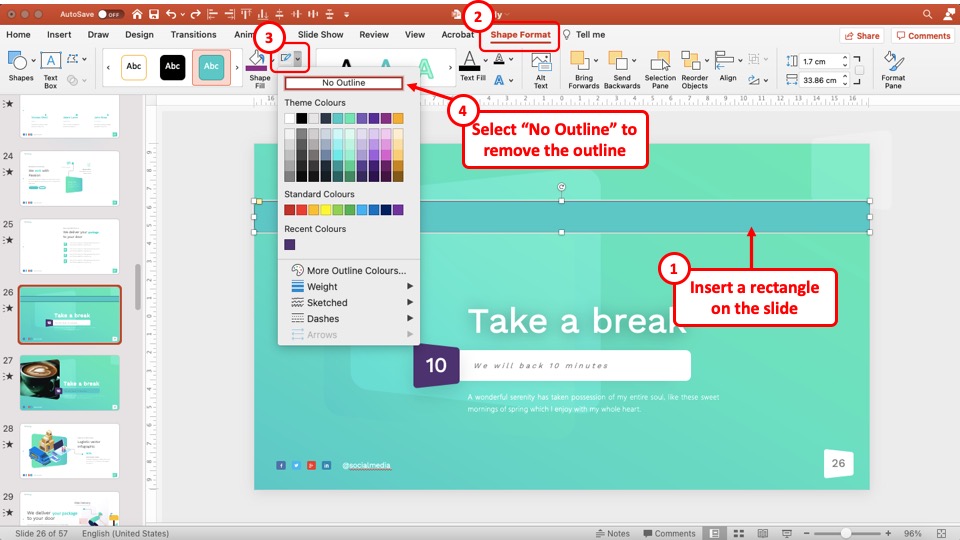
Once you have inserted the shape, you need to format the shape first.
Select the shape. Then, the “ Shape Format ” tab will appear on the top. Click on it. Next, click on the shape outline option (as indicated in the image above).
From the dropdown, click on the “ No Outline ” option. This will remove the outline of the shape.
Step-3: Change the Shape Color to White
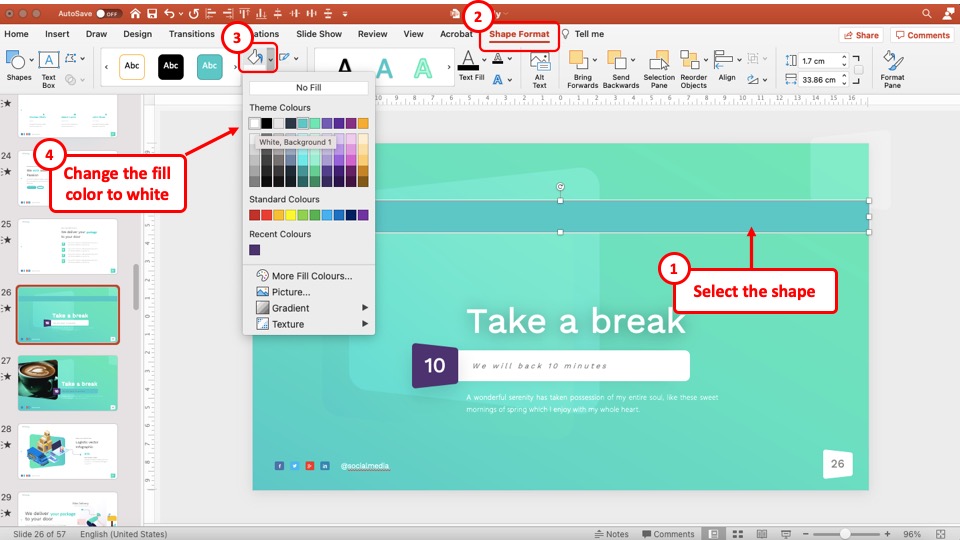
The next step is to change the shape color to a different color than the background. In this case, since I have a teal background, I’d change the color of the shape to white.
To do that, click on the shape, and open the “ Shape Format ” tab. Then, click on the “ Fill Color ” option, and from the dropdown, click on the “ White ” color.
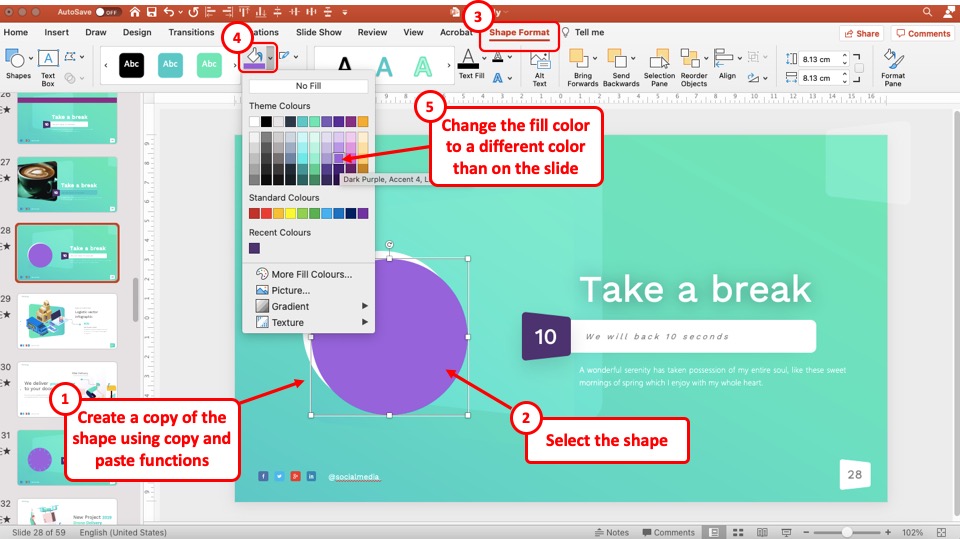
Step-4: Create a Copy of the Shape and Change the Shape Color
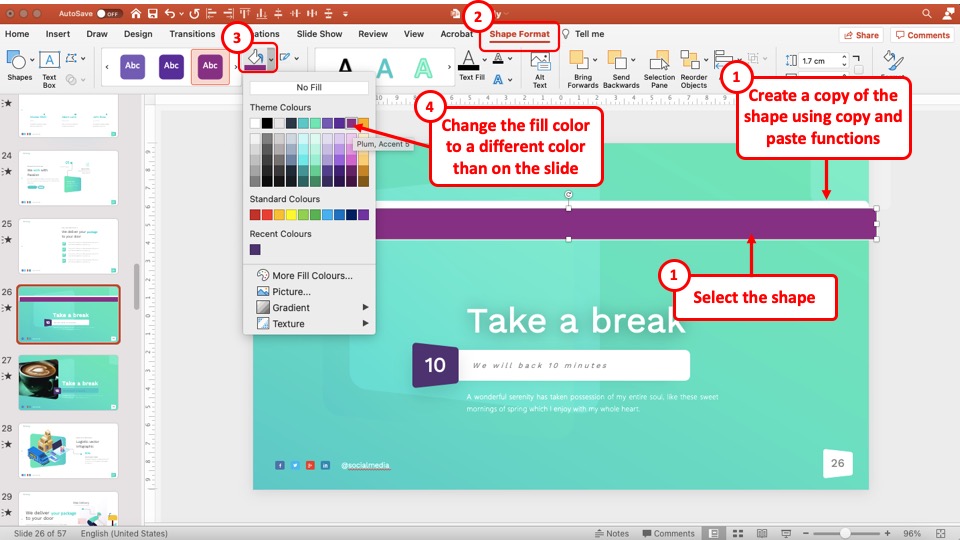
In this next step, we shall create a copy of the shape and change the color of this shape to something other than white and the slide background.
To create a copy of the curved rectangle, click on the shape. Then, copy and paste the shape on the slide using the Ctrl+C (for copy) and Ctrl+V (for paste) shortcuts.
Once the copy is created, select the second shape by clicking on it. Then, click on the “ Shape Format ” tab. From the ribbon, click on the “ Fill Color ” option.
From the color dropdown that appears, choose a color other than white and that of the slide background.
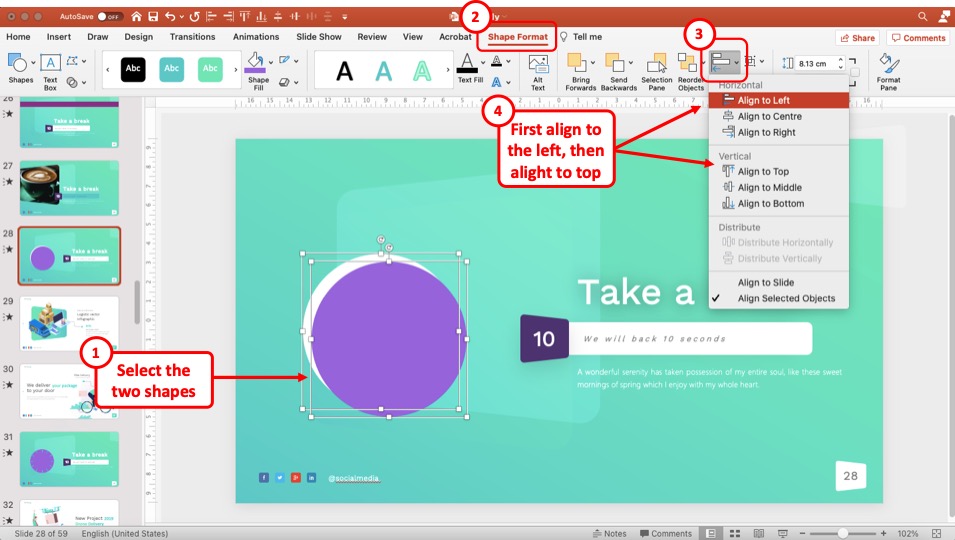
Step-5: Align the Shapes Together
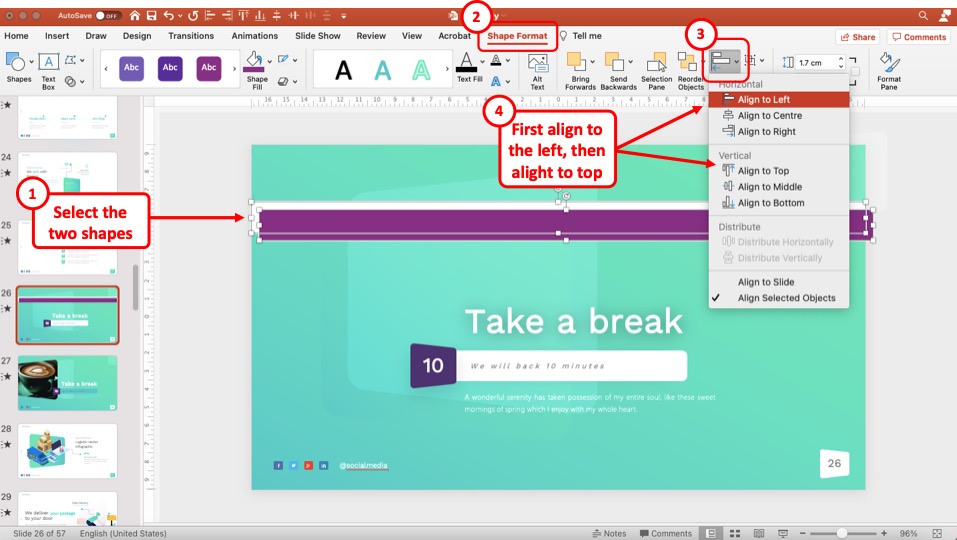
The next step is to make sure that the two shapes align on top of each other. We shall use the align tool in PowerPoint to accomplish this.
First, select the two shapes together by holding the “ Ctrl ” key on your keyboard, and clicking once on both the shapes one by one.
Then, click on the “ Shape Format ” tab. From the “ Align ” option, first, click on the “ Align to Left ” option. Then, click on the “ Align ” tab once again, and from the dropdown, choose the “ Align to Top ” option this time!
You will notice that both the shapes are now overlapping with the colored shape on top of the white one.
Step-6: Click on the “Animations” menu
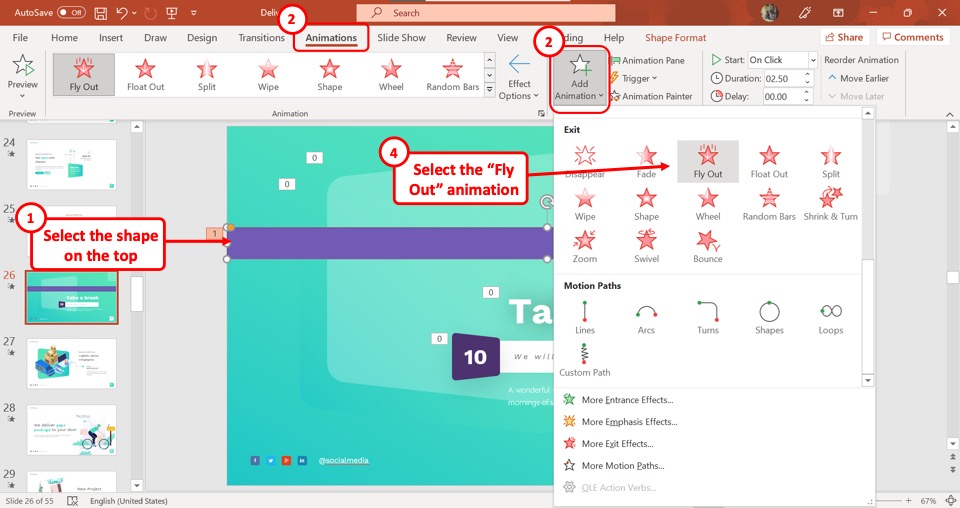
Now we shall add the animations. To do that, first, make sure that only the colored shape on the top is selected.
Then, click on the “Animations” option in the menu ribbon. In the “Animations” menu, click on the “Add Animations” option.
After that, click on the “Fly Out” option under the “Exit” animation section from the dropdown menu.
Step-7: Click on the “Effects” option
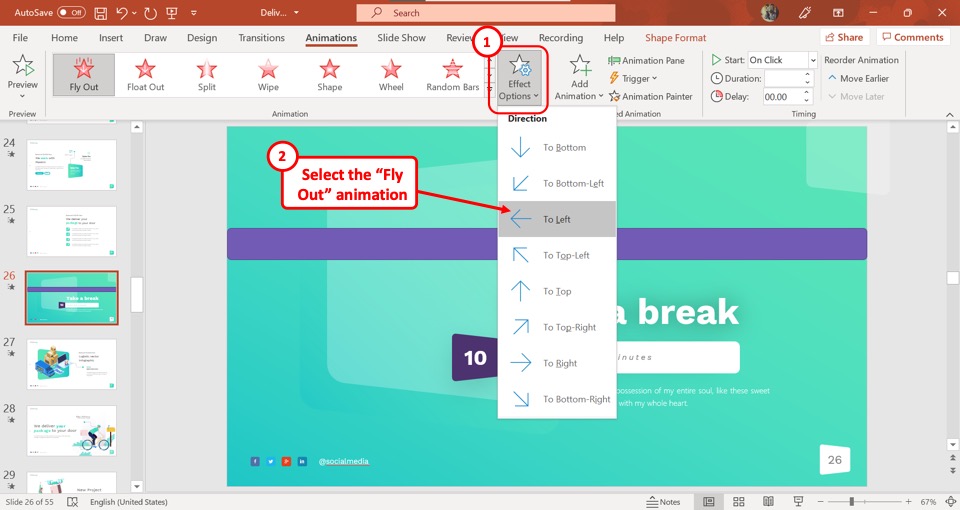
The next step is to click on the “Effects” option in the “Animations” menu. In the dropdown menu under the “Effects” option, click on the “To Left” option.
This will apply the fly out animation effect to the shape and it will fly out towards the left part of the slide.
Step-8: Select your preferred duration
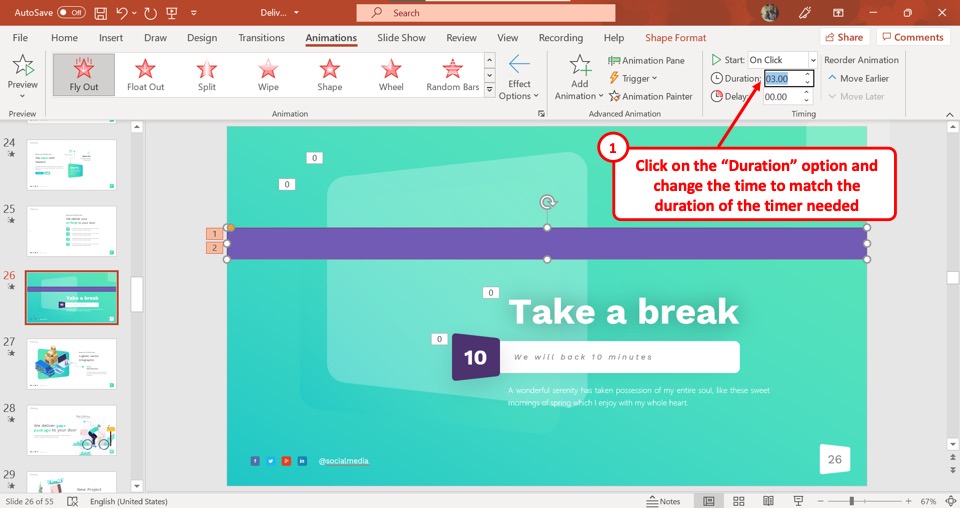
Now all you have to do is click on the “Duration” box in the “Timing” section. Enter the duration of the animation.
Remember – the duration of the animation should be the same as the length of the timer. Type in your preferred time for the timer. It will now appear as a “Bar Countdown Timer” in the “Slide Show” view.
Here’s a quick preview of how this bar countdown timer looks –
2.2 Method 2 – Clock Countdown Timer
You can also add a clock countdown timer in the Microsoft PowerPoint slide. Here’s what it shall look like –
Now let us understand how to build this clock-shaped circular countdown timer in a step-by-step manner.
Here’s what we need to do –
Step-1: Click on “Shapes”
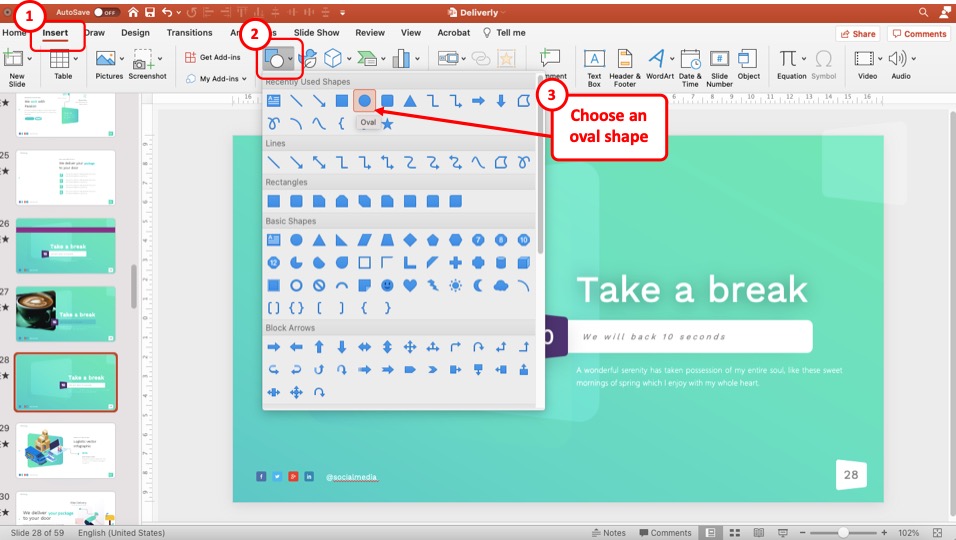
The first step is to create a clock shape. Click on the “Insert” menu from the menu ribbon. Then click on the “Shapes” option and select the “Oval” shape from the “Basic Shapes” section in the dropdown menu.
Then, hold the “Ctrl” key on your keyboard and drag the cursor in one direction. This will help you create a perfect circle on the slide.
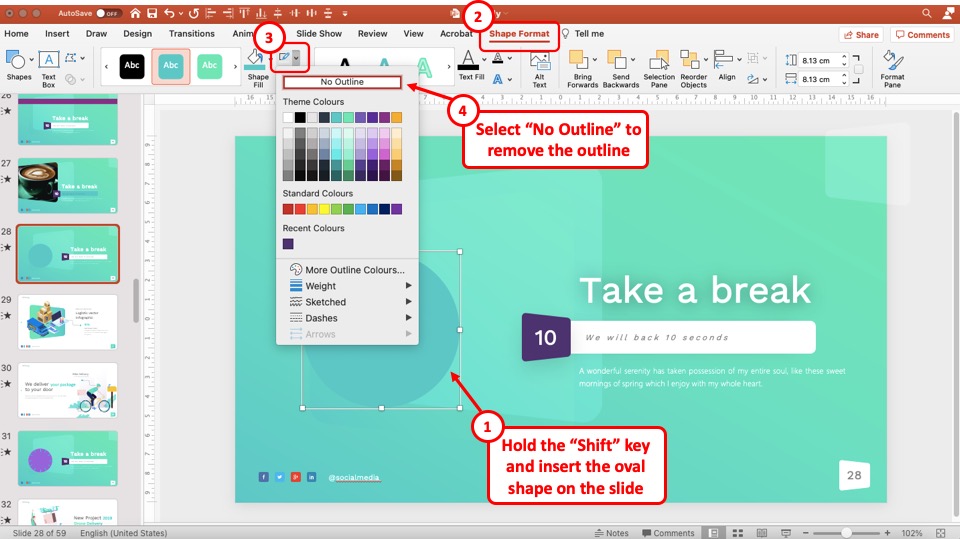
In the next step, you need to remove the outline of the shape.
To remove the shape outline, first, select the shape. Then, click on the “ Shape Format ” tab. Next, click on the “ Shape Outline ” button. Finally, from the dropdown, click on the “ No Outline ” option.
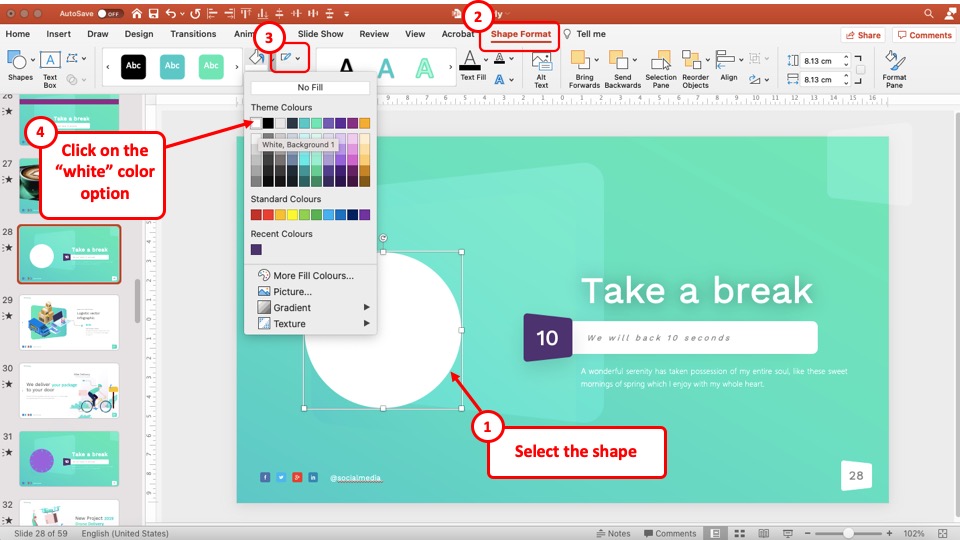
Now, we need to change the shape color to white. Changing the color will help you separate the circle from the background.
To change the color of the shape to white, first, select the shape. Then, click on the “ Shape Format ” tab. Next, click on the “ Fill Color ” option. Finally, from the dropdown, select the color of your choice.
In this case, we shall click on the “ White ” color option.
Step-4: Create a Copy of the Circle and Change the Shape Color
Now, in this step, we shall use the copy and paste functions in PowerPoint to create a copy of the circle that we just created.
Then, change the color of this new circle to something other than that of the slide background and white.
Step-5: Align the Two Circles
Now, we shall align the two circles such that they fit on top of each other.
To do that, hold the “Ctrl” key on your keyboard and select the two circles by clicking on them just once one-by-one.
Then, click on the “ Shape Format ” tab and click on the “ Align ” tool. From the dropdown, first, click on the “ Align to Left ” option. Then, click on the “ Align to Top ” option.
This will ensure that both the circles align properly.
Step-6: Insert a Line
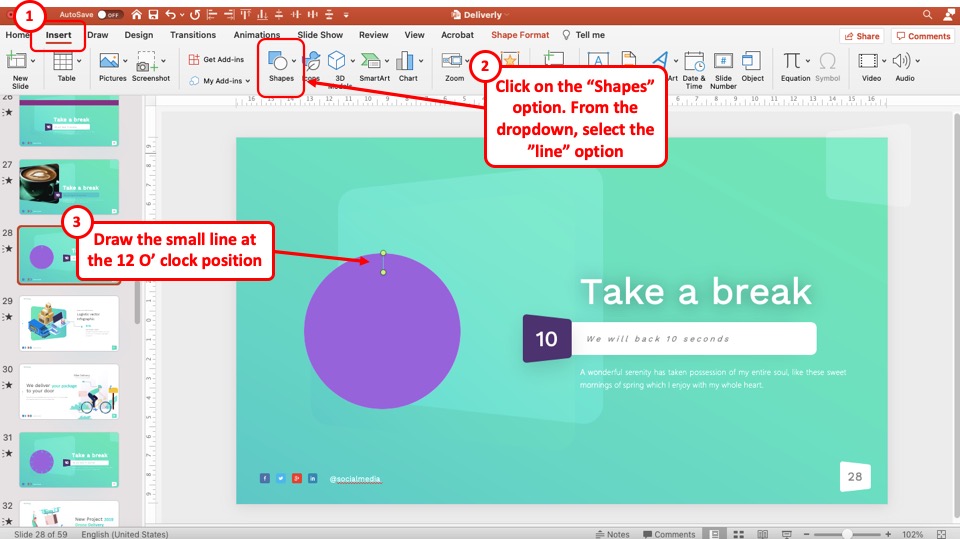
The next step is to click on the “Shapes” option again and click on the “Line” option in the “Lines” section. Then, insert a small line at the 12 o’clock position.
Step-7: Insert more lines
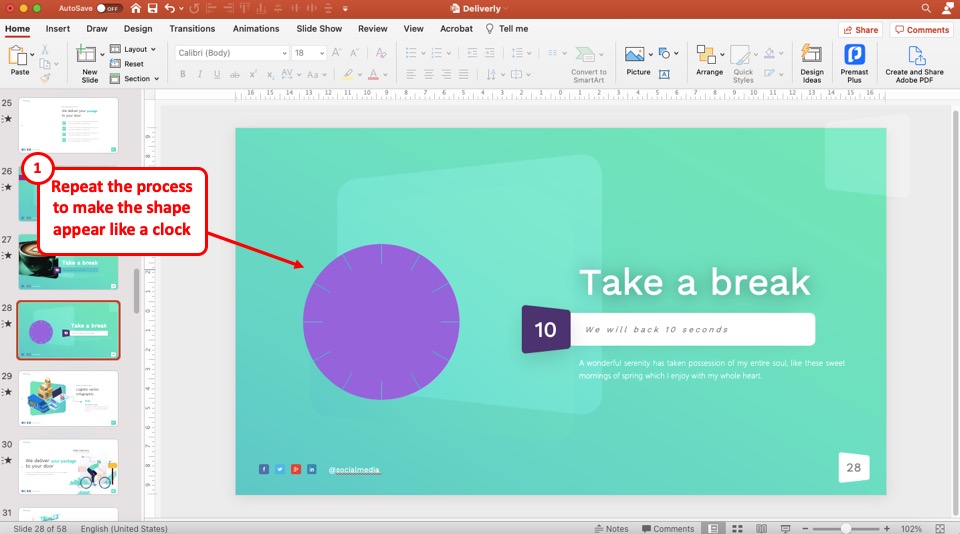
Repeat the process mentioned in step 7 and add more lines such that the lines make the shape appear like a clock.
Step-8: Add the “Wheel” Animation
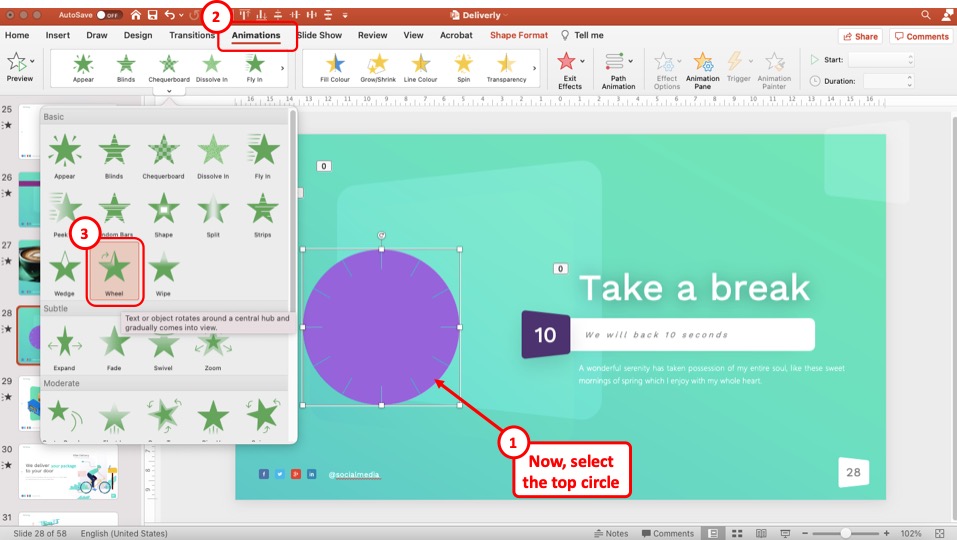
Now, we shall add the animation.
On the slide, first, select the colored circle shape on the top. Click on the “Animations” tab in the menu ribbon.
In the “Animations” menu, click on the “Add Animations” button to open a dropdown menu. From there, click on the “Wheel” option from the “Entrance” section.
Step-9: Set the Animation Duration
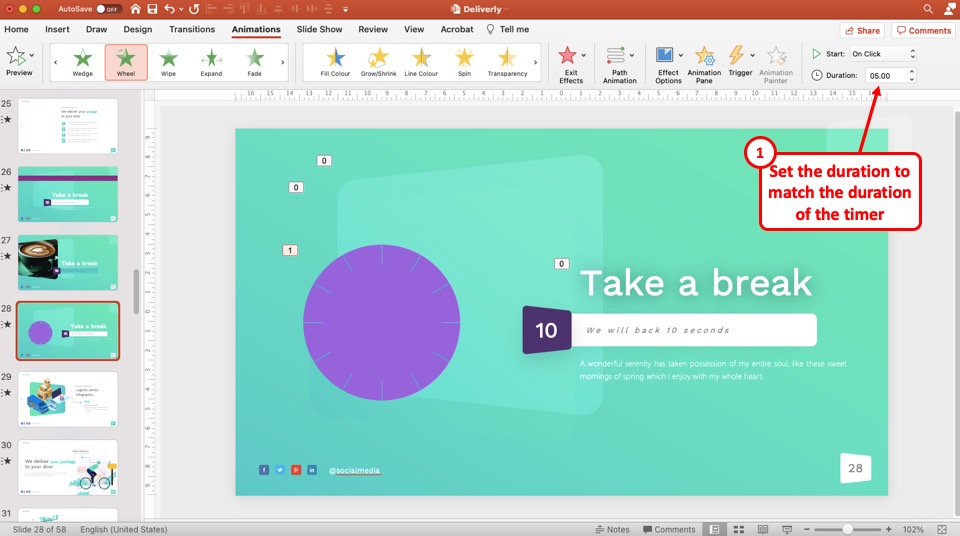
Now all you have to do is click on the “Duration” box in the “Timing” section in the “Animations” menu. In the “Duration” box, type in your preferred time for the clock countdown timer.
3. How to Insert a 5-minute Timer in PowerPoint?
In Microsoft PowerPoint, you can easily set the duration of the timer inserted in a slide. The best and the fastest way to insert a 5-minute timer in PowerPoint is by using an add-in.
Step-1: Click on the “Easy Timer” add-in
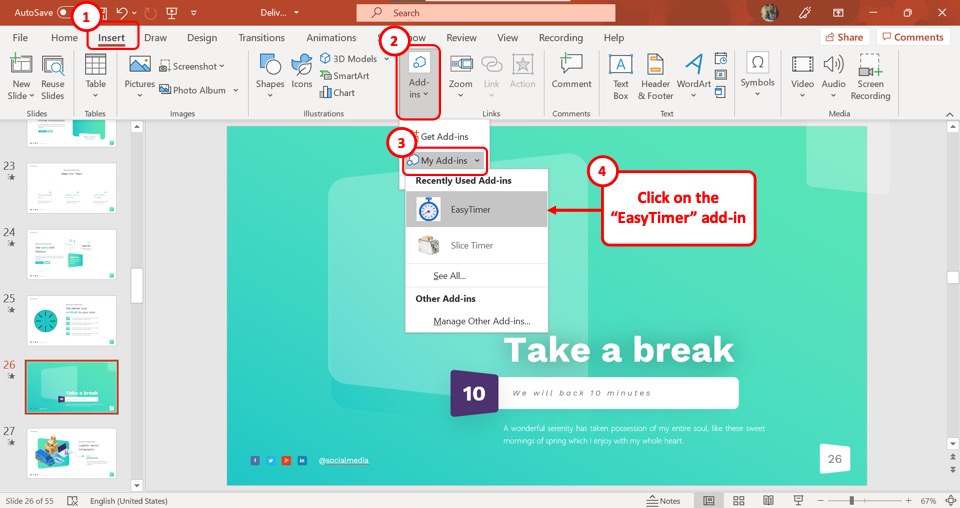
In the menu bar at the top of the screen, click on the “Insert” option. Then click on the “Add-ins” option and select “Easy Timer” under the “My Add-ins” option in the dropdown menu. This will insert a timer in the slide.
Step-2: Click on the “Duration” box
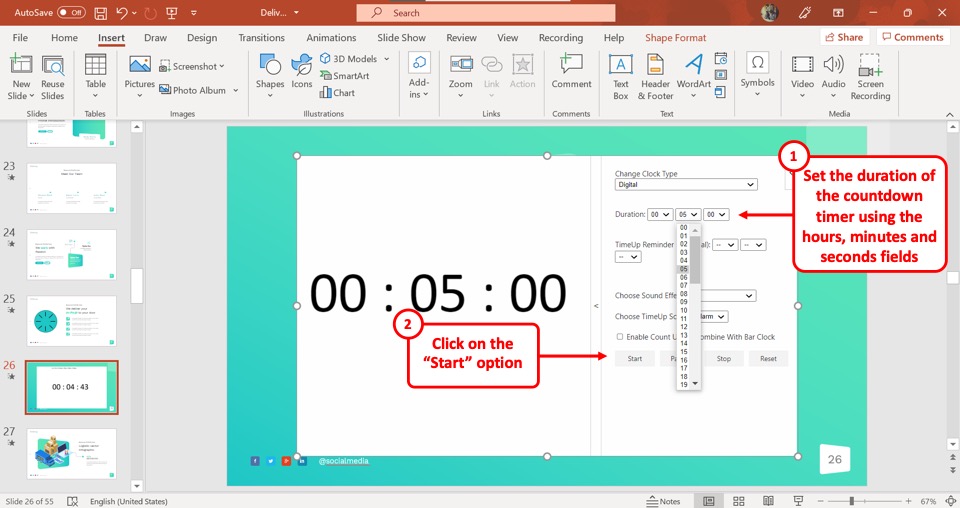
In the Easy Timer box in the slide, click on the “Duration” box. Click on the downward-facing arrow in the “Minutes” box and select “05” from the dropdown menu.
Then click on the arrow pointing downwards in the “Seconds” box and select “00” from the dropdown menu. This will be automatically saved.
You can also insert a 5-minute timer in PowerPoint either by using the other add-ins mentioned earlier in this article or by creating your own timer manually. All you have to do is set the duration to 5 minutes.
Credit to Wayhomestudio (on Freepik) for the featured image of this article (further edited).

Set the timing and speed of a transition
You can modify the duration of a transition, modify the transition effect, and even specify a sound to play during a transition. Also, you can specify the time to spend on a slide before advancing to the next.
Set the speed of a transition
Use Duration to set transition speed. A shorter duration means that a slide advances faster, and a larger number makes the slide advance more slowly.
Select the slide that has the transition that you want to modify.
On the Transitions tab, in the Timing group, in the Duration box, type the number of seconds that you want.

Tip: If you want all the slide show's transitions to use the same speed, click Apply to All .
Modify the effect options for a transition
Many, but not all, of the transitions in PowerPoint can be customized.
Select the slide that has the transition you want to modify.
On the Transitions tab, in the Transition to This Slide group, click Effect Options and select the option that you want.

In this example, a Gallery transition is applied to the slide and the From Right option is selected.

A Gallery transition, with the From Right option selected, during a presentation.
Specify a time to advance to the next slide
Advance Slide sets the transition timing by specifying how long a slide stays in view before the transition to the next slide begins. If no timing is selected, slides advance when you click the mouse.
Select the slide that you want to set the timing for.
On the Transitions tab, in the Timing group, under Advance Slide , do one of the following:
To make the slide advance to the next slide when you click the mouse, select the On Mouse Click check box.
To make the slide advance automatically, select the After check box, and then enter the number of minutes or seconds that you want. The timer starts when the final animation or other effect on the slide finishes.
To enable both the mouse and automatic advance, select both the On Mouse Click check box and the After check box. Then, at After , enter the number of minutes or seconds that you want. The slide will advance automatically, but you can advance it more quickly by clicking the mouse.
Tip: If you want all the slides to advance using the same speed, click Apply to All .
Set a sound to play during a transition
On the Transitions tab, in the Timing group, in the Sound list, select the sound that you want.
Note: If you want to use your own sound, in the Sound list, select Other Sound . Then, in the Add Audio dialog box, select the sound that you want, and then click OK
Rehearse your presentation
As you rehearse, the timer records the amount of time you spend on each slide and the total amount of time spent on all slides. The timer automatically starts when you enter Presenter View.
Go to Slide Show > Set Up > Rehearse Timings .

Begin to practice your presentation.
When you reach the last slide or exit Presenter View, PowerPoint prompts you to save the timings.
Pause, start, or reset the timer
The timer automatically starts when you enter Presenter View. However, you can pause and then restart the timer if you need to stop to type notes for the current slide or take a break. See the following table for details.
|
|
|
|---|---|
| Pause the timer | Click
|
| Start or continue the timer | Click
|
| Reset the timer to zero for the current slide | Click
|
Rehearsed slide timings aren't turned on by default. If you want to use the timings as you present, you can turn the timing on before you play the slide show. On the Slide Show tab, in Set Up , select the Use Timings check box.
Add speaker notes while you rehearse
On the left side of the notes pane, you can see any speaker notes that you entered for the current slide when you created the presentation. However, you can also type additional notes while you rehearse.
Click inside the notes pane on the right, and then type your meeting notes.
Note: When you exit Presenter View, the additional notes are appended to the end of the notes for the slide that was in view when you typed them.
Turn slide timings off
If you previously recorded your presentation and saved the slide timings, the slides may be set to automatically advance according to the saved timings when you play the slide show. If you don't want to use the timings as you present, you can turn them off.
On the Slide Show tab, in Set Up , clear the Use Timings check box.

Add, change, or remove transitions between slides

Need more help?
Want more options.
Explore subscription benefits, browse training courses, learn how to secure your device, and more.

Microsoft 365 subscription benefits

Microsoft 365 training

Microsoft security

Accessibility center
Communities help you ask and answer questions, give feedback, and hear from experts with rich knowledge.

Ask the Microsoft Community

Microsoft Tech Community

Windows Insiders
Microsoft 365 Insiders
Was this information helpful?
Thank you for your feedback.
Home Blog PowerPoint Tutorials How To Set Time Duration To Switch Slides in PowerPoint
How To Set Time Duration To Switch Slides in PowerPoint
Usually, presenters use mouse clicks, keys from a keyboard or a remote to switch slides in PowerPoint . However, if you have your presentation well-timed or have to account for every second in a presentation due to time constraints, you might want to make sure that your slides are well-timed. To do this, you can add a time duration to switch your slides. In this tutorial we will show you how to set time duration to switch slides in PowerPoint. For the purpose of this post, we will be using the Financial PowerPoint Template .
Select Your Slides from Slides Pane
In the first step, click the slide preview for the slide you wish to set time for. In case you want all your slides to switch according to a set time limit (e.g. 10 seconds), select one slide and hit CTRL+A to select all slides.
In case you want to set a different time for each slide, you will have to select each slide one by one and follow the steps shown below.

Select a Time Duration for Your Slides from the Transitions Tab
From the Transitions tab, go to ‘After’ and add a time duration after which you wish to switch your slide(s). Also make sure that ‘ On Mouse Click’ is unchecked.
The process for switching slides is similar in various versions across PowerPoint and while we are demonstrating this method using PowerPoint 2013, you will find similar options in older versions (e.g. PowerPoint 2010).

For a Single slide: For a single slide, select the respective slide from the Preview pane and add a time duration for switching the slide.

For Multiple Slides: To apply the same time duration to multiple slides, select the slides from the Preview pane using CTRL+Mouse Click, go to the Transitions tab and set a time to switch them. As mentioned earlier, you can also select all slides by clicking a single slide preview, followed by CTRL+A.
In case you have applied slide transitions, you can also set the length of the transitions using the ‘Duration’ option from the same section.

Once you have followed the aforementioned steps, switch to Slide Show mode and your slides will switch according to the set time duration.

While having well-timed slides might help in good time management, you nevertheless need good presentation slides to make an impression on your audience. Slide Model provides High-Quality PowerPoint Templates with editable slide elements which have been designed by expert professionals to give you the imagery that can be attention grabbing and visually appealing. For more details, see our plans and pricing.

Like this article? Please share
PowerPoint 2013, PowerPoint Tips, Presentation, Presentation Tips, Time, Time Management, View Presentation Filed under PowerPoint Tutorials
Related Articles

Filed under PowerPoint Tutorials • May 28th, 2024
How to Compress PowerPoint Presentations
You don’t need to end up with gigantic PowerPoint files you cannot email or distribute with ease. Instead, learn how to compress PowerPoint presentations by applying any of these 6 different methods.

How to Combine PowerPoint Files
When making a PowerPoint presentation consisting of different reports, charts, and analyses, there might be a need to combine slides from other PowerPoint templates and presentations. There are different ways by which you can combine PowerPoints into one slide deck, including reusing slides from another presentation and copying them with or without the source formatting. […]

How to Undo in PowerPoint
Don’t start anew your presentations due to simple mistakes. Learn how to undo in PowerPoint and feel confident about your presentation design skills.
Leave a Reply
How to Set Time for Slides in Powerpoint: A Step-by-Step Guide
May 10, 2024
Michael Collins
Setting the time for slides in PowerPoint is a crucial part of creating a seamless presentation. Whether you’re preparing for a timed talk or creating a self-running slideshow, the timing of each slide can be adjusted to fit your needs. In just a few clicks, you can control how long each slide is displayed before automatically advancing to the next one.
Step by Step Tutorial: Setting Time for Slides in PowerPoint
Before we dive into the steps, let’s understand why setting the time for your slides is essential. If you’re giving a presentation, it helps keep you on track. If it’s a self-running presentation, it ensures that your audience has enough time to absorb the information on each slide.
Step 1: Open the Transitions Tab
First things first, you’ll need to open the PowerPoint presentation and select the Transitions tab from the ribbon at the top of the screen.
The Transitions tab is where you’ll find all the options for controlling how your slides move from one to the next. This is also where you’ll set the timing for each slide.
Step 2: Adjust the Timing for Each Slide
Under the "Timing" group on the Transitions tab, you’ll see two boxes: "On Mouse Click" and "After." Uncheck the "On Mouse Click" box and input the desired number of seconds in the "After" box.
By unchecking "On Mouse Click," you’re telling PowerPoint to advance the slide automatically instead of waiting for a click. The number you put in the "After" box is how many seconds the slide will stay on screen before moving to the next one.
Step 3: Apply to All Slides
If you want all your slides to have the same timing, click "Apply To All" after setting the time for one slide.
This will save you a lot of time as you won’t have to manually set the timing for each slide. However, if you prefer to have different timings for different slides, you’ll need to manually adjust each one.
After you’ve completed these steps, your PowerPoint presentation will automatically advance through each slide after the set time has elapsed. This means you can step back and let your presentation do the talking, or it can help keep you on track during a live presentation.
Tips: Setting Time for Slides in PowerPoint
- Always rehearse your presentation with the set timings to ensure they work as expected.
- Consider the amount of content on each slide when setting the timing; more content may require more time.
- Use a consistent timing pattern to create a smooth flow for your audience.
- Remember that you can always manually advance slides if needed, even with timings set.
- If your presentation includes videos or animations, make sure to account for their duration in the slide timing.
Frequently Asked Questions
What if i want to pause the automatic advancement during a presentation.
You can pause the automatic slide advancement at any time by pressing the "S" key on your keyboard.
Can I set different times for different slides?
Yes, you can customize the time for each slide by adjusting the timing settings individually for each slide.
Will setting the time for slides affect my ability to manually advance them?
No, you can still manually advance slides by clicking or using the arrow keys, even after setting automatic timings.
Can I use slide timings for a self-running kiosk presentation?
Absolutely, slide timings are perfect for self-running presentations at kiosks or trade shows.
If I share my PowerPoint presentation, will the slide timings remain?
Yes, the slide timings are saved with the presentation, so they will remain when shared.
- Open the Transitions Tab
- Adjust the Timing for Each Slide
- Apply to All Slides
Setting the time for slides in PowerPoint is a game-changer when it comes to creating effective and professional presentations. Not only does it help keep you within your allotted time, but it also ensures that your audience receives the intended message without unnecessary delays. Whether it’s a sales pitch, a classroom lecture, or a virtual tour, timing your slides adds that extra level of polish that sets your presentation apart.
Remember, practice makes perfect. Rehearsing your presentation with the set timings will help you get a feel for the pace and make necessary adjustments before the big day. And don’t forget, you’re still in control. Despite the automatic timings, you can jump in at any time to elaborate on a point or to answer questions from your audience.
Setting time for slides in PowerPoint might seem like a small detail, but it’s these small details that can have a big impact. So, take the time to set up your slide timings, practice your delivery, and watch as your presentations transform from good to great.
Related posts:
- How to Download a Google Slides Presentation as a Powerpoint File
- How to Delete Multiple Slides in Google Slides: A Step-by-Step Guide
- How to Import Slides from Another Google Slides Presentation Easily
- How to Delete a Slide in Powerpoint: Step-by-Step Guide
- Can You Save a Powerpoint as a Video? Here’s How!
- How to Make a Powerpoint Slide Vertical: A Step-by-Step Guide
- How to Add Page Numbers in Powerpoint: A Step-by-Step Guide
- How to Insert a Google Slides Page Number: A Step-by-Step Guide
- How to check word count on Powerpoint: A Step-by-Step Guide
- How to Put Embedded Youtube Video in Powerpoint: Step-by-Step Guide
- Ending Powerpoint Presentations: How to End on Last Slide
- How to Hide Background Graphics in Powerpoint: A Step-by-Step Guide
Timed Presentations: Tips for When the Clock is Ticking
September 2, 2014 / Blog, Insight, PowerPoint Tips, Presentation presentation tips, time limit, timed presentations
While an extra ten minutes might seem harmless, it could mean something else for the people in your audience. An extra ten minutes could mean that majority of your audience won’t be able to hear your conclusion. It can also make or break the outcome of your presentation, especially if you’re pitching to investors or trying to make a sale.

We redesign PowerPoint presentations.
Get your free quote now..
So how can you be sure that your timed presentations end at the exact moment? Follow these three simple tips to help you finish presentations on time:
Plan accordingly
The secret to timed presentations is sufficient planning. The first thing you have to do is ask how long you have to speak. For business presentations, 30-45 minutes seem to be the standard. If you’re talking at a seminar, you might have an hour to present. Check with your contacts or the organizers to be sure.
Once you have the answer, you can begin planning how everything will play out. Aside from the main discussion, what else do you have in mind for your presentation? Do you want to involve your audience with some activities? Are you planning on giving a live demo?
Think about everything you want to do during your presentation and consider how much time each part could take up. Everything included in your presentation should contribute to your main takeaway. You should also allocate a few minutes for answering questions, and give yourself leeway in case your equipment malfunctions or you arrive late at the venue.
Rehearse and make necessary edits
After you’ve finished planning and preparing your presentation, take the extra step to rehearse everything you want to do on stage. With a timer going, practice your speech with the PowerPoint deck you’ve prepared. You should also rehearse your body language and how you plan to move on the stage. Make your rehearsals as close to your actual presentation as possible.
If you can, ask a friend or family member to help you out. Have them take note of how long you take during each part of your presentation. If it looks like you’re taking too long on the introduction, trim some of the parts out. Keep rehearsing and editing until you’re a little bit under your allotted time. If everything runs smoothly, you can use the extra time to address a few more questions.
Make adjustments on stage
Now that you know how long each part of your presentation will take, use these markers to facilitate your delivery. Take note of the time as you give your presentation. Enable PowerPoint’s Presenter View to access a timer. If you originally allotted 5 minutes for your introduction and you’re running over time, adjust accordingly. Skip the joke you were planning to tell and move on to the next part of the presentation.
Flexibility is important in timed presentations. But keep in mind that being flexible doesn’t mean rushing through your slides and talking fast. Instead, try to condense the less important parts of your presentation by offering a general overview. In cases of unforeseen events, don’t ask for extra time unless you’re offered an extension.
Make sure your audience stays to hear the rest of your presentation by staying within your allotted schedule. Timed presentations might seem a bit restrictive, but they’re basically protocol in the business world.
Don’t miss out on great opportunities just because the clock is ticking behind you.

Download free PowerPoint templates now.
Get professionally designed PowerPoint slides weekly.
Featured Image: MattysFlicks via Flickr
Popular Posts

Common Challenges in Tailoring Presentations—and Solutions

Dos and Don’ts of Pre-Seed Pitch Deck Creation

How to Write a Teaser Pitch Deck that Captivates

Tips for a Persuasive How It Works Slide

What Not to Do When Presenting Funding History

Why Raising Funds Without a Pitch Deck Can Backfire
IMAGES
VIDEO
COMMENTS
To insert a timer in PowerPoint, you can use add-ins such as “Easy Timer”, “Breaktime”, or “Slice Timer”. You can also create your own timer using the animation feature within PowerPoint using the “Fly out” or “Wheel” animation depending on the type of timer you want to add in PowerPoint.
You can modify the duration of a transition, modify the transition effect, and even specify a sound to play during a transition. Also, you can specify the time to spend on a slide before advancing to the next.
In the first step, click the slide preview for the slide you wish to set time for. In case you want all your slides to switch according to a set time limit (e.g. 10 seconds), select one slide and hit CTRL+A to select all slides.
Learn how to set time for your slides in PowerPoint with our easy step-by-step guide. Perfect for timed presentations and rehearsals.
So how can you be sure that your timed presentations end at the exact moment? Follow these three simple tips to help you finish presentations on time: Plan accordingly. The secret to timed presentations is sufficient planning. The first thing you have to do is ask how long you have to speak.
In this comprehensive tutorial, we’ll walk you through the process of perfectly timing your PowerPoint presentations using the powerful ‘Rehearse Timings’ feature.