- PRO Courses Guides New Tech Help Pro Expert Videos About wikiHow Pro Upgrade Sign In
- EDIT Edit this Article
- EXPLORE Tech Help Pro About Us Random Article Quizzes Request a New Article Community Dashboard This Or That Game Popular Categories Arts and Entertainment Artwork Books Movies Computers and Electronics Computers Phone Skills Technology Hacks Health Men's Health Mental Health Women's Health Relationships Dating Love Relationship Issues Hobbies and Crafts Crafts Drawing Games Education & Communication Communication Skills Personal Development Studying Personal Care and Style Fashion Hair Care Personal Hygiene Youth Personal Care School Stuff Dating All Categories Arts and Entertainment Finance and Business Home and Garden Relationship Quizzes Cars & Other Vehicles Food and Entertaining Personal Care and Style Sports and Fitness Computers and Electronics Health Pets and Animals Travel Education & Communication Hobbies and Crafts Philosophy and Religion Work World Family Life Holidays and Traditions Relationships Youth
- Browse Articles
- Learn Something New
- Quizzes Hot
- This Or That Game
- Train Your Brain
- Explore More
- Support wikiHow
- About wikiHow
- Log in / Sign up
- Computers and Electronics
- Presentation Software
- PowerPoint Presentations

Simple Steps to Make a PowerPoint Presentation
Last Updated: April 28, 2024 Fact Checked
Creating a New PowerPoint
Creating the title slide, adding a new slide, adding content to slides, adding transitions, testing and saving your presentation.
This article was co-authored by wikiHow staff writer, Darlene Antonelli, MA . Darlene Antonelli is a Technology Writer and Editor for wikiHow. Darlene has experience teaching college courses, writing technology-related articles, and working hands-on in the technology field. She earned an MA in Writing from Rowan University in 2012 and wrote her thesis on online communities and the personalities curated in such communities. This article has been fact-checked, ensuring the accuracy of any cited facts and confirming the authority of its sources. This article has been viewed 4,328,576 times. Learn more...
Do you want to have your data in a slide show? If you have Microsoft 365, you can use PowerPoint! PowerPoint is a program that's part of the Microsoft Office suite (which you have to pay for) and is available for both Windows and Mac computers. This wikiHow teaches you how to create your own Microsoft PowerPoint presentation on a computer.
How to Make a PowerPoint Presentation
- Open the PowerPoint app, select a template and theme, then like “Create.”
- Click the text box to add your title and subtitle to create your title slide.
- Click the “Insert” tab, then “New Slide” to add another slide.
- Choose the type of slide you want to add, then add text and pictures.
- Rearrange slides by dragging them up or down in the preview box.
Things You Should Know
- Templates make it easy to create vibrant presentations no matter your skill level.
- When adding photos, you can adjust their sizes by clicking and dragging in or out from their corners.
- You can add animated transitions between slides or to individual elements like bullet points and blocks of text.

- If you don't have a Microsoft Office 365 subscription, you can use the website instead of the desktop app. Go to https://powerpoint.office.com/ to use the website version.
- You can also use the mobile app to make presentations, though it's easier to do this on a computer, which has a larger screen, a mouse, and a keyboard.

- If you don't want to use a template, just click the Blank option in the upper-left side of the page and skip to the next part.

- Skip this step if your selected template has no themes available.

- If you're creating a PowerPoint presentation for which an elaborate title slide has been requested, ignore this step.

- You can change the font and size of text used from the Home tab that's in the orange ribbon at the top of the window.

- You can also just leave this box blank if you like.

- You can also click and drag in or out one of a text box's corners to shrink or enlarge the text box.

- On a Mac, you'll click the Home tab instead. [1] X Research source

- Clicking the white slide-shaped box above this option will result in a new text slide being inserted.

- Title Slide
- Title and Content
- Section Header
- Two Content
- Content with Caption
- Picture with Caption

- Naturally, the title slide should be the first slide in your presentation, meaning that it should be the top slide in the left-hand column.

- Skip this step and the next two steps if your selected slide uses a template that doesn't have text boxes in it.

- Text boxes in PowerPoint will automatically format the bulk of your text for you (e.g., adding bullet points) based on the context of the content itself.
- You can add notes that the Presentation will not include (but you'll still be able to see them on your screen) by clicking Notes at the bottom of the slide.

- You can change the font of the selected text by clicking the current font's name and then clicking your preferred font.
- If you want to change the size of the text, click the numbered drop-down box and then click a larger or smaller number based on whether you want to enlarge or shrink the text.
- You can also change the color, bolding, italicization, underlining, and so on from here.

- Photos in particular can be enlarged or shrunk by clicking and dragging out or in one of their corners.

- Remember to keep slides uncluttered and relatively free of distractions. It's best to keep the amount of text per slide to around 33 words or less. [2] X Research source

- Slide content will animate in the order in which you assign transitions. For example, if you animate a photo on the slide and then animate the title, the photo will appear before the title.
- Make your slideshow progress automatically by setting the speed of every transition to align with your speech as well as setting each slide to Advance . [3] X Trustworthy Source Microsoft Support Technical support and product information from Microsoft. Go to source

- If you need to exit the presentation, press Esc .

- Windows - Click File , click Save , double-click This PC , select a save location, enter a name for your presentation, and click Save .
- Mac - Click File , click Save As... , enter the presentation's name in the "Save As" field, select a save location by clicking the "Where" box and clicking a folder, and click Save .
Community Q&A
- If you save your PowerPoint presentation in .pps format instead of the default .ppt format, double-clicking your PowerPoint presentation file will prompt the presentation to open directly into the slideshow view. Thanks Helpful 5 Not Helpful 0
- If you don't have Microsoft Office, you can still use Apple's Keynote program or Google Slides to create a PowerPoint presentation. Thanks Helpful 0 Not Helpful 0

- Your PowerPoint presentation (or some features in it) may not open in significantly older versions of PowerPoint. Thanks Helpful 1 Not Helpful 2
- Great PowerPoint presentations avoid placing too much text on one slide. Thanks Helpful 0 Not Helpful 0
You Might Also Like

- ↑ https://onedrive.live.com/view.aspx?resid=DBDCE00C929AA5D8!252&ithint=file%2cpptx&app=PowerPoint&authkey=!AH4O9NxcbehqzIg
- ↑ https://www.virtualsalt.com/powerpoint.htm
- ↑ https://support.microsoft.com/en-us/office/set-the-timing-and-speed-of-a-transition-c3c3c66f-4cca-4821-b8b9-7de0f3f6ead1#:~:text=To%20make%20the%20slide%20advance,effect%20on%20the%20slide%20finishes .
About This Article

- Send fan mail to authors
Reader Success Stories
Artis Holland
Sep 22, 2016
Is this article up to date?

Oct 18, 2016
Jul 23, 2016
Margery Niyi
Sep 25, 2017
Jul 21, 2016

Featured Articles

Trending Articles

Watch Articles

- Terms of Use
- Privacy Policy
- Do Not Sell or Share My Info
- Not Selling Info
Keep up with tech in just 5 minutes a week!
Critical PowerPoint Shortcuts – Claim Your FREE Training Module and Get Your Time Back!
How to Present a PowerPoint Slideshow (w/ Shortcuts)
- PowerPoint Tutorials
- Shortcuts & Hacks
- May 11, 2019
There are a variety of ways to start a PowerPoint presention, depending on:
- Where you start your presentation (from beginning or from current)
- Which PowerPoint view you prefer to present in (Slide Show view or Presenter view)
- How comfortable you are with keyboard shortcuts
Why would Microsoft include so many ways to present a presentation? My guess is that everyone learns PowerPoint differently, and has personal presentation styles. The more options you have, the easier your life will be as there will always be a way to start your presentation the way you want to (or jump back into it when you need to).
See all the options below and find the method that works best for you and let the slide show begin !
NOTE: If you are running two presentations side-by-side, each presentation needs to be started as it’s own slide show. To see how to set up two PowerPoint presentations to run side-by-side like this before you start your slide show, read my guide here .
Table of Contents
Start slide show from beginning.

To start a slideshow from the beginning of your presentation using the ribbon, simply.
- Navigate to the Slide Show tab
- Select From Beginning
Selecting From Beginning starts your presentation from the very first non-hidden slide in your presentation, regardless of which slide you are currently inside of your deck.

You can also start your slide from the beginning of your presentation by hitting the Slideshow From Beginning keyboard shortcut, F5 .
Regardless of which method you use, this is the classic way to start your presentation in full screen from your first title slide (regardless of where you are in your slide deck).
Let the slide show begin!
NOTE: To expand your knowledge and learn how to use PowerPoint’s FREE and HIDDEN built-in laser pointer to point things out during your presentation, read my guide here .
Take your PPT skills to the next level
Start slide show from current.

To begin your slide show from the slide you are currently on using the ribbon, simply
- Navigate to the Slide Show tab
- Select From Current Slide
Selecting From Current Slide starts your slide show from whatever slide you are currently on, even if the slide is hidden.

You can also start your slide from the current slide you are on by hitting the Shift+F5 keyboard shortcut.
Because it’s often easiest to catch errors when building your slides in this full screen mode, I highly recommend learning the Shift+F5 shortcut and using it frequently as you build your slides to spot them for errors.

If you don’t want to bother learning the From Current Slide shortcut, you can also start your slideshow by clicking the Slide Show icon at the bottom of your screen.
This is a fantastic way to spot check your slides as you are building them. On top of that, it’s a fast and uncomplicated way to re-start your presentation from where you left off after demoing something on screen.
Start a mini-slide show in PowerPoint
You can also use the following hidden PowerPoint shortcut to run a mini slide show over the top of your current deck.

To run a mini slide show, simply:
- Hold down the Alt key on your keyboard
- With your mouse, click the Slide Show icon
Doing so starts a small slide show of your presentation that you can see below, from the current slide you are on.

Presenter View
The Presenter View is an alternate way to run your presentation in PowerPoint. In this view, your slides are projected on screen, and the details of your presentation are displayed on your computer as pictured below.

The presenter view includes your next (non-hidden) slides that is coming up, your current slide projected on screen, how long you’ve been talking and your speaker notes.

To launch the Presenter View from the beginning of your presentation using your Ribbon, simply:
- Navigate to the Slide Show tab
- Hold down the Alt key on your keyboard
- Click From Beginning
Holding down the Alt key and clicking From Beginning , the Presenter View will launch from the very first (non-hidden) slide in your presentation.

You can also launch the presenter view from the beginning of your presentation at any time by clicking Alt + F5 on your keyboard.
Start Presenter View in PowerPoint From Current Slide

Did you know that you can access different views in PowerPoint by adding keys as you click commands in the PowerPoint ribbon?
To start the Presenter view from your current slide using your Ribbon, simply:
- Hold down the Alt key on your keyboard
- Click From Current Slide
Holding the Alt key and clicking From Current Slide launches the Presenter View from your current slide. So, this is another way you can quickly practice your presentation, see your speaker notes and see what’s coming up next.
You can also launch the Presenter View from the beginning of your presentation at any time by hitting Alt+F5 on your keyboard.
Showing and Hiding Presenter View
Regardless of which view you start your PowerPoint slide show; you can switch between the two different slide show views without exiting presentation.

To switch between the two slideshow views (while giving your presentation), simply:
- Right-click your slide in whichever presentation view you are currently in
- Select either Show Presenter View or Hide Presenter View
When would you use a feature like this during a presentation? One example is if you want to view your notes without leaving the slide show mode.
NOTE: The letter r for both Show Presenter View and Hide Presenter View is underlined. This means that it is a keyboard shortcut. So, if you want to quickly flip between these two presentation views, you can simply right-click your slide and hit the letter r on your keyboard. Doing so automatically switches the view you are in.
Controlling how your presentation runs
Another way to control how your presentation runs (including the default laser pointer and pen color), is the Set Up Slide Show dialog box.

To open the Set Up Slide Show dialog box, simply:
- Select the Set Up Slide Show command
Doing so, opens all your PowerPoint slide show settings and options as pictured below.
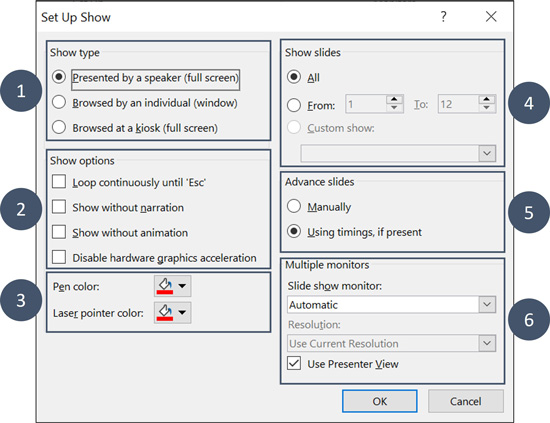
Inside the slide show settings dialog box, you can select:
- How your presentation runs (full screen, window or in kiosk mode).
- Your default pen and laser pointer color options ( see our laser pointer article here ).
- Which slide you want start from, or which slides you want to show. You can also setup a custom show here.
- How your slides progress (manually or using slide timings).
- Which of your computer monitors (or screens) your slide show runs on.
The Set Up Slide Show dialog box is also the secret to running multiple presentations at the same time in PowerPoint. To expand your knowledge and learn how to set this up, read our guide here .
Setup Slide Show SECRET Shortcut

To use the SECRET shortcut to open the Set Up Slide Show dialog box, simply:
- Hold down the Shift key on your keyboard
- With your mouse, click the Reading View icon at the bottom of your screen
This is useful when you need to quickly cycle through lots of PowerPoint presentations and change how those presentations run. Instead of wasting time clicking through the Ribbon, simply hold the Shift key and click the Reading View icon. This is also a friendly conversation starter with a fellow PowerPoint enthusiast at Happy Hour.
NOTE: The color of your Reading View icon might be different than in the picture above, as it is dependent on the Office Theme you selected for PowerPoint.
How to exit a PowerPoint presentation early?

Regardless of how you start your full screen presentation, you can end your presentation at any time by hitting the Esc key on your keyboard.
Hitting Esc immediately takes you out of the PowerPoint presentation mode and back to the normal editing view of your slides, on whatever slide you were last presenting.
Here is how you can use a combination of all the different keyboard shortcuts to spot check and practice your presentation in full screen before you finalize your presentation.
- Hit F5 on your keyboard to start your presentation in full screen from the very first slide in your presentation. You can then use your arrow keys to advance, spot checking your slides for errors.
- When you find an error, simply hit Esc key to return to the normal PowerPoint editing view to fix your slide.
- When you are done, hit Shift + F5 to return the full screen presentation mode from the slide you just updated. You can then continue spot checking your presentation (without having to start over from the beginning).
In this way you can quickly work your way through your slides and practice your presentation, fixing and adjusting your content as you go.
Understanding how to run your presentations is CRITICAL to the success of your presentation. Not only in presenting them live, but also in knowing how to spot check your slides as you build them.
I personally find it easiest to spot check your slides and quickly fix errors by running your presentation in slide show mode (or full screen). The last place you want to discover an error is during your presentation.
Using the commands and shortcuts above, you can quickly start, exit and step back into your slide show. Once you have these commands and features down, you will also look like a whiz during your presentations.
If you enjoyed the depth of this article, you will love our other PowerPoint training courses and free resources. To learn more, visit us here .
🔒 Unlock the PowerPoint Shortcuts Trusted by Industry Leaders KKR, American Express, HSBC, and More!
Join over 114,880 professionals from diverse fields including consulting, investment banking, advertising, marketing, sales, and business development who have supercharged their PowerPoint game with our proven methods.
✅ Customize compelling presentations effortlessly.
✅ Master time-saving techniques for faster deck creation.
✅ Boost your career prospects with top-notch PowerPoint skills.
Get FREE access to the Critical PowerPoint Shortcuts module of our premium training course by entering your name and email below.
DISCLAIMER: PC Users Only!
We respect your privacy and will keep your info safe and confidential.
Related Articles
About the author.

Popular Tutorials
- How to Strikethrough Text (l̶i̶k̶e̶ ̶t̶h̶i̶s̶) in Word, Excel & PowerPoint
- How to Make Animated Fireworks in PowerPoint (Step-by-Step)
- Strikethrough Shortcut (l̶i̶k̶e̶ ̶t̶h̶i̶s̶) for Word, Excel & PowerPoint
- How to Create a Flash Card Memory Game in PowerPoint (Like Jeopardy)
- Keyboard Shortcuts Not Working: Solved
PowerPoint Tutorial Categories
- Strategies & Opinions
- Presentation Design
- Pictures, Icons, Videos, Etc.
- New Features
- Miscellaneous
- Charts & Data Viz
We help busy professionals save hours and gain peace of mind, with corporate workshops, self-paced courses and tutorials for PowerPoint and Word.
Work With Us
- Corporate Training
- Presentation & Template Design
- Courses & Downloads
- PowerPoint Articles
- Word Articles
- Productivity Resources
Find a Tutorial
- Free Training
- For Businesses
We help busy office workers save hours and gain peace of mind, with tips, training and tutorials for Microsoft PowerPoint and Word.
Master Critical PowerPoint Shortcuts – Secure Your FREE Training Module and Save Valuable Time!
⌛ Master time-saving expert techniques.
🔥 Create powerful presentations.
🚀 Propel your career to new heights.
We value your privacy – we keep your info safe.
Discover PowerPoint Hacks Loved by Industry Giants - KKR, AmEx, HSBC!
Over 114,880 professionals in finance, marketing and sales have revolutionized their PPT skills with our proven methods.
Gain FREE access to a full module of our premium PowerPoint training program – Get started today!
We hate spam too and promise to keep your information safe.
You are currently viewing a placeholder content from Facebook . To access the actual content, click the button below. Please note that doing so will share data with third-party providers.
- Irresistible Tech Gifts for That Special Dad
- Killer Smartphone Deals We Love
How to Make a Slideshow on PowerPoint
Whether for work or private, use slideshows to get your message across
:max_bytes(150000):strip_icc():format(webp)/ColettaTeske-af57404a91b342578a97252b7dbd720f.jpg "how to set up presentation in powerpoint")
- Central Washington University
In This Article
Jump to a Section
Before You Begin
- Step-by-Step: Make a Slideshow on PowerPoint
- Play Music During the Slideshow
- Set up the Slideshow
- Add Timings to Each Slide
- Edit Timings on a Slide
- Create a Video Slideshow
- Save a Slideshow to a CD or Other Removeable Media
When you're ready to present your PowerPoint slides to others, look no further than PowerPoint's slideshow feature. Use this tool for all kinds of slides, but those containing photos work best for most viewers.
Instructions in this article apply to PowerPoint for Microsoft 365 , PowerPoint 2019, PowerPoint 2016, PowerPoint 2013, PowerPoint 2010, and PowerPoint for Mac.
Before you create slides for your slideshow presentation, decide how long to make the slideshow, how it should flow, and the pictures you’ll use.
- Length : A slideshow can be as long or as short as you need. The length of the slideshow should be appropriate for the topic and for your audience’s attention span.
- Outline : It’s always smart to start with an outline; it helps you visualize your slideshow. An outline can be as simple as the list of topics you want to cover.
- Pictures : Choose photos that are clear and tell a story.
With PowerPoint's Photo Album , select the pictures and PowerPoint creates the basic slideshow. Fill your slides with informative text and harmonizing background music, then turn your collection of slides into a self-running photo slideshow with music that can play as a video or be stored on a CD.
When you’re ready to make a photo slideshow with music, PowerPoint gets you up and running quickly. To get started, select Insert > Photo Album > New Photo Album .
Here’s how to add and format pictures for the slideshow using the Photo Album:
Add pictures
Select File/Disk and select the images you want in the picture slideshow.
Enhance photos
Place a checkmark next to the picture you want to enhance and change the orientation, contrast, and brightness. You’ll see the changes in the Preview window.
Add text boxes
To add a slide for text, select the image in the album list you want the text to follow and select New Text Box .
Rearrange slides
Place a checkmark next to the picture you want to move and select the Move Up or Move Down arrows.
Choose a picture layout
Select the Picture layout down arrow and choose how you want the pictures to appear in the slideshow.
Frame the pictures
Select the Frame shape down arrow and choose a frame style. You’ll see a preview in the Album Layout area. This option will not be selectable if the picture layout Fit to slide is enabled.
Select Create when you’re finished.
Your photo slideshow is created in a new file. Add text to the slides and change the look of each slide.
How to Play Music During the Slideshow
Play music in the background during your slideshow to offer an audio counterpoint to all the visuals. The background music starts automatically with the slideshow and plays during all the slides.
To add background music to your presentation, select Insert > Audio > Audio on My PC , choose a music file, then select OK .
The audio icon appears in the middle of the current slide. To move it, drag it to a different place on the slide. When the audio icon is selected, the Playback tab appears. Select Play in Background and make changes to the audio file . Here are some suggestions.
- Preview the music : Select Play to hear what the music will sound like during your slideshow.
- Shorten the duration : Select Trim Audio to remove parts of the beginning and end of the music file.
- Adjust the volume : Select Volume to make the background music louder or softer.
How to Set up the Slideshow
Once your slides are finished, it’s time to set up the slideshow. Start by deciding whether to show the slideshow in a window or full screen.
To set up the slideshow, select Slide Show > Set Up Slide Show and choose one of the following:
- Browsed by an individual (window) : Run the slideshow automatically and inside a window. This option works best when you save the slideshow to a CD.
- Browsed at a kiosk (full screen) : Run the slideshow automatically and at full-screen size. This option works best when you convert the slideshow to a video.
Select OK when you’re finished.
How to Add Timings to Each Slide in the Slideshow
Now it’s time to decide how long each slide will appear in the slideshow. To begin, select Slide Show > Rehearse Timings . The slideshow displays in full screen with a Recording toolbar and a timer.
While timing your presentation, use the Recording toolbar to advance through the presentation.
Select Next (arrow pointing to the right) to go to the next slide when the desired timing has been reached.
Select Pause to start and stop the timing.
Select Repeat to restart recording the time for the selected slide.
When you’re finished and have set the time for the last slide, close the Recording toolbar.
Select Yes to keep the recorded slide timings.
How to Edit Timings on a Slide
If you need to increase or decrease the time for your slideshow, change how long slides appear during the slideshow.
To change the timing for a slide:
Select View > Slide Sorter .
Select Transitions .
Select a slide.
In the Advance Slide After text box, enter how long the slide should appear in the slideshow before proceeding to the next slide, then press Enter .
The new timing applies to the slide.
How to Create a PowerPoint Video Slideshow
The easiest way to distribute and play your slideshow is in video format. This way, anyone can view your slideshow no matter what computer or device they use.
To convert a slideshow into a video:
Save the file.
Select File > Export .
Select Create a Video .
To force a smaller file size, select the Full HD drop-down list and choose a lower quality.
Select Create Video .
Select the destination folder and give the video a descriptive file name.
Select Save . It may take a few minutes to process the file and create the video.
How to Save a Slideshow to a CD or Other Removeable Media
To create a presentation that can be watched on any computer and can be stored on a CD or other removable media:
Select Package Presentation for CD > Package for CD .
Type a name for the CD.
Select Copy to Folder or Copy to CD and follow the on-screen directions.
When you’re finished, select Close .
Get the Latest Tech News Delivered Every Day
- The 8 Best Slideshow Apps of 2024
- Tips for Memorial PowerPoint Presentations
- Loop a PowerPoint Slide Show
- How to Use Copilot in Powerpoint
- How to Do a Voiceover on PowerPoint
- Adding Sounds, Music or Narration to PowerPoint Slide Shows
- How to Make an Image Background Transparent in PowerPoint
- How to Create Digital Photo Albums in PowerPoint
- How to Add Music to PowerPoint
- How to Add Audio to PowerPoint
- How to Hide and Unhide a Slide in PowerPoint
- How to Use Speaker Notes in PowerPoint
- Create a Wedding PowerPoint Presentation
- Edit Music, Sound, or Other Audio Settings in PowerPoint
- How to Change a Black-and-White Picture to Color in PowerPoint
- How to Print PowerPoint Slides
Improve your practice.
Enhance your soft skills with a range of award-winning courses.
How to Structure your Presentation, with Examples
August 3, 2018 - Dom Barnard
For many people the thought of delivering a presentation is a daunting task and brings about a great deal of nerves . However, if you take some time to understand how effective presentations are structured and then apply this structure to your own presentation, you’ll appear much more confident and relaxed.
Here is our complete guide for structuring your presentation, with examples at the end of the article to demonstrate these points.
Why is structuring a presentation so important?
If you’ve ever sat through a great presentation, you’ll have left feeling either inspired or informed on a given topic. This isn’t because the speaker was the most knowledgeable or motivating person in the world. Instead, it’s because they know how to structure presentations – they have crafted their message in a logical and simple way that has allowed the audience can keep up with them and take away key messages.
Research has supported this, with studies showing that audiences retain structured information 40% more accurately than unstructured information.
In fact, not only is structuring a presentation important for the benefit of the audience’s understanding, it’s also important for you as the speaker. A good structure helps you remain calm, stay on topic, and avoid any awkward silences.
What will affect your presentation structure?
Generally speaking, there is a natural flow that any decent presentation will follow which we will go into shortly. However, you should be aware that all presentation structures will be different in their own unique way and this will be due to a number of factors, including:
- Whether you need to deliver any demonstrations
- How knowledgeable the audience already is on the given subject
- How much interaction you want from the audience
- Any time constraints there are for your talk
- What setting you are in
- Your ability to use any kinds of visual assistance
Before choosing the presentation’s structure answer these questions first:
- What is your presentation’s aim?
- Who are the audience?
- What are the main points your audience should remember afterwards?
When reading the points below, think critically about what things may cause your presentation structure to be slightly different. You can add in certain elements and add more focus to certain moments if that works better for your speech.

What is the typical presentation structure?
This is the usual flow of a presentation, which covers all the vital sections and is a good starting point for yours. It allows your audience to easily follow along and sets out a solid structure you can add your content to.
1. Greet the audience and introduce yourself
Before you start delivering your talk, introduce yourself to the audience and clarify who you are and your relevant expertise. This does not need to be long or incredibly detailed, but will help build an immediate relationship between you and the audience. It gives you the chance to briefly clarify your expertise and why you are worth listening to. This will help establish your ethos so the audience will trust you more and think you’re credible.
Read our tips on How to Start a Presentation Effectively
2. Introduction
In the introduction you need to explain the subject and purpose of your presentation whilst gaining the audience’s interest and confidence. It’s sometimes helpful to think of your introduction as funnel-shaped to help filter down your topic:
- Introduce your general topic
- Explain your topic area
- State the issues/challenges in this area you will be exploring
- State your presentation’s purpose – this is the basis of your presentation so ensure that you provide a statement explaining how the topic will be treated, for example, “I will argue that…” or maybe you will “compare”, “analyse”, “evaluate”, “describe” etc.
- Provide a statement of what you’re hoping the outcome of the presentation will be, for example, “I’m hoping this will be provide you with…”
- Show a preview of the organisation of your presentation
In this section also explain:
- The length of the talk.
- Signal whether you want audience interaction – some presenters prefer the audience to ask questions throughout whereas others allocate a specific section for this.
- If it applies, inform the audience whether to take notes or whether you will be providing handouts.
The way you structure your introduction can depend on the amount of time you have been given to present: a sales pitch may consist of a quick presentation so you may begin with your conclusion and then provide the evidence. Conversely, a speaker presenting their idea for change in the world would be better suited to start with the evidence and then conclude what this means for the audience.
Keep in mind that the main aim of the introduction is to grab the audience’s attention and connect with them.
3. The main body of your talk
The main body of your talk needs to meet the promises you made in the introduction. Depending on the nature of your presentation, clearly segment the different topics you will be discussing, and then work your way through them one at a time – it’s important for everything to be organised logically for the audience to fully understand. There are many different ways to organise your main points, such as, by priority, theme, chronologically etc.
- Main points should be addressed one by one with supporting evidence and examples.
- Before moving on to the next point you should provide a mini-summary.
- Links should be clearly stated between ideas and you must make it clear when you’re moving onto the next point.
- Allow time for people to take relevant notes and stick to the topics you have prepared beforehand rather than straying too far off topic.
When planning your presentation write a list of main points you want to make and ask yourself “What I am telling the audience? What should they understand from this?” refining your answers this way will help you produce clear messages.
4. Conclusion
In presentations the conclusion is frequently underdeveloped and lacks purpose which is a shame as it’s the best place to reinforce your messages. Typically, your presentation has a specific goal – that could be to convert a number of the audience members into customers, lead to a certain number of enquiries to make people knowledgeable on specific key points, or to motivate them towards a shared goal.
Regardless of what that goal is, be sure to summarise your main points and their implications. This clarifies the overall purpose of your talk and reinforces your reason for being there.
Follow these steps:
- Signal that it’s nearly the end of your presentation, for example, “As we wrap up/as we wind down the talk…”
- Restate the topic and purpose of your presentation – “In this speech I wanted to compare…”
- Summarise the main points, including their implications and conclusions
- Indicate what is next/a call to action/a thought-provoking takeaway
- Move on to the last section
5. Thank the audience and invite questions
Conclude your talk by thanking the audience for their time and invite them to ask any questions they may have. As mentioned earlier, personal circumstances will affect the structure of your presentation.
Many presenters prefer to make the Q&A session the key part of their talk and try to speed through the main body of the presentation. This is totally fine, but it is still best to focus on delivering some sort of initial presentation to set the tone and topics for discussion in the Q&A.

Other common presentation structures
The above was a description of a basic presentation, here are some more specific presentation layouts:
Demonstration
Use the demonstration structure when you have something useful to show. This is usually used when you want to show how a product works. Steve Jobs frequently used this technique in his presentations.
- Explain why the product is valuable.
- Describe why the product is necessary.
- Explain what problems it can solve for the audience.
- Demonstrate the product to support what you’ve been saying.
- Make suggestions of other things it can do to make the audience curious.
Problem-solution
This structure is particularly useful in persuading the audience.
- Briefly frame the issue.
- Go into the issue in detail showing why it ‘s such a problem. Use logos and pathos for this – the logical and emotional appeals.
- Provide the solution and explain why this would also help the audience.
- Call to action – something you want the audience to do which is straightforward and pertinent to the solution.
Storytelling
As well as incorporating stories in your presentation , you can organise your whole presentation as a story. There are lots of different type of story structures you can use – a popular choice is the monomyth – the hero’s journey. In a monomyth, a hero goes on a difficult journey or takes on a challenge – they move from the familiar into the unknown. After facing obstacles and ultimately succeeding the hero returns home, transformed and with newfound wisdom.
Storytelling for Business Success webinar , where well-know storyteller Javier Bernad shares strategies for crafting compelling narratives.
Another popular choice for using a story to structure your presentation is in media ras (in the middle of thing). In this type of story you launch right into the action by providing a snippet/teaser of what’s happening and then you start explaining the events that led to that event. This is engaging because you’re starting your story at the most exciting part which will make the audience curious – they’ll want to know how you got there.
- Great storytelling: Examples from Alibaba Founder, Jack Ma
Remaining method
The remaining method structure is good for situations where you’re presenting your perspective on a controversial topic which has split people’s opinions.
- Go into the issue in detail showing why it’s such a problem – use logos and pathos.
- Rebut your opponents’ solutions – explain why their solutions could be useful because the audience will see this as fair and will therefore think you’re trustworthy, and then explain why you think these solutions are not valid.
- After you’ve presented all the alternatives provide your solution, the remaining solution. This is very persuasive because it looks like the winning idea, especially with the audience believing that you’re fair and trustworthy.
Transitions
When delivering presentations it’s important for your words and ideas to flow so your audience can understand how everything links together and why it’s all relevant. This can be done using speech transitions which are words and phrases that allow you to smoothly move from one point to another so that your speech flows and your presentation is unified.
Transitions can be one word, a phrase or a full sentence – there are many different forms, here are some examples:
Moving from the introduction to the first point
Signify to the audience that you will now begin discussing the first main point:
- Now that you’re aware of the overview, let’s begin with…
- First, let’s begin with…
- I will first cover…
- My first point covers…
- To get started, let’s look at…
Shifting between similar points
Move from one point to a similar one:
- In the same way…
- Likewise…
- Equally…
- This is similar to…
- Similarly…
Internal summaries
Internal summarising consists of summarising before moving on to the next point. You must inform the audience:
- What part of the presentation you covered – “In the first part of this speech we’ve covered…”
- What the key points were – “Precisely how…”
- How this links in with the overall presentation – “So that’s the context…”
- What you’re moving on to – “Now I’d like to move on to the second part of presentation which looks at…”
Physical movement
You can move your body and your standing location when you transition to another point. The audience find it easier to follow your presentation and movement will increase their interest.
A common technique for incorporating movement into your presentation is to:
- Start your introduction by standing in the centre of the stage.
- For your first point you stand on the left side of the stage.
- You discuss your second point from the centre again.
- You stand on the right side of the stage for your third point.
- The conclusion occurs in the centre.
Key slides for your presentation
Slides are a useful tool for most presentations: they can greatly assist in the delivery of your message and help the audience follow along with what you are saying. Key slides include:
- An intro slide outlining your ideas
- A summary slide with core points to remember
- High quality image slides to supplement what you are saying
There are some presenters who choose not to use slides at all, though this is more of a rarity. Slides can be a powerful tool if used properly, but the problem is that many fail to do just that. Here are some golden rules to follow when using slides in a presentation:
- Don’t over fill them – your slides are there to assist your speech, rather than be the focal point. They should have as little information as possible, to avoid distracting people from your talk.
- A picture says a thousand words – instead of filling a slide with text, instead, focus on one or two images or diagrams to help support and explain the point you are discussing at that time.
- Make them readable – depending on the size of your audience, some may not be able to see small text or images, so make everything large enough to fill the space.
- Don’t rush through slides – give the audience enough time to digest each slide.
Guy Kawasaki, an entrepreneur and author, suggests that slideshows should follow a 10-20-30 rule :
- There should be a maximum of 10 slides – people rarely remember more than one concept afterwards so there’s no point overwhelming them with unnecessary information.
- The presentation should last no longer than 20 minutes as this will leave time for questions and discussion.
- The font size should be a minimum of 30pt because the audience reads faster than you talk so less information on the slides means that there is less chance of the audience being distracted.
Here are some additional resources for slide design:
- 7 design tips for effective, beautiful PowerPoint presentations
- 11 design tips for beautiful presentations
- 10 tips on how to make slides that communicate your idea
Group Presentations
Group presentations are structured in the same way as presentations with one speaker but usually require more rehearsal and practices. Clean transitioning between speakers is very important in producing a presentation that flows well. One way of doing this consists of:
- Briefly recap on what you covered in your section: “So that was a brief introduction on what health anxiety is and how it can affect somebody”
- Introduce the next speaker in the team and explain what they will discuss: “Now Elnaz will talk about the prevalence of health anxiety.”
- Then end by looking at the next speaker, gesturing towards them and saying their name: “Elnaz”.
- The next speaker should acknowledge this with a quick: “Thank you Joe.”
From this example you can see how the different sections of the presentations link which makes it easier for the audience to follow and remain engaged.
Example of great presentation structure and delivery
Having examples of great presentations will help inspire your own structures, here are a few such examples, each unique and inspiring in their own way.
How Google Works – by Eric Schmidt
This presentation by ex-Google CEO Eric Schmidt demonstrates some of the most important lessons he and his team have learnt with regards to working with some of the most talented individuals they hired. The simplistic yet cohesive style of all of the slides is something to be appreciated. They are relatively straightforward, yet add power and clarity to the narrative of the presentation.
Start with why – by Simon Sinek
Since being released in 2009, this presentation has been viewed almost four million times all around the world. The message itself is very powerful, however, it’s not an idea that hasn’t been heard before. What makes this presentation so powerful is the simple message he is getting across, and the straightforward and understandable manner in which he delivers it. Also note that he doesn’t use any slides, just a whiteboard where he creates a simple diagram of his opinion.
The Wisdom of a Third Grade Dropout – by Rick Rigsby
Here’s an example of a presentation given by a relatively unknown individual looking to inspire the next generation of graduates. Rick’s presentation is unique in many ways compared to the two above. Notably, he uses no visual prompts and includes a great deal of humour.
However, what is similar is the structure he uses. He first introduces his message that the wisest man he knew was a third-grade dropout. He then proceeds to deliver his main body of argument, and in the end, concludes with his message. This powerful speech keeps the viewer engaged throughout, through a mixture of heart-warming sentiment, powerful life advice and engaging humour.
As you can see from the examples above, and as it has been expressed throughout, a great presentation structure means analysing the core message of your presentation. Decide on a key message you want to impart the audience with, and then craft an engaging way of delivering it.
By preparing a solid structure, and practising your talk beforehand, you can walk into the presentation with confidence and deliver a meaningful message to an interested audience.
It’s important for a presentation to be well-structured so it can have the most impact on your audience. An unstructured presentation can be difficult to follow and even frustrating to listen to. The heart of your speech are your main points supported by evidence and your transitions should assist the movement between points and clarify how everything is linked.
Research suggests that the audience remember the first and last things you say so your introduction and conclusion are vital for reinforcing your points. Essentially, ensure you spend the time structuring your presentation and addressing all of the sections.
How to loop a PowerPoint slideshow so that it automatically starts over as soon as it ends
- To loop a PowerPoint slideshow, you'll need to enable looping in the "Set Up Slide Show" menu.
- Once you set your PowerPoint to loop, it'll start over from the beginning automatically after playing the last slide.
- Visit Business Insider's Tech Reference library for more stories .
If you've designed a Microsoft PowerPoint presentation that's meant to be viewed repeatedly, such as on a kiosk or in a museum installation, you can adjust the settings in PowerPoint so that your slideshow "loops" instead of ending after one viewing.
Getting a PowerPoint to loop is easy. Read on to find out how, using PowerPoint for both Mac and PC.
Check out the products mentioned in this article:
Microsoft office (from $149.99 at best buy), apple macbook pro (from $1,299.00 at apple), acer chromebook 15 (from $179.99 at walmart), how to loop a powerpoint presentation.
1. Open the Microsoft PowerPoint presentation that you want to loop.
2. With your PowerPoint presentation open, click on the "Slide Show" tab, then click on "Set Up Slide Show."
3. In the pop-up window that appears, click on the box next to "Loop continuously until 'Esc'" so that a small checkmark appears inside the box. Feel free to adjust any other settings in this menu as well. Click "OK" when you're finished.
4. To test whether your PowerPoint can loop successfully, click on the "From Beginning" or "Play From Start" button in the Slide Show tab. Click through the slideshow until you reach the end. When your PowerPoint reaches its final slide, it should start over from the beginning automatically. When you're confident that looping is enabled, and you're ready to close the slide show, press the Esc key.
Related coverage from Tech Reference :
How to add a border to slides in powerpoint, and give your slideshow a sleek design, how to embed a youtube video into your microsoft powerpoint presentations using a mac or pc, how to convert google slides to a powerpoint presentation in 4 easy steps, how to create a custom powerpoint template to use or share with others, how to copy or duplicate a powerpoint slide and put it anywhere in your slideshow.
Insider Inc. receives a commission when you buy through our links.
Watch: We compared the $1,200 MacBook Air with the $500 Surface Go, and the results were a mess
- Main content
How-To Geek
How to loop a powerpoint presentation.
If you're showing off a lot of photos at a special event, set your presentation to progress at a continuous, automatic loop. Here's how.
Quick Links
Set up your slideshow to be looped, apply automatic slide transitions.
Slideshows are sometimes used to display images at events, such as weddings or trade shows. Whatever the occasion might be, you’ll want to loop your PowerPoint presentation so your guests aren’t staring at a blank screen. Here’s how it’s done.
First, open your PowerPoint presentation in which you would like to loop. Once open, navigate to the “Set Up” group of the “Slide Show” tab and then select the “Set Up Slide Show” button.
The “Set Up Show” window will appear. In the “Show options” group, check the box next to “Loop Continuously until Esc.” Once selected, click “OK” in the bottom-right corner of the window.
Now, when you play your slideshow, it will end only when you press the “Esc” key instead of when you've finished the last slide.
Related: How to Make YouTube Videos Loop Continuously
One caveat: With the way we currently have it set up, the slideshow will proceed only when someone clicks the mouse button. That’s fine if there will be a speaker present at all times. Otherwise, you’ll need to set up automatic slide transitions.
Head back to the “Set Up Show” window by selecting “Set Up Slide Show” in the “Set Up” group of the “Slide Show” tab.
There are a couple of options you need to select, but one important note is that you must first select “Using Timings, If Present” under the “Advance Slides” group.
The next option we select will lock a few things in place (which is why you need to select “Using Timings, If Present” first).
Under the “Show Type” group, select “Browsed at a Kiosk (Full Screen)." The “Loop Continuously until Esc” option will be enabled automatically if you haven’t already turned it on, and the option you’ve selected under “Advance Slides” will remain unchanged.
Select “OK” when ready to proceed.
Without the “Browsed at a Kiosk” option enabled, the automatic slide progressions would be disabled if someone were to press the Back key. With it enabled, the Forward and Back keys are locked, allowing the slideshow to automatically progress unattended without fear of someone breaking it.
Now it’s time to set the timings of the slides. Head over to the “Transitions” tab. In the “Timing” group, check the box next to “After” and set the timing at which you’d like each slide to progress. Note that it doesn’t matter if the box next to “On Mouse Click” is checked or not---it won’t work.
After that, select the “Apply to All” option in the same group.
Now, when you play your slideshow, it will continuously loop without interruption. To exit the slideshow, press the “Esc” button.
Byte Bite Bit
How to Make Video Play Automatically in PowerPoint: A Step-by-Step Guide
Making a PowerPoint presentation shine often comes down to those small, seamless touches that captivate the audience’s attention. One such technique is having a video play automatically when a slide appears. This simple trick can enhance storytelling, make your delivery more dynamic, and keep viewers engaged throughout. By setting your video to play automatically, you ensure that your content flows smoothly, keeping the momentum of your presentation intact.

We know how crucial it is to maintain that flow and avoid awkward pauses. Imagine the impact when, instead of fumbling to click play, your video starts as soon as the slide pops up. This can give you that extra bit of polish, making your presentation more effective and professional. It’s like setting a stage where the show runs flawlessly, drawing your audience deeper into your message.
With just a few steps, embedded videos in PowerPoint can leap into action without a hitch. In Normal view, click your video, head to the Playback tab, and select Automatically under Start options. This ensures the video will play immediately when you reach the slide, helping keep your audience engaged and your storytelling smooth. Ready to impress with flawless video integration? Let’s dive deeper into making this a part of your presenting toolkit.
- 1.1 Understanding Auto-Play Features
- 1.2 Inserting and Timing Your Videos
- 1.3 Applying Playback Settings
- 2.1 Compatibility and Best Practices
- 2.2 Compression and Quality Optimization
- 3.1 Adding Interactivity with Videos
- 3.2 Effective Use of Audio and Visual Elements
- 4.1 Linking and Embedding Online Video Content
- 4.2 Looping, Sequencing, and Full-Screen Playback
- 4.3 Resolving Common Video Playback Issues
Setting Up Automated Video Playback in PowerPoint
Setting up automated video playback in PowerPoint helps make your presentations smoother and more engaging. By configuring autoplay settings, inserting videos correctly, and fine-tuning playback options, you can ensure your multimedia elements run seamlessly.
Understanding Auto-Play Features
PowerPoint offers various options for starting video playback during a slide show. We can choose to play videos automatically when a slide appears, or trigger them with a click.
To make a video play automatically, select the video on your slide. Then, go to the Playback tab and choose “Automatically” from the Start drop-down menu . This ensures that the video begins without manual intervention.
Inserting and Timing Your Videos
To insert a video, click Insert > Video and choose a file from your computer or an online source. Place the video on your slide where it’s most visually effective.
Timing your video is crucial for a fluid presentation. Adjust the start time on the Playback tab —you can fine-tune it to start after your previous animation or immediately upon slide entry. This keeps your audience engaged without awkward pauses.
Applying Playback Settings
On the Playback tab , you have multiple controls to customize video playback. We can set the volume, loop the video, and rewind after playing.
If the video has sound, selecting Start Automatically is helpful, as audio will begin at the right moment. We can also add Advanced Audio Coding (AAC) for higher quality sound.
These settings make sure that our presentation is both visually and audibly appealing. Adjusting these controls ensures each video clip runs precisely how we want it to, enhancing the flow of our presentation.
Integrating Various Video Formats and Resolutions
When embedding videos into a PowerPoint presentation, we need to ensure they play smoothly across different devices. It’s crucial to choose compatible formats and optimize video quality without oversizing the file.
Compatibility and Best Practices
PowerPoint supports a variety of video formats, including MP4, AVI, MOV , and WMV . Among these, MP4 (H.264) is widely considered the most compatible, balancing quality and file size well.
Steps for embedding videos:
- Insert the video via the “Insert” tab.
- Verify compatibility under the “Playback” tab.
- Select the ‘Play Automatically’ option.
Let’s not forget audio! Ensuring the video’s audio format is compatible (like AAC for MP4) helps avoid playback issues.
Compression and Quality Optimization
Balancing quality and file size is the trick. Using compression tools helps maintain high resolution without creating massive files that can crash a presentation.
Compression Tools:
- HandBrake : Supports MP4 and adjusts bitrate.
- VLC Media Player : Converts and compresses videos.
Keep video resolutions within reasonable ranges, typically 720p or 1080p . Too high a resolution can unnecessarily bloat file sizes.
Ultimately, integrating various video formats and resolutions into PowerPoint effectively requires a smart balance of compatibility and compression. This ensures we achieve smooth playback and quality visuals.
Creating Engaging Multimedia Presentations
Multimedia presentations can amplify the delivery of your message by making use of videos and audio-visual elements. This makes your presentation both interactive and captivating.
Adding Interactivity with Videos
Videos can significantly enhance the engagement level of your presentation. By embedding a video, you can provide a more dynamic experience for your audience.
To add a video:
- Click on the slide where you want to insert the video.
- Go to the “Insert” tab , select “Video,” and then choose “Video on my PC.”
- Locate and select your video file before clicking “Insert.”
Once the video is embedded, we can control how it plays. By selecting “Playback,” and setting it to “Automatically,” the video’s engagement power is maximized. This eliminates the need to manually start the video, thus maintaining the flow of the presentation.
Remember, our videos should support the content. They should be relevant, concise, and high-quality to keep the audience’s attention and add value to our message.
Effective Use of Audio and Visual Elements
Leveraging audio and visual elements can turn an ordinary slide into an extraordinary one. These components should be used wisely to enhance the overall presentation without overwhelming the audience.
Audio elements can include background music or sound effects to highlight key points. Keep audio cues subtle; they should complement the content, not distract from it.
Visual elements , like images, charts, and graphics, can simplify complex information. Animated transitions and effects should be smooth and not overused.
By mixing these multimedia elements, we create a varied and engaging presentation that stands out. Balancing these multimedia components ensures our audience remains attentive and enhances their overall experience with our material.
Advanced PowerPoint Video Features and Troubleshooting
For those looking to get the most out of their video presentations, PowerPoint offers several advanced features, from embedding online videos to troubleshooting playback issues. Let’s dive into these features and how to effectively use them.
Linking and Embedding Online Video Content
Embedding videos from online platforms like YouTube can add value to your presentations. To do this, we can insert a video by selecting Insert > Video > Online Video , and then entering the video’s URL. This method saves time and disk space as the video remains online.
Linking videos ensures that they are always updated with the latest content, but be mindful of internet connectivity during your presentation. It’s a fantastic way to share dynamic content without bulky files, particularly for product demos or educational content.
Looping, Sequencing, and Full-Screen Playback
PowerPoint allows us to loop videos, sequence them precisely, and play them in full screen. Looping a video helps in creating background ambiance, which is perfect when combined with music or narration. To loop a video, select the video, go to Playback > Loop until Stopped .
Sequencing videos can be managed through Animations > Animation Pane —here we can set them to play “After Previous” or “With Previous.” For full-screen playback, choose the Start option under Playback and select Play Full Screen .
Resolving Common Video Playback Issues
Playback issues can arise and often have simple fixes. If a video doesn’t play, check if the file type is supported (like .mp4 or .mpeg). Ensure that the video’s URL is correct when embedding from online sources. Always verify that the presentation and video files are in the same directory when transporting them.
For smooth playback, Share the presentation via OneDrive or email, as this includes all linked files. Update all video drivers and ensure PowerPoint is up to date to prevent compatibility issues. Double-check the video volume settings to avoid distracting silences during play.
By mastering these features, we enhance our presentations and resolve issues with confidence.
Related posts:
- How to Embed a YouTube Video in PowerPoint: Step-by-Step Guide
- How to Add a Video to PowerPoint: Step-by-Step Tutorial
- How to Add Narration to PowerPoint: Step-by-Step Guide for Effective Presentations
- How to Add Slide Numbers in PowerPoint: A Step-by-Step Guide
- How to Do a Voice Over on PowerPoint: Easy Steps for Professionals
- How to Add Notes to PowerPoint: Enhance Your Presentations with Ease
- How to Make an Org Chart in PowerPoint: A Step-by-Step Guide
- How to Make a PowerPoint Presentation: Step-by-Step Guide for Beginners
- How to Change PowerPoint to Portrait: A Step-by-Step Guide
- What Is the Slide Sorter View in PowerPoint? A Guide for Efficient Presentation Management
- How to Embed Excel into PowerPoint: Simplify Data Visualization
- How to Use Designer in PowerPoint for Enhanced Presentations
Leave a Comment Cancel reply
Save my name, email, and website in this browser for the next time I comment.

Contribute to the Microsoft 365 and Office forum! Click here to learn more 💡
April 9, 2024
Contribute to the Microsoft 365 and Office forum!
Click here to learn more 💡
PowerPoint Forum Top Contributors: Steve Rindsberg - John Korchok - Bob Jones AKA: CyberTaz ✅
May 10, 2024
PowerPoint Forum Top Contributors:
Steve Rindsberg - John Korchok - Bob Jones AKA: CyberTaz ✅
- Search the community and support articles
- Microsoft 365 and Office
- Search Community member
Ask a new question
POWERPOINT STOP WHEN I LOCK COMPUTER
I SET UP A SECOND DISPLAY SCREEN TO RUN A POWERPOINT PRESENTATION AT THE FRONT DESK. HOWEVER WHEN THE RECEPTIONIST HAS TO LOCK HER COMPUTER, THE PRESENTATION STOPS. IS THERE A WAY TO STOP THIS? I TRIED SETTING UP A LOCK SCREEN SLIDESHOW BUT IT ONLY WORKS ON THE MAIN SCREEN.
- Subscribe to RSS feed
Report abuse
Reported content has been submitted
Replies (1)
- Microsoft Agent |
Dear Denisse Berrios
Welcome to the Microsoft Community! We are happy to help you.
Understanding that you are experiencing problems with PowerPoint when running a slide show.
Typically, when you set up a second display at the front desk to run a slide show presentation, it's normal for the presentation to stop if the computer is locked because the locking action pauses all running applications.
Is your multi-screen display device a projector or what? Does your computer graphics card support dual output? (There are two video ports for connecting different monitors)
You mentioned trying to set up a lock screen slideshow, what exactly do you do?
What happens if you try switching the slide show monitor to a second screen? Under Slide Show tab - Setup Slide Show - Multi-Monitor option.

Thank you for your understanding and patience. Please feel free to let me know if you have any other updates, thank you.
Jennie | Microsoft Community Support Specialist
Was this reply helpful? Yes No
Sorry this didn't help.
Great! Thanks for your feedback.
How satisfied are you with this reply?
Thanks for your feedback, it helps us improve the site.
Thanks for your feedback.
Question Info
- Norsk Bokmål
- Ελληνικά
- Русский
- עברית
- العربية
- ไทย
- 한국어
- 中文(简体)
- 中文(繁體)
- 日本語
Voice over generator for PowerPoint

Looking for our Text to Speech Reader ?
Featured In
Table of contents, why are voice overs a good idea for powerpoint, how to record a voice over using powerpoint, create a professional voice over quickly and easily with speechify voiceover studio, try speechify voiceover studio today, how do i set up voice over in powerpoint, can you put a voice recording over a powerpoint, how do you get powerpoint to read to you.
Using a voice over generator for PowerPoint adds style, professionalism, and natural properties to your presentation. Here’s how.
PowerPoint (PPT) is Microsoft’s app for making and editing presentations. As part of Microsoft Office, PowerPoint is available on Mac, PC, and mobile devices. It lets users create brand-new or template-based presentations, add text, art, images, animations, or videos, and share their work with others.
Adding voice over as audio support is particularly useful when making PowerPoint presentations and can enhance content delivery. Here’s how to use a voice over generator for PowerPoint, no matter whether you’re using the online PPT maker or the desktop PPT creator app.
What makes a good PowerPoint presentation?
A good PowerPoint presentation seamlessly blends form and function to engage, inform, and persuade its audience. At its core, clarity and conciseness are paramount, ensuring that slides are not overloaded with excessive text or overly complex graphics. Instead, each slide should convey a singular idea, augmented by impactful visuals and limited bullet points. A consistent design theme with appropriate color contrasts, legible fonts, and organized layouts provides visual cohesion and ensures easy readability.
Additionally, the integration of relevant images, charts, and graphs can bolster comprehension and retention of the content. Beyond the slides themselves, the presenter's delivery plays a pivotal role—a dynamic narrative, aligned with the visuals, can bring the content to life, sustaining audience attention and fostering understanding. Ultimately, a successful PowerPoint presentation is one that is both visually appealing and effectively communicates its intended message.
Voice overs complement PowerPoint presentations in many ways. Here are some the best reasons to add a voice over to a presentation.
Boost reliability and validity
Adding clear audio voice over to a presentation adds validity to its content. The audience can feel that validity, which in turn increases the feelings of reliability and adds faith in the content.
Add emotion
Besides increasing validity, a voice over on PowerPoint slides makes the content more emotional. The presentation adds passion that accentuates the vision and values of the presentation.
Serve as a call to action
Voice over functionality is very captivating. It passes the call to action to your audience even without apparent references. This is mainly because the presentation becomes more emphatic when natural-sounding voices are behind it.
Make content more inclusive
Text to speech software and a voice over make any presentation more inclusive and accessible. People with learning disabilities like dyslexia, ADHD, and visual impairments can listen to the content without feeling overwhelmed about reading it.
Recording and adding a voiceover on PowerPoint is simple. Just follow the steps below, and you’ll be good to go.
- Open the PowerPoint presentation where you want to add a voice over.
- Hit the “Record” button from the upper-hand ribbon. You can also choose from different recording options in the “Record” tab.
- You can use the text from the presentation as a teleprompter as you record yourself. Any existing notes will be transformed into text during the recording.
- With proper permissions, turn on or off your camera or microphone.
- Press “Start recording” when ready.
- Use the “left” or “right” arrows to record voice overs for a particular slide.
- Make pauses by pressing the pause button or selecting “Stop” to finish.
- Review the recording by pressing the “Play” button. If you’re unhappy with it, you can edit it by pressing “Retake recording.”
- Export the presentation as a video file by hitting “Export” and “Export Video.”
As you can see, adding a voice over to your PowerPoint presentation can be done from within the app. However, the steps may be a bit too complex for some users. Also, you may not be comfortable with the idea of using your own voice.
But luckily, we have a solution for that.
Originally just a text to speech (TTS) app, Speechify has now expanded into fully customizable, real-time AI voiceover generation with Speechify Voiceover Studio . You can use it to create professional voice overs that sound like real human voices for Microsoft PowerPoint, Google Slides, and other—in addition to recording e-learning and tutorial videos, podcasts, audiobooks, and more. Create audio dialogs, training videos, or stunning slide-show presentation voiceovers in seconds.
The human-like voices, plenty of playback options, and affordable pricing make Speechify Voiceover well worth the consideration.
You can use your own video editor to edit the text to speech voices however you like, or you can use Speechify’s own AI video maker . And if you don’t want to use PowerPoint or Google Slides, you can create your slide-show presentation with Speechify AI Slides.
Here’s an overview of Speechify’s AI Voice Generator features:
- More than 200 high-quality AI voices
- Over 20 different languages and accents
- Complete customization over pronunciation, pauses, pitch, and more.
- 8,000+ licensed background music soundtracks
- Unlimited uploads and downloads
- Commercial usage rights
- 24/7 customer support
- Fast audio editing and processing
- Export in WAV or MP3 files
Speechify Voiceover Studio can provide high-quality natural-sounding voices for your PowerPoint presentations. The ease of use and quick generation of audio files make this app suitable for users of all ages and computer skills.
Try Speechify Voiceover Studio for free today.
You can use the app’s in-built voice recorder feature and record yourself or use third-party computer-generated AI voices offered by Speechify.
Yes, you can use your own voice recordings or computer-generated voices from third-party software like Murf or Speechify over a PowerPoint slide.
PowerPoint has a speech recognition tool you can use to read text out loud. Go to “Speech Recognition,” then “Text to Speech,” and set the reading speed and other properties.
Integrating deep voice text to speech technology with Spotify playlists
ChatGPT 5 Release Date and What to Expect

Cliff Weitzman
Cliff Weitzman is a dyslexia advocate and the CEO and founder of Speechify, the #1 text-to-speech app in the world, totaling over 100,000 5-star reviews and ranking first place in the App Store for the News & Magazines category. In 2017, Weitzman was named to the Forbes 30 under 30 list for his work making the internet more accessible to people with learning disabilities. Cliff Weitzman has been featured in EdSurge, Inc., PC Mag, Entrepreneur, Mashable, among other leading outlets.
- Add an image
- Draft and add content
- Rewrite text
- Chat with Copilot
- Create a summary
- Copilot in Word on mobile devices
- Create a new presentation
- Add a slide or image
- Summarize your presentation
- Organize your presentation
- Use your organization's branding
- Copilot in PowerPoint for mobile devices
- Draft an Outlook email message
- Summarize an email thread
- Suggested drafts in Outlook
- Email coaching
- Get started with Copilot in Excel
- Identify insights
- Highlight, sort, and filter your data
- Generate formula columns
- Summarize your OneNote notes
- Create a to-do list and tasks
- Create project plans in OneNote
Create a new presentation with Copilot in PowerPoint
Note: This feature is available to customers with a Copilot for Microsoft 365 license or Copilot Pro license.
Create a new presentation in PowerPoint.

Select Send and Copilot will draft a presentation for you!
Edit the presentation to suit your needs, ask Copilot to add a slide , or start over with a new presentation and refine your prompt to include more specifics. For example, "Create a presentation about hybrid meeting best practices that includes examples for team building.”
Create a presentation with a template
Note: This feature is only available to customers with a Copilot for Microsoft 365 (work) license. It is not currently available to customers with a Copilot Pro (home) license.
Copilot can use your existing themes and templates to create a presentation. Learn more about making your presentations look great with Copilot in PowerPoint .

Enter your prompt or select Create presentation from file to create a first draft of your presentation using your theme or template.

Edit the presentation to suit your needs, ask Copilot to add a slide , organize your presentation, or add images.
Create a presentation from a file with Copilot
Note: This feature is available to customers with a Copilot for Microsoft 365 license for full options, or a Copilot Pro license for limited options.

With Copilot in PowerPoint, you can create a presentation from an existing Word document—or a PDF if you have a Copilot for Microsoft 365 (work) license. Point Copilot in PowerPoint to your document, and it will generate slides, apply layouts, create speaker notes, and choose a theme for you.

Select the document you want from the picker that appears. If you don't see the document you want, start typing any part of the filename to search for it. You can use a Word document—or, if you have a Copilot for Microsoft 365 (work) license, you can use a PDF, and encrypted documents are available as well.
Note: If the file picker doesn't appear, type a front slash (/) to cause it to pop up.
Select Send and Copilot will draft a presentation for you!
Best practices when creating a presentation from a Word document
Leverage word styles to help copilot understand the structure of your document.
By using Styles in Word to organize your document, Copilot will better understand your document structure and how to break it up into slides of a presentation. Structure your content under Titles and Headers when appropriate and Copilot will do its best to generate a presentation for you.
Include images that are relevant to your presentation
When creating a presentation, Copilot will try to incorporate the images in your Word document. If you have images that you would like to be brought over to your presentation, be sure to include them in your Word document.
Start with your organization’s template
If your organization uses a standard template, start with this file before creating a presentation with Copilot. Starting with a template will let Copilot know that you would like to retain the presentation’s theme and design. Copilot will use existing layouts to build a presentation for you. Learn more about making your presentations look great with Copilot in PowerPoint .
Tip: Copilot works best with Word documents that are less than 24 MB.
Welcome to Copilot in PowerPoint
Frequently Asked Questions about Copilot in PowerPoint
Where can I get Microsoft Copilot?
Copilot Lab - Start your Copilot journey

Need more help?
Want more options.
Explore subscription benefits, browse training courses, learn how to secure your device, and more.

Microsoft 365 subscription benefits

Microsoft 365 training

Microsoft security

Accessibility center
Communities help you ask and answer questions, give feedback, and hear from experts with rich knowledge.

Ask the Microsoft Community

Microsoft Tech Community

Windows Insiders
Microsoft 365 Insiders
Find solutions to common problems or get help from a support agent.

Online support
Was this information helpful?
Thank you for your feedback.
COMMENTS
Select the text. Under Drawing Tools, choose Format. Do one of the following: To change the color of your text, choose Text Fill, and then choose a color. To change the outline color of your text, choose Text Outline, and then choose a color. To apply a shadow, reflection, glow, bevel, 3-D rotation, a transform, choose Text Effects, and then ...
In PowerPoint, you can create a presentation from scratch, or from a theme with built-in graphics, fonts, and placeholders for your text, images, and content...
To do that, simply go up to the Home tab and click on New Slide. This inserts a new slide in your presentation right after the one you were on. You can alternatively hit Ctrl+M on your keyboard to insert a new blank slide in PowerPoint. To learn more about this shortcut, see my guide on using Ctrl+M in PowerPoint.
Open the PowerPoint app, select a template and theme, then like "Create.". Click the text box to add your title and subtitle to create your title slide. Click the "Insert" tab, then "New Slide" to add another slide. Choose the type of slide you want to add, then add text and pictures. Rearrange slides by dragging them up or down in ...
Microsoft PowerPoint is a presentation design software that is part of Microsoft 365. This software allows you to design presentations by combining text, images, graphics, video, and animation on slides in a simple and intuitive way. Over time, PowerPoint has evolved and improved its accessibility to users.
Get started with PowerPoint for Beginners. Follow this 20-Minute step by step PowerPoint tutorial to start creating presentations smoothly.Contents of this v...
How to Create a Presentation in PowerPoint - Office 365. This video explains how to create a basic PowerPoint presentation. How to select a theme and how you...
A good presentation needs two fonts: a serif and sans-serif. Use one for the headlines and one for body text, lists, and the like. Keep it simple. Veranda, Helvetica, Arial, and even Times New Roman are safe choices. Stick with the classics and it's hard to botch this one too badly.
Navigate to the Slide Show tab. Hold down the Alt key on your keyboard. Click From Beginning. Holding down the Alt key and clicking From Beginning, the Presenter View will launch from the very first (non-hidden) slide in your presentation.
Just like for creating a master template, the first thing is to access the master view. Go to View tab > Slide Master to see exactly all the design guidelines your presentation has at the moment. #2. Edit the Master Slide. If there's a common element that you want to change, the Master Slide is the place to do it!
Create a presentation from a theme. Select File > New. Double-click a theme in the gallery to create a presentation in that theme. Or search for more templates.
Start by deciding whether to show the slideshow in a window or full screen. To set up the slideshow, select Slide Show > Set Up Slide Show and choose one of the following: Browsed by an individual (window): Run the slideshow automatically and inside a window. This option works best when you save the slideshow to a CD.
Learn everything you need to know to get started using Microsoft PowerPoint! You'll learn all the basics plus more, including: how to choose a design theme...
This clarifies the overall purpose of your talk and reinforces your reason for being there. Follow these steps: Signal that it's nearly the end of your presentation, for example, "As we wrap up/as we wind down the talk…". Restate the topic and purpose of your presentation - "In this speech I wanted to compare…". 5.
If you want to learn how to loop your slides in PowerPoint, follow these steps: Go to the Slide Show tab and select Set Up Slide Show. When the Set Up Show window appears, go to the Show options group and tick the Loop continuously until 'Esc' option. Don't forget to click OK to apply the new setup!
Chrissy Montelli/Business Insider. 4. To test whether your PowerPoint can loop successfully, click on the "From Beginning" or "Play From Start" button in the Slide Show tab. Click through the ...
First, open your PowerPoint presentation in which you would like to loop. Once open, navigate to the "Set Up" group of the "Slide Show" tab and then select the "Set Up Slide Show" button. The "Set Up Show" window will appear. In the "Show options" group, check the box next to "Loop Continuously until Esc.".
Go to the "Insert" tab, select "Video," and then choose "Video on my PC.". Locate and select your video file before clicking "Insert.". Once the video is embedded, we can control how it plays. By selecting "Playback," and setting it to "Automatically," the video's engagement power is maximized.
We are happy to help you. Understanding that you are experiencing problems with PowerPoint when running a slide show. Typically, when you set up a second display at the front desk to run a slide show presentation, it's normal for the presentation to stop if the computer is locked because the locking action pauses all running applications.
Just follow the steps below, and you'll be good to go. Open the PowerPoint presentation where you want to add a voice over. Hit the "Record" button from the upper-hand ribbon. You can also choose from different recording options in the "Record" tab. You can use the text from the presentation as a teleprompter as you record yourself.
Create a new presentation in PowerPoint. Select the Copilot button in the Home tab of the ribbon. Click or type Create presentation from file. Select the document you want from the picker that appears. If you don't see the document you want, start typing any part of the filename to search for it. You can use a Word document—or, if you have a ...