
How To Export Canva Presentation Slides To PowerPoint
Here’s how to make awesome twitch emotes with canva in your browser..
Canva is an incredible online design software that allows you to create many things including stunning presentations.
But if you’re a PowerPoint user you might be wondering how to export your Canva slides as a PowerPoint presentation?
In this article, we’ll take you through the process step by step, including how to keep your animated elements from Canva.
Let’s dive right in.
Jump to a specific section:
Step 1: Download your Canva slides
Step 2: open the .pptx doc in powerpoint, step 3: copy or add animation.
If you haven’t created your presentation in Canva yet – check out these incredible Canva presentation slide templates to get started.
If you have, open up your Canva slides document, and once you’ve made all your updates and you’re happy with it you can now download it.
You can download as a PDF file, or publish it online, or if you want to export it as a PowerPoint presentation (.pptx) you can do that too. Here’s how:
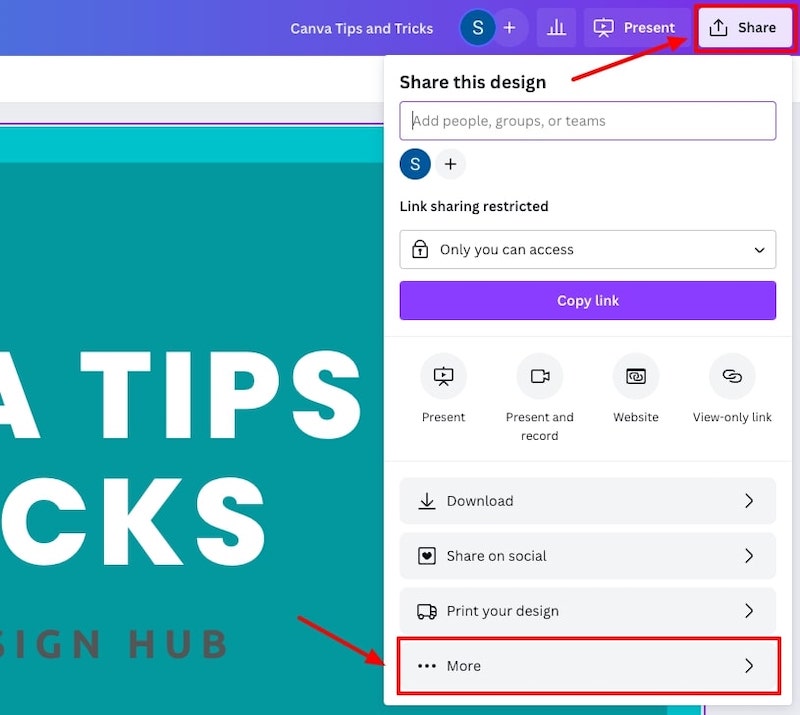
Go to the ‘Share’ button at the top right and click ‘More’:
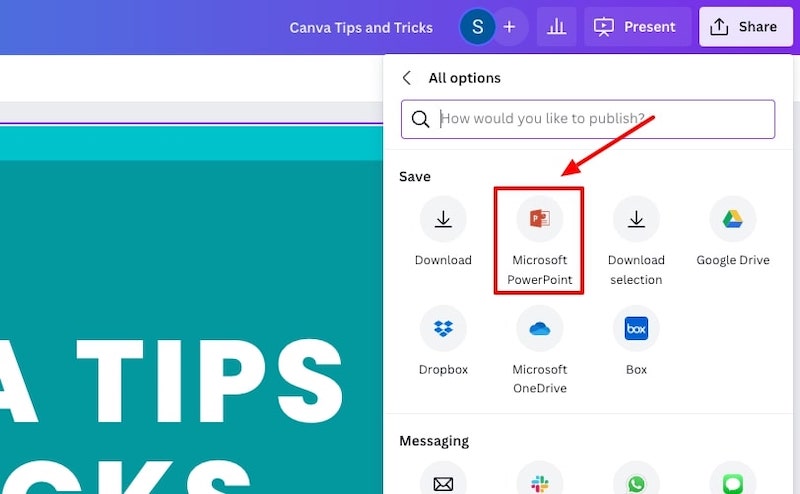
Scroll down to the ‘Save’ options and choose ‘Microsoft PowerPoint’:
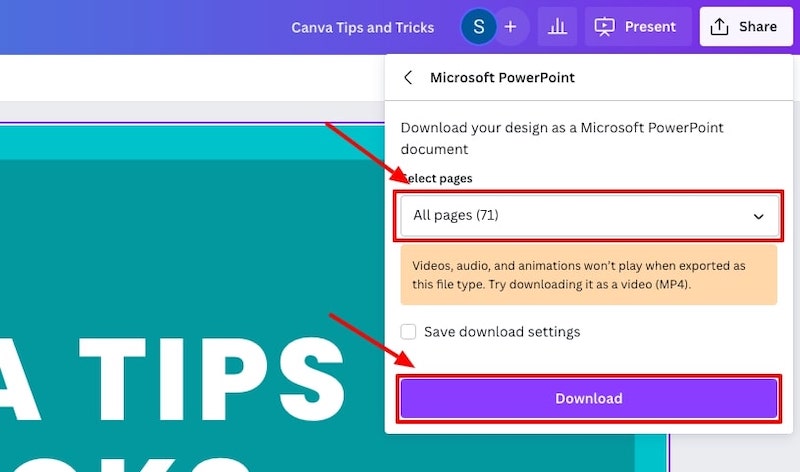
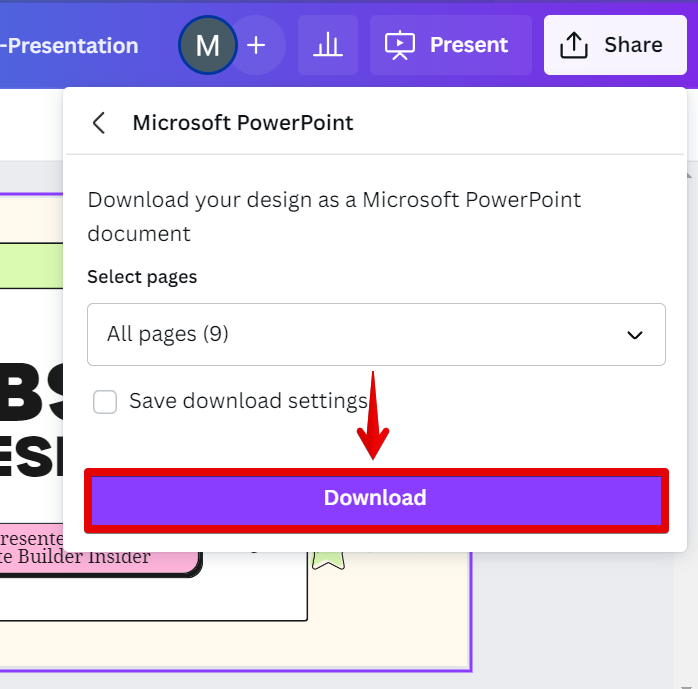
Choose the slides you want to download, and hit the download button:
You will now have a PowerPoint presentation (.pptx) file in your downloads folder that you can open up.
The next step is to check if everything in your presentation was exported from the Canva slides to a PowerPoint presentation correctly.
In the past, elements such as the text fonts, graphs, videos, and some graphics didn’t export correctly but Canva has mostly fixed these issues so your export will likely be completely fine.
It’s worth checking though!
As an example, our .pptx export contained a couple of videos in one of the slides. One of the videos remained in that format:
Whilst the other one was converted into an image element:
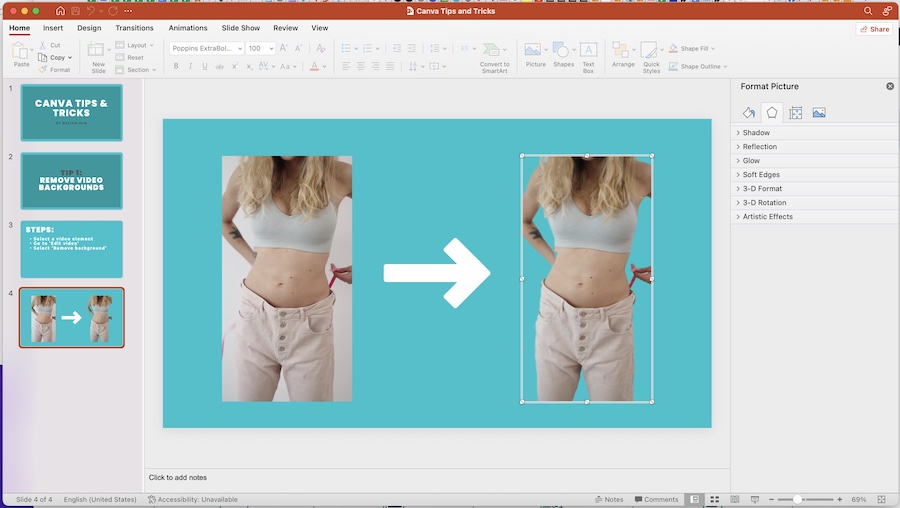
Most of the elements will be converted properly but as you can some elements such as animations and videos might not convert correctly.
There is a workaround for this, which we’ll cover in the next step.
To convert Canva slides with animation into PowerPoint presentation slides here’s what you have to do:
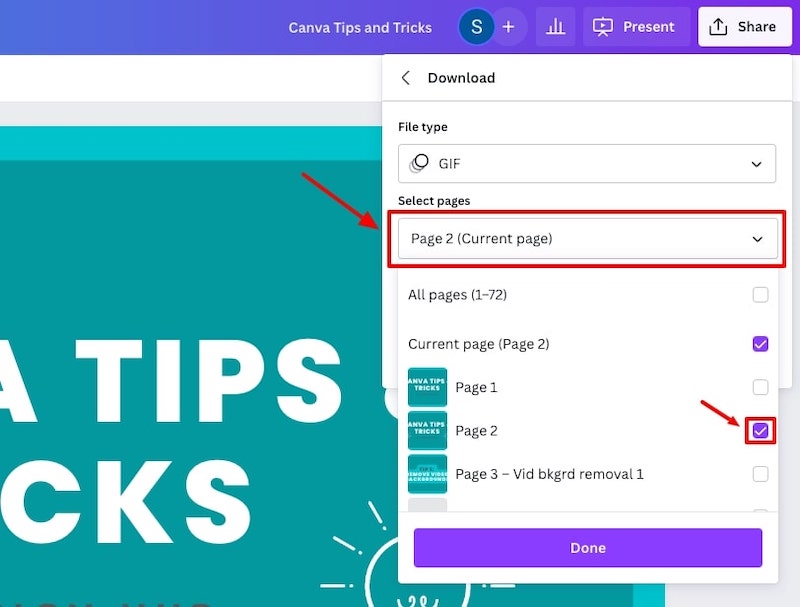
First, go back to your Canva presentation, and download the pages with animation as GIFs. Simply, go to ‘Share’ then ‘Download’ and select the page or pages that you want to download:
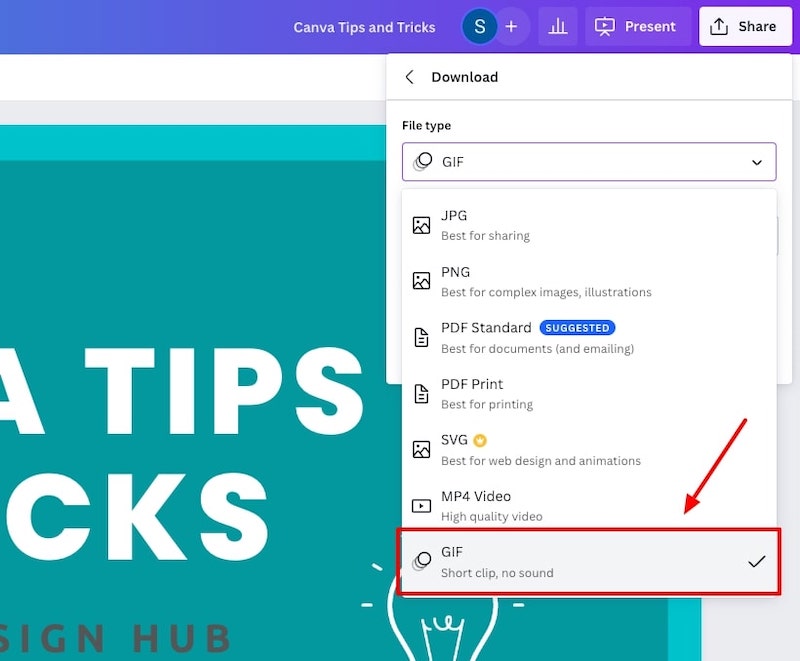
Then, select GIF as your file type, and hit the download button:
The last step is to add a blank slide in your PowerPoint presentation, upload the downloaded GIF image into that new blank slide and adjust it to cover the PowerPoint page and that’s it!
You’ll now have an animated slide in your PowerPoint presentation.
Adding animations in PowerPoint
You can also simply download the full Canva presentation and convert it to a PowerPoint presentation and then add animations within PowerPoint instead.
Here’s a great video showing you how to add animations in PowerPoint:
Related articles
If you’re new to Canva, here are some other articles that might be of interest to you:
- How to use Canva: Beginners tutorial
- Canva tips and tricks
- How to draw on Canva
Wrapping things up
So, there you have it, that’s how you can quickly and easily convert your Canva presentations into PowerPoint presentations, including how to keep your animations.
We hope this tutorial was helpful for you!
Enjoy creating! If you have any questions or suggestions leave a comment below.

Written by Sam McCraw
Leave a reply cancel reply.
Your email address will not be published. Required fields are marked *
Save my name, email, and website in this browser for the next time I comment.
By using this form you agree with the storage and handling of your data by this website. *
How to Use Canva: Tutorial For Beginners
How To Create A 3D Pop Out Effect in Canva
© 2024 by Design Hub
How to Convert Canva Slides to PowerPoint
Do you have a Canva presentation that you need to use in PowerPoint? Here's how to convert it in just a few clicks.
Canva’s presentation tool makes it easy to put together a professional and visually engaging slide deck, regardless of your level of expertise. However, at some point, you may need to convert your Canva slides to PowerPoint to accommodate certain requirements, take advantage of more advanced features, or collaborate with others who prefer to work with PowerPoint.
Whatever the case, this article has got you covered. In this comprehensive guide, we'll walk you through the step-by-step process of seamlessly transitioning your Canva presentations to PowerPoint, ensuring that your hard work and creativity are preserved.
After you’ve created the perfect professional presentation in Canva , here is how you can export it as a PowerPoint file. Click the Share button in the top-right corner and select More from the drop-down menu.
Scroll down the list and click on Microsoft PowerPoint .
You can type PowerPoint in the search bar at the top to quickly find it.
By default, all the slides in your presentation will be selected to be exported. However, if you only want to export specific slides, click on the drop-down arrow under Select Pages . Disable the check marks beside the slides you don’t want to include, and click Done . Now click Download to export your selected slides.
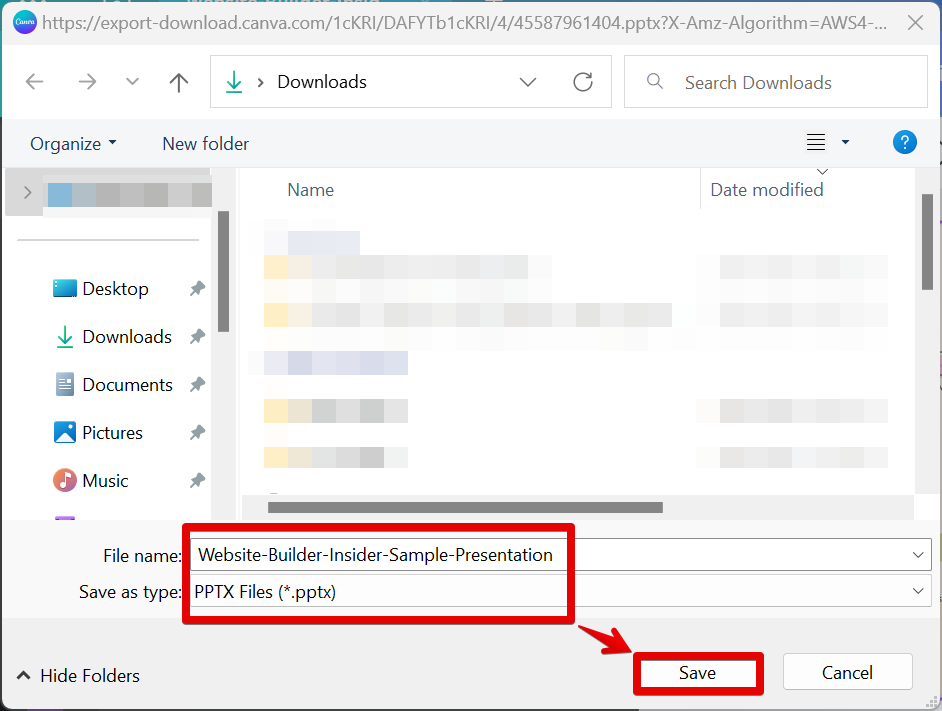
In the file explorer window that pops up, choose a location for your file, give it a suitable name, and click Save . Your Canva slide deck will now be downloaded to your computer as a PowerPoint (PPT) file.
This method of exporting your Canva presentation into a PPT file has a few limitations. The fonts you used may change if you don’t already have them on your computer.
In addition, if you’ve applied standard animations or used Canva’s animation tool to create custom animations for certain elements, these elements will be removed in the PPT document. In the next few sections, we’ll walk through how to work around these limitations.
How to Convert Canva Slides to PowerPoint (Without Changing Fonts)
Depending on the fonts you use, your Canva slide deck won’t look the same in PowerPoint if you don’t have those exact fonts saved on your computer. PowerPoint will automatically replace those custom fonts with default fonts.
If you want to still stick with the custom fonts, one way to go about it is to explore the font library in PowerPoint to see if you would find similar-looking fonts.
Another way to go about this is to first find out the name of the font in Canva or use any of the five best sites for identifying fonts online . From here, you can download the fonts to your computer from any of the best free font websites . The process of adding your new fonts to PowerPoint is similar to that of adding new fonts to Microsoft Word .
How to Convert Canva Slides to PowerPoint (With Animations)
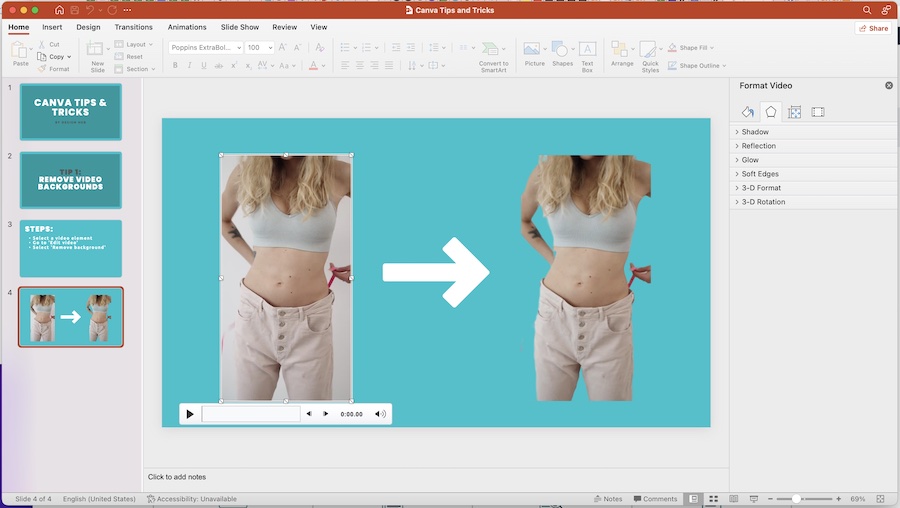
If you don’t want to lose all the cool animation you’ve added to your Canva presentation, you’ll have to export them as a GIF. Here’s how.
Click the Share button and select Download from the drop-down menu.
Ensure GIF is selected under File type. With this method, you’ll have to select one page at a time (under Select pages) to export as a GIF. When you’re done, click Download .
In the file explorer window that appears, choose a file location, give it a suitable name, and click Save . Your Canva slide will now be downloaded to your computer as a GIF file.
You have to repeat the same process for each page in your Canva slide deck. If your slides aren’t many, this shouldn't be much of a problem. However, if you’re working with a bunch of slides, this can be a bit tedious.
If you want to maintain the animated elements without the animations, you can go through a similar process but this time around, save your entire slide deck as a PNG file.
This will export each slide as a PNG file and place it in a zipped folder. From here you can extract the files, then drag and drop them into PowerPoint. Compared to exporting each slide as a GIF, this method will save you lots of time.
While the method of exporting your Canva slide deck into a .PPTX file removes animated elements, this method doesn’t let you modify slide elements in PowerPoint since they’re in GIF or PNG format. Keep these limitations in mind as you decide which method you want to use.
Converting Canva Slides to PowerPoint Is Easy
By following the steps outlined in this article, you can seamlessly transition your Canva presentations to PowerPoint, and get the best of both worlds! Whether you're working in Canva or PowerPoint, you can also choose to convert your presentations into videos.
We explain and teach technology, solve tech problems and help you make gadget buying decisions.
How to Create Presentations in Canva

Parth Shah is an evergreen freelance writer covering how-tos, app guides, comparisons, listicles, and troubleshooting guides on Android, iOS, Windows, Mac, and smart TV platforms. He has over five years of experience and has covered 1,500+ articles on GuidingTech and Android Police. In his free time, you will see him binge-watching Netflix shows, reading books, and traveling.
Canva recently introduced new tools to create docs, whiteboards, videos, websites, and presentations. As such, you no longer need to rely on traditional software solutions like Google Slides, PowerPoint, or Keynote to create an upcoming business presentation. You can easily create presentations in Canva using its familiar suite of editing tools.

Canva offers real-time collaboration, several export options, a present tool, AI add-ons, and much more to make a professional PPT. Canva also lets you make instant presentations with pre-filed slides. Without further ado, let’s get started.
Pick Up an Aspect Ratio and Template
Before you start, make sure to pick a relevant aspect ratio for your presentation. If it’s a traditional PPT, go with a 16:9 aspect ratio. If you plan to show your PPT on mobile, use the 9:16 aspect ratio.
Tablet users can start with a 4:3 aspect ratio. Canva also offers some ready-to-use templates to get started. We highly recommend starting with a template to save some time.

You can also filter templates via style, theme, feature, and color. For example, you can check company, marketing, corporate, marketing, school, and other templates. Most templates are free to use, while some may require a Canva Premium subscription.
Under templates, you also find an option to create instant presentations. You can enter a prompt and check Canva’s suggestions to get started.

Customize a Page With Editing Features
Once you pick up a template, you have the option to add all pages to your presentations. You can click ‘Apply all pages’ and check every slide at the bottom. You can always select a slide and hit delete to remove it from your presentation.

Canva lets you change every aspect of the template with different text styles, filters, and image editing tools. You can change color, tweak transparency, copy style, and more.

We suggest spending some time with editing tools to customize your Canva presentation and add some personal touches.
Add Graphics, Stickers, and Images
Your presentation will not seem as interesting without graphics, stickers, images, and videos. Unlike Google Slides or PowerPoint, you don’t need to import media files to Canva to complete your slides. You can easily add relevant elements from the sidebar.
Step 1: Open a slide in your Canva presentation.
Step 2: Select Elements from the sidebar. Add graphics, icons, stickers, tables, videos, and more.
Step 3: You can explore the AI image generator and turn your creative ideas into images and videos with a single click.

You can add simple descriptions and even turn generated images into videos. Canva also offers a long list of graphics packs in several categories. The possibilities are endless here. It’s up to you to make a compelling slide using useful tools.
Tweak Page Animation
Once you create a page, tweak its animation to make a smooth transition between pages.
Step 1: Select a slide in Canva.
Step 2: Click Animate at the top.
Step 3: Check basic, exaggerated, photo movement, and other animation types from the left sidebar.

You can also tweak the animation intensity, which is great.
Add Presenter Notes
Do you plan to present your Canva PPT on a video conference? You can add notes to each slide so they appear during the Presenter view (more on that later).
When you create a PPT, select a slide and hit Notes at the bottom. Enter your notes that you want to remember or talk about during a video meeting.

Collaborate and Edit in Real Time
Similar to Google Slides and Microsoft PowerPoint, Canva lets you share and edit a presentation in real time. You can take inputs from your colleagues and create a share-worthy presentation in no time.
Step 1: When you are done making changes to your presentation, click Share at the top.
Step 2: Enter people, groups, or your team. Expand the collaboration link menu and select Anyone with the link.
Step 3: Expand the permission menu and select Can edit.

You can also share a link with view or comment-only permission. Select the Copy link and share it with your co-workers.
Enable Presenter View
Presenter view is a thoughtful touch from Canva to give presentations over a Google Meet or Teams call.
You can open a presentation in Canva and select Present at the top. Click Presenter View and check two windows opening up on your computer.

One window shows your presentation with notes open on the sidebar. Another window displays the current slide you are sharing with others over a call.

Download and Share Your Presentation
As expected, Canva gives several options to share and export your presentation. When you complete your presentation, click Share in the top-right corner and expand Download.
You can convert a presentation to PDF, PPTX (Microsoft PowerPoint compatible), MP4, JPG, PNG and SVG formats. Check our dedicated post if you wish to print your Canva presentation .

Use Canva Like a Pro
Canva has done a solid job, granting users access to rich tools to create a convincing presentation. We can’t wait to see how the Australian startup enhances our PPT experience with AI features in the future. Speaking of which, we would love to see a feature similar to ‘Design Ideas from Microsoft PowerPoint’ on Canva. Do let us know if you use Canva for presentations in the comments below.
Was this helpful?
Last updated on 07 January, 2024
The above article may contain affiliate links which help support Guiding Tech. However, it does not affect our editorial integrity. The content remains unbiased and authentic.

The article above may contain affiliate links which help support Guiding Tech. The content remains unbiased and authentic and will never affect our editorial integrity.
DID YOU KNOW

More in Internet and Social

Top 7 Ways to Fix Discord Search Not Working on Android and iPhone

How to Remove a Google Account From Chrome
Join the newsletter.
Get Guiding Tech articles delivered to your inbox.
Home Blog Design How to Use Canva and PowerPoint for Presentations
How to Use Canva and PowerPoint for Presentations

Creating the perfect presentation design is a challenge that speakers often aim to achieve, only to find themselves lacking graphic design knowledge. Although high-tier options like Adobe Photoshop and Adobe Illustrator help users worldwide to put their ideas into pixels, the reality is they are not user-friendly interfaces for people outside the graphic design industry, namely business professionals, marketers, and educators. Hence, the need to find an alternative for making powerful graphics to use in our presentations – and here’s where Canva comes into the picture.
This web-based graphic design tool has quickly become the preferred choice of teachers, social media influencers, and small business owners due to its free-tier plans and pro plans at a convenient subscription-based fee.
In this article, we will see how to use Canva presentation in PowerPoint and how to export Canva to PPT, to create visually appealing presentations.
Table of Contents
Canva vs. Microsoft PowerPoint: Pros and Cons for Presenters
Designing with canva, how to export a canva presentation to powerpoint, how to use canva-made graphics in powerpoint, final words.
Although presenters often see Canva as an alternative to PowerPoint, the reality is that they differ in one single aspect: Canva is a graphic design tool, whereas PowerPoint is a presentation design software. Some of the tools available in PowerPoint are not there in Canva, and vice versa.

Going into more technical aspects, here are the Pros and Cons of working with either software as a presenter.
Pros of Canva as a Presentation Tool
User-friendly interface.
Canva’s drag-and-drop feature makes it easy for non-designers to create presentations by using its library of shapes, graphics, text styles, and other resources.
Wide Range of Templates
It offers a vast library of Canva templates, which can be easily customized in their online editor, saving time on design. There’s a con associated with this point, which we shall discuss later.
Magic Studio for Canva was released mid-Q3 this year with the idea of powering designs with AI tools. This tool is available in Canva search features and in the editor at the bottom right corner, which features the list options:
- AI text generation
- Suggested graphics to match your design
- Suggested photos to match your design
Collaboration Feature
Allows multiple users to simultaneously work on the same presentation, which is great for small team projects. Compared with PowerPoint, it does not require all users to be Premium to collaborate online.
Web-Based Platform
Being an online platform, it allows users to work from any device with Internet access without needing software installation. This particularly helps users with legacy computers who cannot install current versions of Microsoft Office.
Integrated Stock Library
Provides access to a broad selection of stock photos, illustrations, and icons within the platform. Just like with the Canva templates, there’s also a con to this point.
Customization Options
Users can upload images and fonts, enabling brand consistency across presentations. Note: The upload fonts feature is only available for Canva Pro users.
Photo Editing and Animation Features
Canva lets users tweak their graphics with simple-to-use controls. These options help us to adjust opacity, apply photo filters, add animation effects, add bevels and shadows, and more.
Cross-Platform Compatibility
Can export presentations to various formats (as a PDF document, as a video presentation in MP4 format, or even as images), making them viewable on different devices and platforms. The export options allow us to post directly into social media, create printables, post to the web, etc. While some export formats require an upgrade to a Canva Pro subscription (like the ability to export to SVG format), the basic export features are enough for simple presentations and beginners.
Cons of Canva as a Presentation Tool
Limited offline functionality.
Requires an internet connection for full functionality, which can be a limitation in areas with poor connectivity, for business people working on an airline flight, while using Airplane mode, or for people traveling in other zones without Internet access.
Fewer Animation and Transition Options
Unlike PowerPoint, the available options for animations and transitions are limited. Users can find this reiterative, which may be unappealing to using these effects in our presentations.
Premium Content
Although the Canva library is extensive in terms of assets, the reality is that most of these elements are only available for premium users. This applies to templates, shapes, images (mostly), and exporting options. Resizing the graphics you create in Canva to repurpose your design is only available to premium users.
Template Overuse
Popular templates can be overused, making presentations look similar to many others. This is of particular interest to business professionals, as people tend to easily associate some designs as being made with Canva.
Design Decisions
Unlike using a PowerPoint template , you have to work your way with Canva content, as the PPT templates tend to be quite generic and do not offer tools for data representation. Consequently, you have to know how and where to introduce those elements on your own rather than working with a presentation template that already assigned the space for such graphics.
Lack of Advanced Multimedia Integration
Integrating complex multimedia elements like videos is not as seamless as in some desktop applications. You won’t find options to link to source elements; you need to upload the content to your personal Canva library and manually add the resource to the slide. Presenters can also lose third-party integrations via plugins for some multimedia resources.
Pros of PowerPoint as a Presentation Tool
Widespread use and familiarity.
PowerPoint is the leading market tool for presentations, making most audiences and presenters are familiar with it at a basic operational level. This can help us to outsource technical issues quickly rather than aiming to use web-based interfaces to share Canva-created content.
Offline Access
PowerPoint can be used offline, which is ideal for people traveling, areas where the Internet connection is unreliable, or simply because we want to focus on creating the slides rather than facing distractions via the Internet.
Integration with Other Microsoft Office Tools
Seamlessly integrates with other Microsoft products like Excel and Word, making it easy to import data and documents. This is ideal for creating complex graphics for data representation, where the content can be synced, importing databases, working with Gantt Charts in software like Microsoft Project, and more.
Also, Microsoft PowerPoint has the same text editing capabilities as Microsoft Word – a striking contrast with Canva’s limited features.
Templates and Design Options
This is PowerPoint’s forte: the capability of using third-party presentation templates, like the ones provided by SlideModel . Users can buy pre-designed slide decks from professional vendors and ease the need to make design-related decisions. On top of that, Microsoft already includes some basic templates with its 365 subscription.
Advanced Features
Offers a broad range of features, including detailed animations and transitions, which can enhance presentations. For example, the ability to work with SVG graphics allows presentation designers to make pixel-perfect presentations without losing image quality. This is available to all users, unlike Canva, which requires a subscription to unlock certain elements.
Multimedia Capabilities
Supports embedding of various multimedia elements like audio, video, and images directly into presentations. You can use hyperlinks to embed content or work with third-party plugins for specific tasks.
Extensive Support and Resources
As a long-established tool, users can find tutorials everywhere, support communities, and additional resources available online.
Cons of PowerPoint for Presenters
Some features can be complex to use, and the interface may be overwhelming for new users. In particular, this is linked to editing PowerPoint Shapes and graphs, working with Slide Master , applying advanced animation effects and so on.
Unlike Canva or Google Slides, PowerPoint requires purchasing Office 365 or a standalone license.
Heavy Files
PowerPoint files, especially those with multimedia content, can become large and difficult to share via email. As a side effect, those heavy files can be complicated to handle in computers that lack sufficient RAM and processing power. Moreover, they require significant free disk space on your PC.
Time-Consuming
Creating a high-quality presentation with custom animations and graphics can be time-consuming. That’s the reason why we highly recommend users work their way with PowerPoint templates, and mix and match designs to create a unique slide deck .
Learning Curve
Users need to invest time in learning the software to fully utilize its advanced features. This applies to both acquiring the knowledge and practicing the skills you learned. And still, for some users, it feels frustrating not to achieve results relatively quickly.
In this section, we will learn how to use Canva to create graphics for a product presentation. The idea is to create placeholder graphics containing images of a product; then, we will export that content to continue creating our presentation in PowerPoint.
After creating our Canva account, we find ourselves at the Home screen. Go to Templates, and you will see something similar to this UI.

We can go straight to the Presentations (16:9) option or use the search bar to locate the template we want. In this case, we will opt for that scenario and search “Product.”
The images that show a little crown at the low right corner are premium templates, which means we cannot use them with a free account. We will pick a template that fits the needs of our presentation by clicking over it. At the contextual window that opens, select Customize this template .

The Canva builder may take a bit to load, especially if your internet connection is slow. You will find yourself with a window like this one, opened at the Design tab, which offers alternatives for other templates similar to the one you chose.

The Styles tab allows us to quickly change the layout, altering color themes and fonts. Sometimes, that can suit our needs immediately; sometimes, it requires extra work to customize to our preferences.

We can click on any element in this design and customize its content. Depending on the element type, the options are available for us. For this presentation, we will change the text and images, and alter font color at the button to make it stand out.

Next, it’s time to replace the images. We can drag and drop the image into Canva, or we can go to the Uploads button and add the content from there.

In this case, we’re using DALL-E-generated images for this product presentation, you can also use illustrations, photos, videos, or Midjourney illustrations . Once the images are uploaded, drag and drop them to replace the images in the placeholder areas. To complete this design, we removed the shape that came with the template – you can add a new shape by going to Elements > Graphics .

Learning how to use Canva for PowerPoint is pretty straightforward. Download your Canva design as a PowerPoint presentation, which you can do by accessing your design and going to the top-right corner to locate the button Share . Click on it, and then click on Download .
Under File Type , we will select PPTX , as it’s PowerPoint’s native format. Click on Download , and wait for the process of downloading the file to be completed. Depending on the graphic assets included, it can take a while.

At this point, don’t be surprised if you’ll be prompted to upgrade your Canva plan (if you don’t have a premium account). The reason is that Canva will charge you for exporting what they call premium graphics, and since most of the Canva presentation templates use premium graphics, this will be a limitation when exporting your Canva slides to PowerPoint.
A simple workaround is removing the premium graphics before exporting from Canva to PowerPoint. Although, take in mind this may affect the overall design of your presentation.
As you can see below, the PowerPoint file is entirely editable. Something to consider is that unless you have the font installed on your computer, PowerPoint will reassign to a generic font.

Remember the design we created before? Well, it’s time to use that image as part of a marketing deck presentation , which will represent a social media post to be used by the marketing team to promote the brand.
The first step is to download the design we created as PNG. We can close Canva after that.

We opened our PPT template, which is the Annual Marketing Plan PowerPoint Template , and customized the PowerPoint theme colors . Go to Insert > Pictures > This Device .

Select the image we created in Canva and upload it here. We will add some image shadow effects via Shape Format, and a textbox below that describes what the image is about.

And that’s how easily we can use graphics from Canva in our PowerPoint presentations. Remember, it’s best to work with PNG images rather than JPG to reduce file size and preserve image quality.
You can invite others to collaborate on your design by sharing a link to the editable design or by adding them via email as team members on your Canva account.
Canva uses standard cloud storage security measures to protect your data, but like any online platform, it’s important to use a strong password and follow good security practices.
There are two methods for this. You can upload a PPT template into Canva via the Canva Homepage by clicking on Projects , and then go to the Uploads folder. Drag and drop or click on Upload, as we’ve seen before. Once imported, you must click on that file to open it in the Canva editor. The second method is on the editor: go to the Uploads button and upload your PPT file as if it were an image or another media asset.
Yes, you can use SlideModel presentation templates in Canva. As a SlideModel subscriber, you can download .pptx files to import into Canva presentations. This way, you can enjoy the creative slide templates and graphics provided by SlideModel in your Canva presentations
Unfortunately, no, as Canva doesn’t have the same toolset to enable editing functions. That also applies to changing color, so we highly recommend you work with a final PPT file before switching to Canva.
Objects like charts, SmartArt, 3D objects, and WordArt aren’t supported in Canva and won’t be rendered if you upload a slide that contains them.
Yes, all users can download Canva presentations to PPTX format. In case the original Canva design isn’t a presentation file, like a banner or social media post, you won’t be able to resize for that output unless you have a premium account.
Yes, the file must be smaller than 70 MB, and you can import up to 300 slides.
Canva and PowerPoint can collaborate as complementary tools to help presenters overcome the limitations of each individual tool. It takes a while to create your desired workflow, but once that’s accomplished, you can elevate the quality of your PowerPoint or Google Slides presentations with Canva.
We don’t advise using Canva as an alternative to PowerPoint as the current state-of-the-art indicates it won’t support data representation or other PowerPoint stellar tools that make part of most PPT templates.

Like this article? Please share
Design, Microsoft PowerPoint Filed under Design
Related Articles

Filed under Design • May 22nd, 2024
Exploring the 12 Different Types of Slides in PowerPoint
Become a better presenter by harnessing the power of the 12 different types of slides in presentation design.

Filed under PowerPoint Tutorials • May 17th, 2024
How to Add Fonts to PowerPoint
Create custom presentation slides by learning how to add new fonts in PowerPoint. Step-by-step guide.

Filed under PowerPoint Tutorials • May 14th, 2024
How to Create a Roadmap in PowerPoint
Learn how to create effective roadmap presentations in PowerPoint with this step-by-step guide and recommended templates.
Leave a Reply
Canva » Basics » How To Save & Export In Canva (Step By Step)
How to save & export in canva (step by step).
If you’re anything like me and you have a habit of hitting Control/Command + S whenever working on any project, you will want to know how to save in Canva. Luckily, Canva saves files automatically, but you can also do it manually or export the design as a backup.
So, let’s take a look at the different ways to save your designs, along with exporting them once they’re complete. Plus, I’ll explain all of the different file types you can save your designs as later in this tutorial.
Let’s get started!
Table of Contents
How To Save In Canva (Automatic & Manual Saving)
Step 1: allow canva to save automatically .
As you work on your design in Canva, every time you add an element, text block, or image to your project, Canva will automatically save your changes as long as you have a stable internet connection.
You will know if your project was successfully saved if you see a cloud icon with a check mark inside of it.

You may also briefly see “ All Changes Saved ” flash next to this icon. You will also see “ Saving Changes ” if the saving process takes longer than expected.
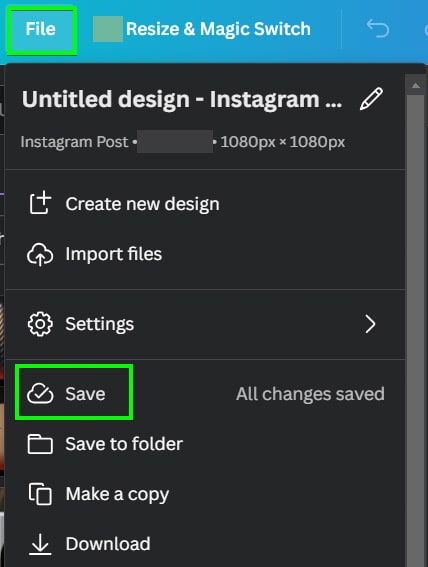
Step 2: Go To File > Save To Save A Project Manually
If you need to ensure that your project has been saved, you can always save your project manually.
You will find the File menu in the top left corner of the taskbar above your work area. Click File , and in the drop-down menu, choose Save . You should then see All Changes Saved right next to Save .
You can return to the Home page and click on your project to ensure that your design is properly saved. There’s also a second way you can save your design.
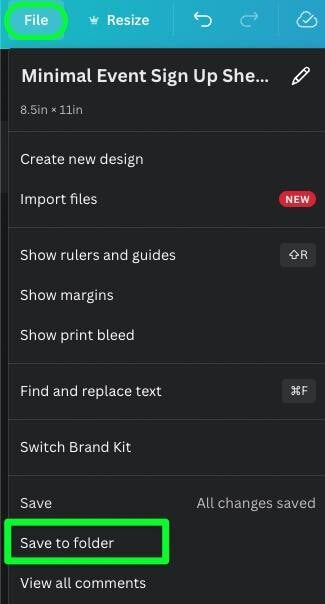
Step 3: Go To File > Save To Folder (Optional)
Click on File , then choose Save To Folder . This will prompt you to choose a folder from your Canva account to store your project. You can also add a new folder by clicking the Create New button.
How To Export In Canva To Your Device
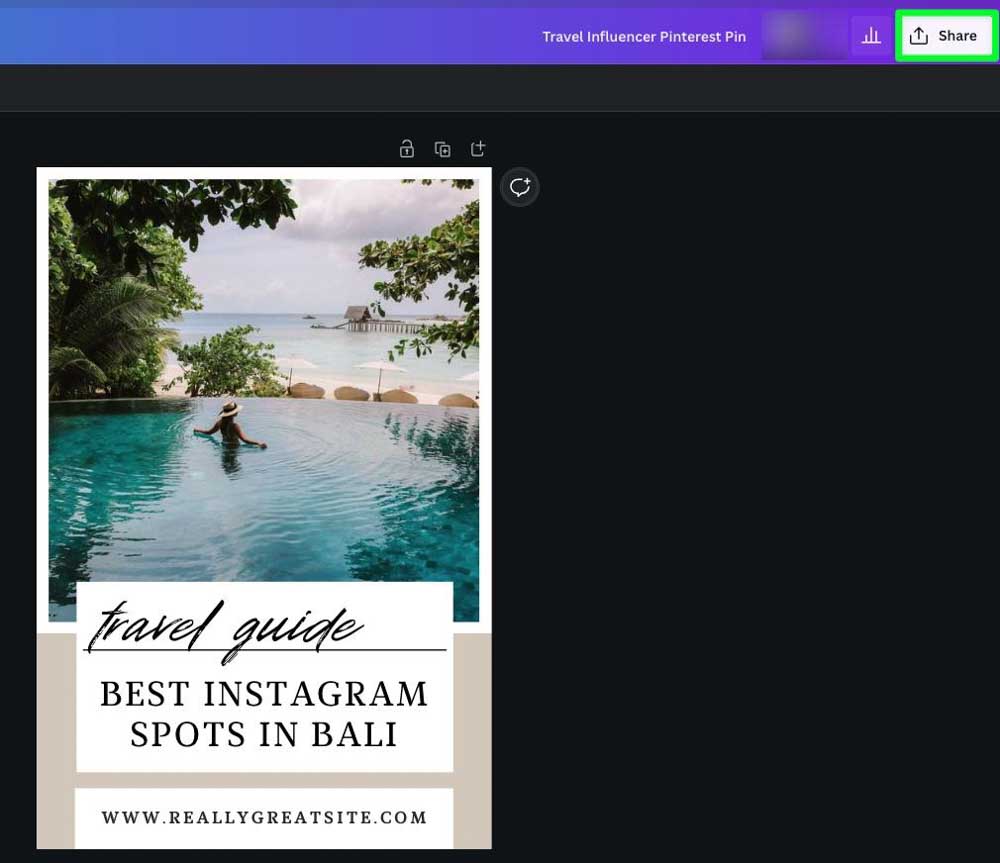
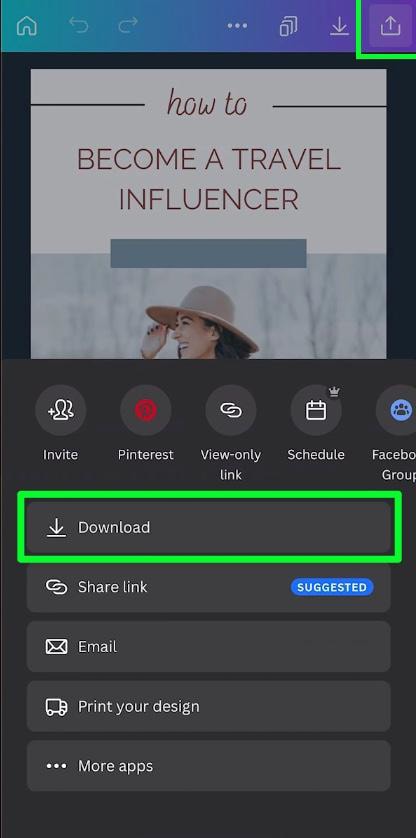
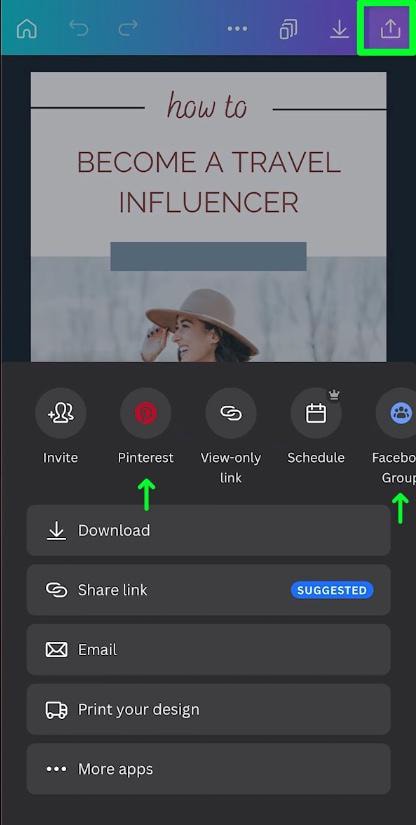
Step 1: click the share button.
To access the Share Menu, click Share in the top right corner of the screen.
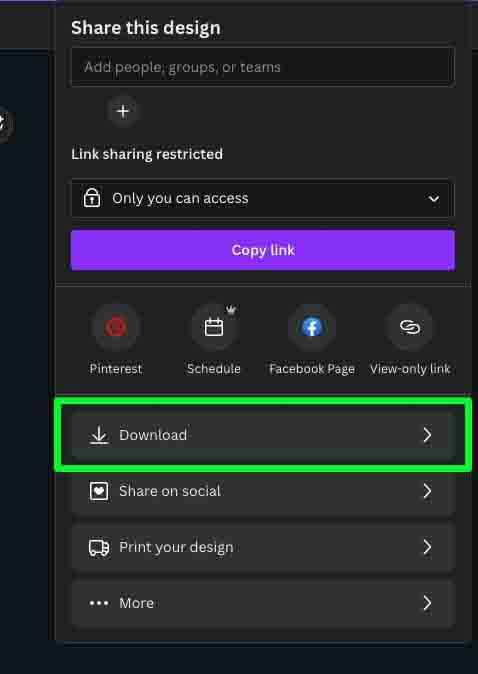
Step 2: Click Download
Downloading your design to your computer takes one extra step, and that’s clicking the Download button.
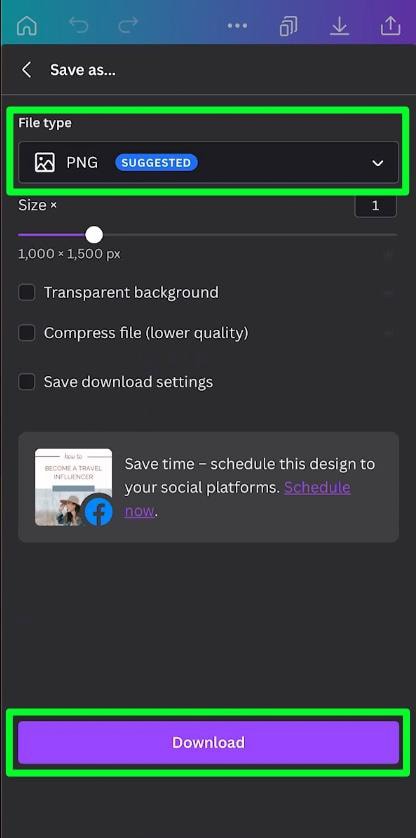
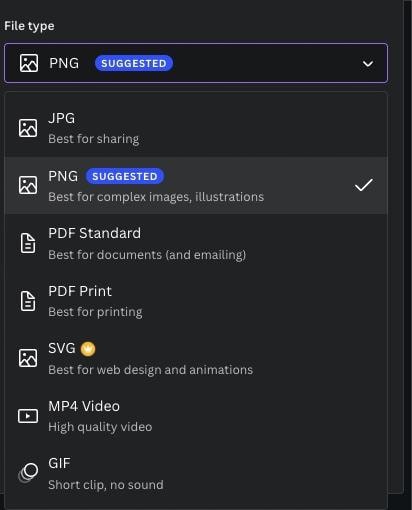
Step 3: Set Your File Type And Click Download
I will explain all the different file types later on. For now, choose JPG or leave the File Type as PNG . These are the most common file types to choose from for your design. Once you’re ready, click on Download .
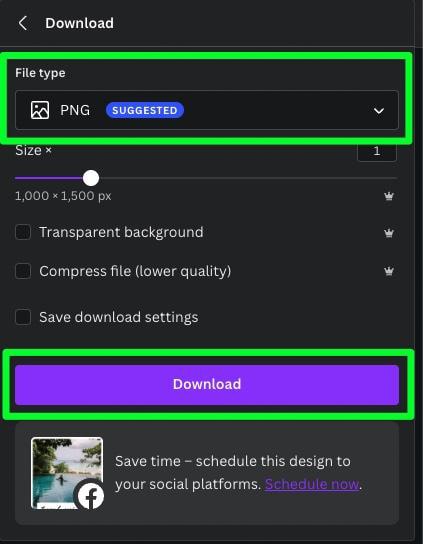
Step 4: Choose Your Save Destination
One last thing you need to do before you download your design is to pick where you want your design to be saved. The box that pops up will allow you to name your file and pick the folder on your hard drive as your destination.
Click on Save to finalize your choices. This will save your design to your computer.
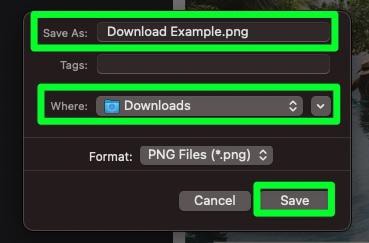
Once your design is saved to your computer, navigate to the folder where you saved your design.
How To Save A Design To Your Camera Roll In Canva Mobile
Step 1: click the share & download buttons.
You can find the Share button in the top right corner of your screen. Tap the Share button, then tap the Download button.
Step 2: Select Your File Type & Tap Download
Much like the Canva Desktop, you will be presented with choosing your File Type and a few more options. For File Type, choose either JPG or PNG , as these are the most well-rounded options for static images. Leave the rest of the options blank.
When you’re finished, tap Download .
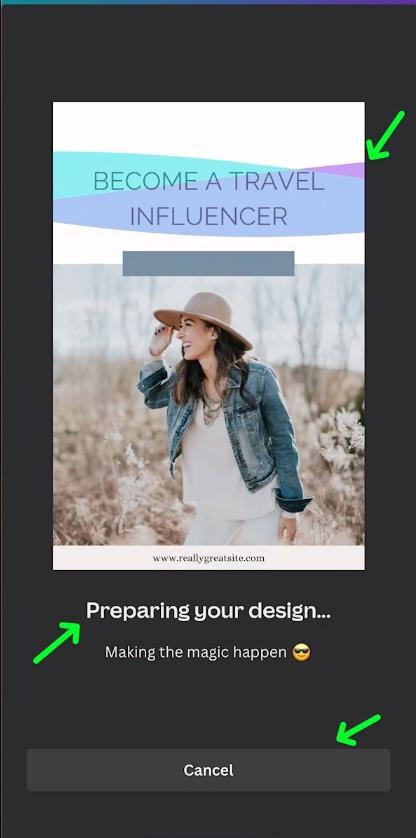
Step 3: Wait For Confirmation
The second you tap Download , you will see an animation of your design being downloaded onto your camera roll.
You will be informed that your design is being prepared at the bottom of the screen. You will also have the opportunity to stop downloading by tapping on Cancel . When your design is finished downloading, an alert will pop up, letting you know.
To ensure that your design has been downloaded to your device, open your camera roll to double-check. Your design should be the most recent design that is showcased.
Step 4: Share Your Project Directly To Social Media (Optional)
First, tap on the Share button. Then, above the Download button, you will find a scrollable bar with various icons on it. You can swipe from the right of your screen to find pretty much every social media site there is.
Tap on your chosen site and set up your account so that you can quickly and easily send your designs from Canva straight to your social media site of choice.
Types Of Export File Types Explained
There is a wide variety of file types available to export to with Canva. You can find these file types in the drop-down menu right before exporting your design.
Here are all the different file types you can export to in Canva and a little bit about how they work.
- JPEG : is compressed, so some non-essential data is lost, resulting in a smaller file size. JPEGs are commonly used on the internet because of their speed and size.
- PNG: is a type of image file that is used on the internet and is often used for images that have transparency, such as those you have removed the background from.
- PDF Standard: is perfect for anyone looking to save space on their hard drive as it has a comparatively lower resolution of 96 dpi than PDF Print.
- PDF Print: offers a 300 dpi resolution that is three times higher than most resolutions, which makes for a big difference in detail and clarity for printed material.
- SVG: is a type of image that can be scaled to any size without losing quality. SVG can be used to create interactive, data-driven visualizations for the web.
- MP4: is a type of video that can be watched on many devices, like phones and computers. The format is also popular for its versatility, as it can contain both video and audio in one package.
- GIFs: are stored in a compressed format and can contain up to 256 colors. They are commonly used on websites, social media, and messaging apps.
So now, with all these file types in mind and the easy exporting options you learned above, you’ll be able to save any project from Canva like a pro!

Continue Reading:
How To Create Adjustment Presets In Photoshop

How To Use The Marquee Tool In Photoshop

How To Crop A Layer In Photoshop (3 Simple Methods)
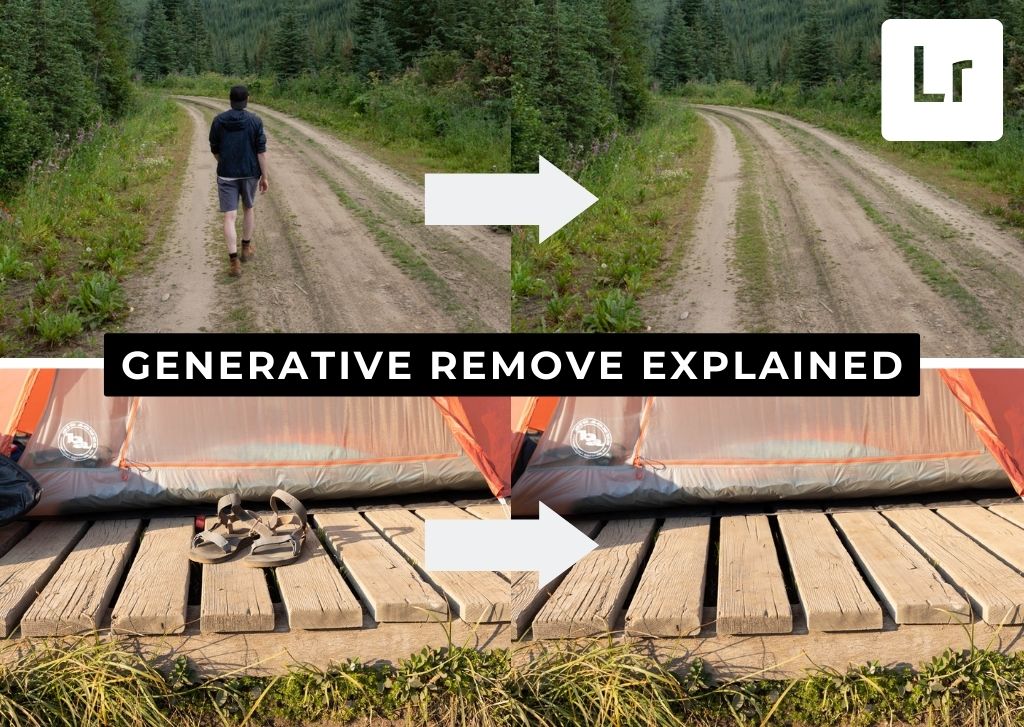
How To Use Generative Remove In Lightroom – Complete Guide

What Are Embedded Previews In Lightroom + How To Use Them

Adobe Lightroom System Requirements For Mac & PC

How To Outline An Image In Canva

How To Add A Border In Canva (To Images, Shapes & Text!)
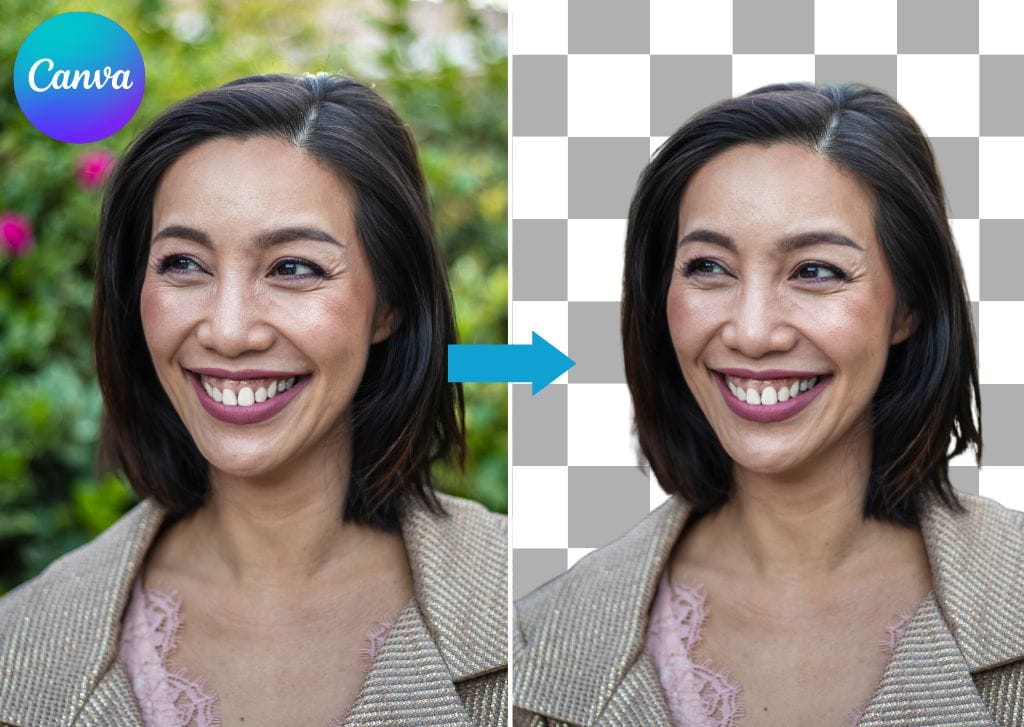
How To Make A Background Transparent In Canva

Products & Courses
Email: [email protected]
As an Amazon Affiliate, I earn from qualifying purchases. Brendan Williams Creative also participates in affiliate programs with Impact, Clickbank, CJ, ShareASale, and other sites. Brendan Williams Creative is compensated for referring traffic and business to these companies . Keep in mind that we may receive commissions when you click our links and make purchases. However, this does not impact our reviews and comparisons. We try our best to keep things fair and balanced, in order to help you make the best choice for you.
How Do I Save a Canva Presentation as a PowerPoint?
Last updated on January 24, 2023 @ 6:11 am
Canva is a great way to create visuals for your presentations, but you may be wondering how to save a Canva presentation as a PowerPoint. Here are the steps:
1. First, open the presentation in Canva and select the “ Share ” button in the upper-right corner.
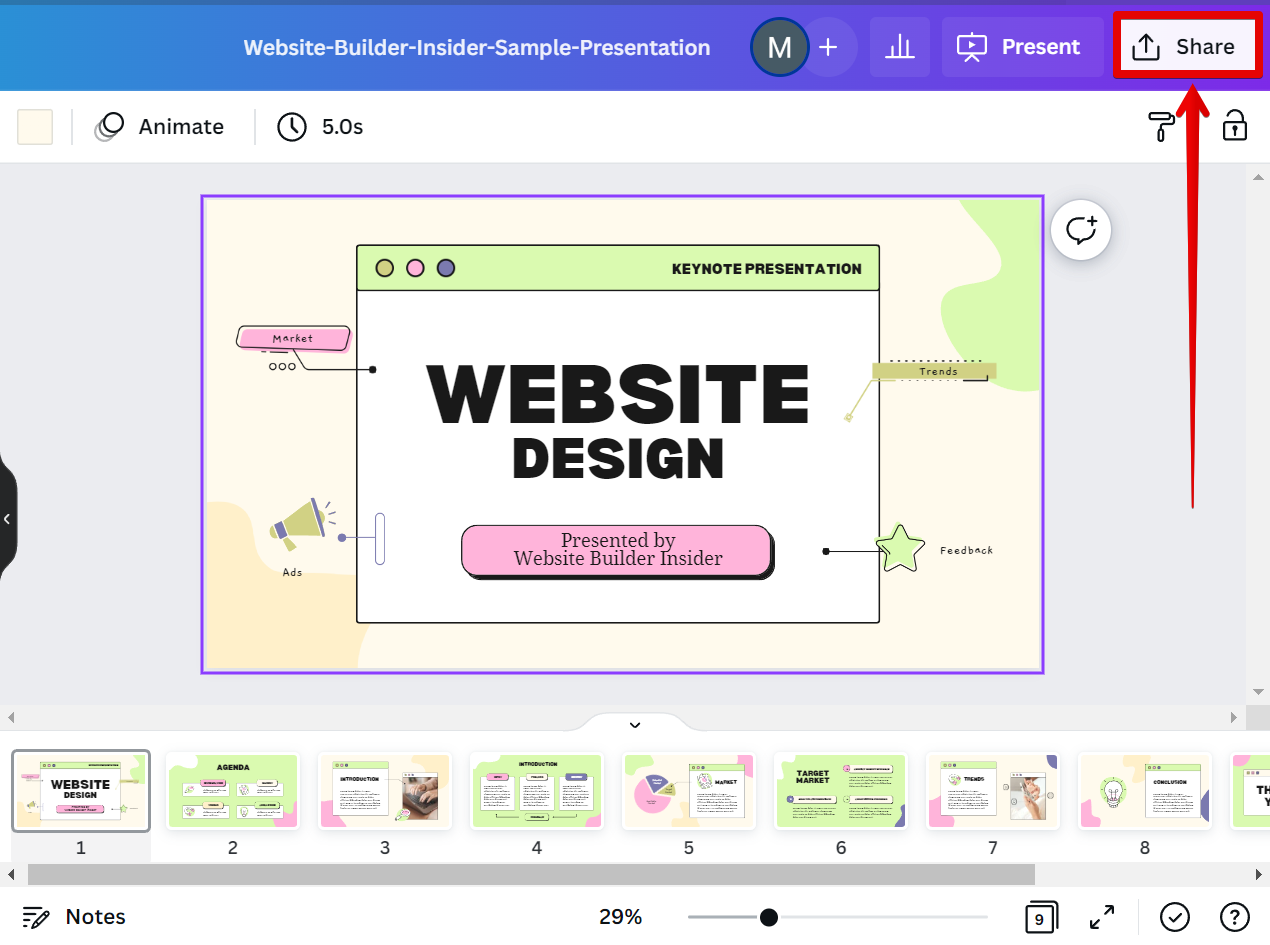
2. Next, scroll down and select the “ More ” option.
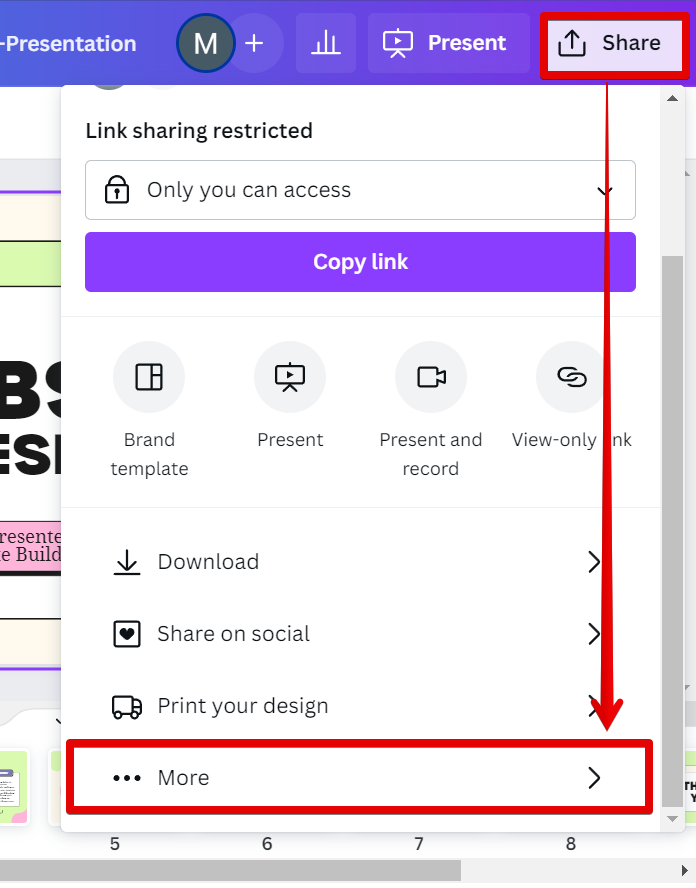
3. From there, scroll down again and in the “ Save ” section, select “ Microsoft PowerPoint ” from the list of options.

4. On the next page that will appear, make sure that all pages in your presentation are selected then click on the “ Download ” button.
5. A new window will appear where you can choose the location for the presentation file that you are downloading. Also, check the file name and the file type (PPTX file type) of the PowerPoint presentation before proceeding to the “ Save ” button.
6. That’s all there is to it! Now you know how to save a Canva presentation as a PowerPoint.

7 Related Question Answers Found
How do i download a canva presentation to powerpoint, how do i transfer a canva presentation to powerpoint, how do i open a canva presentation in powerpoint, how do i import canva to powerpoint, how do i convert canva to powerpoint, how do i download canva for powerpoint, how do i download a canva template in powerpoint.

Morgan Bash
Technology enthusiast and Co-Founder of Women Coders SF.
How To Download Presentation From Canva

- How-To Guides
- Software Tutorials

Introduction
How to Download Presentation from Canva
Canva is a popular online graphic design platform that offers a wide range of customizable templates. One of the many features it offers is the ability to create stunning presentations. Canva provides a user-friendly interface that allows you to design visually appealing slideshows for various purposes, such as business presentations, school projects, or personal use.
Once you have successfully designed your presentation using Canva’s intuitive tools and creative elements, you may want to download it so that you can share or present it offline. In this article, we will guide you through the step-by-step process of downloading a presentation from Canva.
Whether you want to save your presentation in a specific format or share it with someone who doesn’t have access to Canva, downloading the file is a straightforward process. By following these simple steps, you can quickly and easily obtain a copy of your Canva presentation.
So, grab your Canva account login credentials and let’s get started!
Step 1: Sign in to your Canva account
Before you can download your Canva presentation, you need to sign in to your Canva account. If you don’t have an account, you can easily create one for free on the Canva website.
To sign in, simply open your preferred web browser and go to www.canva.com . On the homepage, you will see the “Sign up” and “Log in” options in the top right corner. If you already have a Canva account, click on “Log in”.
Next, enter your Canva account credentials, which include your email address and password. If you prefer a faster way to sign in, you can use your Google or Facebook account by clicking on the respective buttons. This will allow you to directly log in to Canva without having to manually enter your login information.
Once you have entered your credentials or logged in with Google/Facebook, click on the “Log in” button. Canva will verify your account details and redirect you to the Canva platform.
Now you are ready to download your Canva presentation. Proceed to the next step to learn how to choose the presentation you want to download.
Step 2: Choose the presentation you want to download
Once you are logged in to your Canva account, it’s time to select the presentation you want to download. Canva provides a simple and organized way to browse through your saved designs and locate the specific presentation you wish to download.
On the Canva dashboard, you will see various categories and options on the left-hand side of the screen. Look for the “Presentations” category and click on it. This will display all the presentations you have previously created using Canva.
If you have a large number of presentations, you can use the search bar at the top of the screen to quickly find the one you are looking for. Simply type in the title or a relevant keyword related to the presentation, and Canva will filter the results accordingly.
Scroll through the list of presentations until you find the one you want to download. You can also sort your presentations by date or name to make the search easier. Canva displays a thumbnail image and the title of each presentation, making it visually and textually identifiable.
Once you have located the desired presentation, click on it to open it in the Canva editor. This allows you to preview the content and ensure it is the correct presentation before proceeding to the next step.
Now that you have chosen the presentation you want to download, it’s time to move on to the next step, where you will learn how to access the download option in Canva.
Step 3: Click on the “Download” button
After selecting the presentation you want to download in Canva, the next step is to locate and click on the “Download” button. This button allows you to access the various download options available for your presentation.
In the Canva editor, at the top right corner of the screen, you will find the “Download” button represented by an arrow pointing downwards. Click on this button to open the download menu.
Once you click on the “Download” button, a dropdown menu will appear with a list of available download options. Canva provides a range of file formats for you to choose from, depending on your specific needs and preferences.
The download options may include popular formats such as PDF, PowerPoint (PPTX), image (JPEG, PNG), and more. Some formats may require a Canva Pro subscription, so make sure to check the availability of each option based on your account status.
Take a moment to review the available options and consider which format is most suitable for your purpose. If you plan to share the presentation digitally or display it on a screen, a PDF or image format may be more appropriate. On the other hand, if you intend to edit or present the slides offline, the PowerPoint format would be a better choice.
Choose the desired format by clicking on it in the dropdown menu. This will prepare your presentation for download in the selected format.
Now that you have selected the download format, it’s time to move on to the next step and complete the download process.
Step 4: Select the format you want to download the presentation in
After clicking on the “Download” button in Canva, a dropdown menu will appear with a list of available download options. It’s time to select the format in which you want to download your presentation.
Canva offers a variety of file formats to cater to different needs and preferences. Some of the common formats include PDF, PowerPoint (PPTX), image (JPEG, PNG), and more. The availability of these formats may depend on your Canva account type, with certain formats exclusive to Canva Pro subscribers.
Carefully review the list of available formats and consider the purpose for which you want to download the presentation. If you intend to share it digitally or include it in an online portfolio, a PDF or image format might be more appropriate. On the other hand, if you need to make further edits or present the slides offline, the PowerPoint format would be the better choice.
To select the desired format, simply click on the corresponding option in the dropdown menu. Canva will then prepare your presentation for download in the chosen format.
It’s worth noting that you may also have additional options to customize the settings of your chosen format. For example, if you select the PDF format, Canva may provide options to adjust the paper size, orientation, and quality. Take a moment to explore and adjust these settings, if necessary, to ensure the downloaded presentation meets your requirements.
Once you have selected the format and customized the settings (if applicable), you’re ready to proceed to the final step – downloading the presentation. Continue reading to learn how to complete the download process in Canva.
Step 5: Click on the “Download” button again
After selecting the desired format for your Canva presentation, the next step is to initiate the downloading process. To do this, click on the “Download” button again in the download options menu.
Once you have chosen the format you want to download the presentation in, Canva will display a confirmation message confirming your selection and providing a brief summary of the format specifications. This message may include details such as the file size, resolution, and any additional settings you may have customized.
To proceed with the download, simply click on the “Download” button within the confirmation message. Canva will then begin generating and packaging your presentation in the chosen format.
Depending on the size and complexity of your presentation, the download process may take a few seconds or a couple of minutes. During this time, it’s important to ensure that you have a stable internet connection, as any interruptions or fluctuations in the connection may affect the download process.
Once the download is complete, your presentation will be saved to your device’s specified download location. The exact location may vary based on your device settings. Canva typically saves the downloaded file in your computer’s “Downloads” folder by default.
Congratulations! You have successfully downloaded your Canva presentation in the format of your choice. From here, you can proceed to access and utilize the downloaded file according to your specific needs, whether that involves sharing it, presenting it offline, or making further edits to the content.
Now that you have completed all the necessary steps to download your Canva presentation, you can enjoy the convenience and flexibility of having your design readily available in the chosen format.
Step 6: Save the downloaded file to your device
After successfully downloading your Canva presentation, the final step is to save the downloaded file to your device. This ensures that you have easy access to the presentation whenever you need it, even without an internet connection.
When the download is complete, your web browser will prompt you with options on what to do with the downloaded file. You can choose to open the file directly, view it in the folder where it is saved, or locate it manually later. The options may vary depending on your browser and device settings.
To save the downloaded file, click on the “Save” or “Save File” option in the browser prompt. This will allow you to choose a specific location on your device where you want to store the presentation file.
In the dialog box that appears, navigate to the desired folder or directory where you want to save the presentation. You can use the default “Downloads” folder or select a different location based on your preferences and organizational method.
Once you have chosen the destination folder, click on the “Save” button. The presentation file will then be successfully saved to your device.
It’s recommended to keep your presentation in a location that is easily accessible and organized. Consider creating a dedicated folder specifically for Canva presentations or placing it in a relevant folder based on the topic or purpose of the presentation.
By saving the downloaded file to your device, you can effortlessly retrieve and open the presentation whenever you need it, whether it’s for sharing with others, presenting offline, or future reference and editing.
Congratulations! You have completed all the steps to download and save your Canva presentation. Now you can enjoy the benefits of having your design readily available on your device, ready to be utilized as needed.
Downloading a presentation from Canva is a simple and convenient process that allows you to save your design and access it offline. By following the step-by-step guide we have provided, you can easily download your Canva presentation in the format of your choice and save it to your device.
Remember, the first step is to sign in to your Canva account. From there, you can choose the presentation you want to download and click on the “Download” button. Select the format you prefer, and then click on the “Download” button again to initiate the download process. Finally, save the downloaded file to your device in a location that is easily accessible to you.
Downloading your Canva presentation gives you the freedom to share it with others, present it offline, or make further edits as needed. Whether you’re a business professional, a student, or someone who simply enjoys creating visually appealing presentations, Canva simplifies the process and offers a range of customization options to suit your needs.
So, next time you find yourself in need of downloading a presentation from Canva, refer back to this guide and follow the steps to ensure a seamless and successful download process.
Happy designing and downloading!
Leave a Reply Cancel reply
Your email address will not be published. Required fields are marked *
Save my name, email, and website in this browser for the next time I comment.
- Crowdfunding
- Cryptocurrency
- Digital Banking
- Digital Payments
- Investments
- Console Gaming
- Mobile Gaming
- VR/AR Gaming
- Gadget Usage
- Gaming Tips
- Online Safety
- Tech Setup & Troubleshooting
- Buyer’s Guides
- Comparative Analysis
- Gadget Reviews
- Service Reviews
- Software Reviews
- Mobile Devices
- PCs & Laptops
- Smart Home Gadgets
- Content Creation Tools
- Digital Photography
- Video & Music Streaming
- Online Security
- Online Services
- Web Hosting
- WiFi & Ethernet
- Browsers & Extensions
- Communication Platforms
- Operating Systems
- Productivity Tools
- AI & Machine Learning
- Cybersecurity
- Emerging Tech
- IoT & Smart Devices
- Virtual & Augmented Reality
- Latest News
- AI Developments
- Fintech Updates
- Gaming News
- New Product Launches
5 Ways to Improve IT Automation
- What is Building Information Modelling
Related Post
Sla network: benefits, advantages, satisfaction of both parties to the contract, what is minecraft coded in, how much hp does a diablo tuner add, what is halo-fi, what is halo lock iphone, related posts.

How To Download Canva To Google Slides

How To Download A Canva Presentation As A Powerpoint

How To Download Canva Presentation As PPT

How To Download Canva Slides To Google Slides

How To Download From Canva For Free

How To Download Music To Canva

How To Download Font To Canva

How To Download Fonts In Canva
Recent stories.

What is Building Information Modelling?

How to Use Email Blasts Marketing To Take Control of Your Market

Learn To Convert Scanned Documents Into Editable Text With OCR

Top Mini Split Air Conditioner For Summer

Comfortable and Luxurious Family Life | Zero Gravity Massage Chair

Fintechs and Traditional Banks: Navigating the Future of Financial Services

AI Writing: How It’s Changing the Way We Create Content
- Privacy Overview
- Strictly Necessary Cookies
This website uses cookies so that we can provide you with the best user experience possible. Cookie information is stored in your browser and performs functions such as recognising you when you return to our website and helping our team to understand which sections of the website you find most interesting and useful.
Strictly Necessary Cookie should be enabled at all times so that we can save your preferences for cookie settings.
If you disable this cookie, we will not be able to save your preferences. This means that every time you visit this website you will need to enable or disable cookies again.

How To Import PowerPoint Slides Into Canva Tutorial For Beginners
Canva Tutorial
Watch The How To Import PowerPoint Slides Into Canva Tutorial For Beginners Video Below

How To Import PowerPoint Slides Into Canva
Learn how to import powerpoint slides into canva, easy to follow canva video tutorial for beginners, here are some of our services.

Content Creation Services

Unlock Canva Cash: The Ultimate Guide to Making Money with Canva Templates!
Please watch the, video below, plus get 4 free canva mockup templates & start earning now, frequently asked questions.
Welcome to our FAQ Section on Importing PowerPoint Slides into Canva
Navigating new software can often be a daunting task, especially when it involves integrating work from other platforms. That’s why we’ve compiled a detailed and beginner-friendly FAQ section to guide you through the process of importing PowerPoint slides into Canva. Whether you’re a seasoned professional looking to add a creative twist to your presentations or a newcomer eager to explore the realms of digital design, these FAQs are tailored to provide you with step-by-step instructions, practical tips, and real-life examples.
In this section, you’ll find answers to a wide range of questions, from basic procedures like uploading and editing your slides in Canva, to more advanced techniques such as customizing with animations, maintaining brand consistency , and collaborating effectively with your team. Each FAQ is designed to not only give you the information you need but also to inspire you to explore the full potential of your presentations in Canva’s dynamic and user-friendly environment.
Remember, every great design journey starts with a single step. So, whether you’re encountering Canva for the first time or looking to refine your existing skills, these FAQs are here to assist you every step of the way. Let’s dive into the world of creative possibilities together!
Answer: To begin importing PowerPoint slides into Canva, first, you need to have an account on Canva . If you don’t have one, simply visit Canva’s website and sign up for free. Once you’ve logged in, follow these steps:
Navigate to the Homepage : On the Canva homepage, you’ll find various design options. Look for the “Create a design” button, usually located at the top right corner.
Choose a Design Type : Since you’re working with PowerPoint slides, select a design type that matches your content. For typical slides, “Presentation” is a good choice. Clicking on it will open a new design page.
Upload Your PowerPoint File : On the new design page, locate the “Uploads” tab on the left-hand side panel. Click on it, and then select the “Upload an image or video” button. From here, you can upload your PowerPoint file (.ppt or .pptx).
Example : Imagine you have a PowerPoint presentation on ‘Healthy Eating Habits’. After selecting ‘Presentation’ as your design type, you upload your PowerPoint file. Once uploaded, you will see your slides appear in the uploads section.
Adding Slides to Your Design : Drag and drop each slide onto your canvas. You can edit, resize, or embellish them with Canva’s editing tools.
Real-Life Example : Let’s say you have a PowerPoint presentation on ‘Gardening Tips’. After uploading your file, you see your slide about ‘Seasonal Planting’ in the uploads panel. You drag it onto the canvas and decide to add some flair with Canva’s graphics and text styles, making your slide more visually appealing.
Answer: Editing imported PowerPoint slides in Canva is straightforward and offers a range of creative possibilities. Here’s how you can do it:
Select the Slide : Once you’ve imported your PowerPoint slides (as mentioned in FAQ 1), click on the slide you want to edit on the canvas.
Edit Text : Click on any text in the slide to edit. You can change the font style, size, color, and alignment using the text editing toolbar at the top.
Add Elements : To add more flair to your slides, explore Canva’s “Elements” tab. You can add shapes, lines, icons, or even animations to make your slide more engaging.
Adjust Background : If you wish to change the background, click on the background and select a new color or pattern. Canva also offers a range of preset backgrounds that you can use.
Example : You’re working on a slide about ‘Watering Plants’. You decide to change the font to something more playful, add an icon of a watering can from the Elements tab, and change the background to a light green to complement the gardening theme.
Use Templates for Inspiration : If you’re unsure how to start editing, browse through Canva’s vast library of templates for ideas.
Real-Life Example : Imagine your slide on ‘Herb Gardening’ looks a bit plain. You decide to add a border from the elements section, change the font to ‘Poppins’ for a modern look, and replace the background with a herbal pattern from Canva’s library, transforming the slide into a visually appealing masterpiece.
Answer: Once you’ve finished editing your PowerPoint slides in Canva, saving and sharing your work is a breeze. Follow these steps:
Save Your Design : It’s crucial to regularly save your work. Canva autosaves your design, but you can also manually save it by clicking on “File” and then “Save” in the top menu.
Download the Presentation : To download your presentation, click on the “Download” button in the top right corner. You can choose different formats like PDF, JPG, or PowerPoint (PPTX). For compatibility with Microsoft PowerPoint, select PPTX.
Share Directly : Canva also allows you to share your designs directly. Click on the “Share” button, and you can share via email, get a shareable link, or even present your slides live.
Example : After finalizing your presentation on ‘Indoor Plants’, you click on “Download” and select PPTX format. This allows you to open and present it in Microsoft PowerPoint if needed.
Collaborate with Others : If you’re working in a team, use the “Share” button to invite others to view or edit the presentation. You can set permissions for each collaborator.
Real-Life Example : Suppose you’re working on a project about ‘Urban Gardening’. After completing your slides in Canva, you share the presentation with your team members for feedback. You send them a link with edit permissions, allowing them to add their input directly in Canva.
Answer: Importing specific slides from a PowerPoint presentation into Canva requires a small workaround since Canva does not directly allow selective slide imports. Here’s how you can do it:
Prepare Your PowerPoint File : Open your PowerPoint presentation and choose the slides you want to import. You can save these specific slides as a separate PowerPoint file.
Upload to Canva : Follow the upload process as described in FAQ 1. Instead of uploading the entire presentation, upload the file containing only your selected slides.
Editing and Use : Once uploaded, these slides can be edited and used just like any other image or graphic in Canva.
Example : You have a 20-slide presentation on ‘Basic Photography’ but only want to import slides 5, 6, and 7 about ‘Camera Settings’. Save these slides as a separate file and upload this file to Canva.
Real-Life Example : Imagine you’re preparing a presentation on ‘World Cuisines’ and only want to include the Italian cuisine slides from a larger deck. Save the Italian cuisine slides separately, upload them to Canva, and then integrate them into your new Canva design .
Answer: Maintaining the quality of PowerPoint slides when importing them into Canva is crucial for a professional-looking presentation. Here are some tips:
Use High-Quality Images : Ensure that the images in your PowerPoint slides are of high resolution to avoid pixelation when uploaded to Canva.
Proper File Format : Save your PowerPoint slides in a format that preserves quality, like PNG or PDF, before uploading to Canva.
Avoid Over-Editing : While Canva provides various editing tools, over-editing can sometimes reduce the quality of your slides. Use edits sparingly and focus on enhancing rather than completely altering.
Example : If your slide on ‘Basic Yoga Poses’ includes high-quality images, ensure they are saved in a high-resolution format before uploading to Canva to maintain clarity.
Real-Life Example : Consider a PowerPoint presentation on ‘Space Exploration’. To maintain the quality of your detailed images of planets, save the slides in PNG format before uploading to Canva. This ensures that the images remain crisp and clear in your Canva presentation .
Answer: Yes, you can enhance your imported PowerPoint slides with Canva’s vast library of design elements. Here’s how:
Import Your Slides : Follow the steps from FAQ 1 to upload your PowerPoint slides into Canva.
Access Design Elements : Click on the “Elements” tab on the left-hand side of the Canva interface. Here, you can find a variety of graphics, shapes, icons, and even videos.
Drag and Drop Elements : Simply drag and drop any element onto your slide. You can resize and position these elements as per your design needs.
Blend with Existing Design : You can make these elements blend seamlessly with your slide’s existing design by matching colors and styles.
Example : On a slide about ‘Renewable Energy’, you might add an icon of a wind turbine from Canva’s elements, placing it next to your existing content to emphasize the point.
Real-Life Example : If you’re working on a presentation about ‘Healthy Eating’, you can import your slides and then use Canva’s elements to add colorful icons of fruits and vegetables, making the slides more visually engaging and informative.
Answer: Optimizing PowerPoint slides for Canva’s format ensures that your presentation looks great and is compatible with Canva’s design capabilities. Here’s how to do it:
Standardize Slide Size : Before importing, ensure your PowerPoint slides are in a standard size compatible with Canva, such as 16:9 or 4:3 aspect ratio.
Reduce Text Overload : Canva is visual-focused. If your PowerPoint slides are text-heavy, consider condensing the text or breaking it into smaller, more visually digestible chunks.
Use High-Resolution Images : Ensure all images in your PowerPoint are high resolution to avoid pixelation when viewed on Canva.
Simplify Complex Charts or Graphs : If your slides have complex charts or graphs, consider simplifying them or using Canva’s elements to recreate them for better visual appeal.
Example : For a slide with a complex bar graph on ‘Market Trends’, you might recreate the graph using Canva’s chart feature, making it more visually engaging and in tune with your design’s overall aesthetic.
Real-Life Example : Imagine you have a presentation on ‘Global Tourism Trends’. Before importing to Canva, adjust the slides to a 16:9 aspect ratio, simplify detailed graphs, and ensure all images are of high quality to ensure a smooth transition into Canva’s format.
Answer: Adding animations to PowerPoint slides in Canva is a great way to make your presentation more dynamic and engaging. Here’s how:
Upload Your Slides : After importing your PowerPoint slides into Canva (as detailed in FAQ 1), select the slide you want to animate.
Choose Animations : Click on any text box or element you wish to animate. Then, click the “Animate” button on the top toolbar to see a range of animation options.
Apply and Customize Animations : Choose an animation style and apply it to your text or elements. You can also adjust the duration and intensity of the animation.
Example : For a slide about ‘Healthy Eating Habits’, you might add a subtle ‘fade’ animation to the text and a ‘rise’ animation to an image of fruits and vegetables, bringing the slide to life.
Real-Life Example : Suppose you’re enhancing a slide about ‘The Water Cycle’. You could apply a ‘pan’ animation to the background to create a sense of motion, and a ‘pop’ animation to text boxes to draw attention to key facts.
Answer: Collaboration is one of Canva’s strengths, and it’s straightforward to collaborate on presentations that include imported PowerPoint slides. Here’s how:
Upload and Design Your Slides : After importing your PowerPoint slides into Canva, proceed with any edits or additions as required.
Invite Collaborators : Click on the “Share” button in the top right corner of the Canva interface. Enter the email addresses of your collaborators or copy the shareable link.
Set Permissions : Choose whether collaborators can view or edit the presentation. This is important to control the level of access each collaborator has.
Collaborate in Real-Time : Collaborators can add comments, make edits, and even design simultaneously if they have editing permissions.
Example : If you’re working on a slide about ‘Sustainable Living’, you can invite team members to add their input, suggest design changes, or contribute additional content directly in Canva.
Real-Life Example : Imagine preparing a presentation on ‘Innovations in Technology’. You can collaborate with colleagues who may add slides on different innovations, provide feedback, or enhance the design, all within Canva’s platform, streamlining the workflow.
Answer: Combining multiple PowerPoint presentations into a single Canva design can be a great way to consolidate information. Here’s how to do it:
Upload Multiple Presentations : Following the steps from FAQ 1, upload each PowerPoint file you wish to combine into Canva.
Create a New Canva Design : Choose a suitable design type in Canva (like “Presentation”) to serve as your base for the combined slides.
Drag and Drop Slides : From the uploads section, drag and drop slides from your various presentations onto your Canva canvas. You can arrange them in any order you prefer.
Edit and Integrate : Once all slides are on the canvas, edit them for consistency in style, fonts, and colors to ensure a cohesive design across all slides.
Example : If you’re combining presentations on ‘Fundamentals of Marketing’ and ‘Digital Marketing Trends’, import both presentations and then arrange the slides in a logical order, editing for style consistency.
Real-Life Example : Suppose you’re creating a comprehensive guide on ‘Personal Finance’. You can import slides from separate presentations on budgeting, saving, investing, and retirement planning into Canva, and then integrate them into a single, cohesive presentation.
Answer: Proper text formatting is key to ensuring that your imported PowerPoint slides look professional and are easy to read in Canva. Here are some best practices:
Consistent Font Use : Stick to 2-3 fonts throughout your presentation for consistency. Canva offers a wide range of fonts to choose from.
Hierarchy and Size : Establish a clear hierarchy in your text (headings, subheadings, body text) and adjust the size for readability.
Contrast and Color : Ensure there is good contrast between your text and the background. Use colors that complement your overall design and are easy on the eyes.
Spacing and Alignment : Use appropriate spacing and alignment for a clean and organized look. Canva provides alignment tools for precise positioning.
Example : In a slide about ‘Effective Communication Skills’, you might use a bold font for headings, a contrasting color for key points, and align your text left for a professional and clear layout.
Real-Life Example : For a presentation on ‘Healthy Eating’, you can format the titles in a bold, eye-catching font, use a softer color for body text, and ensure each slide is uniformly aligned to create a visually appealing and informative presentation.
Answer: Maintaining your brand’s consistency when importing PowerPoint slides into Canva is crucial for a professional appearance. Here’s how to achieve this:
Use Brand Colors : Canva allows you to add custom colors. Ensure you use your brand’s color palette for text, backgrounds, and elements.
Incorporate Logos and Watermarks : Upload your brand’s logo and use it on each slide. You can also create a watermark for added brand presence.
Consistent Fonts and Styles : If your brand uses specific fonts, try to find similar ones in Canva or upload custom fonts if you have a Canva Pro account.
Templates and Themes : Utilize templates and themes in Canva that resonate with your brand’s aesthetic. You can customize these to better fit your brand.
Example : For a company presentation on ‘Innovative Business Solutions’, use your corporate colors, add your logo in the corner of each slide, and choose a template that reflects a modern, innovative style.
Real-Life Example : If your business specializes in eco-friendly products, you can import your PowerPoint slides into Canva and then adjust the design to include your green and earthy brand colors, add your logo, and use a clean, nature-inspired template for consistency.
Answer: If you need to convert your Canva presentation back to a PowerPoint format after editing or combining slides, follow these steps:
Complete Your Design : Make sure your presentation is finalized in Canva, with all edits and additions completed.
Download in PowerPoint Format : Click on the “Download” button at the top right corner of the Canva interface. From the dropdown menu, select the PowerPoint format (PPTX).
Check the Downloaded File : Open the downloaded file in Microsoft PowerPoint to ensure all slides and elements have been correctly converted and are displaying as intended.
Example : After finalizing a presentation on ‘Global Warming’, download it in PowerPoint format to share with colleagues who might prefer viewing it in Microsoft PowerPoint.
Real-Life Example : Suppose you’ve created a training presentation in Canva with interactive elements and custom designs. When you need to present it in a setting that requires PowerPoint, simply download the Canva presentation in PPTX format, ensuring all your creative efforts are preserved in the conversion.
Answer: Yes, Canva allows you to enhance your PowerPoint slides with multimedia elements such as video and audio. Here’s how to do it:
Import Your PowerPoint Slides : Once your slides are uploaded to Canva, select the slide you want to enhance.
Add Video or Audio : Click on the “Uploads” tab and upload your video or audio files. Then, drag and drop them onto the selected slide.
Customize Media : Resize and reposition your video or audio player on the slide. You can also trim video clips directly in Canva.
Example : For a slide on ‘The Evolution of Music’, add a short video clip of a famous music concert or an audio snippet of a classical composition to make your point more impactful.
Real-Life Example : Imagine enhancing a presentation on ‘Modern Architecture’ with a time-lapse video of a building construction. This multimedia addition can make your slide more engaging and provide a real-world context to your topic.
Answer: Creating interactive elements in Canva for your PowerPoint slides can greatly increase engagement. Here are some steps to do so:
Import Slides and Select : After importing your PowerPoint slides into Canva, select the slide you want to make interactive.
Use Hyperlinks : Canva allows you to add hyperlinks to text or elements. This can direct viewers to external resources for more information.
Incorporate Questions or Polls : Although direct interactivity like quizzes isn’t natively supported in Canva, you can design slides with questions or polls and manually navigate them during a presentation.
Example : On a slide about ‘Nutritional Diets’, include a hyperlink to a detailed article or a designed question for audience interaction during a live presentation.
Real-Life Example : In a business strategy presentation, you could create a slide with a question like “Which market should we target next?” and include hyperlinked options. During the presentation, clicking these links could reveal more information or market analysis.
Answer: Canva’s templates can be a great starting point or enhancement for your imported PowerPoint slides. Here’s how to utilize them effectively:
Choose a Template : After importing your PowerPoint slides, browse Canva’s template library. Select a template that aligns with the theme or style of your presentation.
Apply Template to Slides : You can apply the template to your entire presentation or select individual slides. Drag and drop elements from the template onto your imported slides.
Customize the Template : Adjust the template elements – like colors, fonts, and images – to match the style of your PowerPoint slides for a cohesive look.
Example : If your PowerPoint presentation is about ‘Art History’, choose a template with a classic or artistic theme and apply these design elements to your slides.
Real-Life Example : For a corporate presentation on ‘Business Growth Strategies’, select a professional-looking template from Canva and apply its style elements (like icons, color schemes, and text boxes) to your PowerPoint slides to enhance their visual appeal.
Answer: While importing PowerPoint slides into Canva offers many creative possibilities, there are some limitations to be aware of:
Animation and Transition Limits : PowerPoint-specific animations and transitions may not be preserved or available in Canva.
Font Compatibility : Some custom fonts used in PowerPoint may not be available in Canva, requiring substitutions.
Slide Aspect Ratio : Canva may not support all PowerPoint slide sizes, potentially requiring adjustments to the slide layout.
Interactive Elements : Advanced interactive elements like embedded quizzes or complex hyperlinks in PowerPoint may not function identically in Canva.
Example : If your PowerPoint slide has a complex transition effect, it might not be replicated in Canva and may need a simpler alternative.
Real-Life Example : In a PowerPoint presentation with custom fonts and intricate animations for a product launch, these elements might need adjustments or alternatives when imported into Canva to maintain the presentation’s effectiveness.
Answer: Importing custom fonts from PowerPoint to Canva can be done, but it requires a few steps:
Check Canva’s Font Library : First, see if the font used in your PowerPoint is available in Canva’s extensive font library.
Upload Custom Fonts : If you have a Canva Pro subscription, you can upload custom fonts. Go to the “Brand Kit” section and upload your font files.
Apply Fonts to Slides : Once uploaded, these fonts can be applied to your text in the imported PowerPoint slides.
Example : If your PowerPoint uses a specific font for branding purposes, upload that font to Canva (provided you have the rights and a Pro account) to maintain brand consistency.
Real-Life Example : For a marketing agency presenting a branding strategy , maintaining brand consistency with specific fonts is crucial. By uploading these custom fonts to Canva, you ensure that your presentation remains on-brand even after transitioning from PowerPoint.
ChatGPT Prompts
7,000 chatgpt prompts for business and marketing.

ChatGPT Training
What we offer, chatgpt products, 340 chatgpt prompts for online marketing.

How To Write eBooks With ChatGPT Videos

How To Write eBooks With ChatGPT Guide

18 ChatGPT PDF Checklists For Online Business

Grab The Exclusive 1,200 Chatgpt Prompts Now!

How To Use Canva For Beginners
Master canva quickly: essential tutorials for beginners, start creating stunning designs with easy canva video guides, step-by-step tutorials: from basics to brilliant canva creations.

Canva Training
Canva products, canva step-by-step video tutorials for beginners.

Canva Magic Studio Suite Step-By-Step Video Training

Recent Posts

Customers Reviews
Dfy niche websites testimonial.

Best WordPress Content Creation Plugin!
Over 4,000 Website Using This Powerful WordPress Plugin.
WP Learning 101 Testimonial

The Ultimate Collection Of ChatGPT Prompts - 100% FREE!

Claim Your 3,000 ChatGPT Prompts Now
Enter name & email below.
IMAGES
VIDEO
COMMENTS
In this video I will show you two ways to save your projects, designs, and presentations in Canva. The first way is to use the autosave feature in Canva whi...
How to save your Canva presentation as a Powerpoint. Share. Failed. Try it yourself (opens in a new tab or window) More tutorials for you. See all. 3:24. Kick-start your presentation project. 4:35. Unleash your creativity with Canva Presentations. 4:35. 3:16. Collaborate and record. 3:16. 3:27. Master Canva's presenter tools. 3:27.
In this Canva tutorial for beginners, you'll learn how to seamlessly convert your Canva presentation into a PowerPoint file (PPT). That way, you can export o...
Canva to Powerpoint with Animations! // It's now so easy to export Canva to PowerPoint and include your beautiful Canva animations as well. Just follow my st...
Go to the 'Share' button at the top right and click 'More': Downloading the presentation - Part 1. Scroll down to the 'Save' options and choose 'Microsoft PowerPoint': Downloading the presentation - Part 2. Choose the slides you want to download, and hit the download button: Downloading the presentation - Part 3.
Step 4: Select the "Powerpoint" Option. After clicking on the "Download" button in Canva, a dropdown menu will appear with various file format options. Look for the "Powerpoint" option in the dropdown menu and select it. This will ensure that your Canva presentation is downloaded in a Powerpoint-compatible format.
Canva's presentation tool makes it easy to put together a professional and visually engaging slide deck, regardless of your level of expertise. However, at some point, you may need to convert your Canva slides to PowerPoint to accommodate certain requirements, take advantage of more advanced features, or collaborate with others who prefer to ...
Once you create a page, tweak its animation to make a smooth transition between pages. Step 1: Select a slide in Canva. Step 2: Click Animate at the top. Step 3: Check basic, exaggerated, photo ...
Download your Canva design as a PowerPoint presentation, which you can do by accessing your design and going to the top-right corner to locate the button Share. Click on it, and then click on Download. Under File Type, we will select PPTX, as it's PowerPoint's native format.
Step 2: Go To File > Save To Save A Project Manually. If you need to ensure that your project has been saved, you can always save your project manually. You will find the File menu in the top left corner of the taskbar above your work area. Click File, and in the drop-down menu, choose Save . You should then see All Changes Saved right next to ...
In this Canva tutorial for beginners, learn how to save a Canva presentation as a Powerpoint presentation file.👑 View our full written tutorial: https://est...
Here are the steps: 1. First, open the presentation in Canva and select the " Share " button in the upper-right corner. 2. Next, scroll down and select the " More " option. 3. From there, scroll down again and in the " Save " section, select " Microsoft PowerPoint " from the list of options. 4.
Step 3: Click on the "Download" button. After selecting the presentation you want to download in Canva, the next step is to locate and click on the "Download" button. This button allows you to access the various download options available for your presentation.
Automatic saving. Click "Create a design" on Canva's homepage to create a new project template. 2. Check the top left corner of Canva's taskbar. You will notice right next to the "Resize" tab the words "All changes saved.". 3. Add an element, picture, or text to your project template.
How to download your Canva slides as a PowerPointBlog (with additional details): https://www.regiereducation.com/canva-slides-into-ppt/ Try Canva: NEW Canva ...
Canva automatically saves designs as you work. If your edits don't automatically save, you can also manually save them. If you see the save icon on the status bar, this means your changes have been saved. If your edits don't automatically save, you can manually do so by clicking on File then Save from the status bar.
From the editor. Drag and drop your presentation file to the editor. On the top corner of the editor, click on File > Upload a file. On the editor side panel, click on the Uploads tab, then click on Upload files. Select the files you want to upload, or drag and drop them in the Uploads tab. To use the file in your design, click on it from the ...
Answer: Editing imported PowerPoint slides in Canva is straightforward and offers a range of creative possibilities. Here's how you can do it: Select the Slide: Once you've imported your PowerPoint slides (as mentioned in FAQ 1), click on the slide you want to edit on the canvas.. Edit Text: Click on any text in the slide to edit.You can change the font style, size, color, and alignment ...
Mobile web. On the editor menu bar, click Share. Click Download. On the dropdown, choose a file type for your download. Learn more about the supported download file types. If your design has multiple pages, select the pages you want to download from the dropdown, and click Done. Click Download. If your design has premium elements, click on the ...
About Press Copyright Contact us Creators Advertise Developers Terms Privacy Policy & Safety How YouTube works Test new features NFL Sunday Ticket Press Copyright ...
Free Canva presentation template Convey your non-profit's mission with our modern, minimal Powerpoint and Google Slides templates. Perfect for marketing professionals, this template features a gradient of blues, capturing the essence of coastal cleanup and marine conservation efforts.
Download or save to your device, and share with others. Download or save to your device, and share with others ... Create and publish your own resources on Canva and earn by sharing. ... Importing your PowerPoint presentation for editing in Canva. See all. Fix a problem.
Share your animated presentation online so your audience can even view it asynchronously. Post it on social media, embed it on websites, or send it to your colleagues via email. Impress your audience live when you present straight from Canva. Use our amazing presenter tools like Canva Live to pool in real-time questions and feedback.
Are you struggling with saving your Canva designs as PDFs? In this step-by-step tutorial, we'll show you how to export your Canva files as high-quality PDFs ...
Use the same 'banner' or title font throughout your design. Have the same 'frame' or 'grid' throughout your design. Apply the same background throughout your design. Use consistent fonts. 2. Work smarter, not harder. Create a template page for your presentation to keep all the points above about consistency in line.
Try our quick intro tutorial and get designing on Canva, like a pro.