.css-1qrtm5m{display:block;margin-bottom:8px;text-transform:uppercase;font-size:14px;line-height:1.5714285714285714;-webkit-letter-spacing:-0.35px;-moz-letter-spacing:-0.35px;-ms-letter-spacing:-0.35px;letter-spacing:-0.35px;font-weight:300;color:#606F7B;}@media (min-width:600px){.css-1qrtm5m{font-size:16px;line-height:1.625;-webkit-letter-spacing:-0.5px;-moz-letter-spacing:-0.5px;-ms-letter-spacing:-0.5px;letter-spacing:-0.5px;}} Best Practices The #1 rule for improving your presentation slides
by Tom Rielly • May 12, 2020

When giving presentations, either on a video conference call or in person, your slides, videos and graphics (or lack of them) can be an important element in helping you tell your story or express your idea. This is the first of a series of blog posts that will give you tips and tricks on how to perfect your visual presentations.
Your job as a presenter is to build your idea -- step-by-step -- in the minds of your audience members. One tool to do that is presentation graphics, such as slides and videos.

Why graphics for your presentation?
A common mistake is using slides or videos as a crutch, even if they don’t actually add anything to your presentation. Not all presentations need graphics. Lots of presentations work wonderfully with just one person standing on a stage telling a story, as demonstrated by many TED Talks.
You should only use slides if they serve a purpose: conveying scientific information, art, and things that are hard to explain without pictures. Once you have decided on using slides, you will have a number of decisions to make. We’ll help you with the basics of making a presentation that is, above all, clear and easy to understand. The most important thing to remember here is: less is more.
Less is so much more
You want to aim for the fewest number of slides, the fewest number of photos, the fewest words per slide, the least cluttered slides and the most white space on your slides. This is the most violated slide rule, but it is the secret to success. Take a look at these examples.

As you can see in the above example, you don’t need fancy backgrounds or extra words to convey a simple concept. If you take “Everything you need to know about Turtles”, and delete “everything you need to know about” leaving just “turtles”, the slide has become much easier for your audience to read, and tells the story with economy.

The above example demonstrates that a single image that fills the entire screen is far more powerful than a slide cluttered with images. A slide with too many images may be detrimental to your presentation. The audience will spend more mental energy trying to sort through the clutter than listening to your presentation. If you need multiple images, then put each one on its own slide. Make each image high-resolution and have it fill the entire screen. If the photos are not the same dimensions as the screen, put them on a black background. Don’t use other colors, especially white.

Your slides will be much more effective if you use the fewest words, characters, and pictures needed to tell your story. Long paragraphs make the audience strain to read them, which means they are not paying attention to you. Your audience may even get stressed if you move on to your next slide before they’ve finished reading your paragraph. The best way to make sure the attention stays on you is to limit word count to no more than 10 words per slide. As presentation expert Nancy Duarte says “any slide with more than 10 words is a document.” If you really do need a longer explanation of something, handouts or follow-up emails are the way to go.
Following a “less is more” approach is one of the simplest things you can do to improve your presentation visuals and the impact of your presentation overall. Make sure your visuals add to your presentation rather than distract from it and get your message across.
Ready to learn more about how to make your presentation even better? Get TED Masterclass and develop your ideas into TED-style talks.
© 2024 TED Conferences, LLC. All rights reserved. Please note that the TED Talks Usage policy does not apply to this content and is not subject to our creative commons license.
Home Blog Design How to Make a Presentation Graph
How to Make a Presentation Graph

Visuals are a core element of effective communication, and regardless of the niche, graphs facilitate understanding data and trends. Data visualization techniques aim to make data engaging, easy to recall and contextualize while posing as a medium to simplify complex concepts .
In this article, we’ll guide you through the process of creating a presentation graph, briefly covering the types of graphs you can use in presentations, and how to customize them for maximum effectiveness. Additionally, you can find references on how to narrate your graphs while delivering a presentation.
Table of Contents
What is a Presentation Graph?
Types of graphs commonly used in presentations, how to select a presentation graph type, design principles for effective presentation graphs, working with presentation graph templates, integrating the graph into your presentation, common mistakes to avoid when making a presentation graph, final words.
A presentation graph is a visual representation of data, crafted in either 2D or 3D format, designed to illustrate relationships among two or more variables. Its primary purpose is to facilitate understanding of complex information, trends, and patterns, making it easier for an audience to grasp insights during a presentation.
By visually encoding data, presentation graphs help highlight correlations, distributions, and anomalies within the dataset, thereby supporting more informed decision-making and discussion.
Various types of graphs are commonly used in presentations. Each type serves specific purposes, allowing presenters to choose the most suitable format for conveying their data accurately. Here, we’ll discuss some common examples of presentation graphs.
Check our guide for more information about the differences between charts vs. graphs .
A bar chart is a visual tool that represents data using horizontal bars, where the length of each bar correlates with the data value it represents. This type of chart is used to compare discrete categories or groups, highlighting differences in quantities or frequencies across these categories.
For more information check our collection of bar chart PowerPoint templates .

Column Graphs
Column graphs are a variation of bar charts. They display data through vertical columns, allowing for comparing values across different categories or over time. Each column’s height indicates the data value, making it straightforward to observe differences and trends.

Line Graphs
Line graphs depict information as a series of data points connected by straight lines. They are primarily used to show trends over time or continuous data, with the x-axis typically representing time intervals and the y-axis representing the measured values. Line graphs highlight the rate of change between the data points, indicating trends and fluctuations.
For more information check our collection of line chart PowerPoint templates .

Circle Graphs
Circle graphs, commonly known as pie charts or donut charts, present the data distribution as fractions of an entity. They provide a quick understanding of the relative sizes of each component within a dataset. Pie charts are particularly effective when the goal is to highlight the contribution of each part to the whole data.
For more information check our collection of circle diagram templates .

Area Graphs
Area graphs are similar to line graphs, but the space below the line is filled in, emphasizing the volume beneath the curve. They represent cumulative totals over time through the use of sequential data points, making it easier to see total values and the relative significance of different parts of the data.
For more information check our collection of area chart PowerPoint templates .

Cone, Cylinder, and Pyramid Graphs
Three-dimensional graphs, such as cones, cylinders, and pyramids, create a dynamic visual impact on presentations. While not as common as the other types, they are used for their ability to add depth and dimension to data representation. These graphs create a visually engaging experience for the audience, although sometimes they sacrifice accuracy for the sake of visuals.
For more information check our collection of pyramid diagram PowerPoint templates .
As a presenter, you must be aware of both the topic’s requirements to discuss and your audience’s needs. Different graphs fulfill distinct purposes, and selecting the right one is critical for effective communication.
Line Graphs for Trends Over Time
A line graph is effective when you want to present trends or changes over a continuous period, like sales performance over months. Each point on the line represents a specific time, offering a clear visual representation of the data’s progression.
Bar Graphs for Comparing Quantities
If your goal is to compare quantities or values across different categories, such as sales figures for various products, a bar graph is suitable. The varying lengths of bars make it easy to compare the magnitudes of different categories.
Pie Charts for Showing Proportions
Use pie charts when you want to illustrate parts of a whole. For example, to represent the percentage distribution of expenses in a budget, a pie chart divides the total into segments, each corresponding to a category.
Follow these guidelines to create your presentation graph for the data you intend to represent.
How to Make a Presentation Graph in PowerPoint
Start by opening your presentation slide deck. For this tutorial’s purpose, we’ll work with a blank slide.

Switch to the Insert tab and click on Chart .

A new dialogue window will open, where you have to select the chart type and the specific representation type—i.e., for area charts, you can choose from 2D or 3D area charts and their distribution method.

If you hover over the selected chart, it will zoom in to check the details. Double-click to insert the chosen graph into the slide.

As we can see, a spreadsheet to edit the data is now available. If you accidentally close it, go to Chart Design > Edit Data.
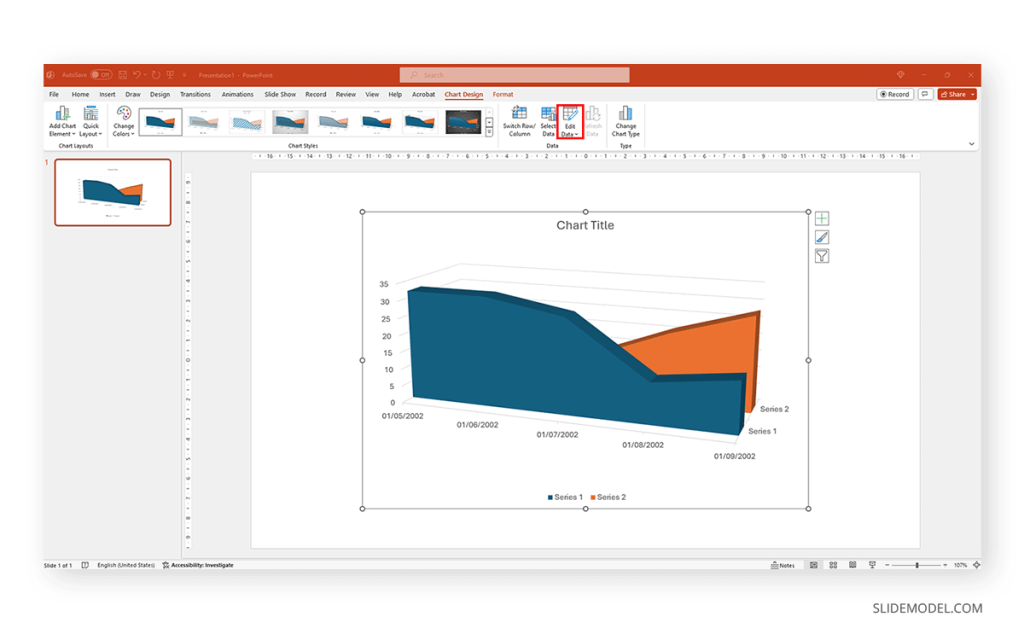
Replace the data in the numbers to reflect the data you need to showcase. The columns’ titles indicate the text the legend shows for each series. Then, we can close the spreadsheet and continue customizing it.

By clicking on the paintbrush, we access the Style options for the graph. We can change the background color, layout style, and more.

If we switch to the Color tab inside of Style , we can modify the color scheme for the presentation graph. And as simple as that is how to make a graph in PowerPoint.

How to Make a Presentation Graph in Google Slides
Now, let’s see how to create a graph in Google Slides. We start once again from a blank slide.

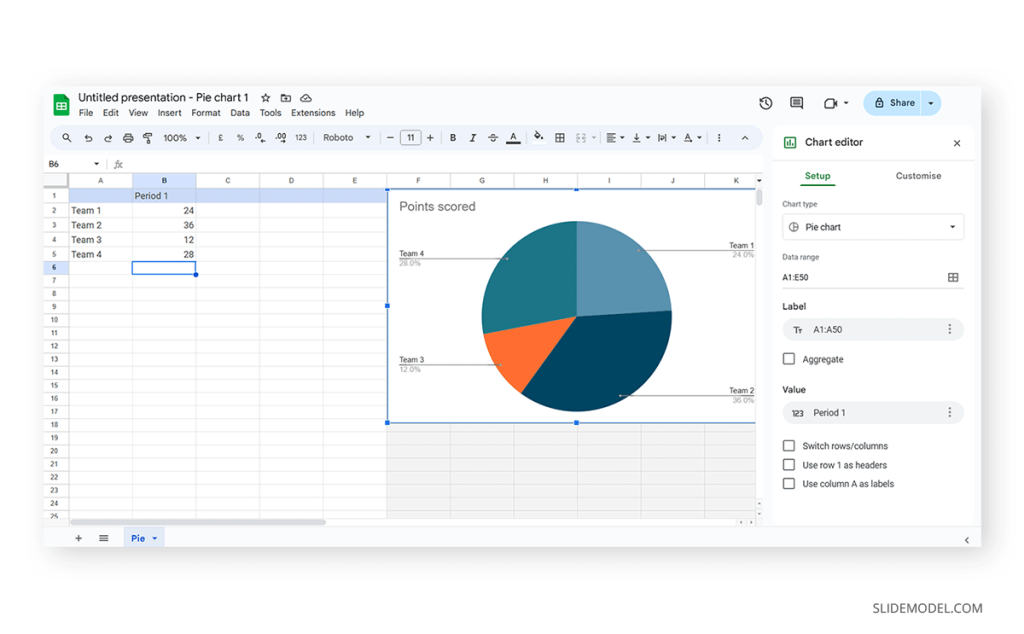
Go to Insert > Chart . Select your desired presentation graph option. In our case, we will work with a Pie Chart.

To change the placeholder data, click on Edit Data .

If you missed the emergent tab, you can go to the three points in the graph, click on them, and select Open Source .

The graph will most likely cover the data spreadsheet, so move it to one side to see the entire data range. In this case, the auto-generated graph is wrong as the sum gives 110%. We’ll correct that now.

And this is how it looks with the corrected data.

Next, we click on the three dots on the chart and select Edit the Chart . This shall open all customization options.

At the Setup tab, we can change the chart style and select from various options.
The data will refresh in that case and adapt its representation to the new style.

If we switch to the Customize tab (it says Customise, as the selected language is UK English), we can fine-tune our presentation graph starting from the background color.

Activate the 3D checkbox to change to a 3D pie chart (applicable to any graph).

We can find tailored settings for the Pie Chart to convert it to a donut chart, with settings like the donut hole size.

The Pie Slice section helps us change the color scheme for each one of the slices.

We can change the title and axis titles in the Chart and axis titles section.

Finally, the Legend section offers many customization options to alter the legend’s format.

Once the customization process is completed, close the Google Spreadsheets tab, go to your presentation chart, and click Update .

Google Slides will refresh the data for your created presentation graph with the last synced data.

Adhering to certain design principles is imperative for creating graphs and communicating information effectively.
Simplicity and Clarity
A graph should be clean and free from unnecessary details. Clear graphs have visible data points and helpful short texts for better understanding. Even if it looks simple, it can still show important information. To make it easy to understand, avoid adding distortions, shading, weird perspectives, too many colors, unnecessary decorations, or 3D effects [2]. It is also essential to ensure the plotted data points are clear, not hidden or covered.
Use of Color and Contrast
Thoughtful use of color and contrast enhances visual appeal and distinguishes different elements within the graph. Colors can effectively improve the chart presentation in three ways: highlighting specific data, grouping items, and encoding quantitative values. However, do not use fancy or varying colors in the background. We suggest resisting decorating graphs excessively, as it can hinder clear data presentation [4]. Only use different colors when they highlight important differences in the data.
Labeling and Legends
Accurate labeling is crucial to provide context and understanding. While designing graphs, we don’t expect the viewer to guess. Instead, we clearly label titles and axes. Clear labeling means displaying both axes on your graph, including measurement units if needed. Identify symbols and patterns in a legend or caption [3]. Legends explain symbols and patterns in a graph.
Scale and Proportion
For more clarity, we keep the measurement scales consistent and avoid distortions for accuracy. This ensures the exact difference between all the values. It will present data relationships and prevent misinterpretation due to skewed visual perceptions.
Tips for Customizing Graphs
PowerPoint provides various customization options—Right-click on elements like axes, data points, or legends to format them. You can also change colors, fonts, and styles to match your presentation’s look.
Coloring Your Data
When you want to make different parts of your chart stand out, click on a bar or line. Then, right-click and choose “Format Data Series.” Here, you can pick a color that helps each set of data pop. Do this for each part of your chart to make it visually appealing.
Changing the Chart Background
If you want to change the background color around your chart, right-click on the white space. Choose “Format Chart Area” and change the background color to something that complements your data.
Customizing Line Styles
Change the appearance of your lines for a unique look. Click on a line in your chart, right-click, and select “Format Data Series.” Experiment with different line styles, such as solid, dashed, or dotted.
Fine-tuning Axis Appearance
To make your chart axes look polished, right-click on the X or Y axis and choose “Format Axis.” Adjust properties like line color, tick marks, and label font to suit your design.
Perfecting Legends
Legends can be tweaked for a more integrated look. Right-click on the legend, select “Format Legend,” and adjust options like placement, font size, and background color to enhance the overall appearance.
Creating graphs in PowerPoint or Google Slides from scratch can be time-consuming, and ultimately, it won’t yield the same results as professional-made designs. We invite you to discover some cool designs for presentation graphs PPT templates made by SlideModel.
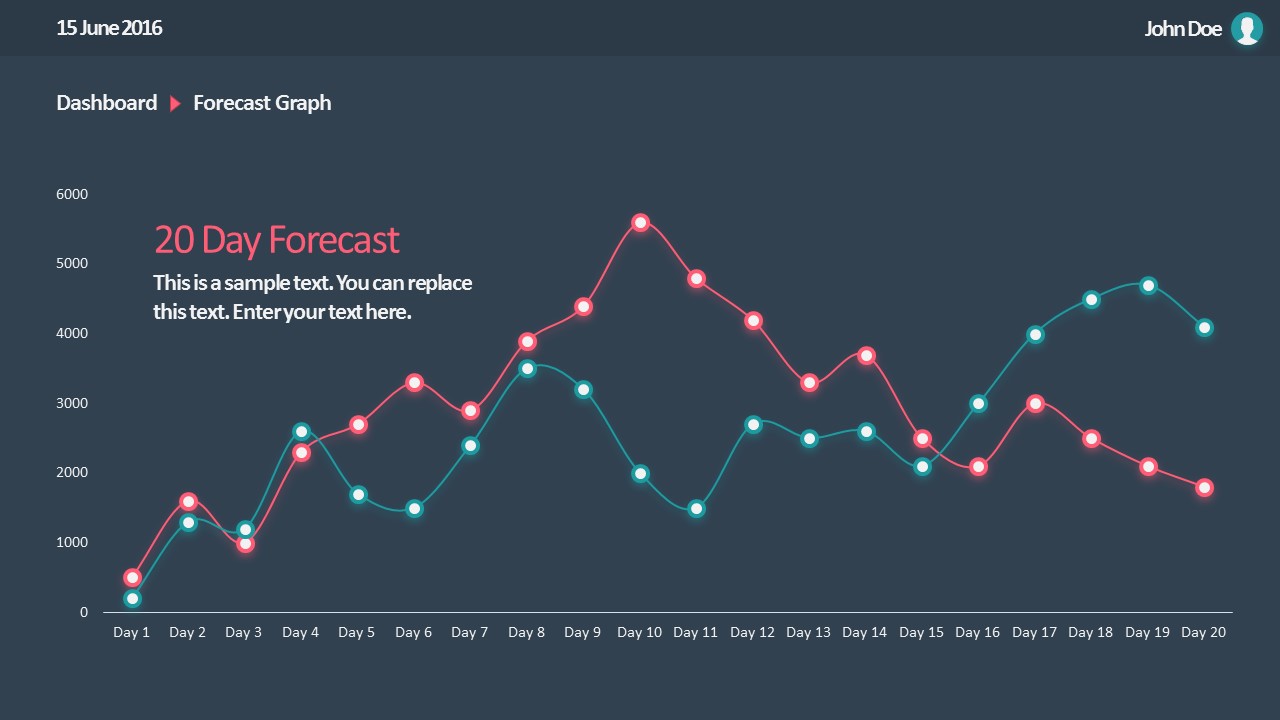
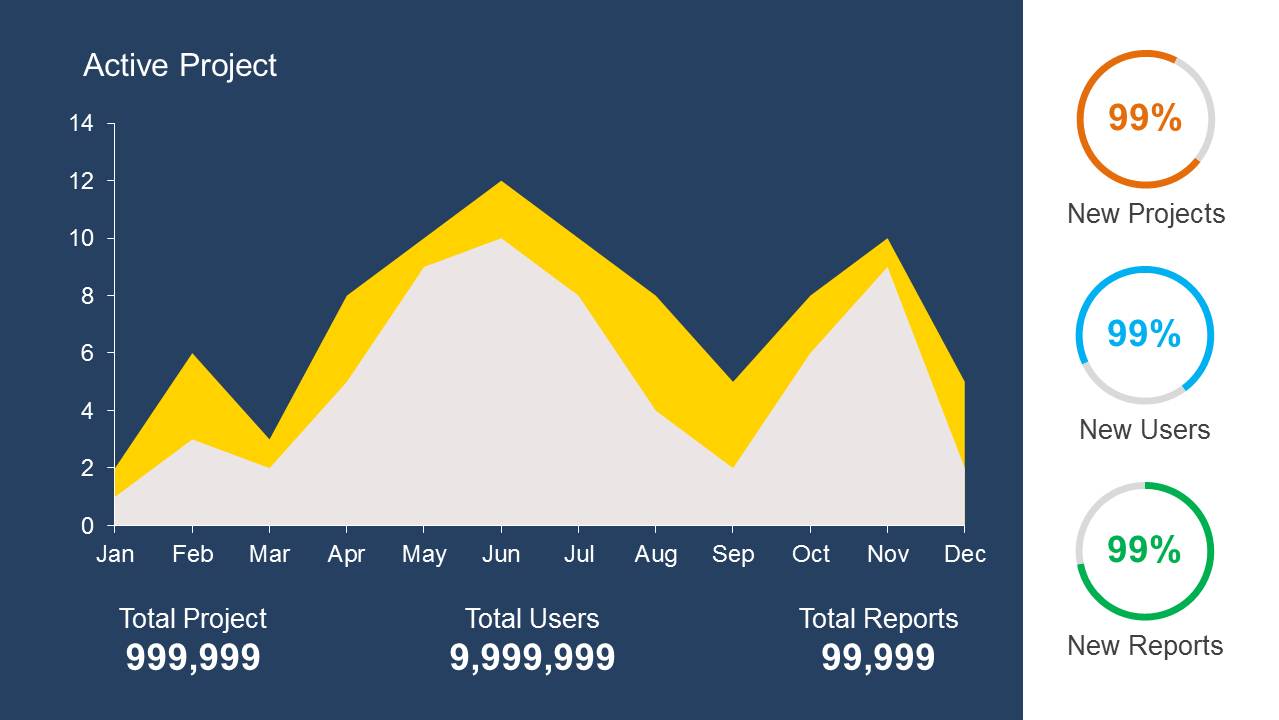
1. Dashboard Presentation Graph for PowerPoint & Google Slides
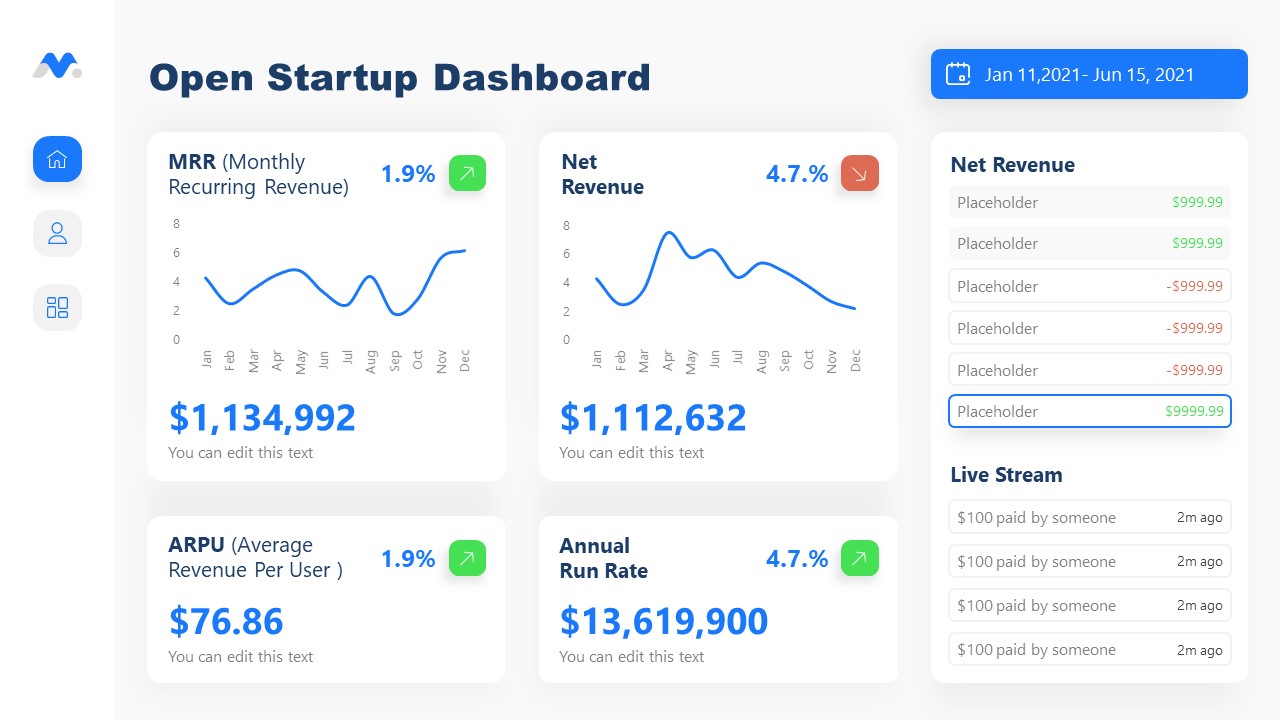
Don’t worry about how to make a graph in PowerPoint – let’s us bring the resources in the shape of a cool dashboard layout. Ideal for any kind of e-commerce business, you can track expenses or income, evaluate metrics, and much more.
Use This Template
2. Infographic Donut Chart Presentation Template
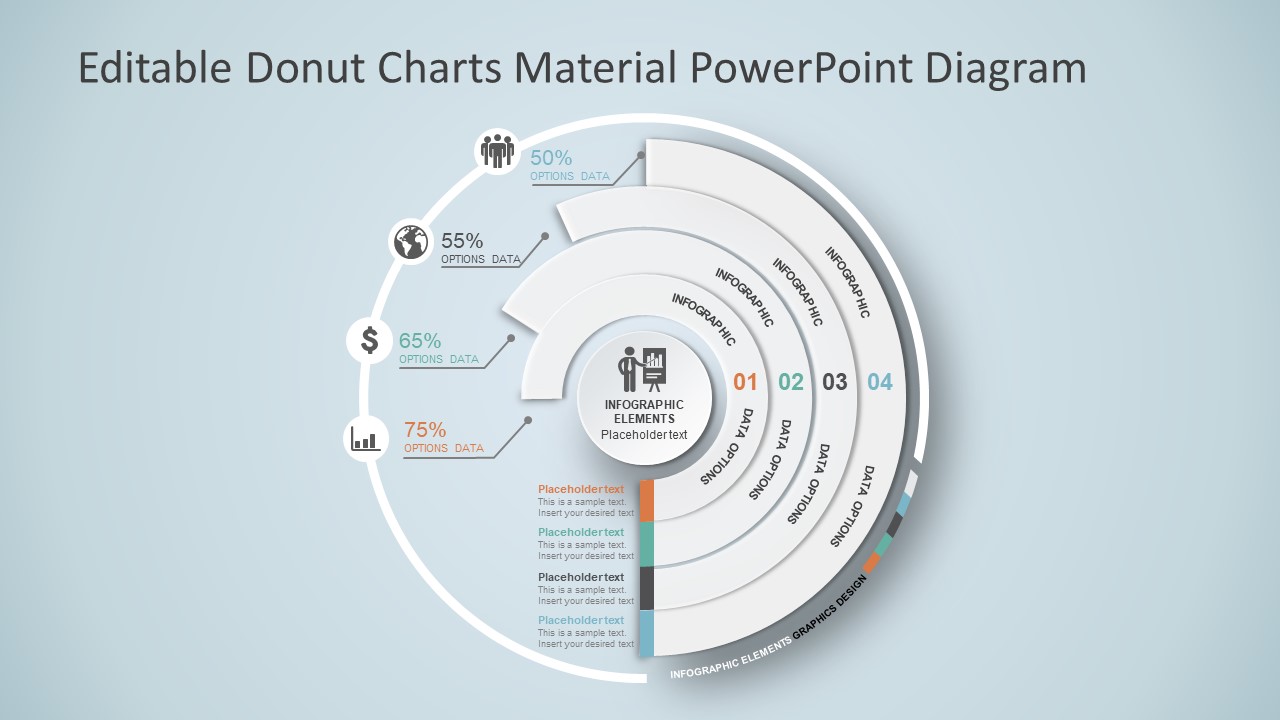
Explain concepts in different hierarchy levels, or processes that require a set of sequential steps by implementing this donut chart PPT template. Each segment has a bubble callout to expand further information for the areas required.
3. Presentation Graph Slide Deck PPT Template
All that’s required to create a data-driven presentation is here. Customize donut charts, funnels, histograms, point & figure charts, and more to create professionally-designed presentation slides.
4. PowerPoint Charts Slide Deck
If you’re looking for clean layouts for column graphs, area charts, line graphs and donut charts, this is the template you need in your toolbox. Perfect for marketing, financial and academic reports.
Consider its relevance to the content when incorporating your graph into the presentation. Insert the graph in a slide where it logically fits within the flow of information.
Positioning the Graph Appropriately in the Presentation
Deciding where to put your graph in the presentation is essential. You want it to be where everyone can see it easily and where it makes sense. Usually, you place the graph on a slide that talks about the data or topic related to the graph. This way, people can look at the graph simultaneously when you talk about it. Make sure it is not too small. If needed, you can make it bigger or smaller to fit nicely on the slide. The goal is to position the graph so that it helps your audience understand your information better.
Ensuring Consistency with the Overall Design of the Presentation
Align the graph with the overall design of your presentation to maintain a cohesive visual appeal. You can use consistent colors, fonts, and styles to integrate the graph seamlessly. The graph must complement the theme and tone of your slides. Therefore, you should avoid flashy or distracting elements that may deviate from the established design. The goal is to create a harmonious and professional presentation where the graph blends naturally without causing visual disruptions. However, we recommend you use bar chart templates already available for presentation.
Narrating Your Graph
When explaining your graph during the presentation, start by providing context. Clearly state what the graph illustrates and its significance to the audience. Use simple and direct language, avoiding unnecessary jargon. It is important to walk through the axes, data points, and any trends you want to highlight. Speaking moderately allows the audience to absorb the information without feeling rushed. You can take pause when needed to emphasize crucial points or transitions.
You can learn more about creative techniques to narrate your graph in our data storytelling guide.
Overloading with Information
One common mistake is presenting too much information on a single graph. Avoid filling the graph with excessive data points or unnecessary details.
Misleading Scales or Axes
Scale mistakes, such as uneven intervals or a bar chart with zero baselines, are common graphical mistakes [5]. Misleading scales can distort the interpretation of the graph and lead to incorrect conclusions. Scales should accurately present the data without exaggerating certain aspects.
Inappropriate Graph Types for the Data
Selecting an inappropriate graph type for your data is a mistake to avoid. Choose a graph type that effectively communicates the nature of your data. For instance, a pie chart for time-based trends might not be the most suitable choice. Match the graph type to the data characteristics to convey information accurately.
Working with presentation graphs may feel challenging for a beginner in presentation design software. Still, practice makes the master. Start by clearly stating your objectives in terms of data representation—this will make the presentation graph-type selection process much easier. Customize the graph by working with appropriate color combinations (you can learn more about this in our color theory guide), as this can also help highlight relevant data sections that may influence an informed decision.
Everything depends on your creative skills and how you want to showcase information. As a final piece of advice, we highly recommend working with one graph per slide, unless you opted for a dashboard layout. Ideally, graphs should be seen from a distance, and working with reduced sizes may hinder accurate data representation.
[1] https://uogqueensmcf.com/wp-content/uploads/2020/BA Modules/Medical Laboratory/Medical Laboratory Courses PPT/Year III Sem II/Biostatistics/lecture 1.pdf (Accessed: 06 March 2024).
[2] Five Principles of Good Graphs. https://scc.ms.unimelb.edu.au/resources/data-visualisation-and-exploration/data-visualisation
[3} Guide to fairly good graphs. Statistics LibreTexts. https://stats.libretexts.org/Bookshelves/Applied_Statistics/Biological_Statistics_(McDonald)/07%3A_Miscellany/7.02%3A_Guide_to_Fairly_Good_Graphs
[4] Practical rules for using color in charts. https://nbisweden.github.io/Rcourse/files/rules_for_using_color.pdf
[5] https://iase-web.org/islp/documents/Media/How%20To%20Avoid.pdf [6] Duquia, R.P. et al. (2014) Presenting data in tables and charts , Anais brasileiros de dermatologia . 10.1590/abd1806-4841.20143388

Like this article? Please share
Data Analysis, Data Science, Data Visualization, Presentation Approaches Filed under Design
Related Articles

Filed under Presentation Ideas • June 6th, 2024
10+ Outstanding PowerPoint Presentation Examples and Templates
Looking for inspiration before approaching your next slide design? If so, take a look at our selection of PowerPoint presentation examples.

Filed under Design • May 22nd, 2024
Exploring the 12 Different Types of Slides in PowerPoint
Become a better presenter by harnessing the power of the 12 different types of slides in presentation design.

Filed under Design • March 20th, 2024
Understanding Data Presentations (Guide + Examples)
Elevate the quality of your message by learning how to work in data presentations effectively. Insights, examples, and PPT templates here.
Leave a Reply
Critical PowerPoint Shortcuts – Claim Your FREE Training Module and Get Your Time Back!
PowerPoint Graphics: How to Improve Your Presentations w/ Graphics
- PowerPoint Tutorials
- Pictures, Icons, Videos, Etc.
- Presentation Design
- August 21, 2018
If you’ve ever touched a PowerPoint slide, chances are that you’ve already used PowerPoint graphics already.
But you may have questions: How do you find good graphics? How do you manipulate them correctly? And how do you customize them?
That’s what this article will answer for you.
What is a PowerPoint graphic?
There seems to be a wide range of things that people label as a graphic for PowerPoint.
Here at Nuts & Bolts, we define a graphic in PowerPoint as any image that is not a picture. This includes SmartArt, which is a type of native PowerPoint graphic and has special attributes.
A PowerPoint graphic most typically refers to a grouping of shapes into an image, commonly referred to as vectors.
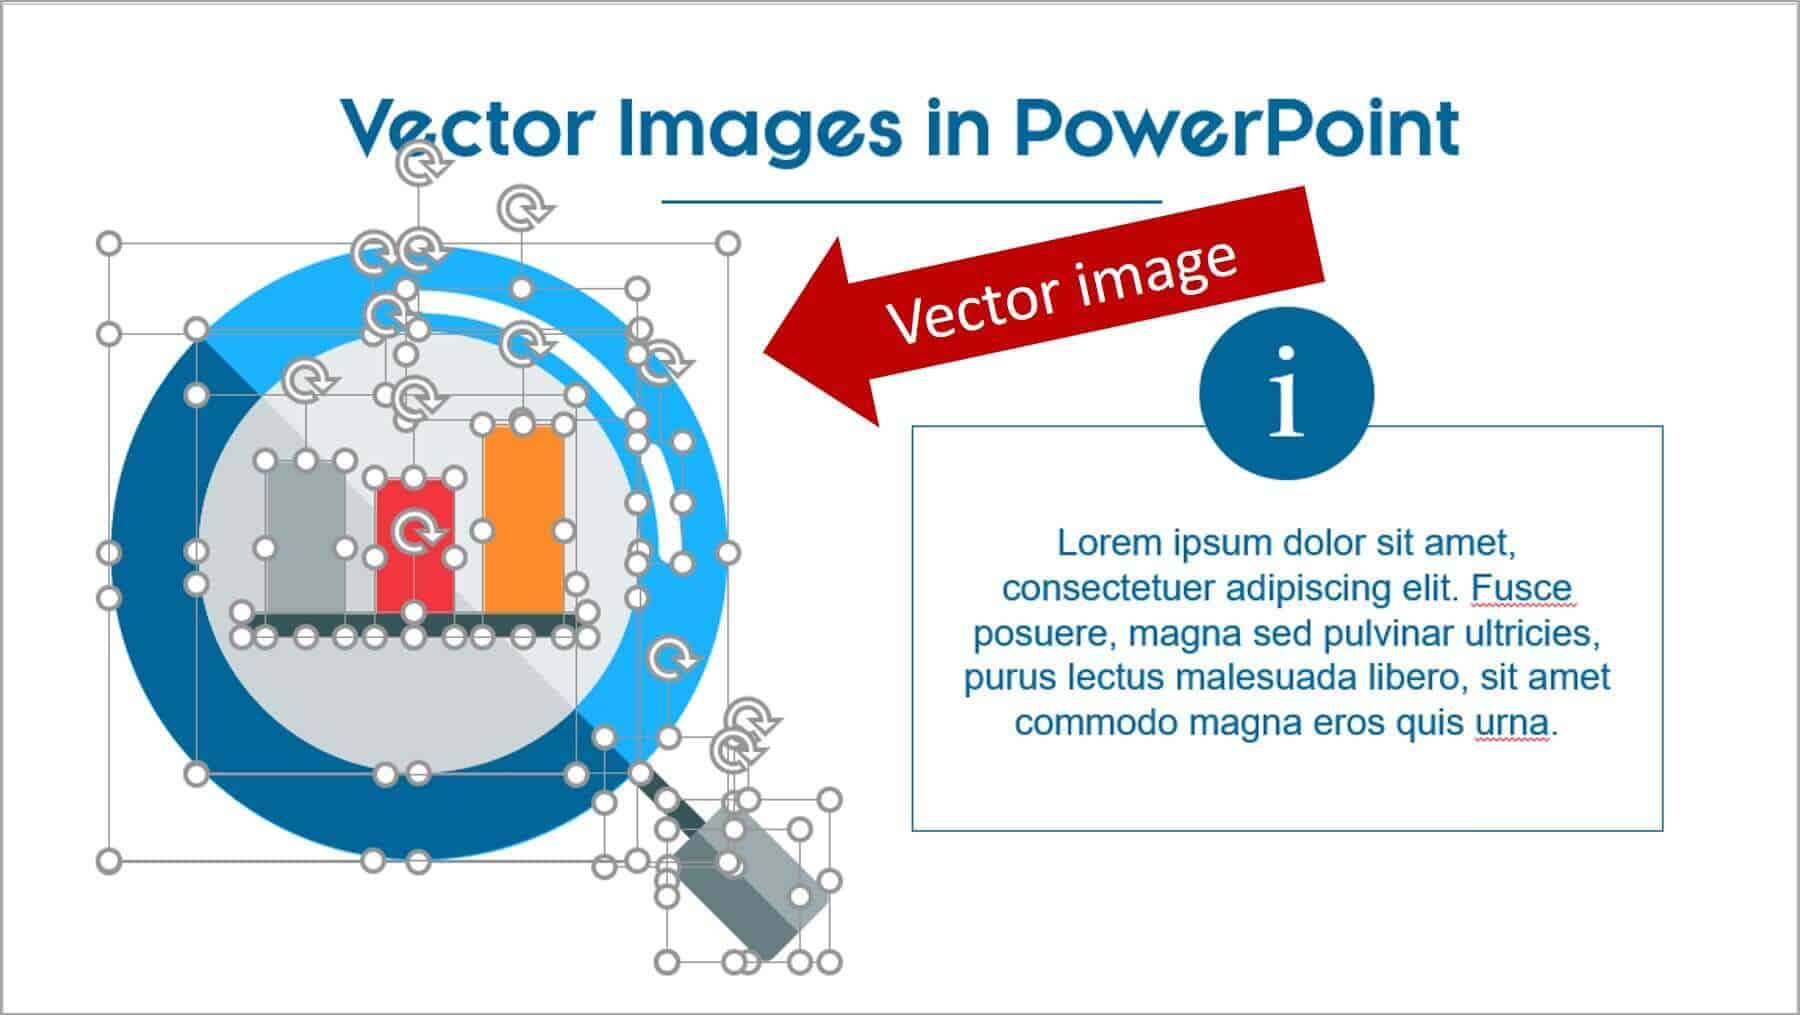
From PowerPoint’s perspective, vectors are considered to be shapes – and that means that you can customize them as you would any rectangle, circle, or freeform shape… giving you complete freedom to create the visual you need.
Vector graphics can come in the following file types:
- EPS (Encapsulated PostScript – create by Adobe – this is perhaps the most common vector image format)
However, PowerPoint will only accept certain file types. To see which ones, go to the section on how to use vectors in PowerPoint below.
Why use a graphic in PowerPoint
As the representation of an idea, a graphic is the perfect way to help your audience immediately visualize and grasp a concept you are sharing with them.
On top of that, it’s a great way to add some flair to any presentation and a quick way to take it up a notch.
Graphics can be better than pictures in some situations, when you need to be able to edit elements in a visual. For example, maybe you need to remove, add or re-color a certain item.

You cannot do this with pictures – but with the right graphic (and in particular a vector graphic), you could potentially customize it to your heart’s content.
Where to get free graphics for PowerPoint
Getting free graphics for PowerPoint is easy – you just have to know where to look.
Here are our favorite 2 places to find free vector graphics for PowerPoint:
- Freepik – Great database with tons of very high-quality and modern icons, flat icons, vectors, and PSD files to use. Freepik does require you to give them credit if you use their material, but they make it very easy with a simple html code.
- Pixabay – Awesome site for 100% free and Creative Commons CC0 licensed images, illustrations, vectors, and videos.
To learn where to get more free PowerPoint graphics, images, videos, etc. check out this list of our favorite PowerPoint resources . Another way to get free vector graphics is to create them from scratch. There are two tools that can help you do this:
- Text-to-Outline by YouPresent – Allows you to convert text into vectors/shapes, which you can then format any way you like in PowerPoint.
- Vector Magic – Creates a vector out of any image…truly magic!
Keep in mind that because these are all free methods for finding vector graphics for PowerPoint, you will be limited in what you find or create. If you want a very specific and professional-looking vector, you may have to go to a paid service to purchase well-designed graphics that suit your need better.
Where to buy graphics for PowerPoint
By far the easiest way to get professional & unique graphics onto your slides (especially now that ClipArt is gone) is to use a service like GetMyGraphics .
They are custom-built graphics designed for PowerPoint. All you need to do is download and insert them onto your slide and then tweak them like you would SmartArt.
Although this is a paid service, we’ve found that we’ve reused these graphics again and again, so we see it as a good investment in sharper looking slides.
How to use vector graphics in PowerPoint
Using vectors in PowerPoint depends on what file type you have. If you have an older version of PowerPoint (2013 and earlier), you can insert the following vector files types into PowerPoint:
If you have Office 365, you can no longer insert EPS files. However, you can still use EMF files, and you can also insert SVG files (except for on a Mac).
If you have an EPS file and can’t import it into your version of PowerPoint, check out our article on how to import EPS files into PowerPoint .
Note: If you’re trying to use a file type that is not supported by your version of PowerPoint, you can try converting your file into the correct file type.
For a really good tutorial on how to convert vectors into usable PowerPoint objects without Adobe software, check out Microsoft MVP Dave Paradi’s post on finding and using vector images in PowerPoint.
Once you have an SVG file downloaded onto your computer, you’ll want to insert it into your presentation.
There are two ways to insert a vector file onto your PowerPoint slide:
Method #1: Drag the file from wherever it is sitting on your computer and drag it onto your slide.
Method #2: Go to the Insert tab in the Ribbon and select ‘Pictures’ (make sure to select the ‘Pictures’ icon and not the ‘Online Pictures’ icon). Then find your vector file and click on ‘Open.’
Note: If you have PowerPoint 2016 with Office 365, you have a new object class, called Icons. These are also vector files (SVG).
You can insert them by going to the Insert tab in the Ribbon and selecting ‘Icons’ (or using this shortcut: Alt, N, Y1). You can learn more about the icons feature in this Office blog article .
Once you have a vector file inserted on your slide, you can manipulate its various pieces.
To do that, you’ll need to ungroup it twice. To ungroup a vector image, select it and then use one of the following methods:
- Hit the ungroup shortcut: Ctrl + Shift + G
- Right-click the vector and select ‘Group’ and then ‘Ungroup’
- Go to the Drawing Tools > Format tab in the Ribbon, select ‘Group’ and then ‘Ungroup’
A pop-up box will appear, asking you if you want to ungroup it. Click on ‘Yes.’
And now you have a series of shapes (instead of a picture) that you can edit and format however you like, just like for regular PowerPoint shapes.
Note: Keep in mind that some things might come out strangely as vectors in PowerPoint:
- Gradients and shadows
- Lines (the lines will likely come out as one object and may lose their original weight)
- Complex artwork, such as sketching and other artistic effects
Some things you can do with your vector images now include:
- Change the fill color
- Add an outline with a custom weight
- Move and resize pieces of the vector
- Edit the points of certain pieces to change even the shape of it
And much more!
What’s next?
Related articles, about the author.

Popular Tutorials
- How to Strikethrough Text (l̶i̶k̶e̶ ̶t̶h̶i̶s̶) in Word, Excel & PowerPoint
- How to Make Animated Fireworks in PowerPoint (Step-by-Step)
- Strikethrough Shortcut (l̶i̶k̶e̶ ̶t̶h̶i̶s̶) for Word, Excel & PowerPoint
- How to Create a Flash Card Memory Game in PowerPoint (Like Jeopardy)
- Keyboard Shortcuts Not Working: Solved
PowerPoint Tutorial Categories
- Strategies & Opinions
- Shortcuts & Hacks
- New Features
- Miscellaneous
- Charts & Data Viz
We help busy professionals save hours and gain peace of mind, with corporate workshops, self-paced courses and tutorials for PowerPoint and Word.
Work With Us
- Corporate Training
- Presentation & Template Design
- Courses & Downloads
- PowerPoint Articles
- Word Articles
- Productivity Resources
Find a Tutorial
- Free Training
- For Businesses
We help busy office workers save hours and gain peace of mind, with tips, training and tutorials for Microsoft PowerPoint and Word.
Master Critical PowerPoint Shortcuts – Secure Your FREE Training Module and Save Valuable Time!
⌛ Master time-saving expert techniques.
🔥 Create powerful presentations.
🚀 Propel your career to new heights.
We value your privacy – we keep your info safe.
Discover PowerPoint Hacks Loved by Industry Giants - KKR, AmEx, HSBC!
Over 114,880 professionals in finance, marketing and sales have revolutionized their PPT skills with our proven methods.
Gain FREE access to a full module of our premium PowerPoint training program – Get started today!
We hate spam too and promise to keep your information safe.
You are currently viewing a placeholder content from Facebook . To access the actual content, click the button below. Please note that doing so will share data with third-party providers.
We use essential cookies to make Venngage work. By clicking “Accept All Cookies”, you agree to the storing of cookies on your device to enhance site navigation, analyze site usage, and assist in our marketing efforts.
Manage Cookies
Cookies and similar technologies collect certain information about how you’re using our website. Some of them are essential, and without them you wouldn’t be able to use Venngage. But others are optional, and you get to choose whether we use them or not.
Strictly Necessary Cookies
These cookies are always on, as they’re essential for making Venngage work, and making it safe. Without these cookies, services you’ve asked for can’t be provided.
Show cookie providers
- Google Login
Functionality Cookies
These cookies help us provide enhanced functionality and personalisation, and remember your settings. They may be set by us or by third party providers.
Performance Cookies
These cookies help us analyze how many people are using Venngage, where they come from and how they're using it. If you opt out of these cookies, we can’t get feedback to make Venngage better for you and all our users.
- Google Analytics
Targeting Cookies
These cookies are set by our advertising partners to track your activity and show you relevant Venngage ads on other sites as you browse the internet.
- Google Tag Manager
- Infographics
- Daily Infographics
- Popular Templates
- Accessibility
- Graphic Design
- Graphs and Charts
- Data Visualization
- Human Resources
- Beginner Guides
Blog Graphic Design 15 Effective Visual Presentation Tips To Wow Your Audience
15 Effective Visual Presentation Tips To Wow Your Audience
Written by: Krystle Wong Sep 28, 2023

So, you’re gearing up for that big presentation and you want it to be more than just another snooze-fest with slides. You want it to be engaging, memorable and downright impressive.
Well, you’ve come to the right place — I’ve got some slick tips on how to create a visual presentation that’ll take your presentation game up a notch.
Packed with presentation templates that are easily customizable, keep reading this blog post to learn the secret sauce behind crafting presentations that captivate, inform and remain etched in the memory of your audience.
Click to jump ahead:
What is a visual presentation & why is it important?
15 effective tips to make your visual presentations more engaging, 6 major types of visual presentation you should know , what are some common mistakes to avoid in visual presentations, visual presentation faqs, 5 steps to create a visual presentation with venngage.
A visual presentation is a communication method that utilizes visual elements such as images, graphics, charts, slides and other visual aids to convey information, ideas or messages to an audience.
Visual presentations aim to enhance comprehension engagement and the overall impact of the message through the strategic use of visuals. People remember what they see, making your point last longer in their heads.
Without further ado, let’s jump right into some great visual presentation examples that would do a great job in keeping your audience interested and getting your point across.
In today’s fast-paced world, where information is constantly bombarding our senses, creating engaging visual presentations has never been more crucial. To help you design a presentation that’ll leave a lasting impression, I’ve compiled these examples of visual presentations that will elevate your game.
1. Use the rule of thirds for layout
Ever heard of the rule of thirds? It’s a presentation layout trick that can instantly up your slide game. Imagine dividing your slide into a 3×3 grid and then placing your text and visuals at the intersection points or along the lines. This simple tweak creates a balanced and seriously pleasing layout that’ll draw everyone’s eyes.
2. Get creative with visual metaphors
Got a complex idea to explain? Skip the jargon and use visual metaphors. Throw in images that symbolize your point – for example, using a road map to show your journey towards a goal or using metaphors to represent answer choices or progress indicators in an interactive quiz or poll.
3. Visualize your data with charts and graphs
The right data visualization tools not only make content more appealing but also aid comprehension and retention. Choosing the right visual presentation for your data is all about finding a good match.
For ordinal data, where things have a clear order, consider using ordered bar charts or dot plots. When it comes to nominal data, where categories are on an equal footing, stick with the classics like bar charts, pie charts or simple frequency tables. And for interval-ratio data, where there’s a meaningful order, go for histograms, line graphs, scatterplots or box plots to help your data shine.
In an increasingly visual world, effective visual communication is a valuable skill for conveying messages. Here’s a guide on how to use visual communication to engage your audience while avoiding information overload.

4. Employ the power of contrast
Want your important stuff to pop? That’s where contrast comes in. Mix things up with contrasting colors, fonts or shapes. It’s like highlighting your key points with a neon marker – an instant attention grabber.
5. Tell a visual story
Structure your slides like a storybook and create a visual narrative by arranging your slides in a way that tells a story. Each slide should flow into the next, creating a visual narrative that keeps your audience hooked till the very end.
Icons and images are essential for adding visual appeal and clarity to your presentation. Venngage provides a vast library of icons and images, allowing you to choose visuals that resonate with your audience and complement your message.

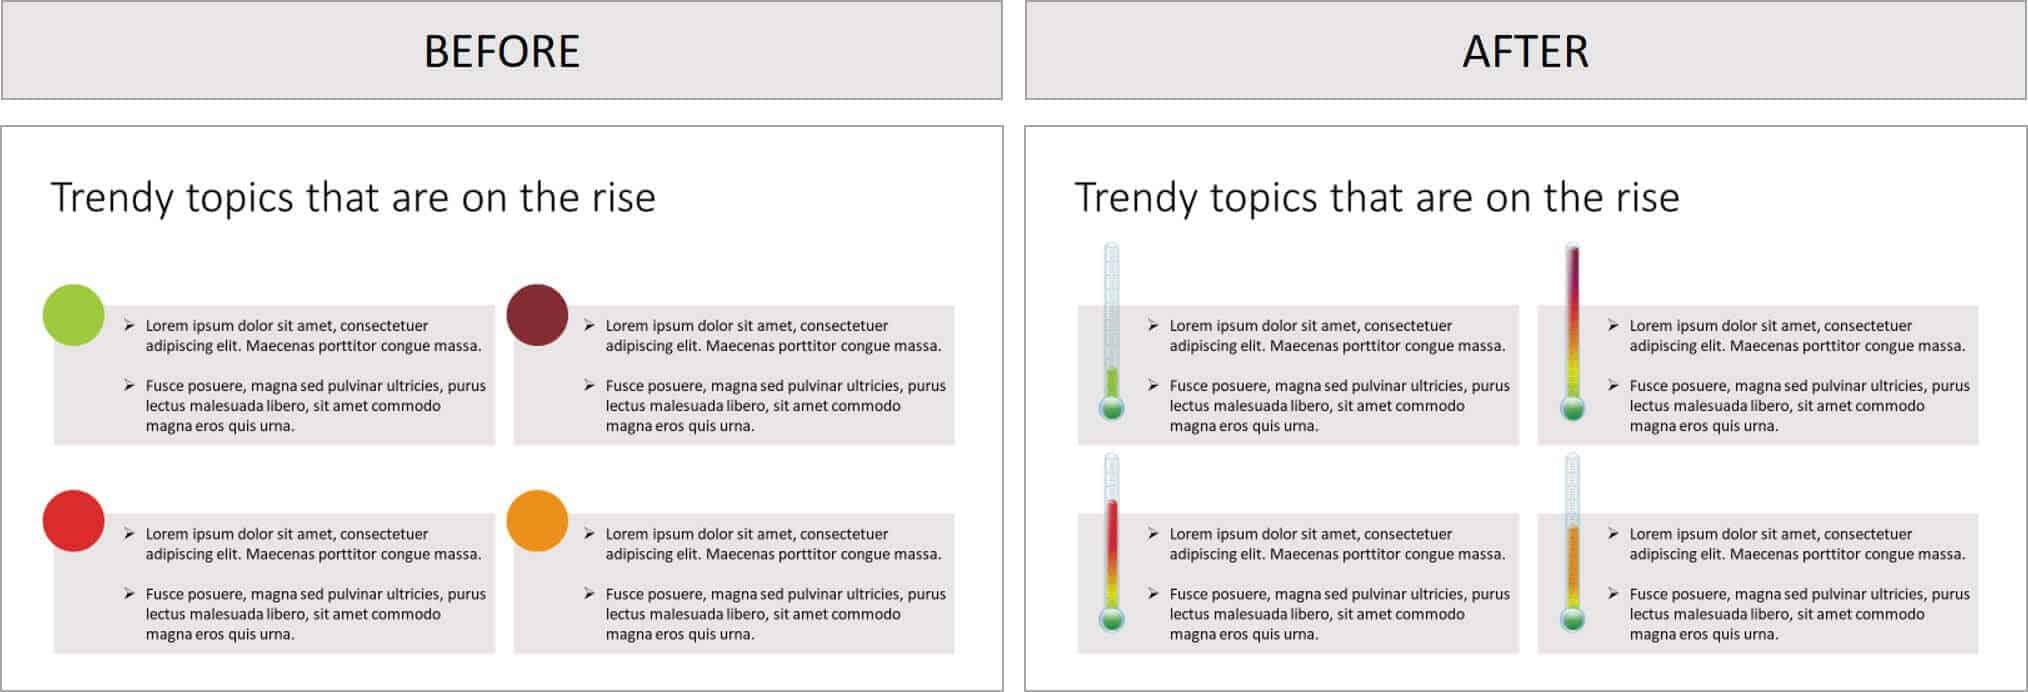
6. Show the “before and after” magic
Want to drive home the impact of your message or solution? Whip out the “before and after” technique. Show the current state (before) and the desired state (after) in a visual way. It’s like showing a makeover transformation, but for your ideas.
7. Add fun with visual quizzes and polls
To break the monotony and see if your audience is still with you, throw in some quick quizzes or polls. It’s like a mini-game break in your presentation — your audience gets involved and it makes your presentation way more dynamic and memorable.
8. End with a powerful visual punch
Your presentation closing should be a showstopper. Think a stunning clip art that wraps up your message with a visual bow, a killer quote that lingers in minds or a call to action that gets hearts racing.

9. Engage with storytelling through data
Use storytelling magic to bring your data to life. Don’t just throw numbers at your audience—explain what they mean, why they matter and add a bit of human touch. Turn those stats into relatable tales and watch your audience’s eyes light up with understanding.

10. Use visuals wisely
Your visuals are the secret sauce of a great presentation. Cherry-pick high-quality images, graphics, charts and videos that not only look good but also align with your message’s vibe. Each visual should have a purpose – they’re not just there for decoration.
11. Utilize visual hierarchy
Employ design principles like contrast, alignment and proximity to make your key info stand out. Play around with fonts, colors and placement to make sure your audience can’t miss the important stuff.
12. Engage with multimedia
Static slides are so last year. Give your presentation some sizzle by tossing in multimedia elements. Think short video clips, animations, or a touch of sound when it makes sense, including an animated logo . But remember, these are sidekicks, not the main act, so use them smartly.
13. Interact with your audience
Turn your presentation into a two-way street. Start your presentation by encouraging your audience to join in with thought-provoking questions, quick polls or using interactive tools. Get them chatting and watch your presentation come alive.

When it comes to delivering a group presentation, it’s important to have everyone on the team on the same page. Venngage’s real-time collaboration tools enable you and your team to work together seamlessly, regardless of geographical locations. Collaborators can provide input, make edits and offer suggestions in real time.
14. Incorporate stories and examples
Weave in relatable stories, personal anecdotes or real-life examples to illustrate your points. It’s like adding a dash of spice to your content – it becomes more memorable and relatable.
15. Nail that delivery
Don’t just stand there and recite facts like a robot — be a confident and engaging presenter. Lock eyes with your audience, mix up your tone and pace and use some gestures to drive your points home. Practice and brush up your presentation skills until you’ve got it down pat for a persuasive presentation that flows like a pro.
Venngage offers a wide selection of professionally designed presentation templates, each tailored for different purposes and styles. By choosing a template that aligns with your content and goals, you can create a visually cohesive and polished presentation that captivates your audience.
Looking for more presentation ideas ? Why not try using a presentation software that will take your presentations to the next level with a combination of user-friendly interfaces, stunning visuals, collaboration features and innovative functionalities that will take your presentations to the next level.
Visual presentations come in various formats, each uniquely suited to convey information and engage audiences effectively. Here are six major types of visual presentations that you should be familiar with:
1. Slideshows or PowerPoint presentations
Slideshows are one of the most common forms of visual presentations. They typically consist of a series of slides containing text, images, charts, graphs and other visual elements. Slideshows are used for various purposes, including business presentations, educational lectures and conference talks.

2. Infographics
Infographics are visual representations of information, data or knowledge. They combine text, images and graphics to convey complex concepts or data in a concise and visually appealing manner. Infographics are often used in marketing, reporting and educational materials.
Don’t worry, they are also super easy to create thanks to Venngage’s fully customizable infographics templates that are professionally designed to bring your information to life. Be sure to try it out for your next visual presentation!

3. Video presentation
Videos are your dynamic storytellers. Whether it’s pre-recorded or happening in real-time, videos are the showstoppers. You can have interviews, demos, animations or even your own mini-documentary. Video presentations are highly engaging and can be shared in both in-person and virtual presentations .
4. Charts and graphs
Charts and graphs are visual representations of data that make it easier to understand and analyze numerical information. Common types include bar charts, line graphs, pie charts and scatterplots. They are commonly used in scientific research, business reports and academic presentations.
Effective data visualizations are crucial for simplifying complex information and Venngage has got you covered. Venngage’s tools enable you to create engaging charts, graphs,and infographics that enhance audience understanding and retention, leaving a lasting impression in your presentation.

5. Interactive presentations
Interactive presentations involve audience participation and engagement. These can include interactive polls, quizzes, games and multimedia elements that allow the audience to actively participate in the presentation. Interactive presentations are often used in workshops, training sessions and webinars.
Venngage’s interactive presentation tools enable you to create immersive experiences that leave a lasting impact and enhance audience retention. By incorporating features like clickable elements, quizzes and embedded multimedia, you can captivate your audience’s attention and encourage active participation.
6. Poster presentations
Poster presentations are the stars of the academic and research scene. They consist of a large poster that includes text, images and graphics to communicate research findings or project details and are usually used at conferences and exhibitions. For more poster ideas, browse through Venngage’s gallery of poster templates to inspire your next presentation.
Different visual presentations aside, different presentation methods also serve a unique purpose, tailored to specific objectives and audiences. Find out which type of presentation works best for the message you are sending across to better capture attention, maintain interest and leave a lasting impression.
To make a good presentation , it’s crucial to be aware of common mistakes and how to avoid them. Without further ado, let’s explore some of these pitfalls along with valuable insights on how to sidestep them.
Overloading slides with text
Text heavy slides can be like trying to swallow a whole sandwich in one bite – overwhelming and unappetizing. Instead, opt for concise sentences and bullet points to keep your slides simple. Visuals can help convey your message in a more engaging way.
Using low-quality visuals
Grainy images and pixelated charts are the equivalent of a scratchy vinyl record at a DJ party. High-resolution visuals are your ticket to professionalism. Ensure that the images, charts and graphics you use are clear, relevant and sharp.
Choosing the right visuals for presentations is important. To find great visuals for your visual presentation, Browse Venngage’s extensive library of high-quality stock photos. These images can help you convey your message effectively, evoke emotions and create a visually pleasing narrative.
Ignoring design consistency
Imagine a book with every chapter in a different font and color – it’s a visual mess. Consistency in fonts, colors and formatting throughout your presentation is key to a polished and professional look.
Reading directly from slides
Reading your slides word-for-word is like inviting your audience to a one-person audiobook session. Slides should complement your speech, not replace it. Use them as visual aids, offering key points and visuals to support your narrative.
Lack of visual hierarchy
Neglecting visual hierarchy is like trying to find Waldo in a crowd of clones. Use size, color and positioning to emphasize what’s most important. Guide your audience’s attention to key points so they don’t miss the forest for the trees.
Ignoring accessibility
Accessibility isn’t an option these days; it’s a must. Forgetting alt text for images, color contrast and closed captions for videos can exclude individuals with disabilities from understanding your presentation.
Relying too heavily on animation
While animations can add pizzazz and draw attention, overdoing it can overshadow your message. Use animations sparingly and with purpose to enhance, not detract from your content.
Using jargon and complex language
Keep it simple. Use plain language and explain terms when needed. You want your message to resonate, not leave people scratching their heads.
Not testing interactive elements
Interactive elements can be the life of your whole presentation, but not testing them beforehand is like jumping into a pool without checking if there’s water. Ensure that all interactive features, from live polls to multimedia content, work seamlessly. A smooth experience keeps your audience engaged and avoids those awkward technical hiccups.
Presenting complex data and information in a clear and visually appealing way has never been easier with Venngage. Build professional-looking designs with our free visual chart slide templates for your next presentation.
What software or tools can I use to create visual presentations?
You can use various software and tools to create visual presentations, including Microsoft PowerPoint, Google Slides, Adobe Illustrator, Canva, Prezi and Venngage, among others.
What is the difference between a visual presentation and a written report?
The main difference between a visual presentation and a written report is the medium of communication. Visual presentations rely on visuals, such as slides, charts and images to convey information quickly, while written reports use text to provide detailed information in a linear format.
How do I effectively communicate data through visual presentations?
To effectively communicate data through visual presentations, simplify complex data into easily digestible charts and graphs, use clear labels and titles and ensure that your visuals support the key messages you want to convey.
Are there any accessibility considerations for visual presentations?
Accessibility considerations for visual presentations include providing alt text for images, ensuring good color contrast, using readable fonts and providing transcripts or captions for multimedia content to make the presentation inclusive.
Most design tools today make accessibility hard but Venngage’s Accessibility Design Tool comes with accessibility features baked in, including accessible-friendly and inclusive icons.
How do I choose the right visuals for my presentation?
Choose visuals that align with your content and message. Use charts for data, images for illustrating concepts, icons for emphasis and color to evoke emotions or convey themes.
What is the role of storytelling in visual presentations?
Storytelling plays a crucial role in visual presentations by providing a narrative structure that engages the audience, helps them relate to the content and makes the information more memorable.
How can I adapt my visual presentations for online or virtual audiences?
To adapt visual presentations for online or virtual audiences, focus on concise content, use engaging visuals, ensure clear audio, encourage audience interaction through chat or polls and rehearse for a smooth online delivery.
What is the role of data visualization in visual presentations?
Data visualization in visual presentations simplifies complex data by using charts, graphs and diagrams, making it easier for the audience to understand and interpret information.
How do I choose the right color scheme and fonts for my visual presentation?
Choose a color scheme that aligns with your content and brand and select fonts that are readable and appropriate for the message you want to convey.
How can I measure the effectiveness of my visual presentation?
Measure the effectiveness of your visual presentation by collecting feedback from the audience, tracking engagement metrics (e.g., click-through rates for online presentations) and evaluating whether the presentation achieved its intended objectives.
Ultimately, creating a memorable visual presentation isn’t just about throwing together pretty slides. It’s about mastering the art of making your message stick, captivating your audience and leaving a mark.
Lucky for you, Venngage simplifies the process of creating great presentations, empowering you to concentrate on delivering a compelling message. Follow the 5 simple steps below to make your entire presentation visually appealing and impactful:
1. Sign up and log In: Log in to your Venngage account or sign up for free and gain access to Venngage’s templates and design tools.
2. Choose a template: Browse through Venngage’s presentation template library and select one that best suits your presentation’s purpose and style. Venngage offers a variety of pre-designed templates for different types of visual presentations, including infographics, reports, posters and more.
3. Edit and customize your template: Replace the placeholder text, image and graphics with your own content and customize the colors, fonts and visual elements to align with your presentation’s theme or your organization’s branding.
4. Add visual elements: Venngage offers a wide range of visual elements, such as icons, illustrations, charts, graphs and images, that you can easily add to your presentation with the user-friendly drag-and-drop editor.
5. Save and export your presentation: Export your presentation in a format that suits your needs and then share it with your audience via email, social media or by embedding it on your website or blog .
So, as you gear up for your next presentation, whether it’s for business, education or pure creative expression, don’t forget to keep these visual presentation ideas in your back pocket.
Feel free to experiment and fine-tune your approach and let your passion and expertise shine through in your presentation. With practice, you’ll not only build presentations but also leave a lasting impact on your audience – one slide at a time.
Discover popular designs

Infographic maker

Brochure maker

White paper online

Newsletter creator

Flyer maker

Timeline maker

Letterhead maker

Mind map maker

Ebook maker
how to give the perfect presentation
Using visuals in your presentation, how to design memorable presentations.
Visuals can impact your presentation dramatically.These images, photos, objects, charts, diagrams, tables, graphs or illustrations have the potential to make or break your presentation. Used sloppily, they can damage your credibility and reputation. Designed wisely, they can strengthen your verbal message and enable you to achieve your objective. Why? Because a picture really is worth a thousand words.
According to research done by Professor Albert Mehrabian, a leading communications expert, we take in about 55% of visual information, versus only 7% of textual information. This means that whenever possible, you should use visuals such as photos, charts, graphs, and tables in your presentation. Also, eliminate sentences unless you are showing a quotation. Reduce the number of words or bullet points you use on your slides.They only distract your audience members and encourage them to read the slides, instead of listening to your words.
Hi-Tech or Low-Tech?
Today’s rapidly evolving technology enables us to add strong state-of-the-art audio-visual elements to our presentations. When planning a presentation before a huge audience, consult with your technical team (or, at least, your teenagers!) to come up with the best options. Yet, hi-tech technological components are not always the answer. In meeting rooms around the world, millions of people give presentations every day with or without the aid of laptops and powerpoint software. Remember the purpose of the visuals is to add interest and enhance your message. Yet, you are still the star, the primary focus. No amount of technology can cover up a poor performance.
Handling Equipment & Visuals
When you handle the equipment and visuals, you are still performing for your audience. Make sure you remain calm when using unfamiliar equipment or solving technical glitches. Remember the audience is watching and listening to the way you treat technicians and assistants. Speak respectfully to all who come up to help you. Practice, to ensure you can move confidently and seamlessly between your speech and your visuals, without fuss or delay. Rehearse the visual part of your presentation, just like other parts of your speech.
Benefits of Visuals
A study at the Wharton Research Centre also revealed that participants remembered 50% of the visual information, but only 5% of the bulleted points. Visuals can help you clarify points, reinforce your message, and create greater interest and enthusiasm for your subject. What’s more, visuals encourage audience interaction and provide a change from just hearing, to seeing and hearing.
As a presenter, you can be more relaxed and active when you show a slide. You may walk around, gesture, or point out key relationships in the information you are presenting graphically. Visuals take some of the attention off you and allow people to focus on your information. In this way, they are beneficial to you and your audience. According to research, audiences retain 10% of what was presented orally, 35% of what was presented visually alone, and 65% of what was presented visually and orally. The bottom line is that incorporating visuals can add to your bottom line.
Developing Visuals
Visuals include a variety of communication tools such as flip charts, overhead transparencies, slides, and videos. Powerpoint slide presentations are often the most popular, though not always what’s necessary. What you use depends on the size of your audience. If you are presenting for up to 50 people, you could use boards, flipcharts, overhead transparencies, handouts, and slides. If you are presenting for about 125 people, it is best to stick to overhead transparencies and slides. If you are presenting for 125 people or more, use slides alone.
When considering which type of visuals to use, take into account time and cost factors. Determine the number of times the slides can be used. Decide if professional development is necessary.
Plan a maximum of one transparency for every five minutes of your presentation. Don’t run after your visuals by trying to pack in too many in a short period of time. Let your visuals support your message and not the other way around.
If you are planning to develop your own visuals, keep the following points in mind:
- Emphasize only one thought or comparison on each slide. If you include more than one message, it may confuse your audience.
- Number your slides in case they get mixed up.
- Keep visuals brief and simple.
- Create visual material that is bold and easily seen from a distance.
Remember that research has shown that people remember most when there is only narration and graphics. In other words, they learn less when there is narration alone and they learn less when there is narration, graphics, and text. Check the effectiveness of your visuals by seeing if they can tell the story without added written information.
Environmental Influences
Lastly, remember that many of us are sleep-deprived. Try to keep some lights on during the presentation or it will be too easy for even the most well-intentioned audience members to doze off comfortably and miss all your hard work!
I put a lot of information on my slides. I need it so I won’t forget what to say, even though I’ve spoken English all my life. What can I do about that?
Start by reducing the number of words on the slides slowly. Soon, you will discover that it’s easier to speak when you don’t have to read every single word. Since you’re an English speaker, you only need a few key words to help you elaborate on the subject. Don’t get caught up in thinking you have to deliver the information only in a certain way. Accept the fact that each time you speak the words may be different but the message will come across just the same. I’m sure you can do it.
Ask a Question: Cancel reply
Ask only about topics covered on this page.
Your Question:
About Presentation Prep

Being able to speak in public can change your life! Presentation Prep is your complete, free guide to delivering speeches, lectures, and presentations more successfully and confidently. Whether you're a native English-speaker who suffers from public speaking anxiety, or a non-native speaker who needs guidelines for presenting to international audiences, this site will give you everything you need. Presentation Prep is written by Rebecca Ezekiel, an experienced corporate trainer who specializes in the areas of communications, presentations, and cross-cultural skills. Her online English language training videos are watched by millions of students worldwide.
Want to create or adapt books like this? Learn more about how Pressbooks supports open publishing practices.
14.2 Incorporating Effective Visuals into a Presentation
Learning objectives.
- Recognize the characteristics of effective visual aids.
- Analyze different types of visual aids and appropriate ways to use them.
- Determine how to create original visual aids and how to locate visual aids created by others.
Good communication is a multisensory experience. Children first learning how to read often gravitate toward books with engaging pictures. As adults, we graduate to denser books without pictures, yet we still visualize ideas to help us understand the text. Advertisers favor visual media—television, magazines, and billboards—because they are the best way to hook an audience. Websites rely on color, graphics, icons, and a clear system of visual organization to engage Internet surfers.
Bringing visuals into a presentation adds color, literally and figuratively. There is an art to doing it well. This section covers how to use different kinds of visual aids effectively.
Using Visual Aids: The Basics
Good writers make conscious choices. They understand their purpose and audience. Every decision they make on the page, from organizing an essay to choosing a word with just the right connotations, is made with their purpose and audience in mind.
The same principle applies to visual communication. As a presenter, you choose the following:
- When to show images or video for maximum impact
- Which images will best produce the effect you want
- When to present information using a table, chart, or other graphic
- How much text to include in slides or informational graphics
- How to organize graphics so they present information clearly
Your goal is to use visual media to support and enhance your presentation. At the same time, you must make sure these media do not distract your audience or interfere with getting your point across. Your ideas, not your visuals, should be the focus.
As you develop the visual side of your presentation, you will follow a process much like the process you follow when you write. You will brainstorm ideas, form an organizational plan, develop drafts, and then refine and edit your work. The following sections provide guidelines to help you make good decisions throughout the process.
What Makes Visual Aids Effective?
To help you get a sense of what makes visual media work, think about what does not work. Try to recall occasions when you have witnessed the following visual media failures:
- Websites crammed with so many images, flashing phrases, and clashing colors that they are almost unreadable
- Assembly instructions with illustrations or diagrams that are impossible to follow
- Photographs that are obviously (and badly) altered with photo-editing software
- Distracting typos or other errors in signs, advertisements, or headlines
- Tables, charts, or graphs with tiny, dense text or missing labels
In each case, the problem is that the media creator did not think carefully enough about the purpose and audience. The purpose of images, color, or flashing text on a website is to attract attention. Overusing these elements defeats the purpose because the viewer may become overwhelmed or distracted. Tables, charts, and graphs are intended to simplify complex information, but without clear labels and legible text, they will confuse the audience.
In contrast, effective visual elements are chosen or created with the purpose and audience in mind. Although a photo shoot for a magazine article might result in dozens of images, editors choose those few that work best with the article. Web designers and video game creators have an audience test their products before they are released, to ensure that people will understand how to use them. Understanding the function of different visual aids will help you use them with purpose.
Types of Visual Aids
Visual aids fall into two main categories—images and informational graphics. Images include photographs, illustrations and clip art, and video footage. Informational graphics include tables, charts, bar graphs, and line graphs.
These visual aids serve two purposes: to add emotional impact to your presentation and to organize information more clearly. With that in mind, read to find out how specific types of visual aids achieve those purposes.
Photographs
A striking photograph can capture your audience’s attention far more successfully than words can. Consider including photographs at the beginning or end of your presentation to emphasize your main ideas or to accompany a particularly important point in the body of your presentation. Remember that, as with other types of graphics, less is often more. Two or three well-chosen photographs are more effective than a dozen mediocre ones.
When you choose photographs, ask yourself these questions:
- What purpose does this image serve? Will it surprise the audience? Will it provoke a strong emotional response? Does it support an important point?
- Will this photograph be more effective if shown with only a caption, or does it need additional text?
- Will the audience understand what is happening in the photograph? Is the meaning immediately evident, or does the photo need some context?
- Would editing the image make it more effective? Consider using image-editing software to crop the photo, change the brightness, or make other cosmetic changes. (Do not go overboard, though. A slightly imperfect but authentic image is preferable to one that has been obviously altered.)
To illustrate the sense of helplessness people felt in the midst of tragedy, a student could use a photograph that shows fear, weariness, or defeat on the face of the photograph’s subject.
Figure 14.3

Neil Moralee – On The Scrap Heap . – CC BY-NC-ND 2.0.
Illustrations
Illustrations, such as editorial or political cartoons, serve much the same purpose as photographs. Because an illustration does not capture a moment in time the way a photo does, it may have less impact. However, depending on your topic and the effect you want to achieve, illustrations can still be very useful. Use the same criteria for choosing photographs to help you choose illustrations.
Figure 14.4

Humor Blog – Political Cartoon about Budget Cuts – CC BY 2.0.
The style of an illustration or photograph affects viewers just as the content does. Keep this in mind if you are working with the stock images available in office software programs. Many of these images have a comical tone. This may be fine for some topics—for instance, a presentation on television shows for children. However, if you need to project a more serious tone, make sure you choose images to suit that purpose. Many free (or reasonably priced) image banks are available online.
Video Footage
Even more than photographs, video footage can create a sense of immediacy, especially if your video includes sound. Showing a brief video clip can help your audience feel as if they are present at an important event, connect with a person being interviewed, or better understand a process. Again, ask yourself the following questions to ensure you are using the footage well:
- What purpose does this video serve? (Never rely on video clips just to fill time.)
- How much footage should be shown to achieve your purpose?
- What will need to be explained, before or after showing the video, to ensure that your audience understands its significance?
- Will it be necessary to edit the video to stay within time requirements or to focus on the most important parts?
Informational graphics, such as tables, charts, and graphs, do not provoke the same response that images do. Nevertheless, these graphics can have a powerful impact. Their primary purpose is to organize and simplify information.
Tables are effective when you must classify information and organize it in categories. Tables are an especially good choice when you are presenting qualitative data that are not strictly numerical. Table 14.1 “Example of Qualitative Data Table” was created for a presentation discussing the subprime mortgage crisis. It presents information about people who have held powerful positions both in the government and at one of the investment banking firms involved in the subprime mortgage market.
Table 14.1 Example of Qualitative Data Table
Sources: http://www.rollingstone.com/politics/news/%3Bkw=%5B3351,11459%5D ; http://www.nytimes.com/2008/10/19/business/19gold.html ; http://topics.nytimes.com/top/reference/timestopics/people/p/henry_m_jr_paulson/index.html?inline=nyt-per ; http://topics.nytimes.com/top/reference/timestopics/people/r/robert_e_rubin/index.html?inline=nyt-per , http://www.nytimes.com/2002/12/13/us/man-in-the-news-economic-adviser-from-other-side-of-the-deficit-stephen-friedman.html ; http://news.bbc.co.uk/2/hi/business/342086.stm .
If you are working with numerical information, consider whether a pie chart, bar graph, or line graph might be an effective way to present the content. A table can help you organize numerical information, but it is not the most effective way to emphasize contrasting data or to show changes over time.
Pie charts are useful for showing numerical information in percentages. For example, you can use a pie chart to represent presidential election results by showing what percentage of voters voted for the Democratic presidential candidate, the Republican candidate, and candidates from other political parties.
Figure 14.5

Source: http://www.fec.gov/pubrec/fe2008/2008presgeresults.pdf
Bar graphs work well when you want to show similarities and differences in numerical data. Horizontal or vertical bars help viewers compare data from different groups, different time periods, and so forth. For instance, the bar graph in Figure 14.6 allows the viewer to compare data on the five countries that have won the most Olympic medals since the modern games began in 1924: Norway, the United States, the former Soviet Union, Germany, and Austria. Bar graphs can effectively show trends or patterns in data as well.
Figure 14.6

Source: http://www.nbcolympics.com/medals/all-time-standings/index.html
Line Graphs
Like bar graphs, line graphs show trends in data. Line graphs are usually used to show trends in data over time. For example, the line graph in Figure 14.7 shows changes in the Dow Jones Industrial Average—an economic index based on trading information about thirty large, US-based public companies. This graph shows where the Dow closed at the end of each business day over a period of five days.
Figure 14.7

Source: http://www.google.com/finance/historical?cid=983582&startdate=May+17%2C+2010&enddate=May+21%2C+2010
In this exercise, you will begin to refine your ideas for incorporating media into your presentation. Complete the following steps on your own sheet of paper.
- Revisit the list you brainstormed for Note 14.12 “Exercise 3” in Chapter 14 “Creating Presentations: Sharing Your Ideas” , Section 14.1 “Organizing a Visual Presentation” and the annotated outline you developed for Note 14.17 “Exercise 4” .
- Analyze the two different types of visual aids: images and informational graphics. Identify at least two places in your presentation where you might incorporate visual aids.
- Evaluate the purpose of the visual aid. Does it create emotional impact, or does it organize information? Is the visual effective?
- Determine whether you will be able to create the visual aid yourself or will need to find it.
Creating Original Visual Aids
You will include original visual aids in your presentation to add interest, present complex information or data more clearly, or appeal to your audience’s emotions. You may wish to create some visual aids by hand—for instance, by mounting photographs on poster board for display. More likely, however, you will use computer-generated graphics.
Computer-generated visual aids are easy to create once you learn how to use certain office software. They also offer greater versatility. You can print hard copies and display them large or include them in a handout for your audience. Or, if you are working with presentation software, you can simply insert the graphics in your slides.
Regardless of how you proceed, keep the following guidelines in mind:
- Create visual aids with purpose. Think carefully about how they will enhance your message, and choose a form that is appropriate for your content.
- Strive for quality. You do not need the skills of a professional photographer or designer, but do take time to make sure your visual aids are neat, attractive, and legible. Proofread for errors, too.
Using Software to Create Visual Aids
You can use standard office software to create simple graphics easily. The following guidelines describe how to work with word-processing software and presentation software.
Working with Photographs
Most personal computers come equipped with some basic image-editing software, and many people choose to purchase more advanced programs as well. You can upload photographs from a digital camera (or in some cases, a cell phone) or scan and upload printed photographs. The images can then be edited and incorporated into your presentation. Be sure to save all of your images in one folder for easy access.
Creating Tables
To create a table within a word-processing document consult your software program’s help feature or an online tutorial. Once you have created the table, you can edit and make any additional changes. Be sure that the table has no more than six to seven rows or columns because you do not want to compromise the size of the text or the readability. Aligning with precision will help your table look less crowded. Also, the row and column titles should spell out their contents.
Creating Graphs
Figure 14.8

Pie charts and bar and line graphs can also be created using standard office software. Although you can create these graphics within a document, you will need to work with both your word-processing application and your spreadsheet application to do so. The graph should visually explain the data using colors, titles, and labels. The use of color will help the audience distinguish information; however, avoid colors that are hard on the eyes, such as lime green or hot pink. The title should clearly state what the graph explains. Lastly, avoid using acronyms in the titles and other labels.
Creating Graphics in an Electronic Presentation
If you plan to work only with hard copy graphics during your presentation, you may choose to create them as word-processing documents. However, if you are using presentation software, you will need to choose one of the following options:
- Create your graphics using the presentation software program.
- Create your graphics within another program and import them.
Standard office presentation software allows you to create informational graphics in much the same way you would create them within a word-processing application. Keep the formatting palette, a menu option that allows you to customize the graphic, open while you use the software. The formatting menu provides options for inserting other types of graphics, such as pictures and video. You may insert pictures from an image bank available within the program, or insert images or video from your own desktop files. Shape your use of multimedia in accordance with the message your presentation is trying to convey, the purpose, and your audience.
Creating Visual Aids by Hand
Most of the time, using computer-generated graphics is more efficient than creating them by hand. Using office software programs helps give your graphics a polished appearance while also teaching you skills that are useful in a variety of jobs. However, it may make sense to use hand-created visual aids in some cases—for instance, when showing a 3-D model would be effective. If you follow this route, be sure to devote extra time to making sure your visual aids are neat, legible, and professional.
Flip charts are inexpensive and quick visual aids used during face-to-face presentations. The flip chart can be prepared before, as well as during, the presentation. Each sheet of paper should contain one theme, idea, or sketch and must be penned in large letters to be seen by audience members farthest away from the speaker.
Writing Captions
Any media you incorporate should include a caption or other explanatory text. A caption is a brief, one- to two-sentence description or explanation of a visual image. Make sure your captions are clear, accurate, and to the point. Use full sentences when you write them.
Captions should always be used with photographs, and in some cases, they can be useful for clarifying informational graphics, which represent qualitative data visually. However, informational graphics may not require a caption if the title and labels are sufficiently clear. For other visual media, such as video footage, providing explanatory text before or after the footage will suffice. The important thing is to make sure you always include some explanation of the media.
In this exercise, you will begin to develop visual aids for your presentation. Complete the steps in this exercise—and enjoy the chance to be creative. Working with visuals can be a pleasant way to take a break from the demands of writing.
- Revisit the ideas you developed in Note 14.24 “Exercise 1” . Choose at least two ideas that you can create. ( Note: If you are using software to develop a slideshow presentation, count this as one of your self-created visual aids. Include at least one other self-created visual aid, such as an original photograph, within your slideshow.)
- Get creative! Take your photographs, construct a 3-D model, create informational graphics, or work on your presentation slides. Develop good working drafts.
- After you have completed drafts of your visual aids, set them aside for a while. Then revisit them with a critical eye. First, check any text included with the graphic. Make sure your facts are correct, your words are clear and concise, and your language is free of errors.
- Next, evaluate how well your aids work visually. Are they large enough to be seen and read from a distance? Are captions and labels easy to find? Are photographs of reasonably high quality? Ask someone else for feedback, too.
- Begin making any needed changes. As you proceed through the rest of this section, continue to revisit your work to improve it as needed.
Collaboration
Please share the first version of your visual aids with a classmate. Examine what they have produced. On a separate piece of paper, note both the elements that catch your attention and those that would benefit from clarification. Return and compare notes.
Testing and Evaluating Visual Aids
Regardless of how you create your visual aids, be sure to test-drive them before you deliver your presentation. Edit and proofread them, and if possible, show them to someone who can give you objective feedback. Use the following checklist.
Checklist 14.1
Visual Aid Evaluation Checklist
- Visual aids are clearly integrated with the content of the presentation
- Photographs and illustrations suit the overall tone of the presentation
- Images and text are large and clear enough for the viewer to see or read
- Images are shown with explanatory text or a caption
- Informational graphics include clear, easy-to-read labels and headings
- Text within informational graphics is easy to read (Watch out for wordiness and crowded text or a font that is too small and hard to read.)
- Formatting choices (color, different fonts, etc.) organize information effectively
- Any text within graphics is free of errors
- Hyperlinks within slides function properly
- Display text for hyperlinks is concise and informative (Never paste a link into a slide without modifying the display text.)
Writing at Work
Office software includes many options for personalizing a presentation. For instance, you can choose or create a theme and color scheme, modify how one slide transitions to the next, or even include sound effects. With so many options, students and employees sometimes get carried away. The result can seem amateurish and detract from, rather than enhance, your presentation.
Remember, you are delivering a presentation, not producing a movie. Use the customization options to help give your presentations a consistent, polished, appearance. However, do not let these special effects detract from the substance of your slides.
Using Existing Visual Media
Depending on your topic, you may be able to find images and other graphics you can use instead of creating your own. For instance, you might use photographs from a reputable news source or informational graphics created by a government agency. If you plan to use visual aids created by others, keep the following guidelines in mind:
- Set a purpose before you begin your search. You will search more efficiently if you start with a general idea of what you are looking for—a line graph of unemployment rates for the past twelve months, for example, or a video clip of the most recent State of the Union address.
- Filter out visual aids that are not relevant. You may come across eye-catching graphics and be tempted to use them even if they are only loosely related to your topic, simply because they are attention getting. Resist the temptation. If the graphic is not clearly connected to your point, it does not belong in your presentation.
- Read carefully. In addition to reading labels, headings, and captions, read any text that accompanies the visual. Make sure you understand the visual in its original context. For informational graphics, make sure you understand exactly what information is being represented. (This may seem obvious, but it is easy to misread graphic information. Take the time to examine it carefully.)
- Evaluate sources carefully and record source information. When you look for visual media to complement your presentation, you are conducting research. Apply the same standards you used for your research paper. Choose reliable sources, such as reputable news organizations, government and nonprofit organizations, and educational institutions. Verify data in additional sources. Finally, be sure to document all source information as you proceed.
Searching Efficiently for Visual Media
You will probably find it most efficient to use the Internet to search for visual aids. Many students begin by typing keywords into a search engine to locate related images. However, this search technique is not necessarily efficient, for several reasons:
- It often pulls up hundreds or even thousands of images, which may be only loosely related to your search terms.
- It can sometimes be difficult to understand the image in its original context.
- It can be hard to find copyright information about how you may use the image.
A more efficient strategy is to identify a few sources that are likely to have what you are looking for, and then search within those sites. For instance, if you need a table showing average life expectancy in different countries, you might begin with the website of the World Health Organization. If you hope to find images related to current events, news publications are an obvious choice. The Library of Congress website includes many media related to American history, culture, and politics.
Searching this way has the following advantages:
- You will often find what you are looking for faster because you are not wasting time scrolling through many irrelevant results.
- If you have chosen your sources well, you can be reasonably certain that you are getting accurate, up-to-date information.
- Images and informational graphics produced by reputable sources are likely to be high quality—easy to read and well designed.
If you do choose to use a search engine to help you locate visual media, make sure you use it wisely. Begin with a clear idea of what you are looking for. Use the advanced search settings to narrow your search. When you locate a relevant image, do not download it immediately. Read the page or site to make sure you understand the image in context. Finally, read the site’s copyright or terms of use policy—usually found at the bottom of the home page—to make sure you may use the material.
If you are unable to find what you are looking for on the Internet consider using print sources of visual media. You may choose to mount these for display or scan them and incorporate the files into an electronic presentation. (Scanning printed pages may lower the quality of the image. However, if you are skilled at using photo-editing software, you may be able to improve the quality of the scanned image.)
Inserting Hyperlinks in an Electronic Presentation
If you are working with images, audio, or video footage available online, you may wish to insert a link within your presentation. Then, during your presentation, you can simply click the link to open the website in a separate window and toggle between windows to return to your presentation slides.
To insert a hyperlink within your presentation, click on insert in the toolbar and then select hyperlink from the menu. Doing so will open a dialogue box where you can paste your link and modify the accompanying display text shown on your slide.
Copyright and Fair Use
Before you download (or scan) any visual media, make sure you have the right to use it. Most websites state their copyright and terms of use policy on their home page. In general, you may not use other people’s visual media for any commercial purpose without contacting the copyright holder to obtain permission and pay any specified fees.
Copyright restrictions are somewhat more ambiguous when you wish to download visual media for educational uses. Some educational uses of copyrighted materials are generally considered fair use —meaning that it is legally and ethically acceptable to use the material in your work. However, do not assume that because you are using the media for an educational purpose, you are automatically in the clear. Make sure your work meets the guidelines in the following checklist. If it does, you can be reasonably confident that it would be considered fair use in a court of law and always give credit to the source.
Checklist 14.2
Media Fair Use Checklist
- You are using the media for educational purposes only.
- You will make the work available only for a short period and to a limited audience. For instance, showing a copyrighted image in a classroom presentation is acceptable. Posting a presentation with copyrighted images online is problematic. In addition, avoid any uses that would allow other people to easily access and reproduce the work.
- You have used only as much of the work as needed for your purposes. For video and audio footage, limit your use to no more than 10 percent of the media—five minutes of an hour-long television show, for example. Image use is harder to quantify, but you should avoid using many images from the same source.
- You are using the media to support your own ideas, not replace them. Your use should include some commentary or place the media in context. It should be a supporting player in your presentation—not the star of the show.
- You have obtained the material legally. Purchase the media if necessary rather than using illegally pirated material.
- Your use of the media will not affect the copyright holder or benefit you financially.
By following these guidelines, you are respecting the copyright holder’s right to control the distribution of the work and to profit from it.
In some fields, such as teaching, job applicants often submit a professional portfolio to a prospective employer. Recent college graduates may include relevant course work in their portfolios or in applications to graduate school. What should you do if your course work uses copyrighted visual media?
This use of media is acceptable according to fair use guidelines. Even though you are using the work for your personal professional advancement, it is not considered an infringement on copyright as long as you follow the additional guidelines listed in the previous checklist.
Crediting Sources
As you conduct your research, make sure you document sources as you proceed. Follow the guidelines when you download images, video, or other media from the Internet or capture media from other sources. Keep track of where you accessed the media and where you can find additional information about it. You may also provide a references page at the end of the presentation to cite not only media and images but also the information in the text of your presentation. See Chapter 13 “APA and MLA Documentation and Formatting” for more information on creating a reference page.
Write captions or other explanatory text for visual media created by others, just as you would for media you created. Doing so helps keep your audience informed. It also helps ensure that you are following fair use guidelines by presenting the media with your commentary, interpretation, or analysis. In your caption or elsewhere in your presentation, note the source of any media you did not create yourself. You do not need to provide a full bibliographical citation, but do give credit where it is due.
In this exercise, you will locate visual aids created by others and continue developing the work you began earlier. Complete these steps.
1. Revisit the ideas you developed in Note 14.24 “Exercise 1” . Choose at least two ideas for which it would make more sense to find the visual aid than to create it yourself. 2. Use the search tips provided in this section to locate at least two visual aids from reputable sources that you can use. Prepare them for your presentation by adding clarifying text as needed. Be sure to credit your source. 3. Incorporate the visual aids you created in Note 14.26 “Exercise 2” and Note 14.32 “Exercise 3” into your presentation. This may involve preparing physical copies for display or inserting graphic files into an electronic presentation.
4. Take some time now to review how you will integrate the visual and verbal components of your presentation.
- If you are working with presentation software, refine your slides. Make sure the visual approach is consistent and suits your topic. Give your text a final proofread.
- If you are not using presentation software, review the annotated outline you created in Note 14.24 “Exercise 1” . Update it as needed to reflect your current plan. Also, determine how you will physically set up your visual aids.
Key Takeaways
- Visual aids are most effective when they are chosen with the purpose and audience in mind. They serve to add emotional impact to a presentation and to organize information more clearly.
- Visual aids should always be clearly related to the presenter’s ideas. Captions, labels, and other explanatory text help make the connection clear for the audience.
- Like writing, developing the visual components of a presentation is a process. It involves generating ideas, working with them in a draft format, and then revising and editing one’s work.
- Visual aids can be divided into two broad categories—image-based media and informational graphics.
- Widely available software programs make it relatively easy to create visual aids electronically, such as photo images, charts, and graphs.
- When using visual aids created by others, it is important to apply good research skills, follow guidelines for fair use, and credit sources appropriately.
Writing for Success Copyright © 2015 by University of Minnesota is licensed under a Creative Commons Attribution-NonCommercial-ShareAlike 4.0 International License , except where otherwise noted.
Pomaka English
Supporting English language learners and educators

Tips and phrases for explaining graphs
Do you have to explain graphs for your work or study?
There are many situations where you might have to explain graphs. It may be for a business meeting or report. It may be for a presentation or a research paper. You also often have to describe or listen to talks about graphs in language tests (eg. IELTS writing task 1). Being able to explain a graph clearly and accurately in English is certainly a useful skill to have.
So, what’s important when explaining graphs?
Below are a few quick tips and phrases that can help listeners and readers understand your graphs.
Clearly introduce graph Be sure to clearly introduce the title or topic at the beginning. Start by using phrases like “This graph shows….” Also, if you’re explaining your graph in a presentation, it’s a good idea to introduce the key labels (eg. axes and units) before talking about the data. Use phrases like “The y axis shows…”, “The x axis shows…”, and “The units here are…”
Keep language simple Remember, the aim is to help people understand your graph, not to make long, complex sentences. Keep your language simple. Try to avoid unnecessarily repeating words. One way to do this is to use pronouns eg. “Weekly expenses increased to $10,000 in January. Then, they remained steady until June.” Another way is to use words like “respectively” eg. “The values for May and June were 350 and 430 respectively .”
Continued below
Mark key points Make sure the listeners are clear about the key points you want to say about your graph. Highlight these points using words like “Importantly…”, “Significantly…”, or “Interestingly….”
Use pointing effectively If you are explaining the graph in a presentation, you will probably show a large picture of the graph on a slide. Help the listeners by pointing to the relevant parts while talking. When pointing, use language like “As you can see here”, “Here you can see” or even just “Here.”
Use hedging After talking about the data, you often need to interpret or speculate about what it means. Your ideas may not always be correct, so it’s a good idea to hedge your language. Use phrases like “This data suggests …”, “This could mean…”, or “This might be because….”

Download explaining graph worksheets & exercises (free)
Related links:
How can I explain things more clearly?
Phrases to help the audience understand your presentation
Privacy Overview
© Copyright 2024 Pomaka - All rights reserved
Home » Presentations » 5 Ways Graphics Improve PowerPoint Presentations

5 Ways Graphics Improve PowerPoint Presentations
- June 14, 2021
- Presentations
Microsoft PowerPoint is one of the most used software when it comes to presentations. You can use its essential functions to put your message across at a conference. But then, the software does not limit you to its basic functions, so you can explore different ways of making the best of it.

One way to do this is to add graphics to your PowerPoint presentations. We all know how important graphics are for communication. They are some of the things you can use to attract an audience’s attention quickly as they help demonstrate ideas better.
There are a few things to understand before you start using graphics in your presentations. You should know the reason why people use them and whether they add real value to your presentation. This article looks into how graphics can improve PowerPoint presentations .
Let’s read on.
Why use graphics in powerpoint.
As mentioned earlier, the best way to deliver a presentation is by making it visually appealing with graphics. Although only a few benefits can be evident immediately, some may take time to see. But there is no doubt that adding graphics to a presentation is a brilliant idea.
Here are some ways graphics can improve your presentation.
1. Make Your Presentation Attention-Grabbing
The first thing that every presenter wants to do is grab their audience’s attention. It is easy for people’s minds to drift off quickly if they find a presentation uninteresting. That’s why presenters use storytelling, cognitive dissonance, surprises, and other techniques to grab attention.
Infusing graphics in a presentation then combining the techniques mentioned above can help you grab your audience’s attention. Texts tell a story while graphics show it, and that makes a combination of the two grab everyone’s attention right from the very beginning of a presentation.
2. Illustrate Relative Amounts
You will find graphics very useful if your presentation involves showing your audience that one thing is more significant than another. Describing relative amounts with words or numbers may not help you deliver the message well. In short, you risk losing your audience as they will have to calculate to confirm the numbers.
The best way to avoid this is by using graphics for a visual representation of values. It is easy to compare one thing with the other using graphical infographics.
3. Make Text Easier to Understand

Another way that graphics improve presentations is by making them understandable. Texts can be challenging to understand, especially for people who are not keen or patient enough. This is because text requires someone to read keenly, especially if the message they carry isn’t straightforward.
This is different when it comes to graphics. You can infuse graphics into your presentations to make them comprehendible. Many people think graphics are too tricky to create and opt to use text only in their presentation. However, graphics are easy to develop, especially with the availability of templates.
You do not need to start creating graphics from scratch. The internet has a variety of free marketing templates that you can add to your PowerPoint presentation. You can also customize the templates to fit your presentation needs, but they come primarily ready for use.
4. Make Information More Memorable
Graphics and visuals, in general, have a higher retention rate than texts. But that’s not to say that people do not remember what they read. The best thing to do is combine short texts and graphics in your presentations. This makes the content engaging and also easy to remember.
The best thing about graphics is that they make words easier to process. As mentioned earlier, some texts do not have literal meanings, and audiences can take time to understand them. The same applies to trying to retain such content. Graphic representations are all you need to make the content better.
5. Inspire Action
Every presenter has end goals that they want to achieve with their presentation. They measure the productivity of the presentation by checking if they reached the goals set before. The best way to ensure that you achieve the goals is by encouraging your audience to take the desired actions.
Having a good call to action in your presentation is, of course, the first thing. But then, you can further increase the chances of your audience taking action by including visuals. Graphics make your call to action more effective as they send a more powerful message to your target audience compared to just texts.
Creating Professional-Looking Graphics in PowerPoint
Graphics can make your presentation look more appealing to your audience. However, it would be best to be careful when choosing your graphics as you need to ensure everything looks professional for the best results. Here are simple ways to create professional-looking graphics for PowerPoint.
1. Create Custom Shapes
There are different graphical shapes that you can use on PowerPoint. They come in various sizes and shapes, making it easy to find some that can go well with the message in your presentation. But then, PowerPoint doesn’t limit you to using these shapes as they are in the program.
The best way to spice up your presentation is by creating custom shapes. You can edit the figures on PowerPoint to create custom shapes that can blend better with your message. This can also help you look professional as you do not use shapes that everyone else uses.
2. Get Familiar with Picture Tools.
PowerPoint has a picture tools tab that you can use to make your presentation better. Many people use this feature only for adding things like shadows and borders to images. But then, there are several other ways this tool can help you make professional-looking graphics for PowerPoint.
For instance, you can use these tools to edit the background of your graphics. They can also be helpful when focusing on the resolution of an image. You can check out this presentation by Brainshark to understand how best you can use the picture tools feature.
3. Use Artistic Effects

PowerPoint also has an artistic effects feature that you can use to create better graphics. Artistic features help you focus on a specific object in an image or graphic. With this feature, you can fade the background and leave objects you want your audience to see.
This makes it easy for your audience to concentrate on the things that matter in images. With some images on PowerPoint having multiple objects, your audience may end up focusing on things that do not matter.
Those are some of the ways that you can improve your PowerPoint presentations with graphics. As mentioned earlier, the first thing for every presenter is to grab their audience’s attention. Graphics, as seen above, is a tremendous attention-grabbing tool that every presenter should use.
Graphics also make texts easier to comprehend and increase the message retention rate. But to achieve this, you need to ensure that your graphics look professional. There are different techniques and tools that you can use to ensure this before using graphics in your presentation.
The insights in this article will help you create graphics that will improve your presentation. Focusing on these tips will help you inspire action and make your next presentation more productive. These best practices, tools, and techniques are all you’ll ever need for your future PowerPoint presentations.

- Advanced Skills
- Roots & Affixes
- Grammar Review
- Verb Tenses
- Common Idioms
- Learning English Plan
- Pronunciation
- TOEFL & IELTS Vocab.
- Vocab. Games
- Grammar Practice
- Comprehension & Fluency Practice
- Suggested Reading
- Lessons & Courses
- Lesson Plans & Ideas
- ESL Worksheets+
- What's New?
How to Read and Explain Charts and Graphs
Charts and graphs are often used to summarize data. They make it easy to see trends and the amount of variation in the information being studied.
(A trend is the direction of change in the data. For example, people’s average lifespan has generally increased over the last century, even though in a few war years it declined. So we could say the trend has been for people to live longer than previous generations.)

That’s why it’s important to understand the ways charts and graphs display information.
If you want to take the IELTS academic writing test, you also need to be able to discuss them. Task 1 asks you to summarize the main features of one or more charts and to make comparisons when appropriate.
Technically, graphs are one kind of chart. (Other kinds of charts include diagrams and tables. Charts include any way to visually summarize and compare data.)
The rest of this page will show examples of different kinds of charts and graphs. It will explain them and show the most important vocabulary you will need to discuss them yourself. Be sure to study the title and labels of any chart carefully, so you will know what it tells you (and what it doesn’t!)
The graphs on this page are taken from two U.S. government websites: the CDC and the BLS . (U.S. government data is in the public domain, which means it is not under copyright and may be used and shared freely.)
At the bottom of the page are links to more kinds of charts you can study.
A Simple Pie Chart

Chart Background:
Of 242 total pages (excluding newsletter back issues), 118 or 48% were vocabulary-related. (Just over half of those were practice pages.)
There were 34 pages teaching or practicing reading and other skills (writing & listening). There were 29 for grammar (also about half explanations and half practice pages), and 27 for tests and games, combined. Lesson plans, worksheets, and other help for teachers included 22 pages, and there were 12 other site pages.
Here’s one way to describe this chart and explain its main points:
This pie chart shows the proportion of pages on EnglishHints.com on various subjects. Almost 50% of its pages are related to vocabulary, and more than half of those are vocabulary practice.
The site has approximately equal numbers of pages for skills, grammar, and tests plus games—around 1/8 each. Pages for teachers make up a little under 10% of site content, and a variety of other pages make up the last 5%.
EnglishHints appears to devote about half its content to explanations and examples. The other half is practice activities including tests and games.
Graph: Number of Antidepressant Mentions for Various Age Groups Over Time
")
x axis- horizontal; y- vertical. Remember to study the title and labels of the x and y axes carefully to be sure you understand what the graph is showing and the size of its effects.
This chart illustrates the gradual increase in mentions of antidepressant drugs during visits to outpatient departments between 1993 and 2000.
The y axis shows the number of outpatient visits and the x axis shows the period of time (in this case years) of the study. The colored lines represent different age groups.
For most age groups there is a slight upward trend between 1993 and 2000 in the number of visits with mentions of antidepressant drugs. Between 1995 and 1998 there was a steeper increase in drug mentions for people over age 65.
However, the number of mentions was highest at all times for the age group from 45-64 years old. There were slightly fewer mentions for the over 65 group, and still fewer for people aged 18-44. People under 18 had far fewer mentions.
Important Vocabulary for Charts and Graphs
The IELTS academic writing task 1 asks test takers to study one or more charts and “summarise the information by selecting and reporting the main features, & make comparisons where relevant.”
To summarize (or summarise-- the British spelling) means to give a short account of the most important points or features of a document or speech. Do not just repeat the exact words of the chart or instructions. Express the main ideas in your own words.
To select is to choose. Relevant means related to your purpose. (So you should make comparisons if the chart shows contrasting data.)
Describing Trends, and the Rate (speed) or Amount of Change
An increase means to go up or rise. A decrease means to go down, fall, drop, or decline.
(Increase and decrease are also verbs. “The number of mentions increased over time.”) Verb forms ending in –ed or –ing can be used as adjectives. (Increasingly is an adverb form.)
Examples: “There were steadily increasing mentions of antidepressant drugs between 1993 and 2000.”
“Mentions of antidepressants were increasingly common for people of most age groups over time.”
“No age group showed decreased mentions of antidepressants during the period studied."
You can call a small change slight, minor, insignificant (unimportant) or a slow increase or decrease. If it is a large or fast change, you can also describe it as sharp, major, steep, or significant or a rapid increase or decrease.
Sometimes there is very little change: the situation is stable. Other times there is no single trend up or down, but fluctuations: a line that goes up and down, then up again, like waves.
More Words to Describe Charts and Graphs
Range is the distance between the farthest points. Example: The range of the increase in mentions of antidepressants went from one (extra mention for those under 18) to 15. (15= from 12 mentions to 27 over the years studied for those from 45-64.)
When information is not exact, you can describe it using the words approximately, roughly, about, around, just under, or just over. (See the description of the EnglishHints’ pie chart for ways to use these words.)
Useful transition words to point out a contrast: however, while, on the other hand, in contrast, whereas, or but. (Don’t over-use ‘but’; the other words are more “academic.”)
Useful words for ending your comments with an even shorter summary: in conclusion, to sum up, in general.
___________________________
Graph 2: Wages & Employment for Different Health Professions

How would you describe or explain the graph on the left?
Try it (now, in your head or on a piece of paper), then compare your answer with my version under the chart.
My example: Description and summary:
This chart compares employment and earning opportunities for various health care occupations in the U.S.
The x-axis represents the number of jobs available (shown by larger and larger employment circles for occupations as jobs increase from 0 toward three million on the far right of the chart.)
The y-axis shows average annual pay. As the average salary of occupations increases, their circles are higher and higher on the chart.
The lowest paid occupations are Home Health Aides (about 900,000 jobs paying just over $20,000). Next are Nursing Aides, Orderlies, and Attendants (with nearly 1,500,000 positions averaging below $30,000, according to the chart.)
Pharmacy Technicians and Dental Assistants have few job opportunities (around 250,000) and low salaries. (Their salaries arearound $30,000/year, although Dental Assistants may earn somewhat more.)
Medical Assistants earn about the same, but have nearly twice the job prospects—almost 500,000 jobs available.
LVNs and LPNs have approximately 750,000 job openings as well as better pay-- about $40,000/year.
Radiologic Techs, Dental Hygienists, and Physical Therapists are paid more. All three groups have small numbers of positions available—200,000 or fewer.
Registered Nurses’ salaries are similar to Dental Hygienists, but they have over 2,500,000 job opportunities. That's far more than for any other health occupation shown.
Pharmacists’ wages are by far the highest of the groups included, although there are only around 250,000 jobs.
__________________________________
Don’t worry if the way you described this data was different from my description. However, you should have mentioned each occupation and compared them for both earning potential and jobs available.
For the IELTS writing task one, the summary must be at least 150 words and accurately fulfill the task requirements in the instructions. It should be well-organized and coherent (connecting your ideas in a logical order). It should also be and cohesive. (That means that it must show the connections between the different things shown on the chart.) Use a variety of words and sentence structures.
More Types of Charts

See this page from the I.R.S. for examples of two pie charts showing U.S. government income and spending (outlay) in 2012. It also includes some questions to help you understand the charts.
The picture at the top of this page shows an example of a bar graph, a line graph, a pie chart, and a table.
The chart on the right shows another bar graph, a diagram (sketch or picture), and a flow chart. (A flow chart shows the steps in a process. Each box that connects to more than one other represents a decision between two or more possible steps.)
There are also organizational charts that show lines of authority and communication. They illustrate who’s in charge, who reports to each supervisor, etc.
TED Ed has an interesting 4-minute discussion on how to recognize misleading graphs (with a quiz and further information.)
Home > English Language Test Preparation > Charts and Graphs
Didn't find what you needed? Explain what you want in the search box below. (For example, cognates, past tense practice, or 'get along with.') Click to see the related pages on EnglishHints.
New! Comments
Would you prefer to share this page with others by linking to it?
- Click on the HTML link code below.
- Copy and paste it, adding a note of your own, into your blog, a Web page, forums, a blog comment, your Facebook account, or anywhere that someone would find this page valuable.
")
What's New?-- site blog
Learn about new and updated pages on EnglishHints, with just enough information to decide if you want to read more.

Do you already use English in your profession or studies-- but realize you need more advanced English or communication skills in certain areas?
I can help-- with targeted suggestions & practice on EnglishHints or with coaching or specialized help for faster results. Let me know. I can suggest resources or we can arrange a call.
Vocabulary in Minutes a Month
Sign up for our free newsletter, English Detective . In a few minutes twice a month you can:
- Improve your reading fluency with selected articles & talks on one subject (for repeated use of key words)
- Understand and practice those words using explanations, crosswords, and more
- Feel more confident about your English reading and vocab. skills-- and more prepared for big tests & challenges
For information (and a free bonus), see Building Vocabulary

Home | About me | Privacy Policy | Contact me | Affiliate Disclosure
- Skip to main content
- Skip to primary sidebar
Business Jargons
A Business Encyclopedia
Presentation
Definition : A presentation is a form of communication in which the speaker conveys information to the audience. In an organization presentations are used in various scenarios like talking to a group, addressing a meeting, demonstrating or introducing a new product, or briefing a team. It involves presenting a particular subject or issue or new ideas/thoughts to a group of people.
It is considered as the most effective form of communication because of two main reasons:
- Use of non-verbal cues.
- Facilitates instant feedback.

Business Presentations are a tool to influence people toward an intended thought or action.
Parts of Presentation

- Introduction : It is meant to make the listeners ready to receive the message and draw their interest. For that, the speaker can narrate some story or a humorous piece of joke, an interesting fact, a question, stating a problem, and so forth. They can also use some surprising statistics.
- Body : It is the essence of the presentation. It requires the sequencing of facts in a logical order. This is the part where the speaker explains the topic and relevant information. It has to be critically arranged, as the audience must be able to grasp what the speaker presents.
- Conclusion : It needs to be short and precise. It should sum up or outline the key points that you have presented. It could also contain what the audience should have gained out of the presentation.
Purpose of Presentation
- To inform : Organizations can use presentations to inform the audience about new schemes, products or proposals. The aim is to inform the new entrant about the policies and procedures of the organization.
- To persuade : Presentations are also given to persuade the audience to take the intended action.
- To build goodwill : They can also help in building a good reputation
Factors Affecting Presentation

Audience Analysis
Communication environment, personal appearance, use of visuals, opening and closing presentation, organization of presentation, language and words, voice quality, body language, answering questions, a word from business jargons.
Presentation is a mode of conveying information to a selected group of people live. An ideal presentation is one that identifies and matches the needs, interests and understanding level of the audience. It also represents the facts, and figures in the form of tables, charts, and graphs and uses multiple colours.
Related terms:
- Verbal Communication
- Visual Communication
- Non-Verbal Communication
- Communication
- 7 C’s of Communication
Reader Interactions
Abbas khan says
October 2, 2022 at 11:33 pm
Thank you so much for providing us with brief info related to the presentation.
Farhan says
February 23, 2023 at 9:45 am
yusra shah says
July 3, 2023 at 2:04 am
it was helpful👍
Leave a Reply Cancel reply
Your email address will not be published. Required fields are marked *
Ready to get started?
- Inspiration
23 presentation examples that really work (plus templates!)

- 30 Mar 2023
To help you in your quest for presentation greatness, we’ve gathered 23 of the best business presentation examples out there. These hand-picked ideas range from business PowerPoint presentations, to recruitment presentations, and everything in between.
As a bonus, several of our examples include editable video presentation templates from Biteable .
Biteable allows anyone to create great video presentations — no previous video-making skills required. The easy-to-use platform has hundreds of brandable templates and video scenes designed with a business audience in mind. A video made with Biteable is just what you need to add that wow factor and make an impact on your audience.
Create videos that drive action
Activate your audience with impactful, on-brand videos. Create them simply and collaboratively with Biteable.
Video presentation examples
Video presentations are our specialty at Biteable. We love them because they’re the most visually appealing and memorable way to communicate.
1. Animated characters
Our first presentation example is a business explainer from Biteable that uses animated characters. The friendly and modern style makes this the perfect presentation for engaging your audience.
Bonus template: Need a business video presentation that reflects the beautiful diversity of your customers or team? Use Biteable’s workplace scenes . You can change the skin tone and hair color for any of the animated characters.
2. Conference video
Videos are also ideal solutions for events (e.g. trade shows) where they can be looped to play constantly while you attend to more important things like talking to people and handing out free cheese samples.
For this event presentation sample below, we used bright colours, stock footage, and messaging that reflects the brand and values of the company. All these elements work together to draw the attention of passers-by.
For a huge selection of video presentation templates, take a look at our template gallery .
Business PowerPoint presentation examples
Striking fear into the hearts of the workplace since 1987, PowerPoint is synonymous with bland, boring presentations that feel more like an endurance test than a learning opportunity. But it doesn’t have to be that way. Check out these anything-but-boring business PowerPoint presentation examples.
3. Design pointers
This PowerPoint presentation takes a tongue-in-cheek look at how the speakers and users of PowerPoint are the problem, not the software itself.
Even at a hefty 61 slides, the vintage theme, appealing colors, and engaging content keep the viewer interested. It delivers useful and actionable tips on creating a better experience for your audience.
Pixar, as you’d expect, redefines the meaning of PowerPoint in their “22 Rules for Phenomenal Storytelling”. The character silhouettes are instantly recognizable and tie firmly to the Pixar brand. The bright colour palettes are carefully chosen to highlight the content of each slide.
This presentation is a good length, delivering one message per slide, making it easy for an audience to take notes and retain the information.
Google slides examples
If you’re in business, chances are you’ll have come across slide decks . Much like a deck of cards, each slide plays a key part in the overall ‘deck’, creating a well-rounded presentation.
If you need to inform your team, present findings, or outline a new strategy, slides are one of the most effective ways to do this.
Google Slides is one of the best ways to create a slide deck right now. It’s easy to use and has built-in design tools that integrate with Adobe, Lucidchart, and more. The best part — it’s free!
5. Teacher education
Here’s a slide deck that was created to educate teachers on how to use Google Slides effectively in a classroom. At first glance it seems stuffy and businessy, but if you look closer it’s apparent the creator knows his audience well, throwing in some teacher-friendly content that’s bound to get a smile.
The slides give walkthrough screenshots and practical advice on the different ways teachers can use the software to make their lives that little bit easier and educate their students at the same time.
6. Charity awareness raiser
This next Google slide deck is designed to raise awareness for an animal shelter. It has simple, clear messaging, and makes use of the furry friends it rescues to tug on heartstrings and encourage donations and adoptions from its audience.
Pro tip: Creating a presentation is exciting but also a little daunting. It’s easy to feel overwhelmed — especially if the success of your business or nonprofit depends on it.
Prezi presentation examples
If you haven’t come across Prezi , it’s a great alternative to using static slides. Sitting somewhere between slides and a video presentation, it allows you to import other content and add motion to create a more engaging viewer experience.
7. Red Bull event recap
This Prezi was created to document the Red Bull stratosphere freefall stunt a few years ago. It neatly captures all the things that Prezi is capable of, including video inserts and the zoom effect, which gives an animated, almost 3D effect to what would otherwise be still images.
Prezi has annual awards for the best examples of presentations over the year. This next example is one of the 2018 winners. It was made to highlight a new Logitech tool.
8. Logitech Spotlight launch
What stands out here are the juicy colors, bold imagery, and the way the designer has used Prezi to its full extent, including rotations, panning, fades, and a full zoom out to finish the presentation.

Sales presentation examples
If you’re stuck for ideas for your sales presentation, step right this way and check out this video template we made for you.
9. Sales enablement video presentation
In today’s fast-paced sales environment, you need a way to make your sales enablement presentations memorable and engaging for busy reps. Sales enablement videos are just the ticket. Use this video presentation template the next time you need to present on your metrics.
10. Zuroa sales deck
If you’re after a sales deck, you can’t go past this example from Zuora. What makes it great? It begins by introducing the worldwide shift in the way consumers are shopping. It’s a global phenomenon, and something we can all relate to.
It then weaves a compelling story about how the subscription model is changing the face of daily life for everyone. Metrics and testimonials from well-known CEOs and executives are included for some slamming social proof to boost the sales message.
Pitch presentation examples
Pitch decks are used to give an overview of business plans, and are usually presented during meetings with customers, investors, or potential partners.
11. Uber pitch deck
This is Uber’s original pitch deck, which (apart from looking a teensy bit dated) gives an excellent overview of their business model and clearly shows how they intended to disrupt a traditional industry and provide a better service to people. Right now, you’re probably very grateful that this pitch presentation was a winner.
You can make your own pitch deck with Biteable, or start with one of our video templates to make something a little more memorable.
12. Video pitch template
This video pitch presentation clearly speaks to the pains of everyone who needs to commute and find parking. It then provides the solution with its app that makes parking a breeze.
The video also introduces the key team members, their business strategy, and what they’re hoping to raise in funding. It’s a simple, clear pitch that positions the company as a key solution to a growing, worldwide problem. It’s compelling and convincing, as a good presentation should be.
13. Fyre Festival pitch deck
The most epic example of a recent pitch deck is this one for Fyre Festival – the greatest event that never happened. Marvel at its persuasion, gasp at the opportunity of being part of the cultural experience of the decade, cringe as everything goes from bad to worse.
Despite the very public outcome, this is a masterclass in how to create hype and get funding with your pitch deck using beautiful imagery, beautiful people, and beautiful promises of riches and fame.
Business presentation examples
Need to get the right message out to the right people? Business presentations can do a lot of the heavy lifting for you.
Simply press play and let your video do the talking. No fumbling your words and sweating buckets in front of those potential clients, just you being cool as a cucumber while your presentation does the talking.
Check out two of our popular templates that you can use as a starting point for your own presentations. While they’re business-minded, they’re definitely not boring.
14. Business intro template
Modern graphics, animations, and upbeat soundtracks keep your prospects engaged as they learn about your business, your team, your values, and how you can help them.
15. Business explainer template
Research presentation examples.
When you’re giving a more technical presentation such as research findings, you need to strike the perfect balance between informing your audience and making sure they stay awake.
As a rule, slides are more effective for research presentations, as they are used to support the speaker’s knowledge rather can capture every small detail on screen.
With often dry, complex, and technical subject matter, there can be a temptation for presentations to follow suit. Use images instead of walls of text, and keep things as easy to follow as possible.
16. TrackMaven research deck
TrackMaven uses their endearing mascot to lighten up this data-heavy slide deck. The graphs help to bring life to their findings, and they ensure to only have one bite-size takeaway per slide so that viewers can easily take notes.
17. Wearable tech research report
Obviously, research can get very researchy and there’s not a lot to be done about it. This slide deck below lays out a ton of in-depth information but breaks it up well with quotes, diagrams, and interesting facts to keep viewers engaged while it delivers its findings on wearable technology.
Team presentation examples
Motivating your team can be a challenge at the best of times, especially when you need to gather them together for….another presentation!
18. Team update template
We created this presentation template as an example of how to engage your team. In this case, it’s for an internal product launch. Using colorful animation and engaging pacing, this video presentation is much better than a static PowerPoint, right?
19. Officevibe collaboration explainer
This short slide deck is a presentation designed to increase awareness of the problems of a disengaged team. Bright colors and relevant images combine with facts and figures that compel viewers to click through to a download to learn more about helping their teams succeed.
Recruitment presentation examples
Recruiting the right people can be a challenge. Presentations can help display your team and your business by painting a dynamic picture of what it’s like to work with you.
Videos and animated slides let you capture the essence of your brand and workplace so the right employees can find you.
20. Company culture explainer
If you’re a recruitment agency, your challenge is to stand out from the hundreds of other agencies in the marketplace.
21. Kaizen culture
Showcasing your agency using a slide deck can give employers and employees a feel for doing business with you. Kaizen clearly displays its credentials and highlights its brand values and personality here (and also its appreciation of the coffee bean).
Explainer presentation examples
Got some explaining to do? Using an explainer video is the ideal way to showcase products that are technical, digital, or otherwise too difficult to explain with still images and text.
Explainer videos help you present the features and values of your product in an engaging way that speaks to your ideal audience and promotes your brand at the same time.
22. Product explainer template
23. lucidchart explainer.
Lucidchart does a stellar job of using explainer videos for their software. Their series of explainers-within-explainers entertains the viewer with cute imagery and an endearing brand voice. At the same time, the video is educating its audience on how to use the actual product. We (almost) guarantee you’ll have more love for spiders after watching this one.
Make a winning video presentation with Biteable
Creating a winning presentation doesn’t need to be difficult or expensive. Modern slide decks and video software make it easy for you to give compelling presentations that sell, explain, and educate without sending your audience to snooze town.
For the best online video presentation software around, check out Biteable. The intuitive platform does all the heavy lifting for you, so making a video presentation is as easy as making a PowerPoint.
Use Biteable’s brand builder to automatically fetch your company colors and logo from your website and apply them to your entire video with the click of a button. Even add a clickable call-to-action button to your video.
Share your business presentation anywhere with a single, trackable URL and watch your message turn into gold.
Make stunning videos with ease.
Take the struggle out of team communication.
Try Biteable now.
- No credit card required
- No complicated design decisions
- No experience necessary
- Trending Now
- Foundational Courses
- Data Science
- Practice Problem
- Machine Learning
- System Design
- DevOps Tutorial
- BCA 4th Semester Syllabus (2023)
Computer Graphics and Multimedia Application
Introduction to computer graphics, applications of computer graphics.
- Interactive Graphical Techniques in Computer Graphics
- Hard-Copy Devices in Computer Graphics
- Display Processor in Computer Graphics
- Raster-Scan Displays
- Random-Scan Display
- Line Clipping | Set 2 (Cyrus Beck Algorithm)
- Mid-Point Line Generation Algorithm
- Computer Graphics - 3D Translation Transformation
- Composite Transformation in 2-D graphics
- Window to Viewport Transformation in Computer Graphics with Implementation
- Computer Graphics Curve in Computer Graphics
- Polygon Mesh in Computer Graphics
- Cubic Bezier Curve Implementation in C
- Binary Space Partitioning
- What is Multimedia?
- CD-ROM Full Form
- Computer Animation
Operating System
- What is an Operating System?
- Batch Processing Operating System
- Memory Management in Operating System
- Difference between Demand Paging and Segmentation
- Page Replacement Algorithms in Operating Systems
- Allocation of frames in Operating System
- Process Schedulers in Operating System
- CPU Scheduling in Operating Systems
- Introduction of Process Synchronization
- Introduction of Deadlock in Operating System
- Functions of Operating System
- Storage Structure in Operating Systems
- Swap-Space Management in Operating system
- File Systems in Operating System
- Free space management in Operating System
Software Engineering
- Introduction to Software Engineering - Software Engineering
- Activities involved in Software Requirement Analysis
- Software Design Process - Software Engineering
- Design and Implementation in Operating System
- Software Maintenance - Software Engineering
- System configuration management - Software Engineering
Optimization techniques
- Linear Programming
- Queuing Models in Operating System
- Optimal Page Replacement Algorithm
- Job Sequencing Problem
- Johnson's Rule in Sequencing Problems
Mathematics 3
- Complex Numbers
- Mathematics | Sequence, Series and Summations
- Fourier Series Formula
- Differential Equations
- Second Order Linear Differential Equation
- BCA 1st Semester Syllabus (2023)
- BCA 2nd Semester Syllabus (2023)
- BCA 3rd Semester Syllabus (2023)
- BCA 5th Semester Syllabus (2023)
- BCA 6th Semester Subjects and Syllabus (2023)
- BCA Full Form
- Bachelor of Computer Applications: Curriculum and Career Opportunity
Computer Graphics are defined as any sketch, a drawing, or a special network that pictorially represents some meaningful information. Computer Graphics is used where a set of images needs to be manipulated or the creation of an image in the form of pixels is drawn on the computer. Computer Graphics can be used in digital photography, film, entertainment, electronic gadgets, and all other core technologies that are required. It is a vast subject and area in the field of computer science. Computer Graphics can be used in UI design, rendering, geometric objects, animation, and many more. In most areas, computer graphics is an abbreviation of CG. There are several tools used for the implementation of Computer Graphics. The basic is the graphics.h header file in Turbo-C, Unity for advanced, and even OpenGL can be used for its Implementation.
The term ‘Computer Graphics’ was coined by Verne Hudson and William Fetter from Boeing who were pioneers in the field.
Computer Graphics refers to several things
- The manipulation and the representation of the image or the data in a graphical manner.
- Various technology is required for the creation and manipulation.
- Digital synthesis and its manipulation.
Types of Computer Graphics
- Raster Graphics: In raster, graphics pixels are used for an image to be drawn. It is also known as a bitmap image in which a sequence of images is into smaller pixels. Basically, a bitmap indicates a large number of pixels together.
- Vector Graphics: In vector graphics, mathematical formulae are used to draw different types of shapes, lines, objects, and so on.
There are many applications of computer graphics discussed below-
- Computer Graphics are used for the aided design of systems engineering and architectural systems- These are used in electrical automobiles and electro-mechanical, and electronic devices. For example gears and bolts.
- Computer Art – MS Paint.
- Presentation Graphics – It is used to summarize financial statistical scientific or economic data. For example- Bar charts systems and line charts.
- Entertainment- It is used in motion pictures, music videos, and television gaming.
- Education and training- It is used to understand the operations of complex systems. It is also used for specialized systems such as framing for captains, pilots, and so on.
- Visualization- To study trends and patterns. For example- Analyzing satellite photos of earth.
Why are Computer Graphics used?
Imagine a car manufacturing company that wants to showcase its vehicle sales over the past decade. Storing and presenting this huge amount of data can be both time-consuming and memory-intensive. Furthermore, it can be difficult for the average person to understand. In such cases, by using graphics can be a more effective solution. By using charts and graphs to visually signify the data, it becomes much easier to understand and analyse the data.
Interactive computer graphics utilize a two-way communication concept between users and computers. The computer receives input signals from the user, and the picture is modified accordingly. When a command is applied, the picture updates promptly.
How To Get Started in Computer Graphics
Step by step process to getting started with computer graphics-
Step-1: Understaind the basics
Learn the fundamental and basics of computer graphics such as rendering, shading, animation, and modeling. Learn basic concepts of mathematics like linear algebra , geometry , and calculus as well as basic principles of physics that support computer graphics.
Step-2: Choose Your Area of Interest
Choose your area of interest like 2D-Graphics, 3D-Graphics, Animation, and special effect (VFX ).
Step-3: Learn Programming
Learn programming language that is used in graphics, such as Python , C++ , and JavaScript . Learn about Graphics Libraries and APIs like OpenGL , Vulkan, DirectX, and frameworks like WebGL that is used in web based graphics.
Step-4: Use Graphics Software
Learn about modeling and animation tools such as Blender , Autodesk Maya , or 3ds Max for 3D modeling and animation. Learn about 2D-Graphics software like Adobe Photoshop, Illustrator, and GIMP.
Step-5: Study and Practice
Take online courses and tutorials, many institution offer Computer Graphics course like Coursera, Udemy, and Khan Academy. And read textbooks like “Computer Graphics: Principles and Practice” by John F. Hughes. Now, Starts with simple projects, such as creating basic shapes and gradually move on to more complex scenes and animations.
Step-6: Create a portfolio of your work
create your own projects and build an online portfolio to display your work, which is helpful for job application.
Step-7: Apply for jobs in computer graphics
If you aim to build a career in computer graphics and grow in this field, gaining experience is important. Search for entry-level positions, freelance, contract work, and internships. When searching for jobs, read the descriptions carefully to understand the responsibilities, required qualifications, and company details. This will help you find roles that align with your career goals and skill set.
Frequently Asked Question On Computer Graphics – FAQs
What are examples of computer graphics.
Examples of computer graphics are photographs, drawings, line art, mathematical graphs, line graphs, charts, diagrams, typography, numbers, symbols, geometric designs, maps, engineering drawings, or other images. Graphics often combine text, illustration, and color.
What are the different types of computer graphics?
There are two type of computer graphics Vector graphics Raster graphics
What are the basic elements of computer graphics?
Basic elements of computer graphics included Line, Shape, Form, Texture, Space, Imagery, Typography, Color.
What are the main application of computer graphics?
main application of computer graphics are in marketing, entertainment, education, healthcare, architecture.
What are the four type of computer graphics?
Four type of computer graphics are Raster graphics Vector graphics 3D-Graphics Animation
Please Login to comment...
Similar reads.
- computer-graphics
- Computer Subject
Improve your Coding Skills with Practice
What kind of Experience do you want to share?
- Government Exam Articles
An Introduction To MS PowerPoint
MS PowerPoint is a program that is included in the Microsoft Office suite. It is used to make presentations for personal and professional purposes.
In this article, we shall discuss in detail the functions and features of a PowerPoint presentation, followed by some sample questions based on this topic for the upcoming competitive exams.
To learn more about the different programs under Microsoft Office , visit the linked article.
Given below are a few important things that one must know about the development and introduction of Microsoft PowerPoint:
- The program was created in a software company named Forethought, Inc. by Robert Gaskins and Dennis Austin.
- It was released on April 20, 1987, and after 3 months of its creation, it was acquired by Microsoft.
- The first version of this program, when introduced by Microsoft was MS PowerPoint 2.0 (1990).
- It is a presentation-based program that uses graphics, videos, etc. to make a presentation more interactive and interesting.
- The file extension of a saved Powerpoint presentation is “.ppt”.
- A PowerPoint presentation comprising slides and other features is also known as PPT.
Gradually, with each version, the program was more creative and more interactive. Various other features were added in PowerPoint which massively increased the requirement and use of this MS Office program.
From the examination point of view, MS PowerPoint happens to be a very important topic. Candidates who are preparing for the various Government exams can visit the Computer Knowledge page and get a list of topics included in the syllabus and prepare themselves accordingly.
Basics of MS PowerPoint
Discussed below are a few questions that one must be aware of while discussing the basics of MS PowerPoint. Once this is understood, using the program and analysing how to use it more creatively shall become easier.
Question: What is MS PowerPoint?
Answer: PowerPoint (PPT) is a powerful, easy-to-use presentation graphics software program that allows you to create professional-looking electronic slide shows.
The image given below shows the main page of MS PowerPoint, where a person lands when the program is opened on a computer system:

Question: How to open MS PowerPoint on a personal computer?
Answer: Follow the steps below to open MS PowerPoint on a personal computer:
- Click on the start button
- Then choose “All Programs”
- Next step is to select “MS Office”
- Under MS Office, click on the “MS PowerPoint”
A blank presentation is open on the screen. According to the requirement, a person can modify the template for a presentation and start using the program.
Question: What is a PowerPoint presentation or PPT?
Answer: A combination of various slides depicting a graphical and visual interpretation of data, to present information in a more creative and interactive manner is called a PowerPoint presentation or PPT.
Question: What is a slide show in a PowerPoint presentation?
Answer: When all the slides of a PowerPoint presentation are set in series and then presented to a group of people, where each slide appears one after the other, is a set pattern, this is known as a PowerPoint slide show.
Question: What all elements can be added to a slide?
Answer: The following elements can be added to a Powerpoint slide:
- Photographs
- Media Clips
All these elements are mainly used to enhance presentation skills and make the slide more interactive.
To learn more about the Fundamentals of Computer , visit the linked article.
For a better understanding of the Microsoft PowerPoint and its operations, functions and usage, refer to the video given below:

Features of MS PowerPoint
There are multiple features that are available in MS PowerPoint which can customise and optimise a presentation. The same have been discussed below.
- Slide Layout
Multiple options and layouts are available based on which a presentation can be created. This option is available under the “Home” section and one can select from the multiple layout options provided.
The image below shows the different slide layout options which are available for use:

- Insert – Clipart, Video, Audio, etc.
Under the “Insert” category, multiple options are available where one can choose what feature they want to insert in their presentation. This may include images, audio, video, header, footer, symbols, shapes, etc.
The image below shows the features which can be inserted:

- Slide Design
MS PowerPoint has various themes using which background colour and designs or textures can be added to a slide. This makes the presentation more colourful and attracts the attention of the people looking at it.
This feature can be added using the “Design” category mentioned on the homepage of MS PowerPoint. Although there are existing design templates available, in case someone wants to add some new texture or colour, the option to customise the design is also available. Apart from this, slide designs can also be downloaded online.
Refer to the below for slide design:

During the slide show, the slides appear on the screen one after the other. In case, one wants to add some animations to the way in which a slide presents itself, they can refer to the “Animations” category.
The different animation styles available on PowerPoint are:

Apart from all these options; font size, font style, font colour, word art, date and time, etc. can also be added to a PPT.

Also, there are various other subjects that are included in the exam syllabus for various competitive exams. Candidates can check the detailed section-wise syllabus in the links given below:
Uses of PowerPoint Presentation
PowerPoint presentations are useful for both personal and professional usage. Given below are a few of the major fields where PPT is extremely useful:
- Education – With e-learning and smart classes being chosen as a common mode of education today, PowerPoint presentations can help in making education more interactive and attract students towards the modified version of studying
- Marketing – In the field of marketing, PowerPoint presentations can be extremely important. Using graphs and charts, numbers can be shown more evidently and clearly which may be ignored by the viewer if being read
- Business – To invite investors or to show the increase or decrease in profits, MS PowerPoint can be used
- Creating Resumes – Digital resumes can be formed using MS PowerPoint. Different patterns, photograph, etc. can be added to the resume
- Depicting Growth – Since both graphics and text can be added in a presentation, depicting the growth of a company, business, student’s marks, etc. is easier using PPT
Government exam aspirants can upgrade their preparation with the help of the links given below:
Sample MS PowerPoint Questions and Answers
As discussed earlier in this article, Computer Awareness is included in the syllabus for many competitive exams. Thus, to understand the program from the examination point of view is also a must.
Given below are a few sample questions based on MS PowerPoint.
Q 1. How many maximum slides can be added to a PowerPoint presentation?
- No fixed number
Answer: (3) No fixed number
Q 2. Slide Sorter view can be selected under which of the following categories?
Answer: (4) View
Q 3. The combination of which keyboard keys can be used as a shortcut to add a new slide in MS PowerPoint?
Answer: (3) ctrl+M
Q 4. Header and Footer option is available under which of the following categories?
Answer: (1) Insert
Q 5. Which of the following is not included in the “Insert” category in MS PowerPoint?
Answer: (4) Animation
Similar types of MS PowerPoint Questions may be asked based on the features or usage of the program. Thus, one must carefully go through the elements and aspects of PPT.
For any further assistance related to the upcoming Government exams, candidates can check the Preparation Strategy for Competitive Exams page.
Get the latest exam information, study material and other information related to the major Government exams conducted in the country, at BYJU’S.
Leave a Comment Cancel reply
Your Mobile number and Email id will not be published. Required fields are marked *
Request OTP on Voice Call
Post My Comment
Connect with us for Free Preparation
Get access to free crash courses & video lectures for all government exams., register with byju's & download free pdfs, register with byju's & watch live videos.
IMAGES
VIDEO
COMMENTS
Presentation graphics provides predefined backgrounds and simple page layouts to help in the creation of slides. These slides can be moved automatically within seconds. Slides: Slides mean we have text, graphics, audio clips, video clips, animations, and other effects Presentation graphics is also known as Presentation Software.
After you add a shape, style it with the Drawing Tools > Format menu. Click on a shape, then check out options like Shape Fill, for example. Select a new color to transform the shape on your slide. Choose a new color from the Shape Fill dropdown, for example, to re-style your newly added PowerPoint graphics. That's it!
Vertex (or Node): A fundamental unit of a graph, representing a point or an entity. Edge: A connection between two vertices in a graph, representing a relationship or interaction. Directed graph (or Digraph): A graph in which edges have a direction, indicating a one-way connection from one vertex to another.
The best way to make sure the attention stays on you is to limit word count to no more than 10 words per slide. As presentation expert Nancy Duarte says "any slide with more than 10 words is a document.". If you really do need a longer explanation of something, handouts or follow-up emails are the way to go.
Switch to the Insert tab and click on Chart . Insert > Chart to add a presentation graph in PowerPoint. A new dialogue window will open, where you have to select the chart type and the specific representation type—i.e., for area charts, you can choose from 2D or 3D area charts and their distribution method.
Method #1: Drag the file from wherever it is sitting on your computer and drag it onto your slide. Method #2: Go to the Insert tab in the Ribbon and select 'Pictures' (make sure to select the 'Pictures' icon and not the 'Online Pictures' icon). Then find your vector file and click on 'Open.'. Note: If you have PowerPoint 2016 ...
7. Add fun with visual quizzes and polls. To break the monotony and see if your audience is still with you, throw in some quick quizzes or polls. It's like a mini-game break in your presentation — your audience gets involved and it makes your presentation way more dynamic and memorable. 8.
Visuals can impact your presentation dramatically.These images, photos, objects, charts, diagrams, tables, graphs or illustrations have the potential to make or break your presentation. Used sloppily, they can damage your credibility and reputation. Designed wisely, they can strengthen your verbal message and enable you to achieve your objective.
RIGHT: 2. Use graphics to simplify rather than more complex. If your data contains multiple elements (like sales over time), a graph is the best way to communicate. However, don't crowd the slide ...
presentation software (presentation graphics): Presentation software (sometimes called "presentation graphics") is a category of application program used to create sequences of words and pictures that tell a story or help support a speech or public presentation of information. Presentation software can be divided into business presentation ...
Keep the background consistent and subtle. Use only enough text when using charts or graphs to explain the concept. Clearly label the graphic. Keep the design clean and uncluttered. Leave empty space around the text and graphics. Use quality clipart and use it sparingly. The graphic should relate to and enhance the topic of the slide.
Exercise 2. In this exercise, you will begin to develop visual aids for your presentation. Complete the steps in this exercise—and enjoy the chance to be creative. Working with visuals can be a pleasant way to take a break from the demands of writing. Revisit the ideas you developed in Note 14.24 "Exercise 1".
Here are steps you can use to explain a graph effectively: 1. Introduce the graph. Introduce the graph to your audience by presenting the title and explaining the topic of the graph. Share what the data highlights, including the topic, values and subjects of the research. It's important to introduce this information to the audience so that they ...
Start by using phrases like "This graph shows….". Also, if you're explaining your graph in a presentation, it's a good idea to introduce the key labels (eg. axes and units) before talking about the data. Use phrases like "The y axis shows…", "The x axis shows…", and "The units here are…". Remember, the aim is to help ...
Take a pause after you ask a question or make a strong statement. Spare your audience a moment to think, reflect, and ponder. Or leave a gap of silence right before you present something exciting to build suspense and anticipation. No one expects you to go on talking for 10-15 minutes without a pause.
Graphics and visuals, in general, have a higher retention rate than texts. But that's not to say that people do not remember what they read. The best thing to do is combine short texts and graphics in your presentations. This makes the content engaging and also easy to remember. The best thing about graphics is that they make words easier to ...
See this page from the I.R.S. for examples of two pie charts showing U.S. government income and spending (outlay) in 2012. It also includes some questions to help you understand the charts. The picture at the top of this page shows an example of a bar graph, a line graph, a pie chart, and a table.
Definition: A presentation is a form of communication in which the speaker conveys information to the audience. In an organization presentations are used in various scenarios like talking to a group, addressing a meeting, demonstrating or introducing a new product, or briefing a team. It involves presenting a particular subject or issue or new ideas/thoughts to a group of people.
Presentation skills are the abilities and qualities necessary for creating and delivering a compelling presentation that effectively communicates information and ideas. They encompass what you say, how you structure it, and the materials you include to support what you say, such as slides, videos, or images. You'll make presentations at various ...
We love them because they're the most visually appealing and memorable way to communicate. 1. Animated characters. Our first presentation example is a business explainer from Biteable that uses animated characters. The friendly and modern style makes this the perfect presentation for engaging your audience.
A presentation graphics program is an application designed to create and enhance charts and graphs so that they are visually appealing and easily understood by an audience through the use of a slideshow. A full-featured presentation graphics package such as Lotus Freelance Graphics or Microsoft PowerPoint includes facilities for making a wide ...
Step-1: Understaind the basics. Learn the fundamental and basics of computer graphics such as rendering, shading, animation, and modeling. Learn basic concepts of mathematics like linear algebra, geometry, and calculus as well as basic principles of physics that support computer graphics. Step-2: Choose Your Area of Interest.
MS PowerPoint is a program that is included in the Microsoft Office suite. It is used to make presentations for personal and professional purposes. In this article, we shall discuss in detail the functions and features of a PowerPoint presentation, followed by some sample questions based on this topic for the upcoming competitive exams.