- PRO Courses Guides New Tech Help Pro Expert Videos About wikiHow Pro Upgrade Sign In
- EDIT Edit this Article
- EXPLORE Tech Help Pro About Us Random Article Quizzes Request a New Article Community Dashboard This Or That Game Popular Categories Arts and Entertainment Artwork Books Movies Computers and Electronics Computers Phone Skills Technology Hacks Health Men's Health Mental Health Women's Health Relationships Dating Love Relationship Issues Hobbies and Crafts Crafts Drawing Games Education & Communication Communication Skills Personal Development Studying Personal Care and Style Fashion Hair Care Personal Hygiene Youth Personal Care School Stuff Dating All Categories Arts and Entertainment Finance and Business Home and Garden Relationship Quizzes Cars & Other Vehicles Food and Entertaining Personal Care and Style Sports and Fitness Computers and Electronics Health Pets and Animals Travel Education & Communication Hobbies and Crafts Philosophy and Religion Work World Family Life Holidays and Traditions Relationships Youth
- Browse Articles
- Learn Something New
- Quizzes Hot
- This Or That Game
- Train Your Brain
- Explore More
- Support wikiHow
- About wikiHow
- Log in / Sign up
- Computers and Electronics
- Microsoft Office

10 Easy Steps to Make a Timeline in Microsoft PowerPoint
Last Updated: May 22, 2023 Fact Checked
This article was co-authored by wikiHow staff writer, Rain Kengly . Rain Kengly is a wikiHow Technology Writer. As a storytelling enthusiast with a penchant for technology, they hope to create long-lasting connections with readers from all around the globe. Rain graduated from San Francisco State University with a BA in Cinema. This article has been fact-checked, ensuring the accuracy of any cited facts and confirming the authority of its sources. This article has been viewed 6,835 times. Learn more...
Do you want to create a timeline to showcase your data in Microsoft PowerPoint? Luckily, PowerPoint has plenty of timeline templates you can choose from with the "SmartArt" tool. You'll just need to pick a style, insert your data, and customize your timeline. This wikiHow will show you how to insert a free timeline in Microsoft PowerPoint using the SmartArt tool on your Windows or Mac computer.
Things You Should Know
- Go to "Insert" → "SmartArt" → "Process" → select a timeline layout → "OK". Click [Text] to add your data.
- To add more data slots, click your timeline, then click "Add Shape".
- To change the color, click your timeline, then click "Change Colors".

- Horizontal timelines work best with up to 8 points with short descriptions.
- Vertical timelines work best for timelines with fewer points and more text.
- Free-flowing timelines are appropriate if you have lots of points and a horizontal timeline won’t give you the space you need.

- Adding a colorful timeline can help you make a great presentation .
- You must have a subscription to Microsoft 365 to use the desktop version of PowerPoint.
- If you don't have the PowerPoint app on your computer, you can use PowerPoint on the web to create your timeline. [2] X Trustworthy Source Microsoft Support Technical support and product information from Microsoft. Go to source

- A new window will open.
- On Mac, a drop-down menu will open.

- On Mac, this will be underneath List in the drop-down menu.

- You'll be able to customize the color and size later.
- The timeline will be added to your slide. Make sure it's selected before proceeding to the next step.

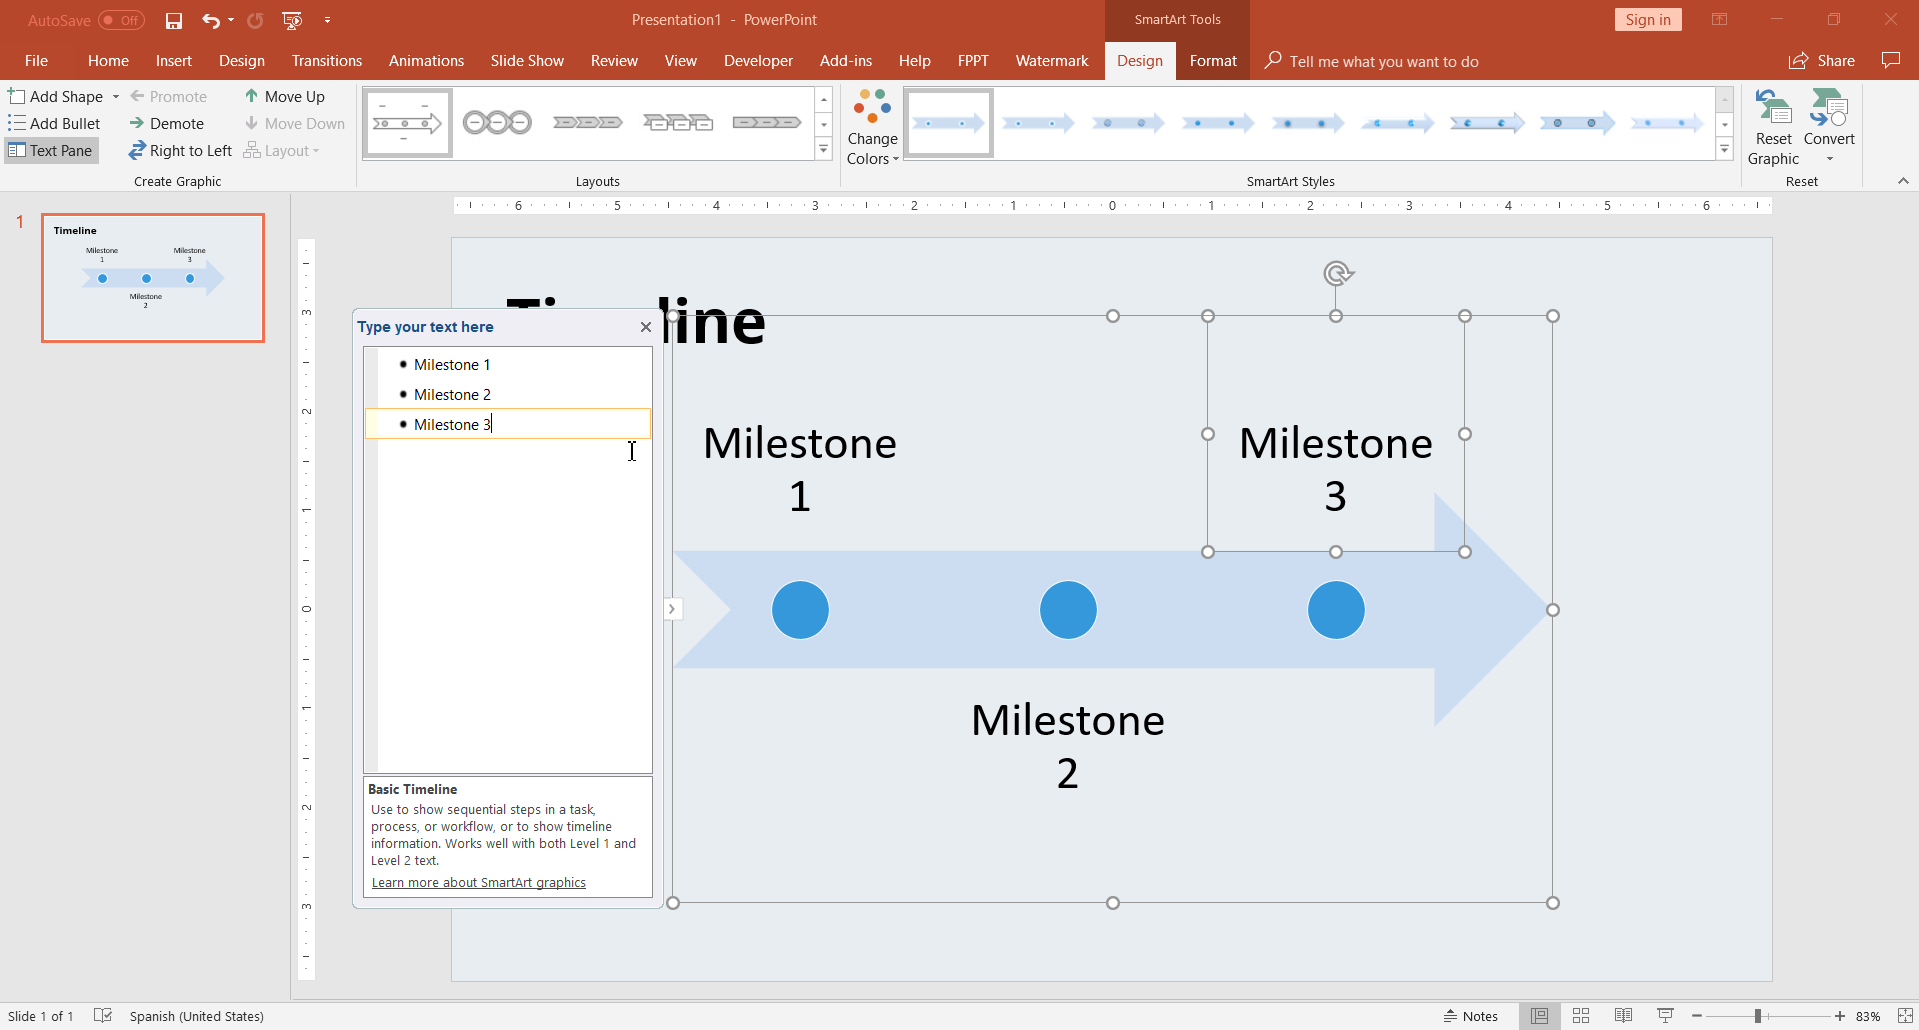
- Click the [Text] field to enter a date or milestone for your timeline.
- Repeat this for all data.

- Click the newly added bullet points in the Text Pane to input your additional data.

- Select from the default palettes to change the theme.
- Click the drop-down menu for Color and select a color.

- To move the entire timeline, click and hold any section of the sizing box. Drag the timeline to where you want it.
- Timelines can also be created in Microsoft Excel or Microsoft Word .
Alternative: Building your PowerPoint Timeline Through Shapes

- To change the look of the circles you can dive back into the Format Shape tab.

Expert Q&A
You might also like.

- ↑ https://support.microsoft.com/en-us/office/create-a-timeline-in-powerpoint-for-the-web-d1bd35a0-bfa7-428b-ba3c-c8f5b6050791
- ↑ https://support.microsoft.com/en-us/office/how-certain-features-behave-in-web-based-powerpoint-a931f0c8-1305-4428-8f7c-9cfa00ef28c5
About This Article

- Send fan mail to authors
Is this article up to date?

Featured Articles

Trending Articles

Watch Articles

- Terms of Use
- Privacy Policy
- Do Not Sell or Share My Info
- Not Selling Info
Keep up with the latest tech with wikiHow's free Tech Help Newsletter
How-To Geek
How to create a timeline in microsoft powerpoint.

Your changes have been saved
Email Is sent
Please verify your email address.
You’ve reached your account maximum for followed topics.
What Is elementary OS? Hands-on With the Mac-Like Linux Distro
Tor browser 13.5 is a last hurrah for old windows pcs and macs, my windows computer just doesn't feel like mine anymore.
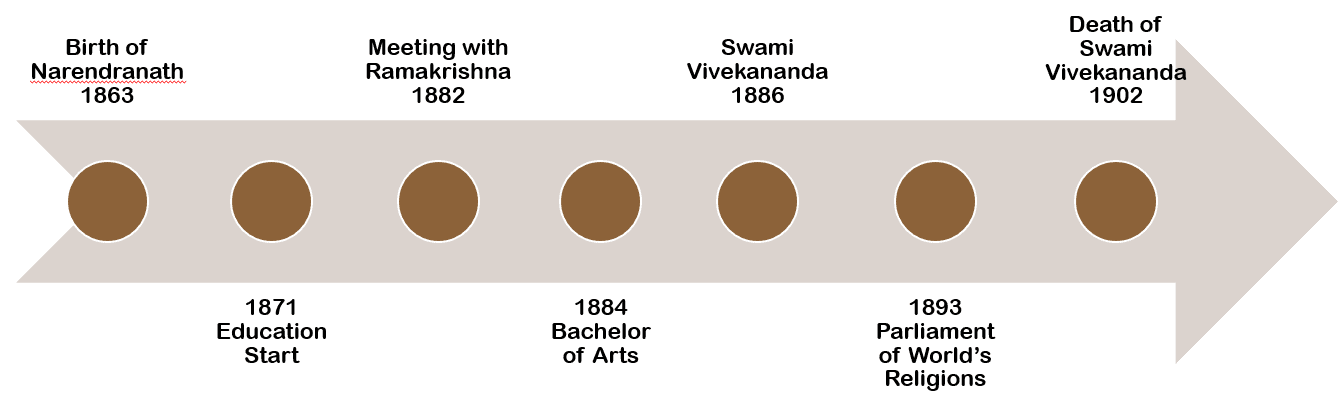
One of PowerPoint’s charms is the ability to visually represent information by using its large library of available graphics, such as charts and graphs. If you want to create a timeline, well, Microsoft has just the thing. Here’s how it’s done.
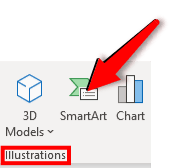
Open your PowerPoint presentation and navigate to the slide in which you would like to add a timeline. Once there, navigate to the “Insert” tab and select “SmartArt” from the “Illustrations” group.

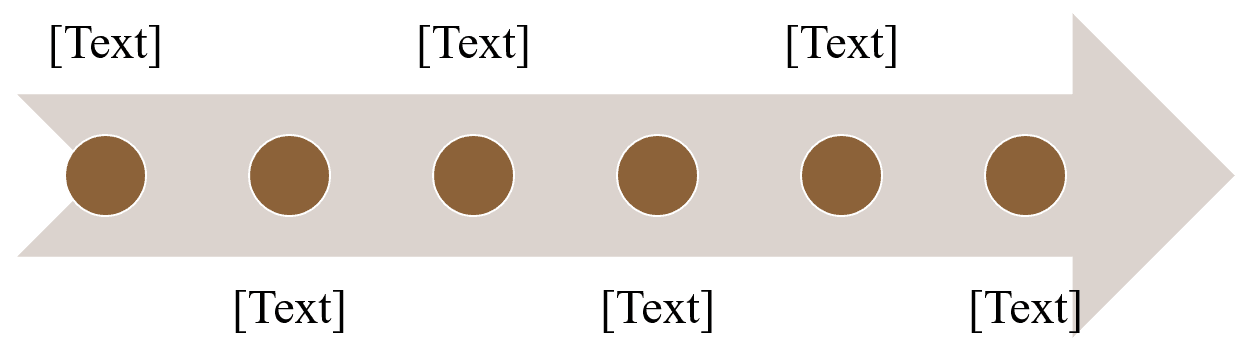
The “Choose a SmartArt Graphic” window will appear. Here, select “Process” from the left-hand pane.

A library of several different process-focused SmartArt graphics will appear. You can choose the style you like best for your timeline. In this example, we’ll use the “Basic Timeline” option.

Once selected, information about the SmartArt option will be displayed in the right-hand pane. When you’re ready to insert the SmartArt, select the “OK" button.

Related: How to Create Star Wars Scrolling Text in PowerPoint
The timeline will now appear on the slide, along with a window where you will type the respective text for the timeline.

The text entered in the box will automatically reflect on the actual timeline.

By default, this timeline will have three bullets for you to fill out. To add more, place your cursor at the end of the last item on the list in the text window, press “Enter,” and then type the desired text. Repeat this step as many times as necessary.

The size of the text and the placement of the bullets on the timeline will adjust automatically.

When you’re finished adding text, select the “X” button at the top right of the text window.

If you need to adjust the colors of the timeline to better align with the presentation, select the timeline and then click “Change Colors” in the “SmartArt Styles” group of the “SmartArt Design” tab.

A menu will appear, displaying a large library of different color schemes for the timeline. In this example, we’ll use “Gradient Loop” from the “Accent 6” group.

Once selected, the change will take place on your timeline.

And, of course, you can adjust the bullets and the text in the timeline by clicking and dragging each item.
Finally, if you ever need to add or remove a bullet from (or edit text in) the timeline, you can bring back the text edit window by selecting the timeline and then clicking the "Left Arrow" icon found on the left side of the graphic box.
Related: How to Build a PowerPoint Organizational Chart With Excel Data
- Microsoft Office
- Microsoft PowerPoint
How to Make a Timeline in PowerPoint? Step by step

In this article, we're going to show how to make a timeline in PowerPoint , one of the most famous software for designing presentation decks.
When presenting a list of events in sequential or chronological order, it's best to use a graphical representation, also known as a "timeline." Of course, you can also use just text to explain the same.
Still, when presenting a timeline in PowerPoint, it's preferable to use a visual representation , so your audience can easily follow a chain of events from the starting point to the endpoint.
To complete your learning, we'll share some tips from Briana Ripas , Design Manager at 24Slides Peru . These will allow you to take your presentations to the next level. Don't miss them!
In summary, you'll find:
How do you Make a Simple Timeline in PowerPoint?
How to make a project timeline in powerpoint, what is the best way to create a timeline, free timeline templates for powerpoint, faq: frequently asked questions to create unique timelines.
Ready to master how to make a timeline in PowerPoint?

Learning how to create a simple timeline in PowerPoint is a process that goes beyond the software itself; there are more steps to consider. We will explain everything you need to know step by step. Take some notes!
1. Create a Draft with all the Milestones of your Timeline
The organization is essential when learning how to make a simple timeline in PowerPoint. The first step is to create a draft with all the dates and events of your timeline .
We recommend that you take some time to organize this part and create a timeline more efficiently. Here's our draft, which will serve as a guide to starting your own timeline in PowerPoint:

Once you have all the dates and events organized like the example, you should arrange the information as follows :

- To achieve this, press the "Enter" and "Tab" keys as you add data to your timeline.
Magic happens! If you don't believe me, follow the next step to learn how to make a timeline in PowerPoint in seconds.
2. Use PowerPoint's SmartArt to create your Timeline in seconds
Once your information is organized, PowerPoint's SmartArt will work its magic. Select the text box as follows:

Ensure you are on the "Home" tab and look for the "Convert to SmartArt" button. Insert the timeline design you prefer (it can be changed later).

And voila! If you have followed each step carefully, you now have the first draft of your timeline design in PowerPoint .

There is more on how to make a timeline in PowerPoint. If you want to create a unique and eye-catching design, please stay tuned for the next step!
3. Customize the Colors of your Timeline in PowerPoint
A great feature of PowerPoint is that it's an intuitive presentation design software. We recommend customizing the colors of your timeline, which can be done in two ways:
1. Use the default colors from the "Smart Design" tab

2. Customize each element in the "Format" tab

4. Customize the Layout of your Timeline in PowerPoint
If you have a bit more time before presenting your project, you can customize the layout of your timeline in PowerPoint. You have a long list of designs to choose from!

Some visual effects can also be added to your timeline in PowerPoint.

Additionally, if you want to change the direction of the arrow in your timeline, you can do so with this software.

5. Correct any Dates on your Timeline if necessary
The process of learning how to make a timeline in PowerPoint is not linear, so if you forgot a date or want to add some information, you can do it from the following panel:

Another way to change information on your timeline in PowerPoint is:
- Right-click on the timeline > Convert to Text > Edit the text as needed, following the instructions in Step 1 of this guide.

Now you know how to make a simple timeline in PowerPoint! The design options are endless in this software .

Before moving on to the next section of how to make a project timeline in PowerPoint, we'd like to give you a taste of how our Designers improved the previous PowerPoint timeline . We hope it inspires you as much as it does to us!

Unlike a simple timeline in PowerPoint, a project timeline or project management timeline has multiple vital elements that need to be highlighted in your chart. Therefore, the process may be longer than the previous guide.
Here is a step-by-step guide on how to create a project timeline in PowerPoint:
1. Organize your Project Information
Each project is unique, so we recommend that you organize its most relevant elements. As an example, we will consider the following elements:
- Responsible individuals/leaders
- Project development timeline (months)
- Significant milestones
- Major tasks
- Task dependencies
We recommend working on your project draft simultaneously while reading this guide on how to make a project timeline in PowerPoint. If not, you can just read the entire guide first and then implement each step. The choice is yours!
2. Choose the type of Project Timeline Design you want
Numerous types of project timelines exist, some resembling Gantt charts. This guide will focus on designing a simple project timeline tailored for high-impact presentations.
If you're curious about Gantt charts, you can find Gantt Chart templates for project presentations in our repository. Use them wisely!
3. Begin Designing based on your Project Timeline Draft
Let's dive in! With all the previous organization in place, begin shaping your project timeline. We'll start by creating the overall structure of the chart:

Next, incorporate all the elements from the draft outlined in the first step of this guide. This is how our project management timeline begins to take shape:

To simplify the process of creating this style of project timeline, you can download our Creative Timeline PowerPoint Template Pack for free. You won't regret it!
4. Customize the Colors and Effects of your Project Timeline
Adding color to your project timeline is essential to achieve a high-impact presentation. There are no strict rules in this step; it will depend on your creativity and the characteristics of your project.
Also, you can consider adding a legend in the footer of your project management timeline to ensure it's clear for your audience. Here's an example of how our design turned out:

As in the previous section, we want to share with you the final timeline design made by our In-house Designers at 24Slides:

Now you know how to make a project timeline in PowerPoint. It's easier than it seems!
Learning how to create a PowerPoint timeline involves several aspects before designing your own on the platform. For this reason, Briana Ripas , Design Manager at 24Slides, wants to share some tips with you. Point them all!
1. Get Inspiration
There are plenty of places on the Internet to get ideas on creating a great-looking timeline. Timeline infographics are handy because they are really eye-catching.
You can navigate on the internet and browse through millions of graphics submitted and shared by members. For example, here's what my search for " timeline infographic design" on Google Images gave me.
Also, Briana wants to share some of her favorite sites to get inspiration before designing: Pinterest and Behance .
“ I assure you that you will find a lot of inspiration to create a timeline that adapts to what you want to express and begin to detach yourself from predetermined designs. That way, you can make it from scratch, and it has everything you are looking for”
2. Use Vector Graphics
You should use vector graphics for visually enticing timelines, as these are fully scalable and can be resized without pixelating . This is a very commonly used resource by professional designers, so if you want your final design to look professional, don't hesitate to look them up.
But, where do you find vectors? Here are a few sites to download free vectors for your timelines: Freepik , VectorStock , and Vector4Free .
3. Use Animations and Slide Transitions
Briana's next tip is: “Don't show your timeline all at once.”
Instead, you can show only the first point and talk about it before you continue with the next section. Using animations will also help the dynamics of your presentation and keep your audience's attention.
4. Follow your Graphic Guidelines
If you have a graphic identity, you must respect it when creating your timeline in PowerPoint. It's crucial!
This practice has many benefits, including building brand awareness with your audience and giving the impression that your work is professional (and therefore trustworthy).
Briana says:
“Some companies already have an established brand manual, and the main thing is to follow its aesthetics, flow, and feel. This is a characteristic that I always take into account when designing a graphic piece for a client.”

If you're looking for some inspiration for your designs or don't have time enough to follow all the steps of our guide: How to make a timeline in PowerPoint, then these templates will delight you:
Free Timeline Template for PowerPoint #1
In this timeline template, you'll find various designs that will undoubtedly save you a lot of time in your creative process. Especially if your project has a red color palette, this is the perfect match for you.
Download our PowerPoint Timeline #1 here .

Free Timeline Template for Powerpoint #2
This next project timeline template in PowerPoint is characterized by its warm colors. If you have an ongoing project, this resource will be very useful for summarizing your tasks and deadlines.
Download our PowerPoint Timeline #2 here .

Free Timeline Template for PowerPoint #3
This is a pack of free templates features colorful and creative timelines. Take a look at one of our designs below!
Download our PowerPoint Timeline #3 here .

Free Timeline Template for PowerPoint #4
If you like gradient designs, these timeline templates will be your perfect match. Moreover, you'll not only find timeline designs but also other graphics for your business or work presentation.
Download our PowerPoint Timeline #4 here .

Free Timeline Template for PowerPoint #5
This is another pack of free timeline templates. Unlike the previous templates, these designs stand out for their use of images. Get inspired by our designs and adapt them to your needs!
Download our PowerPoint Timeline #5 here .

Free Timeline Template for PowerPoint #6
This template is for you if you're looking for a simple but professional timeline design. Download it for free!
Download our PowerPoint Timeline #6 here .

Free Timeline Template for PowerPoint #7
Timelines don't always have to be linear (as ironic as it sounds). This free PowerPoint template will show you how to organize your temporal data in a different way.
Download our PowerPoint Timeline #7 here .

Free Timeline Template for PowerPoint #8
Finally, this free timeline template contains a creative design for organizing your information. If you're looking for templates with pastel colors, this design is for you.
Download our PowerPoint Timeline #8 here .

If you want to master and know all the details of how to make a timeline in PowerPoint, we recommend you keep reading the next section .
1. When would you use a timeline?
Nowadays, the use of timelines encloses many areas of work, including:
- If you're a history teacher, you can present a timeline of whatever historical event you're going to discuss.
- If you're a project manager, you can present a timeline of your project's milestones, deadlines, and deliverables.
- If you are a startup founder looking for investment, you may want to include your product or project's timeline so potential investors can see if getting involved with your company is worthwhile.
There are plenty of uses for a timeline in PowerPoint, and it's ultimately up to you if you need one for your presentation .
2. How do I add a point to my timeline in PowerPoint?
In case you're using a SmartArt timeline layout, you can follow these steps:
- Click on the last point of your timeline.
- Go to the "SmartArt Design" tab.
- Click on "Add Shape."
You can also add points to the chart by expanding the information in the control panel, which automatically appears when creating the timeline in SmartArt.
3. What elements should be in a project timeline?
Project timelines can vary depending on the specific characteristics of each project. However, we can summarize the main elements typically included:
- Start and End dates: Every project has a defined start and end date, so the project timeline should reflect that.
- Phases: It is common to divide a project into phases or stages, and you can include this information in the timeline.
- Milestones: These are significant events or checkpoints within the project. They can include task deadlines, intermediate monitoring dates, or any notable tasks.
- Tasks: These are the activities that need to be completed to progress with the project.
- Task Dependency: Some tasks in your project may depend on the completion of others, so you should have that detail mapped out when capturing it on your project timeline.
Please note that these are general guidelines for making a project timeline, and you can customize the elements based on your project's specific needs and requirements.
4. What software do you use for timeline?
If you don't know what software to use to make a timeline, we recommend you review our article: 15 Popular PowerPoint Alternatives (Full Comparison Guide) .
Thank us later!
If you got here, we're sure you've mastered how to make a timeline in PowerPoint. As you can see, the steps are really easy to follow, but the dedication of time to this process will determine your final outcome.
In case you have some trouble replicating our steps, our team of designers at 24Slides is pleased to help you and optimize the process for you. You can try our abilities out for just $1!

These articles are waiting for you:
- PowerPoint 101: The Ultimate Guide for Beginners
- How to Create a Venn Diagram in PowerPoint?
- How to Make a Pyramid Chart in PowerPoint? + Free Templates
- How To Use PowerPoint Design Ideas - All Questions Answered!
- Master Slides 101: How to Create and Use Master Slides in PowerPoint
Create professional presentations online
Other people also read

Tutorial: Save your PowerPoint as a Video
How To Convert Google Slides To PowerPoint and Vice Versa

How To Add Animations To PowerPoint
How to Create a Timeline in PowerPoint: A Step-by-Step Guide
Creating a timeline in PowerPoint is a breeze once you get the hang of it. It’s all about choosing the right template, adding your milestones, and customizing the design to fit your presentation. Here’s how you do it: Open PowerPoint, go to the Insert tab, select SmartArt, choose a timeline design, add your content, and tweak the design. Voila, you have a timeline that’s ready to impress your audience!
Step by Step Tutorial: Creating a Timeline in PowerPoint
Creating a timeline in PowerPoint is a fantastic way to visually represent a sequence of events. It can help your audience grasp the flow of a project, the history of a company, or the steps in a process. We’re about to walk through the steps to make your very own timeline.
Step 1: Open PowerPoint and Choose a Slide Layout
Select a slide layout that suits your timeline.
When you open PowerPoint, you’ll want to choose a blank slide or one that’s relatively plain. This gives you a clean canvas to work with.
Step 2: Insert SmartArt
Go to the Insert tab and click on SmartArt.
In the Insert tab, you’ll find a variety of options, but for timelines, SmartArt is your go-to. It’s a versatile tool that offers a range of graphics perfect for timelines.
Step 3: Choose a Timeline Design
Select a timeline layout from the Process category.
Once you click on SmartArt, a dialog box will pop up with different categories. Under the Process category, you’ll find timeline designs. Pick one that suits your content.
Step 4: Add Your Content
Type your milestones and dates into the SmartArt graphic.
After selecting your design, you can start adding your milestones and dates directly into the placeholders. This is where you personalize the timeline to match your needs.
Step 5: Customize the Design
Adjust the colors, fonts, and size of your timeline.
Don’t be afraid to get creative here. You can change the colors to match your brand or presentation theme, adjust the font for readability, and resize the graphic to fit your slide.
After you complete these steps, you’ll have a timeline that’s both informative and visually appealing, ready to be a standout feature in your presentation.
Tips for Creating a Timeline in PowerPoint
- Keep it simple. Don’t overcrowd your timeline with too much information.
- Use contrasting colors for different milestones to make them easily distinguishable.
- Align your timeline horizontally or vertically based on your slide layout and preference.
- Use icons or images to represent different points on the timeline for a more engaging look.
- Preview your timeline in Slide Show mode to make sure it’s clear and legible from a distance.
Frequently Asked Questions
How do i add more milestones to my timeline.
Click on your SmartArt graphic and use the “Add Shape” feature to insert additional milestones.
Can I animate my timeline in PowerPoint?
Yes, you can apply custom animations to your timeline elements to make them appear in sequence or all at once.
What if the SmartArt templates don’t fit my needs?
You can create a timeline from scratch using shapes and text boxes or look for downloadable timeline templates online that are compatible with PowerPoint.
How can I share my PowerPoint timeline?
You can save your presentation as a PDF, image, or video file, or present it live using PowerPoint’s presentation mode.
Is it possible to edit a timeline after I’ve created it?
Absolutely, just click on the timeline and make your changes. You can edit text, move shapes, or adjust the design as needed.
- Open PowerPoint and select a suitable slide layout.
- Insert SmartArt from the Insert tab.
- Choose a timeline design from the Process category.
- Add your milestones and dates to the graphic.
- Customize the design to your liking.
Crafting a timeline in PowerPoint is not just about getting your facts in order; it’s about telling a story that captivates your audience. Whether you’re mapping out the next big project, showcasing company milestones, or highlighting historical events, a well-constructed timeline can make your message resonate. Remember, a timeline is more than just dates and events; it’s a visual journey that can influence how your audience perceives the information. So, take the time to choose the right design, color scheme, and layout that best illustrates your narrative. And who knows, your PowerPoint timeline might just be the thing that sticks with your viewers long after the presentation is over. Now go ahead, give it a try, and watch your timeline come to life!

Matthew Burleigh has been writing tech tutorials since 2008. His writing has appeared on dozens of different websites and been read over 50 million times.
After receiving his Bachelor’s and Master’s degrees in Computer Science he spent several years working in IT management for small businesses. However, he now works full time writing content online and creating websites.
His main writing topics include iPhones, Microsoft Office, Google Apps, Android, and Photoshop, but he has also written about many other tech topics as well.
Read his full bio here.
Share this:
Join our free newsletter.
Featured guides and deals
You may opt out at any time. Read our Privacy Policy
Related posts:
- Can I Create a Timeline in Powerpoint?
- How to Add Page Numbers in Powerpoint 2010
- How to Set Time for Slides in Powerpoint
- How to Save Powerpoint as PDF with Notes
- How to Delete a Slide in Powerpoint 2010
- How to Loop a Slideshow on Powerpoint 2013
- How to Unhide a Slide in Powerpoint 2013
- How to Make a Timeline on Google Docs: A Step-by-Step Guide
- How to Rotate a Slide in PowerPoint: A Step-by-Step Guide
- How to Make a Powerpoint Slide Vertical in Powerpoint 2013
- How to End Powerpoint on Last Slide in Powerpoint 2010
- How to Create a PowerPoint Presentation Step by Step: 2024 Guide
- How to Hide a Slide in Powerpoint 2010
- How to Change Hyperlink Color in Powerpoint 2010 (An Easy 5 Step Guide)
- How to Add a New Slide to PowerPoint: A Step-by-Step Guide
- How to Insert Slide Number PowerPoint: The Ultimate 2024 Guide
- How to Insert Slides from Another Presentation in Powerpoint 2010
- How to Embed a Word Document Into PowerPoint 2000: A Step-by-Step Guide
- How to Insert a Pyramid in Microsoft Excel 2010
- How to Drag Slides From One PowerPoint to Another: A Step-by-Step Guide
Unsupported browser
This site was designed for modern browsers and tested with Internet Explorer version 10 and later.
It may not look or work correctly on your browser.
- Presentations
How to Make a Timeline in PowerPoint With Templates (w/Video)
- Bahasa Indonesia
Timelines and presentations go hand in hand. One of the best ways to tell a story in your presentation is to give your audience a timeline that connects the past to the present.

When you're crafting your story, share the key events that led you to the current moment. Timelines can also bridge the gap to the future. These past milestones can help you explain why you've reached a decision or chosen a new direction.
PowerPoint is synonymous with presentations. It's not surprising that you can build timelines using its features. This tutorial will teach you how to make a timeline with many milestones right inside of PowerPoint.
I'll walk you through creating a timeline from scratch that adapts to your content using PowerPoint's SmartArt feature. We'll also look at how to use custom PowerPoint themes to build professional timelines quickly.
Need Help? Download Our New eBook on Making Great Presentations (Free)
We also have a useful complement to this tutorial. Before reading on, download our FREE eBook: The Complete Guide to Making Great Presentations , which will help you write, design, and deliver the perfect presentation.

How to Quickly Make a Timeline in PowerPoint (Watch & Learn)
In this quick two-minute screencast video, I'll teach you an easy way to add a timeline to your PowerPoint slide. You'll learn to use SmartArt to add a timeline with points for key dates. These timelines are easy to edit, so if your points change, you can adapt your timeline without having to start from scratch.
We'll also take a look at using a great-looking PowerPoint template to add a unique timeline to your presentation quickly.
How to Make a Timeline in PowerPoint
Envato Elements has a premium template that contains timelines that you can use in PowerPoint. The template that will be used in this tutorial has a timeline in it.

This template is the Project Timeline PowerPoint Infographics . It comes with over 30 unique slides in 16:9 format. The premium template contains ten premade color schemes and light and dark backgrounds.
If the timeline that is in the template isn’t right or you want to create your own, you can. We will use the SmartArt feature to create your timeline in PowerPoint.
- Using a PowerPoint template timeline
- Creating a timeline with SmartArt
How to Customize Your PowerPoint Template Timeline
The quickest and easiest way to create a timeline in PowerPoint is by customizing a PowerPoint template timeline.
Using a template simplifies having a timeline in your presentation. Plus, it means that few edits are needed since the template was created by PowerPoint design professionals.
The Project Timeline PowerPoint Infographics template from Envato Elements has many timelines in the template. For this tutorial, we’ll edit slide 2. Let's get started:
1. Add Your Information

To add your information, click inside the box where the current text is and highlight the text. Next, press the Delete button on the keyboard.
Now you can add your own information into the text box. Add a title for each point and type the text for any more information you want to include.
You can also delete graphic elements of the timeline and replace them. Just select the item you want to remove and press the Delete button.
Continue modifying the timeline slide until the timeline meets your needs.
2. Add Animation

You can add animation to text or objects to add more emphasis to your timeline. For example, let’s add animation to the text.
- Click the text or object that you want to animate.
- Click on the Animations tab. There are three different types of animation Entrance Effects , Emphasis Effects , and Exit Effects .
- Entrance Effects menu is already open. Choose an animation that you want to use.
- Or select another type of animate from the Animations tab.
3. Preview Your Presentation
You've just finished modifying a PowerPoint timeline template. It's that simple because a template gives you a head start.
But it's always a good idea to preview a presentation after you've customized a template. To review your presentation, click on Slide Show tab. Click the Play from the Start button or the Play from Current Slide button in the toolbar.
How to Make a Timeline Using SmartArt
The second way to make a timeline is to create one yourself through SmartArt:
1. Add a Blank Slide

If you want to create a timeline in PowerPoint, you'll probably want to do it on a blank slide.
To add a blank slide to your presentation, click between the two slides where you want your blank slide to be in the sidebar on the left of your window.
You should see a flashing orange line. That is where your new slide will be added.
Next, click on the Insert tab above the toolbar. Then in the toolbar, click on the New Slide button.
2. Open SmartArt Menu

Now that you’re on the slide that you want to add your timeline to, click on the Insert tab.
Next, click on the SmartArt button in the toolbar. From the drop-down menu, choose the Process option.
A menu appears. Choose the Basic Timeline option from the menu and click OK .
3. Adjust Basic Timeline Graphic

After adding the basic timeline graphic to your slide, you may need to adjust it. You can change the size by dragging the handles that appear in the box around the graphic.
4. Add Your Information

When the graphic appears, you’ll notice a window next to it called SmartArt Text. This is where you can add your information.
Type in this box to add your information. The text boxes automatically adjusts according to how much text you type in the boxes. This feature automatically keeps all your text in the timeline the same size.
5. Add Colors

The timeline automatically appears in a green color. This may not match your color scheme, and you’ll want to change the color.
To change the color, click on the timeline arrow. We’ll change the color of that first.
Next, click on the Shape Fill button in the toolbar under the Home tab. A color menu appears. Choose the color that you want from the menu.
Select each circle and repeat the previous step to change the color of the circles in the arrow. Learn more about working with PowerPoint SmartArt in this tutorial:

5 Top Timeline PowerPoint Presentations from Envato Elements
Here are the top five timeline PowerPoint presentations from Envato Elements:
1. Business Timeline PowerPoint Infographics

The Business Timeline PowerPoint Infographics comes with over 20 unique slides that can be edited in PowerPoint. Each slide features a different timeline infographic. Everything in this template can be edited.
2. TIMELINE PowerPoint Infographics Slides

Timeline PowerPoint Infographic Slides comes with 33 unique timeline slides and a total of 35 total slides. The slides are in 16:9 format. It comes with eleven color scheme options that you can choose from. Also, this template comes with infographics and icons.
3. Business Timeline PowerPoint Template

This premium timeline PowerPoint template comes with 35 unique slides in 16:9 format. Plus, the Business Timeline PowerPoint Template comes with both light and dark versions of the template. Everything in the template is entirely editable.
4. Business Timeline PowerPoint Infographic Slides

The Business Timeline PowerPoint Infographic Slides comes with 20 unique slides and a total of 240 slides. The slides are in 16:9 format. This template comes with 12 color variations that you can choose from. It also comes with 280 vector icons.
5. Corporate Timeline

This premium template comes with 30 unique slides in HD resolution. Easily drag and drop an image of your choice by dragging it into a picture placeholder. You can use this template for any data-heavy business presentation.
Explore More PowerPoint Templates
Are you still looking for more PowerPoint template choices? Read these articles to find some great PowerPoint templates:

Download Our New eBook on Making Great Presentations (Free PDF)
We have the perfect complement to this tutorial, which will walk you through the complete presentation process. Learn how to write your presentation, design it like a pro, and prepare it to present powerfully.
Download our new eBook: The Complete Guide to Making Great Presentations . It's available for FREE with a subscription to the Tuts+ Business Newsletter.

Recap and Keep Learning More PowerPoint Skills
A timeline is a great way to step your audience through the past into the present. In this tutorial, you learned two ways that you can easily create them in PowerPoint. Whether you're using SmartArt or adapting a template to your liking, a timeline is a powerful storytelling tool. Consider a timeline for your next presentation.
These tutorials are a great way to learn other skills to help you connect better with your audience in presentations:

The Best Source for Timeline PowerPoint Templates (With Unlimited Use)
Envato Elements is a top source for premium Timeline PowerPoint Templates. It is a subscription service where all you need to do is pay a low monthly fee by paying a low monthly fee and become a subscriber. Once you’re a subscriber, you can access hundreds of premium timeline PowerPoint templates. You also get access to images, fonts, audio, and more.
Professionals make every premium template look professional and stylish. Also, using a premium template saves time because instead of creating a presentation from scratch, you start with a well-made base.
Once you download a template, all you need to do is to add your text and images. If you’re someone who likes to customize your presentation, you still can with a premium template. A good premium template is fully customizable.
Explore Envato Elements

Download a Premium Timeline PowerPoint Template Today!
As you’ve seen, timelines are a great way to show a process over time. Using a premium template, you can have a nice-looking timeline within seconds.
In this article, you learned how to create your own basic timeline in Microsoft PowerPoint. Save time by downloading a Premium Timeline PowerPoint Template for your next project. If you use digital assets often, sign up today!
Editor's note: This post was originally published in September of 2017. It's been comprehensively updated by Sarah Joy .

- Microsoft's Promise of Easy AI
- Walmart's Killer Tech Deals This Week
How to Create a Timeline in PowerPoint
Use a template or copy it from another app
:max_bytes(150000):strip_icc():format(webp)/acp_casual_headshot-5b59662146e0fb002561f951.jpg "how to create a timeline in a powerpoint presentation")
- Villanova University
What to Know
- Import: Export the timeline from another program into a graphical format (JPG, GIF, or PNG). Insert the timeline graphic into PowerPoint.
- SmartArt: Select Insert > SmartArt . Choose a layout. Use text panes to create the timeline. Change colors or styles or reorder elements.
- Template: Use a PowerPoint template to create a timeline. Move and copy template objects to create new steps or milestones.
There are several ways to insert a PowerPoint timeline into your presentation. You can use copy and paste, SmartArt, a template, or an add-in. We show you how to do all four using PowerPoint 2019, 2016, 2013; PowerPoint for Microsoft 365; Powerpoint for Mac; or PowerPoint Online.
How to Paste a Timeline From Another Program Into PowerPoint
A straightforward way to get a timeline into your PowerPoint presentation file is to create it in another program, copy it, and paste it into PowerPoint. Just export the timeline from a program like Microsoft Project or Excel into a graphical format such as JPG, GIF, or PNG, then insert the timeline graphic into PowerPoint like you would insert pictures or clipart. It's also possible to link the timeline in a way similar to adding Excel data to Word , which updates automatically when you make changes.
How to Make a Timeline in PowerPoint With SmartArt
PowerPoint also offers a built-in function, called SmartArt, which makes adding timelines a breeze. SmartArt objects are configurable graphics that you set up in a point-and-click fashion.
To use a SmartArt graphic for a timeline:
Go to Insert .
Select SmartArt .
In the dialog box that appears, browse for the SmartArt graphic type that best suits your need.
Items in the Process category are good options. For example, choose Basic Timeline or Vertical Chevron List to get started on your timeline.
Select OK to insert the SmartArt into your presentation.
The SmartArt graphic appears on the slide along with a text pane where you'll edit the text. Add text to the objects by editing the bullets in the text pane. It works just like a regular list, press Tab and Shift + Tab to make an indent and outdent or press Enter to add a new bullet point.
Continue to decorate your SmartArt by changing the colors, choosing a different style, and reordering elements.
PowerPoint Online doesn't contain as many SmartArt graphics formats as the desktop version of PowerPoint. The ones mentioned in this article are available.
How to Make a Timeline in PowerPoint With a Template
There are pre-configured PowerPoint templates that allow you to quickly piece together a timeline.
The PPTX file pictured above is available from the Microsoft Office Template Gallery . Move and copy the existing objects on these timeline templates to create new phases of the timeline, or new milestones and annotations. This method is a bit more hands-on, but it allows you to get the exact results you want.
Templates in PPTX format are compatible with all versions of PowerPoint.
How to Create a Timeline in PowerPoint With an Add-In
Another approach is to use a PowerPoint Add-in specifically built for creating timelines. Office Timeline is an excellent choice if you're looking to add project timelines (e.g., Gantt Charts), and it's available in a free version.
You'll need a few minutes to get up and running with the following steps:
Download the Free Edition of the app from the Office Timeline website.
Double-click the .EXE file to start the installation.
Once the installation is complete, PowerPoint starts automatically, shows a quick introduction wizard, and provides a sample file.
Once installed, a new Office Timeline Free tab is added to Powerpoint. This tab contains tools to create new timelines, select the style of timeline to be inserted, and enter or import the data on which the timeline is based.
The Office Timeline Add-In is only available for Windows versions of PowerPoint. However, there's also Pincello , a web-based tool that outputs timelines in PowerPoint format.
Armed with the above options, you're now prepared to create any type of timeline you want in PowerPoint.
Get the Latest Tech News Delivered Every Day
- How to Create a Microsoft Sway Presentation
- Best Free Family Feud PowerPoint Templates
- How to Make a Timeline in Word
- How to Use Copilot in Powerpoint
- How to Draw Freehand in PowerPoint
- How to Make a Timeline on Google Slides
- How to Create a Timeline in Excel
- How to Create a Microsoft Word Flowchart
- How to Make a Word Cloud in PowerPoint
- Create a Default Presentation Template in PowerPoint
- Create Family Trees Using PowerPoint Organization Chart
- How to Insert PDF Files Into PowerPoint Presentations
- The 8 Best Slideshow Apps of 2024
- How to Make a PowerPoint Presentation
- How to Copy a PowerPoint Design Template to Another Presentation
- Slide Layouts in PowerPoint
Home Blog PowerPoint Tutorials The Essential Guide to Making Timelines in PowerPoint and Google Slides
The Essential Guide to Making Timelines in PowerPoint and Google Slides

Timelines are used for a variety of purposes by people across different professions. You might be a project manager looking to create a timeline to understand the outputs and outcomes of your project or a teacher looking to teach your students about all major happenings leading up to a historical event. Timelines are a good way to visualize past, present and future events, to forecast outcomes and to learn from the past.
What is a Timeline?
History of timelines, why timelines are important in presentations, different timeline styles, ingredients of a successful timeline, how to create a timeline in powerpoint, how to create a timeline in google slides, other creative timeline designs (infographics & examples), examples of best timeline templates for presentations, what makes the perfect timeline.
A timeline can be your snapshot into the past and a window into the expected future by analyzing the what, why, where, when and how, leading up to the things that are most important to you. In this guide we shall tell you all that you need to know about timelines and how to create them.
A timeline is essentially a visual representation marking all major events over a period of time. A timeline marks specific milestones, achievements, or expected results tied to a specific topic. What a timeline is used for depends on a number of factors. For example, your timeline can be a graphical representation of past events, a forecast of future results or expected outcomes, or even a mix of past, present and future activities, events and outcomes.
Most timelines use time as a scale. The majority of timelines are linear in scale, while some timelines use a logarithmic scale. Timelines can be created in a number of ways such as with text based labels, numbers, graphs, photos and in the form of animations.
Timelines are most commonly used for educational purposes, in research and project management. However, this is not an exhaustive list. Other than use for business and academic purposes, timelines have been applied to learn about the spread of pandemics, chronology of the universe, and to understand scientific processes.
Timelines have been used for centuries to chronicle events. Timelines have been an effective tool in recording history and learning from the past to determine the effect of past events on the present and the future. Man has chronicled events and written memoirs to record history since time immemorial. These were perhaps methods similar to create a timeline of important aspects of history. However, not all such records contained specific dates. Moreover, recording history was not necessarily done in the form of short timeline visualizations as we often see in the form of modern timelines.
Perhaps the earliest examples of timelines are historical records that were maintained by scribes and historians on the instructions of kings. In fact, scribes performed many tasks that modern timelines serve including; recording the amount of crops harvested, forecasting demand and supply, as well as keeping accounts for ordering supplies. This is somewhat similar to what most project managers do. They plan, anticipate and ensure the implementation of project goals and outcomes in line with set timelines. For this purpose, they use historical and present data, as well as forecasting models. They align their teams in line with the set timeline and offer course correction, as needed. For this purpose, a visually appealing historical timeline template can be a time-saver for educators and historians who need to prepare their presentations.
Modern timelines that we see today can be assumed to have origins as old as recorded history. In fact, this recorded era which roughly spans to 3500 BC has some form of timeline related aspect, as one can trace back events chronologically across multiple civilizations; be it Mesopotamia & Sumerians, or the Roman, Greek, Arab, Chinese, South Asian and other civilizations.

Timelines serve as an essential way of simplifying content within presentations and making it easier to grasp for an audience. Instead of explaining about a concept, project or expected outcome by going back and forth; it can be much easier to simply use a timeline to show the entire layout in chronological order. This ties all aspects of the topic with a thread like symbolism which makes it easier to explain, plan, brainstorm and visualize ideas.
Business presentations, for instance, often require explaining lengthy and cumbersome concepts and ideas in a small time span. Whether you’re pitching your idea before a potential investor, need to explain the forecasts for a project, wish to reveal details about current progress or need to elaborate upon past events; a timeline can make your job so much easier. They can essentially help answer the why, what, when, how and where in the form of a simple visualization.

There are a number of timelines styles that can be applied when making a timeline. The way you construct a timeline is actually quite subjective. It can be hard to put all timeline styles in a box considering the various tools that have now made it possible to construct timelines in so many different ways. Below is a breakdown of some of the timeline styles that you can apply when making timelines.
Horizontal Timelines
A horizontal timeline can be useful for showing progress. Such a timeline can be good for representing events chronologically. Horizontal timelines are one of the most common type of timelines and are great for project management, depicting historical events and forecasting.

Vertical Timelines
A vertical timeline template can be useful for constructing graphs and representing research data. Such a timeline can also be created using an axis to discuss variables affecting an outcome. Needless to say, vertical timelines can also be used for project management, forecasting and representing events chronologically.
Non-Linear Timelines
These can come in radial, spiral or arbitrary forms. These are often represented in the form of chains and interconnected shapes (e.g. arrows) or snake like lines. These timelines might not have a set horizontal or vertical sequence, as they represent interconnected pieces. Such timelines can be useful for depicting processes and discussing multiple variables and for longer event sequences.
Animated or Interactive Timelines: Such a timeline can be made in a number of ways. You can bring together aspects of horizontal, vertical, and non-linear timelines. This is because the ability to create a timeline by bringing together different variables affecting it can result in endless possibilities. Zooming UIs like the one used in Prezis and HTML5 based web apps, and powerful platforms like Microsoft SandDance running with Power BI can help you affect the timeline by selecting multiple variables. Such timelines can remain in flux as you apply data to visualize your content.
The new Morph transition and 3D features in recent versions of PowerPoint open a range of new possibilities to develop animated and really impressive timelines in PowerPoint.

From Tables to Graphical Timelines in PowerPoint
The tabular data were user for years. You can present your data using tables by labeling different bits of the information by date. Tables can be however more complicated and lengthy. From an audience viewpoint, tables could not help to visualize the timeline milestones easily vs. a visually appealing timeline design. If you intend to present your information before an audience, a graphical timeline can be usually easier to present than a table.

Your timeline needs to be fashioned in a manner that makes it easy enough for your audience to understand the various interconnected sections. Here are a few tips for making a timeline that can help you get your message across to an audience.
- Avoid Messy Timelines: Your timeline should be easy to understand and the various parts of your timeline should not be so intertwined that it becomes impossible to make head or tail out of it.
- Ensure Accuracy: There is no use making a visually appealing timeline if your data is wrong. Make sure that the information given in your timeline is accurate and not misrepresented. Even a single mistake in a timeline can disrupt the entire sequence.
- Account for Scalability: You must account for scalability in your timeline. Be it the design of the timeline or the process or forecast shown within it; you must ensure that the timeline can be edited to accommodate changes. This is because there might be a number of ideas, issues or instructions that might be discussed during your presentation or meeting, which might significantly alter the timeline once its presented.
- Goals & Outcomes: Most timelines come with goals and outcomes. If your timeline requires these, make sure that the goals and outcomes are defined properly. You will require emphasizing upon key milestones, and accounting for their expected outputs and outcomes.
- Descriptive Text & Labels: It is always important to ensure your timelines are properly labeled. If necessary, also add descriptive text, especially for milestones, goals and outcomes. This will help you neatly conclude your timeline.
Now that we learned the basics of a timeline, you may be wondering: how to make a timeline? There are a number of ways you can create timeline for your presentations or documents. One of the most common ways of making a timeline slide is in PowerPoint or Google Slides. Other online tools and specific timeline web apps can also be used. Let’s take a look at how you can quickly create professional looking timelines.
Creating a Timeline in Microsoft PowerPoint
How to make a timeline in PowerPoint? Below are 3 easy steps for making a timeline in PowerPoint using SmartArt Graphics. This is probably the easiest method for making a timeline in PowerPoint.
3 Easy Steps for Making a Timeline in PowerPoint using SmartArt
Step 1. Insert a SmartArt Graphic: Go to Insert -> SmartArt and pick a SmartArt Graphic. For making timelines, you might want to use Process based graphics. These can be easier to use for depicting a timeline like sequence. Some of the graphics in this section are specifically meant for timelines, such as the Basic Timeline graphic which depicts an arrow.
However, you can pick and choose a graphic according to need. For example, some of the graphics might not give you enough margin to add a lot of text or doing so might make the graphic confusing. Hence, pick a SmartArt Graphic that you think will be best to accommodate your content, like the Basic Timeline option. This way, you can add a timeline to your PowerPoint slide.
Step 2. Add text to your SmartArt: In the next step, add text to label your timeline and if necessary, to add a description describing each step of the timeline. For some timelines, a simple label might be enough, as you might need to keep the graphical elements minimum to describe each step during your presentation verbally.
Step 3. Design your timeline: You can design your timeline by using SmartArt Tools, and picking the various color schemes given within PowerPoint or changing the shape colors. You can always switch the SmartArt Graphic using SmartArt Tools and try your hands at different graphic types to make interesting timelines. In the following example we have adjusted the fill options to a custom gradient color.

3 Easy Steps for Making a Timeline in PowerPoint using Shapes
Another easy method for making timelines in PowerPoint is by using the built-in PowerPoint shapes. You can use various shapes for designing your timeline, however, a very common shape is the Arrow shape.
- Step 1. Insert shapes: In the first step, insert a shape via Insert -> Shapes. For the purpose of this tutorial, we will use the Right Arrow shape. This is because an arrow can be quite useful for pointing towards a specific direction on the slide; making it ideal for linear timelines. You can insert multiple shapes to construct your timeline, such as a few arrows pointing towards the right.
- Step 2. Add text-boxes: You can insert text-boxes to explain each step of the shape. These text-boxes can be added both within shapes and next to them. The former can help label the shapes with dates and other relevant information, whereas, the latter can be handy for adding a description for what each shape implies.
- Step 3. Design your shapes: You can recolor, resize and reorder the shapes according to your specific timeline requirements in order to make it stand out and to highlight different parts of it by color coding it.

This method can be used either to create a basic timeline or an advanced timeline.
Google Slides has had an impressive growth in recent years and positioned itself as one of the preferred tools when creating business slide decks and presentations for education. As in PowerPoint, Google Slides offers a wide range of tools to create timeline slides are one of the diagrams that can be created in Google Slides presentations.
How to build a timeline in Google Slides? You can create timeline templates in Google Slides by either using shapes, by using the same procedure as PowerPoint (by inserting shapes via Insert -> Shapes in Google Slides), or opt for a much easier method that can help you cut down the time needed for making timelines in Google Slides.
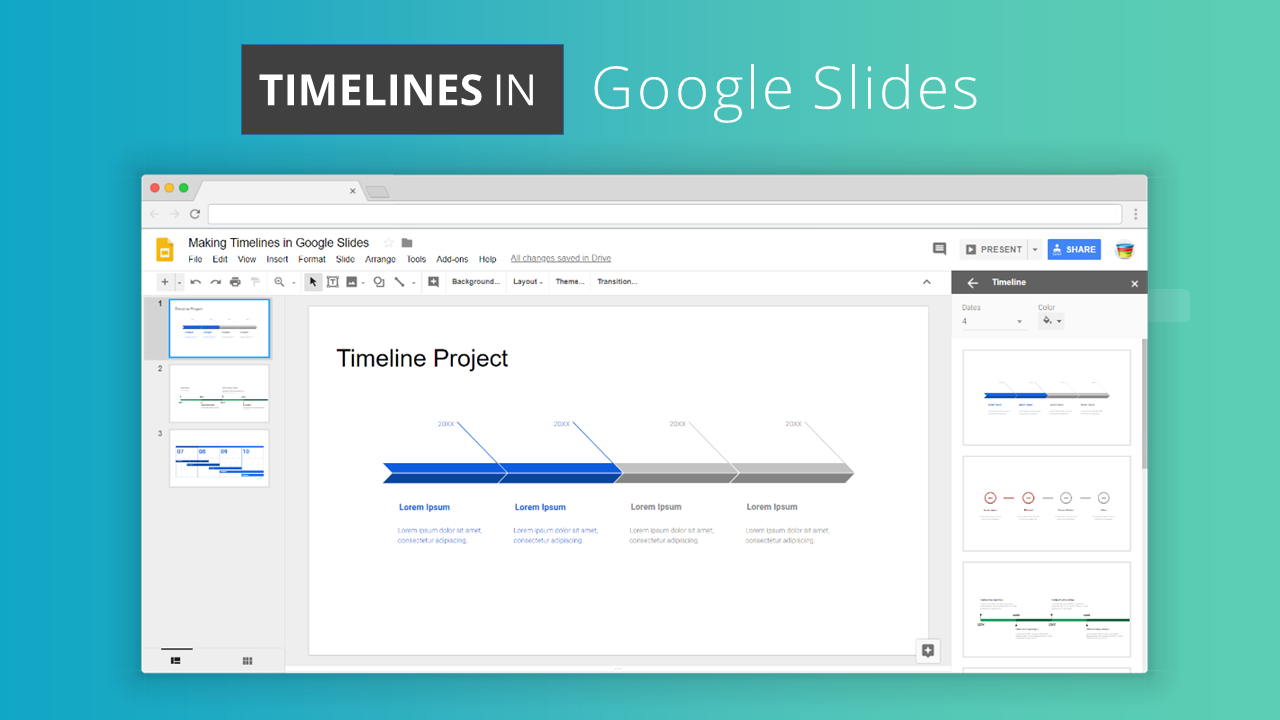
- Step 1. Insert a timeline diagram: You can insert timeline diagrams in Google Slides via Insert -> Diagrams. There are a number of diagram types listed in this section, make sure you pick Timeline diagrams from the right pane.
- Step 2. Pick a timeline diagram template: You can choose from the various timeline diagrams given in this section. Pick the one that you think might be best suited for your timeline requirements.
- Step 3. Customize timeline diagram: Once you have picked a timeline diagram, you can customize it. You can right-click on the diagram to add animations or choose Format Options to edit the various parameters of the diagram.
The Format Options menu takes you to a pane where you can edit the size, position, shadow and reflection of the diagram, as well as to rotate it.
For more information, check our tutorial on how to make a timeline on Google Slides .
An infographic is a visual image used to represent information or data. A well-designed infographic can help to simplify a complicated data structure or message into a captivating experience. Used correctly, timeline infographics can be one of the most effective strategies in digital marketing to convey a message to an audience. Infographic timelines can also be used in social media or other mediums. An effective infographic should be visually engaging and be prepared to target a specific audience.
As many other visual elements used in infographics, timelines are part of infographic design. They can help to portray history, achievements or describe how a business have evolved over the years. There are many creative timeline infographic designs and layouts. Here is just an example of a simple but creative infographic design:

This great timeline created by Anna Vital (Adioma Founder and Information Designer) is a clear example of timeline design that helps to describe how Yahoo started. It’s simple, clear and descriptive.
A timeline template for PowerPoint or Google Slides can help to save a lot of valuable hours. Here is a list of some of the timeline templates for PowerPoint and Google Slides that you can find in our catalog. All timelines are 100% editable and ready to be used in your presentations.
1. Circular Timeline Infographic Template for PowerPoint
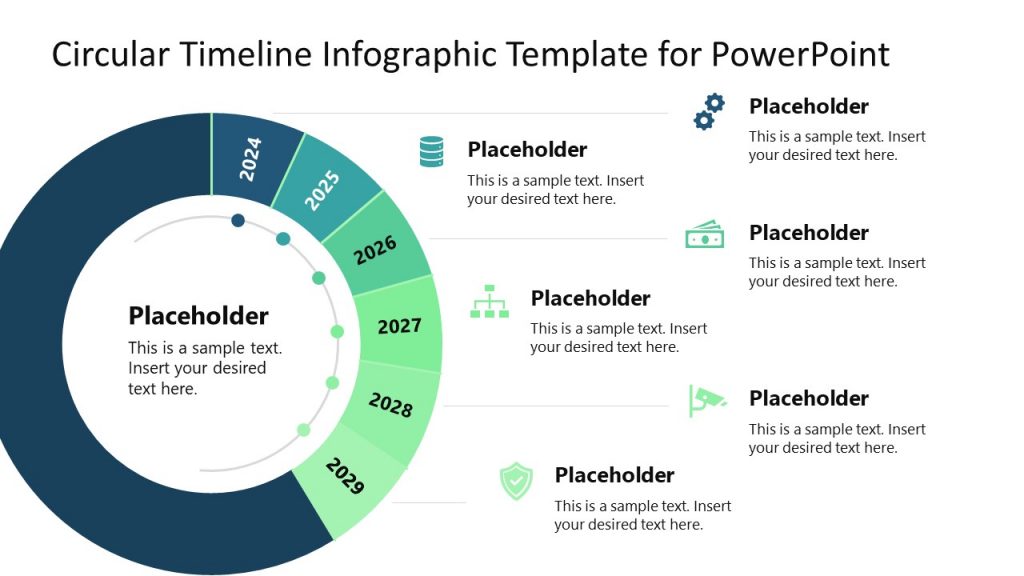
The Circular Timeline Infographic Template for PowerPoint is an interactive way to create a circular timeline infographic design. It seeks to represent different important milestones through a circular design, accompanied by graphic assets and icons that will allow you to communicate in a better way to your audience.
Use This Template
2. Segmented Plan Timeline Template Design for PowerPoint
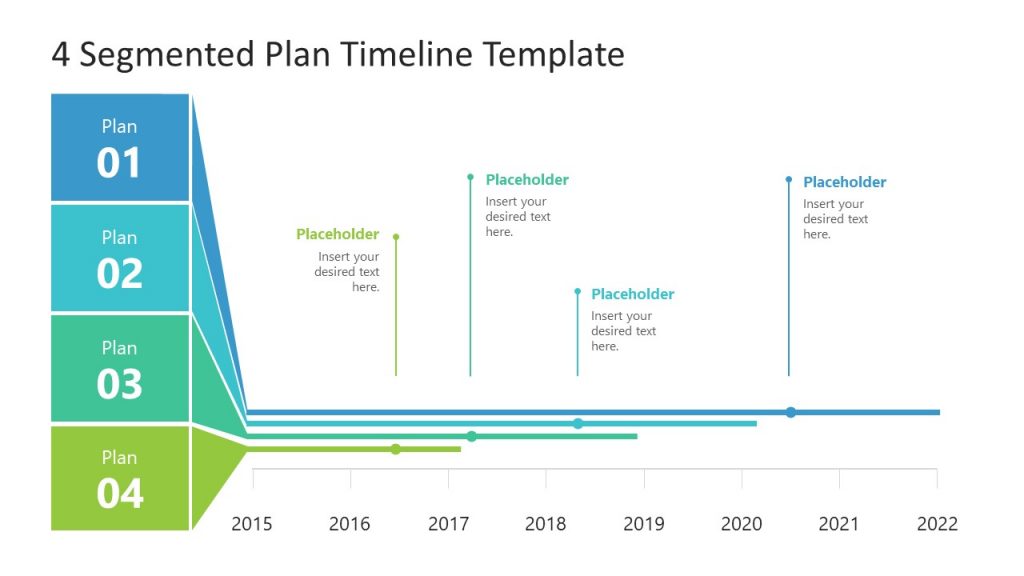
The Segmented Plan Timeline Template Design for PowerPoint is a presentation template widely used for planning and launching a new product to the market. Thanks to its graphic resources, it is straightforward to understand. In this slide, you will be able to show each of the plans of expectation, launch, and maintenance of the product, and at the same time, you can communicate to your audience how long will be the duration of each stage.
3. Curved Year Timeline PowerPoint Template
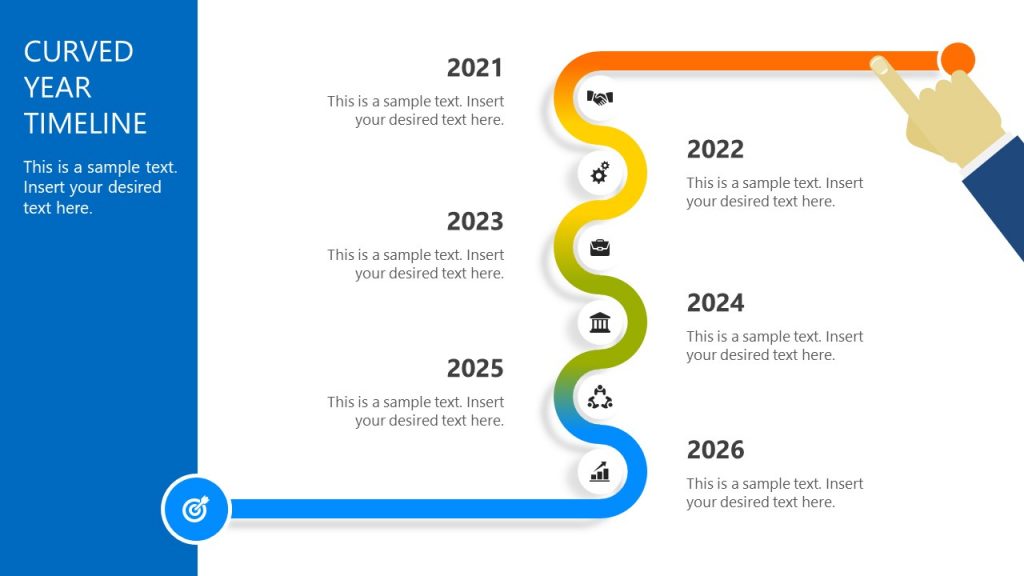
The Curved Year Timeline PowerPoint Template is a one-pager that helps toward planning and setting goals for the following years simply and concisely. This curved year timeline design helps managers, executives and project planners to communicate where you are today and where you want to be in 5 years.
4. Mountain Timeline Concept Template for PowerPoint

The Mountain Timeline Concept Template for PowerPoint is a presentation that seeks to represent the path of growth in a company or project. It includes 6 slides that will allow you to explain and add information in each of the stages in this roadmap. This PowerPoint timleine template is widely used to communicate the desired roadmap for the next 4 or 5 years.
5. One Pager Vertical Timeline Slide Template
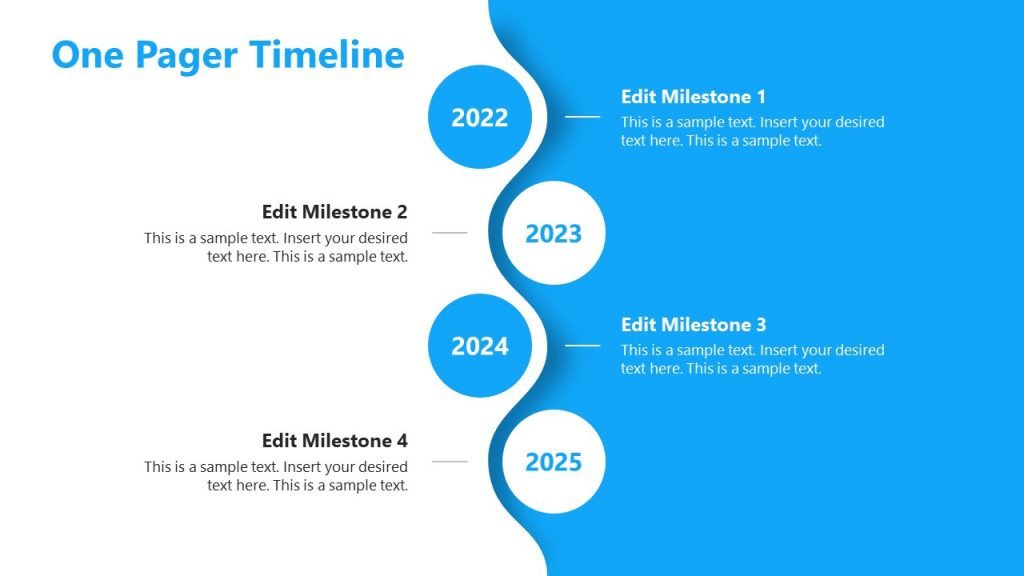
The One Pager Vertical Timeline Slide Template is a clear and concise way to represent a Timeline. Thanks to its minimalist design, it is possible to add relevant information for each of the following stages. This presentation is useful for the education field since it allows to represent events and their respective descriptions to generate a better understanding.
6. Multi-Stage Timeline PowerPoint Template
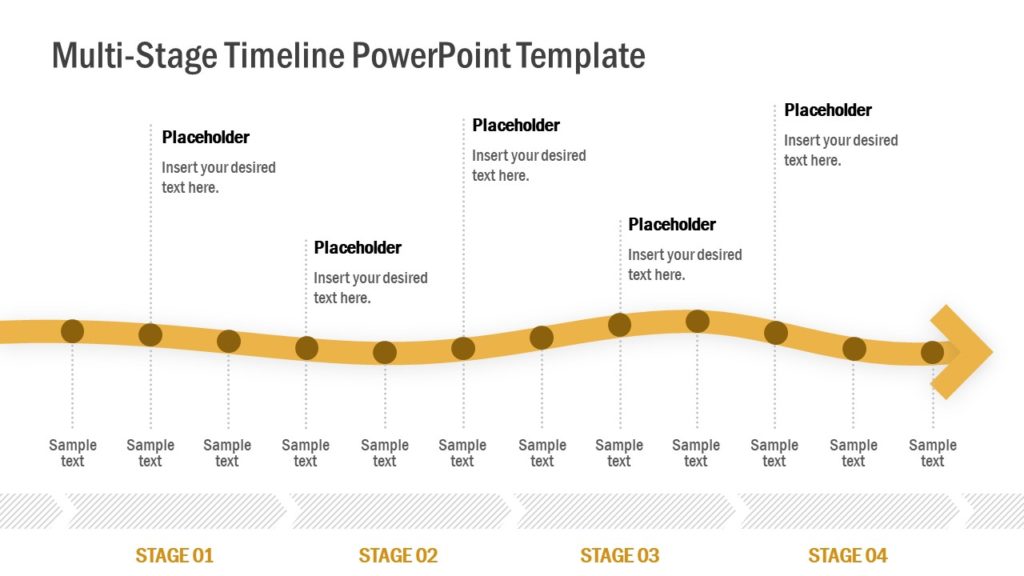
The Multi-Stage Timeline PowerPoint Template is another One Pager that seeks to represent a timeline accompanied by different Stages. Thanks to its attractive design and its two versions, white and blue, you will be able to present a project roadmap accompanied by different relevant stages and explanatory comments.
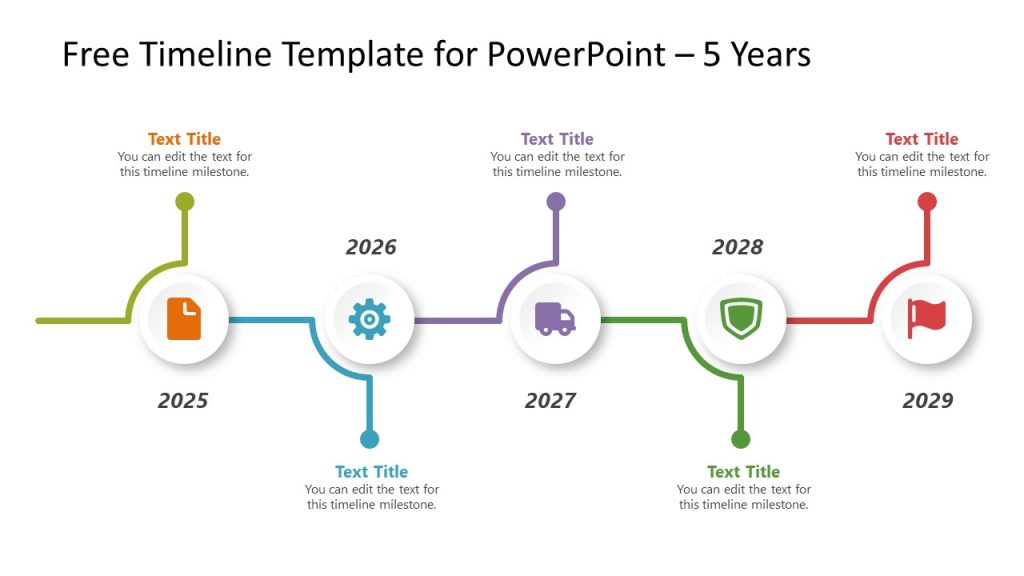
7. Free Timeline Template for PowerPoint
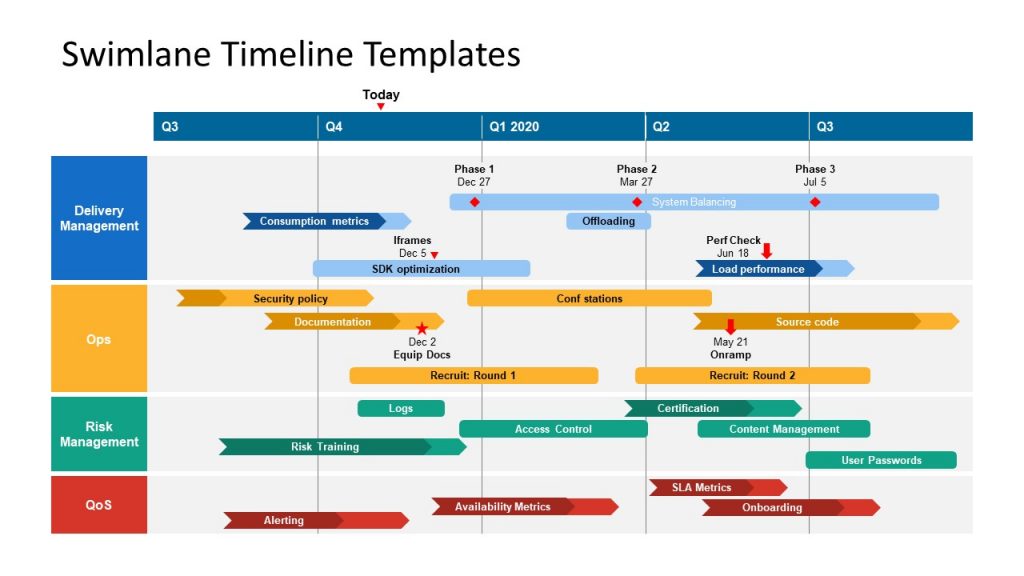
8. Swimlane Timeline Templates
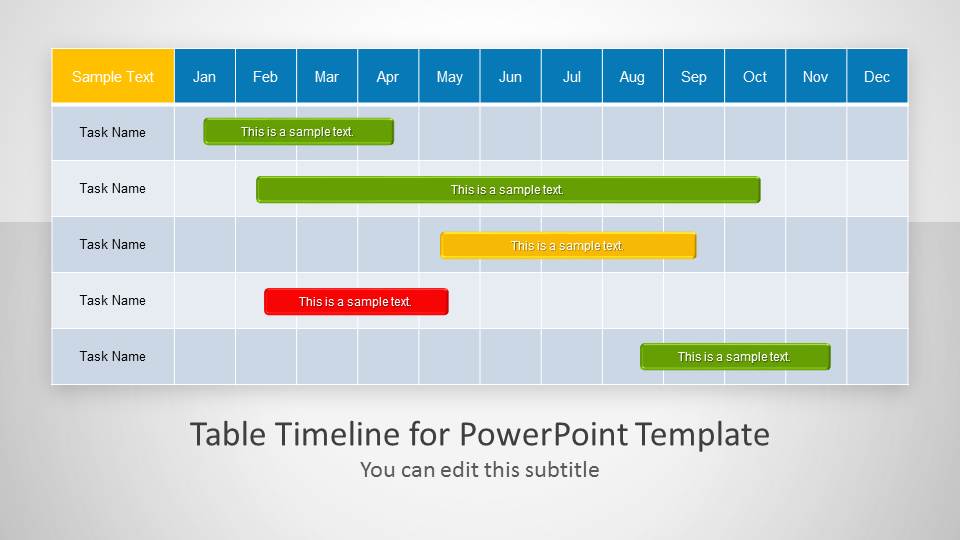
9. Table Timeline Template for PowerPoint
10. Curved Roadmap with Poles Milestones PowerPoint Timeline

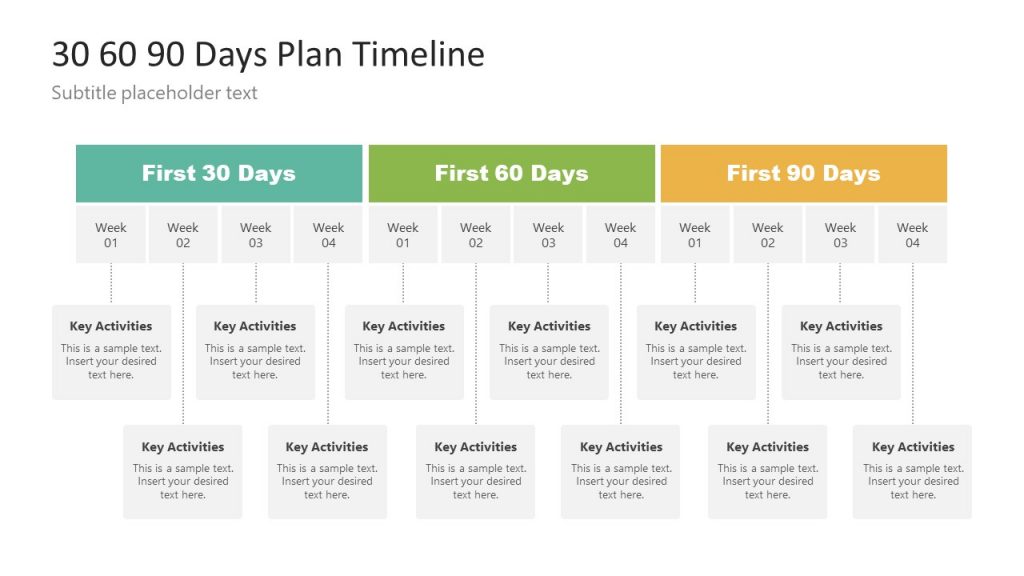
11. 30 60 90 Days Plan Timeline Template
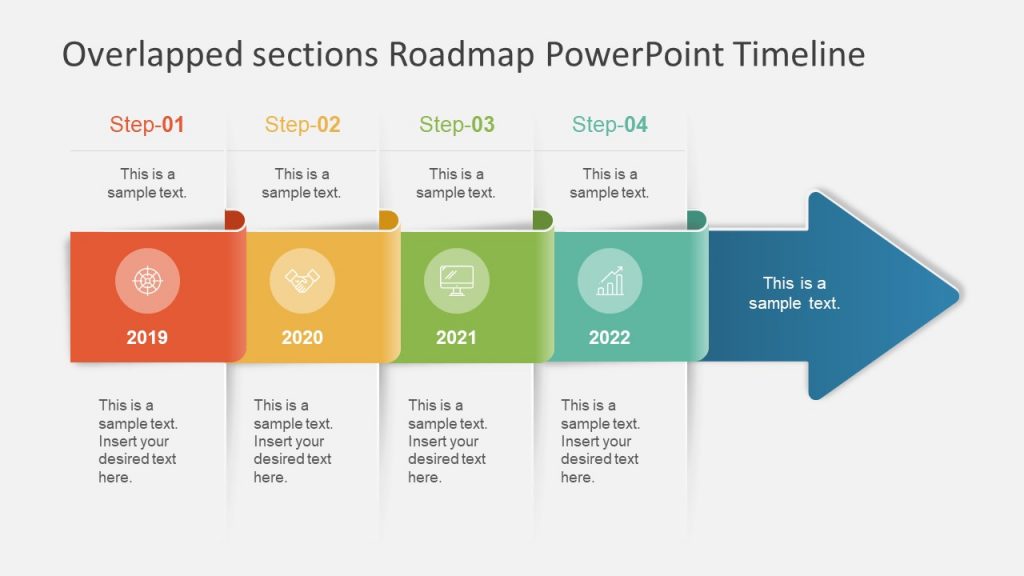
12. 4-Column Overlapped Sections Roadmap PowerPoint Timeline
There are a number of methods for generating timelines using PowerPoint, Google Slides, Web applications and a range of other tools. However, you should opt for the method that seems most suitable. For example, you might like a web application that can make a good timeline, however, if the venue at which you are to present the timeline has no stable internet connection, you might run into trouble. Similarly, you might want to animate your shapes in a PowerPoint timeline, however, it must be duly noted that this might make your slides heavy and if you are using legacy hardware, your presentation might lag. It is always a good idea to play your timeline before the presentation day and make sure everything is in place.
There are a number of flexible presentation templates that can make your life easier. These can be freely used with multiple platforms such as PowerPoint and Google Slides, providing you with both online and offline functionality to offer you more flexibility as a presenter. You can check out some of these templates from the list given below.

Like this article? Please share
Chronological, Deadline, Evolution, Future, History, Infographic, Life, Project Planning, Schedule, Timeline, Timescale, Timetable Filed under PowerPoint Tutorials
Related Articles

Filed under Google Slides Tutorials • May 21st, 2024
How to Make a Timeline on Google Slides
Follow our step-by-step instructions to make a timeline on Google Slides, either with templates or starting from scratch. Check it out!

Filed under Business • April 24th, 2024
How to Create and Present a Project Timeline
Building a project timeline is an essential aspect of project management. Stay tuned to our detailed guide with examples and templates.

Filed under PowerPoint Tutorials • November 8th, 2023
How To Present an Action Plan
An Action Plan is a sequence of steps that must be performed for a strategy to succeed. Learn how to present your Action plan to an Executive Audience.
Leave a Reply
Home » Microsoft Powerpoint » How to Create a Timeline in PowerPoint
How to Create a Timeline in PowerPoint
With Microsoft PowerPoint, you can create a basic timeline. You can then manually adjust and restyle it to fit your needs. The result will be a simple graphic fit for presentations.
3 ways to create Timeline in PowerPoint
- Using a pre-designed timeline template from Microsoft
- Creating a timeline using SmartArt Graphic
- Using basic shapes
We will show you all the above in simple, step-wise instructions.
Method #1: Create a Timeline using a Template
Step #1: open powerpoint file menu.
Open PowerPoint.
Click on the File tab in the top menu bar to changeover to the File menu.

Step #2: Select a Timeline Template
In the left pane, click on the New tab.

In the right pane, type timeline inside the search bar.
Click on the search icon on the right.
PowerPoint will display an array of timelines.
Click on the one most suitable to your application.

Click on the Create button in the next screen.

The chosen timeline will appear in the presentation.

Step #3: Customize the Timeline
Click on and select the text you want to modify.
Change the text appropriately.
Change the other texts according to your requirement.
Method #2: Create a Timeline using SmartArt Graphic
Step #1: open powerpoint.
1. Open a new or an existing presentation in PowerPoint.
2. Navigate to the slide where you want the timeline to appear.
3. Click on and delete any text boxes appearing in the slide.
Step #2: Insert a SmartArt Gaphic
1. Click on the Insert tab in the top menu bar to change the ribbon.

2. In the section Illustrations , click on the SmartArt icon.
3. A Choose a SmartArt Graphic dialog box will open.
4. Click on the Process tab in the left pane.
5. In the central pane, click on the Basic Timeline icon.
Note: You can select any other graphic to suit your specific timeline.
The right pane will show details of the Basic Timeline.
Click on the OK button at the bottom.

The chosen graphic appears in the slide.

Click on one of the [Text] .
Click on the boundary.

Copy it with CTRL+C.
Paste a copy with CTRL+V.
Repeat the copy-paste until you have as many circles and [Text] as you want.
Step #4: Fill in the Timeline
Click on the left arrow on the left of the graphic.

A text box, Type your text here , appears on the left.
Replace the [Text] with appropriate text.

Replace all [Text] appropriately.
Method #3: Create a Timeline using Basic Shapes
Open a new or an existing presentation in PowerPoint.
Navigate to the slide where you want the timeline to appear.
Click on and delete any text boxes appearing in the slide.
Step #2: Insert a Basic Shape
Click on the Insert tab in the top menu bar to change the ribbon.

In the section Illustrations , click on the Shapes icon.

A drop-down menu will open.
Click on the Arrow: Striped Right under Block Arrows .
Note: You can select any other shape to suit your specific timeline.
The cursor will change to a cross.
Position the cross suitably in the slide.
Click and hold the mouse button.
Drag the cursor to a diagonally opposite corner to create the shape.

Use the handles on the shape to resize and position it.
Step #3: Add Text Boxes

In the section Text , click on the Text Box icon.
Drag the cursor to a diagonally opposite corner to create the text box.

Right-click on the boundary of the text box.
In the menu that opens, click on the Outline icon.
From the color palette, choose a suitable color.

Click on the text box.
Use CTRL+C to make a copy.
Use CTRL+V to paste the copy of the text box.
Use CTRL+V to paste as many text boxes as necessary.
Use the handles to position the text boxes appropriately.

Right-click on the first text box.
In the menu that opens, click on Edit Text .

Type in the required text.
Resize the text as appropriate.
Repeat for all the shapes.

We have shown you three methods of creating a timeline in PowerPoint. Use the one you find most suitable.
Leave a Comment Cancel reply
Save my name, email, and website in this browser for the next time I comment.
How to Make a Timeline in PowerPoint
If you are showing information in chronological information, you might need to know how to make a timeline in PowerPoint to communicate most effectively.
A timeline is primarily used to show information that follows a chronology for a list of events. These milestones can be visualized better in a timeline format, and chronologies can be forward or reversed.
There are a couple of ways to accomplish this. We’ll walk through the uses for PowerPoint timelines, the types of timelines you might use, and how to make them. Let’s get started!
Note: All of the timeline examples here are from Envato Elements and are available to download and use.
2 Million+ PowerPoint Templates, Themes, Graphics + More
Download thousands of PowerPoint templates, and many other design elements, with a monthly Envato Elements membership. It starts at $16 per month, and gives you unlimited access to a growing library of over 2,000,000 presentation templates, fonts, photos, graphics, and more.

Ciri Template

Business PPT Templates
Corporate & pro.

Maximus Template

Mystify Presentation
Explore PowerPoint Templates
Uses for a PowerPoint Timeline

PowerPoint is a great tool for showing timelines because they are an excellent addition to many presentations. PowerPoint is also a commonly used application and allows for the creation of this style of infographic without a lot of other graphic design knowledge.
Timelines are commonly used in business presentations, to show event information, and to highlight milestones in project management.
PowerPoint timelines are also practical for showing notable events or schedules, visualizing business or project plans, explaining the history of a company or project, or almost anything else that is a time-based collection of data and information.
The format and visual style of a timeline can help present information more clearly and concisely. PowerPoint makes it easy to create timelines of any size – from just a couple of milestones to hundreds – with built-in tools or templates for a more custom timeline design.
Types of Timelines

When you are learning how to make a timeline in PowerPoint, it’s important to think about the different types of graphics available.
For the most part, timelines break down into four categories:
- Horizontal timeline: Information moves chronologically from left to right
- Vertical timeline: Information moves chronologically from top to bottom
- Roadmap timeline: Information flows on a format that looks like a road with larger to smaller elements to show information; this is often used for milestone-based timelines
- Event timeline: Information is broken into a series of events, sometimes with horizontal and vertical elements to show steps or milestones

When you are figuring out how to make a timeline in PowerPoint, you have two options:
- Use timeline tools built right into PowerPoint
- Find a timeline template to start with and customize
For a very basic timeline that you create inside PowerPoint , you can use SmartArt to create a basic timeline. You’ll find it by clicking on the Insert menu, then SmartArt, Process category, and then Basic Timeline.
There are several options for adding sequential data. While you can customize everything, this can be a little cumbersome if you aren’t very comfortable with PowerPoint tools.
Start with a Template

Getting started with a template can make building an org chart a lot easier. A template will give you a visual idea of the type of chart you need, how to arrange elements, and what the design might look like.
Templates allow you to adjust colors, fonts, styles, and branding to suit your organizational needs while providing a ready-made design to jumpstart the project. Many PowerPoint templates, such as the ones featured here, many include multiple design options in the same downloadable file to help you create different versions of your org chart if you need them.
Often these different design styles are made to account for small versus large organizations or elements such as shape, size, or overall look and feel of the chart. They can also show charts of different types because not every organization wants to start with a typical flow chart style.
Choose a Timeline Style for Your Brand and Information

Once you pick out a template, you can match everything in it to your brand and style. The first step is probably to think about the information you are putting on the timeline and the type of graphic representation that might work best.
Then you can start to rework these timeline elements to match your color and font palettes. Reworking the template to your brand helps you create a timeline that will feel like it belongs to your company and will even encourage you to use it more.
Most PowerPoint templates come with a readme file that will help you understand any intricacies of the design as you customize it. But generally, you can do all of this on the master slides.
Fill in Your Information

Once you have the design set to your style, it is time to pick the slide variation you plan to use for your timeline. The option you choose probably depends on the amount of content you have to work with and the number of stops on the timeline. (Feel free to delete the others.) Then start filling in your information.
It can be helpful to construct the timeline on paper before you start working in PowerPoint to ensure you have all the elements you need.
Check Your Work

The final step is to edit everything for errors and check for mistakes. It’s a good idea to have someone else look at the timeline for errors in chronology, spelling, and even missing items. (It is challenging to proof your own work.)
Once all the proofing is finished, you can prep the PowerPoint timeline for use digitally or in printing. Add this slide to other presentation decks or export the slide as an image file that you can use in other locations.
The availability of export options from PowerPoint is a solid reason to use this tool when creating a timeline.
Once you learn how to make a timeline in PowerPoint, you’ll be able to level up your presentations with a visually appealing and informational graphic. Whether you create your own or start with a template, timelines can be a great addition to presentations, websites, and business documentation.
How to Create a Timeline Using PowerPoint

Welcome to our comprehensive guide on how to create a timeline using PowerPoint. Timelines are powerful visual tools that help convey information in a chronological and organized manner.
They are appealing because people find them easier to understand than complex text. Take advantage of this! Show them complex processes as a series of simpler steps on a timeline, using images and PowerPoint. Make the complex simple! This is exactly what your audience wants.
In this guide, we will walk you through the step-by-step process of creating a timeline in PowerPoint, from preparing the data to customizing the design. Get ready to captivate your audience with an engaging and informative timeline presentation!
Table of Contents
What is a Timeline?
Why use a timeline in a presentation, what are the best timelines to use in a presentation slide, what do i need to know to create a timeline using powerpoint, how to start creating a timeline, prepare the data to create a timeline in powerpoint, select a timeline layout for your powerpoint slide, let’s move on to building a timeline, faqs about using a timeline in presentation.

A timeline is a way of visually representing events or tasks that occur in chronological order. It is often used to organize and visualize information that includes dates, time intervals, markers, or images.
Timeline is a versatile presentation tool that helps the audience better understand the chronology and importance of events. It can serve as a visual aid for highlighting events both in the past, such as a company’s history, and in the future, such as stages of a prospective project.
There are several types of timeline layouts – horizontal or vertical – that can be used in a presentation slide. The choice depends on the theme and objectives of the specific slide. Gantt chart is also a timeline that is used to display the duration of project stages. Any of them can be the best. Most likely, you will be able to choose the best layout for the slide after structuring the information for it and determining the number of milestones.
To create a timeline in Powerpoint, you will need to know how to create shapes, insert images, and use colors to display data. While Powerpoint provides a set of functions for creating timelines, knowing the basic principles of design and composition will help make your timeline more readable and understandable. Additionally, it is useful to know how to evenly arrange timeline elements on the slide. To do this, you will need skills in aligning horizontally and vertically, resizing, and positioning elements using Powerpoint.
Start by structuring the information based on which you will create the timeline.
- Understand the Purpose of Your Timeline To create an effective timeline in PowerPoint, it’s important to first understand the purpose behind it. Consider why you need a timeline and what information you want to convey to your audience. Are you showcasing a project’s milestones, historical events, or a chronological sequence? Clearly defining the purpose will guide you in structuring and designing your timeline effectively.
- Determine the Timeline’s Start and End Points Identify the specific start and end points of your timeline. This could be a range of dates, a series of events, or any other relevant time frame. Knowing the start and end points will help you establish the timeline’s length and scale. It’s crucial to accurately represent the time span to provide a clear visual representation for your audience.
- Choose a Suitable Horizontal Timeline Layout PowerPoint offers various built-in timeline templates and layouts to choose from. Select a timeline layout that aligns with your content and complements the overall design of your presentation. Consider factors such as the number of events, space availability, and the level of detail you wish to include. Experiment with different layouts to find the one that best fits your needs.
- Remove everything unnecessary Shorten the descriptions to the necessary minimum. The words you leave on the slide should imprint in the minds and memories of your audience! All other words you will say yourself.
- Find or create graphic images that will accompany your presentation.
Now that all the introductory words have been said, let’s start to create a timeline using Powerpoint.
Firstly, since we have determined that a timeline is a chronological sequence of events, the milestones on your slide should contain brief textual information about these events:
- a title or event name,
- a timestamp or time of occurrence,
- and perhaps a brief description of the event. If a description is needed, it should contain only a few of the most important words. All other words should be spoken by the presenter, that is, you.
In addition to textual information, you will need images or icons for your milestones to make them clear and memorable. If you don’t already have these, you can find them on PoweredTemplate , Microsoft Store , or Pixabay .
Secondly, you need to determine the number of events that will make up your timeline. The best way to do this is to make a list of them.
In one of our previous posts, we wrote about How to Create a Comprehensive Project Plan . We will take a list of stages from it, which make up the creation of a project plan. It will serve as the basis for creating a timeline using Powerpoint tools. So, here is a table view of a list of six headings, arbitrary dates, and a brief description of the milestones:
| Title | Date | Description |
|---|---|---|
| Outline the Business Case | February 6 | Why the project is needed |
| Meet with Key Stakeholders | February 7 | Discuss the project’s goals |
| Define Project Scope | February 8 | Describe the work |
| Assemble a Project Team | February 9 | Find skilled professionals |
| Determine a Project Budget | February 10 | Be sure to include the costs |
| Set Project Goals & Objectives | February 13 | Ensure that the goals are clear |
These are your data. Let’s open Powerpoint and place them on a slide.

Most likely, this is not what you were expecting to see. This happened because we haven’t selected a layout for your slide yet.
In the PoweredTemplate Library, you’ll Find Dozens of the Best Eye-catching Powerpoint or Google Slides Timeline Slides

You’ll save hours of development time with easy-to-configure features and enjoy the benefits of unlimited downloads with your unlimited subscription.
When it comes to creating timelines in PowerPoint, you have the opportunity to unleash your creativity and choose from different design options. In this section, we’ll explore the characteristics and applications of three timeline design layouts: horizontal, vertical, and free-flowing.

When deciding on a timeline design, consider the nature of your content, the story you want to tell, and the overall visual impact you wish to achieve. Each design offers its own strengths and applications, so choose the one that best aligns with your presentation objectives.
When working with a screen that has a 16:9 aspect ratio,
- horizontal timelines with 6-8 events can fit perfectly within the available space. But this layout provides limited space for accompanying text. In a horizontal timeline, the text can be positioned either above or below the timeline axis.
- vertical timelines with 3-4 events are well-suited and can be placed perfectly within the available space. The vertical orientation allows for a clear and concise representation of the timeline’s events, and the space to the right of the axis provides an excellent opportunity to include additional details and information.
- the free-flowing layout offers a visually engaging effect by snaking around the page, making it an excellent choice for timelines with a high number of events. This layout allows for the inclusion of more events compared to a horizontal layout, providing a comprehensive overview of the timeline’s progression. However, it’s important to note that executing a free-flowing layout can be more challenging compared to other timeline layouts.
Now that we have explored the characteristics of horizontal, vertical, and free-flowing timeline designs, let’s move on to the next section. There, using a horizontal layout, we will depict the timeline we started talking about above.
There are two ways to create a timeline using PowerPoint: the easy way and the slightly more complex way. The first, which is simpler, involves using the standard PowerPoint SmartArt. But since we’re not looking for easy standard solutions, let’s go with the second method. We will create the timeline ourselves from scratch.
So, we will draw a horizontal timeline. Let’s start with an axis that will show the direction of time:

- Hold Shift to lock the line horizontally and drag your arrow across the slide from right to left.

Now is the time to start adding events. We have prepared the data in advance and now we need a calculator and a little patience to evenly place events on the timeline.
First, measure the timeline. Select a row and click the Format Shape tab. The Size&Properties section will list the width – our line is 30 cm wide. This means that each event can take up 5 cm in the timeline, along with a small gap to the right.

Launch the PowerPoint software on your computer and create a new presentation or open an existing one. Then click on the “New Slide” button in the PowerPoint toolbar to add a new slide to your presentation.
Now we can choose the shape of milestones and place them on the timeline. Let’s go with a rectangle, although it’s no better than any other shape. Then, go back to the “Format Shape” tab again to input the width of the rectangle, let it be 4.5 cm. The remaining 0.5 cm will serve as the gap between neighboring rectangles.
To continue follow the next steps:
- Drag this shape over your slide so the left edge butts up against the start of your timeline
- Copy & Paste the rectangle so you have a total of six.
- Place one of these so the right edge butts up against the end of the timeline.
- Select all six and click Align Objects Middle, then Distribute Horizontally .

All 6 event containers should now be perfectly aligned and distributed on your slide.
Type the titles you prepared into each box, then change the shape fill to No Fill in the Format Shape tab. In the Size & Properties section, you can also tick Resize Shape to Fit Text, trimming down the boxes to size.

Next, select all your boxes, hold Ctrl+Shift, and drag them vertically down to duplicate all 6. Repeat this, but now drag the boxes vertically up. Write descriptions of your milestones in the lower ones, and place time markers in the upper ones. Don’t forget to reduce the font size a bit so the titles pop. As a result, you should get something like this.

Good plan, but something is missing, right? Plan events don’t look tied to the timeline, that’s the point! Let’s fix this and add some visual anchors to the timeline to make the slide look more attractive. Six small circles will be just right – one circle per timeline event!
- Insert a new Circle (Insert > Shapes > Circle) and drag to resize (holding Shift while dragging to draw a perfectly round circle).
- Select the circle, and holding Ctrl, drag the shape anywhere on the slide to make a six duplicate.
- Repeat until you have one circle per timeline event.
- Align one circle on the timeline above your first event and another at the end one.
- Select all of the circles and use the Distribute Horizontally tool, followed by Align Objects Middle .
- Go back into the Format Shape tab.
- Match the Fill Colour to the slide background and add an outline that matches the timeline to look the anchors and the timeline seamless.

Well, there you go, that’s much better!
Next is really simple! We just repeated the sequence we discussed here twice: insert shape, align horizontally, and center. First, we did it with the teardrop shape, and then with the icons. As a result, we got this:

In conclusion, creating a timeline using PowerPoint can be a powerful way to visually represent chronological information and engage your audience. By following the steps outlined in this guide, you can effectively build a timeline that showcases events, milestones, or historical sequences in a clear and organized manner.
Remember, PowerPoint offers a range of tools and features to help you create visually captivating timelines. Experiment with different layouts, colors, fonts, and shapes to achieve the desired effect to suit your presentation needs and audience preferences.
So go ahead, start to create your timeline using PowerPoint, and unlock the potential to captivate and inform your audience with a visually stunning and engaging presentation.
Presentory for Windows
Presentory for mac, presentory online.
Rebrand your approach to conveying ideas.
Differentiate your classroom and engage everyone with the power of AI.
Knowledge Sharing
Create inspiring, fun, and meaningful hybrid learning experiences
Create with AI
- AI Tools Tips
Presentation Ideas
- Presentation Topics
- Presentation Elements
- Presentation Software
- PowerPoint Tips
Presentation Templates
- Template Sites
- Template Themes
- Design Ideas
Use Presentory Better
- Creator Hub
More Details
- Basic Knowledge
- Creative Skills
- Inspirational Ideas
Find More Answers
- LOG IN SIGN UP FOR FREE
- Elaborating The Unique Ways of How to Create a Timeline in PowerPoint
- How to Use Keynote Remote to Control Presentation from iPhone, iPad, or Apple Watch
- 10 Best Sites for Keynote Presentation Templates
- Detailed Explanation of Presentation Tips and Speaking Techniques
- A Comprehensive Guide to Convert PPT to Video with Sound
- 10 Useful PowerPoint Animation Tips in 2023
- Learn and Explore 5 Best Comparison Slides Templates
- A Comprehensive Guide to Creating Mind Maps in PowerPoint
- A Complete Guide to SWOT Analysis PPT For Proper Professional Growth
- Get The Finest Idea of Designing Perfect Roadmap Templates in No Time!
- How to Create Venn Diagram in PowerPoint, Google Docs, and Google Slides
- Compelling Presentations: The Essential 5 PPT Elements for Engagement
- Unveiling the Key Elements of a Dynamic and Impactful Presentation
- Mastering Presentation Excellence With Efficient Elements: A How-To Guide
- Everything You Need to Know About the Table of Contents of PowerPoint
- How to Create PowerPoint Presentations with ChatGPT [2023 Update]
- How is AI Revolutionizing Presentations? (Tips & Tool)
- Top 14 AI Presentation Makers in August 2023 [Free & Paid]
- How To Add Animations and Transitions In Google Slides
- How to Use Slides Changing Remote to Control Presentation from Mobile Devices
- Over 100 Inspiring Google Slides Themes and Ideas for Every Occasion
- What is Google Slides? A Comprehensive Guide to Practical Usage
- How to easily import themes into Google Slides
- 10 free and aesthetic Google Slides templates sites
- How to Convert Google Slides to Video? [5 Methods]
- A Comprehensive Guide to Adding Video to Google Slides [Easy Navigation]
- How to Add Slide Transitions in PowerPoint?
- How to Use PowerPoint Morph Transition in 2023
- How to Control Your PowerPoint by Using an Apple Watch?
- How to Enhance Your PowerPoint Presentations with 3D Models
- An In-Depth Guide to Using PowerPoint
- Mastering Slide Transitions in Flutter: A Comprehensive Guide
- Tutorial | How to user Slide Master in PowerPoint
- How to Record Your Screen in PowerPoint? [3 Ways]
- How to Convert PowerPoint to Video Conversion on Windows and macOS?
- How to Add Video to PowerPoint from YouTube and Local Path
- 8 Ways to Solve “PPT Cannot Play Media”
- Top Guide to Play Video Automatically in PowerPoint
Presentations are a form of communication that can educate or persuade the audience. Timeline PowerPoint presentations are a valuable source for business proposals and project updates. They make your important events clear and memorable to the viewers. With timelines in presentations, you can represent complex milestones in a sequenced manner.
A well-designed timeline proves professionalism and draws the audience's attention. In this article, you will learn the purpose of inserting timelines in slides and their types. Moreover, we will show you detailed steps in creating a timeline in PowerPoint . You will know a few factors that make them effective, along with the top 3 timeline PPT templates.
In this article
- What is the Purpose of Using the PowerPoint Timeline Template?
- What are the Types of Timeline Styles in PowerPoint?
- Creating a Timeline Slide in PowerPoint
- What Factors Should Be Present in a Timeline Slide to Make It Effective
- Top 3 PowerPoint Timeline Templates to Use in 2023
Bonus Tip. The Best AI-Powered Presentation Maker to Enhance the Timeline Presentation
Part 1. what is the purpose of using the powerpoint timeline template.
PowerPoint timelines can visually represent deadlines, milestones, and historical events. They can show the progression of events and time in an engaging manner. Using timelines can improve the understanding and give proper context to the event. Following are the basic purposes of using timelines PowerPoint for effective presentations:
- Timelines enhance storytelling by providing a structural framework for information. This way, you can engage your participants towards the details being presented. Also, it ensures that the listeners keep important points in their minds for longer.
- Presenters can display an accurate compare and contrast of two opinions with timelines. In this way, they can show a relationship between events and differences in periods. By making such timelines, your audience can grasp information instantly.
- Timelines make predictions and resource allocation easier for project managers. They can use timelines for analyzing past trends and deducing future needs of products. Also, timelines provide a structure to show where and when to divide resources.
- Another purpose of the timeline is to show change and development over time. It makes the audience understand how trends change and leave worthy impacts. Also, they provide a base for the documentation of historical events and decisions.
- Text-heavy slides can distract and confuse viewers in understanding the sequence of data. Using timelines can make complex information simpler and visually clear. It aims to enhance the overall quality of the presentation and make decision-making easier.
Part 2. What are the Types of Timeline Styles in PowerPoint?
Timelines in PowerPoint can boost the significance of the information in presentations. A clear and concise timeline proves beneficial for project management and business professionals. There are many forms of timelines PowerPoint depending on the purpose of planning or educating. Following this, we have listed down a few common types of timeline styles in PowerPoint:
1. Linear Timelines
This form represents a simple horizontal form of timelines that contains left-to-right chronological order of data. In such timelines, you can display milestones and processes in a single line. They are suitable for showing chronological schedules of projects and historical events.
Moreover, stepped-linear timelines show steps and blocks with a horizontal line. Using such timelines can provide clear visual separation between any two concepts.

2. Vertical Timelines
It’s another common style of linear timeline slides that moves from the top to bottom direction. They represent time and progression with downward arrows and connecting lines. In a few cultures, the downward direction of writing is a part of natural readings.
Thus, vertical timelines can display journeys and growth over time in various contexts. They are useful when you need a limited horizontal space and the most vertical space.

3. Interactive Timelines
It is best to click and move towards upcoming milestones to keep your audience intact with timelines. This timeline style lets presenters click on one event and enter the detailed slide. It's a dynamic way of presenting sequential data where you can add animations and illusions.
Interactive timeline PPTs often provide navigations such as next and previous. This way, users can explore better timelines and respond to your actions.

4. Historical Timelines
Historical timelines can display past occasions and developments in a sequenced manner. It provides a visual representation of historical data and makes it less boring. Typically, such timelines contain horizontal figures with dates or years.
Timelines for historical lessons, research, and presentation might offer cover icons and images. In this way, your audience can better grasp the concepts in a storytelling manner.

5. Roadmaps
A roadmap is a type of timeline PowerPoint that can convey goals, strategies, and directions. The purpose of using such timelines is to visualize the path of the projects and plan their journeys. Moreover, they can assist in showing long-term planning and development of important tasks.
In this regard, roadmap timelines consist of roads in their graphical representations. They contain clear color coding to show differences in paths and priority levels.

6. Process Timelines
This style of timelines can maintain workflow by showing steps in a flowchart. Such ideas depict a flow of starting and finishing when they explain how the process works. In this type, rectangles represent steps, and arrows point toward the flow.
Furthermore, the text in those shapes provides a detailed description of actions. These timelines are valuable in showing sequence, business workflows, and technical steps.

7. Cyclical Timelines
A cyclical timeline slide can show events repeating over time through circles and semi-circles. They are known for displaying annual reports, episodic incidences, and seasons. It uses annotations, color coding, and labels to emphasize points in the cycle.
These timelines can clearly show reoccurring patterns and phases with circle diagrams. For instance, you can show quarterly financial reports through a yearly cycle.

8. Nested Timelines
Nested timelines can illustrate multiple levels of complex information. This style involves larger and smaller timelines in single slides to show their connections. It proves fruitful when you need to discuss high-level reviews with detailed descriptions.
For instance, you can create a timeline PPT that shows the overall history of the company. Then, draw a secondary timeline that shows a larger context of the primary timeline. Within primary timelines, show major milestones and insert detailed data in the secondary one.

Part 3. Creating a Timeline Slide in PowerPoint
Microsoft PowerPoint provides users with adjustable timelines as per their needs. After adding a simple timeline in slides, you can edit it for accurate and updated results. Thus, read this step-by-step guide to insert and customize timelines PowerPoint .
1. Create Timeline Slide in PowerPoint
To insert the timeline in PowerPoint, you need to access SmartArt graphic tools. Considering the complexities of such tools, below are a few steps to create a timeline.
Step 1: Access your existing PowerPoint file or create a new file. Then, head to the toolbar and click the downward sign on "New Slide" to get a drop-down list. From the displayed drop-down menu, choose “Blank Slide” and tap on it.

Step 2: Now, move to the top toolbar and click the “Insert” option. Afterwards, choose the "SmartArt" tab from the "Illustration" section in the toolbar.

Step 3: After tapping "SmartArt," you will see the "Choose a SmartArt Graphic" window. Moving forward, select “Process” from the left toolbar section. Later, choose your desired SmartArt graphic and press “OK” to add the timeline to the slide.

Step 4: Next, add your data in the given text placeholders by tapping them. If the text pane is not visible, hit the small icon on the left side of the graphic. To insert shapes, head to the left side toolbar and click on the drop-down sign of “Add Shape.” From the list, you can choose “Add Shape After” or “Add Shape Before” options.

2. Customize Timeline Slide in PowerPoint
You can resize, reshape, and recolor the graphics for a captivating timeline slide . For this purpose, move forward and find detailed steps to customize timelines.
Step 1: After getting the timeline in the slide, you can modify the colors of the graphic. Next, explore the "SmartArt Design" option from the top ribbon. Later, tap on the drop-down sign of the “Change Colors” button and click on any color.

Step 2: You can also change the font colors to make your timelines unique. Simply hold and drag to select the targeted text, and you will see an extended pop-up menu. Now, click on the "Font Color" drop-down icon and choose your desired color.

Step 3: If you want to change the shape and size of the timeline, tap the “Format” tab in the top bar. Then, move towards the “Shapes” section at the top-left side. Press the "Change Shape" option and choose a new shape for your graphics. Also, you can click on the "Larger" and "Smaller" buttons to adjust the size of the shapes.

Step 4: Lastly, change the style of shapes by heading toward the "Shape Style" section. Next, press the downward arrow of the “Shape Style” section and see the extended menu. Afterward, choose your desired shape style and tap to apply it to the graphic.

Part 4. What Factors Should Be Present in a Timeline Slide to Make It Effective
Timeline slides are widely used in workflow documentation and genealogical research. Moreover, the corporate sector uses timelines for event planning and task scheduling. In such cases, use a well-designed timeline to meet the diverse professional needs. Consider using the below factors in your timelines for successful presentations.
1. Title and Timeframes
For a good timeline template PPT , you should insert a clear and descriptive title of your timeline. A title should give the participants an immediate understanding of the timeline. For example, you can use titles such as “product development timeline” and “company’s history.”
Moreover, you should provide a clear starting or ending date that the timeline covers. A timeframe is important in helping the audience to understand a chronological order.
2. Color Coding and Font Sizes
It is suggested to use the same color coding to show the connection between details. This way, you can emphasize key points or differentiate certain categories of details. For instance, presenters can use different colors to show projects, phases, and years.
Besides, you should choose a font size of 14-18 that is considered legible for all readers. Also, maintain a reasonable distance between fonts and elements for a neat PowerPoint timeline template .
3. Connectors and Captions
Establish a clear connection between elements by using lines and arrows as connectors. In this regard, you should add visual links to show dates and milestones with their descriptions. You can use the same color, thickness, and arrowheads to give a professional look to the slides.
Also, it is recommended to insert a brief caption or context of the provided milestones. You should avoid over-describing timeline slides that can confuse the participants.
4. Visual Alignments
Another effective factor is using icons and symbols to represent events. This can be understood from an example of a calendar icon showing dates and branding icons to represent your company. For an organized appearance, you should ensure the consistent alignment and spacing of texts.
Moreover, it is suggested to avoid unnecessary information to keep the timelines simple. To avoid overcrowding slides, you can maintain adequate whitespace in slides.
Part 5. Top 3 PowerPoint Timeline Templates to Use in 2023
Business strategies are incomplete without an appropriate timeline in their presentations. Also, the training materials are insufficient to guide new employees without any timeline. Considering the importance of timelines, you can use predesigned timeline templates. Thus, we have listed the top 3 timelines PowerPoint templates free for diverse users.
1. Timeline Infographics Template
This template is helpful to create a list of events, deadlines, and processes in linear order. It saves from missing an important event with clear and consistent designs. There are 35 slides available to download in PowerPoint and Google Slides format. It’s a white-themed template with multiple colors in the timeline infographic shapes.
Start customizing the slides and introduce your topic in the first slide. Afterward, there are slides offering monthly, weekly, and daily progress of projects. Different timelines contain different shapes that are colored, filled, hand-drawn, and outlined.

2. Timeline PowerPoint Template
Timelines are an essential element for organizations in planning activities and programs. This template will assist you in tracking milestones, setting targets, and allocating resources. It allows downloading in Google Slides and PowerPoint in two aspect ratios. These 13 slides are fully editable and allow users to edit text, change colors, or move elements.
In each slide, you can show yearly progression with the help of colored timeline figures. Such figures consist of rotated boxes, triangles, tabs, and circle shapes. In the ending slides, there are a variety of icons to customize slides or extend the template.

3. 30 60 90 Days Plan Timeline Template
Organizing and planning future projects are key to the success of any company. In such cases, you can use this template that offers all the relevant figures and elements. This template can assist you in managing complex data using various color codes. For instance, the 2 nd slide can show details in the green, yellow, and turquoise placeholders as per their importance.
Afterward, users can compare their milestones by using colorful timelines. Then, you can plan goals with all statuses and responsibilities by table. Moreover, a few slides offer circle and calendar timelines for diverse needs.

People tend to use predesigned templates instead of designing timelines from scratch. They save their time, effort, and resources by using timeline PowerPoint templates. Do you think that is enough for a successful presentation in a professional setting? Attractive and engaging timelines also demand visual elements and effects in the slides.
Thus, you should try using Wondershare Presentory for stunning timeline presentations. Suppose you want to show a cinematic entrance of your steps in a timeline figure. In this regard, you fail to set an order of effects applied on timeline steps. You can use animation effects from this AI presentation maker and set their order as required.

Free Download Free Download Try It Online
Key Features Of Wondershare Presentory
- Rich Resources: This AI tool offers stickers, icons, text, and slide backgrounds. Also, there are animation and transition effects that make your content breathable. Users can insert emphasis, entrance, and exit animations to their text and objects. Afterward, they can set the desired order of animation effect on a single slide.
- Built-in Templates: Use this AI software for a tech-savvy look in timeline presentations. It offers appealing predesigned themes and template designs for business or education purposes. Users can move the elements, change backgrounds, or customize the slides. Despite using templates, you can import timeline PPTs and enhance them with resources.
- AI-generated Content: Get accurate AI-generated presentation outlines within seconds. This AI tool provides detailed outlines by prompting topics and extra details. You can select your niche from information sharing to training courseware materials. After getting the content, users can review it and proceed to insert it in slides.
- Streaming and Recording: Present your timelines with the global team of your company. Using this AI software, you can live stream your presentations on various platforms. It allows streaming on Zoom, Microsoft Teams, and Google Meets. Moreover, users can record their timeline materials and share via using links. It also offers beautification effects to enhance your videos.
In summary, a timeline slide enables you to highlight important events to remember. Using such slides can convey an accurate picture of events engagingly. Timelines prove vital for business proposals and education presentations with their various styles. In this article, you have learned to create and customize PowerPoint timeline templates .
We've discussed an innovative and dynamic platform to boost your timeline presentations. So, it is suggested to use Wondershare Presentory, which is an AI presentation maker. Using it, you can import PPT, insert visuals, and live stream across popular platforms. Despite that, it offers teleprompter features for smoother and more confident timeline presentations.
You May Also Like
- Best 8 Video Presentation Makers [PC & Online]
Related articles

Create a timeline in PowerPoint
Use a SmartArt graphic to create a timeline showing target dates for an assignment or project.

Create a timeline
On the Insert tab, click SmartArt .

In the Choose a SmartArt Graphic gallery, click Process , and then double-click a timeline layout.
Tip: There are two timeline SmartArt graphics: Basic timeline and Circle Accent Timeline , but you can also use almost any process-related SmartArt graphic.

Click [Text] , and then type or paste your text in the SmartArt graphic.
Note: You can also open the Text Pane and type your text there. If you do not see the Text Pane , on the SmartArt Tools Design tab, click Text Pane .
Add more dates to your timeline
Click a shape in the timeline.

On the SmartArt Design tab, do one of the following:
To add an earlier date, click Add Shape , and then click Add Shape Before .
To add a later date, click Add Shape , and then click Add Shape After .

In the new date box, type the date that you want.
Move a date in your timeline
On the timeline, click the date you want to move.

To move a date sooner than the selected date, click Move Up .
To move a date later than the selected date, click Move Down .

Change to a different timeline layout
Click the SmartArt graphic timeline.

Note: To view only the timeline and process-related layouts, at the bottom of the layouts list, click More Layouts , and then click Process .
Pick a timeline or process-related SmartArt graphic, like the following:
To show progression in a timeline, select Accent Process .
To create a timeline with pictures or photos, click Continuous Picture List . The circular shapes are designed to contain pictures.
Change the colors of your timeline
On the SmartArt Design tab, select Change Colors .

Note: If you don't see the SmartArt Tools Design tab, make sure you’ve selected the timeline.
Click the color combination that you want.
Tip: Place your pointer over any combination to see a preview of how the colors look in your timeline.
Apply a SmartArt style
A SmartArt style applies a combination of effects, such as line style, bevel, or 3-D perspective, in one click, to give your timeline a professionally polished look.
Click the timeline.
On the SmartArt Design tab, click the style you want.

Create a timeline in Visio
Import and export timeline data between Visio and Project
Create a timeline in Project
Get Microsoft timeline templates

On the SmartArt Tools Design tab, do one of the following:

To show progression in a timeline, click Accent Process .
On the SmartArt Tools Design tab, click Change Colors .

On the SmartArt Tools Design tab, click the style you want.

Create a timeline
On the Insert tab, click Smart Art .

Pick a timeline layout from the gallery that appears, such as this Basic Timeline in the List section.

On the slide, a text editor opens next to the graphic so you can easily add words to the graphic.
In the text editor, enter the dates and descriptions, and then press Enter.

Optionally, you can make a sub-item in the bulleted list by clicking the bullet with the text you want to use for a sub-item, and on the Smart Art tab, clicking Demote .

Change the color or style of a timeline
You can change the color or style of the timeline graphic. You can also choose a different graphic layout entirely.
Select the timeline.
Select the SmartArt tab of the Ribbon, and then select either Change Colors or Styles to see a menu of available options for the timeline graphic. Click the style or color you want to select it.

You can also try changing the layout by opening the layout gallery to the left of Change Colors . Some of the options in the List and Process sections of the gallery are suitable for timelines.
Resize the timeline
You can change the size of the graphic so it fits better on your slide.
Point at one of the corner sizing handles until you see the two-headed arrow, and then click and drag to resize the timeline.

Create a SmartArt graphic

Need more help?
Want more options.
Explore subscription benefits, browse training courses, learn how to secure your device, and more.

Microsoft 365 subscription benefits

Microsoft 365 training

Microsoft security

Accessibility center
Communities help you ask and answer questions, give feedback, and hear from experts with rich knowledge.

Ask the Microsoft Community

Microsoft Tech Community

Windows Insiders
Microsoft 365 Insiders
Was this information helpful?
Thank you for your feedback.
- Make Timeline
How to make timelines with your usual office tools
Learn how to create an easy-to-follow timeline using the office software you’re most familiar with.

Using timelines to communicate key events
Timelines are a great way to visualize a series of events that happen over time, making it easy to understand and remember essential data. Professionals who need to create eye-catching timelines for important presentations can use their favorite office software, since almost all of the traditional productivity tools have functions that can produce such visuals one way or another. Alternatively, you can also use dedicated timeline makers that save time and effort by automating the process.
Since the steps to making a timeline can get quite complex, this page presents a series of detailed tutorials and resources to help you get started faster.

How to make a timeline in Microsoft PowerPoint
PowerPoint is one of the most popular tools for presenting data to clients, managers, and any other non-technical audiences. It is familiar, intuitive, and widely spread in organizations of all types, allowing anyone with the Microsoft Office Suite installed to view and edit a project report or presentation. Click the button below for a step-by-step guide on how to make a timeline in PowerPoint.

How to make a timeline in Microsoft Excel
Professionals who prefer to plan and track their projects in Excel can use the tool’s Scatter Chart function to turn their plans or schedules into a timeline. The process involves quite a few steps to make the graphic look tidy and presentable, and the result looks similar to the image above. See a detailed tutorial on how to make a timeline in Excel and learn about automating the process using a timeline generator .

How to make a timeline in Microsoft Word
Although commonly associated with writing and editing copy, Microsoft Word also provides some simple graphic tools that can help users create basic timelines and other similar visuals. This step-by-step tutorial demonstrates how to generate a timeline in Word using SmartArt Tools and provides a few customization tips to make the visual easier to follow.

How to make a timeline in Microsoft Project
Professionals who manage complex plans in Microsoft Project can use the tool’s functions to create an overview timeline that shows only the key milestones of their project. See a detailed tutorial that explains how to build the timeline and prepare it for high-level presentations.

How to make a timeline in Google Docs and Google Sheets
Professionals who need to collaborate on small to mid-sized projects can work with Google Docs and Google Sheets to create a basic timeline online. The resulting graphic may need a bit of formatting to be easy to follow, but it can be accessed and edited from any device with an internet connection. Click the button below to see the exact steps of the process.

How to make a timeline in Numbers for Mac
Apple's Numbers allows Mac users to create a basic timeline right in the spreadsheet app by tweaking a Bubble chart. See a detailed Numbers timeline tutorial that explains all the steps involved in building and customizing the graphic to show key events or milestones more clearly. The guide also includes a downloadable timeline template for Mac.

How to make a timeline in Keynote for Mac
While Keynote comes equipped with a variety of eye-catching charts and graphs, it doesn't currently have a built-in timeline feature. However, professionals who wish to illustrate a series of milestones or events in their presentations can still create a timeline in Keynote by formatting one of the pre-designed charts available. Click the button below for a step-by-step guide.

How to make a timeline in Pages for Mac
Primarily a word processor, Pages also comes with many of the graphic tools available in the other iWork applications. Therefore, Mac users who wish to include visual timelines in their documents can create them right inside Apple's word processor. This tutorial explains how to build a timeline in Pages and format it until it looks just right. It will also show you how to save time and effort with a free online timeline maker .
Frequently asked questions about making timelines
What is an example of a timeline.
A timeline is a visual representation of events aligned in chronological order. A good example of a timeline is one that is easy to follow, organized, and provides enough information to be useful without being overwhelming. It should be clear what events are being represented and how they are connected. Additionally, a good timeline will be visually appealing and easy to navigate.
Examples of timelines can be any listing of key milestones in a historical figure’s life, project schedules, conference programs or wedding agendas.
For visual samples that would help you see how to design your own timeline, check out our extensive gallery of downloadable timeline examples .
What do you need in a timeline?
The events that you want to include;
The order in which you want to place the events;
The timeframe in which the events occurred;
The level of detail that you want to include for each event.
Other details can be added too, such as activities (or tasks), start and end dates of your project, or any other info your audience might find useful. Whatever details you need to include, what’s important is to make sure you don’t overcrowd your timeline as this will make it harder to read.
This is how a simple timeline can look like:

For more ideas, browse our collection of timeline templates . You can download them for free and make customizations in order to create your own timeline.
How do you make a good timeline?
A good timeline should be clear, concise, and easy to follow. It needs to be highly visual to ensure busy audiences can read it at first glance and understand the main points without requiring further explanations. One tip to creating an effective timeline would be to use colors, shapes, and fonts to make the visual stand out, to ensure a cohesive look, and, most importantly, to draw attention to important details. For instance, you can use color codes to show the importance or risk level of each milestone, or various shapes to group similar events into easy-to-spot categories.
Another idea, especially useful when making project timelines, would be to add tracking details such as a Today marker and Elapsed Time on the timescale, or a % Complete indicator for activities. This will help your audience see the status of the project instantly, without needing too much explanatory text on the graphic. This is a good example:

This project timeline was created with Office Timeline , an automated timeline maker. With this powerful PowerPoint add-in, you can automatically generate professional timelines. This tool offers you the possibility to calibrate your timelines to their finest, adding as much detail as you want, and taking advantage of the multiple timescales that you can use to manage time units. To try Office Timeline, download and install the free trial .
Is there a timeline template in Word?
No, there aren’t any built-in timeline templates in Microsoft Word. However, you can make a timeline using the drawing tools in Word, following the steps described in our Word timeline tutorial .
Simply copy-paste the slide into your Word document – the timeline will be included as an embedded object/image. The timeline cannot be edited or updated it in this format; you’ll just have to copy-paste it again.
To allow updating, insert the timeline as a linked Microsoft PowerPoint Slide object . To do this, copy the slide, and, on the Home tab, click the arrow under Paste , then select Paste Special . In the dialog that opens, select Paste link and Microsoft PowerPoint Slide object under As .

This way, if you update your timeline in PowerPoint, you’ll be able to update it with a click, directly in the Word document: right click on the timeline and select Update Link .
What is the best program to make a timeline?
Whether a program is the best to make a timeline ultimately depends on your preferences and specific needs. What works for one project can be useless for another.
- They are fast and easy to use. Dedicated timeline software should save you considerable time and effort compared to your usual office tools. Otherwise, they’re not worth the effort of getting them and learning all the ropes.
- They provide a variety of templates to help you find inspiration and create a beautiful timeline quickly.
- They integrate with other productivity tools. A good timeline generator can draw data from other programs you use and automatically generate your visual based on that data.
We might say that the all-time most popular program to make timelines is Microsoft PowerPoint. With a powerful add-in like Office Timeline you can really get the fastest, best results: automatically generated, beautiful timelines, ready in minutes. Try it for free and see how it meets all the requirements we just mentioned.
Here’s a sneak peek at a few of the templates it offers:

How do you create a timeline?
Creating a timeline can be a helpful way to organize and visualize information. When creating a timeline, it is important to first decide on the scope. This will determine how much detail is required and how far back in time the timeline needs to extend.
Choose a time period. Decide on the time period you want to visualize. This will help determine the scale of the timeline.
Gather and organize information. Once you know the time period you want to focus on, start gathering information. This can include events, dates, people, and anything else that might be relevant. Then organize it in a way that makes sense. This could involve creating categories, grouping items by date, or anything else that will help you make sense of the data.
Create a visual representation of the information. First you need to choose a format. You could create a traditional timeline with chronological events, or you could use a more creative approach and visualize the information in a different way. Once you have your format and information organized, it’s time to start creating the timeline.
Add details , such as labels or descriptions, to help explain the information or events.
Want to make it super easy? Use an automated tool such as the Office Timeline PowerPoint add-in and get your timelines ready in minutes, with just a few clicks. All you have to do is use one of the tens of professional timeline templates, insert your data into the timeline creator wizard (by manual input, copy-paste or import), and generate your awesome timeline. Try Office Timeline for free . Your timeline could look like one of these templates (or dozens of others):

How do you make a timeline on Google?
There are a few different ways you can do it if you want to make a timeline using one of the productivity tools from Google. You can use the built-in Google Sheets timeline feature or create a custom timeline using Google Drawings. The easiest solution that yields the best results is to make a timeline with the help of a free professional timeline maker and use it in your Google documents.
Find out more details on creating timelines with Google tools in our step-by-step tutorial on how to make a timeline in Google Docs and Google Sheets .
To make a timeline with a free, professional timeline maker, go to Office Timeline Online and pick one of the tens of templates in the tool’s template library, insert your data, and your timeline is ready to use.

The timelines created with Office Timeline Online can be downloaded as images (.png files) or PowerPoint slides (.pptx files). Import the slides into your Google Slides presentation or copy-paste your images directly into the target Google document.
Learn more details on using the timelines created with Office Timeline Online in our support article Office Timeline Online Quick-Start .
How do you create a timeline in PowerPoint?
You can make timelines in PowerPoint using shapes and lines or using templates. Or, to make it quick and easy, use a free automated timeline maker .
On the Insert tab, in the Illustrations group, click Shapes .
Select the line shape that you want to use and draw a line or an arrow to create an axis for your timeline. Then select the shapes that you want from the Shapes gallery on the Insert tab, and draw as many shapes as needed on the slide.
To format the shape, select it, and use the options on the Shape Format contextual tab.
On the File tab, click New. Type “timeline” in the search box and you’ll see all the available timeline templates available in PowerPoint. Select the one that you want to use.
Edit the timeline template to add your own content.
Save the edited timeline template as a PowerPoint presentation.
If the templates in PowerPoint don’t meet your expectations, or if you just want something else, download a free timeline template from our rich collection.
C. Use an automated timeline maker:
If you want to impress your audience and aim for an elegant look for your presentation, create your own professional-looking timelines directly in PowerPoint with the help of Office Timeline, an automated timeline maker that offers a free trial period. With this neat PowerPoint add-in, making timelines is a quick and easy job. The only thing you need to do is select the template you like, copy-paste or import your data and generate your timeline.

How do I create a timeline from Excel to PowerPoint?
There are two ways to make a timeline in PowerPoint using Excel data: you can create a timeline in Excel and copy it in your PowerPoint presentation or you can create the timeline directly in PowerPoint using the data from Excel.
This method is quite difficult and time consuming.
In Excel, create a new workbook and enter your timeline data in a table. The first column should include the date, the position and the name of each event/item in your timeline.
Select the data and insert a Scatter chart.
Format the chart as desired, including adding a title, axis labels, and legend. You can find detailed info on making a timeline with Charts in our step-by-step tutorial on how to make a timeline in Excel .
Copy the chart and paste it into a new PowerPoint slide.
Add more slides as needed to complete your timeline presentation.
B. Create a timeline directly in PowerPoint using the data from Excel.
This is the easy way, but first you’ll need to download and install the professional, automated timeline maker Office Timeline (free trial). It is a PowerPoint add-in that works perfectly with your Excel data: you just pick one of the tens of templates, copy-paste or import your data from Excel into the timeline creator wizard and your awesome timeline is ready!
Learn more on creating timelines in PowerPoint using Excel data in our step-by-step tutorial on how to make a timeline in PowerPoint automatically .

PowerPoint Timeline Maker
For client and executive communications, professionals can use a PowerPoint timeline maker to build eye-catching visuals in less than 2 minutes. The Office Timeline add-in for PowerPoint integrates with popular productivity tools to instantly turn project data into timeline slides and update them on the fly.

Get free 14-day Office Timeline trial
I was given an assignment to do a timeline with 30+ milestones and put them on a slide for a board presentation. I used the free version for about 5 minutes and then bought two Office Timeline licenses. I'm getting requests from all over the company for info on what I used to build these timelines. Easy to use.
S. Millar Office Timeline user
Office Timeline Pro+ is here!
Align programs and projects on one slide with multi-level Swimlanes.
How to Build Interactive PowerPoint Timelines Quickly
Learn to create interactive PowerPoint timelines quickly with our easy-to-follow guide. Enhance presentations effectively!
Why Use Timelines in Presentations?
Method 1: use powerpoint’s built-in tools, step 1: insert a smartart graphic.
- Open your PowerPoint presentation and select the slide where you want to add the timeline.

- Go to the “Insert” tab on the Ribbon.

- Click on “SmartArt” in the Illustrations group.

- In the SmartArt Gallery, click on the “Process” category and choose a timeline layout that suits your needs, such as “Basic Timeline” or “Circle Accent Timeline”.

Step 2: Customize Your Timeline
- Click on the SmartArt graphic to add text. Enter key dates and events in the text panes that appear next to the graphic.

- Customize the look of your timeline by selecting the SmartArt Design tab. Here, you can change colors, add shapes, and apply styles to make your timeline visually appealing.

Step 3: Animate Your Timeline
- To make your timeline interactive, add animations that reveal each point sequentially.
- Select your timeline, go to the “Animations” tab, and choose an animation like “Fade” or “Wipe”.

- Adjust the animation settings from the Animation Pane to control the timing and sequence of each element.
Method 2: Use a PowerPoint Add-in
Step 1: install the add-in.
- Download and install the Office Timeline add-in from its official website.

- Once installed, it will appear as a new tab in PowerPoint.

Step 2: Create the Timeline
- Click on the Office Timeline tab and select “New” to start creating your timeline.

- Use the template wizard to input your dates, events, and milestones. The add-in will automatically generate a professional-looking timeline.

Step 3: Customize and Animate
- Customize your timeline’s style, color, and scale using the tools provided by the add-in.
- Similar to the built-in tools, you can animate your timeline using PowerPoint’s native animations to make it interactive.
Method 3: Import Data from Excel
Step 1: prepare your excel data.
- Organize your data in Excel with columns for dates, events, and descriptions.

- Save your Excel file.
Step 2: Import to PowerPoint
- In PowerPoint, go to the Insert tab and click on “Object” in the Text group.

- Select “Create from file” and browse to your Excel file.

- Check “Link” to keep your timeline updated with any changes to the Excel file.

Step 3: Convert Data into a Graphic
- Use the Insert Chart feature in PowerPoint to turn your Excel data into a visual timeline.

- Customize the chart to fit the style of your presentation.
Additional Tips for Effective Timelines
- Keep It Simple: Avoid cluttering your timeline with too much information. Focus on key events or milestones.
- Use Consistent Design: Maintain consistent colors, fonts, and styles to make your timeline coherent and part of your overall presentation theme.
- Interactive Elements: Consider adding hyperlinks or trigger animations in your timeline to make it interactive and engaging.
Streamline Your Presentation with Magicslides.app
1. what is the quickest way to create a timeline in powerpoint, 2. can i automatically update my powerpoint timeline, 3. how do i make my timeline interactive in powerpoint, 4. are there tools to help create more complex timelines in powerpoint, 5. what are the best practices for designing an effective timeline.
Ayan Ahmad Fareedi
writer at MagicSlides
How to Find and Use Free AI Presentation Generators
18 June 2024
How to Build Professional Slideshows Online in Minutes
14 June 2024
How to Craft a Video Presentation That Captivates
How to Access and Use Free AI PPT Makers? (2024 Guide)
10 June 2024
How to Use AI for Stunning PowerPoint Presentations
7 June 2024
How Can Presentation Maker AI Change the Way You Create Slides?
4 June 2024
50+ ChatGPT Prompts to Enhance Your Presentations
5 Features of AI Pitch Deck Generators That Every Startup Should Know About
23 May 2024
How to Use ChatGPT to Create PowerPoint Pres
14 May 2024
Stunning presentations in seconds with AI
Install MagicSlides app now and start creating beautiful presentations. It's free!

Free AI PPT Tools
Free All-in-One Office Suite with PDF Editor
Edit Word, Excel, and PPT for FREE.
Read, edit, and convert PDFs with the powerful PDF toolkit.
Microsoft-like interface, easy to use.
Windows • MacOS • Linux • iOS • Android

- Articles of PPT
How to make a timeline in PowerPoint
When sharing updates about your work or presenting a project report, timelines can be a great way to illustrate the sequence of events. However, creating a timeline from scratch can be a real pain and may need to look better.
That's why we've put together this guide to help you create a timeline that looks professional and is easy to make using tools like Microsoft and WPS. You can make an excellent timeline for your next presentation without wasting time using SmartArt graphics, templates, scatter charts, and text boxes.
Using a SmartArt Graphic
SmartArt graphics are a lifesaver when making diagrams, flowcharts, and other visuals for your presentation. They're super easy to use and give you many options to create a professional and impressive timeline.
With SmartArt, you can choose from various shapes, colors, and layouts to create a timeline tailored to your needs. Plus, you can easily edit and customize your timeline as needed, making it a perfect solution for anyone who wants to save time without sacrificing quality.
How to Create a Timeline Using SmartArt Graphics:
Navigate to the slide on your PowerPoint or WPS Presentation where you wish to include your chronology.
Click the 'Insert' tab and select 'SmartArt' from the options.
In the SmartArt dialog box, choose the 'Process' category, then select the 'Basic Timeline' layout that suits your needs. Once you've selected your preferred timeline layout, click the 'OK' button to insert it onto your slide.
Start adding events to your timeline by clicking on each shape within the graphic and entering the event name, date, and any additional details you want to include.
Customize your timeline's colors, fonts, and other design elements using the 'SmartArt Tools' tab once you've selected your timeline.
As you continue adding events to your timeline, you can resize, reposition, or duplicate shapes to ensure everything fits perfectly on your slide.
Once you're happy with your timeline, save your presentation and prepare to wow your audience! You can create a professional-looking timeline using these simple steps in no time.
Easy to find: You don't need to search for additional tools or software to create your timeline because SmartArt graphics are built into Microsoft and WPS. It's super convenient!
Variety of forms: SmartArt graphics offer plenty of options to create a timeline that fits your needs and preferences. You can pick from various shapes, colors, and layouts to create something unique.
Easy to operate and edit: Once you've selected a SmartArt graphic, you can easily customize it by adding or removing shapes and text. You can even alter the fonts and colors to make it seem precisely the way you want it to.
Limited free graphics: While SmartArt graphics come in various forms, the free options may be limited. If you're looking for more specialized or custom graphics, you may need to pay for additional tools or resources.
The model is rough: Although SmartArt graphics are a fast and easy way to create a timeline, they may not always look as polished or professional as a custom-designed graphic. So, keep that in mind if you're going for a high-end, sophisticated look.
Using a Timeline Template
If you need more time or design skills, a timeline template can be an excellent option for quickly and easily creating a professional-looking timeline. WPS offers a variety of timeline templates in their template store that you can download for free.
But what exactly is a PowerPoint timeline template? In short, it's a pre-designed PowerPoint slide with placeholders for text and images, allowing you to plug in your information to create a timeline.
Templates often include pre-designed shapes and graphics, making creating a visually appealing timeline even easier without starting from scratch.
Download a timeline template from WPS Template Store or another reliable source.
Open the template in PowerPoint by clicking "Open" in the "File" tab and navigating to where the template is saved.
Customize the template by replacing the default text and images with your content. Change the design elements like colors and fonts as desired. You can also add shapes, text boxes, or graphics using the "Insert" tab if needed.
Save the file and insert the timeline slide into your presentation where appropriate.
Time-saving and efficient: Let's face it, creating a timeline from scratch can take time and effort, especially if you're not a designer. A pre-designed timeline template can save you a lot of time and effort and allow you to focus on other essential aspects of your project.
Large number and variety of templates: The great thing about using timeline templates is the many options. You can find templates that are simple and clean or ones that are more visually dynamic and attention-grabbing.
Free timeline templates: Another great thing about using PowerPoint timeline templates is that many are free. This means you can create a professional-looking timeline without spending any money. This can be especially helpful for small businesses, students, and educators who may need more money to hire a professional designer.
Create a Timeline Yourself Step by Step
Creating a timeline yourself in PowerPoint can be a great way to personalize your presentation and make it more engaging. While it may take more time and effort than pre-made templates, creating your timeline can help you better visualize your data and communicate your message more sophisticatedly.
Open PowerPoint and select a blank slide.
Go to the Insert tab and click on Insert chart.
Choose a timeline layout that best suits your needs. For example, click Scatter.
Enter your timeline data into the graphic and make it skinnier.
Click “Insert” and locate the text box.
Insert all the information you needed for the timeline and add the lines and shapes that you wanted.
Following these steps will help you create a personalized and sophisticated timeline that effectively communicates your message.
Creating a timeline allows for a personalized and professional-looking timeline tailored to your specific needs.
You don't need to search for pre-made templates or rely on someone else's design choices.
By designing your timeline, you have complete control over the layout, colors, and other design elements, allowing for more creativity and flexibility.
Creating a timeline can be more complicated and time-consuming than pre-made templates.
Creating a clear and visually appealing timeline may require more design skills and experience.
Without a pre-made template, ensuring consistency in design and formatting throughout your presentation may not be easy.
How to Choose the Best Way to Make a Timeline in PPT?
When making a timeline in PowerPoint there are several ways to do it, each with advantages and disadvantages. To choose the best way for your needs, consider the following factors:
If you need to create a timeline quickly and only have a little time to spend on design, a SmartArt graphic or a timeline template is a good option. Both methods allow you to create a timeline in just a few clicks and are pre-designed to look visually appealing.
Requirements
Using a SmartArt graphic is a good option if you only need a rough timeline for internal use. The pre-designed graphics are quick and easy to use and give a basic timeline layout.
Professionalism and Sophistication
If you need a timeline for a professional presentation or want to create a sophisticated and personalized timeline, using a timeline template or creating a timeline yourself step by step is recommended.
A pre-designed template will provide a professional look and feel while creating a timeline yourself will allow for a more personalized and sophisticated design.
Are there any other tools to make timelines in PowerPoint?
Yes, several other tools are available such as OfficeTimeline, Monday.com, and iSpring. These tools can help create professional-looking timelines in PowerPoint presentations.
OfficeTimeline : It offers different versions, including Free, Pro, and Pro+, with varying features and capabilities. It allows you to create timelines quickly and easily, import data from Excel or Project, and customize your timeline with different styles and formats.
Monday.com is a project management tool with a timeline feature, allowing you to create timelines and Gantt charts for your projects. It has various templates and customization options to help you create professional timelines.
iSpring: It is a tool that offers both free and paid versions. It allows you to create interactive timelines with different media types, including images, videos, and audio. It offers a simple drag-and-drop interface, making it easy to use.
What should I prepare before creating a timeline?
Before creating a timeline in PowerPoint, it is essential to collect and organize the information you want to include, such as dates, events, and milestones. Sorting out the information's logic can also help create a logical and coherent timeline. Additionally, envisioning the desired timeline effect can help you choose the appropriate timeline tool and customize the timeline according to your expectations.
Summary of How To Make Timeline in PowerPoint
The article discusses various ways to create timelines in PowerPoint, including using SmartArt graphics, timeline templates, and creating a timeline from scratch. It highlights the pros and cons of each method and provides step-by-step instructions for creating timelines using SmartArt graphics, timeline templates, and from scratch.
Additionally, the article mentions other tools available to create timelines in PowerPoint, such as Office Timeline, monday.com, and iSpring. The article emphasizes using WPS Office templates for creating timelines, which offers many free and professional templates.
The importance of preparation before creating a timeline is also emphasized, including organizing information and envisioning the desired timeline effect. Overall, the article provides valuable information for anyone looking to create timelines in PowerPoint and highlights the convenience and efficiency of using WPS Office Templates .
- 1. 10 Free Google Docs Timeline Templates with Editing Tips
- 2. Download Excel project timeline templates for free
- 3. How to Create a Timeline in Word A Comprehensive Guide
- 4. How to create a timeline with PPT?
- 5. How to Make a Timeline on Google Docs [A Complete Guide]
- 6. How to Create a Timeline in Excel (3 Easy Methods)

15 years of office industry experience, tech lover and copywriter. Follow me for product reviews, comparisons, and recommendations for new apps and software.
Got any suggestions?
We want to hear from you! Send us a message and help improve Slidesgo
Top searches
Trending searches

9 templates

education technology
239 templates

first day of school
70 templates

computer technology
306 templates

39 templates

meet the teacher
30 templates
Timeline Slides
It seems that you like this template, timeline slides presentation, premium google slides theme, powerpoint template, and canva presentation template.
Download the Timeline Slides presentation for PowerPoint or Google Slides and start impressing your audience with a creative and original design. Slidesgo templates like this one here offer the possibility to convey a concept, idea or topic in a clear, concise and visual way, by using different graphic resources. You need to talk about a specific topic, but you don't know how to do it? Try using presentations like this one here, 100% customizable!
Features of this template
- 100% editable and easy to modify
- Different slides to impress your audience
- Contains easy-to-edit graphics such as graphs, maps, tables, timelines and mockups
- Includes 500+ icons and Flaticon’s extension for customizing your slides
- Designed to be used in Google Slides and Microsoft PowerPoint
- Includes information about fonts, colors, and credits of the resources used
What are the benefits of having a Premium account?
What Premium plans do you have?
What can I do to have unlimited downloads?
Don’t want to attribute Slidesgo?
Gain access to over 27400 templates & presentations with premium from 1.67€/month.
Are you already Premium? Log in
Related posts on our blog

How to Add, Duplicate, Move, Delete or Hide Slides in Google Slides

How to Change Layouts in PowerPoint

How to Change the Slide Size in Google Slides
Related presentations.

Premium template
Unlock this template and gain unlimited access

IMAGES
VIDEO
COMMENTS
Create a timeline. On the Insert tab, click SmartArt. In the Choose a SmartArt Graphic gallery, click Process, and then double-click a timeline layout. Tip: There are two timeline SmartArt graphics: Basic timeline and Circle Accent Timeline, but you can also use almost any process-related SmartArt graphic. Click [Text], and then type or paste ...
There are two simple ways to create a PowerPoint timeline using the data from Excel: Build a timeline in Excel, then insert it into your PowerPoint presentation. Create a timeline directly in PowerPoint from Excel data. Here are some more details on each method. 1.
Things You Should Know. Go to "Insert" → "SmartArt" → "Process" → select a timeline layout → "OK". Click [Text] to add your data. To add more data slots, click your timeline, then click "Add Shape". To change the color, click your timeline, then click "Change Colors".
Here's how it's done. Open your PowerPoint presentation and navigate to the slide in which you would like to add a timeline. Once there, navigate to the "Insert" tab and select "SmartArt" from the "Illustrations" group. The "Choose a SmartArt Graphic" window will appear. Here, select "Process" from the left-hand pane.
2. Use PowerPoint's SmartArt to create your Timeline in seconds. Once your information is organized, PowerPoint's SmartArt will work its magic. Select the text box as follows: Ensure you are on the "Home" tab and look for the "Convert to SmartArt" button. Insert the timeline design you prefer (it can be changed later).
Summary. Open PowerPoint and select a suitable slide layout. Insert SmartArt from the Insert tab. Choose a timeline design from the Process category. Add your milestones and dates to the graphic. Customize the design to your liking.
Learn four methods to create a PowerPoint Timeline. There are three-click-FAST timelines, time scale timelines, elegant timelines, and sophisticated professi...
Create a timeline. On the Insert tab, click SmartArt. In the Choose a SmartArt Graphic gallery, click Process, and then double-click a timeline layout. Tip: There are two timeline SmartArt graphics: Basic timeline and Circle Accent Timeline, but you can also use almost any process-related SmartArt graphic. Click [Text], and then type or paste ...
Now that you're on the slide that you want to add your timeline to, click on the Insert tab. Next, click on the SmartArt button in the toolbar. From the drop-down menu, choose the Process option. A menu appears. Choose the Basic Timeline option from the menu and click OK.
In this video I show you how to make an amazing timeline using the Morph Transition in PowerPoint!😊 Download the slides featured in this video ️ https://w...
Insert the timeline graphic into PowerPoint. SmartArt: Select Insert > SmartArt. Choose a layout. Use text panes to create the timeline. Change colors or styles or reorder elements. Template: Use a PowerPoint template to create a timeline. Move and copy template objects to create new steps or milestones.
Creating a timeline in Google Slides using pre-defined diagram designs. Step 1. Insert a timeline diagram: You can insert timeline diagrams in Google Slides via Insert -> Diagrams. There are a number of diagram types listed in this section, make sure you pick Timeline diagrams from the right pane. Step 2.
Step #2: Select a Timeline Template. In the left pane, click on the New tab. In the right pane, type timeline inside the search bar. Click on the search icon on the right. PowerPoint will display an array of timelines. Click on the one most suitable to your application. Click on the Create button in the next screen.
Use timeline tools built right into PowerPoint. Find a timeline template to start with and customize. For a very basic timeline that you create inside PowerPoint, you can use SmartArt to create a basic timeline. You'll find it by clicking on the Insert menu, then SmartArt, Process category, and then Basic Timeline.
First, measure the timeline. Select a row and click the Format Shape tab. The Size&Properties section will list the width - our line is 30 cm wide. This means that each event can take up 5 cm in the timeline, along with a small gap to the right. The "Size" section will list the width - our line is 30 cm wide.
From the Insert tab, select SmartArt. Choose a timeline template layout from the SmartArt gallery. A text pane will appear on the slide alongside your SmartArt graphic. This text pane lets you easily add commentary to your timeline in PowerPoint. Within the text pane, enter the milestone dates and descriptions.
Use a scatter chart and text boxes connected together with lines-----#powerpoint ...
1. Click an existing entry closest to where the new entry is to be added. 2. Click Add Shape in the Create Graphic group of the Design tab. Choose either of the Add Shape After or Add Shape Before options. Note: If you don't see the Design or SmartArt Tools tabs, make sure you have selected the timeline on the slide.
Part 3. Creating a Timeline Slide in PowerPoint. Microsoft PowerPoint provides users with adjustable timelines as per their needs. After adding a simple timeline in slides, you can edit it for accurate and updated results. Thus, read this step-by-step guide to insert and customize timelines PowerPoint. 1. Create Timeline Slide in PowerPoint
Here are some steps you can follow when creating a timeline in PowerPoint: 1. Launch timeline template options. The first step when making a timeline on Microsoft PowerPoint is to create a template. To do this, start by launching the PowerPoint app and clicking the "Insert" tab on the top bar, which prompts a set of options.
Create a timeline. On the Insert tab, click SmartArt. In the Choose a SmartArt Graphic gallery, click Process, and then double-click a timeline layout. Tip: There are two timeline SmartArt graphics: Basic timeline and Circle Accent Timeline, but you can also use almost any process-related SmartArt graphic. Click [Text], and then type or paste ...
Select the line shape that you want to use and draw a line or an arrow to create an axis for your timeline. Then select the shapes that you want from the Shapes gallery on the Insert tab, and draw as many shapes as needed on the slide. B. Use a template: On the File tab, click New.
Enhance presentations effectively! Learn to create interactive PowerPoint timelines quickly with our easy-to-follow guide. Enhance presentations effectively! ...
How to Create a Timeline Using SmartArt Graphics: Navigate to the slide on your PowerPoint or WPS Presentation where you wish to include your chronology. Click the 'Insert' tab and select 'SmartArt' from the options. In the SmartArt dialog box, choose the 'Process' category, then select the 'Basic Timeline' layout that suits your needs.
Download the Timeline Slides presentation for PowerPoint or Google Slides and start impressing your audience with a creative and original design. Slidesgo templates like this one here offer the possibility to convey a concept, idea or topic in a clear, concise and visual way, by using different graphic resources. ...
May 16, 2024 - Template Specifications Name: Quantity: 18 slides Ratio: 16:9 Colors : Rating: Premium Tutorials: Download SlidesBrain offers presentation features that allow you to customize every aspect of your slides. This means you can modify text, images, colors, fonts, and icons to your liking. Additionally, adjusting graphs in PowerPoint is simple, enabling you to change colors, numbers ...