- PRO Courses Guides New Tech Help Pro Expert Videos About wikiHow Pro Upgrade Sign In
- EDIT Edit this Article
- EXPLORE Tech Help Pro About Us Random Article Quizzes Request a New Article Community Dashboard This Or That Game Popular Categories Arts and Entertainment Artwork Books Movies Computers and Electronics Computers Phone Skills Technology Hacks Health Men's Health Mental Health Women's Health Relationships Dating Love Relationship Issues Hobbies and Crafts Crafts Drawing Games Education & Communication Communication Skills Personal Development Studying Personal Care and Style Fashion Hair Care Personal Hygiene Youth Personal Care School Stuff Dating All Categories Arts and Entertainment Finance and Business Home and Garden Relationship Quizzes Cars & Other Vehicles Food and Entertaining Personal Care and Style Sports and Fitness Computers and Electronics Health Pets and Animals Travel Education & Communication Hobbies and Crafts Philosophy and Religion Work World Family Life Holidays and Traditions Relationships Youth
- Browse Articles
- Learn Something New
- Quizzes Hot
- This Or That Game
- Train Your Brain
- Explore More
- Support wikiHow
- About wikiHow
- Log in / Sign up
- Computers and Electronics
- Media Software
- Media Conversion
- Video Conversion Software

How to Convert Powerpoint to MP4
Last Updated: June 17, 2024
wikiHow is a “wiki,” similar to Wikipedia, which means that many of our articles are co-written by multiple authors. To create this article, 14 people, some anonymous, worked to edit and improve it over time. This article has been viewed 233,358 times. Learn more...
PowerPoint is great for creating slideshows, but they can be difficult to share if the recipient doesn't have PowerPoint installed. One easy way to share your presentations is to create an MP4 video file. This will allow you to play it on any computer or device, or upload it to YouTube or another streaming service. Newer versions of PowerPoint have this ability built-in, but you'll need to do a little more work for PowerPoint 2007 and earlier.
PowerPoint 2010 and 2013

- Presentation (2013)/High (2010) - This will result in the highest-quality video, and is best suited for actual presentations on a big screen. If you are planning on using the video to project the presentation, select this option. It will produce the largest file out of the three options.
- Internet (2013)/Medium (2010) - If you're planning on uploading the video to YouTube, or want to share it with others who will be watching from a computer, select this option. The file size can be significantly smaller, and the quality will only be slightly worse than the high quality option.
- Low/Low - This will result in a very small file, but will also result in a smaller, blurrier video. This option is best suited for aging smart phones and tablets, though recent devices can easily play higher-quality versions.

- You are given the option to record timing and narration from this menu as well. You can preview your timings before proceeding.

PowerPoint 2007 and Earlier

- Click the Office button or the File menu and select "Save As".

- Select or create a new directory for all of the slide files.

- Click the File menu and select "Import Into Collections". In Movie Maker 2012, click "Add videos and photos" instead.
- Navigate to the folder containing the files you just created, and then select them all. The folder will have the same name as the presentation.
- Click Open after selecting all of the files in the folder. The image files will be opened into Movie Maker.

- See How to Add Transitions in Movie Maker for a detailed guide on using transitions.

- Click "Save movie" or "Save to my computer"
- If given the option to select a device, choose either "For a computer" or the specific device you intend to play the video on.
- Name and save the file. It should be in MP4 format. If it isn't, select "MPEG-4" from the "Save as type" menu.

Community Q&A
You Might Also Like

- ↑ https://support.nsula.edu/index.php?/Knowledgebase/Article/View/12/9/how-to-export-powerpoint-slide-show-to-mp4-video
- ↑ https://iconlogic.blogs.com/weblog/2010/12/powerpoint-2007-converting-presentations-to-movies.html
About This Article
- Send fan mail to authors
Is this article up to date?

Featured Articles

Trending Articles

Watch Articles

- Terms of Use
- Privacy Policy
- Do Not Sell or Share My Info
- Not Selling Info
wikiHow Tech Help Pro:
Level up your tech skills and stay ahead of the curve
PPT to MP4 converter
Convert your file from Microsoft PowerPoint Presentation File to MPEG-4 Video Stream with this PPT to MP4 converter .
Enter the timestamps of where you want to cut your video. The format is HH:MM:SS. HH = hour, MM = minutes, SS = seconds.
Example: 00:02:23 for 2 minutes and 23 seconds.
How to convert a PPT to a MP4 file?
- Choose the PPT file you want to convert
- Change quality or size (optional)
- Click on "Start conversion" to convert your file from PPT to MP4
- Download your MP4 file
Not convinced? Click on the following link to convert our demo file from PPT to MP4 :
Stay connected:
Rate this tool 4.2 / 5
You need to convert and download at least 1 file to provide feedback
Feedback sent
Thank you for your vote
Convert to PPT
Convert from ppt, file format, ppt (microsoft powerpoint presentation file).
PPT is the binary file format for Microsoft Office PowerPoint 97-2007. Presentations using PowerPoint can include images, text, audio, video, charts, graphs, hyperlinks, and animation to provide presentations created for students and businesses. Mos...
MP4 (MPEG-4 Video Stream)
MPEG-4 Part 14 files (MP4) are capable of storing multimedia such as audio, video, and subtitles. This file type is commonly used by Apple and other producers of mobile products which allow audio, still images, or video. This includes but is not limi...
Specify a downloader that fits your task
Tutorial: Save your PowerPoint as a Video
It pays to know how to save PowerPoint as video. Whether you are preparing a PowerPoint presentation for work, school , non-profit, staff training or investor relations. Content marketing is one of the biggest trends of the past couple of years and knowing how to distribute your content via various media is critical to business success. This article will guide and show you, step by step, how to save your PowerPoint presentation in video format. Next, we discuss the advantages of PowerPoint to video conversion and how you can put a single presentation to greater use. This guide is written by 24Slides’ Powerpoint experts and includes instruction on using PowerPoint for Mac.

6 Reasons to save PowerPoint as video
So you are considering saving your PowerPoint presentation as video? Before we show you how to do it, let’s talk about why it’s a great idea to convert your PowerPoint to video.
- You can show your presentation to a wider audience by sharing the video on YouTube and other video platforms.
- Your audience do not need to have a copy of Microsoft PowerPoint to view your presentation.
- Burn your presentation video on CD or DVD and giveaway as promotional material to clients or potential customers.
- Leverage your presentation and increase the return on investment (ROI) of your presentations by distributing them as video.
- The technical ability of your audience will not become a barrier to delivering your message. Your video becomes easy to access without the knowledge and understanding of powerpoint.
- Your audience will see your presentation exactly as you have intended it to be seen. Unlike sharing it as a presentation, some slides may get deleted or changed.
Now that you know why you’re on the right track by learning how to save PowerPoint presentations as video, let’s get into the process of exactly how to do it.
How to save PowerPoint 2010 as a video
If you are still using PowerPoint 2010 to create your presentations, you’ll be pleased to know you can still convert your PowerPoint to video. The process is som simple that you’ll wonder why you haven’t been doing this all along.
Whether your presentation contains just text or is a multimedia presentation with sound narration, transitions and video, you will be able to convert it into video. Microsoft PowerPoint allows you to save PowerPoint as video in Windows Media Video (.wmv) file format. If you plan for sharing your presentation as a video before creating it, you can decide whether to record the narration before creating the presentation.
Here are the steps you need to follow:
- Create your PowerPoint presentation as normal and save it.
- If you’re using narration for your presentation, record the narration and add timings to the slideshow.
- Select the File menu and click on Save & Send .

- Under the Save & Send menu, find and click on Create a Video .

- Click on the Computer & HD Displays option to customise the video size and quality (small, medium and large size & quality).

- Click the Don’t Use Recorded Timings and Narrations to select if you’re using timings and narrations.

- Click Create Video and another dialogue box opens.

- Enter appropriate filename and saving location to save your newly created video.
Once your presentation to video conversion is complete, the video is ready to share via Facebook, Youtube, Vimeo or email.
How to save a PowerPoint 2007 presentation as video
There are many users still running Microsoft Office 2007, hence PowerPoint 2007 on their computers. If you are one of them, don’t worry, there are ways to convert your PowerPoint to video using a bundled Microsoft product, Windows Movie Maker.
If you want to convert a PowerPoint 2007 presentation to video and you are running a newer version of the program, you can open the file within PowerPoint 2013. You can then use the Create a Video feature to convert your PowerPoint to video.
Alternatively, if you only have access to PowerPoint 2007 and have a copy of Windows Movie Maker installed, you can save your presentation as image files (.jpg). Once you’ve saved each slide, fire up Windows Movie Maker and start a new project.

Next, import all the slides you saved as images into the new project and create your video.

Note: You can include transitions in Windows Movie Maker. However, animations will not convert when you save the slides as image (.jpg) files. Make sure you modify your slides to remove any animations and ensure you do not lose vital parts of your message before saving as images.
If your presentation has narration, you can import the the sound file directly into Windows Movie Maker. If you do not have the source audio file, you can save the presentation as a web page (a separate .wav file is created). You can then import the .wav file into your Windows Movie Maker video.
How to convert your PowerPoint to video in PowerPoint 2013 in 7 Steps
Turning your PowerPoint 2013 presentation slides into a video is easier than you think. In seven simple steps, you can turn your presentation into a video you can share with viewers wherever they are. Here’s how you do it.
- Access Powerpoint’s Backstage View by clicking on File.

- Select Export and click on Create a Video to access the video export menu.

- Click on the Create a Video option and expand the Computer and HD Displays option to select output video size and quality settings.

- Click on the drop down arrow to expand the Use Recorded Timings and Narrations menu. Use this to select whether you’re using recorded timings or not. If not using recorded timings and narrations, set the duration of each slide using the timings option at the bottom.

- Click the Create Video button to show the Save As dialogue box.

- Select the location where you want to save your video and choose a suitable filename for the video file. Also choose the video file type.

- Click Save and PowerPoint will begin converting your presentation to video. This may take a couple of seconds or a few minutes depending on the size of your presentation.

When the video creation is complete, the video is ready to view, upload to your website, Facebook, YouTube or sharing by email.

How to save a presentation as a movie file in PowerPoint For Mac
If you have an Apple computer running a Mac version of PowerPoint, you can convert your presentation into a movie for easier and wider distribution. The process is similar to Windows system with the inevitable differences between the operating systems. In just a few simple steps, you will be able to turn your powerful presentation into a movie file. The following limitations apply:
- The output is a .mov file compatible with only the Quicktime player or 3rd party converting programs.
- You will lose transitions and animations within the presentation and so make sure you modify your presentation prior to converting it.
- You will also lose narration during the conversion process, you may wish to add the narration as an audio soundtrack to the movie.
The steps are as follows:
- Click on File and choose Save as Movie .

- Click Movie Options to add a background soundtrack (music or your narration) or credits.

- Click Movie Settings to adjust the output quality and video size settings. You can also choose the slide durations, to create a looping video and slide transitions under this option.

- Click OK to close the Movie Options dialogue box.

- Click Save to start creating your video. The process will take a couple of seconds or longer depending on the size and quality options you select.
Once the process is complete, your movie is ready for playback or to convert into other file formats and share via Social Media or other outlets. If you’re using PowerPoint for Mac 2008 and 2011, these steps will work for either.
How to create a video from PowerPoint 2016
You can create a full-fidelity video from your presentation in PowerPoint 2016 in MPEG-4 (.mp4) or Windows Media Video (.wmv) format. In just six steps, you can turn your presentation into a video you can share and distribute on Facebook, YouTube, burn to DVD or via email. Here’s how you go about it:
- Click on the File tab to show file options.

- Scroll down and select Export and navigate to Create a Video.

- Select your video settings preference (video quality, timings and narration, video size).

- Click on Create a Video.

- Choose a filename, saving location and video type (.mp4 or .wmv).

- Click on Save to start video creation process.
This article has shown you how to convert and save PowerPoint as video. Once you’ve delivered a powerful presentation to an audience, making it available afterwards is always a great idea, especially for training presentations. To maintain the presentation in its entirety, saving it as a video and distributing it is the best option. By converting a presentation to video, you are able to reach a wider audience through YouTube, Facebook and other video hosting and sharing sites. We hope you’ve gained some useful insights on how you can achieve that following the simple, step by step guides for the version of PowerPoint you are running.

Did you know?
At 24slides, we provide stunning Powerpoint presentation services and are able to help you and your team have an incredible presentation to film. Take a look at some examples of our work and let’s get in touch . Alternatively, feel free to browse and download hundreds of free Powerpoint templates from our library.
You might also find this interesting: How to Create Social Media Videos With PowerPoint
Create professional presentations online
Other people also read

How To Convert Google Slides To PowerPoint and Vice Versa

How To Add Animations To PowerPoint

How To Create The Best PowerPoint Presentation Background
How to Record My PowerPoint Presentation (and save it as MP4)?
There are actually a number of ways you can record yourself delivering a speech or presentation on your PC with an inset video from your Webcam. One straightforward option: Zoom . Open up a Zoom meeting in the Zoom app, share your presentation, press ‘record’ within Zoom, and you’re ready to go. Third-party apps like Loom offer similar functionality if you want to go that route too. But it turns out that Microsoft PowerPoint also has the ability for you to record a narrated slide show and can also record you on video and then export the resultant file as an mp4 video!
HOW TO RECORD YOUR POWERPOINT PRESENTATION
Recording your powerpoint slide show, save your powerpoint slide show presentation, export your narrated slide show as mp4 movie, leave a reply cancel reply.
How-To Geek
How to save or convert a powerpoint presentation to a video.
Your changes have been saved
Email Is sent
Please verify your email address.
You’ve reached your account maximum for followed topics.
Spotify Has a New Secret Premium Plan
I'm not a programmer, but here’s why linux is my daily driver, i get automatic notifications when web pages change: here's how and why i do it.
Most people know that you can create PowerPoint presentations with pictures, music, images, web content, and text, but one little known trick is the ability to save PowerPoint presentations as videos.
PowerPoint presentations have been a long time favorite for use in business and academic presentations all over the world. They are highly versatile and offer a wide variety of features that you can use to enhance them.
In order to save your PowerPoint as a video you will first need to create a presentation or download the sample we used for this tutorial. Once you have the document open, you will need to save it as a video. Begin by pressing “File.”

Instead of following the logical train of thought and opening the “Save” section, you will need to click on “Export,” then click on “Create a video.”

Once you do this, you will see the “Create a Video” option. This will offer a few options in the form of two drop-down menus and a time value box.

The first drop-down box is where you will choose the quality of your exported video. These three options will also determine the size of your exported video file. For the purposes of this example, we will choose the second option to reduce the size of the video without compromising too much video quality.

The second drop-down menu allows you to include or exclude any timings or narrations that you inserted on your PowerPoint presentation. Since the sample document has no timings or narrations, we will leave this as is. The “Use Recorded Timings and Narrations” will be unavailable if you don’t have any of them in your presentation.

The time value box is where you can edit the amount of time that your slides will appear in the video. The default time is set at 5 seconds. For this tutorial, we will set it to 3 seconds. Lastly, you need to click on the “Create Video” button.

You will now be taken to the “Save” dialog box. Browse to the location where you want to save the file and give it a name then press “Save.”

While the video is being created, you will see the small progress bar at the bottom of your PowerPoint window. Wait till this is done and then go to your video.

Now you can double-click your video file and it will automatically play with your video player. Remember that the more slides you have and the more time you allot to each slide, the more space the video will take up in the end. This handy export tool is great for automating presentations or for uploading them as videos to online video sharing services like Facebook or YouTube.
- Microsoft PowerPoint
Convert PowerPoint to MP4
Converting ppt to mp4 has never been easier.
Are you looking for a convenient solution to convert your PowerPoint to MP4? No hassle, no extra downloads and installs? Our lightning-fast tool empowers you to save PPT as MP4 files within just a couple of clicks. Before you convert PPT to MP4, you can enhance your video by trimming, adding effects and transitions, and layering other images or even other videos. Flixier is an advanced online video editor that anyone can use, anytime, and anywhere.

Save Time As You Convert PPT to MP4
Flixier is a browser-based video editor, which means that all you need is a steady internet connection and access to your favorite browser to convert PowerPoint to MP4. Say goodbye to having to download additional applications and software barriers. Save time and storage by working directly in our powerful cloud servers as you convert PPT to MP4. It’s that easy to convert PPT to MP4 with audio, all in one tab!
Convert PPT to MP4 With Audio
Flixier is not the usual PPT to MP4 converter that you can only use to change the file format. Not only can you take advantage of our tool to record presentations, but you can also convert PPT to MP4 with audio, so you don’t miss out on speaker key points. Before you save PPT as MP4 you can also record yourself or even use the innovative and natural-sounding voice-over generator in many languages of your choice. Pretty neat, right?
Convert PPT to MP4 And Share on Socials
Great, now that you’ve converted and edited PPT to MP4 with audio effects, your presentation is a bona fide multimedia project that’s ready to see the light! Flixier’s user-friendly interface can streamline your entire creative process whether by downloading and saving the MP4 locally or in a cloud storage solution. Even better, you can share your project to your preferred social media platform directly through Flixier’s seamlessly integrated interface. It’s as easy as click & share!
Enhance and Save PPT as MP4
There’s nothing more frustrating than faded colors on a presentation video. Use Flixier’s video enhancer tool to automatically adjust brightness, contrast, saturation, or gamma values as you convert PowerPoint to MP4, and you get a professional-looking video within minutes. The live enhancement previews allow you full control over the look and feel of your presentation before you save PPT as MP4 multimedia projects.
How to convert PowerPoint to MP4?
Upload your presentation.
Click on “Get Started”, then tap the "Record" button to turn your presentation into a video you can convert to save PPT as MP4. Flixier’s PowerPoint recorder works like a charm to record your decks.
Edit and Enhance
Experiment with video and audio customization features before you convert your PowerPoint to MP4. Go for snappy transitions, colorful effects, and visual aiding elements to highlight information in your presentation.
Convert and Save
Click on the “ Export” button and make sure you select “ Video” from the Format dropdown options. Flixier does its magic almost instantly and automatically produces your requested MP4 file.
Why use Flixier as a PowerPoint to MP4 converter
Convert powerpoint to mp4 for free.
The best thing about Flixier is that you can convert PPT to MP4 for free, without even creating an account! Click on ”Get Started” and jump right into editing your PowerPoint deck video. There’s also a free trial option that lets you save progress and safely store your files, so you can save PPT as MP4 and enjoy our tool’s numerous functionalities.
Add Images to Your PowerPoint
Before you convert PowerPoint to MP4 videos, you can tweak the content as you add image to video directly from Flixier. Either upload your own media or choose from the hundreds of royalty-free stock images the Flixier library boasts. Take your pick and remember that sometimes converting PPT to MP4 with audio is not enough, since you can enrich the presentation with illustrations, all in a couple of clicks.
A Top Presentation Editing Toolkit
Our online video editor boasts an impressive number of video editing functionalities to make your presentation truly stand out. Use Flixier to edit MP4 files and add motion graphics as key visual elements, subtitles, or dynamic transitions. Before you know it, the process of saving PPT as MP4 multimedia projects will have turned into a fun editing experience that will leave your peers speechless.
Save PPT as MP4 Securely
Our cloud-powered servers maintain the highest standards of security, so you can safely store your video projects. When you convert PPT to MP4 with audio files and other multimedia, the progress is automatically saved into your Flixier account, so you can relax and rely on the power of cloud storage and no longer fill up your device’s memory with “Version 5” of the same project.
What people say about Flixier

I’ve been looking for a solution like Flixier for years. Now that my virtual team and I can edit projects together on the cloud with Flixier, it tripled my company’s video output! Super easy to use and unbelievably quick exports.

My main criteria for an editor was that the interface is familiar and most importantly that the renders were in the cloud and super fast. Flixier more than delivered in both. I've now been using it daily to edit Facebook videos for my 1M follower page.

I'm so relieved I found Flixier. I have a YouTube channel with over 700k subscribers and Flixier allows me to collaborate seamlessly with my team, they can work from any device at any time plus, renders are cloud powered and super super fast on any computer.
Frequently Asked Questions
Can you save a ppt as an mp4.
Of course! You can easily save a PPT as an MP4 with Flixier, the online video editor that not only helps you record and convert PowerPoint presentations but also brings an advanced video editing suite to your fingertips.
How do I reduce the size of an MP4?
You can make an MP4 take up less space by using Flixier’s native MP4 compressor feature. It’s available for anyone, as long as you’ve got access to an internet connection and your preferred browser.
Is it free to convert ppt to mp4?
You can convert PPT to MP4 for free using Flixier! The online video editor comes with a free trial you can take advantage of to access numerous expert editing features, as well as the possibility to edit PPTs without even creating an account. It’s as simple as that!
Need more than a PPT to Video convertor?
Edit easily, publish in minutes, collaborate in real-time, other ppt converter tools, articles, tools and tips, unlock the potential of your pc.
Guide Center

LibAnswers: Student Digital Skills and Assistive Technology
How long does the export from powerpoint to mp4 (video) take.
If you have a narrated PowerPoint Presentation to convert into a video (MP4 file) and are using the desktop version of PowerPoint, please note to give this plenty of time to export to a video file.
We highly recommend doing this step at least a day before the actual submission due date so your video can be ready to upload or submit.
You can track the progress of the video creation by looking at the status bar at the bottom of your screen. The video creation process can take up to several hours depending on the length of the video and the complexity of the presentation.
Brief steps below to export your narrated PowerPoint to a video (MP4)
- Open the PowerPoint you wish to save as an MP4.
- Click the File menu from PowerPoint.
- Select Export .
- Select a location on your computer to save the file, such as the Desktop or Documents folder.
- In the File Format dropdown menu , select MP4 .
- Adjust any quality settings to your preference.
- Click Export .
- PowerPoint will begin exporting the presentation as an MP4 file and will show a progress bar at the bottom of the presentation. Do not close PowerPoint until this is complete. Depending on the size of the PowerPoint presentation this could take some time.
Exporting instructions for PC users
Exporting instructions for Mac users
If you have to upload your presentation (mp4) into a DMU Replay (panopto) assignments folder that your lecturer has enabled, this can be accessed from panopto.dmu.ac.uk , the following guide has easy to follow steps which explain how to do this - guide for using DMU Replay (panopto )
Links & Files
- How to I convert a PowerPoint to mp4?
- Last Updated 11 Apr, 2024
- Views 14241
- Answered By Sukhtinder Kaur
FAQ Actions
- Share on Facebook
Welcome to Digital Partners' FAQs.
You can type in your question in the search bar above. You can also browse the digital skills and assistive technology topics above to find what you are looking for. Use the filter options in the top right-hand corner to select topics and groups of FAQs.
The complete list can be accessed by clicking on the 'Answers' link above.
How to Save a PowerPoint Presentation? [PPT & Other Formats!]
By: Author Shrot Katewa
![How to Save a PowerPoint Presentation? [PPT & Other Formats!]](https://artofpresentations.com/wp-content/uploads/2022/03/Featured-Image-How-to-Save-a-PowerPoint-Presentation.webp "how to save powerpoint presentation as mp4")
Saving a PowerPoint presentation is one of the most important things that you need to do when you are creating a presentation using PowerPoint. Unlike some of the modern web-based presentation applications, you need to make sure that you save a PowerPoint presentation when you are using an offline version!
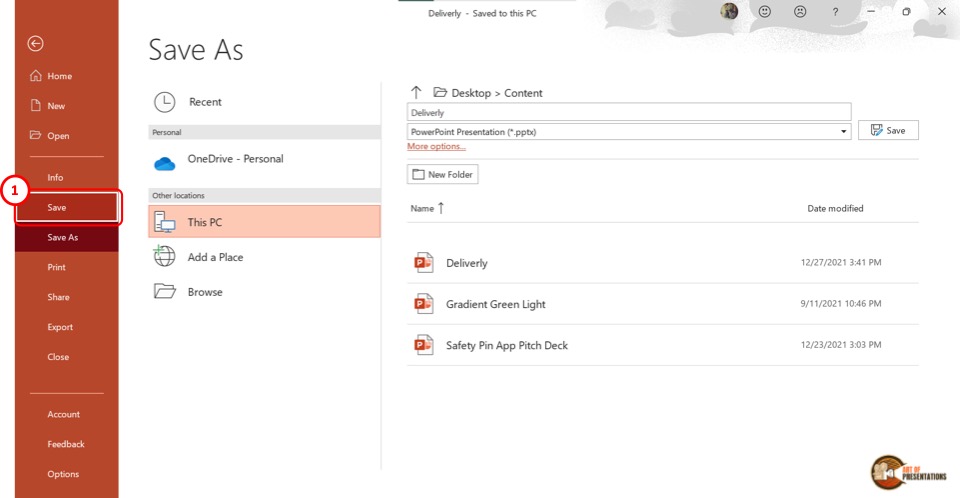
To save a PowerPoint presentation, click on the “File” tab. Then, from the backstage view, click on the “Save” option from the left panel. Choose the location or the folder where you want to save the presentation on your computer, and click on “Save”.
In this article, we shall not only understand how to save a standard PPT or PPTx file, but we shall also take a look at how to save a PowerPoint presentation in different file formats such as a PDF, video or an image!
So, let’s get started!
1. How to Save a PowerPoint Presentation?
Once you have saved a PowerPoint presentation, you can easily save it again with just one click. Furthermore, you can also save a PowerPoint presentation in other formats. However, the process of saving a PowerPoint presentation is slightly different on Windows and on Mac.
Let’s understand the process in further detail.
1a. Saving a PowerPoint Presentation on Windows
To save a PowerPoint Presentation on Windows PC, you can follow either of the 2 simple methods.
Method-1: Using the “Save” button on Quick Access Toolbar
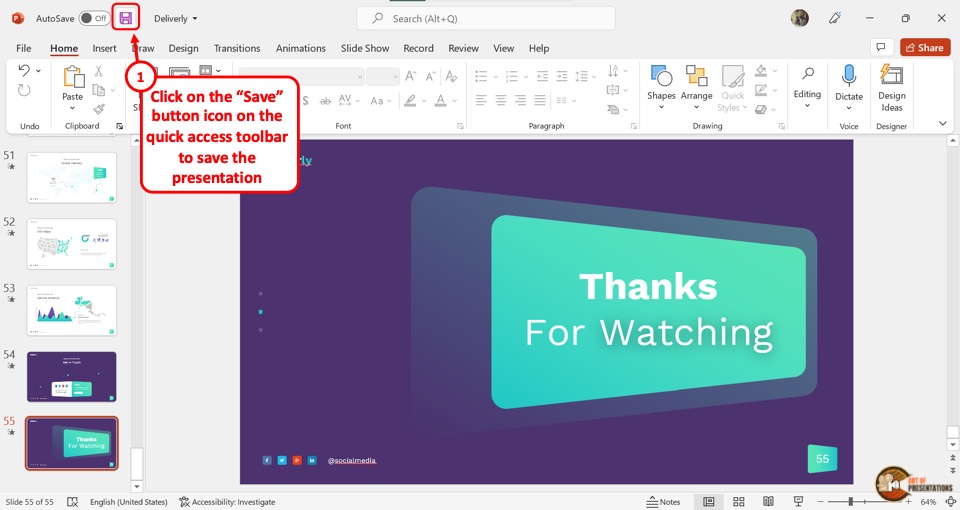
In the Quick Access Toolbar located at the very top of the screen, click on the “Save” icon.
The “Save” icon is located on the left side in the Quick Access Toolbar and looks like a floppy disk. Clicking on the “Save” button will immediately save the PowerPoint presentation in its current location as a “.pptx” file.
If you have opened a new presentation and you are saving it for the first time, clicking on the “Save” button will open a new explorer window. Simply navigate to the folder where you wish to save the new presentation on your computer, and click on “ Save “.
Method-2: Using the “File” tab
Another, more common method is to use the “File” tab in PowerPoint to save your PowerPoint presentation.
Here’s what you need to do –
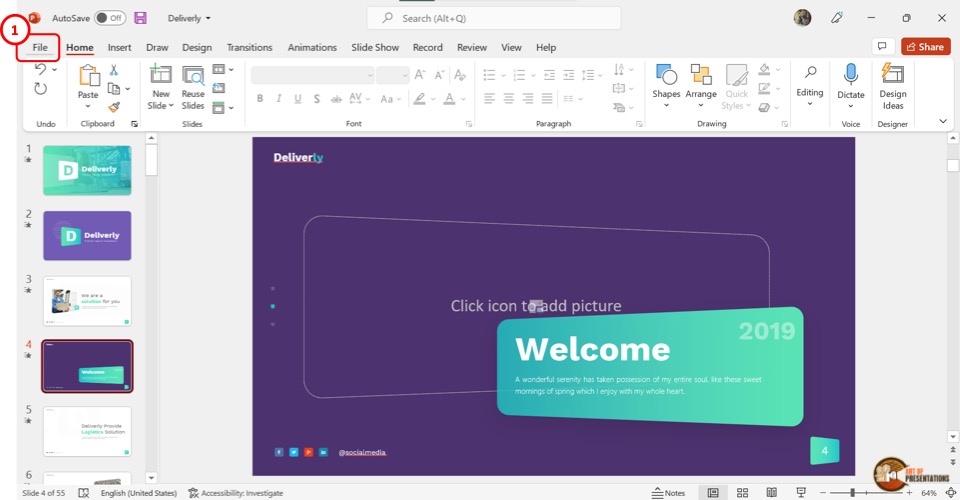
Step 1 – Click on the “File” Tab
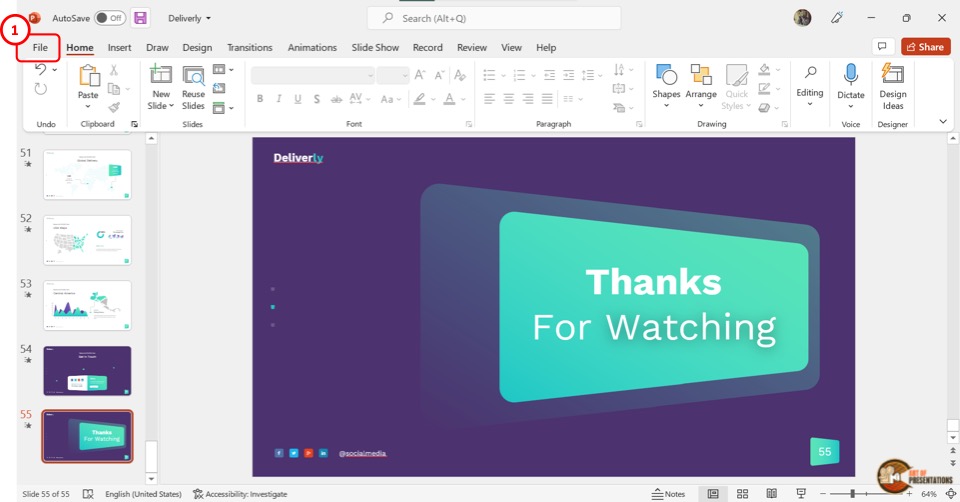
Another way to save a PowerPoint presentation is to use the “File” menu. You have to first click on the “File” tab located at the left corner of the menu ribbon at the top of the screen.
Step 2 – Click on the “Save” option
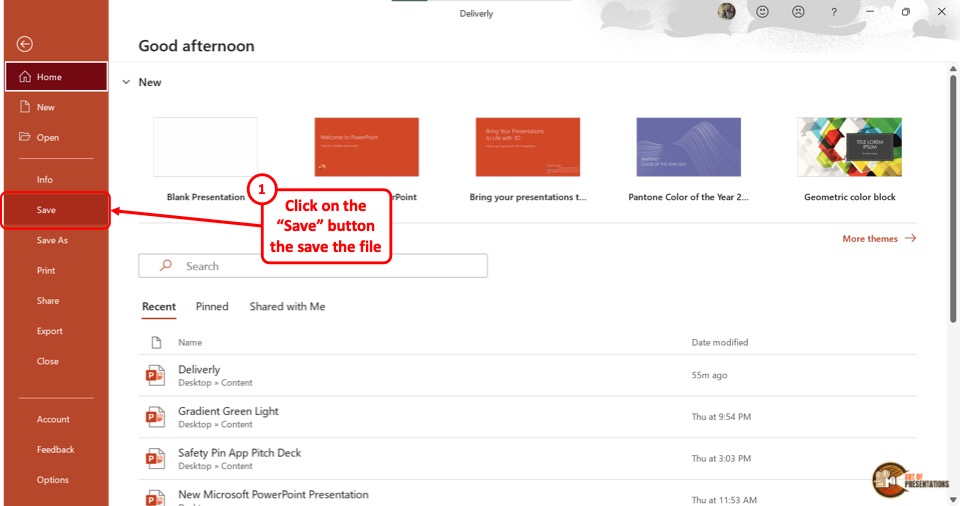
This will open the backstage view in PowerPoint. Now, click on the “Save” option from the sidebar on the left side of the screen. This will save the Microsoft PowerPoint as a “.pptx” file in the current location.
1b. Saving a PowerPoint Presentation on Mac
On a Mac computer, you can use the “File” menu as well to save the PowerPoint presentation.
The first step is to click on the “File” menu in the menu bar located at the top of the screen (above the PowerPoint window). This will open a dropdown menu. Click on the “Save” option from the dropdown menu to save the presentation as a “.pptx” file which is the standard format for presentations.
1c. Shortcut Keys to Save a PowerPoint Presentation
Microsoft PowerPoint also allows you to save a presentation with keyboard shortcuts. All you have to do is press the “Ctrl+S” keys on your keyboard in an open PowerPoint file. This will save the PowerPoint presentation.
1d. Best Format to Save a PowerPoint Presentation?
PowerPoint allows you to save a presentation in various different file formats! For instance, you can use the .ppt format if you wish to open the presentation file using PowerPoint 2007 or earlier. You can use .ppsx to open presentation directly as a PowerPoint Show file that opens it in the presentation mode.
In fact, there are several other formats you can save a presentation in. We shall explore how to save a PowerPoint presentation in several different formats later in the article.
However, the best format to save a PowerPoint Presentation is a “.pptx” file. This type can support all the latest as well as the older features of the PowerPoint presentation.
If you will be opening the presentation using a different software other than Microsoft PowerPoint, “.odp” is the best format. For printing, make sure to save the PowerPoint presentation as a PDF. That said, .pptx file format can help serve these purposes too.
2. How to Save a PowerPoint Presentation as PDF
Saving a PowerPoint presentation in PDF format is the suitable method for printing out your presentation. To save the PowerPoint presentation as a PDF file, follow the 4 easy steps.
Step-1: Click on the “File” Tab
First, click on the “ File ” tab in PowerPoint to open the back stage view of PowerPoint.
Step 2 – Click on the “Save As” option
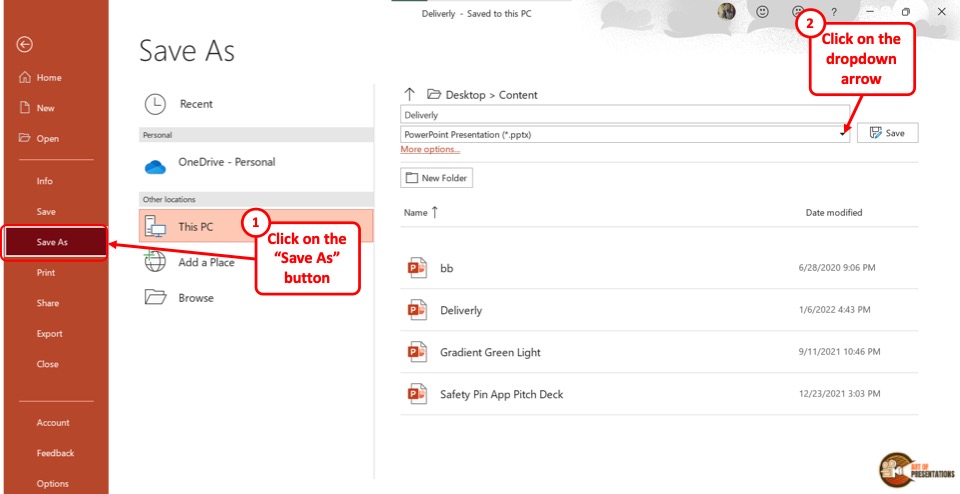
In the menu ribbon located at the top of the screen, click on the “File” tab. In the “File” menu, click on the “Save As” option from the sidebar on the left side of the screen.
Step-3: Click on the “PDF (*.pdf)” option
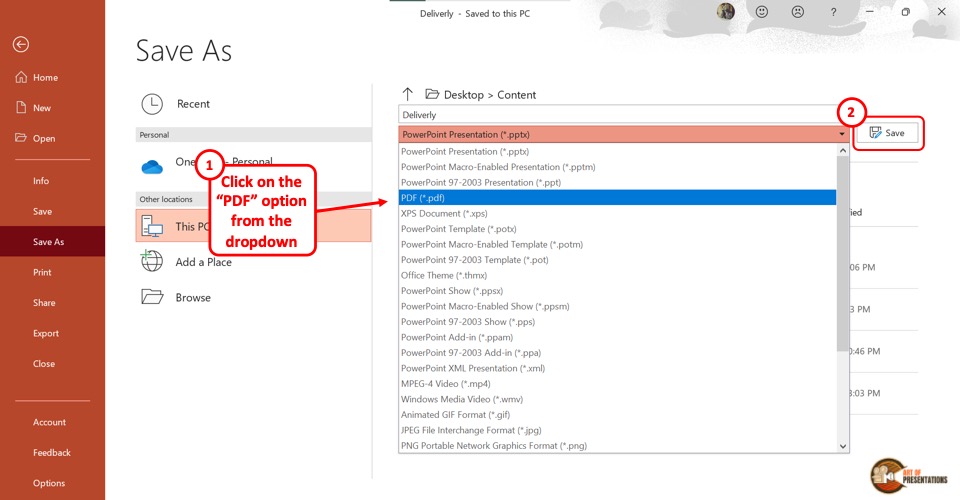
In the “Save As” screen, click on the box that shows “PowerPoint Presentation (*.pptx)” . This will open a dropdown menu. Click on the “PDF (*.pdf)” option from the dropdown menu.
Step-4: Click on the “Save” button
Now all you have to do is click on the “Save” button beside the box to save the PowerPoint presentation as a PDF file (as shown in the image in step 2).
3. How to Save a PowerPoint Presentation as a Video?
In Microsoft PowerPoint, you can also save a presentation as a video. This allows you to play the presentation slides as a video rather than a slide show.
3a. On Windows
To save a PowerPoint presentation as a video on a Windows PC, follow the 3 easy steps.
Step-1: Click on the “File” tab
The first step is to open the “Save As” screen. To do so, click on the “File” tab in the menu ribbon. In the “File” menu, click on the “Save As” option.
Step-2: Choose the “.mp4” file format from the “Save As” tab
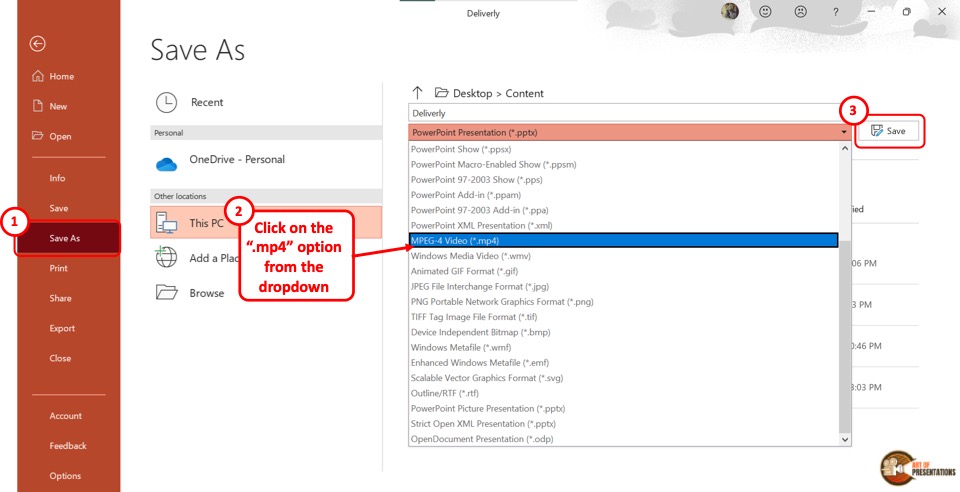
The next step is to click on the “Save As Options” box. It is the second box on the right side of the “Save As” screen. In the dropdown menu, click on either the “MPEG-4 Video (*.mp4)” option or the “Windows Media Video (*.wmv)” option.
Step-3: Click on the “Save” button
The final step is to click on the “Save” button (as indicated in step 2 above). It is located on the right side of the “Save As Options” box. This will save your PowerPoint presentation as a video.
To save a PowerPoint presentation as a video on a Mac device, follow the 3 simple steps.
Step-1: Click on the “Export” option
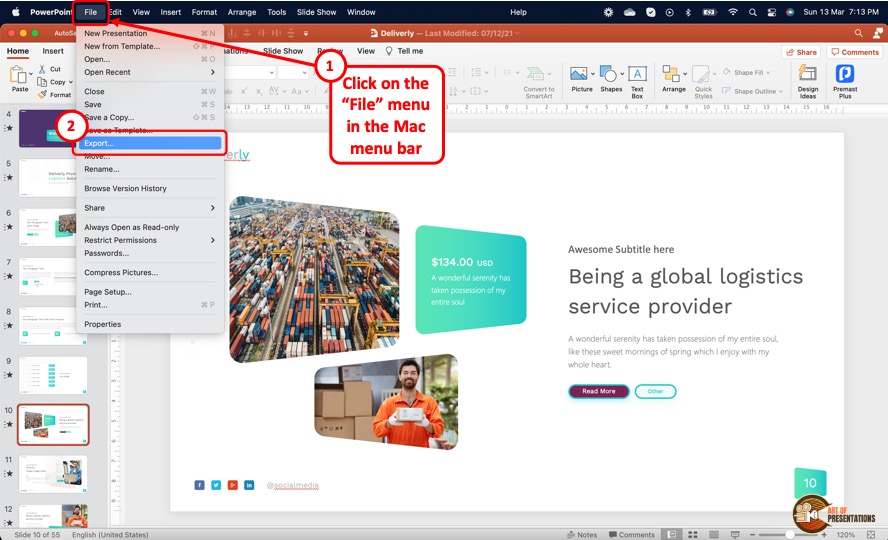
In the menu bar at the top of the screen, click on the “File” option. In the “File” dropdown menu, click on the “Export” option. This will open a dialog box.
Step-2: Click on the “File Format” box
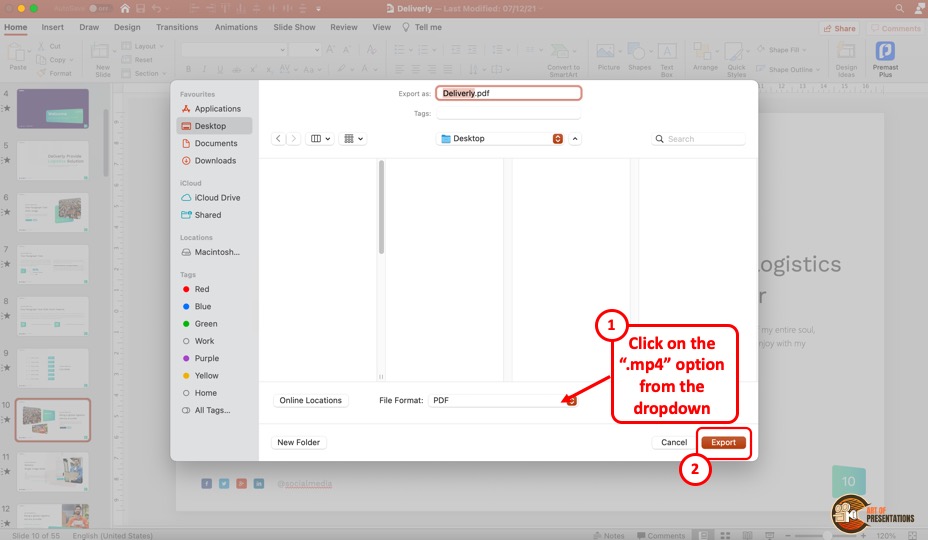
In the dialog box, click on the “File Format” box. This will open a dropdown menu. You can click on either the “MP4” option or the “MOV” option as you prefer.
Step-3: Click on the “Export” button
In the dialog box, you can also click on the “Quality” option to select the quality of the video. Once you are satisfied with the selections in the dialog box, click on the “Export” button at the bottom (as shown in the image in the previous step). This will save the presentation as a video.
4. How to Save a PowerPoint Presentation to Open in Slideshow Mode?
Microsoft PowerPoint allows you to save the PowerPoint presentation as a “PowerPoint Show” file. This opens directly as a slideshow. To save a PowerPoint presentation to open in slideshow mode, follow the 2 easy steps.
In the open PowerPoint file, click on the “File” tab from the menu ribbon which is located at the top of the screen. In the “File” menu, click on the “Save As” option.
Step-2: Click on the “PowerPoint Show (*.ppsx)” option
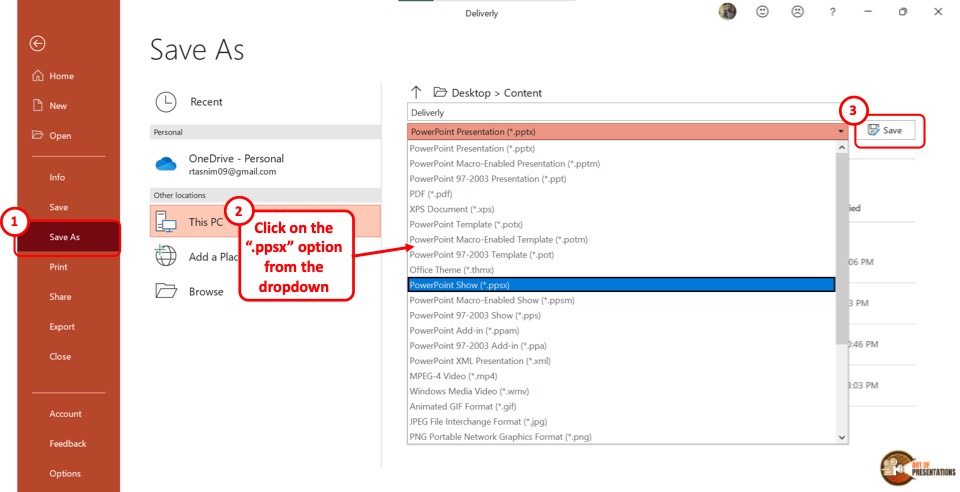
In the “Save As” screen, click on the “Save As Options” box which shows “PowerPoint Presentation (*.pptx)” . This will open a dropdown menu. Click on the “PowerPoint Show (*.ppsx)” option.
Now all you have to do is click on the “Save” button to save the PowerPoint presentation to open as a slideshow.
5. How to Save a PowerPoint Presentation as an Image?
In Microsoft PowerPoint, you can save the presentation as an image in five different formats: “Animated GIF Format (*.gif)” , “JPEG File Interchange Format (*.jpeg)” , “PNG Portable Network Graphics Format (*.png)” , “TIFF Tag Image File Format (*.tif)”, and “Scalable Vector Graphics Format (*.svg)” .
To save your presentation as an image, follow the 3 simple steps.
Step-1: Click on the “Save As” option from the “File” tab
The first step is to click on the “File” tab in the menu ribbon. Then click on the “Save As” option from the “File” menu.
Step-2: Select your preferred image format
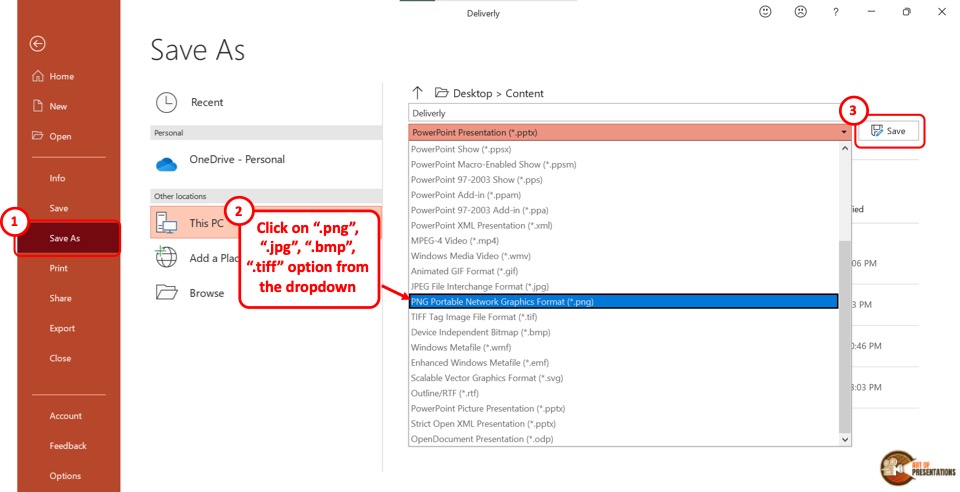
In the “Save As” screen, click on the “Save As Type” box which is the second box in the right column. From the dropdown menu, click on your preferred image format from the five available formats.
Now all you have to do is click on the “Save” button (as shown in the image in step 2) beside the “Save As Type” box. This will save your presentation in a folder containing each slide as a separate image file.
6. How to Save a PowerPoint Presentation as a Template?
A PowerPoint template is a predesigned presentation that you can edit to add your own content. To save a presentation as a template, follow the 3 easy steps.
The first step is to click on the “File” tab in the menu ribbon. Then click on the “Export” option from the sidebar in the “File” menu.
Step-2: Click on “Change File Type”
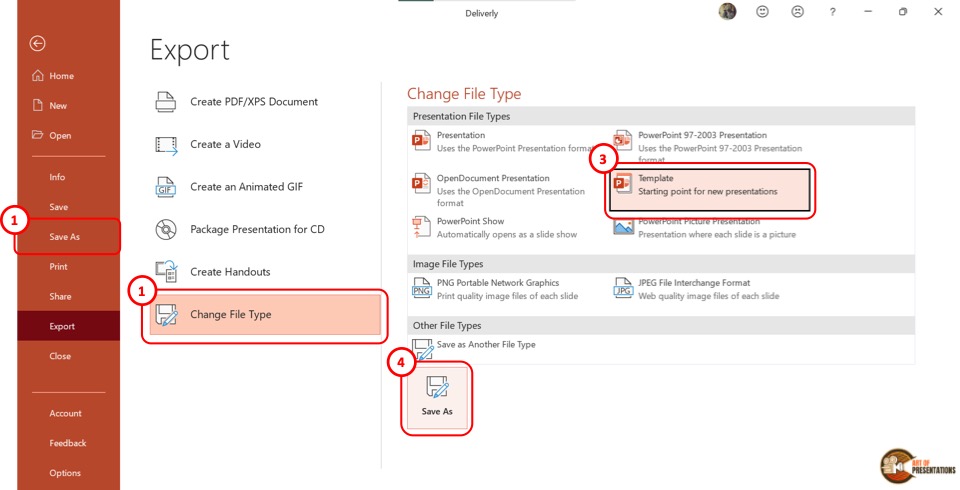
Now you have to click on the “Change File Type” option. Under the “Presentation File Types” group in the right column, click on the “Templates” option. Then click on the “Save As” button at the bottom of the screen.
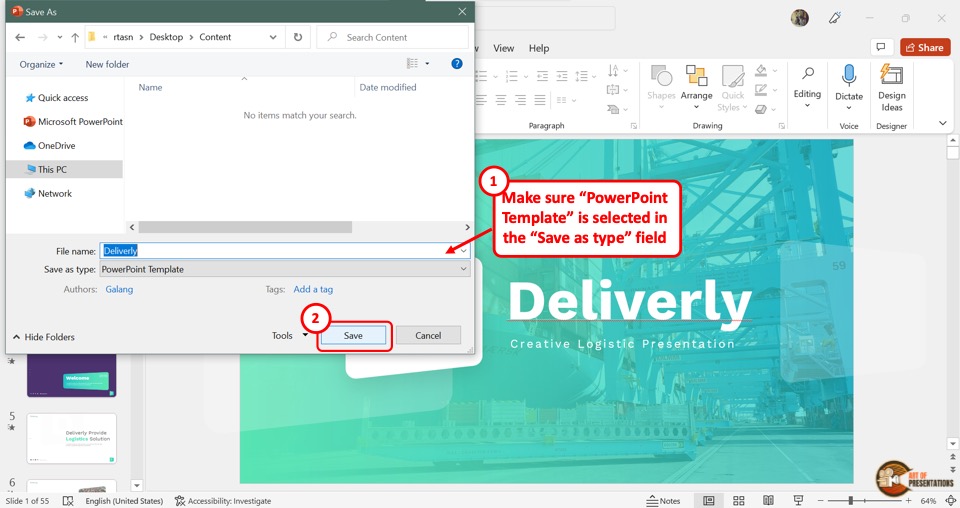
In the “Save As” dialog box, you will see that the “Save as type” box shows the “PowerPoint Template” format. Now all you have to do is click on the “Save” button.
7. How to Save PowerPoint Presentation as Google Slides?
Microsoft PowerPoint does not offer any feature to upload a presentation to Google Slides directly. However, Google Slides does offer you an option to upload your PowerPoint presentation and save it in Google Slides!
Step-1: Save Your PowerPoint Presentation
The first step is to save your PowerPoint presentation using any method described in the section 1 of this article.
Make sure that you note down the location of the folder in which you have save the PowerPoint file.
Step-2: Click on the “Open file picker” option in Google Slides
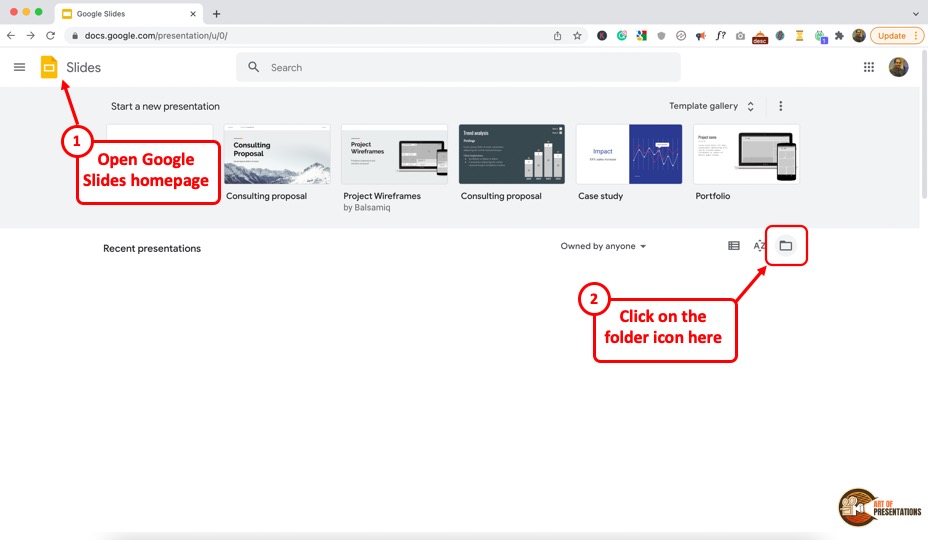
Now, the next thing you need to do is open your Google Slides account by visiting slides.google.com . If you aren’t logged in, make sure you sign in with your account credentials.
Next, you will be presented with Google Slides home screen (as shown in the image above). In Google Slides, click on the “Open file picker” icon which looks like a folder. This will open the “Open a file” dialog box.
Step-2: Click on “Upload”

In the “Open a file” dialog box, click on the “Upload” tab.
From your “File Explorer” window, drag and drop the PowerPoint presentation in the dialog box. Now the presentation will automatically open in Google Slides.
Also Read – How to “ Make a Copy of a Google Slides Presentation ” and how to “ Share a Google Slides Presentation Correctly ” with others!
You can also click on the “ Select a file from your device ” button (blue button in the center of the screen). This will open the file explorer window. Navigate to the folder in which you have saved your PowerPoint presentation, and click on “OK”. This will open and save the presentation file in Google Slides.
8. How to Save a PowerPoint Presentation to a Flash Drive?
To save a PowerPoint presentation on a flash drive or any external device, follow the 3 simple steps.
In the menu ribbon located at the top of the screen, click on the “File” tab. In the “File” menu, click on the “Save As” option.
Step-2: Click on “Browse”
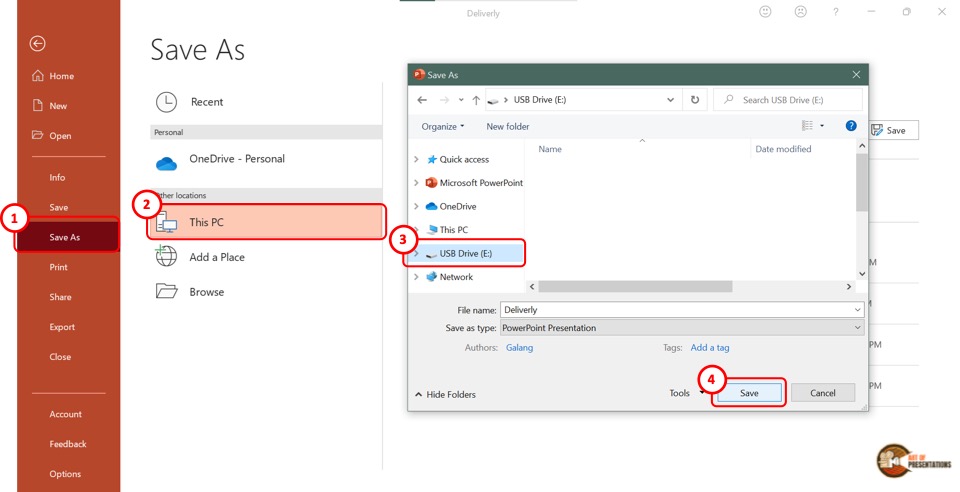
In the “Save As” screen, click on the “Browse” option which is the last option in the left column. This will open the “Save As” dialog box. In the sidebar on the left of the dialog box, click on the external disc.
Now all you have to do is click on the “Save” button at the bottom of the dialog box to save the PowerPoint presentation on the flash drive (as shown in the image in step 2).
9. How to Save a Copy of a PowerPoint Presentation?
The “Save A Copy” feature of Microsoft PowerPoint allows you to save changes in your presentation in a copied file without changing the original file.
Check out my article to learn detailed steps on how to save a copy of a PowerPoint presentation .
10. How to Save a Read-Only PowerPoint Presentation?
The “Read-Only” feature of Microsoft PowerPoint allows you to protect your PowerPoint presentation .
Using this feature, you can share your presentation with others without giving them the access to change your presentation. To save a read-only PowerPoint presentation, follow the steps mentioned below –
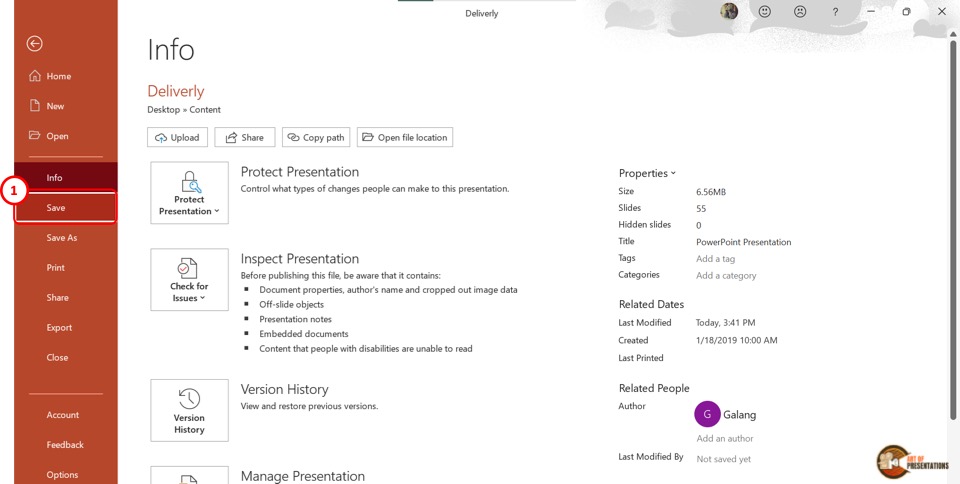
The first step is to click on the “File” tab in the menu ribbon. From the sidebar in the “File” menu, click on the “Info” option.
Step-2: Click on the “Protect Presentation” button

The next step is to click on the “Protect Presentation” option in the “Info” screen. This will open a dropdown menu. Click on the “Always Open Read-Only” option from the dropdown menu.
Step-3: Click on the “Save” option
Now all you have to do is save the presentation. To do so, click on the “Save” option in the sidebar right under the “Info” option. Alternatively, you can press the “Ctrl+S” keys on your keyboard.
If you have received a presentation that opens only in the read-only mode, but you don’t know how to work with it, check out my other article on “ How to Edit a Presentation in Read-Only Mode “.
11. How to Save a PowerPoint Presentation Without Notes?
When saving a PowerPoint presentation, you might want to remove the speaker notes. To do so, all you have to do is follow the 5 quick steps.
In the menu ribbon, click on the “File” tab. Then click on the “Info” option from the “File” menu.
Step-2: Click on “Check for Issues” on the “Info” tab
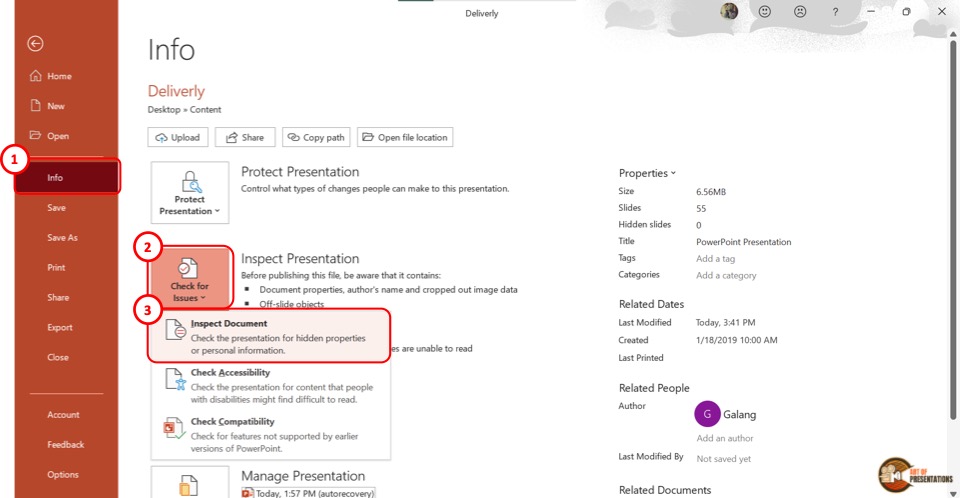
In the “Info” option, click on the “Check for Issues” button. Then click on the “Inspect Document” option from the dropdown menu. This will prompt a dialog box.
Step-3: Click on the “Inspect” option
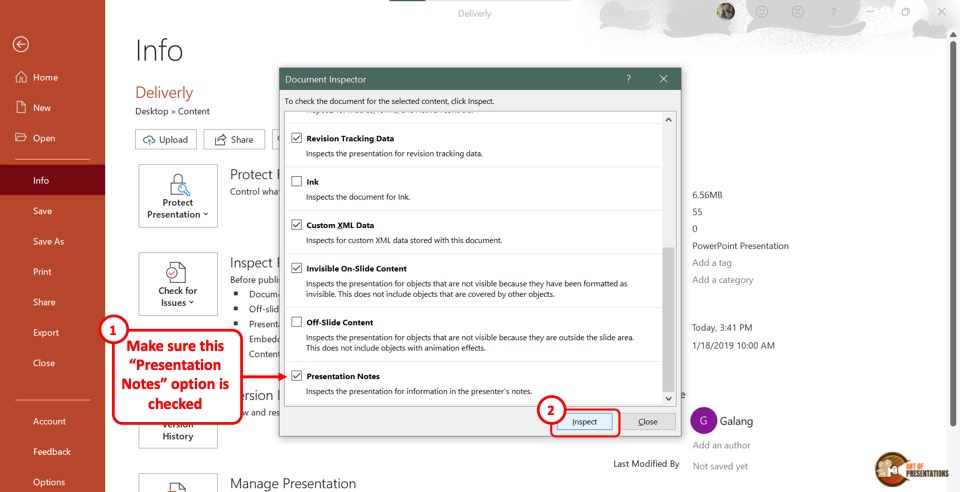
In the “Document Inspector” dialog box, scroll all the way to the bottom and make sure the “Presentation Notes” option is selected. Then click on the “Inspect” button at the bottom of the dialog box.
Step-4: Click on the “Remove All” option
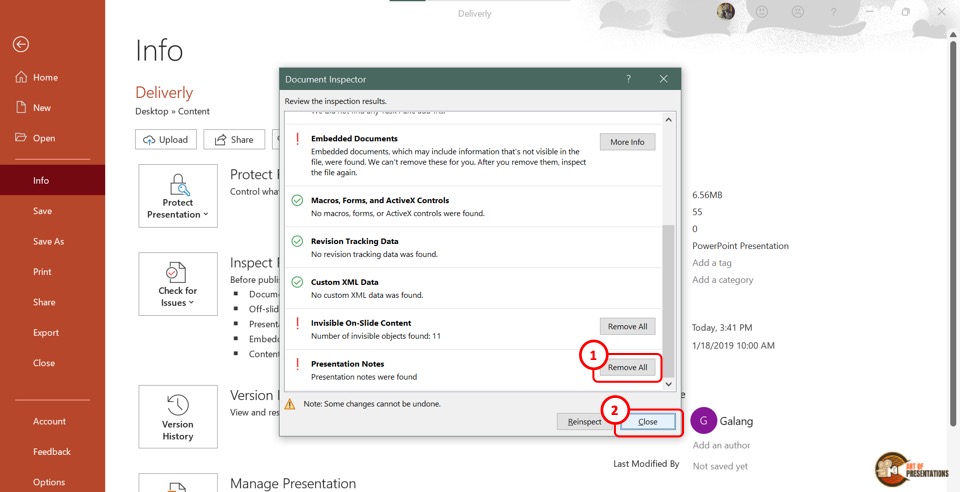
Once the inspection results are shown in the “Document Inspector” dialog, scroll to the bottom again to find the “Presentation Notes” option. Then click on the “Remove All” button at the right side of the “Presentation Notes” option.
Now all you have to do is click on the “Close” button at the bottom of the dialog box to finish the process.
Step-5: Click on the “Save” option
The final step is to click on the “ Save ” option in the sidebar of the “File” menu to save the presentation without notes. You can alternatively press the “Ctrl+S” keys on your keyboard.
12. How to Save PowerPoint Presentation Directly in Microsoft Teams?
If you are delivering a PowerPoint presentation to an audience using Microsoft teams, you can easily share a PowerPoint deck with your audience in the following steps –
- First, open the Microsoft Teams application and login to the meeting.
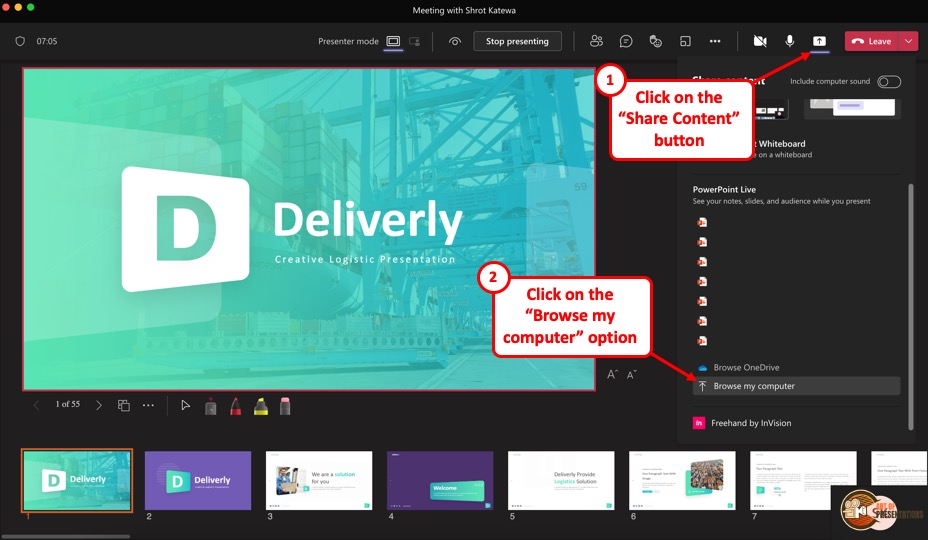
- On the “ Meeting Controls ” menu available in the top part of your meeting screen, locate the “ Share Content ” option.
- Click on the share content button. This will show the most recent PowerPoint files that you opened. You can either choose to click on one of the files visible. Alternatively, scroll down on the right panel and click on the “ Browse my computer ” option.
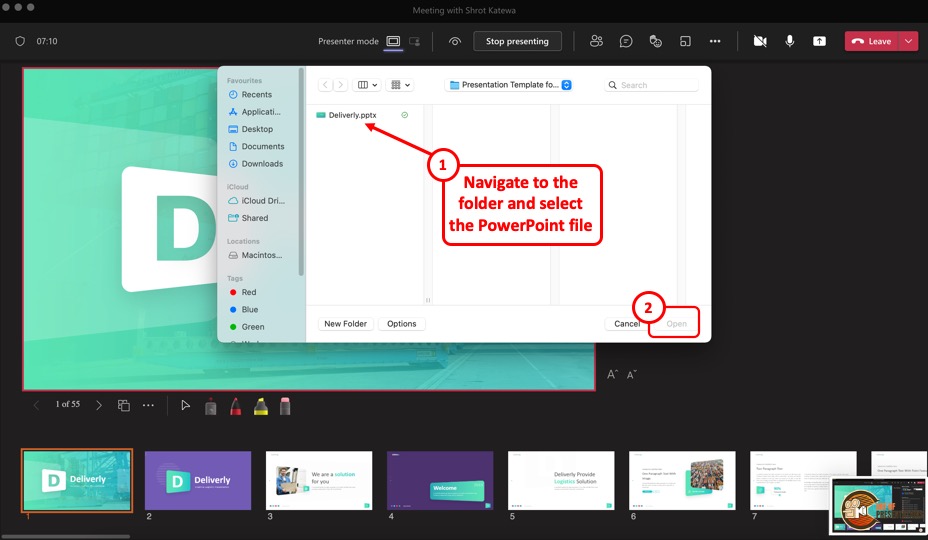
- This will open a new file browser window. Navigate to the respective location where your PowerPoint presentation is saved, click on it to select it. Then, click on “Open” to open the presentation in Microsoft Teams.
- The presentation will open by default in the presenter mode and shared with the audience of the meeting.
13. How to Enable Autosave in PowerPoint Presentation?
The autosave option is only available if you are using the Microsoft Office 365 version of PowerPoint . Other than that, you will have to manually save the PowerPoint file in all other versions.
You can autosave the PowerPoint presentation to the OneDrive cloud, and also autosave recovery files. To enable autosave in PowerPoint presentation, follow the 4 simple steps.
Step-1: Click on the “AutoSave” button
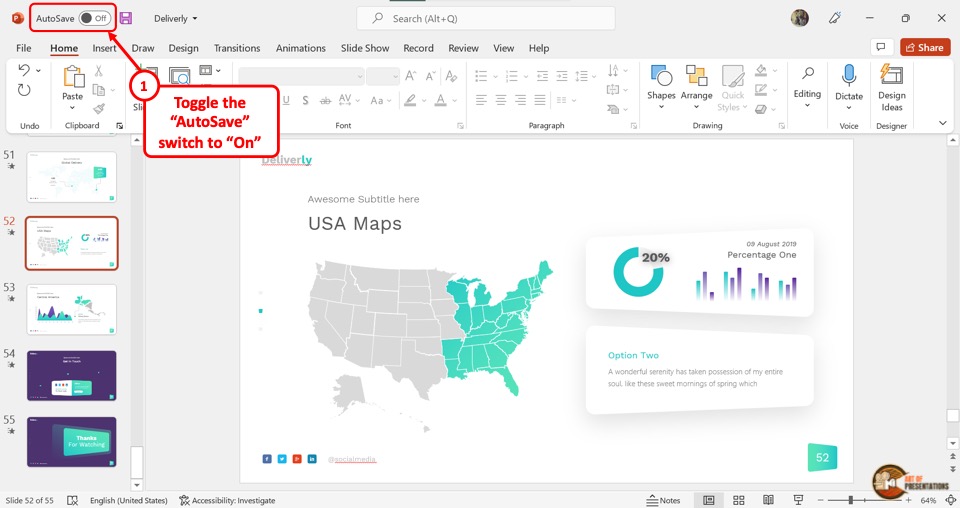
To simply turn on autosave in the OneDrive cloud for the PowerPoint presentation, all you have to do is click on the slider beside the “Autosave” option.
It is located in the left corner of the Quick Access Toolbar at the top of the screen.
Step-2: Click on “Options”
To access more autosave options, click on the “File” tab in the menu ribbon. Then click on the “Options” option which is the last option in the sidebar in the “File” menu. It will open a dialog box.
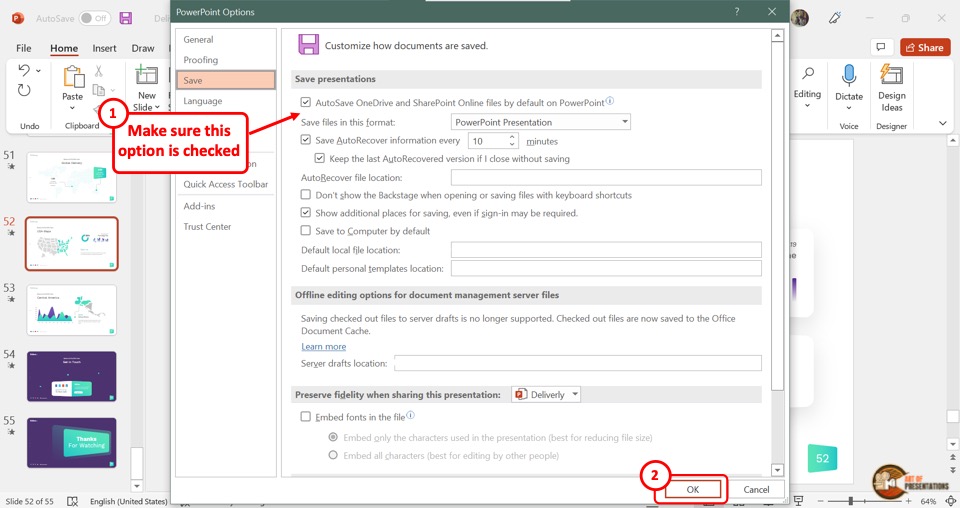
In the “PowerPoint Options” dialog, click on the “Save” option from the sidebar located on the left side. Now you can enable your preferred autosave options in the “Save presentations” section.
Click on the “Autosave OneDrive and SharePoint Online files by default on PowerPoint” for auto-saving on the cloud. You can also select how often the auto-recovery copy is saved by clicking on the box at the right side of the “Save Autorecover information” option.
Step-4: Click on the “OK” button
Now all you have to do is click on the “OK” button at the bottom of the “PowerPoint Options” dialog box to enable your autosave preference (as shown in the image in step 2).
Credit to Cookie_studio (on Freepik) for the featured image of this article (further edited).
You’re using an older browser version. Update to the latest version of Google Chrome , Safari , Mozilla Firefox , or Microsoft Edge for the best site experience.
- Corporate Training
- Course Selling
- Academic Learning
- Learning Basics
- Instructional Design
- Online Training Tools
- Manufacturing
- Products iSpring Suite iSpring Learn
- Use Cases Onboarding Compliance Training Induction Training Product Training Channel Partner Training Sales Training Microlearning Mobile Learning
- Company About Us Case Studies Customers Partnership Course Development Contact Us
- Knowledge Hub Knowledge Hub Academy Webinars Articles Guides Experts on iSpring
- Language EN English Français Deutsch Español Italiano Nederlands Português Polski 中文 日本語 العربية Indonesia
- Shopping Cart
How to Convert PowerPoint to Video for Windows and macOS

content creator
Helen Colman See full bio →

Let’s say you want to share a PowerPoint presentation that includes your narration. What should you do?
Turn a PowerPoint into a video! Converting PPT or PPTX to MP4 is pretty easy, and you only need MS PowerPoint. With version 2010 or later, you can create a short movie out of your PPT slideshow quickly. In this article, you’ll learn how to do this step by step – whether you’re a Windows or macOS user.
This approach is perfect for those who have simple presentations without many effects, animations, and complex timings. Otherwise, you should use third-party video converters that will preserve your effects better.
Let’s see how you can convert your PowerPoint presentation to video using the default version of MS PowerPoint.
How to Convert PowerPoint Slides to MP4 Video in Windows
1. Open the PowerPoint file you want to convert. If it’s already open, save a backup copy of your latest version before the conversion to ensure that your video includes all recent changes.
2. Select File and then click Export if you use PowerPoint 2013 and above, or Save & Send if you’re using PowerPoint 2010.

3. Click on Create a Video .

4. Select your video quality. You don’t really need the highest screen resolution unless you want to show the video on a big screen — it will only take up space in your computer’s storage. Full HD is more than sufficient for most cases, including if you want to upload your video to YouTube.

5. If you have timings and narrations and want to preserve them in your video presentation, click on Use Recorded Timings and Narrations .
If you don’t have narrations yet but need them in your final MP4 file, you can record them at this stage by selecting Record Timings and Narrations .

6. If you don’t have custom timing for each slide, set the amount of time you want each of them to display. You can increase or decrease the time using the up or down arrow next to Seconds spent on each slide without a set timing .

7. Click on Create Video .

8. Now, select a location where you would like to save the PPT as a video and the necessary video format.

Once the conversion process is finished, it’s done! You’ve converted PPT to video.
How to Convert PPT to Video in macOS
2. Select File and then click on Export .

3. Select the format of your video presentation in the File Format drop-down menu.

4. Next, select the quality of your video on the Quality menu. You don’t really need the highest screen resolution unless you want to show the video on a big screen — it will only take up space in your computer’s storage. Full HD is more than sufficient for most cases, including if you want to upload your video to YouTube.

6. If you don’t have custom timings for each slide, set the amount of time you want each of them to display. You can increase or decrease the time using the up or down arrow next to Seconds spent on each slide without a set timing .

7. Click on Export .

And that’s it! Just wait for the conversion process to finish, and your MP4 presentation is ready.
Preserve Quality, Sounds, and Effects with a PowerPoint to MP4 Converter
PowerPoint is more than sufficient for simple presentations. However, we often see that, in more complex cases, the timings of slide transitions are inaccurate after you convert PPT to video.
If you want to preserve all of your PPT effects, transitions, and animations intact in your final video, use iSpring Converter Pro . Our PPT to MP4 converter was designed specifically for this sort of task and comes with a fully functioning 14-day free trial version .
What video formats are supported?
PowerPoint offers several format options: MPEG-4 Video (MP4) , Windows Media Video (WMV) for Windows users, and MOV — for macOS users. If you need a different file format, you can use another video converter software .
Why convert PPT to MP4 videos?
People convert PowerPoint to MP4 for three main reasons:
- They want to share their presentations on social media, blogs, or video sharing sites.
- They want to protect their PowerPoint file from modification and repackaging by someone else.
- They want their presentation to display flawlessly on devices that support video, like smart TVs, tablets, and smartphones.
Will animations and transitions be preserved in the converted video?
It depends on the conversion method you use. MS PowerPoint preserves some simple effects, but in complex cases, animations can be distorted or lost. Some third-party converters, like iSpring Converter Pro , retain animations and transitions, while others may not. So, before turning your presentation into a video, check if your tool supports the effects in your slides.
Are there any recommended settings for optimizing video quality during conversion?
We advise selecting a resolution that’s based on your target platform (e.g., 1080p for YouTube). Additionally, consider adjusting settings like frame rate and bitrate for optimal quality.
Table of Contents
iSpring Suite
Create online courses and assessments in record time.

Content creator
Helen Colman
She enjoys combining in-depth research with expert knowledge of the industry. If you have eLearning insights that you’d like to share, please get in touch .

How to Record and Add Narration to a PowerPoint Slides
15 PowerPoint Tips to Make Your Slides More Effective

Instructional Video Made Easy: Types, Costs, Guides, and Tips

We use cookies to give you the best possible experience on our website and also for analytics and marketing purposes. You can enable or disable optional cookies as desired. See our Cookie Policy for more details.
Manage your cookies
Essential cookies are always on. You can turn off other cookies if you wish.
Essential cookies
Analytics cookies
Social media cookies
Unsupported browser
This site was designed for modern browsers and tested with Internet Explorer version 10 and later.
It may not look or work correctly on your browser.
- Presentations
Why Make Your PowerPoint Into a Video ?
PowerPoint isn't marketed as a video tool. There are many advanced video tools out there like Adobe Premiere or Final Cut Pro X. With all of these options, you might be wondering why you would use PowerPoint to create a video file.
Here are four great reasons to use PowerPoint to create video presentations:
- The device you want to show your PowerPoint file on doesn't support PowerPoint files (think Smart TV's or handheld game consoles).
- You already have a finished PowerPoint presentation and don't have the time to recreate it from scratch in a video editor.
- Your recipient doesn't have PowerPoint installed on their device, but can open it in a standard video player app.
- You don't have the time to learn a new piece of video editing software to create a presentation video.
How to Quickly Convert Your PowerPoint to Video (Watch & Learn)
Let's walk through how to convert a PowerPoint (PPT) file into a video. In the quick, two minute screencast below, you can watch me cover the process step-by-step:

Keep scrolling to see more tips for making videos with PowerPoint, including compression tips that weren't mentioned in the video.
How to Export Your PowerPoint to Video
Start off by opening your PowerPoint presentation. Exporting a PowerPoint presentation to a video file should be the last step of your process. This is because you'll need to convert the PowerPoint presentation to video each time you make changes.
As I mentioned earlier, PowerPoint will export animations and transitions when you export the file as a video.
To begin the export, go to the File > Export > Create a Video menu option.

From this menu, there are several key settings to choose before you export your finished video. The dropdown boxes on the right side control the quality and timing of your presentation.
Here are the key choices you'll need to make before converting your PowerPoint to video:
1. Set PowerPoint Video Quality
Choose a quality setting from the dropdown to find the sweet spot between file size and video quality.
The better the quality setting you choose, the larger the finished file will be. If you're going to upload the video online to a service like YouTube, it's fine to export at the highest quality and let them handle the compression.

If you're sharing this video with a colleague via email or posting it on your own server, a smaller file size might be the right choice. Here are my recommendations for when to use each of the settings:
- Presentation Quality. When keeping the file size small is no object, use Presentation Quality. It will render a video that looks extremely close to your original presentation alongside a large file.
- Internet Quality. This is ideal if you want to upload quickly to a social service like Facebook or Twitter. Using Internet Quality is a good middle ground between file size and clarity.
- Low Quality. This is the right choice when you're trying to save space, such as when you'll attach a video to an email.
Choose a quality setting from the dropdown option to make your selection.
2. Control PowerPoint Slide Timings
Now, you need to set timings, the runtime for each slide in your video. There are two options for timings on the dropdown menu:
- Don't use Recorded Timings and Narrations. Simply set a length of time for each slide to show in the video, such as 5 seconds each.
- Use Recorded Timings and Narrations. Setup specific lengths of time for each slide to show, and optionally record narrations for the video version.

Basically, these two options let you choose between setting specific timings or using the same runtime for each slide.
For this example, let's leave the option set to Don't Use Recorded Timings and Narrations.

When you choose this option, you'll need to set the Seconds spent on each slide option. This is how long each slide will show in the video version. The default is 5 seconds as you can see in the screenshot above.
3. Create Your PowerPoint Video
Finally, click on Create Video. PowerPoint will open up a Save As window, and you'll need to set a folder and filename for your finished video.

You can also choose between an MPEG-4 video (.MP4 file) or Windows Media Video (.WMV) file when exporting, so choose the appropriate format if your device has any limitations. I typically leave this set to MP4.
How to Record Timings in PowerPoint
In the example above, we used the same amount of time spent on each slide (a flat 5 seconds in the example shown.) However, you can setup timings and narrations for your slide to customize how long each slide should show.
To setup timings and narrations, choose Record Timings and Narrations from the timings dropdown.

Then, a dropdown menu will appear. There are two options here:
- Slide and animation timings. Leave this box checked to record the amount of time
- Narrations, ink, and laser pointer. Leave this box checked if you want to record audio from your computer's default microphone.
Voiceovers are very helpful if you want to send a slide deck to a colleague and share your commentary while they watch the video.

Once you press Start Recording, PowerPoint will go into a fullscreen view of your presentation. Leave each slide on screen for the length of time it should show in the video.
Basically, PowerPoint is recording a live version of your presentation. If you leave a slide on a screen for 10 seconds, it will appear for 10 seconds in the video version.

You can use the arrow keys to advance the slides and change slides. When you reach the end of the presentation, PowerPoint will exit to the menu.

Now, you can save your finished video presentation with your own timings and narrations. The finished video will use the same timings you used while rehearsing.
Create Powerful Video Presentations Fast With the iSpring Suite
If you need to make video-based presentations that are more robust from within PowerPoint, then why not use a quality tool designed for this? Plug the iSpring Suite into your PowerPoint setup today.
With iSpring Suite, you can start recording video and audio directly from within the PowerPoint environment. Also, go one step further. Make use of a variety of iSpring Suite’s next-level eLearning presentation components. Then export to common video formats like MP4.

Take Your Video Presentations to the Next Level
Add more robust eLearning components into your presentation videos with iSpring Suite. Here are some of the advanced iSpring Suite capabilities you can tap into:
- Edit your video right from within PowerPoint. You can trim, add titles, transitions, audio, graphics and merge your presentation videos.
- Record screencasts and software tutorials with voiceovers. Or create a webcam video that's directly embedded into your PowerPoint presentation.
- Create full video-based courses. Take lectures and combine them with video slides and iSpring’s tools to quickly make your online course material.
- Build interactive assessments. You can pair your video material with a full assortment of quizzes. Use quiz templates, branching, and flexible scoring.
- Translate your text to speech to add professional voice-overs and localize courses in 42 languages.
- Take advantage of iSpring Suite’s adaptive player. It allows you to play your presentation on all devices seamlessly.

Quickly Add Videos and eLearning Components to Your Presentations
iSpring Suite will transform PowerPoint into a more powerful toolset. With it you can add videos to your presentations and edit them from within PowerPoint.
Pair these videos with so much more. Turn your presentations into full courses, with quizzes, eLearning interactions, and interactive role-plays. Then export your presentation into common video format or deploy as fully interactive mobile-ready courses.
The best way to get started is to sign up for the 14-day free trial , so that you can check out all the features at your own pace, without paying anything upfront.
Recap and Keep Learning More About PowerPoint
Maybe you're converting your PowerPoint presentation to go online, or maybe you're trying to make it easy for a co-worker that doesn't have PowerPoint installed. Either way, there are plenty of reasons to convert a PowerPoint file to a video for easy watching.
Don't stop here. There's much more to learn about PowerPoint. Check out these tutorials to do just that:
We also have plenty of professional PowerPoint templates with great design options, if you need a quick start to making your presentation. Browse through these curated collections:

What are your favorite tips for converting PowerPoint presentations? Let me know in the comments below.

- English Español Deutsch Português Italiano Français 日本語 한국어 繁體中文 Türkçe Dutch Polish Thai Indonesian Malay
- Free Download For Windows For macOS
- Screen Recording RecExperts For Windows Screen recorder for PC RecExperts For Mac Screen recorder for macOS Online Screen Recorder Record screen online free ScreenShot Take Screenshot on PC
- Buy Now Buy Now
- Student Discount
- Resources Screen Recorder Windows 10 Record Zoom Meeting Record Internal Audio Mac Record Gameplay on PC Video Recording Software
- Support Support Center Guides, License, Contact Chat Support Chat with a Technician Pre-Sales Inquiry Chat with a Sales Rep
How to Record a Presentation with Your Face (Audio and Video)
How to record a presentation with your face? This article offers three ways: video record all presentations without limits by using EaseUS RecExperts, record a PowerPoint presentation with its default recording function, and record Google slideshows via its built-in recorder.
Trustpilot Rating 4.7
Don’t forget to share this post!
Page Table of Contents
Updated on Jun 19, 2024
The development of technology enriches communication forms. From professors to business consultants, college to company, and school assignments to work reports, self-presenting has become indispensable in our study and work.
Adding narration in Google Slides, meetings, and other scenarios not only enhances audience engagement but also conveys ideas efficiently. So, users are more inclined to record presentations with their faces and audio.
This guide will teach you how to record a presentation with your face in PowerPoint, Google Slides, and other video narration forms. Read this article and get free video recording software to record slide about yourself easily and effectively.
|
|
|
|
| 🔥 | - No time limit; no license or signup; no lag or watermark |
|
| ⭐ | - Need a Microsoft Office license; recordings saved on each slide separately; record the PPT area only; saved video file size super large |
|
| 👍 | - Need a Google account; recording length up to 30 minutes; affected by the Google Drive storage |
|
How to Record Presentation with Face Using EaseUS RecExperts
A professional screen recorder like EaseUS RecExperts would be the best way to record PPT with video. It helps you record yourself presenting a PowerPoint , including your face and audio.
Narrators can record PowerPoint with webcam and audio, easily record presentations on Google Slides, and effectively record a presentation on Zoom with face. This easy-to-use presentation recorder can simplify the experience of recording presentations with faces.
EaseUS RecExperts
- Record Google Slides , MS PowerPoint, Zoom meetings, and other presentations with face, audio, and video using a webcam and microphone.
- Record about me presentation, self-presenting videos, and slide about yourself without time limit, lag, or watermark.
- Record full screen , part of screen, and any region of screen on computer.
- Save a PowerPoint as a video in high-quality. The AI-empowered function can reduce noise naturally.
Now, let's see how to record a presentation with your face.
Step 1. Launch EaseUS RecExperts on your computer. Choose a recording mode from "Full Screen" or "Region" . To record a part of the screen, select the recording area manually.

Step 2. After selecting the recording mode, click on the camera sign on the interface. This will let the tool record your screen and the webcam at the same time.

Step 3. You can also change the background with the AI Recognition ot green screen feature. Classroom, blur, studio, or your local images are supported. Just click "Webcam" > "Settings" > "Remove Background" to download and use these modules. Then, click the "REC" button to start recording.

Step 4. After recording, the recording list window will open. Here you can view, split, delete, manage your recordings easily.

How to Record a PowerPoint Presentation with Your Face via the Internal Recorder
If you want to record yourself talking in Microsoft PowerPoint, an inbuilt screen recorder is provided. You can record PowerPoint presentations with audio and video through its Record Slide Show or Screen Recording feature.
Before learning how to record on PowerPoint, pay attention to the following tips:
➤ You need to have a license for Microsoft Office to use PowerPoint.
➤ Check if the webcam and microphone are pre-placed well before recording.
➤ A new recording is saved on each slide separately. So, you should cover everything on one slide and not go back, otherwise the new recording will replace the previous one.
➤ Microsoft PowerPoint only records the PPT area, not supporting full-screen recording.
➤ The saved videos are very large. Make sure your computer has enough space.
After reading the perquisites, let's see how to record a PowerPoint presentation with your face.
Step 1. On the toolbar, tap Record Slide Show or Screen Recording .

Step 2. Click Record . Then, you can select Record from Current Slide… or Record from Beginning… .

Step 3. You have entered the recording screen. In the bottom right corner, turn on the microphone and webcam.
Step 4. Click Record in the upper left corner. It starts recording the PPT on yourself with audio. Click the arrow to move to the next slide, and use the pen to write notes on the slide if needed.

Step 5. To stop recording in PPT, click Stop .
Step 6. To save a PowerPoint as a video, go to Files > Export > Create a Video in the upper left corner. The recording file will be saved in MP4 format.

Share this post on your social platform to help more people!
How to Record a Presentation with Your Face Google Slides via the Default Recorder
Google Slides is another popular presentation tool that allows users to record video with face. Unlike MS, Google Slides is a cloud-based software that requires no installation or license. But there are some limitations you need to pay attention to:
➤ Each presentation can be recorded for up to 30 minutes.
➤ You need a Google account to use this function.
➤ There is a storage limit. You cannot record new videos if the Google Cloud has insufficient space.
After reading the perquisites, let's see how to record a presentation with your face Google Slides:
Step 1. Open a browser, sign into your Google account, and visit Google Slides .
Step 2. Create or open a PPT, click the Rec button in the upper right corner, and tap Record new video .
Step 3. You will enter the screen recording interface. Press the red button to start recording.
Step 4. In the coming prompt, click Allow and toggle on Also allow tab audio to enable the camera and microphone. Now, you can record your face and voice.
Step 5. To end the recording, press the red button again. Here, you can click Re-record to start over or click Save to Drive to save the presentation as a video.
Extra Tip: How to Record a PowerPoint Presentation with Your Face on Mac
Since there is not a Mac version of MS PowerPoint, users may ask what is the best way to record a presentation for Mac ?
For how to record a PowerPoint presentation with your face Mac, you have two options:
Way 1. Use the Mac built-in recorder - QuickTime Player
Although Mac has a default presentation recorder, it cannot capture internal sound. If you want to record screen on Mac with audio , you need to download and install an extra add-on extension: Soundflower.
Step 1. Open the Soundflower download page . Then, download and install Soundflower on your Mac.
Step 2. Launch Soundflower and go to System Preferences > Volume . Click the Gear icon at the bottom-left panel. Tap Create a Mult-Output Device > Built-in Output > Soundflower (2ch) .

Step 3. Click the Gear button again and click Use This Device for Sound Output .
Step 4. Open QuickTime Player, navigate to File > New Screen Recording , tap the down-arrow icon next to the record button, and choose Soundflower (2ch) as the microphone device.

Step 5. Now, open the presentation PPT and locate the slide you want to record.
Step 6. Click Record to start recording slide about yourself.
Step 7. To stop recording in PPT, the Stop button.
Way 2. Try another presentation recorder - EaseUS RecExperts for Mac
To record presentation with face and audio directly, you can use a Mac screen recorder . Compared with QuickTime Player, it offers an easier and more straightforward solution.

Step 1. Firstly, launch EaseUS RecExperts on your Mac. There are two options, "Full Screen" and "Region," for you to select the recording area.

Step 2. Then, click on the "Webcam" button at the bottom. When a "Record webcam" window pops up, click the button to activate the webcam, and you can select the device you want to use from the dropdown menu.

Step 3. If you want to capture the screen with audio, the "Sound" button beside "Webcam" can help. You can click on the two buttons on the "Select recording sound" window to choose the audio source, such as the system sound, the microphone audio, or two of them.

After adjusting the settings appropriately, click on the "REC" button to start recording.
Step 4. Now, you can record the Mac screen and your webcam at the same time. After capturing all the content you need, hit the "Stop" button to end it, and this software will offer you a built-in video player to view the video you captured.

Guess now you have known how to record a presentation with your face . To summarize, both the internal recording functions in PowerPoint and Google Slides are limited. If you want to record PowerPoint, Google Slides, Zoom, or other presentations without any limits, use EaseUS RecExperts.
It allows narrators to record their PPT with face easily. No time limit, no screen size limit, and no sophisticated steps. Download this free presentation recorder to your computer and give it a shot.
FAQs on How to Record a Presentation with Your Face
Learn more frequently asked questions on how to record presentation with face.
1. Is there a free recording app?
Yes, there is a free recording app called EaseUS RecExperts. This versatile screen recorder lets you record everything you want, including presentation, video conference, streaming video, gameplay, YouTube, and more. You can record full screen or part of screen to your liking.
2. Why can't I record my face on PowerPoint?
Recording face on PowerPoint not working can be caused by:
- The microphone not enabled. Go to Settings on PowerPoint to check if you give access to your microphone.
- Insufficient disk space. You need to free up your drive and leave more storage space.
3. How do you present yourself in PowerPoint?
To present yourself in PowerPoint, you can use the built-in recorder in MS PowerPoint. Here are the steps:
Step 1. Go to Record Slide Show or Screen Recording .
Step 2. Click Record > Record from Current Slide… or Record from Beginning… .
Step 3. Click Record on the upper left corner to video record yourself presenting a PowerPoint.
Step 4. Click Stop to end recording the introduction slide about yourself.

One-click to capture anything on screen!
No Time Limit, No watermark
Melissa Lee
Related Posts

How to Record Overwatch with 4 Ways

Top 10 Best Video Player for Windows 11 [2024 Updated]

How to Record Flash Video in 2024 [High Quality]

Editor's Pick | Top 8 OGG Player Recommended in 2024
Success, thanks for submitting!
- Refund Policy
- Terms & Conditions
- Do Not Sell
Copyright © 2004 - 2023 EaseUS. ALL RIGHTS RESERVED.
- How to Login
- Use Teams on the web
- Join a meeting in Teams
- Join without a Teams account
- Join on a second device
- Join as a view-only attendee
- Join a breakout room
- Join from Google
- Schedule a meeting in Teams
- Schedule from Outlook
- Schedule from Google
- Schedule with registration
- Instant meeting
- Add a dial-in number
- See all your meetings
- Invite people
- Meeting roles
- Add co-organizers
- Hide attendee names
- Tips for large Teams meeting
- Lock a meeting
- End a meeting
- Manage your calendar
- Meeting controls
- Prepare in a green room
- Share content
- Share slides
- Share sound
- Apply video filters
- Mute and unmute
- Spotlight a video
- Multitasking
- Raise your hand
- Live reactions
- Take meeting notes
- Customize your view
- Laser pointer
- Cast from a desktop
- Use a green screen
- Join as an avatar
- Customize your avatar
- Use emotes, gestures, and more
- Get started with immersive spaces
- Use in-meeting controls
- Spatial audio
- Overview of Microsoft Teams Premium
- Intelligent productivity
- Advanced meeting protection
- Engaging event experiences
- Change your background
- Meeting themes
- Audio settings
- Manage attendee audio and video
- Reduce background noise
- Voice isolation in Teams
- Mute notifications
- Use breakout rooms
- Live transcription
- Language interpretation
- Live captions
- End-to-end encryption
- Presenter modes
- Call and meeting quality
- Meeting attendance reports
- Using the lobby
- Meeting options
- Record a meeting
- Meeting recap
- Play and share a meeting recording
- Delete a recording
- Edit or delete a transcript
- Customize access to recordings or transcripts
- Switch to town halls
- Get started
- Schedule a live event
- Invite attendees
- organizer checklist
- For tier 1 events
- Produce a live event
- Produce a live event with Teams Encoder
- Best practices
- Moderate a Q&A
- Allow anonymous presenters
- Attendee engagement report
- Recording and reports
- Attend a live event in Teams
- Participate in a Q&A
- Use live captions
- Schedule a webinar
- Customize a webinar
- Publicize a webinar
- Manage webinar registration
- Manage what attendees see
- Change webinar details
- Manage webinar emails
- Cancel a webinar
- Manage webinar recordings
- Webinar attendance report
- Get started with town hall
- Attend a town hall
- Schedule a town hall
- Customize a town hall
- Host a town hall
- Use RTMP-In
- Town hall insights
- Manage town hall recordings
- Cancel a town hall
- Can't join a meeting
- Camera isn't working
- Microphone isn't working
- My speaker isn’t working
- Breakout rooms issues
- Immersive spaces issues
- Meetings keep dropping

Share slides in Microsoft Teams meetings with PowerPoint Live
PowerPoint Live in Teams gives both the presenter and audience an inclusive and engaging experience, combining the best parts of presenting in PowerPoint with the connection and collaboration of a Microsoft Teams meeting.

When you’re the presenter, you have a unique view that lets you control your presentation while staying engaged with your audience, seeing people’s video, raised hands, reactions, and chat as needed.
And if you’re an audience member, you can interact with the presentation and personalize your viewing experience with captions, high contrast slides, and slides translated into your native language.
Here’s how it works:
Tip: Are you an audience member? Jump down to learn more about how you can interact during the presentation.
Presenter view

Present your slides

If you're in PowerPoint for the web, select Present > Present in Teams .
Your slides will appear in the Teams meeting, with your Notes next to them.
Navigate through the slides

Use the navigation arrows to go forward and backward.
Use the thumbnail strip to jump ahead or backwards.
Select Go to slide to see a grid view of all slides in the presentation. Select one to jump to it.
Stay connected to the audience
One of the benefits of using PowerPoint Live to present instead of sharing your screen is that you have quick access to all your meeting tools you need to engage with the audience and to read the room in one view. This is especially true if you’re presenting from a single screen.
Turn Chat on or off to view what your audience is saying.
See audience reactions and raised hands in real-time.
Change the Layout of your presentation and choose how your live camera feed appears in your presentation, like Standout or Cameo . It helps the audience read your non-verbal cues and keeps them engaged.
Use the Laser pointer , Pen , Highlighter , or Eraser to clearly reference items on your slides.
Audience view
As an audience member, you’re able to personalize your experience without affecting anyone else. Try these options to find what works best for you:

Note: If presenters don't want people to be able to independently navigate through a PowerPoint file they are sharing, use the Private view toggle to turn it off.
Click any hyperlink on slides to get more context right away.
Interact with videos on slides to adjust the volume or jump to a timestamp and consume it at your own pace.
Use a screen reader to get full access to the slide content.

Switch to a high contrast view to make the slides easier to view if you have low vision. Select More options > View slides in high contrast .
Your viewing experience will be at a higher fidelity, letting you see crisp text and smooth animations. PowerPoint Live also requires significantly less network bandwidth than typical sharing, making it the best option when network connectivity is a problem.
Independent magnifying and panning
You can zoom in and pan on a presentation slide without affecting what others see. Use your mouse, trackpad, keyboard, touch, or the Magnify Slide option as applicable.
To zoom in or out on a slide, do any one of the following:
Hover over the slideshow and pinch or stretch on trackpad.
Pinch or use the stretch touch gesture (on a touch-enabled device).
Press the + or – keys.
Hover over slide, hold down Ctrl key and scroll with mouse wheel.
In the More Actions menu, click the + or – buttons.
To pan around your slide, do any one of the following:
Press the arrow keys.
Click and drag using a mouse.
Click and drag on a trackpad.
Use one finger to touch and drag (on touch-enabled device).
When done zooming and panning, press Esc to reset your screen.
Important:
PowerPoint Live is not supported in Teams live events, CVI devices, and VTC devices.
If you're using Teams on the web, you’ll need Microsoft Edge 18 or later, or Google Chrome 65 or later, to see the presenter view.
Presenter view is hidden by default for small screen devices but can be turned on by selecting More options below the current slide and then Show presenter view (or by selecting the sharing window and then pressing Ctrl+Shift+x).
Meetings recordings won’t capture any videos, animations, or annotation marks in the PowerPoint Live session.
When you share from Teams, the PowerPoint Live section lists the most recent files you've opened or edited in your team SharePoint site or your OneDrive. If you select one of these files to present, all meeting participants will be able to view the slides during the meeting. Their access permissions to the file outside of the meeting won't change.
If you select Browse and choose to present a PowerPoint file that hasn't been uploaded to Teams before, it will get uploaded as part of the meeting. If you're presenting in a channel meeting, the file is uploaded to the Files tab in the channel, where all team members will have access to it. If you're presenting in a private meeting, the file is uploaded to your OneDrive, where only the meeting participants will be able to access it.

Need more help?
Want more options.
Explore subscription benefits, browse training courses, learn how to secure your device, and more.

Microsoft 365 subscription benefits

Microsoft 365 training

Microsoft security

Accessibility center
Communities help you ask and answer questions, give feedback, and hear from experts with rich knowledge.

Ask the Microsoft Community

Microsoft Tech Community

Windows Insiders
Microsoft 365 Insiders
Was this information helpful?
Thank you for your feedback.
COMMENTS
Save in a video format. Select File > Export. (Don't use Save As, because it doesn't offer video options.) Open the File Format list and select the video format that you want ( MP4 or MOV ). If the MP4 and MOV options aren't in your version of PowerPoint, see Requirements below for more information. Select the video Quality you want ...
On the File menu, select Save to ensure all your recent work has been saved in PowerPoint presentation format (.pptx). Select File > Export > Create a Video. (Or, on the Recording tab of the ribbon, select Export to Video .) In the first drop-down box under the Create a Video heading, select the video quality you want, which pertains to the ...
Select "Export" (2013) or "Share" (2010). This will allow you to convert the slideshow into a variety of different formats. 4. Click "Create a Video". This will open the video creation options. 5. Select the quality. The quality of the video will affect the clarity of the image and the size of the file.
In the Seconds spent on each slide box, select the default time you want to spend on each slide. Select Create Video. Enter a file name and then browse to the location you want to save your video. In the Save As type box, select if you want to save the video as a MPEG-4 Video or Windows Media Video. Tip: The MPEG-4 Video format is recommended ...
To turn a PowerPoint presentation into a video, first, open your presentation with the PowerPoint app on your Windows or Mac computer. In the top-left corner of PowerPoint, click the "File" option. From the sidebar that opens after clicking the "File" option, select "Export." In the "Export" menu, click "Create a Video."
How to convert a PPT to a MP4 file? Choose the PPT file you want to convert. Change quality or size (optional) Click on "Start conversion" to convert your file from PPT to MP4. Download your MP4 file. Try the MP4 conversion with a PPT test file.
Watch this video to learn how to convert your PowerPoint presentation into a video. When you make a recording of a presentation, all its elements (narration,...
Want to know how to save/export your PowerPoint presentation as a video file in MP4 format? This video will show you how you can covert your standard Microso...
Under the Save & Send menu, find and click on Create a Video. Click on the Computer & HD Displays option to customise the video size and quality (small, medium and large size & quality). Click the Don't Use Recorded Timings and Narrations to select if you're using timings and narrations. Click Create Video and another dialogue box opens.
Once you've specified exactly what you want, choose " Create Video ", the button on the bottom of the screen. You'll be prompted for a file name, as usual: Notice that the format is MPEG-4 Video, the long, fancy name for "MP4". Pay attention to where you're saving it and click " Save " to proceed.
Learn how to effortlessly convert your PowerPoint presentations into MP4 videos with this comprehensive tutorial on Microsoft PowerPoint 2016. Discover the s...
On the PowerPoint window, in the left sidebar, click the slide in which you want to add a video. At the top of the PowerPoint window, click the "Insert" tab. In the "Insert" tab, under the "Media" section (which is to the extreme right side of the interface), click "Video." You'll now see an "Insert Video From" menu.
Browse to the location where you want to save the file and give it a name then press "Save.". While the video is being created, you will see the small progress bar at the bottom of your PowerPoint window. Wait till this is done and then go to your video. Now you can double-click your video file and it will automatically play with your video ...
Enhance and Save PPT as MP4. There's nothing more frustrating than faded colors on a presentation video. Use Flixier's video enhancer tool to automatically adjust brightness, contrast, saturation, or gamma values as you convert PowerPoint to MP4, and you get a professional-looking video within minutes. The live enhancement previews allow you full control over the look and feel of your ...
Click the File menu from PowerPoint. Select Export . Select a location on your computer to save the file, such as the Desktop or Documents folder. In the File Format dropdown menu, select MP4 . Adjust any quality settings to your preference. Click Export . PowerPoint will begin exporting the presentation as an MP4 file and will show a progress ...
In this video, I will show you How to Save PowerPoint Slides as an MP4 Video. In this tutorial I'm using PowerPoint 2016 from the Microsoft Office 365 softwa...
To save the PowerPoint presentation as a PDF file, follow the 4 easy steps. Step-1: Click on the "File" Tab. First, click on the " File " tab in PowerPoint to open the back stage view of PowerPoint. Step 2 - Click on the "Save As" option. In the menu ribbon located at the top of the screen, click on the "File" tab.
1. Open the PowerPoint file you want to convert. If it's already open, save a backup copy of your latest version before the conversion to ensure that your video includes all recent changes. 2. Select File and then click on Export. 3. Select the format of your video presentation in the File Format drop-down menu. 4.
To begin the export, go to the File > Export > Create a Video menu option. Go to File > Export > Create a Video to choose the export settings for your PowerPoint presentation video. From this menu, there are several key settings to choose before you export your finished video.
Encountering issues with PowerPoint not being able to convert your presentation to video format can be quite frustrating, especially when the deadline is approaching. ... Here are some suggestions that might help you resolve the problem: First, please refer to how to save a presentation as a movie file or MP4: Save a presentation as a movie ...
In the Seconds spent on each slide box, select the default time you want to spend on each slide. Select Create Video. Enter a file name and then browse to the location you want to save your video. In the Save As type box, select if you want to save the video as a MPEG-4 Video or Windows Media Video. Tip: The MPEG-4 Video format is recommended ...
Try-it! Transcript. Save your presentation, so you don't lose all your hard work. Then, print it to share it with others. Save your presentation. Click FILE > Save, pick or browse to a folder, type a name for your presentation in the File name box, and click Save. Save your work as you go. Hit Ctrl+S often.
To stop recording in PPT, click Stop. Step 6. To save a PowerPoint as a video, go to Files > Export > Create a Video in the upper left corner. The recording file will be saved in MP4 format. Share this post on your social platform to help more people!
In this step-by-step tutorial, I show you how to turn your Powerpoint Presentation into a .mp4 or .mov video file which you can share with others, play for a...
In this video, I will show you How to Save PowerPoint Slides as an MP4 Video. In this tutorial I'm using Microsoft Office 365 software package. This feature ...
If your presentation is already open in PowerPoint for Windows or Mac, go to the file and select Present in Teams. If you're in PowerPoint for the web, select Present > Present in Teams. Your slides will appear in the Teams meeting, with your Notes next to them. Navigate through the slides.