
How To Use “Thesis” In A Sentence: Optimal Application

Thesis, a word that carries weight and significance in academic and professional circles alike. It represents the culmination of research, analysis, and critical thinking. But how can we effectively incorporate this powerful term into our everyday language? In this article, we will explore the proper usage of “thesis” in a sentence, providing you with the tools to articulate your thoughts with precision and clarity.
So, what is the correct way to use “thesis” in a sentence? In its simplest form, “thesis” refers to a statement or theory that is put forward and supported by evidence. When using “thesis” in a sentence, it is essential to ensure that the context aligns with this definition. For example:
“Her thesis on climate change offers a compelling argument supported by extensive research.”
This sentence demonstrates the appropriate usage of “thesis” by clearly indicating that the statement is backed by evidence and research. It is crucial to avoid using “thesis” as a synonym for a general opinion or belief.
Now that we have established the proper usage of “thesis” in a sentence, let us delve deeper into the various contexts in which this term can be effectively employed.
Definition Of Thesis
A thesis is a central argument or claim that a writer or speaker puts forward and supports with evidence in a piece of academic writing or discourse. It serves as the backbone of the entire work, guiding the reader or listener through the main points and supporting details.
In the realm of academia, a thesis is typically a formal statement that presents the main idea or position of a research paper or dissertation. It is often written as a single declarative sentence and is supported by a logical and coherent argument.
Historically, the concept of a thesis can be traced back to ancient Greece, where it was used in rhetorical debates and discussions. However, the modern understanding of a thesis as a formal statement of argumentation emerged during the Middle Ages in European universities, where it became an integral part of the academic tradition.
While the term “thesis” is predominantly associated with academic writing, it can also have different meanings in other contexts. In the field of music, for example, a thesis refers to a long composition or musical piece that is typically performed by a soloist or an orchestra. Additionally, in some countries, the term “thesis” is used to refer to a master’s degree dissertation or a doctoral dissertation.
How To Properly Use Thesis In A Sentence
When it comes to using the word “thesis” in a sentence, there are certain grammatical rules that should be followed to ensure clarity and accuracy. Additionally, it is important to understand the different parts of speech that “thesis” can function as, allowing for a more versatile usage of the word.
Grammatical Rules Surrounding Thesis
In order to use “thesis” correctly in a sentence, it is crucial to consider its role as a noun. As a noun, “thesis” refers to a statement or theory that is put forward and supported by arguments, typically in academic or scholarly writing. To adhere to grammatical rules, it is essential to treat “thesis” as a singular noun, using appropriate singular verb forms and pronouns.
For example:
- “The thesis presented by the student was well-researched and compelling.”
- “Her thesis on climate change received accolades from the scientific community.”
It is worth noting that “thesis” can also function as a plural noun, referring to multiple theses or a collection of research papers or dissertations. In such cases, it is important to use plural verb forms and pronouns to maintain grammatical consistency.
- “The theses submitted by the graduate students covered a wide range of topics.”
- “Their theses explored various aspects of cultural anthropology.”
Parts Of Speech And Versatility
While “thesis” primarily functions as a noun, it is worth mentioning that it can also be used as a verb in certain contexts. As a verb, “thesis” means to present or support a particular statement or theory. However, it is important to note that the verb form of “thesis” is less common and often reserved for specialized or technical writing.
- “The author skillfully theses his argument throughout the book.”
- “She will thesis her findings at the upcoming conference.”
By understanding the different parts of speech that “thesis” can be, both as a noun and a verb, writers can effectively incorporate the word into their sentences, adding depth and precision to their language.
Examples Of Using Thesis In A Sentence
When it comes to incorporating the word “thesis” into a sentence, it is important to consider the various contexts and nuances that this term can encompass. By using a mix of simple and complex sentences, we can explore different meanings and applications of the word. Here are five examples that demonstrate the versatility of the term “thesis”:
1. Academic Context:
In the realm of academia, a thesis refers to a research paper or a formal argument put forth by a student to support their claim or hypothesis. For instance:
- John defended his thesis on quantum mechanics with utmost confidence and precision.
- The professor praised Mary’s thesis, acknowledging her originality and meticulous research.
2. Literary Context:
In literature, a thesis can represent the main idea or theme of a work. It serves as a guiding principle for the author’s narrative or argument. Consider these examples:
- The author’s thesis in the novel revolved around the destructive power of greed.
- In her poem, the poet skillfully conveyed her thesis about the impermanence of human existence.
3. Philosophical Context:
Within the realm of philosophy, a thesis can refer to a proposition or statement put forward for philosophical discussion or debate. Observe the following sentences:
- The philosopher’s thesis challenged conventional notions of morality, provoking intense intellectual discourse.
- In his treatise, the author presented a compelling thesis on the nature of consciousness.
4. Scientific Context:
In the scientific domain, a thesis can denote a hypothesis or a theory that is supported by empirical evidence. These sentences exemplify the usage:
- The researcher’s thesis proposed a groundbreaking explanation for the observed phenomenon.
- The study’s findings confirmed the thesis that exposure to sunlight improves mood.
5. General Usage:
Beyond specific contexts, “thesis” can also be used in a broader sense to express a central argument or claim. Consider these examples:
- The politician’s speech lacked a clear thesis, leaving the audience confused about his stance.
- Her thesis about the importance of early childhood education resonated with many parents.
By examining these diverse examples, we can appreciate the multifaceted nature of the word “thesis” and its ability to adapt to different contexts, whether academic, literary, philosophical, scientific, or general usage.
Edge Cases Or Things To Consider
When it comes to using the word “thesis” in a sentence, there are a few edge cases and considerations worth exploring. Understanding these nuances will not only help you avoid common mistakes but also navigate any cultural or regional differences that may arise.
Common Mistakes People Make When Using Thesis
While the word “thesis” is relatively straightforward, there are a few common mistakes that people often make when incorporating it into their sentences. By being aware of these pitfalls, you can ensure your usage is accurate and precise.
- Misusing the term: One common mistake is using the word “thesis” interchangeably with “topic” or “argument.” While a thesis does encompass the main idea or argument of a piece of writing, it is more specific and refers to a statement or theory that is supported by evidence.
- Incorrect placement: Another error is placing the thesis statement in an inappropriate location within a sentence. The thesis statement should typically appear at the end of an introductory paragraph or as the last sentence of the introduction, clearly outlining the main point of the essay or research paper.
- Weak or vague thesis: A weak or vague thesis can weaken the overall impact of your writing. It is crucial to ensure that your thesis statement is clear, concise, and provides a strong argument or stance. Avoid generalizations or statements that lack specificity.
- Overcomplicating the language: Sometimes, individuals tend to overcomplicate their thesis statements by using convoluted language or excessive jargon. It is important to strike a balance between clarity and complexity, ensuring that your thesis statement is accessible to your target audience.
By being mindful of these common mistakes, you can effectively utilize the word “thesis” in your sentences and enhance the overall quality of your writing.
Cultural Or Regional Differences
While language is a universal tool of communication, certain cultural or regional differences can influence the usage of the word “thesis” in a sentence. These disparities may arise due to variations in educational systems, academic conventions, or linguistic nuances.
In some cultures, the concept of a thesis may be more prevalent and deeply ingrained in academic discourse. For example, in countries where a thesis is a mandatory requirement for obtaining a degree, the word may carry a greater weight and significance. In such contexts, using the term “thesis” in a sentence may evoke a sense of scholarly rigor and intellectual depth.
On the other hand, in regions where the educational system or academic traditions differ, the word “thesis” may not hold the same level of prominence. In these cases, alternative terms or phrases may be used to convey a similar meaning. It is important to be aware of these cultural differences to ensure effective communication and avoid any potential misunderstandings.
Moreover, regional variations in language can also impact the usage of “thesis” in a sentence. Different dialects or accents may influence pronunciation or even the specific vocabulary employed. Adapting to these variations and understanding the cultural context will help you integrate the word “thesis” appropriately into your sentences.
In conclusion, understanding common mistakes and cultural or regional differences associated with using the word “thesis” in a sentence is crucial for effective communication and accurate expression of ideas. By being aware of these nuances, you can confidently incorporate the term into your writing, ensuring clarity, precision, and cultural sensitivity.
Synonyms Or Alternates To Use
When it comes to expressing the concept of a thesis in a sentence, there are several synonyms or alternate words that can be used. Each of these terms carries a slightly different nuance and can be employed in specific contexts to convey various aspects of the main idea. Let’s explore four such alternatives to the word ‘thesis’ and highlight their subtle differences in meaning and usage.
1. Proposition
The term ‘proposition’ can be used as an alternate word for ‘thesis’ in certain situations. While both words often refer to a statement or claim put forward for consideration, ‘proposition’ tends to emphasize the idea of a suggested course of action or a proposal. It implies that the statement being made is open to debate or further examination.
In contexts where the focus is on presenting a theory or argument that requires validation or refutation, ‘proposition’ may be a preferred choice. For instance, in a scientific research paper, the term ‘proposition’ could be used to convey the idea of a hypothesis that needs to be tested through experimentation or analysis.
2. Hypothesis
Another synonym for ‘thesis’ is ‘hypothesis.’ While ‘thesis’ and ‘hypothesis’ share similarities, the latter specifically refers to a proposed explanation for a phenomenon or a prediction that can be tested and verified. ‘Hypothesis’ is commonly used in scientific and research contexts.
When the intention is to highlight the provisional nature of the statement being made, or to emphasize the need for empirical evidence to support or reject it, ‘hypothesis’ is the more appropriate term. It suggests that the idea put forward is subject to investigation and may undergo modifications based on the outcome of experiments or observations.
3. Assertion
‘Assertion’ can also be used interchangeably with ‘thesis,’ although it carries a slightly different connotation. While ‘thesis’ often implies a well-reasoned argument or a central claim of an essay or academic work, ‘assertion’ places greater emphasis on the act of confidently stating or declaring a position.
In contexts where the aim is to assert a belief, opinion, or viewpoint without necessarily providing extensive supporting evidence or analysis, ‘assertion’ might be the preferred term. This term is commonly used in persuasive writing, speeches, or informal discussions where the primary goal is to make a strong and forceful statement.
The word ‘premise’ can also be considered as an alternate term for ‘thesis,’ although it is more commonly used in logic and argumentation. ‘Premise’ refers to a statement or proposition that serves as the basis for an argument or reasoning process.
When the focus is on presenting the foundational ideas or assumptions upon which a logical argument or deduction is built, ‘premise’ can be the appropriate choice. This term is frequently employed in philosophical discourse or legal contexts where constructing a valid argument requires establishing a set of premises that lead to a conclusion.
These four synonyms or alternate words, namely ‘proposition,’ ‘hypothesis,’ ‘assertion,’ and ‘premise,’ provide a range of options to express the concept of a thesis in various contexts. Selecting the most suitable term depends on the specific intention, emphasis, and the nature of the discourse in which it is used.
Related Phrases Or Idioms
When it comes to incorporating the word “thesis” into phrases or idioms, the English language offers a few interesting options. These expressions not only add depth to our language but also provide a glimpse into the significance and versatility of the term “thesis.” Let’s explore some of these related phrases and idioms, understanding their meanings and seeing them in action through example sentences.
1. Stick To Your Guns
Meaning: To firmly hold on to a belief or opinion, even when facing opposition or challenges.
Example sentence: Despite the criticism from her colleagues, Sarah stuck to her guns and defended her thesis until the end.
2. Throw Down The Gauntlet
Meaning: To issue a challenge or invitation for a confrontation or competition.
Example sentence: The renowned professor threw down the gauntlet, challenging his students to develop a thesis that could revolutionize the field of astrophysics.
3. Go To The Mat
Meaning: To fully commit to an argument, debate, or cause, often involving intense effort or perseverance.
Example sentence: The passionate student went to the mat, presenting a meticulously researched thesis that left the entire panel impressed.
4. Put Forth A Proposition
Meaning: To present or propose an idea or argument for consideration.
Example sentence: In his groundbreaking thesis, the young scholar put forth a proposition that challenged the existing theories in the field of psychology.
5. Draw A Line In The Sand
Meaning: To establish a boundary or set a limit, indicating one’s firm stance or position.
Example sentence: The professor drew a line in the sand, making it clear that any thesis lacking empirical evidence would not be considered for publication.
These phrases and idioms demonstrate how the word “thesis” has permeated various aspects of our language. They reflect the importance of holding firm to one’s beliefs, presenting compelling arguments, and challenging existing norms. Incorporating these expressions into your everyday conversations can not only enrich your vocabulary but also provide a subtle nod to the power of a well-crafted thesis.
In conclusion, understanding how to use the term “thesis” correctly is of utmost importance for effective communication and academic writing. By grasping the proper usage of this term, individuals can express their ideas with clarity and precision, ensuring that their arguments and research are well-supported and logically presented.
Using “thesis” accurately not only enhances the credibility of one’s work but also facilitates effective communication between scholars, researchers, and readers. It allows for the seamless exchange of ideas within academic circles, contributing to the advancement of knowledge and the development of new insights.
Moreover, mastering the appropriate use of “thesis” can significantly impact one’s academic and professional success. The ability to craft a strong and well-structured thesis statement is a fundamental skill required in various disciplines, including literature, history, social sciences, and beyond. A well-crafted thesis statement serves as the backbone of an academic paper, guiding the writer’s arguments and providing a clear direction for the reader.
As such, it is crucial for individuals to practice using “thesis” in their own sentences. By actively engaging with the term and incorporating it into their writing, readers can strengthen their understanding and familiarity with its correct usage. Regular practice will not only enhance their writing skills but also instill confidence in their ability to effectively convey their ideas and arguments.
To encourage readers to hone their skills in using “thesis” correctly, here are a few tips:
1. Write A Thesis Statement For Each Piece Of Academic Writing:
Whether it’s an essay, research paper, or even a short response, challenge yourself to create a clear and concise thesis statement that encapsulates the main argument or focus of your work. This exercise will help you refine your understanding of what a thesis entails and how to effectively convey your intentions to the reader.
2. Seek Feedback From Peers Or Professors:
Share your thesis statements with others and ask for constructive criticism. Receiving feedback from peers or professors can provide valuable insights and help you identify areas for improvement. This collaborative approach allows you to learn from others and refine your skills in using “thesis” accurately.
3. Read And Analyze Scholarly Articles:
Engage with academic literature in your field of interest and pay close attention to how authors use “thesis” in their writing. Analyze the structure, language, and placement of thesis statements within these articles. By studying the work of established scholars, you can gain a deeper understanding of how to effectively incorporate “thesis” into your own writing.
4. Utilize Writing Resources And Style Guides:
Refer to reputable writing resources and style guides that provide guidance on crafting and using thesis statements. These resources often offer examples, explanations, and exercises to help you develop your skills in using “thesis” correctly. Some popular resources include the Chicago Manual of Style, the MLA Handbook, and the APA Publication Manual.
By following these tips and actively practicing the use of “thesis” in your writing, you will gradually enhance your proficiency and confidence in employing this term accurately. Remember, mastering the proper usage of “thesis” is a valuable skill that will benefit your academic pursuits and contribute to your overall success as a writer and communicator.
Shawn Manaher is the founder and CEO of The Content Authority. He’s one part content manager, one part writing ninja organizer, and two parts leader of top content creators. You don’t even want to know what he calls pancakes.
- Skip to Content
- Skip to Main Navigation
- Skip to Search

Indiana University Bloomington Indiana University Bloomington IU Bloomington

- Mission, Vision, and Inclusive Language Statement
- Locations & Hours
- Undergraduate Employment
- Graduate Employment
- Frequently Asked Questions
- Newsletter Archive
- Support WTS
- Schedule an Appointment
- Online Tutoring
- Before your Appointment
- WTS Policies
- Group Tutoring
- Students Referred by Instructors
- Paid External Editing Services
- Writing Guides
- Scholarly Write-in
- Dissertation Writing Groups
- Journal Article Writing Groups
- Early Career Graduate Student Writing Workshop
- Workshops for Graduate Students
- Teaching Resources
- Syllabus Information
- Course-specific Tutoring
- Nominate a Peer Tutor
- Tutoring Feedback
- Schedule Appointment
- Campus Writing Program
Writing Tutorial Services
How to write a thesis statement, what is a thesis statement.
Almost all of us—even if we don’t do it consciously—look early in an essay for a one- or two-sentence condensation of the argument or analysis that is to follow. We refer to that condensation as a thesis statement.
Why Should Your Essay Contain a Thesis Statement?
- to test your ideas by distilling them into a sentence or two
- to better organize and develop your argument
- to provide your reader with a “guide” to your argument
In general, your thesis statement will accomplish these goals if you think of the thesis as the answer to the question your paper explores.
How Can You Write a Good Thesis Statement?
Here are some helpful hints to get you started. You can either scroll down or select a link to a specific topic.
How to Generate a Thesis Statement if the Topic is Assigned How to Generate a Thesis Statement if the Topic is not Assigned How to Tell a Strong Thesis Statement from a Weak One
How to Generate a Thesis Statement if the Topic is Assigned
Almost all assignments, no matter how complicated, can be reduced to a single question. Your first step, then, is to distill the assignment into a specific question. For example, if your assignment is, “Write a report to the local school board explaining the potential benefits of using computers in a fourth-grade class,” turn the request into a question like, “What are the potential benefits of using computers in a fourth-grade class?” After you’ve chosen the question your essay will answer, compose one or two complete sentences answering that question.
Q: “What are the potential benefits of using computers in a fourth-grade class?” A: “The potential benefits of using computers in a fourth-grade class are . . .”
A: “Using computers in a fourth-grade class promises to improve . . .”
The answer to the question is the thesis statement for the essay.
[ Back to top ]
How to Generate a Thesis Statement if the Topic is not Assigned
Even if your assignment doesn’t ask a specific question, your thesis statement still needs to answer a question about the issue you’d like to explore. In this situation, your job is to figure out what question you’d like to write about.
A good thesis statement will usually include the following four attributes:
- take on a subject upon which reasonable people could disagree
- deal with a subject that can be adequately treated given the nature of the assignment
- express one main idea
- assert your conclusions about a subject
Let’s see how to generate a thesis statement for a social policy paper.
Brainstorm the topic . Let’s say that your class focuses upon the problems posed by changes in the dietary habits of Americans. You find that you are interested in the amount of sugar Americans consume.
You start out with a thesis statement like this:
Sugar consumption.
This fragment isn’t a thesis statement. Instead, it simply indicates a general subject. Furthermore, your reader doesn’t know what you want to say about sugar consumption.
Narrow the topic . Your readings about the topic, however, have led you to the conclusion that elementary school children are consuming far more sugar than is healthy.
You change your thesis to look like this:
Reducing sugar consumption by elementary school children.
This fragment not only announces your subject, but it focuses on one segment of the population: elementary school children. Furthermore, it raises a subject upon which reasonable people could disagree, because while most people might agree that children consume more sugar than they used to, not everyone would agree on what should be done or who should do it. You should note that this fragment is not a thesis statement because your reader doesn’t know your conclusions on the topic.
Take a position on the topic. After reflecting on the topic a little while longer, you decide that what you really want to say about this topic is that something should be done to reduce the amount of sugar these children consume.
You revise your thesis statement to look like this:
More attention should be paid to the food and beverage choices available to elementary school children.
This statement asserts your position, but the terms more attention and food and beverage choices are vague.
Use specific language . You decide to explain what you mean about food and beverage choices , so you write:
Experts estimate that half of elementary school children consume nine times the recommended daily allowance of sugar.
This statement is specific, but it isn’t a thesis. It merely reports a statistic instead of making an assertion.
Make an assertion based on clearly stated support. You finally revise your thesis statement one more time to look like this:
Because half of all American elementary school children consume nine times the recommended daily allowance of sugar, schools should be required to replace the beverages in soda machines with healthy alternatives.
Notice how the thesis answers the question, “What should be done to reduce sugar consumption by children, and who should do it?” When you started thinking about the paper, you may not have had a specific question in mind, but as you became more involved in the topic, your ideas became more specific. Your thesis changed to reflect your new insights.
How to Tell a Strong Thesis Statement from a Weak One
1. a strong thesis statement takes some sort of stand..
Remember that your thesis needs to show your conclusions about a subject. For example, if you are writing a paper for a class on fitness, you might be asked to choose a popular weight-loss product to evaluate. Here are two thesis statements:
There are some negative and positive aspects to the Banana Herb Tea Supplement.
This is a weak thesis statement. First, it fails to take a stand. Second, the phrase negative and positive aspects is vague.
Because Banana Herb Tea Supplement promotes rapid weight loss that results in the loss of muscle and lean body mass, it poses a potential danger to customers.
This is a strong thesis because it takes a stand, and because it's specific.
2. A strong thesis statement justifies discussion.
Your thesis should indicate the point of the discussion. If your assignment is to write a paper on kinship systems, using your own family as an example, you might come up with either of these two thesis statements:
My family is an extended family.
This is a weak thesis because it merely states an observation. Your reader won’t be able to tell the point of the statement, and will probably stop reading.
While most American families would view consanguineal marriage as a threat to the nuclear family structure, many Iranian families, like my own, believe that these marriages help reinforce kinship ties in an extended family.
This is a strong thesis because it shows how your experience contradicts a widely-accepted view. A good strategy for creating a strong thesis is to show that the topic is controversial. Readers will be interested in reading the rest of the essay to see how you support your point.
3. A strong thesis statement expresses one main idea.
Readers need to be able to see that your paper has one main point. If your thesis statement expresses more than one idea, then you might confuse your readers about the subject of your paper. For example:
Companies need to exploit the marketing potential of the Internet, and Web pages can provide both advertising and customer support.
This is a weak thesis statement because the reader can’t decide whether the paper is about marketing on the Internet or Web pages. To revise the thesis, the relationship between the two ideas needs to become more clear. One way to revise the thesis would be to write:
Because the Internet is filled with tremendous marketing potential, companies should exploit this potential by using Web pages that offer both advertising and customer support.
This is a strong thesis because it shows that the two ideas are related. Hint: a great many clear and engaging thesis statements contain words like because , since , so , although , unless , and however .
4. A strong thesis statement is specific.
A thesis statement should show exactly what your paper will be about, and will help you keep your paper to a manageable topic. For example, if you're writing a seven-to-ten page paper on hunger, you might say:
World hunger has many causes and effects.
This is a weak thesis statement for two major reasons. First, world hunger can’t be discussed thoroughly in seven to ten pages. Second, many causes and effects is vague. You should be able to identify specific causes and effects. A revised thesis might look like this:
Hunger persists in Glandelinia because jobs are scarce and farming in the infertile soil is rarely profitable.
This is a strong thesis statement because it narrows the subject to a more specific and manageable topic, and it also identifies the specific causes for the existence of hunger.
Produced by Writing Tutorial Services, Indiana University, Bloomington, IN
Writing Tutorial Services social media channels

Thesis Statements
What this handout is about.
This handout describes what a thesis statement is, how thesis statements work in your writing, and how you can craft or refine one for your draft.
Introduction
Writing in college often takes the form of persuasion—convincing others that you have an interesting, logical point of view on the subject you are studying. Persuasion is a skill you practice regularly in your daily life. You persuade your roommate to clean up, your parents to let you borrow the car, your friend to vote for your favorite candidate or policy. In college, course assignments often ask you to make a persuasive case in writing. You are asked to convince your reader of your point of view. This form of persuasion, often called academic argument, follows a predictable pattern in writing. After a brief introduction of your topic, you state your point of view on the topic directly and often in one sentence. This sentence is the thesis statement, and it serves as a summary of the argument you’ll make in the rest of your paper.
What is a thesis statement?
A thesis statement:
- tells the reader how you will interpret the significance of the subject matter under discussion.
- is a road map for the paper; in other words, it tells the reader what to expect from the rest of the paper.
- directly answers the question asked of you. A thesis is an interpretation of a question or subject, not the subject itself. The subject, or topic, of an essay might be World War II or Moby Dick; a thesis must then offer a way to understand the war or the novel.
- makes a claim that others might dispute.
- is usually a single sentence near the beginning of your paper (most often, at the end of the first paragraph) that presents your argument to the reader. The rest of the paper, the body of the essay, gathers and organizes evidence that will persuade the reader of the logic of your interpretation.
If your assignment asks you to take a position or develop a claim about a subject, you may need to convey that position or claim in a thesis statement near the beginning of your draft. The assignment may not explicitly state that you need a thesis statement because your instructor may assume you will include one. When in doubt, ask your instructor if the assignment requires a thesis statement. When an assignment asks you to analyze, to interpret, to compare and contrast, to demonstrate cause and effect, or to take a stand on an issue, it is likely that you are being asked to develop a thesis and to support it persuasively. (Check out our handout on understanding assignments for more information.)
How do I create a thesis?
A thesis is the result of a lengthy thinking process. Formulating a thesis is not the first thing you do after reading an essay assignment. Before you develop an argument on any topic, you have to collect and organize evidence, look for possible relationships between known facts (such as surprising contrasts or similarities), and think about the significance of these relationships. Once you do this thinking, you will probably have a “working thesis” that presents a basic or main idea and an argument that you think you can support with evidence. Both the argument and your thesis are likely to need adjustment along the way.
Writers use all kinds of techniques to stimulate their thinking and to help them clarify relationships or comprehend the broader significance of a topic and arrive at a thesis statement. For more ideas on how to get started, see our handout on brainstorming .
How do I know if my thesis is strong?
If there’s time, run it by your instructor or make an appointment at the Writing Center to get some feedback. Even if you do not have time to get advice elsewhere, you can do some thesis evaluation of your own. When reviewing your first draft and its working thesis, ask yourself the following :
- Do I answer the question? Re-reading the question prompt after constructing a working thesis can help you fix an argument that misses the focus of the question. If the prompt isn’t phrased as a question, try to rephrase it. For example, “Discuss the effect of X on Y” can be rephrased as “What is the effect of X on Y?”
- Have I taken a position that others might challenge or oppose? If your thesis simply states facts that no one would, or even could, disagree with, it’s possible that you are simply providing a summary, rather than making an argument.
- Is my thesis statement specific enough? Thesis statements that are too vague often do not have a strong argument. If your thesis contains words like “good” or “successful,” see if you could be more specific: why is something “good”; what specifically makes something “successful”?
- Does my thesis pass the “So what?” test? If a reader’s first response is likely to be “So what?” then you need to clarify, to forge a relationship, or to connect to a larger issue.
- Does my essay support my thesis specifically and without wandering? If your thesis and the body of your essay do not seem to go together, one of them has to change. It’s okay to change your working thesis to reflect things you have figured out in the course of writing your paper. Remember, always reassess and revise your writing as necessary.
- Does my thesis pass the “how and why?” test? If a reader’s first response is “how?” or “why?” your thesis may be too open-ended and lack guidance for the reader. See what you can add to give the reader a better take on your position right from the beginning.
Suppose you are taking a course on contemporary communication, and the instructor hands out the following essay assignment: “Discuss the impact of social media on public awareness.” Looking back at your notes, you might start with this working thesis:
Social media impacts public awareness in both positive and negative ways.
You can use the questions above to help you revise this general statement into a stronger thesis.
- Do I answer the question? You can analyze this if you rephrase “discuss the impact” as “what is the impact?” This way, you can see that you’ve answered the question only very generally with the vague “positive and negative ways.”
- Have I taken a position that others might challenge or oppose? Not likely. Only people who maintain that social media has a solely positive or solely negative impact could disagree.
- Is my thesis statement specific enough? No. What are the positive effects? What are the negative effects?
- Does my thesis pass the “how and why?” test? No. Why are they positive? How are they positive? What are their causes? Why are they negative? How are they negative? What are their causes?
- Does my thesis pass the “So what?” test? No. Why should anyone care about the positive and/or negative impact of social media?
After thinking about your answers to these questions, you decide to focus on the one impact you feel strongly about and have strong evidence for:
Because not every voice on social media is reliable, people have become much more critical consumers of information, and thus, more informed voters.
This version is a much stronger thesis! It answers the question, takes a specific position that others can challenge, and it gives a sense of why it matters.
Let’s try another. Suppose your literature professor hands out the following assignment in a class on the American novel: Write an analysis of some aspect of Mark Twain’s novel Huckleberry Finn. “This will be easy,” you think. “I loved Huckleberry Finn!” You grab a pad of paper and write:
Mark Twain’s Huckleberry Finn is a great American novel.
You begin to analyze your thesis:
- Do I answer the question? No. The prompt asks you to analyze some aspect of the novel. Your working thesis is a statement of general appreciation for the entire novel.
Think about aspects of the novel that are important to its structure or meaning—for example, the role of storytelling, the contrasting scenes between the shore and the river, or the relationships between adults and children. Now you write:
In Huckleberry Finn, Mark Twain develops a contrast between life on the river and life on the shore.
- Do I answer the question? Yes!
- Have I taken a position that others might challenge or oppose? Not really. This contrast is well-known and accepted.
- Is my thesis statement specific enough? It’s getting there–you have highlighted an important aspect of the novel for investigation. However, it’s still not clear what your analysis will reveal.
- Does my thesis pass the “how and why?” test? Not yet. Compare scenes from the book and see what you discover. Free write, make lists, jot down Huck’s actions and reactions and anything else that seems interesting.
- Does my thesis pass the “So what?” test? What’s the point of this contrast? What does it signify?”
After examining the evidence and considering your own insights, you write:
Through its contrasting river and shore scenes, Twain’s Huckleberry Finn suggests that to find the true expression of American democratic ideals, one must leave “civilized” society and go back to nature.
This final thesis statement presents an interpretation of a literary work based on an analysis of its content. Of course, for the essay itself to be successful, you must now present evidence from the novel that will convince the reader of your interpretation.
Works consulted
We consulted these works while writing this handout. This is not a comprehensive list of resources on the handout’s topic, and we encourage you to do your own research to find additional publications. Please do not use this list as a model for the format of your own reference list, as it may not match the citation style you are using. For guidance on formatting citations, please see the UNC Libraries citation tutorial . We revise these tips periodically and welcome feedback.
Anson, Chris M., and Robert A. Schwegler. 2010. The Longman Handbook for Writers and Readers , 6th ed. New York: Longman.
Lunsford, Andrea A. 2015. The St. Martin’s Handbook , 8th ed. Boston: Bedford/St Martin’s.
Ramage, John D., John C. Bean, and June Johnson. 2018. The Allyn & Bacon Guide to Writing , 8th ed. New York: Pearson.
Ruszkiewicz, John J., Christy Friend, Daniel Seward, and Maxine Hairston. 2010. The Scott, Foresman Handbook for Writers , 9th ed. Boston: Pearson Education.
You may reproduce it for non-commercial use if you use the entire handout and attribute the source: The Writing Center, University of North Carolina at Chapel Hill
Make a Gift
- Walden University
- Faculty Portal
Writing a Paper: Thesis Statements
Basics of thesis statements.
The thesis statement is the brief articulation of your paper's central argument and purpose. You might hear it referred to as simply a "thesis." Every scholarly paper should have a thesis statement, and strong thesis statements are concise, specific, and arguable. Concise means the thesis is short: perhaps one or two sentences for a shorter paper. Specific means the thesis deals with a narrow and focused topic, appropriate to the paper's length. Arguable means that a scholar in your field could disagree (or perhaps already has!).
Strong thesis statements address specific intellectual questions, have clear positions, and use a structure that reflects the overall structure of the paper. Read on to learn more about constructing a strong thesis statement.
Being Specific
This thesis statement has no specific argument:
Needs Improvement: In this essay, I will examine two scholarly articles to find similarities and differences.
This statement is concise, but it is neither specific nor arguable—a reader might wonder, "Which scholarly articles? What is the topic of this paper? What field is the author writing in?" Additionally, the purpose of the paper—to "examine…to find similarities and differences" is not of a scholarly level. Identifying similarities and differences is a good first step, but strong academic argument goes further, analyzing what those similarities and differences might mean or imply.
Better: In this essay, I will argue that Bowler's (2003) autocratic management style, when coupled with Smith's (2007) theory of social cognition, can reduce the expenses associated with employee turnover.
The new revision here is still concise, as well as specific and arguable. We can see that it is specific because the writer is mentioning (a) concrete ideas and (b) exact authors. We can also gather the field (business) and the topic (management and employee turnover). The statement is arguable because the student goes beyond merely comparing; he or she draws conclusions from that comparison ("can reduce the expenses associated with employee turnover").
Making a Unique Argument
This thesis draft repeats the language of the writing prompt without making a unique argument:
Needs Improvement: The purpose of this essay is to monitor, assess, and evaluate an educational program for its strengths and weaknesses. Then, I will provide suggestions for improvement.
You can see here that the student has simply stated the paper's assignment, without articulating specifically how he or she will address it. The student can correct this error simply by phrasing the thesis statement as a specific answer to the assignment prompt.
Better: Through a series of student interviews, I found that Kennedy High School's antibullying program was ineffective. In order to address issues of conflict between students, I argue that Kennedy High School should embrace policies outlined by the California Department of Education (2010).
Words like "ineffective" and "argue" show here that the student has clearly thought through the assignment and analyzed the material; he or she is putting forth a specific and debatable position. The concrete information ("student interviews," "antibullying") further prepares the reader for the body of the paper and demonstrates how the student has addressed the assignment prompt without just restating that language.
Creating a Debate
This thesis statement includes only obvious fact or plot summary instead of argument:
Needs Improvement: Leadership is an important quality in nurse educators.
A good strategy to determine if your thesis statement is too broad (and therefore, not arguable) is to ask yourself, "Would a scholar in my field disagree with this point?" Here, we can see easily that no scholar is likely to argue that leadership is an unimportant quality in nurse educators. The student needs to come up with a more arguable claim, and probably a narrower one; remember that a short paper needs a more focused topic than a dissertation.
Better: Roderick's (2009) theory of participatory leadership is particularly appropriate to nurse educators working within the emergency medicine field, where students benefit most from collegial and kinesthetic learning.
Here, the student has identified a particular type of leadership ("participatory leadership"), narrowing the topic, and has made an arguable claim (this type of leadership is "appropriate" to a specific type of nurse educator). Conceivably, a scholar in the nursing field might disagree with this approach. The student's paper can now proceed, providing specific pieces of evidence to support the arguable central claim.
Choosing the Right Words
This thesis statement uses large or scholarly-sounding words that have no real substance:
Needs Improvement: Scholars should work to seize metacognitive outcomes by harnessing discipline-based networks to empower collaborative infrastructures.
There are many words in this sentence that may be buzzwords in the student's field or key terms taken from other texts, but together they do not communicate a clear, specific meaning. Sometimes students think scholarly writing means constructing complex sentences using special language, but actually it's usually a stronger choice to write clear, simple sentences. When in doubt, remember that your ideas should be complex, not your sentence structure.
Better: Ecologists should work to educate the U.S. public on conservation methods by making use of local and national green organizations to create a widespread communication plan.
Notice in the revision that the field is now clear (ecology), and the language has been made much more field-specific ("conservation methods," "green organizations"), so the reader is able to see concretely the ideas the student is communicating.
Leaving Room for Discussion
This thesis statement is not capable of development or advancement in the paper:
Needs Improvement: There are always alternatives to illegal drug use.
This sample thesis statement makes a claim, but it is not a claim that will sustain extended discussion. This claim is the type of claim that might be appropriate for the conclusion of a paper, but in the beginning of the paper, the student is left with nowhere to go. What further points can be made? If there are "always alternatives" to the problem the student is identifying, then why bother developing a paper around that claim? Ideally, a thesis statement should be complex enough to explore over the length of the entire paper.
Better: The most effective treatment plan for methamphetamine addiction may be a combination of pharmacological and cognitive therapy, as argued by Baker (2008), Smith (2009), and Xavier (2011).
In the revised thesis, you can see the student make a specific, debatable claim that has the potential to generate several pages' worth of discussion. When drafting a thesis statement, think about the questions your thesis statement will generate: What follow-up inquiries might a reader have? In the first example, there are almost no additional questions implied, but the revised example allows for a good deal more exploration.
Thesis Mad Libs
If you are having trouble getting started, try using the models below to generate a rough model of a thesis statement! These models are intended for drafting purposes only and should not appear in your final work.
- In this essay, I argue ____, using ______ to assert _____.
- While scholars have often argued ______, I argue______, because_______.
- Through an analysis of ______, I argue ______, which is important because_______.
Words to Avoid and to Embrace
When drafting your thesis statement, avoid words like explore, investigate, learn, compile, summarize , and explain to describe the main purpose of your paper. These words imply a paper that summarizes or "reports," rather than synthesizing and analyzing.
Instead of the terms above, try words like argue, critique, question , and interrogate . These more analytical words may help you begin strongly, by articulating a specific, critical, scholarly position.
Read Kayla's blog post for tips on taking a stand in a well-crafted thesis statement.
Related Resources
Didn't find what you need? Email us at [email protected] .
- Previous Page: Introductions
- Next Page: Conclusions
- Office of Student Disability Services
Walden Resources
Departments.
- Academic Residencies
- Academic Skills
- Career Planning and Development
- Customer Care Team
- Field Experience
- Military Services
- Student Success Advising
- Writing Skills
Centers and Offices
- Center for Social Change
- Office of Academic Support and Instructional Services
- Office of Degree Acceleration
- Office of Research and Doctoral Services
- Office of Student Affairs
Student Resources
- Doctoral Writing Assessment
- Form & Style Review
- Quick Answers
- ScholarWorks
- SKIL Courses and Workshops
- Walden Bookstore
- Walden Catalog & Student Handbook
- Student Safety/Title IX
- Legal & Consumer Information
- Website Terms and Conditions
- Cookie Policy
- Accessibility
- Accreditation
- State Authorization
- Net Price Calculator
- Contact Walden
Walden University is a member of Adtalem Global Education, Inc. www.adtalem.com Walden University is certified to operate by SCHEV © 2024 Walden University LLC. All rights reserved.
While Sandel argues that pursuing perfection through genetic engineering would decrease our sense of humility, he claims that the sense of solidarity we would lose is also important.
This thesis summarizes several points in Sandel’s argument, but it does not make a claim about how we should understand his argument. A reader who read Sandel’s argument would not also need to read an essay based on this descriptive thesis.
Broad thesis (arguable, but difficult to support with evidence)
Michael Sandel’s arguments about genetic engineering do not take into consideration all the relevant issues.
This is an arguable claim because it would be possible to argue against it by saying that Michael Sandel’s arguments do take all of the relevant issues into consideration. But the claim is too broad. Because the thesis does not specify which “issues” it is focused on—or why it matters if they are considered—readers won’t know what the rest of the essay will argue, and the writer won’t know what to focus on. If there is a particular issue that Sandel does not address, then a more specific version of the thesis would include that issue—hand an explanation of why it is important.
Arguable thesis with analytical claim
While Sandel argues persuasively that our instinct to “remake” (54) ourselves into something ever more perfect is a problem, his belief that we can always draw a line between what is medically necessary and what makes us simply “better than well” (51) is less convincing.
This is an arguable analytical claim. To argue for this claim, the essay writer will need to show how evidence from the article itself points to this interpretation. It’s also a reasonable scope for a thesis because it can be supported with evidence available in the text and is neither too broad nor too narrow.
Arguable thesis with normative claim
Given Sandel’s argument against genetic enhancement, we should not allow parents to decide on using Human Growth Hormone for their children.
This thesis tells us what we should do about a particular issue discussed in Sandel’s article, but it does not tell us how we should understand Sandel’s argument.
Questions to ask about your thesis
- Is the thesis truly arguable? Does it speak to a genuine dilemma in the source, or would most readers automatically agree with it?
- Is the thesis too obvious? Again, would most or all readers agree with it without needing to see your argument?
- Is the thesis complex enough to require a whole essay's worth of argument?
- Is the thesis supportable with evidence from the text rather than with generalizations or outside research?
- Would anyone want to read a paper in which this thesis was developed? That is, can you explain what this paper is adding to our understanding of a problem, question, or topic?
- picture_as_pdf Thesis
- University of Michigan Library
- Research Guides
Microsoft Word for Dissertations
- Introduction, Template, & Resources
- Formatting for All Readers
- Applying a Style
- Modifying a Style
- Setting up a Heading 1 Example
- Images, Charts, Other Objects
- Footnotes, Endnotes, & Citations
- Cross-References
- Appendix Figures & Tables
- Table of Contents
- List of Figures/Tables
- Chapter and Section Numbering
- Page Numbers
- Landscape Pages
- Combining Chapter Files
- Commenting and Reviewing
- The Two-inch Top Margin
- Troubleshooting
- Finalizing Without Styles
- Preparing Your Final Document
Help with Microsoft Word
Members of the University of Michigan community can get dissertation & thesis formatting assistance from the experts at ScholarSpace:
Please visit this link to make an appointment , or send an email to [email protected].
We're here to solve any formatting problems you've run into, and can give you guidance about captioning figures, solving numbering issues, creating a List of Tables/Figures/Appendices, and more.
Contact Information

Introduction to Word for Dissertations
Formatting your dissertation (or thesis) will likely take more time than you expect. But using the special features described in this Guide will save you a great deal of work , particularly if you use our template (available in the box below). The earlier you begin to use these tools, the more time you'll save and the less stress you'll have as your submission deadline approaches. Students at the University of Michigan are also encouraged to contact the experts at the Library's ScholarSpace anytime you run into a problem or have a question.
To meet Rackham’s Dissertation Formatting Guidelines you will need to modify the standard settings that Microsoft Word uses. This guide will show you how to use the tools to make the necessary modifications. While we do follow the requirements from Rackham’s formatting guidelines to demonstrate the tools, in the end, you are responsible for verifying that your document meets the requirements that Rackham sets.
To save yourself time and effort , please consider using our Dissertation Template (link available in the box below). Many of the settings discussed in this Guide are already included in that document.
Please note that, as a University of Michigan student, you have free access to the Microsoft Office suite of tools -- including Microsoft Word. Visit this link to learn more and to download Office to your own computer.
Dissertation Template and other Resources
- ScholarSpace Template for Dissertations This Microsoft Word document comes with many of the Rackham formatting guidelines built in, and can be used for dissertations and theses. Please note that this template doesn't follow the formatting direction of any particular Style Guide. It is your responsibility to make sure you are following the Style Guide predominant in your field, and to make any relevant formatting changes to heading styles, numbering, captions, etc... How to make many of those changes is described throughout this Guide.
- Rackham Dissertation Handbook Rackham's Dissertation Guidelines and Handbook
- Dissertation Formatting Checklist Rackham's list of formatting issues to watch out for in your dissertation.
- Using Microsoft Word for Large Documents (non-dissertation specific) Handout (This document was written for an older -- much older -- version of Word, but nearly all of the information is still accurate and useful)
- Guide to Copyright for Dissertations
A word about LaTeX
LaTeX is a markup language (sometimes accessed through the Overleaf editor) that is often used in science and engineering documents because it allows for great control in creating complex equations and formulas. ScholarSpace does not maintain a template for dissertations created with LaTeX, and we can only provide very limited support for it. That said, there is a community of U-M folks who actively maintain this LaTeX template to keep it in line with Rackham's guidelines .
Here are some other very useful resources:
- Video recording of a UM Library Workshop on Dissertation Formatting with LaTeX
- Documentation for LaTeX and Overleaf
- Bibiliography Management with LaTeX
- How to Write a Thesis in LaTeX
- A huge collection of LaTeX resources
Can I use Google Docs for my dissertation?
No. Google Docs can get you pretty far down the road to something that looks like what Rackham requires, however, it's going to take a lot more work to get that far, and as you approach the finish line you will collide with obstacles that Google Docs just won't be able to get around. The issue is that Google Docs was not designed for complicated documents like a thesis or dissertation. To get it to do many of the special things that Rackham requires, you'll have to do a great deal of work that Word will just do for you . A few examples:
- Rackham requires 1" margin on all pages, but a 2" margin at the top of each new section. You'll have to manually adjust every relevant page yourself in Docs to get this, but Word will just do it automatically.
- Docs gives you three choices for how your Table of Contents will look, none of which are suitable by Rackham's standards. While you can adjust the format, many aspects of it (such as spacing) will revert to the original every time you update it. With Word, you're in charge of what your ToC looks like.
- In Docs, you'll have to manually type in your figure numbers ("Figure 3.6") and change them every time you add or move them. But Word will manage numbering and caption placement for you, it will renumber figures or tables as you add or move them, and it will create your List of Figures/Tables automatically – correct page numbers and all.
- With Word's figure/table numbering, you can also insert cross-references, so when you refer to "(see Figure 4.2)" but then you add some new figures before that, not only will Figure 4.2 renumber itself automatically, but anywhere you've referred to it will be updated, too. No more anxiety about whether you've updated everything accurately.
- Page numbers: Rackham wants the first two pages to have no page numbers, the rest of the frontmatter to have small roman numerals, and the body of the document to have arabic numerals. Docs just plain can't do that.
If you're concerned about the learning curve of using Word, please know that this Guide goes over how to do everything, AND the Word template found here has nearly everything already set up for you. We also regularly offer a workshop that serves as an introduction to the most useful features, and you can set up a meeting with a ScholarSpace expert anytime you run into something that you can't figure out.
Writing Assistance
This Guide is all about how to properly format your dissertation -- how to make it look the way Rackham wants it to look. But what if you need help with the actual composition of your content? Our friends at the Sweetland Writing Center offer such assistance, through their Writing Workshop program. From their website:
These are just a few quick but especially important tips to help you get started. See our more expansive Tips & Troubleshooting section for suggestions that are a little more complex.
- Save early , save often, and create backup versions as you go along. Consider setting up Microsoft OneDrive (you have free access with your umich login credentials). With this, you can turn on "Autosave" in Word to automatically save your document at regular intervals, and have access to previous versions.

- Use our template (available above), it will save you lots of time. Nearly all of the difficult formatting stuff we discuss in this Guide is already built into the template. Consider doing all of your writing in it -- even if you're working in separate files for each chapter, you can use a copy of the template for each one of those chapters.
- Set the margins including the two-inch margin for chapters titles ( Setting Margins ) .
- Define styles for Headings 1-3, Normal, Captions, and Quotes – these are most common; you may need others ( Working with Styles ).
- If headings need to be numbered (for example, 1.1, 1.2, 2.1, etc.), define a multi-level list ( Automatic Numbering ).
- If captions need to include the chapter number, define a multi-level list ( Automatic Numbering ).
- Share your file(s) with your advisors using Track Changes ( Commenting and Reviewing ) .
- If you use EndNote to manage your citations and create your bibliography, use only one EndNote library for your entire dissertation (see our EndNote Basics guide).
- Did we mention that you really ought to try out our template (available above)?
Purdue Online Writing Lab Purdue OWL® College of Liberal Arts
Developing Strong Thesis Statements

Welcome to the Purdue OWL
This page is brought to you by the OWL at Purdue University. When printing this page, you must include the entire legal notice.
Copyright ©1995-2018 by The Writing Lab & The OWL at Purdue and Purdue University. All rights reserved. This material may not be published, reproduced, broadcast, rewritten, or redistributed without permission. Use of this site constitutes acceptance of our terms and conditions of fair use.
The thesis statement or main claim must be debatable
An argumentative or persuasive piece of writing must begin with a debatable thesis or claim. In other words, the thesis must be something that people could reasonably have differing opinions on. If your thesis is something that is generally agreed upon or accepted as fact then there is no reason to try to persuade people.
Example of a non-debatable thesis statement:
This thesis statement is not debatable. First, the word pollution implies that something is bad or negative in some way. Furthermore, all studies agree that pollution is a problem; they simply disagree on the impact it will have or the scope of the problem. No one could reasonably argue that pollution is unambiguously good.
Example of a debatable thesis statement:
This is an example of a debatable thesis because reasonable people could disagree with it. Some people might think that this is how we should spend the nation's money. Others might feel that we should be spending more money on education. Still others could argue that corporations, not the government, should be paying to limit pollution.
Another example of a debatable thesis statement:
In this example there is also room for disagreement between rational individuals. Some citizens might think focusing on recycling programs rather than private automobiles is the most effective strategy.
The thesis needs to be narrow
Although the scope of your paper might seem overwhelming at the start, generally the narrower the thesis the more effective your argument will be. Your thesis or claim must be supported by evidence. The broader your claim is, the more evidence you will need to convince readers that your position is right.
Example of a thesis that is too broad:
There are several reasons this statement is too broad to argue. First, what is included in the category "drugs"? Is the author talking about illegal drug use, recreational drug use (which might include alcohol and cigarettes), or all uses of medication in general? Second, in what ways are drugs detrimental? Is drug use causing deaths (and is the author equating deaths from overdoses and deaths from drug related violence)? Is drug use changing the moral climate or causing the economy to decline? Finally, what does the author mean by "society"? Is the author referring only to America or to the global population? Does the author make any distinction between the effects on children and adults? There are just too many questions that the claim leaves open. The author could not cover all of the topics listed above, yet the generality of the claim leaves all of these possibilities open to debate.
Example of a narrow or focused thesis:
In this example the topic of drugs has been narrowed down to illegal drugs and the detriment has been narrowed down to gang violence. This is a much more manageable topic.
We could narrow each debatable thesis from the previous examples in the following way:
Narrowed debatable thesis 1:
This thesis narrows the scope of the argument by specifying not just the amount of money used but also how the money could actually help to control pollution.
Narrowed debatable thesis 2:
This thesis narrows the scope of the argument by specifying not just what the focus of a national anti-pollution campaign should be but also why this is the appropriate focus.
Qualifiers such as " typically ," " generally ," " usually ," or " on average " also help to limit the scope of your claim by allowing for the almost inevitable exception to the rule.
Types of claims
Claims typically fall into one of four categories. Thinking about how you want to approach your topic, or, in other words, what type of claim you want to make, is one way to focus your thesis on one particular aspect of your broader topic.
Claims of fact or definition: These claims argue about what the definition of something is or whether something is a settled fact. Example:
Claims of cause and effect: These claims argue that one person, thing, or event caused another thing or event to occur. Example:
Claims about value: These are claims made of what something is worth, whether we value it or not, how we would rate or categorize something. Example:
Claims about solutions or policies: These are claims that argue for or against a certain solution or policy approach to a problem. Example:
Which type of claim is right for your argument? Which type of thesis or claim you use for your argument will depend on your position and knowledge of the topic, your audience, and the context of your paper. You might want to think about where you imagine your audience to be on this topic and pinpoint where you think the biggest difference in viewpoints might be. Even if you start with one type of claim you probably will be using several within the paper. Regardless of the type of claim you choose to utilize it is key to identify the controversy or debate you are addressing and to define your position early on in the paper.
- Meet the Mentors
- Get Involved
- Get the T-Shirt
- Life Science Marketing
- Community Marketing
- Custom Marketing
Join Us Sign up for our feature-packed newsletter today to ensure you get the latest expert help and advice to level up your lab work.
- Genomics & Epigenetics
- DNA / RNA Manipulation and Analysis
- Protein Expression & Analysis
- PCR & Real-time PCR
- Flow Cytometry
- Microscopy & Imaging
- Cells and Model Organisms
- Analytical Chemistry and Chromatography Techniques
- Chemistry for Biologists
- Basic Lab Skills & Know-how
- Equipment Mastery & Hacks
- Managing the Scientific Literature
- Career Development and Networking
- Dealing with Fellow Scientists
- Getting Funded
- Lab Statistics & Math
- Organization & Productivity
- Personal Development
- PhD Survival
- Soft Skills & Tools
- Software & Online Tools
- Survive & Thrive
- Taming the Literature
- Writing, Publishing & Presenting
- Software and Online Tools
Using Word to Write your Thesis: Creating a Master Document
The end is in sight! You’ve drafted your individual thesis chapters and now it’s time to combine them into a single thesis master document. Follow our easy step-by-step instructions to get your thesis submission-ready.
Published December 10, 2020

Lauren has a PhD in Biochemistry from the University of Dundee .

Wow – your thesis is really coming along. First, you created an outline to help you organize your chapters. Second, you made a Table of Contents and learned how to insert captions and how to cross-reference within the document.
Now it’s time to combine your chapters into a single thesis master document; this allows you either to work on the whole thesis at once or to concentrate on individual chapters.
Separate or Together?
When putting together a thesis, it is useful to keep the chapters in separate documents because it keeps the files smaller. This means they will open and close faster, and if something goes wrong (which hopefully it won’t, but it’s better to plan for the worst) there’s less to lose.
You also won’t have to scroll through pages and pages of introduction when you only want to make a slight amendment to a method! With a thesis master document, you can work on each of the chapters separately, or have them all open together in the same document depending on what you need to do.
But eventually, you will have to put it all together.
Before you start…
Beware: Once you have linked files to the master document, you can’t change the file’s name or the file’s location or the master document won’t be able to find it! I stored all my thesis files in a folder in my dropbox account – this saved me having to update backup copies every other week and meant I wasn’t moving the documents around.
Make sure you have an up-to-date backup of the individual files , as sometimes creating the master document can go a bit wrong, and you don’t want to lose a chapter or two.
Thesis master documents can be a little tricky to get used to and take some playing around with to get the hang of. Before you get started setting up your thesis master document, try linking a few smaller files together and get used to manipulating them in Word – think of it like an artist doing a rough sketch before a masterpiece!
Making Your Thesis Master Document
To create the master document:
1. Open a new word file
2. Go to the Outlining tool
3. In the master document options, select “ Show document ”

This will create the option to “Create” or “Insert” files into the master document.

4. Click on “ Insert ” and add in your chapter files, which will appear as file path links with the normal format (depending on where you saved them) “C:\Users\…” followed by the name of the computer you’re saving on, the location, the folder, etc.
5. Hit “ Expand Subdocuments ” to get a look at the content of the chapters rather than just the file paths. This gives you a look at the thesis as a whole and a chance to update your table of contents, list of figures, etc.

You Have a Thesis Master Document – What Next?
Don’t forget to update your table of contents, list of figures, and list of tables when you create your thesis master document. At this point, it’s important to do a snag check. We’ve all had that document where it ends up saved as “final-v5-final_update_v2” because we kept noticing minor errors after we thought it was final and had to keep going back to it.
Remember that this document is HUGE, and while you’re probably up against a deadline, you need to take that half an hour to scroll through the whole document and find the bits that have gone rogue:
- actual figures appearing in the list of figures – usually because they’ve been styled as a caption.
- masses of white space before or after a figure, or titles/legends on separate pages from the figure/table they are describing – ticking or unticking “Keep with next” in the paragraph options can help keep things together, or if it’s a large paragraph that won’t fit together, can allow it to break over a page.
- incorrect cross-references – select all the text and update the fields (F9 or right-click).
Once you have your final thesis ready to go, you can add the cover page and page numbering, then expand your subdocuments, save the entire file as a PDF (to stop things moving about) and print!
Come back for the final article in this series in which I discuss cover pages, page numbering, and some time-saving tips for using Word for thesis writing.
Originally published October 29, 2014. Reviewed and updated on December 2, 2020
**Note: All screenshots taken from Word for Windows, 2019.
Share this article:
More 'Software and Online Tools' articles

Brushing Up On Your Excel Skills: Part One
Microsoft Excel can be a really powerful, useful tool for certain kinds of data processing and record keeping, and the chances are you probably don’t even know how to use half of the functions it comes with! That’s OK, personally, I find Excel a bit less user-friendly than Word, but also it’s a programme I…
Crafting Multi-panel Images Into Figures
So, you’ve slaved away in the lab for months and now you’re ready to create your first figure –whether it’s for a thesis or a journal – way to go you! Now you could always use Word or PowerPoint to compile your first image, but don’t – ever do that! (And if you plan to…

Applications of Artificial Intelligence in Biology: An Easy Intro to AI for Researchers
Get a short introduction to AI including key terminology, example applications of artificial intelligence in biology, and resources to help you get started.

How to Start Using Coding to Automate Image Analysis Part 2: Batch Processing Multiple Images
In Part 1 of this article, I introduced you to using code for basic image manipulation in ImageJ and working with the command recorder to expand your coding vocabulary. I covered how to make a simple macro, how to edit it and then save it to be run again another time. If you skipped the…

5 Digital Tools to Increase Your Productivity in Research
Scientific research is a constant battle against time. Whether it is your Masters, PhD or Postdoc, you always feel the pressure to generate data for external validation. For that, you need to spend your time on the bench and not at the desk, but that can be hard. Unfortunately, non-laboratory tasks occupy a large segment…
How to Start Using Coding to Automate Image Analysis Part 1: The Simple Process
Pat yourself on the back, you saw a post with the word “coding” in the title and you didn’t freak out or glaze over. That’s the first step. Coding seems to have such a stigma attached to it; people tend to think that it’s incomprehensible nonsense that they could never learn, and that it has…
Be very careful with Dropbox or similar online storage systems. These are technically no backups. The reason is simple: The moment you do a change on the folder which has been linked to the Dropbox, it will be propagated to the Dropboxsystem. So if you manage to produce a corrupt version of one of your thesis files, this will be in your online storage before you will be able to prevent it and replace your last working version there. I have seen dramas here…
To avoid this, create an independent backup (not something you work on) which is on a USB stick, or a different folder which syncs with Dropbox. This way you are relatively safe of this work errors. It is more work by hand though, but you have to know how much your thesis means to you.
This is not true anymore. Dropbox has file version history that goes back to 30 days where you can recover an uncorrupted version . https://www.dropbox.com/en/help/11
Comments are closed.
Raise your Research Game with Bitesize Bio
Sign up for our feature-packed newsletter today to ensure you get the latest expert help and advice to level up your lab work.
You’ll stay up-to-date with our podcasts, webinars, workshops, downloadables, and more, delivered to your inbox every fortnight.
Don’t delay! Sign up now
Newsletters
All emails contain an unsubscribe link. You can review our privacy policy , cookie policy and terms and conditions online.
- Technical Skills
- More Skills
Bitesize Bio Powered
- Microscopy Focus
- Privacy Policy
- Cookie Policy
- Terms of Use
- Mardigian Library
- Subject Guides
Formatting Your Thesis or Dissertation with Microsoft Word
- Introduction
- Copyright Page
- Dedication, Acknowledgements, & Preface
- Headings and Subheadings
- Citations and Bibliography
- Page Numbers
- Tables and Figures
- Rotated (Landscape) Pages
- Table of Contents
- Lists of Tables and Figures
- List of Abbreviations
- Some Things to Watch For
- PDF with Embedded Fonts
Natural Sciences Librarian

Using Microsoft Word to format your thesis or dissertation
[If you want to use LaTeX instead of Microsoft Word, see the Formatting in LaTeX section, below.]
UM-Dearborn Microsoft Word thesis template
Most students use Microsoft Word to write their thesis or dissertation. For previous assignments, you likely did not use some of Word's advanced features such as styles, section breaks, rotated pages, automatically generated table of contents, automatically generated list of abbreviations, etc. Some of these things are required for your document, others just make formatting and updating your document much easier, and still others may be needed for your particular document. It isn't intuitive how to do many of these things. Moreover, the University of Michigan-Dearborn has specific requirements for formatting your document and following videos or using templates from other universities may lead to more work fixing formatting issues later, after you have submitted the thesis for the final format check.
The video series on the following pages demonstrates how to use Word to make formatting your document easier while following the UM-Dearborn guidelines. While designed specifically for CECS thesis format using a modified IEEE style , much of what is covered in these tutorials also can be applied to or modified for CASL theses as well as CECS and CEHHS dissertations. Please make sure that you check the requirements for your discipline, program, department, or college regarding formatting and which style guide to follow.
Note: Different versions of Microsoft Word were used in these videos. The first slide in each video will state which version was used. Most things are done the same in different versions of Word, but finding some of the features might vary slightly.
Thesis and Dissertation Formatting Guidelines
Your Master's thesis or Ph.D. dissertation should be formatted according to university guidelines. See the Thesis and Dissertation Formatting Checklist for items that your format checker will look for.
Formatting in LaTeX
Some CECS students use LaTeX to write their thesis or dissertation. There is no official or sanctioned LaTeX template. Ann Arbor's Scholar Space directs students to the LaTeX template at https://github.com/umangv/ thesis-umich . According to Scholar Space, this template "has proven to be the most actively maintained and accurate that we've seen".
- Next: Title Page >>
- Last Updated: Mar 21, 2024 2:35 PM
- URL: https://guides.umd.umich.edu/Word_for_Theses
Call us at 313-593-5559
Chat with us
Text us: 313-486-5399
Email us your question
- 4901 Evergreen Road Dearborn, MI 48128, USA
- Phone: 313-593-5000
- Maps & Directions
- M+Google Mail
- Emergency Information
- UM-Dearborn Connect
- Wolverine Access
- Writing a Thesis Using MS Word
- Graduate Academic Affairs
MS Word Template
The template above provides a basic thesis layout, which meets the IIT thesis manual requirements. It consists of the following parts:
- Acknowledgment
- Authorship Statement
- Table of Contents
- List of Tables
- List of Figures
- List of Symbols
- Bibliography plus
- 5 Chapters each having 3 sections. (You may delete chapter and sections or add extra ones in case your thesis has a different number of chapters and sections; Chapter names are generic and you should use what is appropriate for your research).
Style Elements Template
This document has includes several examples of figures, tables, and their captions for Microsoft Word. You can cut-and-paste one- or two-line figure titles and table titles and insert columns and rows as needed to formatted tables.
This template only provides a basic layout of what is required. Due to technical limitations, all of the following should be done manually (we hope to update this in the future):
- Page numbers in the Table of Contents
- Figure and Table label numbers and page numbers for the List of Figures or List of Tables
- Provide bibliography parts and the relevant citations (the template is compatible with reference management software)
- Revise the above items if any related changes are made (e.g. a figure/table/page is added or deleted)
The template below is an obsolete version, provided for reference purposes. We do not recommend using this template for your thesis.
Download iitthesis2.dot
Learn more...
Unscrambler and Scrabble Word Finder
Word unscrambler.
| Thesis is a Scrabble word. Scrabble point value for thesis: 9 points. |
| Thesis is a Words with Friends word. Words with Friends point value for thesis: 9 points. |
Words made by unscrambling the letters T H E S I S
6 letter words made by unscrambling the letters in thesis, 5 letter words made by unscrambling the letters in thesis, 4 letter words made by unscrambling the letters in thesis, 3 letter words made by unscrambling the letters in thesis, 2 letter words made by unscrambling the letters in thesis.
Above are the results of unscrambling thesis. Using the word generator and word unscrambler for the letters T H E S I S, we unscrambled the letters to create a list of all the words found in Scrabble, Words with Friends, and Text Twist. We found a total of 51 words by unscrambling the letters in thesis. Click these words to find out how many points they are worth, their definitions, and all the other words that can be made by unscrambling the letters from these words. If one or more words can be unscrambled with all the letters entered plus one new letter, then they will also be displayed.
Unscrambled words using the letters T H E S I S plus one more letter
Definitions of thesis.
a treatise advancing a new point of view resulting from research; usually a requirement for an advanced academic degree |
Typing Word Game - Click "Play Now" to Start!
Have a language expert improve your writing
Run a free plagiarism check in 10 minutes, generate accurate citations for free.
- Knowledge Base
- Academic writing
- Taboo words in academic writing
Words and Phrases to Avoid in Academic Writing
Published on February 6, 2016 by Sarah Vinz . Revised on September 11, 2023.
When you are writing a dissertation , thesis, or research paper, many words and phrases that are acceptable in conversations or informal writing are considered inappropriate in academic writing .
You should try to avoid expressions that are too informal, unsophisticated, vague, exaggerated, or subjective, as well as those that are generally unnecessary or incorrect.
Bear in mind, however, that these guidelines do not apply to text you are directly quoting from your sources (including interviews ).
Instantly correct all language mistakes in your text
Upload your document to correct all your mistakes in minutes

Table of contents
Too informal, too exaggerated, too subjective, generally incorrect, other interesting articles.
Academic writing is generally more formal than the writing we see in non-academic materials (including on websites). It is also more formal than the ways in which we normally speak. The following words and phrases are considered too informal for a dissertation or academic paper.
| A bit | The interviews were difficult to schedule | The interviews were to schedule |
| A lot of, a couple of | studies | studies |
| Isn’t, can’t, doesn’t, would’ve (or any other ) | The sample | The sample |
| Kind of, sort of | The findings were significant | The findings were |
| Til, till | From 2008 2012 | From 2008 2012 |
| You, your (i.e., the ) | can clearly see the results | can clearly see the results
|
Informal sentence starts
Some words are acceptable in certain contexts, but become too informal when used at the beginning of a sentence. You can replace these with appropriate transition words or simply remove them from the sentence.
| Plus | the participants were in agreement on the third question | , the participants were in agreement on the third question |
| So | it can be concluded that the model needs further refinement | it can be concluded that the model needs further refinement |
| And | the participants were all over the age of 30 | The participants were all over the age of 30 |
| we asked all the participants to sign an agreement | , we asked all the participants to sign an agreement |
Here's why students love Scribbr's proofreading services
Discover proofreading & editing
Using vague terms makes your writing imprecise and may cause people to interpret it in different ways. Always try to be as specific as possible.
| Stuff | People are concerned about their | People are concerned about their |
| Thing | The report presents many | The report presents many |
| This topic has interested researchers for | This topic has interested researchers for |
Academic writing is usually unadorned and direct. Some adverbs of frequency (such as always and never ) and intensifiers (words that create emphasis, such as really ) are often too dramatic. They may also not be accurate – you’re making a significant claim when you say something is perfect or never happens.
These terms do sometimes add value, but try to use them sparingly.
| Always, never | Researchers argue that | Researchers argue that |
| Perfect | The solution to the problem | to the problem |
| Really, so, super | This theory is important | This theory is |
Some words and phrases reveal your own bias. For instance, if you state that something will obviously happen, you are indicating that you think the occurrence is obvious – not stating a fact.
Expressing your opinion is appropriate in certain sections of a dissertation and in particular types of academic texts (such as personal statements and reflective or argumentative essays ). In most cases, though, take care when using words and phrases such as those below – try to let the facts speak for themselves, or emphasize your point with less biased language.
| Beautiful, ugly, wonderful, horrible, great, boring | A review of the literature yielded many articles | A review of the literature yielded many articles |
| Obviously, naturally, of course | The results indicate | The results indicate |
Certain words and phrases are often used incorrectly, even by native speakers of a language. If you’re exposed to such mistakes often enough, you may start to assume they are correct – but it’s important that you don’t let them creep into your writing.
You should also bear in mind that some of these mistakes relate to things we all frequently mishear (for instance, we often think the speaker is saying would of instead of would have ).
| Literally | The students did not understand | The students did not understand |
| Would of, had of | The study considered | The study considered |
In general, you should also try to avoid using words and phrases that fall into the following categories:
- Jargon (i.e., “insider” terminology that may be difficult for readers from other fields to understand)
- Clichés (i.e., expressions that are heavily overused, such as think outside of the box and at the end of the day )
- Everyday abbreviations (e.g., approx. , ASAP, corona, stats, info )
- Slang (e.g., cops , cool )
- Gender-biased language (e.g., firemen , mankind )
- Generally unnecessary (e.g., redundant expressions that do not add meaning, such as compete with each other instead of simply compete)
Reflective reports and personal statements sometimes have a less formal tone. In these types of writing, you may not have to follow these guidelines as strictly. The preface or acknowledgements of a dissertation also often have a less formal and more personal voice than the rest of the document.
If you want to know more about AI for academic writing, AI tools, or fallacies make sure to check out some of our other articles with explanations and examples or go directly to our tools!
- Ad hominem fallacy
- Post hoc fallacy
- Appeal to authority fallacy
- False cause fallacy
- Sunk cost fallacy
- Deep learning
- Generative AI
- Machine learning
- Reinforcement learning
- Supervised vs. unsupervised learning
(AI) Tools
- Grammar Checker
- Paraphrasing Tool
- Text Summarizer
- AI Detector
- Plagiarism Checker
- Citation Generator
Cite this Scribbr article
If you want to cite this source, you can copy and paste the citation or click the “Cite this Scribbr article” button to automatically add the citation to our free Citation Generator.
Vinz, S. (2023, September 11). Words and Phrases to Avoid in Academic Writing. Scribbr. Retrieved June 11, 2024, from https://www.scribbr.com/academic-writing/taboo-words/
Is this article helpful?

Sarah's academic background includes a Master of Arts in English, a Master of International Affairs degree, and a Bachelor of Arts in Political Science. She loves the challenge of finding the perfect formulation or wording and derives much satisfaction from helping students take their academic writing up a notch.
Other students also liked
Transition words & phrases | list & examples, list of 47 phrasal verbs and their one-word substitutions, get unlimited documents corrected.
✔ Free APA citation check included ✔ Unlimited document corrections ✔ Specialized in correcting academic texts
Research Guides
Submit and publish your thesis.
- The Graduate Thesis: What is it?
- Thesis Defences
- Deadlines and Fees
Formatting in MS Word
- Formatting in LaTeX
- Making Thesis Accessible
- Thesis Embargo
- Review and Release
- Your Rights as an Author
- Re-using Third Party Materials
- Creative Commons Licenses for Theses
- Turning Thesis into an Article
- Turning Thesis into a Book
- Other Venues of Publication
Thesis style template for MS Word is available on the School of Graduate Studies website . You are not required to use the template but using it will make some of the formatting requirements easier to meet.
►► Thesis template for Microsoft Word (.docx)
For formatting instructions and requirements see the Formatting section of the SGS website .
MS Word formatting tips
Section breaks and page numbers.
One of the most common formatting items that causes difficulty is the page numbering, since the front section and the rest of the thesis use different characters and placement. The way to properly format these sections is to add Section Breaks in between the front matter and the Introduction or Chapter One and between each of the following chapters, including the Bibliography and Appendices sections.
Adding Section Breaks and Page Numbers in Word 2016
You will need to insert “Section Break – next page” in between all chapters and between the front matter and the first chapter as well as between the last chapter and the appendices and the references.
- Click on the place where the break should be inserted and then go to the Layout tab.
- Click on the arrow beside Breaks and choose Section Break Next Page from the list. This allows you to format sections individually of each other.
- Go to the first chapter after the front matter, click in the header and footer area and in the Header & Footer tools, ensure that “Different First Page” is selected and then ensure that the “Link to Previous” option is not selected. This way, when you format the front matter with Roman numerals in the bottom centre, it won’t carry the formatting into the next section.
- Use the Insert Page Numbers and Format Page numbers to insert the page numbers in the appropriate place with the appropriate formatting.
Using Document Styles
The template has Styles that can be used to format your entire thesis. To use a style, select the text to apply the style to, then choose the appropriate style from the Styles window.
If you don’t want to use the template (for example, if you don’t want to use the numbered headings, you can create your own styles. To do this, format the heading (or other element) the way you want, then click New Style in the style window. Insert a unique name for the style and click OK . You can then use that style for those elements going forward.
Table of Contents (TOC)
To automatically generate a TOC, apply the appropriate Styles to all headings. The template has styles created for this purpose. If you are not using the template, you can create your own heading styles to apply.
Auto-generate the TOC in Word 2016 on both Mac and Windows
- Go to the References tab, choose Table of Contents and select Custom Table of Contents . Click OK .
Using your own styles
- If you have created your own styles with custom names, go to the References tab, choose Table of Contents and select Custom Table of Contents , then click Options .
- Put numbers beside the styles you created that correspond with the level of heading they represent. Click OK , then OK again.
Manual formatting of TOC
To add right-aligned tabs with leaders:
- From the Home tab, open the Paragraph settings and click on the Tabs button.
- Enter the tab stop position, choose Right Tab and for Leader , choose the … option. Click Set (or the + sign on Mac), then click OK .
- Type the TOC entry, press tab, then insert the page number.
Miscellaneous tips
- Use page breaks instead of pressing Enter or Return
- Use paragraph first-line indent or tab consistently throughout doc (best to use Styles)
- Use consistent spacing around headers
- Use Shift + Return/Enter to keep headings that run over 2 lines in the same paragraph
- Ensure there are no Widow/Orphan headings or paragraphs
- When inserting longer quotes, use margins to indent rather than tabbing in and inserting a hard return after each line
- Always use tabs rather than spaces. Set tab stops so you aren’t using multiple tabs
Formatting issues and examples
When creating your own table of contents , be sure to format the space between the text and the numbers properly. Do not use multiple tabs or periods to separate them. This will result in a jagged right margin. You want to set a right-aligned tab with leaders in order to have the numbers properly aligned to the right margin. The auto-generate TOC feature does this automatically.

When starting content on a new page, do not use the return key until you get to the next page. If you add content to that section later on, it will move everything down the page, even on the following page. Instead, use the Insert Page Break feature.

When formatting indented quotes, do not use tabs to indent the lines , or put a return at the end of each line. The test in the paragraph won’t flow properly if you need to add more text or change the margins. Instead use the margin controls in the Ruler to indent the paragraph on each side.

- << Previous: Formatting
- Next: Formatting in LaTeX >>
- Last Updated: Sep 15, 2023 3:23 PM
- URL: https://guides.library.utoronto.ca/thesis
Library links
- Library Home
- Renew items and pay fines
- Library hours
- Engineering
- UT Mississauga Library
- UT Scarborough Library
- Information Commons
- All libraries
University of Toronto Libraries 130 St. George St.,Toronto, ON, M5S 1A5 [email protected] 416-978-8450 Map About web accessibility . Tell us about a web accessibility problem . About online privacy and data collection .
© University of Toronto . All rights reserved. Terms and conditions.
Connect with us
Formatting your dissertation in Word
About this guide.
Learn how to use Word features effectively and efficiently:
- basic templates
- images, captions, and page numbers
- front matter
- work with styles and much more!
Before you start:
- Participants should have basic experience using Microsoft Word. This workshop specifically uses Word 2016.
Note: See dissertation/thesis formatting and submission guidelines (PDF) from University of Minnesota Graduate Student Services and Progress (also see Thesis/dissertation submission and formatting page).
Tutorials for formatting your dissertation in Word
Setting margins, formatting page numbers, changing fonts and spacing with styles, defining headings and heading styles, automatic page numbers, creating and applying word templates, inserting images, inserting captions and cross-references, keeping captions with their figures, copying charts from excel, adding a landscape page, adding front matter, adding a table of contents, adding a list of figures, sample documents.
The following documents and materials are used in the tutorials. You are welcome to use your own documents, or download ours.
- Sample Chapter 1 Sample document to be used throughout the tutorials. It's currently unformatted text - you will be applying tutorials to the content.
- Sample Chapter 2 Sample document to be used throughout the tutorials. It's currently unformatted text - you will be applying tutorials to the content.
- Image 1 Sample image to be used in some of the tutorials.
- Image 2 Sample image to be used in some of the tutorials.
- Sample Chart Excel chart to be used in the tutorial Copying Charts from Excel.
- Sample Front Matter Sample front matter layout with proper breaks and page numbering. Includes the following: - Title page - Copyright page - Acknowledgements (not required) - Dedication (not required) - Abstract (not required) - Table of contents - List of tables - List of figures - Other items - Placeholder for Chapter 1 content
Supplementary handouts and slides
The following materials can help supplement the tutorials, though they are not required.

Helpful tools and services from the Libraries
The Libraries offer many tools and services that you may find useful as you write your thesis or dissertation.
- Citation Managers
- Dissertation Calculator
- Study Carrels
- Thesis/Dissertation Submission and Formatting Guidelines
- Full List of Researcher Support Services
- Deutschland
- United Kingdom
- PhD Dissertations
- Master’s Dissertations
- Bachelor’s Dissertations
- Scientific Dissertations
- Medical Dissertations
- Bioscience Dissertations
- Social Sciences Dissertations
- Psychology Dissertations
- Humanities Dissertations
- Engineering Dissertations
- Economics Dissertations
- Service Overview
- Revisión en inglés
- Relecture en anglais
- Revisão em inglês
Manuscript Editing
- Research Paper Editing
- Lektorat Doktorarbeit
- Dissertation Proofreading
- Englisches Lektorat
- Journal Manuscript Editing
- Scientific Manuscript Editing Services
- Book Manuscript Editing
- PhD Thesis Proofreading Services
- Wissenschaftslektorat
- Korektura anglického textu
- Akademisches Lektorat
- Journal Article Editing
- Manuscript Editing Services
PhD Thesis Editing
- Medical Editing Sciences
- Proofreading Rates UK
- Medical Proofreading
- PhD Proofreading
- Academic Proofreading
- PhD Proofreaders
- Best Dissertation Proofreaders
- Masters Dissertation Proofreading
- Proofreading PhD Thesis Price
- PhD Dissertation Editing
- Lektorat Englisch Preise
- Lektorieren Englisch
- Wissenschaftliches Lektorat
- Thesis Proofreading Services
- PhD Thesis Proofreading
- Proofreading Thesis Cost
- Proofreading Thesis
- Thesis Editing Services
- Professional Thesis Editing
- PhD Thesis Editing Services
- Thesis Editing Cost
- Dissertation Proofreading Services
- Proofreading Dissertation
PhD Dissertation Proofreading
- Dissertation Proofreading Cost
- Dissertation Proofreader
- Correção de Artigos Científicos
- Correção de Trabalhos Academicos
- Serviços de Correção de Inglês
- Correção de Dissertação
- Correção de Textos Precos
- Revision en Ingles
- Revision de Textos en Ingles
- Revision de Tesis
- Revision Medica en Ingles
- Revision de Tesis Precio
- Revisão de Artigos Científicos
- Revisão de Trabalhos Academicos
- Serviços de Revisão de Inglês
- Revisão de Dissertação
- Revisão de Textos Precos
- Corrección de Textos en Ingles
- Corrección de Tesis
- Corrección de Tesis Precio
- Corrección Medica en Ingles
- Corrector ingles
- Choosing the right Journal
- Journal Editor’s Feedback
- Dealing with Rejection
- Quantitative Research Examples
- Number of scientific papers published per year
- Acknowledgements Example
- ISO, ANSI, CFR & Other
- Types of Peer Review
- Withdrawing a Paper
- What is a good h-index
- Appendix paper
- Cover Letter Templates
- Writing an Article
- How To Write the Findings
- Abbreviations: ‘Ibid.’ & ‘Id.’
- Sample letter to editor for publication
- Tables and figures in research paper
- Journal Metrics
- Revision Process of Journal Publishing
- JOURNAL GUIDELINES
Select Page
Word Use, Syntax & Sentence Structure in PhD Theses – Grammar Advice
Posted by Rene Tetzner | Oct 29, 2021 | PhD Success | 0 |

5.4 Word Use, Syntax and Sentence Structure
Although the advice on writing formal scholarly prose provided in this section will prove especially helpful for those who are just developing their scholarly voice (as is the case with many doctoral candidates) and/or those whose first language is not English, even students who consider their English writing skills excellent may well find some of the information useful. Please note that while the focus here is on words and their order in English sentences, a sentence must also be properly punctuated to function effectively, so Section 5.6 on various marks of punctuation and their use should be consulted in conjunction with this section. Some matters of punctuation can be determined by author preferences or university or department guidelines because there is more than one correct approach (using a serial comma or not, for instance: see Section 5.6.1): in such cases one acceptable method should be chosen and used consistently. With other aspects of punctuation, however, there are right and wrong ways of proceeding (a comma splice should always be avoided, for example: again, see Section 5.6.1), and in those cases the correct punctuation should be used in all relevant instances. In all cases, punctuation should enhance and clarify the structure, language and meaning of your sentences whether they are short and simple or long and extremely complex.
5.4.1 Using Words in a Scholarly Fashion without Bias
Word use is not only an enormous and wide-ranging topic, but, like punctuation, the use of individual words can be not only correct or incorrect, but also a matter of authorial choice, which means that the writer of a thesis must choose his or her words with care. Dehumanising language, for instance, should always be avoided when writing about human beings, and words that assert the presence or role of human beings in a study should not be omitted. There is a tendency, however, for study participants to be reduced through a kind of shorthand to the condition they represent in a study: ‘diabetes and nondiabetes’ might be used, for instance, instead of the more humanising ‘participants with and without diabetes’ or ‘participants with and without a diagnosis of diabetes.’ While such shorthand language is sometimes necessary to convey results efficiently, especially in tabular form, it should be avoided as much as possible and certainly not used when first introducing the people involved in a study. Some departments or thesis committees may even frown upon the use of ‘subjects’ instead of ‘individuals’ or ‘people’ because it is too impersonal, and most will want the age of participants and other people to be referred to accurately: young men and women, for instance, should not be called ‘boys’ and ‘girls,’ which, as a general rule, should be used only of children 12 years of age and under. It can therefore be helpful to discuss such language with your supervisor and check university or department guidelines for any restrictions of this kind, and it is also important to keep the particular context in mind and use common sense while considering each term. For example, while referring to a 25-year-old man as a ‘boy’ is inappropriate in most cases, referring to a 40-year-old prostitute as a ‘working girl’ may not be if that is what the prostitute calls herself and you use the term in quotations and/or with appropriate explanation.

Appropriate word use of this kind is a matter of achieving precision and avoiding bias. If, for instance, an author refers to a 30-year-old man as a ‘man,’ but refers to a woman of the same age as a ‘girl,’ or uses the masculine pronoun ‘he’ when writing of doctors and the feminine pronoun ‘she’ when writing of nurses without specifying a context and details that justify this treatment, it may not be a deliberate distinction, but it will come across as both inaccurate and biassed. Bias can occur in terms of race, nationality, sex/gender, class, education, age and so on, and can involve arbitrarily prioritising one group of people over another or stereotyping any particular group of people (see the advice on avoiding bias of various kinds in the Publication Manual of the APA , 2010, pp.73–77). Some readers might extend this to historical times and their people (the idea, for example, that any one time is better than another or the common notion that people now are more intelligent or more imaginative than people were in the past) as well as to animals and other creatures (with the prioritisation of people over animals or the environment, for instance, smacking of anthropocentrism). Avoiding gender bias is particularly important in western (including English-speaking) societies of the twenty-first century, so be sure to reflect on any instances in which you mention men or women alone: if women are the only subjects of the study or if women alone are relevant for a particular statement (only women can actually bear children, for instance), using ‘women’ alone is appropriate, but if both men and women are involved (both men and women can be parents, for example), both should be mentioned or an alternative that implies both (such as ‘parents,’ ‘people’ or ‘participants’) should be used.

5.4.2 The Precise and Appropriate Use of Pronouns
Although uncomplicated in many instances, the gender-specific pronouns ‘he’ and ‘she’ must always be used with care. Their use is straightforward when speaking of a male or female person, but when ‘a person’ (singular) is used more generally or hypothetically, problems can arise because ‘he’ (once used in most situations of this sort: e.g., ‘When a person is learning to write scholarly prose, he requires sound examples’) is no longer acceptable as a neutral pronoun, and although ‘she’ is now used as neutral by some authors, it really just inverts rather than solves the problem. A better choice is the singular pronoun ‘one,’ which is suitably neutral but can sound artificial to some writers and readers, or ‘he or she’ (or ‘s/he’) which covers the necessary ground but can come across as awkward, especially if used frequently. Some writers uncomfortable with using ‘one,’ ‘he or she’ or ‘s/he’ (as well as ‘him or her,’ ‘his or her,’ ‘himself or herself’ and ‘him/herself’) would argue that ‘they’ (along with ‘them,’ ‘their’ and ‘themselves’) is an acceptable non-gender-specific substitute for the singular forms (When a person is learning to write scholarly prose, they require sound examples). However, ‘they,’ ‘them,’ ‘their’ and ‘themselves’ are all plural, so they are not really appropriate or correct as pronouns referring to singular nouns, and using them as though they are can quickly become extremely confusing. So if you use ‘a person,’ ‘an individual’ or similar phrasing, you need a singular pronoun, and both ‘he’ and ‘she’ are required to render the language inclusive: ‘When a person is learning to write scholarly prose, he or she requires sound examples.’ Only if the noun is plural is the plural pronoun appropriate: ‘When students are learning to write scholarly prose, they require sound examples.’ Careful proofreading of your own writing will catch most problems associated with gender-specific language, but for more information on sexist and nonsexist language, see Miller and Swift (1995).

Pronouns can be problematic in a number of other ways as well. On the topic of referring to people appropriately, for instance, a person, participant, student, woman, father, teenager or child is never an ‘it,’ which as a neuter pronoun should be used of inanimate objects (e.g., ‘When the questionnaire is finished, it will be circulated online’) and is appropriate when referring to countries, which, like ships, are generally not referred to with feminine pronouns as they once were (Canada should reconsider its treatment of immigrants). ‘It’ should not be used when referring to people, however (When the student wrote the exam, he was feeling ill). Relative pronouns should be used similarly, with ‘who,’ ‘whom’ and ‘whose,’ not ‘that,’ representing people – ‘the student who wrote the exam’ or ‘the woman who felt depressed,’ not ‘the student that wrote the exam’ or ‘the woman that felt depressed’ – although conversely the possessive form ‘whose’ can be used of inanimate objects as well as of people (‘the house whose door was purple,’ which is often preferred to ‘the house of which the door was purple’). The essential point is that pronouns – ‘it,’ ‘who,’ ‘he,’ ‘she’ and others – should be used with the utmost accuracy so that the relationship between each pronoun and its antecedent is clearly established, leaving no doubt about the meaning of the pronoun. For example, in ‘The boy thought his sister was lost. She was actually at a friend’s house,’ ‘She’ can only refer to the sister, so there is no risk of confusion. However, in ‘The girl lost her cat Tigress. She was actually at a friend’s house,’ the antecedent of ‘She’ is not clear. Since the ‘girl’ is the subject of the first sentence, the reader might expect ‘She’ in the second sentence to refer to the ‘girl’ as well, but it could also refer to the female cat named Tigress, so confusion is created about what is actually being said and thus about the implications of the text. Is the cat safe at a friend’s house, or did the girl lose the cat at a friend’s house and thus in a less familiar and potentially more dangerous landscape? Is there continuing cause for worry or not?
The ambiguity possible even in so simple a sentence hints at the kind of confusion that can result if a long and complex sentence reporting and discussing detailed results and conclusions opens with ‘It’ and contains two more instances of that pronoun as well as a ‘they’ and a ‘them.’ Such a sentence may fail to communicate your meaning clearly to your intended audience, especially if you are also dealing with the challenge of writing in a language not your own and perhaps use one ‘it’ when referring to a plural antecedent and ‘them’ for a singular one by mistake. In most cases, five pronouns are too many for a sentence in any case, but whether you use many pronouns or only one in a sentence, it is vital that the antecedent for each can be identified readily and with certainty. Sometimes the grammar-checking function in Word will catch an incorrectly or oddly used pronoun, but much like the spell-checking function, this is far from reliable. If you detect the potential for ambiguity in your use of pronouns, your meaning would definitely be clearer were you to use nouns or noun phrases instead. Beware in particular of using pronouns to refer to large or abstract ideas which are difficult to define or explain: such concepts are far clearer and more effective in scholarly writing if they are referred to via precise terminology and carefully explained, difficult though that may be, so such an approach will not only improve your writing style, but also your argument in major as well as minor ways.
As a general rule, the pronoun ‘you’ (as well as ‘your’ and ‘yourself’) should be avoided altogether in academic and scientific prose. In quotations such as those from the direct speech of interviews or the informal answers on questionnaires, ‘you’ is fine because it is not expressed in the author’s own voice, but the reader should not be addressed directly in this way in scholarly prose: in most contexts using ‘you’ simply establishes too personal a voice for formal academic or scientific writing. This is rarely a problem for authors, but since I use the second-person voice frequently and informally in this book to adopt a casual tone and facilitate concise expression of the advice I am offering, I thought I best mention the discrepancy (definitely an instance of ‘do as I say’ rather than ‘do as I do’). ‘I’ (as well as ‘me,’ ‘my’ or ‘mine’ and ‘myself’ in the other cases) can usually be used, however, when referring specifically to yourself as the author of the thesis (e.g., ‘I circulated the questionnaire,’ ‘I detected in the results’ and ‘I discovered a striking difference’). In fact, when used specifically and with discretion, ‘I’ is often preferable to potentially awkward third-person circumlocutions such as ‘the present author’ and ‘the present investigator.’ Do check with your supervisor or department before using the first-person voice, however, as its use varies among disciplines, and deliberately avoiding this voice (perhaps to create an impression of objectivity) is still considered standard for scholarly writing in certain fields. If you do decide to use the first-person voice at times, remember that ‘I’ should never be considered interchangeable with ‘we’: a thesis has only one author and ‘we’ is never appropriate when referring to yourself. If you had assistance in conducting certain parts of your research, ‘we’ might be appropriate when you are describing what was done, but you must also make it clear who exactly you are referring to when you use ‘we.’ ‘We’ can also be used successfully (though with care) when referring to researchers or practitioners as a group, such as ‘we geologists’ or ‘we as manuscript specialists,’ especially if the thesis relates to methodology, the accumulated knowledge of a discipline and/or the self-awareness or education of the group concerned.
‘We’ used in a general or fictional sense that implicitly includes the reader or even the whole of humanity is best avoided in scholarly writing, however. Phrases such as ‘we can observe that,’ ‘we see here,’ ‘we now know that’ and ‘we human beings do not’ in which the author implies or assumes that the reader (and others) are part of that ‘we’ may be acceptable for writing in some areas and media, but they are not, generally speaking, a feature of academic and scientific theses, and avoiding them is one of the characteristics of a professional scholarly voice. The use of the fictional ‘we’ can be particularly problematic when it is used to include the reader in assumptions that have not yet been proved with convincing results or established via analysis and an effective argument, and using the ‘we now know’ stance as a substitute for true scholarly argumentation is simply unacceptable and can weaken both your writing and your thesis. It is therefore a good idea to do a search (by using the Find and Replace box in Word’s Home menu, for instance) for all occurrences of ‘we’ and perhaps ‘I’ once you have your thesis drafted, and to consider each instance carefully to be sure that you are using these pronouns accurately, effectively and professionally.
Why PhD Success?
To Graduate Successfully
This article is part of a book called "PhD Success" which focuses on the writing process of a phd thesis, with its aim being to provide sound practices and principles for reporting and formatting in text the methods, results and discussion of even the most innovative and unique research in ways that are clear, correct, professional and persuasive.

The assumption of the book is that the doctoral candidate reading it is both eager to write and more than capable of doing so, but nonetheless requires information and guidance on exactly what he or she should be writing and how best to approach the task. The basic components of a doctoral thesis are outlined and described, as are the elements of complete and accurate scholarly references, and detailed descriptions of writing practices are clarified through the use of numerous examples.

The basic components of a doctoral thesis are outlined and described, as are the elements of complete and accurate scholarly references, and detailed descriptions of writing practices are clarified through the use of numerous examples. PhD Success provides guidance for students familiar with English and the procedures of English universities, but it also acknowledges that many theses in the English language are now written by candidates whose first language is not English, so it carefully explains the scholarly styles, conventions and standards expected of a successful doctoral thesis in the English language.

Individual chapters of this book address reflective and critical writing early in the thesis process; working successfully with thesis supervisors and benefiting from commentary and criticism; drafting and revising effective thesis chapters and developing an academic or scientific argument; writing and formatting a thesis in clear and correct scholarly English; citing, quoting and documenting sources thoroughly and accurately; and preparing for and excelling in thesis meetings and examinations.

Completing a doctoral thesis successfully requires long and penetrating thought, intellectual rigour and creativity, original research and sound methods (whether established or innovative), precision in recording detail and a wide-ranging thoroughness, as much perseverance and mental toughness as insight and brilliance, and, no matter how many helpful writing guides are consulted, a great deal of hard work over a significant period of time. Writing a thesis can be an enjoyable as well as a challenging experience, however, and even if it is not always so, the personal and professional rewards of achieving such an enormous goal are considerable, as all doctoral candidates no doubt realise, and will last a great deal longer than any problems that may be encountered during the process.

Interested in Proofreading your PhD Thesis? Get in Touch with us
If you are interested in proofreading your PhD thesis or dissertation, please explore our expert dissertation proofreading services.

Rene Tetzner
Rene Tetzner's blog posts dedicated to academic writing. Although the focus is on How To Write a Doctoral Thesis, many other important aspects of research-based writing, editing and publishing are addressed in helpful detail.
Related Posts

PhD Success – How To Write a Doctoral Thesis
October 1, 2021

Table of Contents – PhD Success
October 2, 2021

The Essential – Preliminary Matter
October 3, 2021

The Main Body of the Thesis
October 4, 2021
Techniques for managing theses using Microsoft Word
Theses and other long documents (e.g., books, manuals, reports) can present challenges that shorter documents wouldn't. Theses are often more structured, contain several levels of headings, and may have numbered headings. It is more difficult to maintain a standard "look and feel" throughout a long document like a thesis.
Information on using the UWaterloo Thesis template .
Theses often contain components not found in shorter documents such as a Table of Contents, List of Tables/Figures, an Index, cross references, footnotes or endnotes. (The files used in the exercises below are: Nursery_Rhymes (.docx) and fiddle.bmp . The .jpeg version below can be saved and used.)

University of Waterloo thesis requirements
uWaterloo thesis regulations for formatting requirements are outlined on the Graduate studies website .
Some details worth mentioning (as of April 2008):
- The text of the thesis (main body) must either be double spaced or space and a half.
- Captions related to figures: it is acceptable to have them single spaced on the same page (some disciplines do require the caption to appear on a separate page).
Accessibility Styles Heading styles Modifying styles (including a related exercise) Creating a new style (including a related exercise) Modifying a heading style (including a related exercise) Numbering headings (List style and legal style numbering) (including related exercises) Document templates (including accessing and using the uWaterloo Word Thesis template) Captioning and numbering of tables and figures (including related exercises) Footnotes and endnotes (including related exercise) Endnotes with square brackets ([1],[2],...) Bookmarks (including related exercise) Cross references (including related exercise) Outline view (including related exercise) Creating a Table Of Contents (including related exercise) Generating a list of tables and a list of figures (including related exercises) Page numbering/headers and footers (including related exercises) Inserting landscape pages (including related exercises) Creating your thesis from many small documents (including a related exercise) Enter document properties Hanging indents Inline references and bibliography PDF for electronic submission Electronic thesis submission
Accessibility
All web pages, including, Word and PDF files on our websites, published as of January 1, 2012, will need to be accessible as per the Accessibility for Ontarians With Disabilities Act (AODA) by January 1, 2014 (WCAG 2.0 Level A). This may include theses on UWSPACE as well.
Review the following and follow the steps to ensure your thesis is accessible.
- Ensure your file has a title ( File/Info, Properties, Title , see 'Enter Document Properties' below)
Styles: Headings
- Using the Heading 1, 2, 3, etc. styles for your headings as described below.
- For shorter documents only use the Heading 1 tag once.
- For long documents, if you use the Heading 1 tag multiple times, ensure the document title is set in File/Info, Properties, Title.
- Don't make headings too long
- Do NOT underline headings or any other text (links will be underlined automatically)
Meaningful links
- e.g. 'University of Waterloo Library Website' links to http://lib.uwaterloo.ca
- Don't use links such as 'click here'; instead use a meaningful description of what the link is
Images/objects
- Right click on the image/object
- Choose Format... (or Format Picture , Format Object , etc)
- A dialog box will appear. Click on the Alt Text tab. (In Word 2013 for images inserted by Insert>Pictures option, a side panel will appear. Select Layout & Properties>ALT TEXT .)
- Under Description or Alternative text: , type a meaningful description
- Avoid any 'floating' images/objects.
- Select the image/object
- Under the Format tab in the Arrange section, click the Wrap Text button and select In Line with Text .
- Put “” in the alt text description (null) OR
- Mark image as an artifact so that screen readers skip them.
- Use columns instead of text boxes or floating objects
- Ensure you use the lists features in Word rather than manually typing your own bullets/dashes/numbers for an ordered or unordered list
Charts/graphs
- Charts/graphs should have good colour contrast for those who are colour blind.
- Colour Contrast Analyzer for Windows
- Contrast Analyzer for Windows and Mac
- right click on the chart/graph and select Format Plot Area/Format Data Series .
- In the side panel that appears, select Chart Area from the dropdown box.
- Select Layout & Properties>ALT TEXT .
- Under Description type a meaningful description of the graph
- Or use the longdesc attribute
- Provide the data information used to generate the graph in a table (beside/above/under it)
- Place your cursor inside the header row.
- In the Table Tools tab select Layout , in the Data section, click on Repeat Header Rows
- Do not use nested tables (tables within tables)
- Do not use tables for layout. If you must, make sure they are linearized.
- Avoid blank columns and rows if possible (delete rows/columns not needed)
- Make sure the order is correct when tabbing through a table
- Right click on the table
- Choose Table Properties
- Select the Alt Text section
- Under Description , type a meaningful description
Text boxes/floating objects
- Avoid text boxes and floating objects
- Use columns instead
Video/audio
- Any videos/audio should include closed captioning and/or descriptive text
Avoid blank lines, extra spaces, empty table cells
- Use page breaks, tabs, etc. instead
Checking for Accessibility in Word
Once your thesis is complete, or periodically as you write it, it is recommended that you check it for accessibility. Word 2010 has an accessibility checker that checks a variety of things to ensure your document is reasonably accessible.
The rules that Word follows for the Accessibly Checker are found on Microsoft's Accessibility Checker page .
Using Word's Accessibility Checker
- From the File tab choose Info.
- In the Prepare for Sharing (Word 2010) or Inspect Document (Word 2013) section, choose Check for Issues>Check Accessibility .
- A new pane will open to the right of your document that lists the issues it has found.
- Take you to the spot in your document where they occur so you can fix them
- View information on how to fix them under Additional Information at the bottom of the pane
The best way to ensure consistent formatting in a Word document is by consistent use of Word styles. Every paragraph in Word has a “Style” associated with it. A style is a collection of formatting that details the font, font size, font highlighting (bold, italics, etc.), paragraph alignment, paragraph indents, paragraph spacing, and so on. If a style is edited, and any of its attributes changed, the formatting of any paragraph to which that style was assigned will immediately change to reflect the modifications.
The style assigned to the current paragraph is indicated in the Home tab and in the Styles section.

If no style is highlighted in this area, you may need to scroll up or down using the arrows to find the assigned style.
A document can contain many different styles, but most documents will have paragraphs of “Normal” style, which are standard paragraphs, and one to three levels of headings (Heading 1, Heading 2 and Heading 3).
It is important to use styles in all documents to carry out formatting of paragraphs of different types. This is especially true in longer documents where it is more difficult to apply standard formatting manually, and where the formatting requirements may change a number of times throughout the document production time. A unique style should be created for every paragraph type : normal paragraphs, indented paragraphs, etc.
You can create your own styles, or adapt one of the many styles that are pre-defined in Word. You can view the recommended style list from Word by simply scrolling through them using the arrows, but to see a complete list of styles:
- Click on the button in the bottom right of the Styles section in the Home tab.
- In the Styles window that appears, click on Options... in the bottom right.
- Now in the Styles window you will see many built-in styles you may use. You may modify them as you will see later in this document.
As you will see, there are a very large number of styles available. For practical purposes, you may want to show only Recommended styles.
You will note that clicking on the button in the bottom right of the Styles section in the Home tab, caused a floating Styles window to be displayed. If you want to close this window, simply click its Close button. When the Styles window is visible, you can click on any of the styles and that style will be applied to the selected paragraphs in the document.
Heading styles
Amongst Word’s predefined styles are nine levels of heading styles: Heading 1 through Heading 9. Although you could make up your own styles to apply to headings in your document, there are several reasons why you should use Word’s built-in heading styles.
- It becomes trivial to generate a Table of Contents of items tagged with heading styles.
- Word’s outline view offers a powerful tool for structuring long documents, and it is driven by Word’s heading styles.
- You can insert cross-references to headings created with Word’s heading styles.
To practice editing styles, we will use the file called Nursery Rhymes.docx.
Modifying styles
If you do not explicitly assign a style to a paragraph, Word assigns the “Normal” style. Most other styles are based on this Normal style, so modifying the Normal style can have the effect of modifying other styles in the document.
To modify a style, right click on the style in the ribbon or in the Styles window and choose Modify.
For example, to change the Normal style to Arial, 11 point, with three points of white space following each paragraph, do the following.
- Click on the File tab in the top left and choose Options .Click Advanced on the left and then scroll down on the right to the Display section. Beside Show measurements in units of: , choose Inches from the drop down menu and click OK.
- Now open the file on your N:\ drive called Nursery Rhymes.docx
- The Modify Style dialog box will appear.
- Under Formatting ,from the font drop down list, select Arial , and from the size drop down select 11 .

- Select the Indents and Spacing tab.

- Click OK twice.
Creating a new style
You may need to create a new style that does not currently exist in Word. For example, you may want a paragraph that is indented half an inch from both the left and right margins, and has three points of white space after and three points before.
- Click on the button at the bottom right of the Styles section of the Home tab to open the floating Styles window.
- Click on the New Style button at the bottom of the Styles window. The Create New Style from Formatting dialog box will open.
- In the Name: field, enter Indp .

- Click Format and select Paragraph .
- Under the Indentations section, in the Left: and Right: fields enter 0.5 .
- Under the Spacing section, in the Before: and After: fields enter 3 .

- Cli c k Format and select Shortcut key .
- Press [Ctrl]+[Shift]+[I] (all at once - this will be your shortcut key combination).
- Click Assign and the Close .
- Click OK .
- Now go to the end of the Jack and Jill rhyme, press [Enter] to start a new paragraph, and type the second verse of Jack and Jill:
Up Jack got and off did trot, As fast as he could caper, He went to bed to mend his head, With vinegar and brown paper
- clicking anywhere in the paragraph, and selecting Indp from the Style section of the Home tab or
- pressing [Ctrl]+[Shift]+[I] .
Modifying a heading style
As mentioned above, Word has nine levels of built-in heading styles, Heading 1 to Heading 9. You will probably use three or four levels in your thesis, and likely you will want to change the format and appearance of them.
Steps to modify the Heading 1 and Heading 2 styles are given below. Other heading styles can be modified in the same way .
- Suppose we want Heading 1 styles to be in Times New Roman font (it is acceptable to have the body of a document in one font, usually a serif font, and the document headings in a different font, usually sans serif), 16 point , bold , and centered . To do this, right click on the Heading 1 style in the Styles section of the Home tab and choose Modify . The Modify Style dialog box will appear.

- Now click the Format button, and choose Paragraph .
- Widow/Orphan control: Prevents Word from printing the last line of a paragraph by itself at the top of a page (widow) or the first line of a paragraph by itself at the bottom of a page (orphan)
- Keep with next: Prevents a page break between the selected paragraph and the following paragraph.
Generally speaking, all paragraphs should have Widow/Orphan control set. Also, all headings should have Keep with next set; otherwise a heading might appear all by itself at the bottom of a page, and that is not a desirable situation. Notice some other settings you can make on this dialog box. Keep lines together should be used if you have a paragraph that you want to prevent from being broken across two pages. The other option, Page break before, could be used perhaps for a Heading 1, if you always wanted Heading 1 to begin on a new page (this can be confusing sometimes, though, if you aren't aware of this setting and are trying to remove the page break).
- (Note in this window, that a Heading 1 style will be followed automatically by a Normal style. That’s all right, unless we knew we had a document structure where a Heading 1 was always followed immediately by a Heading 2. In that case, we would choose Heading 2 as the default style to follow a Heading 1. We don’t think that is the case here, so we will leave it at Normal.)
- Let's create a shortcut key for each heading style to make them easier to apply while typing. We'll use 1 for a Heading 1, 2 for a Heading 2, etc. Click the Format button, and choose Shortcut Key . Hold down the keys 1 all at once. Click Assign , Close and then OK.
- Click OK again.
- Now we want to modify a Heading 2 style. Our Heading 2 s should be Times New Roman font , 14 point bold , and left justified. Follow the above instructions (1. to 9.) to make these changes to the Heading 2 style (use 2 as the shortcut keys for a Heading 2). When you are done, click OK to return to the main modify style box, and then click OK to finish.
Some documents use the style “body text” for standard document paragraphs. If that is what you want, you should modify all other styles used in the document to make “Body Text” be the paragraph type to follow all other paragraphs and also the style other styles are based on.
Numbering headings
Theses frequently have a requirement that all headings in the document be numbered. There are two types of numbering.
The first is list style numbering, where major headings are numbered with one style, perhaps I, II, III… second level headings in another style, perhaps A, B, C…etc. third level headings in yet another style, perhaps 1, 2, 3… and so on. Every time a new higher level heading occurs, the numbering of lower level headings starts at the beginning.
The other type of numbering is legal style numbering, where first level headings are numbered 1, 2, 3… (or perhaps I, II, III…); second level headings are numbered 1.1, 1.2, 1.3…(or 2.1, 2.2, 3.1, 3.2… as appropriate); third level headings are numbered 1.1.1, 1.1.2.… and so on.
List style numbering
- To number headings with a List style , first go to the top of your document by pressing (together) on your keyboard. (Similarly, pressing CTRL-End will move the insertion point immediately to the end of the document. Want to get back to the last place you were working? Try SHIFT-F5 .)
- In the dialog box that appears, click the More >> button at the bottom left.
- Choose the numbering style you want by selecting it from the Number style for this level: list, perhaps I, II, III, ... etc .
- Modify the punctuation beside the number if you like, If you want the number followed by some other punctuation (or nothing) instead of a right parenthesis, click to the right of the punctuation beside the number/letter in the Enter formatting for number: box, and hit Backspace to remove the punctuation. If you want some other punctuation, type it now. If you don’t want the number followed by any punctuation, don’t type anything. (Ensure not to type over the letter/number but to only add/change the punctuation.)
- Set Number alignment to Left , set Aligned at to 0 and set Text indent at to 0 . If you want to set these settings for all your levels, click the Set for All Levels ... button and (optionally) set all the values to 0 and click OK.
- Under Link level to style : choose Heading 1 .
- Set Follow number with: to Space .

- Select a, b, c, ... from the Number style for this level: list.
- Type the desired punctuation to follow the number style under Enter formatting for number: (ensure not to type over the letter/number but to only add/change the punctuation).
- Under Link level to style: choose Heading 2 style.
- Set Number alignment to Left , set Aligned at to 0 and set Text indent at to 0 .
- Set Follow number with: to Space .
- Repeat the above procedure for levels 3, 4 and as many heading levels as you wish to have numbered in your document. In all cases, make sure that the restart numbering after higher list level is checked.
Note 1: If you are defining this numbering format to a document that already has headings with heading styles applied, make sure that the mouse is clicked at the very beginning of the document. This will cause the numbering styles to be applied from that point forward. The numbering will also apply to any subsequent headings that you enter.
Note 2: You could have selected a pre-formatted numbering style from the Multilevel drop down list; however, the procedure outlined above makes it clearer to you that you can attach any numbering scheme to heading level styles.
Legal style numbering
- Go to the top of your document by pressing (together) on your keyboard.

- This may be all you need to do. If you want to change the alignment options or make the first level a roman numeral number (I, II, III, etc.), the steps below describe how to do this.
- Make sure Level 1 is selected by clicking 1 under Click level to modify: , and choose I, II etc . from the Number style for this level: list., perhaps I, II, III, ...
- If you want the number followed by some other punctuation (or nothing), click to the right of the punctuation beside the number/letter in the Enter formatting for number: box, and hit Backspace to remove the punctuation. If you want some other punctuation, type it now. If you don’t want the number followed by any punctuation, don’t type anything. (Ensure not to type over the letter/number but to only add/change the punctuation.)
- Repeat this for level 3 and any other levels you are using
- Make sure Level 1 is selected by clicking 1 under Click level to modify:
- Click the Set for All Levels ... button and set the values as you like and click OK.
- Set Follow number with: to Space or Tab (define the tab location beside Text indent at: )
- Set Number alignment to Left , Centred , or Right
Left aligning multi-line headings
- If you anticipate any of your headings will wrap to a second line, you may want to set up your numbering such that the first line and any subsequent lines will line up vertically. To do this we will set a specified position for the text that follows the number and follow the number with a Tab .
- First go to the top of your document by pressing (together) on your keyboard.
- Set Number alignment to Left , set Aligned at to 0 (or whatever position you want your number to be left aligned at) and set Text indent at to 0.5 (or a larger indent if your number is indented as well) .
- Set Follow number with: to Tab
- Repeat step 5 for each level you are using. Keep in mind that the Text indent must be larger than the Aligned at value by enough space to allow for your largest anticipated number (e.g. if you are using legal style numbering and anticipate a level 4 number like 23.12.11.1, you will need to make sure the Text indent is at approximately 0.8" or so larger than the Aligned at setting.
- Click OK once you have set these settings for all levels you are using.
Document templates
Every document created in Word has a template associated with it. A template is a collection of formatting, styles, macros and possibly text. When you start Word 2010, it opens a blank document based on the “Normal” or “standard” template. When you go to create a new document by clicking the File taband choosing New , or open Word 2013, Word displays a variety of available templates from which you can choose, including the standard Blank document template which uses the Normal template.
A template is simply a Word document, with a file extension of .dotx (regular template) or .dotm (a template that may contain macros) instead of .docx .
Saving and creating templates
Templates you create should be stored in the trusted templates folder:
- C:\Users\userid\Documents\Custom Office Templates (Windows 8)
- C:\Users\userid\Documents\Custom Office Templates (Windows 7)
- C:\Users\userid\AppData\Roaming\Microsoft\Templates (Windows Vista/7/8)
- C:\Documents and Settings\userid\Application Data\Microsoft\Templates (Windows XP)
Where 'userid' is the name of the computer account you are logged into.
Saving here tells Word that it is safe to open even if the template should contain macros or other code. Because macros can contain malicious code, Word is on the lookout against opening documents with macros. If your computer security settings are at the recommended level, Word will open any template file, but it will disable any macros it contains. For templates that are in the (Trusted) Templates folder, however, Word doesn't disable the macros. It assumes the files are safe, so be sure the files you store there are from a trusted source.
You may wish to create all the styles you think you will need, and set up some standard formatting, (margins, etc.) and save these settings as a template:
- Choose File/ Save As
- For Word 2010, select Microsoft> Templates (or Trusted Templates if you are using Windows XP) on the left side of the Save As window. (In Word 2013 the save location is automatically changed to the templates folder when step 3 is completed)
- Beside Save as type: select Word Macro-Enabled Template or Word Template . Choose Word Macro-Enabled Template if your template has macros, as the UWaterloo Thesis template does .
- Enter the File Name:
- Click Save .
- For Word 2010, click on My Templates and select your template. Click OK .
- For Word 2013, click on PERSONAL and select your template.
Using the UWaterloo Thesis template
The UWaterloo Thesis template (dotm) may be useful as-is for your thesis, or it may be a useful starting point for you to modify.
Exercise: Downloading and using the UWaterloo Word Thesis template
- Download the UWaterloo Thesis template (dotm) .
- If prompted to confirm you want to open this file, click on the OK button.
- When you first open the UWaterloo Thesis template, a yellow bar (Security Warning) will appear at the top, click Enable Content .
- Choose File/Save As
- For Word 2010, select Microsoft> Templates (or Trusted Templates if you are using Windows XP) on the left side of the Save As window.
- Beside Save as type: select Word Macro-Enabled Template.
- Click Save
- Choose File/New
- For Word 2010, click on My Templates and select uwthesis_word . Click OK .
- For Word 2013, click on PERSONAL and select uwthesis_word .
Captioning and numbering of tables and figures
In a longer more structured document, you will frequently want to number and add captions to your tables and figures. You could do this manually, but a better idea is to let Word add these captions and automatically assign the numbers. You need this automated approach for a number of reasons.
- If you want to easily make a cross-reference to the table or figure, Word must maintain the caption.
- If you want to automatically create a List of Tables or List of Figures for your Table of Contents, Word must maintain the captions.
- If you insert or delete tables or figures, Word will automatically renumber if it maintains the captions.
A caption consists of the word Table or Figure, whichever is appropriate, followed by a number. You may then choose to add punctuation, such as a period or a colon, and then the text you wish to have for the caption.
Captioning tables
You may want to add captions to tables already entered into your document or, alternatively, you may want to have captions automatically added to any new tables you create.
Adding captions to existing tables
If you have tables without captions in your document and wish to add captions, you can do so quite easily. For each table:
- Click somewhere in the table
- Click on the References tab
- Click the Insert Caption button
- In the Caption box, it will read Table 1 (if it reads Figure 1, choose Table from the Label: drop down list) and allow you to add further information. If you wish to have punctuation appear after the number, type it, and then type the text of the caption. Notice that the Position box lets you select Above or Below for the caption, but table captions are generally positioned above the table.
Repeat the above procedure for every table in your document. Word will automatically provide the correct table number.
Automatically captioning tables
Word can automatically add the caption to a table when the table is created. To do this:
- Click on the AutoCaption button. You will be presented with a list of objects that can be captioned automatically. One of those is Microsoft Word Table . Click the checkbox beside this item. Confirm the Options below are what you want and click OK . Now every time you create a table, the caption Table followed by the appropriate number will be added automatically. You can simply click in the caption line, type any punctuation you wish, and then type the caption text.
Combining manual and automatic captioning
You can manually caption any existing tables, and then ask Word to automatically caption any additional tables you add. Word will handle the numbering properly.
Captioning figures
To caption an existing figure, select the figure and:
- Make sure that Figure is selected in the Label box. The Caption box will read Figure 1 and permit you to type additional information. Type any punctuation that you wish to have after the number, and then type the text of the caption. Repeat this process with each figure in your document. Note that the caption appears by default at the bottom of the figure.
Automatic captioning is probably not a viable option for figures. Automatic captioning only works with figures inserted via an application that supports Object Linking and Embedding (OLE), that is, objects that can be inserted into a document via the Insert>Object command. Generally, most people insert figures from a variety of sources, so manually captioning is often necessary.
Step-by-step captioning and numbering of tables and figures
Now we will ask Word to automatically add captions to any additional tables that we create:
- Our document already contains 1 table, and we will be adding more. We would like to add a caption to the existing table, and automatically add captions to any additional tables we create.
- First, click anywhere inside the existing table.
- In the resulting dialog box, make sure that Table is selected in the Label: box, and Above Selected Item in the Position box.

- Click on the References tab.
- Click the Insert Caption button.
- Click on the AutoCaption button.

- Now go to the Jack and Jill rhyme, and click at the end of the text of the Jack and Jill rhyme, and press Enter to move to a new line.

Enter the following information into the table.
| Child | Result |
|---|---|
| Jack | Fell down |
| Jill | Broke crown |
Note: The caption “Table 2” is created automatically, and you can click after the 2 and type a colon, and then type the caption “Result of Climbing Hill”.
Now we will add a caption to the Lamb figure that appears in “Mary had a Little Lamb”:
- Click on the image of the lamb to select it, click on the References tab, and click the Insert Caption button.
- In the label box, select Figure . Note that that causes the Position to be set to Below selected item .

Now we will add an additional figure near the top of the document. On your N : drive is an image file called fiddle.bmp .
- Set the mouse pointer after the title of “Hey Diddle Diddle”, press enter>. Go to the Insert tab and click on the Picture (Word 2010) or Pictures (Word 2013) button. Select fiddle.bmp from the N drive .
- Now click on the fiddle image to select it . Click on the References tab and then the Insert Caption button. Make sure that Figure is selected from the drop down list beside Label: . To the caption field add a colon , followed by “Cat’s Fiddle” and click OK . Note that the picture is captioned as Figure 1 because it appears first in the document, and the picture of the Lamb, which was Figure 1 has been renumbered to Figure 2.
Aligning the table and figure caption
The caption for both figures and tables defaults to left alignment. You may wish to have your captions centered, particularly if your tables and figures are centered on the page. Captions are inserted with the Caption style attached. To change the alignment:
- Click on the button in the bottom right of the Styles section in the Home tab. In the Styles window that appears, click on the down arrow beside the Caption style and choose Modify

- Scroll to find the Caption style in the style gallery and right click on it and choose Modify.

Since the same style is applied to Figure and Table captions, you cannot have different alignments for these two types of captions, unless you create a new style for one of the captions. This will work, but you must remember to apply that style manually to the captions, and if you are creating a List of Tables or List of Figures, you must remember to tell Word to use items of that style to build the list.
Concatenating chapter number to figure or table number
You may wish to have the chapter number appended to the table or figure number in the caption, such as Table 1.3, or Figure 3.8:
- Choose Table in the Label box

- Choose Heading 1 beside Chapter starts with style and . (period) beside Use separator:
- Click OK (note that the type of numbering you choose for your Heading 1s will be used)
- Repeat the above, but choose Figure in the Label box.
- Click Close .
Captioning tables and figures in appendices
You likely want to caption your tables and figures in your Appendices using the Appendix letter and the number of the table/figure (e.g. A-1). I have found two ways to do this:
- You can create a new label when captioning your tables and figures: When you are in Appendix A you would create a new label of Table A- and then the numbering will add the 1, 2, etc. The only issue with this is that it 'forces' a space after the '-' that you would have to remove manually or with a macro (or you could add a space between the 'A' and the '-' in the label so the spacing is even but that may not be consistent with the rest of your thesis). If you choose to do it this way, when you generate your list of Tables and Figures you would need to generate the list of table and figures in the appendices separately by choosing these other labels at the time of creating your lists of tables and figures.
- You could use a heading style (for example Heading 9) for your appendix headings. You could base it on the Appendix style and then format it as you like it. You would then need to click on your first appendix title and go back into Format/Bullets and Numbering to link the level to style 'Heading 9' (rather than style 'Appendix'). You would also need to change all the Appendix titles to the Heading 9 style as well. At this point, you could use the built-in labels for Tables and Figures and click on Numbering and indicate to Include chapter number and Chapter starts with style, Heading 9 .
Footnotes and endnotes
Footnotes and endnotes are handled in a similar fashion, except that footnotes appear at the bottom of the current page, and endnotes appear at the end of the document.
- We wish to insert a footnote after the word fiddle in the rhyme Hey Diddle Diddle . Click your mouse immediately after the word fiddle and click on the References tab and then the Insert Footnote button. If you are in Print Layout view, you will be shifted to the bottom of the page and be able to enter your footnote text right away. If you are in Draft view, a new pane will appear at the bottom to allow you to type your footnote. In either case, to return to the same spot in your document, simply double click on the footnote number. (In Draft view you could also click on the close button on the right side.
- Type the footnote text:
The instrument in question was really a violin. The rumour that it was a very expensive Stradivarius was simply that, mere rumour.

Here you could make changes to the number format, restart the numbering, convert footnotes to endnotes, etc. We won't make any changes now so just click the Cancel button.
- Double clicking on the footnote number
- Now, switch views. If you were in Draft switch to Print Layout, and vice versa. Do this by selecting the appropriate Document View from the View tab.
- We want to put another footnote, in Jack and Jill , after the word crown. Click after the word crown , and click on the References tab and then the Insert Footnote button. The footnote number will be presented, and you can type your footnote. Type this footnote:
A crown is another name for the head. They could have said that Jack broke his head, but that would not rhyme, so they used the word crown instead.
- Now return to the main document by double clicking the footnote number.
- Move the mouse over one of the footnote indicators in the document (don’t click) and see the note that appears showing the text of the footnote.
- In the References tab, right click on the Insert Footnote button and then choose Add to Quick Access Toolbar.
- Now create a footnote by clicking on the button on the Quick Access Toolbar.
Note: If your Word file was imported from a previous version of word and you have issues with footnotes appearing on the wrong page, you can try the following:
- Open the file.
- From the File tab, choose Options .
- Click Advanced on the left and scroll down to the bottom section, Compatibility options for
- From the drop down list beside Lay out this document as if created in: choose Microsoft Word 2010 or Microsoft Word 2013 , depending on the version you're using.
How to change the footnote separator
The footnote separator is the thin line that appears between the bottom of your page and any footnote text that may be on that page.
- In the View tab, click Draft to switch to Draft view.
- In the References tab, click Show Notes (in the Footnotes section of the tab).
- Directly above the pane that appears at the bottom is a drop down menu. From this drop down menu, you can choose Footnote Separator .
- You can then change the footnote separator in the pane and click on the X in the top right of the pane to close the pane.
Endnotes with square brackets ([1],[2],...)
- In the References tab, click Insert Endnote
- Click on the button at the bottom right of the Styles section of the Home tab to open the floating Styles window. Click on the Options link. Under Select styles to show choose All styles and click OK. Find the Endnote Reference style in the list and click the drop down arrow beside it and choose Modify. OR
- Select an endnote reference number from the endnotes section at the end of your document, right click and choose Style. Endnote Reference will be selected. Click the Modify button.
- In the Modify Style window that opens, click on the Format button (bottom left) and choose Font ; uncheck superscript and then click OK and OK again. (Click Close if necessary.) All of your Endnote Reference numbers should now NOT be superscript.
- In the References tab, clicking on the button at the bottom right of the Footnotes section
- Beside Number format, choosing the style you like
- Clicking on the Apply button
- Click at the top of your document (or press Ctrl-Home on your keyboard to quickly go to the top of your document).
- In the Home tab, click Replace on the far right (in the Editing section).
- Click on the More button. (If you don’t see a More button but do see a Less button, then you can leave things as they are.)
- With your insertion point in the text box beside Find What: , choose the Format button and choose Style then choose Endnote Reference from the list and click OK .
- Click in the text box beside Replace With: and type [^&] . Now click on the Replace All button. A message will pop up to tell you how many replacements were made. Click OK . All of your Endnote Reference numbers should now have square brackets around them.
- Click the Close button to close the Find and Replace window.
A Bookmark marks a place in a document that you may wish to jump to, refer to, etc.
We will insert a bookmark at the location of the song “Inky Dinky Spider”.
- Select the title “Inky Dinky Spider” . From the Insert tab, click on Bookmark . In the resulting dialog box, assign the bookmark a name of “spider” and click Add . Initially, you will not see any indication that a bookmark exists, but the next step will describe how you can view a bookmark 'codes' so you will know where your bookmarks are.
Cross references
A cross-reference is a referral from one location in a document to a component elsewhere in the document. For example, “see Table 2: Snowfall in 2003”. Cross references can be made to tables, figures, footnotes, headings, page numbers, bookmarks, etc.
We will create a cross-reference to the “Jack and Jill” table.

- In the Reference type : drop down list, select Table . Note that a list of all tables appears.

and we can add the text “climbing things can prove dangerous”. Note that the grey area that you see when you click on the inserted cross-reference text is there to indicate that this is a cross-reference. It will not print.
- Now we will delete the first table in our document, and we will see what happens to our reference. Drag through to select the caption and the complete Table 1 , and press the delete key.
- If we print it or do a print preview, the references will be updated before printing occurs.
- Home tab: Select/Select All (in the Editing section) or press Ctrl-A on your keyboard
- Press F9 . Note that the table numbering and cross-references are updated.
- In the Reference type: drop down list, choose Bookmark.
- From the list of bookmarks presented, select spider (in this case this is the only item in the list).
- From the Insert reference to: drop down list, choose Page number (as opposed to the actual text that was bookmarked).

- Click on the Close button to close the cross-reference window.
Outline view
Outline View is very useful for viewing the structure of your document, or for restructuring it. The following exercise takes you through some of the features/uses of Outline View.
- Click on the View tab and then click Outline in the Document Views section.
- A new Outlining tab will appear with various options/settings to choose from.
- “Rhymes About Animals” is currently a Heading 2. Promote it to a Heading 1 by clicking in the heading , and then clicking the Promote button (alternatively, click SHIFT TAB). Note that when you promote this heading, you do not promote any headings at a lower level. “Baa Baa…”, “Hey Diddle…” and “Mary Had…” all remain as Heading 3.
- Click “Rhymes About Animals” again and demote it back to a Heading 2 by clicking the Demote button (or by pressing the TAB key).
- Click on the Plus sign beside “Rhymes About Stars” (the mouse printer will become a double headed arrow when you are over that plus sign). Clicking on this plus sign selects the current line and the entire structure under that line as well.
- Now click the Promote button. Note that all heading levels are promoted, but the text remains as text.
- To verify that the text remained as text, click on the Show Level: drop down list and choose All Levels to display the text as well as the headings.
- Select this structure again ( click on the Plus sign beside “Rhymes About Stars” ), and demote it to its original level by clicking on the Demote button.
- Perhaps the heading “Twinkle Twinkle …” should have been body text, and not a heading. Click on the heading "Twinkle Twinkle ..." and demote it to body text by clicking the Demote to Body Text button. Now promote it back to a heading by clicking the Promote button(it may become a Heading 2 so you may need to click on the demote button to make it a Heading 3 again).
- Try choosing All Levels from the Show Level drop down menu to display the entire document.
- Click on the check box beside Show First Line Only (with show all levels), to see that it displays only the first line of each paragraph but all heading levels.
- Choose Level 1 from the Show Level drop down menu to view only level 1 headings.
- C lick somewhere in the first level one heading , and then click on the Expand button on the ribbon above to expand that heading to show all Heading 2s.
- Click in one of the Heading 2s and expand it by clicking the Expand button .
- Now reverse the process by clicking in the appropriate heading level and clicking the Collapse button . Return your outline to showing only level 1 headings.
- Now click on the big plus sign beside the “Nursery Rhymes” heading , and click the Expand button . Note that you see all Heading 2s. Click again on the Expand button , and all Heading 3s appear. Reverse the process by repeatedly clicking the Collapse button twice.
- Select Level 2 from the Show Level drop down menu to view Heading 1s and Heading 2s.
- Click on the Plus sign beside the heading “Rhymes About Stars” to select the entire structure.
- Move it up in the document by clicking the Move Up button until you have the heading appearing above the “Rhymes About Animals” heading.
- View the entire document by selecting All Levels from the Show Level drop down menu to convince yourself that not only the heading but everything that appears under that heading was moved.
- Now put the entire structure back into its original location by selecting Show Level 2 from the Show Level drop down menu and clicking the Move Down button .
- Let's go back to Print Layout view. Click on the View tab and then click the Print Layout button on the left side of the ribbon.
Creating a table of contents
Word can automatically generate a Table of Contents (TOC) from your styles, primarily the Heading styles you have used. Although it is easiest to create the TOC from built in Heading styles, you can also ask Word to include other styles as well by clicking on the Options button in the Table of Contents window while generating the Table of Contents. To create the Table of Contents, you
- Set the insertion point at the beginning of the document, where the TOC should appear
- Choose an item from the Table of Contents drop down button on the far left of the ribbon. If you like one of the sample Table of Contents formats in the list, you can choose one of those; if you want to customize your Table of Contents you can choose Insert Table of Contents and select the format, and the number of heading levels you wish to have appear in the TOC, and optionally click on the Options button if you want to add or remove styles to include in the Table of Contents, and click OK.
- Word will insert the Table of Contents.
- At some later point, you can insert the TOC again, and Word will ask if you want to replace the old TOC.
Generating a list of tables and a list of figures
A List of Tables and a List of Figures can be automatically generated as well. You would click on the References tab and click on Insert Table of Figures from the Captions section of the ribbon. From the Caption label: drop down menu, you would choose either Table or Figure , whichever is appropriate. If you wish to generate a list for both, do one first and then the other.
Exercise: Adding a title page and creating a Table of Contents
- Switch to Draft view by selecting the View tab then the Draft button.
- Go to and click your mouse at the top of your document or press on your keyboard to go to the top of your document.
- At the top of your document, press Enter> to open up a blank line. Make sure that the blank line is in the normal style by clicking in that line , and clicking on the Normal style button in the Styles section of the Home tab.
- Type some information that will constitute the Title Page of your thesis.
- Click at the end of the text on the title page , and insert a Section break: click on the (Page) Layout tab and, in the Page Setup section, click Break and then choose Next Page (in the Section Breaks section) .
- Click within the text of your title page and click on the button in the Page Setup section of the (Page) Layout tab. In the Layout tabof the window that opens, under Page, set Vertical alignment to be Center and click OK.
- Now, on the page after the title page, press the Enter key to open a new line (if necessary). In that line, type Table of Contents .
- Let's create a new style for the titles on the preliminary pages, called " Prelim Headings ". This new style should be based on the Normal style, Centered, Arial font, 14 point, and bold.
- Select "Table of Contents" and assign the new style, Prelim Headings to it.
- Click after the title, Table of Contents and press Enter to go to a new line. Make sure the new line is the Normal Style (by clicking on the Normal style button in the Styles section of the Home tab if necessary).
- Click on the Options button.
- Scroll down until you see the Prelim Headings style in the list.
- Put at " 1 " beside the Prelim Headings style and click on the OK button.

- The Table of Contents is inserted into your document. When you click on it, it appears greyed, but the grey shading will not print.
- After making changes in your document, to update the Table of Contents, right click on it and choose Update Field; you will then be prompted to Update page numbers only or to Update entire table; choose one and then click OK .
Exercise: Creating a list of figures and a list of tables
- Now we will create a List of Figures.
- Put a page break after the Table of Contents by pressing on your keyboard.
- At the top of the new page, type List of Figures .
- Assign the new style, Prelim Headings to the title List of Figures.
- Press Enter to go to a new line.
- Click on the References tab and click on Insert Table of Figures from the Captions section of the ribbon.

- Everything else is fine, so click OK . A List of Figures is inserted.
- Repeat the above procedure to create a List of Tables. The title of the page should be List of Tables . Assign the new style, Prelim Headings to the title List of Tables. In the settings window, choose Table from the drop down list beside Caption label .
- To update a List of Figures or a List of Tables, right click on the list and choose Update Field; you will then be prompted to Update page numbers only or to Update entire table; choose one and then click OK .
Page numbering/headers and footers
The pages of the front material of the thesis (all components up to and including the Table of Contents) should be numbered in lower case Roman numerals, but no page number should appear on the first page. The body pages of the thesis must be numbered in Arabic numerals, starting at 1. In order for parts of the document to have different formatting, it must be divided into sections. Earlier, when we were inserting the Table of Contents and Title Page, we inserted a section break. We will need to insert another section break between the preliminary pages and the body pages. We will then have the front material in one section, and the body in another section and be ready to number our pages. We will place our page numbers in the bottom centre.
Assigning page numbers
- Click on the View tab and click on the Draft button in the ribbon to change to Draft view.
- Click at the top of the first page of the body of your thesis (before any text).
- Click on the ( Page) Layout tab and, click Break/ Next Page (in the Section Breaks section of the drop down list) .
- Scroll to the beginning of the document, and place the cursor at the top of the second (2nd) page after the section break.

- You should now have lower case roman numeral numbering starting from ii on the second page of your preliminary pages.
- Click on the page number on your title page
- Now you should NOT have a page number on your title page, but you should still have page numbers on all the pages following the title page.
- Your pages will now have numbers on the bottom centre, but they are all Roman numerals. That is not what we want for the main body of your thesis. We need to reset the page numbering and format beginning on the first page of the body of your thesis.
- Click on the page number on the first page of the body of your thesis.
- Click on the Insert tab , and choose Page Number/Format Page Numbers from the Header & Footer section .

Inserting landscape pages
Sometimes you may have a table or figure that is too wide to fit on a normal portrait page (8.5 by 11) so you want to place it rotated on the page. That is, you want to create a landscape page, (11 by 8.5). That is fairly simple to do if you understand the concept of Word sections.
In order to change any formatting in Word, such as the page orientation, you need to insert a new section.
Exercise: Adding a landscape page in the middle of a document
- Go to the spot in your document where you want to insert the landscape page.
- Press Enter after the section break to open up a blank line.
- Then click on the (Page) Layout tab and, choose Break/Next Page (in the Section Breaks section of the drop down list)to end the previous section.
- Click in the empty line between the two section breaks, click on the (Page) Layout tab, and choose Orientation/La ndscape (in the Page Setup section of the ribbon). This will cause the new empty page to be landscape but all other pages will remain portrait.
- Choose View/Print Layout to see that this new blank page is landscape, but the rest of the document is portrait.
Perhaps you have already created the table, and now wish to modify it so that it appears in landscape mode.
Exercise: Modifying a table so that it appears in landscape mode
- If you have a table caption, you will want to drag through the text of the caption and the table to select all the information you will want on the landscape page.
- Click in it and then click the symbol that you will see near the top left corner of the table when you hover your mouse in this area OR
- Click in the table and then click on the Layout tab that you will see at the top under Table Tools . Then choose Select/Select Table from the Table section of the ribbon.
- With the table selected, click on the ( Page) Layout tab. Now click on the button in the Page Setup section of the ribbon.

- This will cause Word to add the section breaks before and after the table and to put the table on a landscape page.
- Click at the top of the page in question.
- Click on the Insert tab.
- Choose Page Number/Format Page Numbers from the Header & Footer section of the ribbon.
- Click the button beside Continue from previous section (see below) and click OK .
Note that when you add page numbers or headers/footers to this document, they will appear in a landscape not portrait orientation. This is acceptable in an electronic thesis. If you had a requirement for a printed copy to have a portrait page number on a landscape page, Microsoft has instructions or in Word 2010/2013, you can do the following:
- Click in your landscape page that already has section breaks around it.
- Click on the Insert tab, choose Page Number and then Page Margins, and choose the option called Vertical, Right.
- You should now be in a Header/Footing editing view.
- Click on the page number on the right side of the page and drag the square boxes so that the box the page number is in spans the width (or height in this case) of your page. You may have to resize this box to see your page number to edit it, but you can always adjust it later. As long as the box is centred on the page, all will look as it should.
- Click on the page number text and press Crtl-E to centre the text vertically (this could also be done with the middle alignment button in the Home tab).
- You may edit the text within the box to remove the word, 'Page' as well.
- Select the number itself, click on the Home tab and change the style to Footer to match the other page numbers.
- If the page number itself is incorrect, choose Page Number/Format Page Numbers from the Header & Footer Tools/Design section of the ribbon (or in the Insert tab), and click the button beside Continue from previous section , or specify a page number, and click OK .
- While in the footer, click Link to Previous in the Header & Footer Tools/Design section of the ribbon to unselect it.
- If there is still a page number in another location, select it and delete it by pressing the delete key on your keyboard.
Creating your thesis from many small documents
Since computers are faster and have more memory than they did in the past, and since Word 2010/2013 file sizes are smaller (due to format) than earlier versions of Word, it may be best and easiest to have your thesis all in one file.
While you are creating your thesis, however, you may create it as a number of smaller files, perhaps storing each chapter in a separate file. In order to build a table of contents, create cross references and get pages numbered sequentially, you will want to combine them into a single file at the end.
The easiest way to do this is to simply amalgamate all files by selecting the Insert tab then Object/Text from File . This method will combine all your smaller files into one large file. This one large file should be fine for the reasons stated above, if you have sufficient memory on your computer, and if your thesis is not too large and doesn't contain a lot of large images.
If you absolutely cannot have such a large file due to an older computer or lack of computer memory, another option exists. The other option is to use the Insert as Link feature.
Notes about the 'Insert as Link' feature :
- All cross-references will need to be added at the end; updating them (using Ctrl-A, F9) will likely break them and they will need to be re-inserted.
- If you use the software, EndNote, for managing your bibliography, you may need to do all of your updating in the individual files and avoid using F9 in your main file.
- Start with an empty document. F rom the Insert tab, in the Text section of the ribbon, choose Object/Text from File .

- You will want to see the actual text, so if you do see some code like the above, click on the File taband choose Options . Click Advanced on the left and then scroll down on the right to the Show Document Content section. Beside Show field codes instead of their values , make sure there is NOT a checkmark. If there is, click on the checkbox to remove the checkmark and click the OK button.
- Alternatively, you can toggle between viewing the complete text or field code of a specific field by right clicking on it, and from the context menu that appears, select Toggle Field Codes .
- Repeat this Insert as Link process for all your files. When you have created a single document, you can add cross references, page numbers, table of contents, etc.
- When you are done, save this new document.
- If you need to update your table of contents, lists of figures or list of tables, avoid using F9 and update them individually by right clicking on them and choosing Update Field; you will then be prompted to Update page numbers only or to Update entire table ;choose one and then click OK .
- Select the entire main document (Home tab, Editing section of ribbon , Select/Select All, OR simply press CTRL-A on your keyboard ).
- Then simply press the F9 key to update your main file. (Remember that you may need to re-insert all your cross references if you do this.)
- Select the entire main document (Home tab, Editing section of ribbon , Select/Select All, OR simply press CTRL-A on your keyboard )
- Press CTRL-SHIFT-F7 on your keyboard . Any modified files will be saved. You can then save the main file.
Enter document properties
To ensure your PDF and Word file is accessible , it is imperative that the Title of your thesis be entered in the document properties:
- Choose File/Info .
- Look at the Properties information on the right.
- Click on the Title text box and type in the correct title.
- You can also enter other document properties such as your name for the Author (by clicking Add an author ;you can remove an author by right clicking on their name and choosing Remove Person ),etc
Hanging indents
If you are creating your bibliography manually, you may want to create a hanging indent. To do so:
- Click on the line where you want your first item.
- In the ( Page) Layout tab, click on the corner arrow in the Paragraph section.
- In the Paragraph window that opens, make sure you are in the Indents and Spacing tab.
- Under Indentation , beside Left , set the size you want for the tab that will be used for the 2nd and subsequent lines of your entry.
- Under Special , choose Hanging.
- Now type the information you want for your bibliography item. When the text wraps to the second and subsequent lines, it will automatically be indented until you press enter on your keyboard.
Inline references and bibliography
Creating in line references and generating a bibliography is possibly the most complex task involved in preparing a thesis. This isn't because this is hard to do, but because there are probably as many different formats required for references as there are people preparing a thesis at any given point in time.
One solution to this problem is to purchase a Personal Bibliographic Management program. Packages such as these, all perform essentially the same functions, interface with Word, and let you manage a bibliography, etc.; however, these packages can be costly to purchase.
The recommended solution is to use RefWorks, a web based bibliographic management package licensed by the UW Library, that is available to all UWaterloo faculty, staff and students at no charge. It is linked from the UWaterloo Library web site in the right panel. The UWaterloo Library offers courses on how to use RefWorks and they also maintain course notes for RefWorks .
PDF for electronic submission
Theses are now submitted electronically in PDF format to the Graduate Office. They should be named, based on your name, Lastname_Firstname.pdf . Word 2010 and Word 2013 have a built in PDF creator, and Word 2007 allows you to download a free PDF creator add-in that works very well with Word 2007 for creating PDF files.
For Word 2007, check to see if the PDF creator add-in is installed:
- If, under Save As, you see PDF or XPS , then the add-in is installed and you can click on PDF or XPS, then browse to where you want your PDF file saved, type in the name you want it to be called, and click Publish .
- If, under Save As, you see Find add-ins for other file formats, then the add-in is not installed. See the next section for instructions on how to install it
Word 2007: How to install the add-in if it is not installed:
- Sign onto the PC with an administrative account.
- Open Word and click on the Office buttonat top left, then select Save As/Find add-ins for other file formats .
- A Word Help window will appear. Browse down and click on the hypertext for Microsoft Save as PDF or XPS Add-in for 2007 Microsoft Office programs.
- Internet Explorer (or your default web browser) should load a page.
- Click on the Validation button in the middle of the page to continue.
- A horizontal message bar will appear near the top of your window (below the Internet Explorer toolbar). Click where it says "click here" and select Install Active X Control from the menu.
- Click Run to any windows asking you to install Active X, and then the SavetoPDF... exe file.
- At the license page, click in the bottom left to " accept " then the continue button.
- A window should appear when the installation is complete.
- Close Word and re-open it.
Converting Word files to PDF
If you are using Word 2010/2013 built in PDF creator
- Click on the File taband choose Save As
- Browse to the location where you want it saved.
- Choose PDF (*.pdf) beside Save as type:
- Click Options . Make sure that the Document structure tags for accessibility and Document Properties is checked and Create bookmarks using Headings is checkedand click OK.
- Type in the name you want it to be called (based on the Lastname_Firstname.pdf format), and click Save .
- NOTE: Avoid security settings as they may interfere with assistive software
How to save a Word 2007 file as PDF using the add-in:
- Click on the Office button and choose Save As/ PDF or XPS .
- Browse to where you want it saved, type in the name you want it to be called (based on the Lastname_Firstname.pdf format), and click Publish .
Testing PDFs for Accessibility
PDF files can be checked after creation, to ensure that the tags are in a logical sequence and that all items are properly tagged.
Adobe Acrobat Pro Accessibility Checker
- Open Adobe Acrobat Pro (these notes are based on Adobe Acrobat XI (version 11)
- Open the newly created PDF file
- View/Tools/Accessibility , click " Full Check " on the right.
- Under Checking Options, check all the checkboxes and click Start Checking.
- click the + sign beside (e.g.) Document (## issue) and read the information displayed for each issue to learn how to fix it
- If there are issues, it is often easiest to fix them in Word and then re-create the PDF file
PDF Accessibility-Checker (PAC) (*free*)
- Free download
- Recommended by World Wide Web Consortium (W3C)
- 14/23 WCAG 2.0 checks
- Gives text of what a blind person would hear
- Easy to install and use
- Windows and Mac versions available
- Download and install PAC from its website (you do not need to be an administrator to do this)
- To run PAC, double click on pac.exe from where it is installed
- Click Browse and browse to the PDF file you would like to check; select the file and click Open
- Click Start Check
- Click Report
- You can ignore any issues related to ‘Correct Syntax of Tags / Rolls’
- Some issues may require some investigating as PAC doesn’t provide as much detail as Word on issues
- Issues related to ‘Consistent Heading Structure’ or ‘Logical Reading Order’ are often related to an issue such as a Heading 1 followed by a Heading 3 (instead of Heading 1 followed by Heading 2 followed by Heading 3)
Electronic Thesis submission procedures
Procedures for submitting your thesis electronically .
Library Subject Guides
4. writing up your research: thesis formatting (ms word).
- Books on Thesis Writing
- Thesis Formatting (MS Word)
- Referencing
| Other Research Support Guides >> >> >> >> |
Haere mai, tauti mai—welcome! These instructions are designed to be used with recent versions of MS Word. Please note there is no template or specific formatting guidelines for a thesis at UC. Please talk to your supervisor and take a look at theses in the UC Research Repository to see how they are usually formatted.
- Where to start
- Show/Hide Formatting
- Heading Styles
- Navigation Pane
- Table of Contents
- Numbered Headings
- List of Figures/Tables
- Page/Section Breaks, Page Numbering & Orientation
Word Thesis Formatting workshops run throughout the year.
Some useful documents.
- Word Formatting Instructions PDF This PDF contains the same instructions that are available on this page.
- Sample Thesis Document with No Formatting This sample thesis file can be used to practise formatting. It is not a template for how to format a thesis. UC does not provide any guidelines on formatting a thesis.
- APA 7th Edition Formatting Example This document is formatted according to APA 7th Edition formatting guidelines. It could be used as a template or as an example to follow. It contains some additional instructions for certain APA formatting in Word.
For more APA formatting advice see the APA Style Blog's excellent Style and Grammar Guidelines .
Finding Examples
Look at examples and ask your supervisor.
The best guide on how to format your thesis is a combination of:
- Looking at previous theses in your discipline. Search the UC Research Repository for your subject or department, and browse by issue date to get the most recent.
- Asking your supervisor for recommendations on specific formatting and details.
General Recommendations
The following is an example only of preliminaries to the thesis that could be included.
- Acknowledgements
- List of Figures
- List of Tables
- Abbreviations
- Toggle show Home ->Show/Hide formatting

Using styles for headings allows you to create an automatic table of contents.
- Select major headings one at a time and choose Home ->Styles ‘Heading 1’
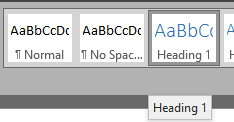
- Select subheadings and apply Home ->Styles ‘heading 2’ and ‘heading 3’
- Modify a style by right clicking on it and choosing Modify in the styles pane at the top of the screen.
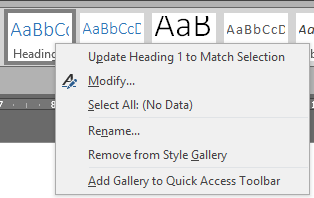
The Navigation Pain is useful for seeing the outline of your document as well as providing links to quickly go to any section of the document.
- View->check Navigation Pane

In order to create an automatic table of contents heading styles must be used.
- References -> Table of Contents -> Custom Table of Contents (no heading in table)

- Right click table of contents to ‘update field’ and choose ‘update entire table’

- Home->Multilevel list-> choose style with a number level for each heading level

- To change the heading level 1 number to say ‘Chapter 1’ right click on heading level 1 in the styles area Heading 1->Modify .

- In the modify screen click Format->Numbering.

- Then click ‘ Define New Number Format’.

- Then add the word ‘Chapter’ and a space before the ‘1’.

To create automatic lists of figures or tables you first have to give a caption to all your figures and tables.
- Right click figure or table and select Insert Caption

- Choose Label type eg. Figure, Table etc
- Choose position above or below
- Give the table or figure a title in the top box
- Go to the headings for List of Figures and List of tables and then click References->Insert Table of Figures -> select caption label type (Figure or Table)

- On the following menu select caption label type (Figure or Table) and click OK

This can be used to have different page numbering styles of different sections of your document or to have certain pages landscape to display a large table or graph.
- Insert a section break (next page) at the end of the title page ( Layout -> Breaks -> Next Page )

- Insert a section break at chapter 1 ( Layout -> Breaks -> Next Page )
- Insert page breaks for all other ‘heading 1’ headings ( Layout -> Breaks -> Page )
Adding Page Numbers
- Insert -> Page Number and choose a position on the page

- Double click on title page header or footer (top or bottom of the page) and tick ‘ Different First Page’ in the Design ribbon that appears

- Click in second page header or footer, right click on the page number and select ‘ format page numbers ’

- Select Roman numerals eg. ‘i, ii, iii, iv’ etc
- Select start at ‘i’ (start at ‘1’)

- Scroll to chapter 1 and change number style for this section back to ordinary numbers and start at 1
Change Page Orientation
- Insert a section break before and after the pages you want to change to landscape orientation (See instructions above for inserting a section break)
- Layout -> Orientation -> Landscape
NOTE: A section break is usually only needed if page orientation or separate page numbers are required.
| Workshops run throughout the year. |
- << Previous: Books on Thesis Writing
- Next: Referencing >>
- Last Updated: Feb 8, 2024 12:29 PM
- URL: https://canterbury.libguides.com/writingup
Free AI Presentation Maker for Generating Projects in Minutes
- Generate ready-to-use presentations from a text prompt.
- Select a style and Visme’s AI Presentation Maker will generate text, images, and icon.
- Customize your presentation with a library of royalty-free photos, videos, & graphics.
Generate a presentation with AI

Brought to you by Visme
A leading visual communication platform empowering 27,500,000 users and top brands.

Presentations Engineered With Visme’s AI Presentation Maker
Ai presentation prompt 1.
Craft a presentation outlining a leading company’s cutting-edge innovations in AI-powered hardware, emphasizing their impact on enhancing workplace productivity and efficiency.
AI Presentation Prompt 2
Generate a comprehensive presentation highlighting the latest digital marketing trends, focusing on strategies for enhancing brand visibility and customer engagement across diverse platforms.
AI Presentation Prompt 3
Create a detailed presentation elucidating a company’s diversified investment portfolio, emphasizing its robust performance, risk mitigation strategies, and the potential for sustainable long-term growth.
AI Presentation Prompt 4
Develop a compelling presentation showcasing a company’s groundbreaking medical devices and software solutions, emphasizing their role in revolutionizing patient care, treatment efficacy, and healthcare accessibility worldwide.

How it works
How to generate AI presentations with Visme
Save time and create beautiful designs quickly with Visme AI Designer. Available inside the Visme template library, this generator tool is ready to receive your prompts and generate stunning ready-to-use presentations in minutes.

- Log in to the Visme dashboard, and open the template library by clicking on Create New button -> Project -> Presentations. Inside the template library, scroll down and click on the Generate with AI option.
- In the popup that opens, type in a prompt and describe in detail what aspects your presentation should feature. If you don’t provide enough information, chatbot will ask you follow-up questions.
- Visme Chatbot will suggest template styles; choose the most relevant for your presentation, and wait for the AI to create the design. Preview, regenerate or open your project in the Visme editor.
- Customize your project in Visme: Pick a color theme or create your own, edit text, and use assets from Visme’s royalty-free library of photos, videos, and graphics, or create your own with AI tools.
Features of the AI Presentations Maker
Ready-to-use presentations in minutes.
Starting is often the hardest part of a project. Visme’s free AI presentation maker helps you overcome this block and generates results within minutes. It gives you a headstart and a good first draft that is ready-to-use with minimal or no customization.

Customize every part of your presentation
Visme editor is easy to use and offers you an array of customization options. Change the color theme of your presentation, text, fonts, add images, videos and graphics from Visme royalty-free library of assets or generate new ones with AI image generator, AI image touchup tools, or add your own. For more advanced customization, add data visualizations, connect them to live data, or create your own visuals.

Add your branding
Stay on-brand even with AI-generated presentations. Quickly and easily set up your brand kit using AI-powered Visme Brand Wizard or set it up manually. Use your brand colors and fonts in AI-generated presentations. Add your logo and upload your brand assets to make a presentation match your company’s branding.

Download, share or schedule your presentation
Share your presentations generated with Visme AI Designer in many ways. Download them in various formats, including PPTX, PDF and HTML5, present online, share on social media or schedule them to be published as posts on your social media channels. Additionally, you can share your presentations as private projects with a password entry.

More than just an AI Presentation Maker

Beautify your content
Unique Elements & Graphics
Browse through our library of customizable, one-of-a-kind graphics, widgets and design assets like icons, shapes, illustrations and more to accompany your AI-generated presentations.

Visualize your data
Charts & Graphs
Choose from different chart types and create pie charts, bar charts, donut charts, pyramid charts, Mekko charts, radar charts and much more.

Make it engaging
Interactivity
Share AI-generated presentations online with animated and interactive elements to grab your audience’s attention and promote your business.
More AI tools in Visme
Ai image generator.
The Visme AI Image generator will automatically create any image or graphic. All you need to do is write a prompt and let AI magic do the rest.

Visme AI Writer helps you write, proofread, summarize and tone switch any type of text. If you’re missing content for a project, let AI Writer help you generate it.

Save yourself hours of work with AI Resize. This feature resizes your project canvas and adjusts all content to fit the new size within seconds.

AI TouchUp Tools
The Visme AI TouchUp Tools are a set of four image editing features that will help you change the appearance of your images inside any Visme project. Erase and replace objects that you don’t want in your photos.

The Brand Wizard
The AI-based Visme Brand Wizard populates your brand fonts and styles across a beautiful set of templates.

Make the most of Visme’s features
Choose the perfect visual from our extensive photo and video library . Search and find the ideal image or video using keywords relevant to the project. Drag and drop in your project and adjust as needed.
Incorporate 3D illustrations and icons into all sorts of content types to create amazing content for your business communication strategies. You won’t see these 3D designs anywhere else as they’re made by Visme designers.
When you share your Visme projects, they’ll display with a flipbook effect . Viewers can go from page to page by flipping the page like a digital magazine. If you don’t want the flipbook effect, you can disable it and share as a standard project.
Remove the background from an image to create a cutout and layer it over something else, maybe an AI-generated background. Erase elements of the image and swap them for other objects with AI-powered Erase & Replace feature.
Create scroll-stopping video and animation posts for social media and email communication. Embed projects with video and animation into your website landing page or create digital documents with multimedia resources.
With Visme, you can make, create and design hundreds of content types . We have templates for digital documents, infographics, social media graphics, posters, banners, wireframes, whiteboards, flowcharts.
Design and brainstorm collaboratively with your team on the Visme whiteboard . Build mind maps and flowcharts easily during online planning and strategy sessions. Save whiteboards as meeting minutes and ongoing notes for projects.
Edit your images , photos, and AI image-generated graphics with our integrated editing tools. On top of the regular editing features like saturation and blur, we have 3 AI-based editing features. With these tools, you can unblur an image, expand it without losing quality and erase an object from it.
Frequently Asked Questions (FAQs)
How can i get better results with the ai presentations maker.
Like any AI generator from a text tool, the prompt is everything. To get better results with the AI Presentation maker, you need better prompts. Write the prompt to be as detailed as possible. Include all the content topics you want the presentation to cover. As for style elements, there’s no need to include it in the prompt. Focus on choosing the style that you like from the Chatbot suggestions. Try to select the style that already features the color palette and shapes that you like. AI will change icons and photos based on text it generates.
How many AI Presentations can I generate?
Visme AI Presentation maker is available in all plans with higher credits/usage available in Premium plans. Note: AI credits are spread amongst all AI features. So if you use other AI features, your credits will be deducted.
Is the Visme AI Designer a third-party API?
No, Visme AI Presentation maker was developed in-house and is a unique tool. However, it does use third-party APIs: ChatGPT and Unsplash.
This website uses cookies to improve the user experience. By using our website you consent to all cookies in accordance with our cookie policies included in our privacy policy.

AI Image Generator
Generate an image using Generative AI by describing what you want to see, all images are published publicly by default.
Get inspiration, text to image prompts and trending image generations; just need to login first!
Do you have a question.

Craft a Compelling Thesis: 9 pro tools for research and writing success
The journey from a captivating research topic to a compelling thesis can be long and winding. Between navigating mountains of information, organizing your thoughts, and crafting a well-structured argument, it’s easy to feel overwhelmed. But fear not, intrepid researcher! This article introduces you to the categories of powerful tools that will streamline your research process, empower your writing, and ultimately help you craft a thesis that shines.
Part 1: Laying the Foundation – Research powerhouses
Your research is the backbone of your thesis. To build a strong foundation, you need access to credible and diverse sources. Here are two essential online tools to kickstart your search:
Google Scholar and JSTOR: Unearthing scholarly gems
These academic search engines are goldmines for researchers. Google Scholar scours the web for scholarly articles, theses, books, and abstracts across a wide range of disciplines. JSTOR delivers a curated collection of high-quality, peer-reviewed journals and primary sources.
Power Up Your Research with Google Scholar and JSTOR:
1. Advanced Search Techniques: Both platforms offer advanced search functions. You can filter by publication date, author, title keywords, or specific journals.
2. Citation Tracking: Both Google Scholar and JSTOR allow you to track citations, helping you identify seminal works and build upon existing research.
3. Saved Searches and Alerts: Set up alerts to receive notifications when new articles relevant to your topic appear. This keeps you at the forefront of your field.
Choosing Between Them
Google Scholar offers a broader search across the web, while JSTOR provides a more focused collection of academically vetted sources. Use both in tandem for a comprehensive research strategy.
Part 2: Organizing the Chaos – From drafts to masterpieces
With research underway, the next hurdle is organizing your findings. Thankfully, digital note-taking apps like Evernote can be your savior.
Evernote: Your digital research vault
Evernote functions as a multi-functional information hub.
Evernote’s Powerhouse Features:
1. Text, Audio, and Image Capture: Capture ideas in various formats, including typed notes, voice recordings, and images of handwritten notes or scanned documents.
2. Organization and Tagging: Organize your notes using notebooks and tags, making it easy to find specific information later.
3. Web Clipper Integration: Save relevant web pages directly into Evernote, including text snippets, images, and links.
4. Collaboration: Share notes and collaborate with your peers on research projects.
Mastering Evernote for Thesis Success:
1. Create Subject-Specific Notebooks: Dedicate notebooks to different aspects of your thesis topic.
2. Maintain a Master Bibliography: Use a dedicated notebook to compile references you encounter during research.
3. Organize Quotes and Excerpts: Tag key quotes and excerpts with relevant keywords for easy retrieval.
4. Record Brainstorming Sessions: Use Evernote’s audio recording feature to capture fleeting ideas for future exploration.
Part 3: Roadmap to Success – Project management magic
With Evernote keeping your research organized, it’s time for project management tools to keep you on track. Trello, a popular visual project management platform, can be your guiding light.
Trello: Your thesis roadmap
Trello uses boards with lists and cards to visually represent your project progress.
Trello’s Advantages for Thesis Writers:
1. Visualizing Your Thesis Journey: Break down your thesis into manageable tasks within lists, and visualize your progress as you move cards across stages.
2. Setting Deadlines and Reminders: Assign deadlines to each task card and receive timely reminders to stay on schedule.
3. Collaboration Made Easy: Share your Trello board with your advisor or fellow researchers for collaborative brainstorming and task management.
Optimizing Trello for Your Thesis:
1. Create Lists for Different Stages: Set up lists like “Research,” “Outline,” “Writing,” “Revision,” and “Final Draft.”
2. Break Down Research Objectives: Within the “Research” list, create cards for specific sources you need to explore.
3. Track Writing Progress: Divide your writing into chapters or sections and create cards for each one, tracking progress as you write drafts.
4. Add Resources and Deadlines: Attach relevant research articles or outline notes to each card and set realistic deadlines to stay focused.
Part 4: Unveiling the Data – Statistical power
If your research involves quantitative data analysis, statistics software like SPSS (Statistical Package for the Social Sciences) becomes your secret weapon.
SPSS: Unveiling insights from data
SPSS (Statistical Package for Social Sciences) is a robust tool for quantitative data analysis, allowing you to explore relationships between variables, test hypotheses, and create data visualizations.
Unlocking the Power of SPSS:
1. Data Input and Cleaning: Enter your data into SPSS and utilize its cleaning tools to identify and address inconsistencies or missing values.
2. Statistical Analysis: Conduct various statistical tests depending on your research question. Explore correlations, conduct t-tests or ANOVAs, and analyze complex relationships.
3. Data Visualization: Create informative charts and graphs to visually represent your findings, making them easier to understand for yourself and your audience.
Part 5: Crafting Your Thesis – Writing and polishing
With research organized, the project managed, and data analyzed, it’s time to translate your knowledge into a compelling thesis. Here, two writing powerhouses come into play:
Scrivener and MS Word: From drafts to polished prose
This software is designed specifically for writers, offering unique features to help you structure and organize your thesis.
Scrivener’s Strengths:
1. Corkboard Feature: Visually arrange your research notes, chapter outlines, anddrafts on a digital corkboard for easy reorganization.
2. Focus Mode: Minimize distractions by hiding everything on the screen except the current section you’re working on.
3. Goal Setting and Tracking: Set daily writing goals and track your progress to maintain momentum.
This ubiquitous word processor offers essential writing and editing tools.
Ms word’s advantages:.
1. Collaboration Tools : Share your thesis document with your advisor or peers for real-time feedback and collaborative editing.
2. Formatting and Styles: Utilize built-in styles and formatting options to ensure consistent formatting throughout your thesis.
3. Reference Management Tools: Integrate reference management software like Mendeley (mentioned later) for seamless in-text citations and bibliography creation.
Optimizing Your Writing Process:
1. Choose Your Weapon: Use Scrivener for initial brainstorming and organization, then switch to MS Word for fine-tuning formatting and referencing.
2. Utilize Templates: Both programs offer thesis templates to jumpstart your formatting process.
3. Embrace Collaboration: Share your drafts with others for constructive feedback and fresh perspectives.
Part 6: Extracting Text from Images – A hidden gem
Sometimes, your research may involve extracting text from images, such as scanned documents or screenshots. This is where Cardscanner.co comes in handy.
Cardscanner.co: Turning images into text
Cardscanner.co is an online OCR based Image to text converter which allows you to upload images, scanned documents, hand written notes and convert the text within them into editable digital format.
Cardscanner’s Benefits:
1. Effortless Text Extraction: Save time by quickly extracting text from images instead of manual retyping.
2. Supports Various Formats: Handle documents, scanned and printed images, hand written notes and more.
3. Batch Conversion: Allows you to process multiple files simultaneously and perform the text extracting conversion with complete accuracy.
4. Directly Export in Spreadsheet: Cardscanner also allows you to directly extract text from images containing any tabular data and export them directly into spreadsheets (XLSX, XLS, CSV).
5. Text Translation: With the translation feature, even if the image contains text in another language, the tool allows you to extract and translate the text without the need to translate it separately after extraction.
Part 7: Visual Storytelling – Infographics for impact
Visuals can significantly enhance your thesis by making complex information more understandable and engaging. Here, two online infographic creation tools offer a helping hand:
Canva and Venngage: Simplifying visual communication
Canva and Venngage both are user-friendly platforms that provide a wide range of templates, icons, and design elements to create stunning infographics.
Canva and Venngage’s Advantages:
1. Drag-and-Drop Functionality: Easily design infographics without needing graphic design expertise.
2. Pre-designed Templates: Choose from a vast library of templates tailored to various topics and styles.
3. Collaboration Features: Work with your peers or advisor to create infographics collaboratively.
Tips for Creating Effective Infographics for Your Thesis:
1. Focus on Clarity: Keep your infographic focused on a single key message and avoid information overload.
2. Choose Data Wisely: Select the most impactful data points from your research to visually represent in your infographic.
3. Maintain Brand Consistency: Ensure your infographic aligns with the overall style and tone of your thesis.
Part 8: Citation Management Made Easy – Reference powerhouse
Proper citation management is crucial for academic writing. Mendeley is a software specifically designed to streamline this process.
Mendeley: Your citation management ally
Mendeley helps you organize your research references, automatically generate in-text citations and bibliographies in various citation styles, and seamlessly integrate with writing software like MS Word.
Mendeley’s Benefits:
1. Reference Organization: Import references from various sources, including online databases and research papers.
2. Automatic Citation Generation: Generate in-text citations and bibliographies in the required format with a few clicks.
3. PDF Annotation and Highlighting: Annotate and highlight key passages within your research PDFs directly.
Part 9: Polishing Your Prose – Grammar and plagiarism checkers
Even the most meticulous researcher can benefit from a final polish. Here, two tools can empower you to deliver a grammatically sound and plagiarism-free thesis:
Trinka AI and Enago Plagiarism Checker : Ensuring Accuracy and Originality
Trinka AI : This online grammar checker utilizes AI technology to identify and correct grammatical errors, typos, and sentence structure issues.
Trinka AI’s Benefits:
1. Advanced Error Detection: Identifies a wider range of errors beyond basic grammar mistakes.
2. Contextual Analysis: Provides suggestions based on the context of your writing, ensuring appropriate phrasing.
3. Free Basic Plan: Offers a free plan with limited checks, with paid options for extended features.
Enago Plagiarism Checker : This online tool scans your thesis against a vast database of academic sources to identify unintentional plagiarism.
Enago Plagiarism Checker’s Advantages:
1. Peace of Mind: Ensures your work is original and avoids plagiarism accusations.
2. Detailed Report: Provides a report highlighting potential plagiarism instances with suggestions for correction.
3. Free Basic Version: Offers a free basic version with limited checks, with paid options for more comprehensive reports.
Final Words: A thesis triumph awaits!
With this arsenal of powerful tools at your disposal, you are well-equipped to navigate the research and writing journey with confidence. Remember, research and writing are iterative processes. Utilize these tools to organize your information, analyze data, craft compelling arguments, and present your findings in a clear and concise manner.
The path to a successful thesis may have its challenges, but with dedication and these tools as your allies, you can transform your research into a compelling and impactful document. Best of luck on your thesis journey!
Disclaimer: The opinions/views expressed in this article exclusively represent the individual perspectives of the author. While we affirm the value of diverse viewpoints and advocate for the freedom of individual expression, we do not endorse derogatory or offensive comments against any caste, creed, race, or similar distinctions. For any concerns or further information, we invite you to contact us at [email protected].
- : By clicking here, I state that I have read and understood the terms and conditions mentioned above.
Rate this article Cancel Reply
Your email address will not be published.
Recommended from Academy

- Old Webinars
- Webinar Mobile App
Improving Research Manuscripts Using AI-Powered Insights: Enago reports for effective research communication
Language Quality Importance in Academia AI in Evaluating Language Quality Enago Language Reports Live Demo…

- Promoting Research
- Thought Leadership
- Trending Now
How Enago Academy Contributes to Sustainable Development Goals (SDGs) Through Empowering Researchers
The United Nations Sustainable Development Goals (SDGs) are a universal call to action to end…

- Reporting Research
Beyond Spellcheck: How copyediting guarantees error-free submission
Submitting a manuscript is a complex and often an emotional experience for researchers. Whether it’s…
How to Find the Right Journal and Fix Your Manuscript Before Submission
Selection of right journal Meets journal standards Plagiarism free manuscripts Rated from reviewer's POV

- Manuscripts & Grants
Research Aims and Objectives: The dynamic duo for successful research
Picture yourself on a road trip without a destination in mind — driving aimlessly, not…

I am looking for Editing/ Proofreading services for my manuscript Tentative date of next journal submission:

As a researcher, what do you consider most when choosing an image manipulation detector?
- Add an image
- Draft and add content
Rewrite text
- Chat with Copilot
- Create a summary
- Copilot in Word on mobile devices
- Create a new presentation
- Add a slide or image
- Summarize your presentation
- Organize your presentation
- Use your organization's branding
- Copilot in PowerPoint for mobile devices
- Draft an Outlook email message
- Summarize an email thread
- Suggested drafts in Outlook
- Email coaching
- Get started with Copilot in Excel
- Identify insights
- Highlight, sort, and filter your data
- Generate formula columns
- Summarize your OneNote notes
- Create a to-do list and tasks
- Create project plans in OneNote

Elevate your content with Copilot in Word
Note: This feature is available to customers with a Copilot for Microsoft 365 license or Copilot Pro license.
Copilot in Word now offers an enhanced experience on the Web, allowing you to directly type in changes to the AI-generated rewrites. This interactive feature ensures that your ideas are captured and refined in real-time, streamlining the editing process. Just like before, Copilot can adjust the tone of your text and transform it into an editable table, but now with the added convenience of immediate, hands-on customization.
Available on the Web, Windows, Mac OS, and iPad
Select the text you want Copilot to rewrite.

From the left margin Copilot menu, select Auto-rewrite .
Copilot will show you rewritten options to choose from.

Interactive rewriting
Available exclusively on the Web
After selecting the text, use the Copilot menu to choose the Auto-rewrite option.
After Copilot displays the rewritten text options, use the arrows to navigate through the different versions and select the one you prefer.
To modify the AI-generated text to your preference, begin typing directly within the suggestion box.
Your edits will update the content in real-time, allowing for immediate refinement.
When satisfied, select Replace to use the revised text in your document.

This new interactive feature streamlines the editing process, giving you full control over the final output of your text.
Convert text to a table
Available exclusively on the Web
Select the text you want Copilot to turn into a table.
From the left margin Copilot menu, select Visualize as a table .
Copilot will show you what the table will look like.

To fine tune the table, enter details into the Copilot compose box to state what to change about the table, like " Add an empty third column. "
Changing a table's formatting isn't supported using the compose box, but the table's formatting can be changed by using the table options in the Word ribbon.

Welcome to Copilot in Word
Frequently asked questions about Copilot in Word
Where can I get Microsoft Copilot?
Copilot Lab

Need more help?
Want more options.
Explore subscription benefits, browse training courses, learn how to secure your device, and more.

Microsoft 365 subscription benefits

Microsoft 365 training

Microsoft security

Accessibility center
Communities help you ask and answer questions, give feedback, and hear from experts with rich knowledge.

Ask the Microsoft Community

Microsoft Tech Community

Windows Insiders
Microsoft 365 Insiders
Find solutions to common problems or get help from a support agent.

Online support
Was this information helpful?
Thank you for your feedback.
Today's Connections Hints and Answer (Tuesday, June 11, 2024)
Connections is a daily word game that millions of people play. We have the solution and some clues for anyone struggling to beat Connections #366.
Quick Links
Category clues for today's connections (#366), today's connections solution (june 11, 2024), what made today's connections difficult, our top tips to beat connections every day.
Connections requires players to find the connections between 16 words, and place them in four groups of four. If you want some help, we have the solution to Connections for Tuesday, June 11, 2024, along with hints to help you solve it yourself.
SPOILERS AHEAD (CLUES)
Today, as every day, you need to split the 16 words that make up the Connections puzzle grid into four groups of four based on specific categories. It isn't as easy as it sounds. Fortunately, we're on hand to help you solve today's Connections puzzle .
If you want to jump straight to today's Connections solution, scroll past the next spoiler warning. However, if you'd rather see some hints designed to help you solve it without giving the answers away first:
- Yellow: "I want to purchase an NSYNC song"
- Green: "What gym bods are made up of"
- Blue: "What some people listen to in their headphones"
- Purple: "Simplified options when cooking food"
SPOILERS AHEAD (CATEGORIES)

If those clues aren't enough, and you're still struggling to beat Connections #366 without running out of mistakes, here is the answer...
Today's Connections Categories
- Yellow = "Homophones"
- Green = "Muscles, Informally"
- Blue = "Music Genres"
- Purple = "Settings on an Appliance Knob"
With the categories revealed, you should try to guess which words belong where. There are 16 words in total, with four belonging to each category.
If you are still stuck despite knowing the names of each category, continue scrolling down for the 16 words organized into their respective categories.
SPOILERS AHEAD (SOLUTION)
Today's Connections Solution
- Yellow: "Homophones" = BI, BUY, BY, BYE
- Green: "Muscles, Informally" = AB, PEC, QUAD, TRI
- Blue: "Music Genres" = DUB, EMO, POP, TRAP
- Purple: "Settings on an Appliance Knob" = HI, LO, MED, OFF
Today's Connections puzzle was made difficult due to the following:
- I found the whole thing quite difficult today due to the clever use of small, single-syllable words throughout. Upon first look, all 16 meld into one, and you have to seriously engage your brain in order to separate them out.
- The most obvious red herrings are the words from different categories that rhyme. As well as the four words that make up the yellow category, there's "tri" and "hi". There's also "bi" (meaning two), "tri" (meaning three), and "quad" (meaning four).
- For me, the Blue category was the toughest today, as you either know or don't know the names of music genres. Of these four, "trap" isn't one I'm familiar with, which made it tricky to find the fourth word to complete the category.
- Shuffle the words as many times as you need. Shuffling the words around means you're more likely to spot the connections.
- Look for differences as well as similarities. The NYT is trying to trip you up, so look for what divides the words with similar meanings.
- Take your time, and don't rush into a guess. Connections isn't a timed challenge, so you have the luxury of planning everything out.
- Look for common themes over time. The more you play Connections, the more you'll spot recurring themes cropping up regularly.
- Tune into the NYT editors' way of thinking. It's the puzzle setters you're competing against, so you need to understand their game plan.
Now that you have completed today's Connections puzzle (with a little help from your friends at MUO), you should check out some of the other free games from the New York Times.
Wordle is the best-known of them all, and challenges you to find a 5-letter word within six guesses. For every letter you find, you get told if it's in the correct place, allowing you to whittle down the possible options. If you need help with Wordle, check out our tips and tricks to improve your Wordle score .
There's also Strands, the newest addition to the New York Times' burgeoning list of games. Just like Connections, it's extremely challenging, but in a unique string-the-letters-together way. We recommend you check out our best tips for beating Strands to give yourself a leg up on the daily challenge.
Or, if you're really only into Connections but want more tips than are offered above, check out our longer list of Connections tips and tricks .
IMAGES
VIDEO
COMMENTS
How To Properly Use Thesis In A Sentence. When it comes to using the word "thesis" in a sentence, there are certain grammatical rules that should be followed to ensure clarity and accuracy. Additionally, it is important to understand the different parts of speech that "thesis" can function as, allowing for a more versatile usage of the ...
A thesis statement summarizes the central points of your essay. It is a signpost telling the reader what the essay will argue and why. The best thesis statements are: Concise: A good thesis statement is short and sweet—don't use more words than necessary. State your point clearly and directly in one or two sentences.
Revised on April 16, 2024. A thesis is a type of research paper based on your original research. It is usually submitted as the final step of a master's program or a capstone to a bachelor's degree. Writing a thesis can be a daunting experience. Other than a dissertation, it is one of the longest pieces of writing students typically complete.
Hint: a great many clear and engaging thesis statements contain words like because, since, so, although, unless, and however. 4. A strong thesis statement is specific. A thesis statement should show exactly what your paper will be about, and will help you keep your paper to a manageable topic. For example, if you're writing a seven-to-ten page ...
A thesis statement: tells the reader how you will interpret the significance of the subject matter under discussion. is a road map for the paper; in other words, it tells the reader what to expect from the rest of the paper. directly answers the question asked of you. A thesis is an interpretation of a question or subject, not the subject ...
A good thesis has two parts. It should tell what you plan to argue, and it should "telegraph" how you plan to argue—that is, what particular support for your claim is going where in your essay. Steps in Constructing a Thesis. First, analyze your primary sources. Look for tension, interest, ambiguity, controversy, and/or complication.
Tips for Writing Your Thesis Statement. 1. Determine what kind of paper you are writing: An analytical paper breaks down an issue or an idea into its component parts, evaluates the issue or idea, and presents this breakdown and evaluation to the audience.; An expository (explanatory) paper explains something to the audience.; An argumentative paper makes a claim about a topic and justifies ...
When drafting your thesis statement, avoid words like explore, investigate, learn, compile, summarize, and explain to describe the main purpose of your paper. These words imply a paper that summarizes or "reports," rather than synthesizing and analyzing. Instead of the terms above, try words like argue, critique, question, and interrogate.
Thesis. Your thesis is the central claim in your essay—your main insight or idea about your source or topic. Your thesis should appear early in an academic essay, followed by a logically constructed argument that supports this central claim. A strong thesis is arguable, which means a thoughtful reader could disagree with it and therefore ...
Formatting your dissertation (or thesis) will likely take more time than you expect. But using the special features described in this Guide will save you a great deal of work, particularly if you use our template (available in the box below).The earlier you begin to use these tools, the more time you'll save and the less stress you'll have as your submission deadline approaches.
This thesis statement is not debatable. First, the word pollution implies that something is bad or negative in some way. Furthermore, all studies agree that pollution is a problem; they simply disagree on the impact it will have or the scope of the problem. No one could reasonably argue that pollution is unambiguously good.
Making Your Thesis Master Document. To create the master document: 1. Open a new word file. 2. Go to the Outlining tool. 3. In the master document options, select " Show document ". This will create the option to "Create" or "Insert" files into the master document.
UM-Dearborn Microsoft Word thesis template. Most students use Microsoft Word to write their thesis or dissertation. For previous assignments, you likely did not use some of Word's advanced features such as styles, section breaks, rotated pages, automatically generated table of contents, automatically generated list of abbreviations, etc.
"We might all put "Microsoft Office" on our CV, but people from academic don't know how to REALLY use Microsoft word." This was from an actual informational ...
Illinois Tech welcomes you to join our community of people who discover, create, and solve. Apply today, visit us in Chicago, and contact us for more information. MS Word Template Template The template above provides a basic thesis layout, which meets the IIT thesis manual requirements. It consists of the following parts:
Above are the results of unscrambling thesis. Using the word generator and word unscrambler for the letters T H E S I S, we unscrambled the letters to create a list of all the words found in Scrabble, Words with Friends, and Text Twist. We found a total of 51 words by unscrambling the letters in thesis.
Words and Phrases to Avoid in Academic Writing. Published on February 6, 2016 by Sarah Vinz.Revised on September 11, 2023. When you are writing a dissertation, thesis, or research paper, many words and phrases that are acceptable in conversations or informal writing are considered inappropriate in academic writing.. You should try to avoid expressions that are too informal, unsophisticated ...
Manual formatting of TOC. To add right-aligned tabs with leaders: From the Home tab, open the Paragraph settings and click on the Tabs button. Enter the tab stop position, choose Right Tab and for Leader, choose the … option. Click Set (or the + sign on Mac), then click OK. Type the TOC entry, press tab, then insert the page number.
Participants should have basic experience using Microsoft Word. This workshop specifically uses Word 2016. Note: See dissertation/thesis formatting and submission guidelines (PDF) from University of Minnesota Graduate Student Services and Progress (also see Thesis/dissertation submission and formatting page).
Dissertation-Proofreading.com. Allia Future Business Centre. The Guildhall. Market Square. Cambridge. CB2 3QJ. United Kingdom. +44 (0) 20 31 500 431. This article deals with helpful grammar advice on word use, syntax and sentence structure when writing a PhD thesis in ANY academic field.
Using the UWaterloo Thesis template . The UWaterloo Thesis template (dotm) may be useful as-is for your thesis, or it may be a useful starting point for you to modify. Exercise: Downloading and using the UWaterloo Word Thesis template . To open the UWaterloo Thesis template: Download the UWaterloo Thesis template (dotm).
Word Thesis Formatting workshops run throughout the year. Some Useful Documents. Word Formatting Instructions PDF. This PDF contains the same instructions that are available on this page. Sample Thesis Document with No Formatting. This sample thesis file can be used to practise formatting. It is not a template for how to format a thesis.
Using a Thesis and Outline to Construct Your Paper. Aug 2024. Wed 7. 3:00 pm - 4:00 pm.
Free AI Presentation Maker for Generating Projects in Minutes. Generate ready-to-use presentations from a text prompt. Select a style and Visme's AI Presentation Maker will generate text, images, and icon. Customize your presentation with a library of royalty-free photos, videos, & graphics. Generate a presentation with AI.
There are plenty of benefits to using an AI Text to Image generator. Bring your ideas to life instantly without having to spend time designing from scratch. No more creative blocks as you start inspired and easily create stunning visuals. Use your AI-generated photos as eye-catching web content, quirky social media posts, or winning design ...
1. Choose Your Weapon: Use Scrivener for initial brainstorming and organization, then switch to MS Word for fine-tuning formatting and referencing. 2. Utilize Templates: Both programs offer thesis templates to jumpstart your formatting process. 3. Embrace Collaboration: Share your drafts with others for constructive feedback and fresh perspectives.
Available on the Web, Windows, Mac OS, and iPad. Select the text you want Copilot to rewrite. In the left margin next to your text, select the Copilot icon. From the left margin Copilot menu, select Auto-rewrite. Copilot will show you rewritten options to choose from. Select Replace to use the revised text, Insert below to insert the rewritten ...
Written by Coursera Staff • Updated on Apr 19, 2024. Data analysis is the practice of working with data to glean useful information, which can then be used to make informed decisions. "It is a capital mistake to theorize before one has data. Insensibly one begins to twist facts to suit theories, instead of theories to suit facts," Sherlock ...
Category Clues for Today's Connections (#366) Today's Connections Solution (June 11, 2024) What Made Today's Connections Difficult. Our Top Tips to Beat Connections Every Day. Connections requires players to find the connections between 16 words, and place them in four groups of four. If you want some help, we have the solution to Connections ...
Bill Pruitt, a former producer on "The Apprentice," describes the moment he says he heard former President Donald Trump use the N-word in a production meeting. CNN cannot independently verify ...