Enter your email address below and we'll send you password reset instructions.
- Audio Converter
- Video Converter
- Image Converter
- Document Converter
- Archive Converter
- Presentation Converter
- Font Converter
- Ebook Converter

PPS to PPT Converter
Convert your pps files to ppt online & free.
- Presentation
PowerPoint Slide Show 97/2000/XP
Microsoft powerpoint 97/2000/xp, how to convert pps to ppt, upload pps-file(s).
Select files from Computer, Google Drive, Dropbox, URL or by dragging it on the page.
Choose "to ppt"
Choose ppt or any other format you need as a result (more than 200 formats supported)
Download your ppt
Let the file convert and you can download your ppt file right afterwards
PPS to PPT Quality Rating
Critical PowerPoint Shortcuts – Claim Your FREE Training Module and Get Your Time Back!
How to Present a PowerPoint Slideshow (w/ Shortcuts)
- PowerPoint Tutorials
- Shortcuts & Hacks
- May 11, 2019
There are a variety of ways to start a PowerPoint presention, depending on:
- Where you start your presentation (from beginning or from current)
- Which PowerPoint view you prefer to present in (Slide Show view or Presenter view)
- How comfortable you are with keyboard shortcuts
Why would Microsoft include so many ways to present a presentation? My guess is that everyone learns PowerPoint differently, and has personal presentation styles. The more options you have, the easier your life will be as there will always be a way to start your presentation the way you want to (or jump back into it when you need to).
See all the options below and find the method that works best for you and let the slide show begin !
NOTE: If you are running two presentations side-by-side, each presentation needs to be started as it’s own slide show. To see how to set up two PowerPoint presentations to run side-by-side like this before you start your slide show, read my guide here .
Table of Contents
Start slide show from beginning.

To start a slideshow from the beginning of your presentation using the ribbon, simply.
- Navigate to the Slide Show tab
- Select From Beginning
Selecting From Beginning starts your presentation from the very first non-hidden slide in your presentation, regardless of which slide you are currently inside of your deck.

You can also start your slide from the beginning of your presentation by hitting the Slideshow From Beginning keyboard shortcut, F5 .
Regardless of which method you use, this is the classic way to start your presentation in full screen from your first title slide (regardless of where you are in your slide deck).
Let the slide show begin!
NOTE: To expand your knowledge and learn how to use PowerPoint’s FREE and HIDDEN built-in laser pointer to point things out during your presentation, read my guide here .
Take your PPT skills to the next level
Start slide show from current.

To begin your slide show from the slide you are currently on using the ribbon, simply
- Navigate to the Slide Show tab
- Select From Current Slide
Selecting From Current Slide starts your slide show from whatever slide you are currently on, even if the slide is hidden.

You can also start your slide from the current slide you are on by hitting the Shift+F5 keyboard shortcut.
Because it’s often easiest to catch errors when building your slides in this full screen mode, I highly recommend learning the Shift+F5 shortcut and using it frequently as you build your slides to spot them for errors.

If you don’t want to bother learning the From Current Slide shortcut, you can also start your slideshow by clicking the Slide Show icon at the bottom of your screen.
This is a fantastic way to spot check your slides as you are building them. On top of that, it’s a fast and uncomplicated way to re-start your presentation from where you left off after demoing something on screen.
Start a mini-slide show in PowerPoint
You can also use the following hidden PowerPoint shortcut to run a mini slide show over the top of your current deck.

To run a mini slide show, simply:
- Hold down the Alt key on your keyboard
- With your mouse, click the Slide Show icon
Doing so starts a small slide show of your presentation that you can see below, from the current slide you are on.

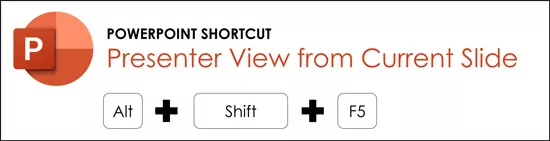
Presenter View
The Presenter View is an alternate way to run your presentation in PowerPoint. In this view, your slides are projected on screen, and the details of your presentation are displayed on your computer as pictured below.

The presenter view includes your next (non-hidden) slides that is coming up, your current slide projected on screen, how long you’ve been talking and your speaker notes.

To launch the Presenter View from the beginning of your presentation using your Ribbon, simply:
- Navigate to the Slide Show tab
- Hold down the Alt key on your keyboard
- Click From Beginning
Holding down the Alt key and clicking From Beginning , the Presenter View will launch from the very first (non-hidden) slide in your presentation.

You can also launch the presenter view from the beginning of your presentation at any time by clicking Alt + F5 on your keyboard.
Start Presenter View in PowerPoint From Current Slide

Did you know that you can access different views in PowerPoint by adding keys as you click commands in the PowerPoint ribbon?
To start the Presenter view from your current slide using your Ribbon, simply:
- Hold down the Alt key on your keyboard
- Click From Current Slide
Holding the Alt key and clicking From Current Slide launches the Presenter View from your current slide. So, this is another way you can quickly practice your presentation, see your speaker notes and see what’s coming up next.
You can also launch the Presenter View from the beginning of your presentation at any time by hitting Alt+F5 on your keyboard.
Showing and Hiding Presenter View
Regardless of which view you start your PowerPoint slide show; you can switch between the two different slide show views without exiting presentation.

To switch between the two slideshow views (while giving your presentation), simply:
- Right-click your slide in whichever presentation view you are currently in
- Select either Show Presenter View or Hide Presenter View
When would you use a feature like this during a presentation? One example is if you want to view your notes without leaving the slide show mode.
NOTE: The letter r for both Show Presenter View and Hide Presenter View is underlined. This means that it is a keyboard shortcut. So, if you want to quickly flip between these two presentation views, you can simply right-click your slide and hit the letter r on your keyboard. Doing so automatically switches the view you are in.
Controlling how your presentation runs
Another way to control how your presentation runs (including the default laser pointer and pen color), is the Set Up Slide Show dialog box.

To open the Set Up Slide Show dialog box, simply:
- Select the Set Up Slide Show command
Doing so, opens all your PowerPoint slide show settings and options as pictured below.
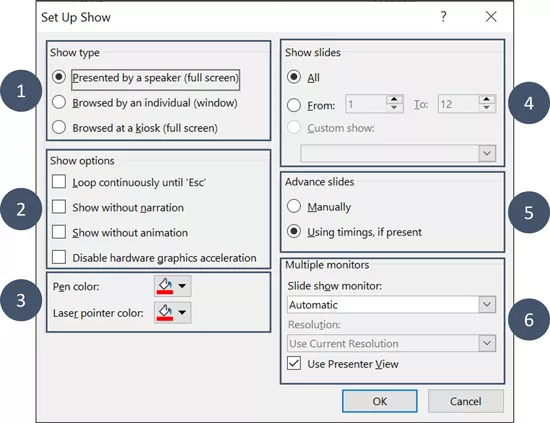
Inside the slide show settings dialog box, you can select:
- How your presentation runs (full screen, window or in kiosk mode).
- Your default pen and laser pointer color options ( see our laser pointer article here ).
- Which slide you want start from, or which slides you want to show. You can also setup a custom show here.
- How your slides progress (manually or using slide timings).
- Which of your computer monitors (or screens) your slide show runs on.
The Set Up Slide Show dialog box is also the secret to running multiple presentations at the same time in PowerPoint. To expand your knowledge and learn how to set this up, read our guide here .
Setup Slide Show SECRET Shortcut

To use the SECRET shortcut to open the Set Up Slide Show dialog box, simply:
- Hold down the Shift key on your keyboard
- With your mouse, click the Reading View icon at the bottom of your screen
This is useful when you need to quickly cycle through lots of PowerPoint presentations and change how those presentations run. Instead of wasting time clicking through the Ribbon, simply hold the Shift key and click the Reading View icon. This is also a friendly conversation starter with a fellow PowerPoint enthusiast at Happy Hour.
NOTE: The color of your Reading View icon might be different than in the picture above, as it is dependent on the Office Theme you selected for PowerPoint.
How to exit a PowerPoint presentation early?

Regardless of how you start your full screen presentation, you can end your presentation at any time by hitting the Esc key on your keyboard.
Hitting Esc immediately takes you out of the PowerPoint presentation mode and back to the normal editing view of your slides, on whatever slide you were last presenting.
Here is how you can use a combination of all the different keyboard shortcuts to spot check and practice your presentation in full screen before you finalize your presentation.
- Hit F5 on your keyboard to start your presentation in full screen from the very first slide in your presentation. You can then use your arrow keys to advance, spot checking your slides for errors.
- When you find an error, simply hit Esc key to return to the normal PowerPoint editing view to fix your slide.
- When you are done, hit Shift + F5 to return the full screen presentation mode from the slide you just updated. You can then continue spot checking your presentation (without having to start over from the beginning).
In this way you can quickly work your way through your slides and practice your presentation, fixing and adjusting your content as you go.
Understanding how to run your presentations is CRITICAL to the success of your presentation. Not only in presenting them live, but also in knowing how to spot check your slides as you build them.
I personally find it easiest to spot check your slides and quickly fix errors by running your presentation in slide show mode (or full screen). The last place you want to discover an error is during your presentation.
Using the commands and shortcuts above, you can quickly start, exit and step back into your slide show. Once you have these commands and features down, you will also look like a whiz during your presentations.
If you enjoyed the depth of this article, you will love our other PowerPoint training courses and free resources. To learn more, visit us here .
🔒 Unlock the PowerPoint Shortcuts Trusted by Industry Leaders KKR, American Express, HSBC, and More!
Join over 114,880 professionals from diverse fields including consulting, investment banking, advertising, marketing, sales, and business development who have supercharged their PowerPoint game with our proven methods.
✅ Customize compelling presentations effortlessly.
✅ Master time-saving techniques for faster deck creation.
✅ Boost your career prospects with top-notch PowerPoint skills.
Get FREE access to the Critical PowerPoint Shortcuts module of our premium training course by entering your name and email below.
DISCLAIMER: PC Users Only!
We respect your privacy and will keep your info safe and confidential.
Related Articles
About the author.

Popular Tutorials
- How to Strikethrough Text (l̶i̶k̶e̶ ̶t̶h̶i̶s̶) in Word, Excel & PowerPoint
- How to Make Animated Fireworks in PowerPoint (Step-by-Step)
- Strikethrough Shortcut (l̶i̶k̶e̶ ̶t̶h̶i̶s̶) for Word, Excel & PowerPoint
- How to Create a Flash Card Memory Game in PowerPoint (Like Jeopardy)
- Keyboard Shortcuts Not Working: Solved
PowerPoint Tutorial Categories
- Strategies & Opinions
- Presentation Design
- Pictures, Icons, Videos, Etc.
- New Features
- Miscellaneous
- Charts & Data Viz
We help busy professionals save hours and gain peace of mind, with corporate workshops, self-paced courses and tutorials for PowerPoint and Word.
Work With Us
- Corporate Training
- Presentation & Template Design
- Courses & Downloads
- PowerPoint Articles
- Word Articles
- Productivity Resources
Find a Tutorial
- Free Training
- For Businesses
We help busy office workers save hours and gain peace of mind, with tips, training and tutorials for Microsoft PowerPoint and Word.
Master Critical PowerPoint Shortcuts – Secure Your FREE Training Module and Save Valuable Time!
⌛ Master time-saving expert techniques.
🔥 Create powerful presentations.
🚀 Propel your career to new heights.
We value your privacy – we keep your info safe.
Discover PowerPoint Hacks Loved by Industry Giants - KKR, AmEx, HSBC!
Over 114,880 professionals in finance, marketing and sales have revolutionized their PPT skills with our proven methods.
Gain FREE access to a full module of our premium PowerPoint training program – Get started today!
We hate spam too and promise to keep your information safe.
You are currently viewing a placeholder content from Facebook . To access the actual content, click the button below. Please note that doing so will share data with third-party providers.

Microsoft Learn Q&A needs your feedback! Learn More
May 20, 2024
Microsoft Learn Q&A needs your feedback!
Want to earn $25 for telling us how you feel about the current Microsoft Learn Q&A thread experience? Help our research team understand how to make Q&A great for you.
Find out more!
Contribute to the Microsoft 365 and Office forum! Click here to learn more 💡
April 9, 2024
Contribute to the Microsoft 365 and Office forum!
Click here to learn more 💡
PowerPoint Forum Top Contributors: Steve Rindsberg - John Korchok - Bob Jones AKA: CyberTaz ✅
May 10, 2024
PowerPoint Forum Top Contributors:
Steve Rindsberg - John Korchok - Bob Jones AKA: CyberTaz ✅
- Search the community and support articles
- Microsoft 365 and Office
- Search Community member
Ask a new question
Setting the Monitor for the powerpoint presenter view
I am trying to get the presenter view to the third monitor (windows pc) when starting the presentation mode. Sadly no luck so far. Can someone tell me if it is possible and if so, how to do that? Thanks in advance Timothy
Report abuse
Reported content has been submitted
Replies (4)
Hello Mate,
Does the presentation only appear on two monitors and the third one will only be a black screen?
Anyhow, here are some few things that you can try:
Connect the primary PC and the second and third PCs to the same network or use Ethernet cross-over cables to manually connect.
Open the browser on your primary computer and go to the MaxiVista website to download a free demo version of MaxiVista.
Click “Download Now.”
Click “Open” in the dialog box which opens.
Click “Run” to start the set-up and follow the set-up wizard's instructions.
Repeat the download and set-up process on the other two computers by repeating the primary computer set-up procedures.
Right-click the MaxiVista icon on the desktop of the second computer and click “Enable Secondary Display.”
Right-click the MaxiVista icon on the desktop of the third computer and click “Enable Secondary Display.” Your computer is now set-up and ready to run multiple monitors.
Open PowerPoint presentation.
Click “Slide Show.”
Click “Set Up Show.”
Check the box “Show Presenter View” in the dialog box which opens. This opens a navigation panel on the presenter’s monitor which allows the presenter to easily manage the multiple screens.
Click the monitor you want the slide show presentation to appear on under the “Display Slide Show” list.
Click “OK” to start the presentation.
Let me know how it goes. Cheers.
11 people found this reply helpful
Was this reply helpful? Yes No
Sorry this didn't help.
Great! Thanks for your feedback.
How satisfied are you with this reply?
Thanks for your feedback, it helps us improve the site.
Thanks for your feedback.
Hello,
I don't quite understand want you try to say with the 1. proposed solution. (i only have one Computer)
I can move the powerpoint output. thats no problem what I want to redirect is the presenter view, you know the one where you see the actual slide, the next slide your notes and so on. For the presenting person.
Maybe it is a little bit more clear what i try to achieve.
Thanks again for your help
- Microsoft Agent |
Hi Timothy,
Using PowerPoint Presenter view, you can see your notes as you present, while the audience sees only your slides. For us to help you with this concern, we suggest that you check this article: Start the presentation and see your notes in Presenter view. It has a video and a walkthrough on how to use the presenter view and also the controls that you can use. We also recommend that you check this article: Present on multiple monitors (and view speaker notes privately) for more details using multiple monitors on Presenter view.
Kindly get back to us with the results.
Hello, Thanks for your help, I appreciate it.
I think i need to give a little more background on what i am trying to do. In the current setup we have currently duplicated the monitor at the speaker table with the one back at the technician workplace to allow our presenters to use their powerpoint presentations while staying in controll. The presentation goes to the Beamer as it should and always did. This works but comes with a price, wen someone is presenting, our technician workplace ist beeing occupied by the presenter view and blocking some advanced setting we would like to be able to utilize as well as simply prepairing the next steps ( whitch we can not do at the moment since it would desturb the presenting person)
I would like to be able to specify on which monitor the PowerPoint Presenter view shall be displayed on, to get it away from the technician workplace monitor. But that seams to be impossible so far :( Thanks again for your help
10 people found this reply helpful
Question Info
- Norsk Bokmål
- Ελληνικά
- Русский
- עברית
- العربية
- ไทย
- 한국어
- 中文(简体)
- 中文(繁體)
- 日本語
- I Tried Both: Apple Watch 9 vs Fitbit Charge 6
- Best Places to Print Photos Online
How to Make a Slideshow on PowerPoint
Whether for work or private, use slideshows to get your message across
:max_bytes(150000):strip_icc():format(webp)/ColettaTeske-af57404a91b342578a97252b7dbd720f.jpg "how to change powerpoint slide show to powerpoint presentation")
- Central Washington University
In This Article
Jump to a Section
Before You Begin
- Step-by-Step: Make a Slideshow on PowerPoint
- Play Music During the Slideshow
- Set up the Slideshow
- Add Timings to Each Slide
- Edit Timings on a Slide
- Create a Video Slideshow
- Save a Slideshow to a CD or Other Removeable Media
When you're ready to present your PowerPoint slides to others, look no further than PowerPoint's slideshow feature. Use this tool for all kinds of slides, but those containing photos work best for most viewers.
Instructions in this article apply to PowerPoint for Microsoft 365 , PowerPoint 2019, PowerPoint 2016, PowerPoint 2013, PowerPoint 2010, and PowerPoint for Mac.
Before you create slides for your slideshow presentation, decide how long to make the slideshow, how it should flow, and the pictures you’ll use.
- Length : A slideshow can be as long or as short as you need. The length of the slideshow should be appropriate for the topic and for your audience’s attention span.
- Outline : It’s always smart to start with an outline; it helps you visualize your slideshow. An outline can be as simple as the list of topics you want to cover.
- Pictures : Choose photos that are clear and tell a story.
With PowerPoint's Photo Album , select the pictures and PowerPoint creates the basic slideshow. Fill your slides with informative text and harmonizing background music, then turn your collection of slides into a self-running photo slideshow with music that can play as a video or be stored on a CD.
When you’re ready to make a photo slideshow with music, PowerPoint gets you up and running quickly. To get started, select Insert > Photo Album > New Photo Album .
Here’s how to add and format pictures for the slideshow using the Photo Album:
Add pictures
Select File/Disk and select the images you want in the picture slideshow.
Enhance photos
Place a checkmark next to the picture you want to enhance and change the orientation, contrast, and brightness. You’ll see the changes in the Preview window.
Add text boxes
To add a slide for text, select the image in the album list you want the text to follow and select New Text Box .
Rearrange slides
Place a checkmark next to the picture you want to move and select the Move Up or Move Down arrows.
Choose a picture layout
Select the Picture layout down arrow and choose how you want the pictures to appear in the slideshow.
Frame the pictures
Select the Frame shape down arrow and choose a frame style. You’ll see a preview in the Album Layout area. This option will not be selectable if the picture layout Fit to slide is enabled.
Select Create when you’re finished.
Your photo slideshow is created in a new file. Add text to the slides and change the look of each slide.
How to Play Music During the Slideshow
Play music in the background during your slideshow to offer an audio counterpoint to all the visuals. The background music starts automatically with the slideshow and plays during all the slides.
To add background music to your presentation, select Insert > Audio > Audio on My PC , choose a music file, then select OK .
The audio icon appears in the middle of the current slide. To move it, drag it to a different place on the slide. When the audio icon is selected, the Playback tab appears. Select Play in Background and make changes to the audio file . Here are some suggestions.
- Preview the music : Select Play to hear what the music will sound like during your slideshow.
- Shorten the duration : Select Trim Audio to remove parts of the beginning and end of the music file.
- Adjust the volume : Select Volume to make the background music louder or softer.
How to Set up the Slideshow
Once your slides are finished, it’s time to set up the slideshow. Start by deciding whether to show the slideshow in a window or full screen.
To set up the slideshow, select Slide Show > Set Up Slide Show and choose one of the following:
- Browsed by an individual (window) : Run the slideshow automatically and inside a window. This option works best when you save the slideshow to a CD.
- Browsed at a kiosk (full screen) : Run the slideshow automatically and at full-screen size. This option works best when you convert the slideshow to a video.
Select OK when you’re finished.
How to Add Timings to Each Slide in the Slideshow
Now it’s time to decide how long each slide will appear in the slideshow. To begin, select Slide Show > Rehearse Timings . The slideshow displays in full screen with a Recording toolbar and a timer.
While timing your presentation, use the Recording toolbar to advance through the presentation.
Select Next (arrow pointing to the right) to go to the next slide when the desired timing has been reached.
Select Pause to start and stop the timing.
Select Repeat to restart recording the time for the selected slide.
When you’re finished and have set the time for the last slide, close the Recording toolbar.
Select Yes to keep the recorded slide timings.
How to Edit Timings on a Slide
If you need to increase or decrease the time for your slideshow, change how long slides appear during the slideshow.
To change the timing for a slide:
Select View > Slide Sorter .
Select Transitions .
Select a slide.
In the Advance Slide After text box, enter how long the slide should appear in the slideshow before proceeding to the next slide, then press Enter .
The new timing applies to the slide.
How to Create a PowerPoint Video Slideshow
The easiest way to distribute and play your slideshow is in video format. This way, anyone can view your slideshow no matter what computer or device they use.
To convert a slideshow into a video:
Save the file.
Select File > Export .
Select Create a Video .
To force a smaller file size, select the Full HD drop-down list and choose a lower quality.
Select Create Video .
Select the destination folder and give the video a descriptive file name.
Select Save . It may take a few minutes to process the file and create the video.
How to Save a Slideshow to a CD or Other Removeable Media
To create a presentation that can be watched on any computer and can be stored on a CD or other removable media:
Select Package Presentation for CD > Package for CD .
Type a name for the CD.
Select Copy to Folder or Copy to CD and follow the on-screen directions.
When you’re finished, select Close .
Get the Latest Tech News Delivered Every Day
- The 8 Best Slideshow Apps of 2024
- How to Make an Image Background Transparent in PowerPoint
- How to Do a Voiceover on PowerPoint
- Tips for Memorial PowerPoint Presentations
- Loop a PowerPoint Slide Show
- How to Create Digital Photo Albums in PowerPoint
- How to Use Copilot in Powerpoint
- How to Add Music to PowerPoint
- Adding Sounds, Music or Narration to PowerPoint Slide Shows
- Create a Wedding PowerPoint Presentation
- How to Change a Black-and-White Picture to Color in PowerPoint
- How to Add Audio to PowerPoint
- How to Use Speaker Notes in PowerPoint
- How to Print PowerPoint Slides
- How to Hide and Unhide a Slide in PowerPoint
- Edit Music, Sound, or Other Audio Settings in PowerPoint
How to make a slide show
Learn how to make a slide show with photos, videos, music, and custom settings using a slide show maker.
Learn how to make a slide show with PowerPoint
Discover how to make a slide show with photos, videos, music, and custom settings using a slide show app like PowerPoint.
What is a slide show maker?
To create a slide show, you’ll want to use a slide show maker—or slide show app—which is a software program or online service that enables you create digital slide shows with text, photos, videos, music, and other special effects. The full range of slide show features and functionality varies from program to program.
Once you’ve created a slide show, it can be published on the internet or shared with others as a video file. Additionally, you can use slide shows to create dynamic, interactive content on websites.
Slide show software can be used for a variety of purposes, such as creating presentations for work, school, and even your personal life. For instance, slide shows are often used to:

Display photos during an event
Slide shows are a great way to share photos and videos with guests at a wedding, birthday, or other special event.
Create a digital photo album
Some slide shows are created for personal reasons, such as sharing important memories with family or friends.

Highlight products or services
Businesses can use slide shows to showcase their products, promote special offers and sales, or pitch their services to potential clients.
Enhance teaching, training, and public speaking
Slide shows can also provide helpful visuals in educational settings, classroom presentations, and public speaking forums.
What you need to make a slide show
When it comes to creating a slide show, there are a few things you'll need to get started. First and foremost, you'll need a device equipped with presentation software or access to an online slide show app. Secondly, you’ll need a way to display your slide show, which usually means connecting your device to a projector or big screen TV. Beyond that, you’ll need some visual aids and other media to bring your slide show to life.
Explore each of these slide show requirements in more detail:
Devices and equipment —To create a slide show, you’ll use a computer or other device—such as a tablet or mobile phone—with PowerPoint or a similar program installed. You will also need a way to project the slides onto a screen or wall. This can be done with a projector, but if you don't have one available, you can use your TV or computer monitor. Simply connect your device to the TV or monitor using an HDMI cable and select the correct input. Your slides will now be projected onto the screen.
Media —Of course, creating a slide show requires media that adds visual and even audio elements to your presentation. This can be anything from photos and videos to music and text. You can use search engines to find copyright-free media to use in your slide show.
Another option is to purchase royalty-free stock footage, images, and audio files from online media libraries. This could be a bit more expensive, but it guarantees that you have the legal right to use the media in your presentation.
Finally, you can also use your own videos, images, and even music. While this can be a time-consuming process, it does allow you to create custom content specifically for your slide show.
Slide show creator —To bring your slide show together, you’ll need a slide show creator. The slide show software you choose will depend on your presentation requirements and preferences. There are many slide show makers on the market, with Microsoft PowerPoint being one of the most popular and widely used programs globally.
How to choose a slide show maker
When choosing slide show software, it's important to consider the features and specifications that are most important to you. Some of the questions you might ask when choosing a slide show maker include:
- How easy is the software to use?
- Is the software Mac or PC compatible?
- Can I access and edit my slide show on the cloud?
- What kind of slide shows can be created with the software?
- How many photos and/or videos can be included in a slide show?
- Can text and other elements be added to slide shows?
- Are transitions and effects available for slide shows?
- Is music accompaniment an option?
- What are the options for saving and sharing your slide show?
Building a slide show doesn't have to be difficult. With the right software, you can create an engaging presentation in no time.
Six steps for creating a slide show

1. Plan your slide show
Before getting too deep into your slide show project, it’s a good idea to select and save the photos and videos you want to use. This helps you create a slide show more efficiently and purposefully, ensuring a better outcome.
4. Import media
Start adding photos, videos, and other desired media to your slides. You can upload these from your device or online media libraries. If you planned your slide show in advance, you should have all your media saved in one place.

2. Launch your slide show app
Once you’ve decided on a slide show maker, you’ll want to launch the app from whatever device you’ll be using to create your presentation.
5. Add text, music, and transitions
After you’ve arranged the visuals in your slide show, you can provide additional information and communicate sentiment using custom text, music, and timed slide transitions.

3. Choose your theme
Most slide show software offers a variety of pre-set themes, colors, and designs. You can choose one that best suits your slide show or create a custom theme using the program’s various tools and features.
6. Record, save, and share your slide show
Now you’re ready to record your slide show, which can include a voiceover or Cameo . Once your slide show is complete, you can save it as a video to your device or to the cloud, such as OneDrive . You can access your saved slide show at any time to display at events, use in meetings, share online, or send directly to other people.
How to make a slide show with photos
Adding photos to your slide show is a great way to enliven your presentation and make it more visually interesting. Here are a few different ways you can add photos to your slide show in PowerPoint.

Add photos from your device
Whether you’re using a computer, tablet, phone, or other device, you can use photos that are saved to your device to create your slide show. In PowerPoint, simply select “Insert” then “Pictures” from the program menu, then choose “This Device.” This will open your photo library and allow you to find the photos you want to use. Once you’ve selected the photos that you want to import, just click on the "Insert" button and they will be added to your slide show. If you’re using a pre-made theme, you can also right-click the image in the slide show and select “Change Picture.” Again, you will choose “This Device” to access your photo library. After inserting your photo, you can reposition it on your slide or resize it however you like.

Use stock photos
Another way to add photos in PowerPoint is to follow the same process you would when adding photos from your device, but when prompted to choose your photo source, select “From Stock Images” instead of “This Device.” This will display a library of photos that you can use in your slide show without worrying about copyright infringement. There are thousands of stock images available in most slide show maker programs. Once the library is open, you can explore existing photo categories or use keywords to search for photos that fit your needs.

Explore online photo sources
Online photos are images you can insert into a PowerPoint slide show directly from the internet, as opposed to using those you have saved on your device. This is a convenient option if you don't have photos already prepared for your slide show, or if you can’t find the right kind of photo in the stock image library. However, there are some potential risks associated with using online photos, namely that you must be careful to use royalty-free images so not to infringe on any copyrights. In PowerPoint, there is a filtering option to ensure your search results only show royalty-free photos. Inserting photos from online sources follows the same process as the previous two methods, but this time, you’ll select “From Online Sources.”
How to add videos, music, and text

How to add videos to PowerPoint slide shows
Adding videos to your slide show involves accessing videos from your device, a stock video library, or online video sources—just as you would when adding photos. In this case, however, you’ll navigate to the menu in PowerPoint and select “Insert,” followed by “Media,” then “Video.” Once your video appears on your slide, you can resize or reposition it to fit your presentation needs. You can also set your video to play automatically in the slide show by selecting “Playback” on the menu and choosing “Start Automatically.”

How to add music to PowerPoint slide shows
Much like adding videos, you can add music to individual slides in PowerPoint by navigating to “Insert” on the menu, then “Media,” and finally “Audio.” You can then import music from your device, or you can record your own audio directly in PowerPoint. However, if you want your audio to play across multiple slides in your presentation—for example, as background music for a slide show—you’ll have to take a couple of extra steps. Once you’ve imported your audio file, select “Playback” from the menu and choose the “Play in Background” option. Your music will now play across all slides. You can set one song to loop for the duration of the slide show, or you can add more songs to play continuously throughout the slide show.

How to add text to PowerPoint slide shows
Premade themes in PowerPoint make adding text slide shows easy. On slides that already have templated content, you can simply click on the text and begin editing. In addition to changing what the text says, you can resize, recolor, reposition, and add special effects to the text. Of course, you can also change the font—or style—of the text. Most of this can be done from the “Home” tab on the menu while certain effects, such as shadows, can be found on the “Shape Format” tab. If you’re designing your presentation slides from scratch, or want to create additional text, find “Insert” on the menu, then choose “Text Box” or “Word Art,” depending on your desired text effect.
Discover custom slide show settings
Add even more effects to your PowerPoint slide show with custom settings like timing, transitions, and looping.

Set slide show timing
Adding timing to your slide show is a great way to control the pacing and flow of your presentation. To add timing in PowerPoint, go to the "Transitions" tab on the menu and find the "Advance Slide" area. Make sure the box next to “After:” is checked, then input the amount of time you’d like each slide to appear on-screen. The slides will automatically advance, creating a movie-like effect that’s great for events and special occasions.

Create slide show transitions
Now that you’ve added automatic timing to your slide show, you can make it more visually appealing by creating slide transitions. Transitions are special effects that allow you to animate the way your slides change from one to the next, and there are a variety of different transitions in PowerPoint that you can choose from. You can add these transitions to your slide show from the "Transitions” tab. From there, you’ll select the transition you want to add. To preview the transition, simply click on it. You can click “Apply To All” to automatically add the same transition to every slide in your slide show, or you can manually add different transitions to different slides.

Loop your slide show
If you want your slide show to play continuously until you choose to turn it off, you can set your PowerPoint presentation to loop. This will ensure your slide show automatically starts over from the beginning once it reaches the end. To get started, navigate to the “Slide Show” tab on the menu and select “Set Up Slide Show.” When the settings window opens, check the box next to “Loop continuously until ‘ESC’” and then click “OK.” When you’re ready to turn your slide show off, simply press the Esc key on your keyboard.
Slide show template and theme tips
Search themes and templates online.
With numerous slide show themes and templates available, it’s easy to find one that fits your needs.
Customize your design
If you can’t find the perfect theme or template, you can change things like colors and fonts.
Build a custom template
If you want a blueprint to use with future slide shows, you can create your own template.
Add new slides
If you need more slides, you can choose a specific layout and your theme will be carried over.
Edit your slide layouts
Even when using a theme or template, you can rearrange slide content to highlight key information.
Add photos, videos, and text
Themes and templates make adding media easy since most slides have designated content areas.
Change or resize your fonts
If your theme’s font is too small, you can resize it or choose a new font to make it easy to read.
Reorder your slide show
Some themes and templates have a predefined sequence, but you can reorder slides to meet your needs.
Create your own slide show
Slide shows are a great way to engage your audience and present important information. Whether you're creating a slide show for personal or professional reasons, slide shows are an essential tool for anyone who wants to share information in a visually appealing manner.
Discover more ways to improve your slide show
What options are available to create a slide show?
Slide show makers come in many forms. Some slide show software can only be used on specific devices, while other slide show creators can be accessed via the cloud from any device at any time.
It’s a good idea to evaluate a variety of slide show makers to ensure that you find one with all the features you need. For instance, some slide show software skews toward business use cases and others toward personal.
Microsoft PowerPoint is a popular slide show app that allows you to save presentations to your device or the cloud, and is widely used for personal, professional, and educational purposes.
Frequently asked questions
What are slide show apps and software.
Slide show apps and software are used to create and share slide shows. Slide show programs are typically used to communicate information, diagrams, plans, or processes. They can also be used to display photos and videos at events or retail stores. Usually, slide show makers have a range of built-in features and layouts, making them easy to use, regardless of technical skill levels.
What should a slide show include?
An effective slide show should be engaging, visually appealing, and informative. To achieve this, you'll want to make sure to include the following elements:
- A catchy headline or title. This will help grab your audience's attention and set the tone for the rest of your presentation.
- A variety of images. Don't just rely on text—incorporate photos, illustrations, or even video to maximize viewership.
- Bullet points or short blocks of text. Keep your slide content concise and easy to digest; too much information will only overwhelm your viewers.
How do I make a picture slide show?
There are a few different ways to make picture slide shows. You can use online programs, or you can create a slide show directly on your computer, phone, tablet, or other device using slide show software. Some programs, such as Microsoft PowerPoint, can be accessed on your personal device and on the cloud.
How long should a slide show be?
The length of your slide show will depend on several factors, such as the topic of your presentation, the audience you're presenting to, and the amount of time you have. That said, slide shows are generally between five and ten minutes long.
How can I make a slide show better?
Here are a few tips to make your slide show more engaging:
- Add images, videos, and music to bring your slide show to life.
- Use a font that is easy to read from a distance.
- Try not to use too many words on each slide.
- Use custom transitions and timing to make your slide show flow.
- Ensure a cohesive slide show by using a theme or template.
- For live presentations, practice with the Speaker Coach feature .
Follow Microsoft 365
Home Blog PowerPoint Tutorials How to Change Slide Layout in PowerPoint
How to Change Slide Layout in PowerPoint

You might want to add an additional text box or image to your slide without disturbing the balance of the existing design. You can quickly change the slide layout to make such changes rather than redesign the layout from scratch.
How to Change Layout in PowerPoint
To change the layout in PPT, go to the Layout menu via the Home tab and select a desired layout to switch to. You will find various layouts to instantly select, including title slide, title and content, section header, two content, comparison, title only, blank, content with the caption, and picture with a caption. Different PowerPoint templates also come with predefined layouts that the developer has incorporated within the slide deck.

Another easy method to change the PPT layout is to right-click a slide and go to Layout to reveal the menu with available layout options.

Once you select a layout, the placeholders on the slide will change, providing you with various options to include new information or redesign your slides. Since PowerPoint provides a handy feature called Designer , you can use it to refine your slides further’ look based on AI-generated suggestions.

Final Words
Changing a layout in PowerPoint or selecting one for a new slide can help you select a format best suited for your presentation needs. This can save time in selecting which placeholders to use and where to place them. Some PowerPoint templates come with exclusive layouts; others are available for PowerPoint files by default. To generate new layouts, you can create them via Slide Master in PowerPoint .

Like this article? Please share
Microsoft PowerPoint, PowerPoint Tips Filed under PowerPoint Tutorials
Related Articles

Filed under PowerPoint Tutorials • May 14th, 2024
How to Create a Roadmap in PowerPoint
Learn how to create effective roadmap presentations in PowerPoint with this step-by-step guide and recommended templates.

Filed under PowerPoint Tutorials • May 10th, 2024
How to Copy a Slide in PowerPoint
Optimize your slide deck creation process by learning how to copy a slide in PowerPoint. Detailed instructions with screenshots here.

Filed under Google Slides Tutorials , PowerPoint Tutorials • April 17th, 2024
Google Slides vs. PowerPoint: A Detailed Comparison
Contrast and pick with presentation software suits your best. Check our guide on how the Google Slides vs. PowerPoint eternal debate.
Leave a Reply
Byte Bite Bit
How to Share PowerPoint with Others to Edit: Collaborative Presentation Tips
Sharing a PowerPoint presentation with others for collaborative editing is like passing a baton in a relay race—it’s all about making a smooth handoff. We’ve all been there, staring at a presentation and wishing for a second pair of eyes or an extra set of hands to finesse those slides. Whether it’s for business collaborations, school projects, or planning that surprise party, the ability to share and simultaneously edit a single presentation can be a game-changer.

We live in a wonderful era where technology bridges gaps, and PowerPoint’s sharing features exemplify this beautifully. Imagine seamlessly connecting with colleagues or classmates, entering their email addresses, and voila—they’re in, editing alongside you. With everyone’s ideas merging in real time, the final product is often much richer and more polished than anything we could have done alone. Gone are the days of back-and-forth emails with attachments that clutter your inbox and confuse everyone with multiple versions. Let’s dive into how this fantastic feature streamlines our workflow and turns individual efforts into collaborative masterpieces.
To ensure everyone is on the same page—literally—we have to nail the sharing settings. It’s a straightforward process: hit ‘Share’ on the ribbon, type in those email addresses, and decide who gets to wield the editor’s pen. But, remember to uncheck the ‘Allow editing’ box if you’re not ready to hand over the creative reins just yet. In the spirit of playing nice in the sandbox, keeping communication clear is key. Adding a brief message with the share invite often clears up any potential confusion and sets the tone for a productive collaboration session.
- 1.1 Utilizing Share Buttons and Links
- 1.2 Emailing Presentations Directly
- 1.3 Setting Permissions for Collaboration
- 1.4 Working with OneDrive and Cloud Services
- 2.1 Editing and Real-Time Collaboration
- 2.2 Version History and Changes Tracking
- 3.1 Creating Accessible PDFs and Images from Slides
- 3.2 Sharing Through Multiple Online Platforms
- 4.1 Utilizing Comments and Chat for Feedback
- 4.2 Email and Messaging Integration with Outlook
Sharing PowerPoint Presentations

When it comes to team collaboration, there’s nothing like sharing your PowerPoint presentation and watching the magic happen as everyone chips in. So let’s get right to the how-to’s!
Utilizing Share Buttons and Links
Clicking that Share button is essentially tossing the ball into the team’s court.
In Microsoft PowerPoint, look for the Share button, usually located at the top-right corner. One click, and you land right into the sharing zone. It’s all about options here; send out a link or invite folks directly using their email address . Opt for “Anyone with the link” to cast a wider net, or keep it exclusive to specific collaborators. And here’s a nifty trick: if you hit “Copy Link” , you can just drop it wherever your heart desires—like a chat message or a carrier pigeon, if that’s your thing.
Emailing Presentations Directly
Sometimes you just want to zip it and ship it straight to someone’s inbox.
Setting Permissions for Collaboration
Now, we’re not the gatekeepers of the PowerPoint realm, but we do hold the master key to permissions.
Decide who gets to wield the editing sword by checking or unchecking the glorious “Allow editing” option. Distribute the power evenly, or reserve it for the chosen few. And remember, with great power comes great responsibili—oh wait, that’s for another talk show.
Working with OneDrive and Cloud Services
The cloud isn’t just a fluffy white thing in the sky—it’s also where our presentations can live a happy, accessible life.
Save your PowerPoint to OneDrive, Google Drive, or Dropbox—your choice, our treat!
With PowerPoint’s integration with Microsoft 365, the online version is just as shiny and functional as the desktop one. Share directly from the cloud, and watch as your teammates dive in, without the hassle of back-and-forth emails. It’s like hosting a block party, but everyone’s bringing a piece of the presentation puzzle. Cheers to efficiency in the sky!
Management and Control of Editable Files
When we’re in the driver’s seat of a PowerPoint presentation, steering collaborators towards productive editing without crashes is key. Let’s buckle up for the specific controls we have under our belt.
Editing and Real-Time Collaboration
Imagine you’re painting a mural, but your team is sprinkled across different time zones. With PowerPoint’s online co-authoring, it’s like we’re all dabbing on the same wall, in real-time. First and foremost, ensure your file lives on OneDrive or SharePoint to get the gears turning. Now, let’s get down to the nitty-gritty:
Version History and Changes Tracking
Alright, so you’ve unleashed the hounds of creativity and edits are flying in left, right, and center. Take a breather. We can pull the reins anytime. PowerPoint’s version history is our secret time machine.
Navigate to the ‘File’ tab, click ‘Info’, and select ‘Version History’. Here, we can revisit earlier drafts faster than we can say “Marty McFly”. Just remember, using the time machine wisely could be the difference between a masterpiece and a madhouse of edits.
Extending Presentations Beyond PowerPoint
Sharing a PowerPoint presentation for editing purposes isn’t just about handing over the PPT file. We have to consider that not everyone will want, or be able, to use PowerPoint. Let’s explore how you can transform those slides into more universal formats, and how to share them on different platforms for a seamless collaborative experience.
Creating Accessible PDFs and Images from Slides
We’re no strangers to PDFs – they’re like the Swiss Army knife of documents! Converting our PowerPoint slides to a PDF ensures that everybody, regardless of their device or software preferences, can view our presentation. But remember, it’s not just about hitting ‘Save As’. When saving a PowerPoint file as a PDF, we often overlook aspects like ensuring hyperlinks stay clickable or that text isn’t inadvertently converted into an image. To make it accessible:
- Check the “Save as PDF” options carefully
- Include alt text for visuals
- Ensure that the reading order in the PDF is logical and flows correctly
What about images? Sometimes, you just need a single slide to make your point. Exporting individual slides as images is as simple as saving them in a JPEG or PNG format. Doing this keeps the visuals crisp and is perfect for embedding into web pages or sharing quickly through messaging apps.
Sharing Through Multiple Online Platforms
Now, let’s talk about getting the word out. PowerPoint templates are just the starting point – once we’ve jazzed up our slides, we shouldn’t limit ourselves to email attachments or flash drives. Many online platforms can turn our presentation into a shared workspace where ideas grow faster than a beanstalk!
We can also save to an online location directly from PowerPoint, making it accessible to others without much hassle. Think cloud services – like OneDrive or Google Drive. By setting permissions, we control who can view or edit the presentation, ensuring that only the right eyes see our slides.
Communication and Follow-Up after Sharing
Now that we’ve cast our PowerPoint into the digital sea for our colleagues to nibble on, it’s crucial to reel in their input. It’s not just about sharing our slides but about nurturing a dynamic workspace that thrives on everyone’s contributions.
Utilizing Comments and Chat for Feedback
We’ve all been there, haven’t we? You share your masterpiece and then—crickets. To avoid that eerie silence, let’s get chatty. PowerPoint’s comments feature is like leaving breadcrumbs for our peers to follow – they can pinpoint their thoughts directly on what needs polish or praise.
- Tag team members using the @mention feature to notify them directly.
- Keep the conversation threaded by replying to comments directly.
- Set up notifications to stay updated on new comments.
While comments are our go-to for annotate-as-you-go feedback, sometimes we need faster, more direct dialogue. That’s where the chat tool swoops in. Locked and loaded in Microsoft Office, it lets us send a quick nudge or a hearty dose of praise without leaving our beloved slide deck.
Email and Messaging Integration with Outlook
Emails – the trusty old carrier pigeons of our digital world. When we hit ‘share’ on our PowerPoint gem, we can send an invite link straight to our team’s inbox via Outlook. Giving access is a breeze, and we can even add an optional message to give our recipients a head’s up about what they’re diving into.
And for those of us who like to keep things close-knit, Outlook’s integration with Office apps means we can manage our sharing preferences without juggling multiple tools. Want to switch permissions from edit to read-only after feedback’s in? Go right ahead. Need to pull the plug on access? You’re in command.
So there you have it. Like a well-oiled machine, we gear up our PowerPoint for collaboration, and with comments, office chat, and the mighty Outlook, we keep the gears running smoothly, ensuring every voice is heard and every pixel is perfected.
Related posts:
- Add Guests to Microsoft Teams: A Step-by-Step Guide
- AH IPS vs IPS: Understanding the Differences in Display Technology
- Reinstall Bluetooth Drivers in Windows 10: A Step-by-Step Guide
- Fix Remote Desktop Not Working on Windows 11: Troubleshooting and Solutions
- Windows 11 Import Export Registry Keys: Command Line Procedures Explained
- Windows 11 Webcam is Out of Focus: Quick Fixes for Clear Video Calls
- WoW vs WoW Classic: Analyzing the Evolution of a MMORPG Giant
- How to Change Theme Colors in Excel: A Step-by-Step Guide
- How to Move a Chart to a New Sheet in Excel: A Step-by-Step Guide
- How to Get Ruler on Word: Enabling Precise Document Formatting
- Use the Navigation Pane to Go to the Heading Quickly in Word Documents
- How to Insert Slicer in Excel with Pivot Table: Streamline Your Data Analysis
Leave a Comment Cancel reply
Save my name, email, and website in this browser for the next time I comment.
How-To Geek
6 ways to create more interactive powerpoint presentations.
Engage your audience with cool, actionable features.
Quick Links
- Add a QR code
- Embed Microsoft Forms (Education or Business Only)
- Embed a Live Web Page
- Add Links and Menus
- Add Clickable Images to Give More Info
- Add a Countdown Timer
We've all been to a presentation where the speaker bores you to death with a mundane PowerPoint presentation. Actually, the speaker could have kept you much more engaged by adding some interactive features to their slideshow. Let's look into some of these options.
1. Add a QR code
Adding a QR code can be particularly useful if you want to direct your audience to an online form, website, or video.
Some websites have in-built ways to create a QR code. For example, on Microsoft Forms , when you click "Collect Responses," you'll see the QR code option via the icon highlighted in the screenshot below. You can either right-click the QR code to copy and paste it into your presentation, or click "Download" to add it to your device gallery to insert the QR code as a picture.
In fact, you can easily add a QR code to take your viewer to any website. On Microsoft Edge, right-click anywhere on a web page where there isn't already a link, and left-click "Create QR Code For This Page."
You can also create QR codes in other browsers, such as Chrome.
You can then copy or download the QR code to use wherever you like in your presentation.
2. Embed Microsoft Forms (Education or Business Only)
If you plan to send your PPT presentation to others—for example, if you're a trainer sending step-by-step instruction presentation, a teacher sending an independent learning task to your students, or a campaigner for your local councilor sending a persuasive PPT to constituents—you might want to embed a quiz, questionnaire, pole, or feedback survey in your presentation.
In PowerPoint, open the "Insert" tab on the ribbon, and in the Forms group, click "Forms". If you cannot see this option, you can add new buttons to the ribbon .
As at April 2024, this feature is only available for those using their work or school account. We're using a Microsoft 365 Personal account in the screenshot below, which is why the Forms icon is grayed out.
Then, a sidebar will appear on the right-hand side of your screen, where you can either choose a form you have already created or opt to craft a new form.
Now, you can share your PPT presentation with others , who can click the fields and submit their responses when they view the presentation.
3. Embed a Live Web Page
You could always screenshot a web page and paste that into your PPT, but that's not a very interactive addition to your presentation. Instead, you can embed a live web page into your PPT so that people with access to your presentation can interact actively with its contents.
To do this, we will need to add an add-in to our PPT account .
Add-ins are not always reliable or secure. Before installing an add-in to your Microsoft account, check that the author is a reputable company, and type the add-in's name into a search engine to read reviews and other users' experiences.
To embed a web page, add the Web Viewer add-in ( this is an add-in created by Microsoft ).
Go to the relevant slide and open the Web Viewer add-in. Then, copy and paste the secure URL into the field box, and remove https:// from the start of the address. In our example, we will add a selector wheel to our slide. Click "Preview" to see a sample of the web page's appearance in your presentation.
This is how ours will look.
When you or someone with access to your presentation views the slideshow, this web page will be live and interactive.
4. Add Links and Menus
As well as moving from one slide to the next through a keyboard action or mouse click, you can create links within your presentation to direct the audience to specific locations.
To create a link, right-click the outline of the clickable object, and click "Link."
In the Insert Hyperlink dialog box, click "Place In This Document," choose the landing destination, and click "OK."
What's more, to make it clear that an object is clickable, you can use action buttons. Open the "Insert" tab on the ribbon, click "Shape," and then choose an appropriate action button. Usefully, PPT will automatically prompt you to add a link to these shapes.
You might also want a menu that displays on every slide. Once you have created the menu, add the links using the method outlined above. Then, select all the items, press Ctrl+C (copy), and then use Ctrl+V to paste them in your other slides.
5. Add Clickable Images to Give More Info
Through PowerPoint's animations, you can give your viewer the power to choose what they see and when they see it. This works nicely whether you're planning to send your presentation to others to run through independently or whether you're presenting in front of a group and want your audience to decide which action they want to take.
Start by creating the objects that will be clickable (trigger) and the items that will appear (pop-up).
Then, select all the pop-ups together. When you click "Animations" on the ribbon and choose an appropriate animation for the effect you want to achieve, this will be applied to all objects you have selected.
The next step is to rename the triggers in your presentation. To do this, open the "Home" tab, and in the Editing group, click "Select", and then "Selection Pane."
With the Selection Pane open, select each trigger on your slide individually, and rename them in the Selection Pane, so that they can be easily linked to in the next step.
Finally, go back to the first pop-up. Open the "Animations" tab, and in the Advanced Animation group, click the "Trigger" drop-down arrow. Then, you can set the item to appear when a trigger is clicked in your presentation.
If you want your item to disappear when the trigger is clicked again, select the pop-up, click "Add Animation" in the Advanced Animation group, choose an Exit animation, and follow the same step to link that animation to the trigger button.
6. Add a Countdown Timer
A great way to get your audience to engage with your PPT presentation is to keep them on edge by adding a countdown timer. Whether you're leading a presentation and want to let your audience stop to discuss a topic, or running an online quiz with time-limit questions, having a countdown timer means your audience will keep their eye on your slide throughout.
To do this, you need to animate text boxes or shapes containing your countdown numbers. Choose and format a shape and type the highest number that your countdown clock will need. In our case, we're creating a 10-second timer.
Now, with your shape selected, open the "Animations" tab on the ribbon and click the animation drop-down arrow. Then, in the Exit menu, click "Disappear."
Open the Animation Pane, and click the drop-down arrow next to the animation you've just added. From there, choose "Timing."
Make sure "On Click" is selected in the Start menu, and change the Delay option to "1 second," before clicking "OK."
Then, with this shape still selected, press Ctrl+C (copy), and then Ctrl+V (paste). In the second box, type 9 . With the Animation Pane still open and this second shape selected, click the drop-down arrow and choose "Timing" again. Change the Start option to "After Previous," and make sure the Delay option is 1 second. Then, click "OK."
We can now use this second shape as our template, as when we copy and paste it again, the animations will also duplicate. With this second shape selected, press Ctrl+C and Ctrl+V, type 8 into the box, and continue to do the same until you get to 0 .
Next, remove the animations from the "0" box, as you don't want this to disappear. To do this, click the shape, and in the Animation Pane drop-down, click "Remove."
You now need to layer them in order. Right-click the box containing number 1, and click "Bring To Front." You will now see that box on the top. Do the same with the other numbers in ascending order.
Finally, you need to align the objects together. Click anywhere on your slide and press Ctrl+A. Then, in the Home tab on the ribbon, click "Arrange." First click "Align Center," and then bring the menu up again, so that you can click "Align Middle."
Press Ctrl+A again to select your timer, and you can then move your timer or copy and paste it elsewhere.
Press F5 to see the presentation in action, and when you get to the slide containing the timer, click anywhere on the slide to see your countdown timer in action!
Now that your PPT presentation is more interactive, make sure you've avoided these eight common presentational mistakes before you present your slides.
How can I change the aspect ratio in PowerPoint?
May 13, 2024 /
To change the aspect ratio in PowerPoint, follow these steps: 1. Open your PowerPoint presentation. 2. Go to the “Design” tab. 3. Click on the “Slide Size” button. 4. From the drop-down menu, select “Custom Slide Size.” 5. In the “Slide Size” dialog box, you can choose from various aspect ratio options, such as 4:3, 16:9, or even a custom ratio. 6. Once you have selected the desired aspect ratio, click on the “OK” button to apply the changes to your presentation.
- How can I add different backgrounds to my PowerPoint presentation?
- How can I change the background theme in PowerPoint?
- How can I change the background template in PowerPoint for my presentation?
- How can I add and customize background pictures in PowerPoint presentations?
- How can I apply diagonal stripes as a background pattern for a slide in my presentation design?
Popular Posts

Common Challenges in Tailoring Presentations—and Solutions

Dos and Don’ts of Pre-Seed Pitch Deck Creation

How to Write a Teaser Pitch Deck that Captivates

Tips for a Persuasive How It Works Slide

What Not to Do When Presenting Funding History

Why Raising Funds Without a Pitch Deck Can Backfire
Change the size of your slides
Basic steps.
To change the slide size:
Select the Design tab of the toolbar ribbon.

Select Standard (4:3 aspect ratio) or Widescreen (16:9) or Custom Slide Size .

For more about the predefined sizes (including formats like Overhead, A3, A4, Banner, B4, and B5) or your own custom sizing, click a heading below to expand it and see the details .
Detailed steps
Choose the standard or widescreen slide size.
On the Design tab of the Ribbon, locate Slide Size in the Customize group, near the far right end of the toolbar.

Select Slide Size , and then select either Standard (4:3) or Widescreen (16:9) .

When PowerPoint is unable to automatically scale your content, it prompts you with two options:
Maximize : Select this option to increase the size of your slide content when you are scaling to a larger slide size. Choosing this option could result in your content not fitting on the slide.
Ensure Fit : Select this option to decrease the size of your content when scaling to a smaller slide size. This could make your content appear smaller, but you’ll be able to see all content on your slide.

The 16:9 widescreen setting is the default value for new presentations you create. When you change the slide size for a presentation, the size you choose only applies to that presentation. However, you can make it easy to create a new 4:3 presentation for yourself whenever you want—by defining a custom theme that uses the 4:3 aspect ratio. See the section below named "Make a default size to start from when creating new presentations."
Choose another size, such as A3, B4, or Overhead
Select Slide Size , and then select Custom Slide Size .

In the Slide Size box, click the down arrow next to Slides sized for and select an option. Their dimensions are listed below:
Overhead provides an aspect ratio very close to the standard 4:3 slide size.
There are two options for 16:9 aspect ratios:
On-screen Show (16:9) sets the slide dimensions to 10 in x 5.625 in.
Widescreen sets it to 13.333 in x 7.5 in.
Both of these options are the same aspect ratio so they will look the same in Normal View , since PowerPoint automatically adjusts the zoom level. Widescreen (13.333 in x 7.5 in.) provides more slide surface area for the content, so that is the best choice for presentations. Widescreen won’t fit on an 8.5" x 11" sheet of paper without you having to scale it down.

Select OK to accept the dimensions and close the Slide Size dialog box.
Choose custom dimensions (in inches, centimeters, or pixels)
The Slide Size dialog box opens.
In the Slide Size dialog box, ensure the orientation is set the way you want it.
In the Height and Width boxes, PowerPoint accepts measurements in inches , centimeters , or pixels . Type a number followed by a space and then the appropriate abbreviation: in , cm , or px .
PowerPoint then converts measurements, if necessary, to the type of unit your operating system uses.
You can change the unit of measure that is shown in PowerPoint dialog boxes if you like.
Make a default size to start from when creating new presentations
This version of PowerPoint has a default size of 16:9 for new presentation, but you can create a different default for yourself.
Start PowerPoint.
On the File tab of the toolbar ribbon, select New . Then double-click the Blank Presentation to create a new, empty presentation.
Then on the Design tab, click Slide Size and choose the size you want for a default.
(If you want a different default slide size than what's listed there, select Custom Slide Size and then choose your size in the Slide Size dialog box, and then click OK .)

Select Save Current Theme .
Give your theme a name that you'll remember easily and click Save . Don't change the folder that the new theme is to be saved in.
On the Design tab, click the More arrow again in the bottom-right corner of the Themes group. You'll see your newly saved theme under a Custom heading.
Right-click that new custom theme under the Custom heading, and then select Set as Default Theme :

Close PowerPoint. Don't save any files if it prompts you.
Open PowerPoint again. On the File tab of the toolbar ribbon, select New .
The custom theme that you just saved is listed at the top left corner, named Default Theme . The thumbnail image looks like a widescreen slide, but in reality, when you create a new presentation based on that theme, the presentation has the aspect ratio that you've defined for this default theme.
The next time you open PowerPoint, you'll see your default theme in the upper-left of the theme gallery. When you select it, all the slides will be the custom size you chose by default.
Sizing applies to all slides in a presentation
PowerPoint isn't able to resize one slide within a presentation. All slides in a presentation are the same size.
If this is a feature you’d like to request, please send us your feedback to help us prioritize new features in future updates. See How do I give feedback on Microsoft 365 for more information.
Orientation applies to all slides in a presentation
PowerPoint isn't able to change the page orientation of certain slides. All slides in a presentation have the same page orientation.
Change the page orientation in PowerPoint between landscape and portrait
Use portrait and landscape slide orientation in the same presentation
Reduce the file size of a picture
On the File menu, select Page Setup .
In the Page Setup dialog box, under Slides sized for , select the predefined size you want, or choose Custom and specify the dimensions you want.

Select Slide Size .

Select Standard (4:3) or Widescreen (16:9) .

PowerPoint may prompt you about scaling your content. Choose one of the following options:
Scale: Select this option to decrease or increase the size of your slide content. When scaling to a smaller slide size, this could make your content appear smaller, but you’ll be able to see all content on your slide.
Don't Scale: Select this option to maintain the size of your slide content. Choosing this option could result in your content not fitting on the slide.

Choose Page Setup from the menu that appears.
Page Setup gives you an assortment of predefined slide/page size options. The options and their dimensions are listed below:
In the Slide Size box, click the down arrow next to Slides sized for and select an option.
Widescreen sets the dimensions to 13.333 in x 7.5 in.

Choose custom dimensions (in inches, centimers, or pixels)
Select Slide Size , and then click Page Setup .

The Page Setup dialog box opens.
In the Width and Height boxes, PowerPoint accepts measurements in inches , centimeters , or pixels . Type a number followed by a space and then the appropriate abbreviation: in (inches) or cm (centimeters) or px (pixels).
PowerPoint then converts the measurements, if necessary, to the unit of measurement your operating system uses.
Make a new slide size the default for new presentations
Select Slide Size , and then select Page Setup .
Follow the steps in the prior section to choose the slide size you want.
On the Design tab, click the More arrow below the standard themes.

Click Save Current Theme at the bottom of the window.

Give your theme a name that you'll remember easily and click Save .
On the Design tab, click the More arrow below the standard themes again. You'll see your newly saved theme under Custom .

Right-click your new custom theme, and then click Set as Default Theme .

The next time you open PowerPoint, you'll see your default theme in the upper-left of the theme gallery. When you select it, all the slides will be the size you chose for your default theme.
Some folks have asked about resizing one slide within a presentation. PowerPoint isn't able to do that. All slides in a presentation are the same size.
Some folks have also asked about changing the page orientation of certain slides. PowerPoint isn't able to do that. All slides in a presentation have the same page orientation.
On the Design tab of the toolbar ribbon, click Slide Size in the Customize group.

Click Standard (4:3) or Widescreen (16:9) .
When PowerPoint for the web is unable to automatically scale your content, it prompts you with two options:

The 16:9 widescreen setting is the default value for new presentations you create. When you change the slide size for a presentation, the size you choose only applies to that presentation.
You can also change the orientation of all the slides in your presentation. See Change the page orientation for instructions.

Choose custom dimensions
In the Width and Height boxes, type a measurement in inches . PowerPoint doesn't accept measurements outside the minimum and maximum shown below:

Need more help?
Want more options.
Explore subscription benefits, browse training courses, learn how to secure your device, and more.

Microsoft 365 subscription benefits

Microsoft 365 training

Microsoft security

Accessibility center
Communities help you ask and answer questions, give feedback, and hear from experts with rich knowledge.

Ask the Microsoft Community

Microsoft Tech Community

Windows Insiders
Microsoft 365 Insiders
Was this information helpful?
Thank you for your feedback.
IMAGES
VIDEO
COMMENTS
PowerPoint can convert a PPSX file to a PPTX one. Here's how. First, open "PowerPoint" and choose File > Open to find the file you want to edit. Go to File > Save As to save the file. From the drop-down menu at the top right, choose "PowerPoint Presentation (*.pptx)" to save the file as an editable file you can share with colleagues.
I would like to be able to edit or modify a PowerPoint Show file *.pps or *.ppsx. So I suppose I need to somehow convert it back to PowerPoint Presentation *.ppt or *.pptx in order to be able to do
Select File > Open and locate the show file with the .ppsx extension on your computer. Right-click the show file with the .ppsx extension and choose Open file location . Right-click on the file name and choose Rename . Change the file extension from .ppsx to .pptx . Double-click on the newly named file to open it in PowerPoint as a working ...
A file to store the generated presentations and Microsoft PowerPoint slide shows with the ability to edit them. It was first introduced to store the data in PowerPoint 97 Editor. Stores a set of individual slides with text, graphics, video, and audio information. The file contains information on visual effects inside the slides.
If you want to learn how to loop your slides in PowerPoint, follow these steps: Go to the Slide Show tab and select Set Up Slide Show. When the Set Up Show window appears, go to the Show options group and tick the Loop continuously until 'Esc' option. Don't forget to click OK to apply the new setup!
Press Ctrl+A. A subset of the slides. Press and hold Ctrl while you click the individual slides you want to select. Copy the selected slides (Ctrl+C). Switch to the new file, right-click the thumbnail pane, and under Paste Options select Use Destination Theme: All the copied slides are inserted in the new presentation.
Go to Slide Show > Custom Slide Show, and then select Custom Shows. In the Custom Shows dialog box, select New. Tip: To preview a custom show, click the name of the show in the Custom Shows dialog box, and then click Show. Under Slides in presentation, choose the slides that you want to include in the custom show, and then select Add.
On the Slide Show tab, in the Set Up group, click the arrow on the Record Slide Show button. In the Record Slide Show dialog box, select the Narrations and laser pointer check box, and if appropriate, select or deselect the Slide and animation timings check box. Click Start Recording.
To do that, simply go up to the Home tab and click on New Slide. This inserts a new slide in your presentation right after the one you were on. You can alternatively hit Ctrl+M on your keyboard to insert a new blank slide in PowerPoint. To learn more about this shortcut, see my guide on using Ctrl+M in PowerPoint.
Navigate to the Slide Show tab. Hold down the Alt key on your keyboard. Click From Beginning. Holding down the Alt key and clicking From Beginning, the Presenter View will launch from the very first (non-hidden) slide in your presentation.
Click "Slide Show.". Click "Set Up Show.". Check the box "Show Presenter View" in the dialog box which opens. This opens a navigation panel on the presenter's monitor which allows the presenter to easily manage the multiple screens. Click the monitor you want the slide show presentation to appear on under the "Display Slide Show ...
Start by deciding whether to show the slideshow in a window or full screen. To set up the slideshow, select Slide Show > Set Up Slide Show and choose one of the following: Browsed by an individual (window): Run the slideshow automatically and inside a window. This option works best when you save the slideshow to a CD.
Six steps for creating a slide show. 1. Plan your slide show. Before getting too deep into your slide show project, it's a good idea to select and save the photos and videos you want to use. This helps you create a slide show more efficiently and purposefully, ensuring a better outcome. 4.
Here are the different options available for reformatting: Colors: Changes all the colors used in your presentation, as well as the color options available in the color picker. Fonts: Changes all the headings and body fonts used in the presentation. Effects: Changes the appearance (shading, border, etc.) of objects in your presentation. Background Styles: Choose the background style for the ...
Select the slide that you want to start the slide show from. On the Slide Show tab, click Play. Play a custom slide show from the first slide. On the Slide Show tab, click the arrow next to the Custom Show button, and then click Custom Slide Show on the menu. In the Custom Shows screen, click the custom slide show you want to present.
Another easy method to change the PPT layout is to right-click a slide and go to Layout to reveal the menu with available layout options. Once you select a layout, the placeholders on the slide will change, providing you with various options to include new information or redesign your slides. Since PowerPoint provides a handy feature called ...
In the "Customize" section of the "Design" tab, select the "Slide Size" button. This will display the two common slide sizes in a drop-down menu. Click either the "Standard (4:3)" or "Widescreen (16:9)" option to switch all of your PowerPoint slides to that size. Unfortunately, it isn't possible to use multiple slide sizes in a PowerPoint ...
Here's a trick: mix it up with bold for your main points and italics for emphasis. Make sure your text breathes with ample whitespace. Short, concise bullet points always hit the mark. No one enjoys a wall of text. Here's a tip: Stick to one idea per paragraph, and keep those sentences snappy.
In Microsoft PowerPoint, look for the Share button, usually located at the top-right corner. One click, and you land right into the sharing zone. It's all about options here; send out a link or invite folks directly using their email address.Opt for "Anyone with the link" to cast a wider net, or keep it exclusive to specific collaborators. And here's a nifty trick: if you hit "Copy ...
To print your PowerPoint slides, launch PowerPoint, and open the presentation you'd like to print. Next, go to the File tab in the ribbon, which opens a new menu. On the left sidebar, find and click on Print. You can now select a print layout. To do this, under Settings, choose a print layout.
How to Change Picture Shape in PowerPoint | Transform Your Slides!Discover the secrets to transforming your PowerPoint slides with custom picture shapes! In ...
Start presenting. On the Slide Show tab, in the Start Slide Show group, select From Beginning. Now, if you are working with PowerPoint on a single monitor and you want to display Presenter view, in Slide Show view, on the control bar at the bottom left, select , and then Show Presenter View.
Step 3: Add Custom Animations to Your Animated PowerPoint. Your animated PowerPoint templates and all Visme presentation templates have plenty of different styles of animation possibilities. With Visme, add all these types of animations to any element in a slide. Enter Animations. Fade in.
Open your PowerPoint presentation. Go to the Insert tab on the PowerPoint ribbon. Click on Cameo. You have the option to add Cameo to a particular slide, or to your entire presentation: Choose what you want and a placeholder will appear on your slide that looks like this: Click on the camera button on the bottom left corner to switch on your ...
Click anywhere on your slide and press Ctrl+A. Then, in the Home tab on the ribbon, click "Arrange." First click "Align Center," and then bring the menu up again, so that you can click "Align Middle." Press Ctrl+A again to select your timer, and you can then move your timer or copy and paste it elsewhere.
On the File menu, select Save to ensure all your recent work has been saved in PowerPoint presentation format (.pptx). Select File > Export > Create a Video. (Or, on the Recording tab of the ribbon, select Export to Video .) In the first drop-down box under the Create a Video heading, select the video quality you want, which pertains to the ...
3. Click on the "Slide Size" button. 4. From the drop-down menu, select "Custom Slide Size.". 5. In the "Slide Size" dialog box, you can choose from various aspect ratio options, such as 4:3, 16:9, or even a custom ratio. 6. Once you have selected the desired aspect ratio, click on the "OK" button to apply the changes to your ...
Select the Slide Show tab. Select the Use Presenter View checkbox. Select which monitor to display Presenter View on. Select From Beginning or press F5. In Presenter View, you can: See your current slide, next slide, and speaker notes. Select the arrows next to the slide number to go between slides. Select the pause button or reset button to ...
You need high-quality business presentation software to take your slides to the next level. Some of the best presentation software include Visme, Haiku Deck, Prezi, Microsoft Powerpoint, Canva and Google Slides. In this comparison guide, we'll analyze each of these tools and many more to understand what the difference is between them so you ...
Open PowerPoint again. On the File tab of the toolbar ribbon, select New.. The custom theme that you just saved is listed at the top left corner, named Default Theme.The thumbnail image looks like a widescreen slide, but in reality, when you create a new presentation based on that theme, the presentation has the aspect ratio that you've defined for this default theme.