- MyU : For Students, Faculty, and Staff
Technology Help


Record PowerPoint Presentations using an iPad or iPhone
Using PowerPoint for iPad or iPhone, it is possible to make a recording of your slide show. You can include voiceover/narration, and point to and draw things on the screen.
Recordings can be published to a Canvas course using Kaltura in one of the following ways:
- Canvas: Add Media from Kaltura Using the Rich Content Editor
- Canvas: Add Kaltura Videos to Media Galleries
In this article:
Preparing to Record
Adding screen recording to control center.
- Presenting and Recording Your Slideshow
Cropping Your Screen Recording
Uploading your recording to kaltura in canvas.
- On an iPad, you can lock the screen to be in landscape mode.
- If using an iPhone, be careful not to rotate your phone and thus rotate the screen into portrait mode.
- For voiceover/narration, use an external microphone . Apple headphones or Airpods are sufficient.
- Enable Do Not Disturb on your device to prevent unexpected notifications.
- Consider dividing your slide show into topics that are not longer than 10 minutes or so. You can group recordings together later.
To record your slideshow you will need to enable and then use the Screen Recording feature built into iPadOS and iOS. If you don't already have screen recording available, complete the following steps:

- Select Control Center .
- Select Customize Controls .

Presenting and Recording Your Slide Show
Use the following steps to set up your iPhone or iPad to record your slideshow.
Background recording: iPad Screen Recording with PowerPoint
- In PowerPoint , go to the slide you wish to begin presenting.
- Tap the Play button.
- From the top right of the screen, slide your finger down . The Control Center appears.
- Tap and hold the Record button to show Screen Recording options.
- The button will turn red, and the text will change to say Microphone On .
- Tap Start Recording . There will be a three-second countdown .
- Tap the background (outside of the Screen Recording box) to return to Control Center .
- Note : Each time you start or pause a recording, the Control Center appears.
- To point things out on your slides: Tap and hold on the screen. A red dot appears that you can drag around. When you lift your finger off the screen, the dot will disappear.
- To annotate on your slides: Tap towards the top of the screen, then tap the Pencil icon ; when this button is highlighted, you can draw on the screen.
- For more options: To the right of the screen, tap the pen with the gear .
- When you are done, from the top right of the screen, slide your finger down . The Control Center appears.
- Tap the flashing Record button. Your recording will save to the Photos app.
When recording a slideshow from your iPad/iOS device's screen using the method described in this article, the resulting recording will be surrounded by black bars. You may want to crop out those black bars before uploading the video from your device.
Background recording: How to Crop a Screen Recording in iOS .
Review the following screen recordings to understand cropping rationale:
- PowerPoint Screen Recording in PowerPoint on iPhone X 16:9
- PowerPoint Screen Recording in PowerPoint on iPhone X 16:9 cropped
Note: Cropping screen recordings appears to result in reduced image quality that is noticeable but not severe.
Background recording: Adding Video to Canvas Media Gallery on iPad
We recommend splitting a longer presentation (such as a 50-minute lecture) into multiple shorter recordings/topics.
To group recordings together, such as having four parts of one lecture for a specific date, you can use Media Gallery Playlists in Canvas. Playlists appear in the Canvas Media Gallery , or can be embedded on a Canvas page using the Rich Content Editor .
Note: It appears that when in Safari on iPad and iPhone, users cannot access the Settings button in Media Galleries to set up playlists. We have a ticket open with the vendor requesting such functions for iPad.
Last modified
How To Record In PowerPoint On ipad
In this tutorial by Regina Griffin, a teacher from Oregon, US, we will explore the benefits of recording in PowerPoint on your iPad.
Learn what you need and how to successfully record in PowerPoint on your iPad, along with some valuable tips for a successful recording.
Key Takeaways:
Why record in powerpoint on ipad.
One of the significant benefits of using PowerPoint on iPad for recording presentations is the convenience it offers. With intuitive touch controls and a familiar interface, users can easily navigate through slides, record their voiceovers, and make edits on the go.
The interactive elements that can be incorporated into presentations, such as animations, hyperlinks, and multimedia content, make the presentations dynamic and visually appealing. iPad recording provides a versatile platform to showcase creativity and enhance the overall impact of the presentation.
Easy to Use
Regarding editing audio files, the built-in tools in PowerPoint on iPad make it straightforward. You can easily trim, adjust volume, or even add background music to enhance your presentation.
Accessibility
Adjusting settings for more enhanced accessibility is also key in ensuring that presentations are fully accessible. Users can customize captions, font sizes, and color contrasts to cater to different visual and auditory needs. Integrating external tools such as Kaltura , Canvas , or Rich Content Editor can further enhance the presentation experience.
Interactive Presentations
Recording in PowerPoint on iPad enables the creation of interactive presentations that go beyond traditional slideshows. With features like narrated slideshows and real-time cropping options, users can engage their audience in dynamic and captivating ways.
Imagine creating a presentation where the audience can interact with the slides, watch embedded videos, and answer questions in real time. This level of engagement not only captures attention but also fosters a deeper connection with the content being presented.
What Do You Need to Record in PowerPoint on iPad?
Having the right tools is crucial when it comes to recording presentations in PowerPoint on your iPad. The iPad device serves as the primary platform for creating your presentations, while the PowerPoint app offers a user-friendly interface for designing slides and recording narration. To ensure crystal-clear sound quality, using a compatible microphone is recommended. With the audio aspect covered, you can focus on delivering your content with confidence and professionalism.
The primary requirement for recording in PowerPoint on an iPad is to have an iPad device that supports the PowerPoint app. The iPad’s screen recording capabilities and app compatibility make it an ideal platform for creating dynamic presentations on the go.
PowerPoint App
Having the PowerPoint app installed on your iPad is essential for recording, editing, and saving your presentations. This versatile app provides a range of features that allow users to create professional-quality slideshows with audio narration and interactive elements.
One of the standout functionalities of the PowerPoint app on iPad is its seamless recording feature, enabling users to add their voiceover to each slide for a more engaging presentation. With its editing capabilities, users can effortlessly modify text, images, and transitions to enhance visual appeal.
When selecting a microphone for your iPad PowerPoint recordings, it’s essential to consider the environment where you’ll be recording. USB microphones are popular choices for their plug-and-play functionality and high recording quality. For those looking for mobility, lavalier microphones offer hands-free operation, ideal for dynamic presentations. Dynamic microphones , known for their durability and resistance to feedback, are great for live settings.
To optimize your microphone settings, ensure that the device is properly connected and recognized by your iPad. Adjust the microphone input volume to prevent distortion and background noise interference, creating a professional recording environment. Experiment with proximity to the microphone to find the ideal balance between clarity and warmth in your voiceovers.
How to Record in PowerPoint on iPad?
Recording in PowerPoint on iPad is a straightforward process that involves opening the PowerPoint app, selecting the recording tab, choosing audio and video options, starting the recording, and stopping when you are done. These simple steps allow you to create engaging presentations with ease.
To begin, ensure you have the latest version of PowerPoint installed on your iPad for optimal performance. Once you open the app, navigate to the main menu and locate the ‘Record’ tab, which is typically represented by a microphone or camcorder icon. Clicking on this tab will prompt you to choose between recording audio only, video, or both. Make sure to position your iPad securely, preferably on a stand or tripod, to maintain a stable recording environment and achieve professional-quality results.
Open PowerPoint App
The first step in recording in PowerPoint on an iPad is to open the PowerPoint app on your device. By launching the app, you gain access to a range of tools and features that facilitate the recording and editing of your presentations.
Once you open the PowerPoint app on your iPad, you will be greeted by the familiar PowerPoint interface adapted for the tablet. At the top, you will find the menu bar where you can access various options such as creating new slides, adding animations, and customizing the appearance of your presentation. The left sidebar allows you to navigate through your slides easily, while the main canvas is where you can design and arrange your content.
Select Recording Tab
Once you have opened the PowerPoint app, navigate to the recording tab to access audio and video recording options . This tab provides essential settings for capturing high-quality audio and video content to enhance your presentations.
Choose Audio and Video
For optimal audio clarity, consider using an external microphone to reduce background noise and enhance voice quality.
Regarding video quality, adjust the resolution and frame rate to match the specifications of your presentation – higher resolution may provide sharper visuals but could impact file size.
Ensure a balanced audio-video output by testing the levels beforehand and adjusting as needed to prevent one overpowering the other, creating a seamless viewing experience for your audience.
Start Recording
Stop recording.
Conclude the recording by pressing the ‘Stop Recording’ button in the PowerPoint app. This action finalizes the recording process, allowing you to review and edit your presentation before saving it for future use.
At this stage, you can fine-tune the audio and video elements to enhance the overall quality of your presentation. Adjusting the volume levels, inserting transitions, or trimming sections can greatly improve the visual and auditory appeal.
Once you are satisfied with the edits, remember to save your work. It’s advisable to store your presentation in a secure location to prevent any data loss and ensure easy access in the future.
Tips for a Successful Recording
When selecting a microphone, opt for a directional one to capture your voice clearly and minimize external sounds. Experiment with different positions to find the best sound quality.
To improve your speech delivery, practice enunciating words and maintaining a steady pace. Pausing at appropriate moments can emphasize key points and engage your audience.
Practice Beforehand
Preparing and practicing your presentation before recording can help streamline the recording process and improve your delivery. By familiarizing yourself with the content and pacing, you can deliver a polished and engaging presentation on your iPad.
To overcome nervousness, try deep breathing exercises or visualization techniques to stay calm and focused. Practicing in front of a mirror or recording yourself can build confidence and highlight areas for improvement. Optimize performance by maintaining eye contact with the camera, exuding enthusiasm, and incorporating storytelling elements to make your presentation memorable.
Use a good-quality microphone
Investing in a high-quality microphone can significantly improve the audio clarity and overall recording quality of your presentations on iPad.
Proper placement of the microphone is equally important. Placing it close to your speaking position and at the right angle can help in capturing your voice clearly and minimizing background noise interference. Adjusting the microphone settings on your iPad, such as input levels and sensitivity, can further optimize the recording quality.
Check Lighting and Background
Ensuring adequate lighting and a suitable background for your recording environment can enhance the visual appeal and professionalism of your presentations on iPad. By optimizing lighting conditions and minimizing distractions in the background, you can create a polished recording.
Choosing the right camera angle is also key to capturing a flattering view and maintaining engagement. Position your iPad at eye level or slightly above to avoid unflattering angles and ensure direct eye contact with your viewers.
Opt for backgrounds that are clean, clutter-free, and harmonious with your content to avoid visual distractions that could detract from your message.
Speak Clearly and Slowly
When delivering your narration, focus on enunciating each word distinctly to avoid any confusion. Strive to capture the audience’s attention by modulating your tone to convey emotions effectively. Remember to pause strategically to give listeners time to digest information. By varying your pacing, you can create emphasis on key points and maintain listener engagement throughout the presentation. Practice different narration styles to find the one that suits your content and delivery best. Confidence in your vocal delivery will significantly enhance the quality of your recordings on iPad, ensuring a professional and impactful presentation.
Recording in PowerPoint on iPad revolutionizes the way presentations are created and delivered. With the accessibility features, ease of use, and advanced recording capabilities offered by iPad, users can elevate their presentations to new heights of engagement and professionalism.
Enhancing user experience, the intuitive interface of PowerPoint on iPad enables presenters to focus on content delivery rather than technical complexities, ensuring a smooth and engaging presentation experience for both presenters and audiences.
Additional Resources for PowerPoint on iPad
Taking advantage of Apple device compatibility features such as AirDrop and Handoff can streamline the process of transferring files between your iPad and other Apple devices, enhancing your workflow.

Frequently Asked Questions
How do i record my presentation in powerpoint on ipad.
To record your presentation in PowerPoint on iPad, first open the PowerPoint app and select the presentation you want to record. Then, tap on the “Recording” tab and select “Record Slideshow.” You will be prompted to choose between “Record from Beginning” or “Record from Current Slide.” Once you have made your selection, tap on the microphone icon to start recording.
Can I narrate my slides while recording in PowerPoint on iPad?
How do i pause or stop my recording in powerpoint on ipad, can i add annotations or drawings to my recording in powerpoint on ipad.
Yes, you can add annotations or drawings to your recording in PowerPoint on your iPad. Simply tap on the “Draw” tab in the recording toolbar and use your finger or a stylus to draw on the slide as you record. Your annotations will be saved and synced with your recording.
How do I edit my recording in PowerPoint on iPad?
Can i share my recorded presentation in powerpoint on ipad, similar posts, how to outline text in powerpoint, how to scale text in powerpoint, how to split a picture into pieces in powerpoint, how to remove click to add notes in powerpoint, how to create a flowchart in powerpoint, how to get laser pointer in powerpoint.
How to Record A PowerPoint Presentation [2022 User Guide]
- Share on Facebook
- Share on Twitter
By Nikolay Kaloyanov
in How-To Tutorials
2 years ago
Viewed 704 times
Spread the word about this article:

If knowing how to record a PowerPoint presentation wasn’t necessary a decade ago, this isn’t how things stand today. The pandemic taught us a valuable lesson – if we don’t catch up with technology, we will fall short.
Fortunately, Microsoft’s app is the global leader in presentation software and provides you with all the required tools to create an excellent presentation you can show in front of your audience. But how to record a presentation on PowerPoint, and is it easy to do so?
Article overview: 1. What are the benefits of recording PowerPoint presentations? 2. How to record a PowerPoint presentation? 3. How to live stream a PowerPoint presentation? 4. Frequently asked questions
1. What are the benefits of recording PowerPoint presentations?
I am are pretty sure that if recording presentations weren’t helpful, PowerPoint wouldn’t offer it to its users. Well, we all know that’s not the case. Recording your PowerPoint slides can bring a ton of benefits. Let’s see which they are:
- Save time – regardless if you’re a lecturer or present in front of colleagues, having a video of your recording will save you many hours. Imagine speaking in front of your marketing team, but 2 members are on summer holidays. It’s fine. They’ll catch up later when they watch your PowerPoint recording.
- Focus on the presentation – usually, if you’re presenting in front of an audience, it’s typical to get asked many questions that you need to answer promptly. But that is a good reason to get distracted from your core information. Thus, it makes sense to record your presentation beforehand.
- Practice before presenting – the best way to carry out a great presentation is to spend some time at home, focusing on key details. When you record your PowerPoint slides, you can find areas of improvement and work on them.
2. How to record a PowerPoint presentation?
There are many tools that you can use to record a PowerPoint presentation. From Loom and Panopto, and even Apple’s basic Quicktime and Windows’ own recording tool. But here we will discuss none of the other options. Why? The answer is simple: PowerPoint has its own in-built, robust recording tool.
Unlike other options, PowerPoint’s recording feature enables you to record slide by slide. This effectively means you can create as many recordings as you like, until you like the playback version, and move on to the next slide.
Pro tip : PowerPoint doesn’t record slide transitions. You need to start recording each slide when it is opened and finish the recording before you move on to the next one.
Let’s see how to record a PowerPoint presentation with video and audio in just a few steps.
Step #1: Open your PowerPoint presentation
The first step is to open the PowerPoint presentation you wish to record. Ensure you have all the necessary slides and information on them. While this seems logical, there aren’t one or two cases when presenters have recorded wrong or unfinished slides, which leads to a disappointing outcome.
Step #2: Prepare your video and audio devices
Before you start the recording, you should check your camera and microphone. Try to make a sound check and see if your camera works properly.
Step #3: Select the slides you wish to record
PowerPoint gives you the option to record a presentation right from the beginning, or from a specifically selected slide.
- Pick “ From Beginning ” (1) from the Record tab of the Ribbon if you wish to start from the first slide.
- Pick “ From Current Slide ” (2) from the same tab in case you would like to start from a selected slide (which isn’t the first one).
- Click the Record button (3) which is positioned in the top right corner, between the Comments and Share buttons. It starts the recording from the slide you have currently selected.

Step #4: Start the recording
Once you click on one of the options, you are ready to start narrating your PowerPoint presentation. You will see a countdown timer, after which you can start narrating slides.

Step #5: Manage your PowerPoint recording
You have probably seen a couple of other options aside from the recording one. Let’s see which they are:
- Timer with a grey/red light – if you are recording your narration, you will see a timer and a small circle with a red light that indicates you are recording. If you pause, the small circle indicator will become grey again and the timer will stop counting.
- Refresh icon – right next to the timer there is a refresh-like icon but it serves a different purpose – to re-take the recording. You have the option to record again the current slide or all slides.
- Start/Stop button – the big red button serves as a start/stop button for your recordings. Only stop the recording when you want to move on to the next slide.
- Pause button – if you would like to stop the slide recording, in order to drink some water or read your speaker notes, you can use the Pause button, and then resume the recording. Bear in mind you cannot pause and move to the next slide. You have to stop the recording, to indicate you have finished with the current slide.
- Camera button – clicking the camera button will work as a toggle on/off.
- Microphone Button – clicking the microphone button will work as a toggle on/off.
- Ellipsis – this is the place where you can select camera and microphone settings, as well as erase recordings from the current slide or all slides.

Step #6: Export your PowerPoint video recording
The last button from the menu is the Export setting. You can export your narration as an mp4 file in Full HD size by default. However, you can customize your export and get your narration in 4 sizes – 480p, 720p (HD), 1080p (Full HD – standard), and 4K. We don’t recommend Ultra HD exports.
Pro Tip : Exporting 4K PowerPoint presentation recordings doesn’t necessarily mean you will get better quality (unless you have 4K resources within your presentation) but it does guarantee a significantly larger file size – up to 4 times more than on standard Full HD recordings.

3. How to live stream a PowerPoint presentation?
If you have already honed your skills and would like to stream your PowerPoint slides directly to your audience, there are many ways to do so. We are going to cover two of them.
3.1. How to stream a PowerPoint presentation from OneDrive?
Microsoft has invested a lot of resources to make OneDrive a powerful cloud service, and so far they have been quite successful. Let’s see how to record a PowerPoint presentation in front of live audiences.
Step 1 – save your PowerPoint presentation in OneDrive.

Step 2 – open your PowerPoint slides from PowerPoint online.

Step 3 – go to Present Live from the Slideshow Ribbon tab.

Step 4 – share a live link with your audience.

3.2. Stream your PowerPoint presentation in Zoom

Zoom is one of the most popular conference call apps which has plenty of tools, including live streaming presentations. Since PowerPoint is the leading presentation program in the world, Zoom developers have created some amazing things, like PowerPoint presentation recording with a web camera on a transparent background. If you’re interested, you can check our guide on how to record a Zoom presentation .
Does PowerPoint have a screen recording?
PowerPoint has a screen recording window and you can select the area you would like to be recorded. Go to Record (from the Ribbon), then select Screen Recording , choose the area and start recording.
Can I view speaker notes while recording narration?
You are able to access your speaker notes if you have created them beforehand. To insert speaker notes, you have to go to View -> Notes Page and you will have a text box that you can utilize for speaker notes.
What format does PowerPoint use for video?
PowerPoint records videos in mp4 format. The default resolution is 1080p (Full HD).
Recording your PowerPoint presentations can make the difference between a successful and smooth speech and a bad narration. Being able to record each slide means you can get the best narration possible for your whole presentation.
And if you would like to stream your presentation live, there are more than enough options to do so – both via the online version of PowerPoint or via third-party apps like Zoom.
If you found this article helpful, you can also check some of our other PowerPoint tutorials:
- Add Audio to PowerPoint: The Quick Step-by-Step Guide
- Insert GIFs into PowerPoint – a 2022 Pocket Guide
- How to Convert Your PowerPoint Presentation into Google Slides ?

Add some character to your visuals
Cartoon Characters, Design Bundles, Illustrations, Backgrounds and more...
Like us on Facebook
Subscribe to our newsletter
Be the first to know what’s new in the world of graphic design and illustrations.
- [email protected]
Browse High Quality Vector Graphics
E.g.: businessman, lion, girl…
Related Articles
How to record a presentation on google slides, color theory basics for non-designers: everything you should know, how to record a zoom presentation and present in a virtual meeting, 25+ wonderful cartoon character design tutorials, how to cite a powerpoint presentation in apa 7, enjoyed this article.
Don’t forget to share!
- Comments (0)
Nikolay Kaloyanov
Nikolay is a copywriter with vast experience in Technology, Marketing, and Design. When he isn't playing with words and crafting texts, he watches sports and asks questions. He is a funny person...until you put him on a diet.

Thousands of vector graphics for your projects.
Hey! You made it all the way to the bottom!
Here are some other articles we think you may like:

How-To Tutorials
How to embed a video in powerpoint [2022 user guide].
by Nikolay Kaloyanov

How to Create a Custom Business Card Like a Professional [Tutorials]
by Iveta Pavlova
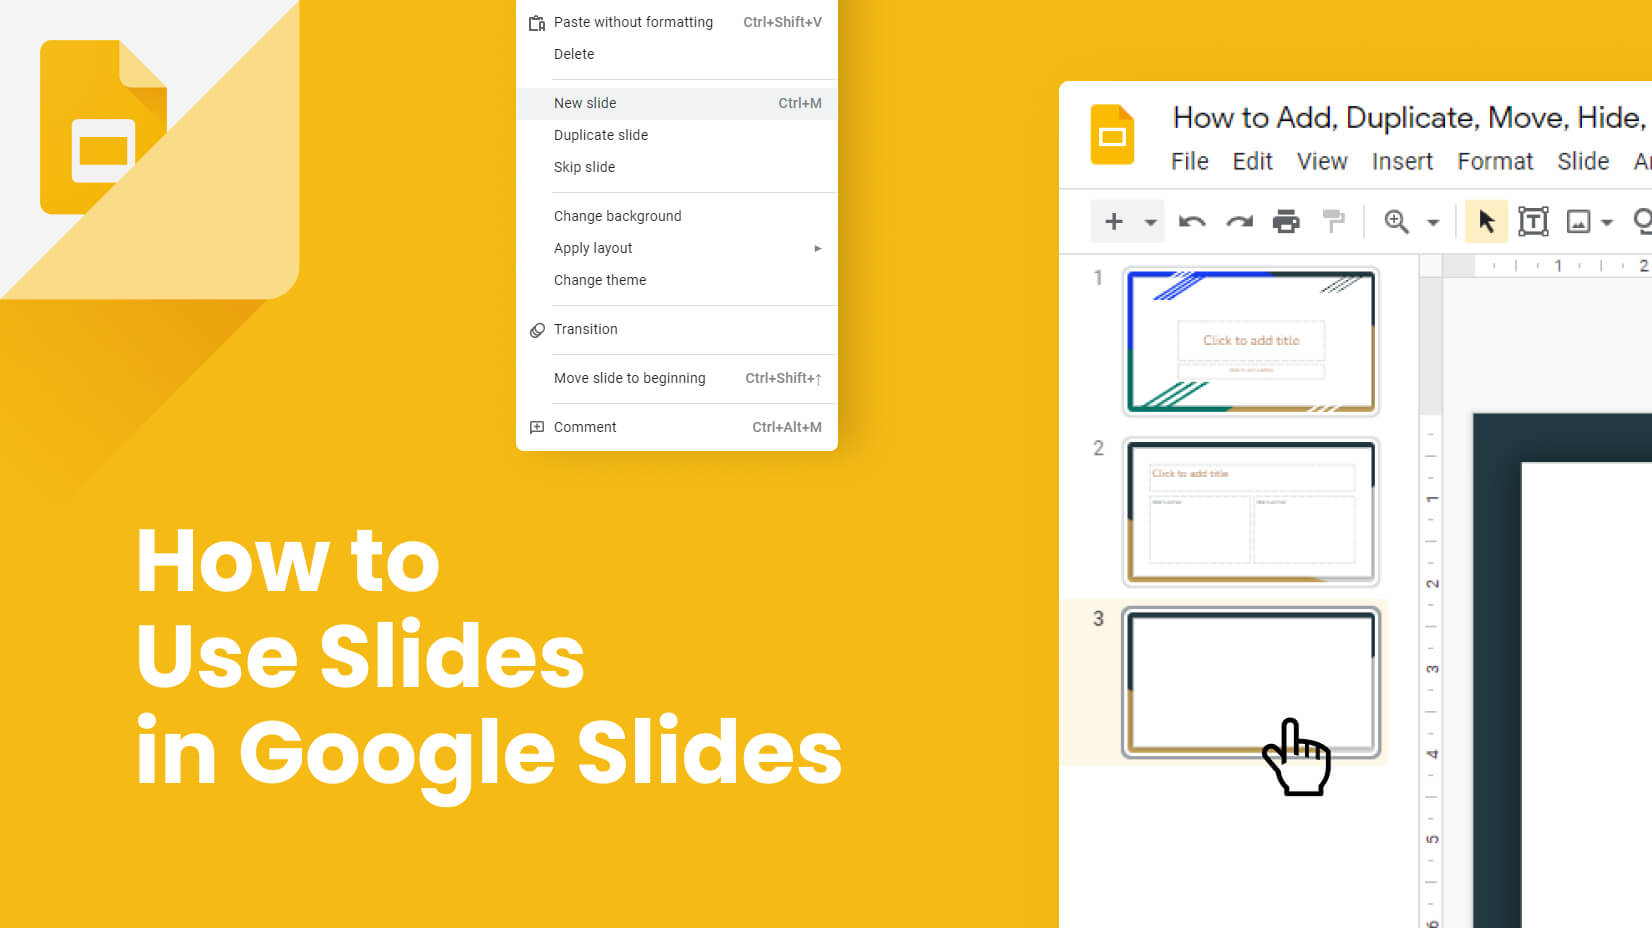
How to Add, Duplicate, Move, Hide, and Delete Slides in Google Slides?
Looking for design bundles or cartoon characters.
A source of high-quality vector graphics offering a huge variety of premade character designs, graphic design bundles, Adobe Character Animator puppets, and more.
Critical PowerPoint Shortcuts – Claim Your FREE Training Module and Get Your Time Back!
PowerPoint for iPad: A Visual Guide
- PowerPoint Tutorials
- Miscellaneous
- October 29, 2017
In this first ever visual guide for the iPad version of Microsoft PowerPoint (iPad PPT), we show you step-by-step how to use the app, as well as all of the nitty gritty details behind it that you likely don’t know.
We highlight those “little hiccups” that will drive you up the wall (it’s still not the same experience as your desktop version), and we’ve done our best to show you the workarounds, if and when they exist.
Make sure to note the orange boxes we’ve sprinkled through the guide with pro tips and tricks based on years of experience building PowerPoint presentations…ignore them at your own peril
We will do our best to keep this guide up to date with each new Microsoft update. If you see something that we’ve missed, PLEASE let us know and we’ll do our best to update this guide ASAP.
Don’t have the PowerPoint app on your iPad yet? Download it by clicking here .
Things that go well with your iPad
Here are some useful resources for working with PowerPoint for the iPad:
Microsoft apps for the iPad
If you want to edit or display your Microsoft documents in their native environments on your iPad or iPhone, you’ll need to download the Microsoft PowerPoint, Word, Excel, OneNote, and OneDrive apps on your iPad and iPhone through the iTunes store. Find them here .
Microsoft Office 365
Get automatic upgrades and unlimited storage by signing up for the Microsoft 365 subscription model. Check out the latest of version of Microsoft Office here .
Lightning to VGA adapter
If you’re giving presentations with your iPad, don’t assume the meeting room will have the right adapters for you. So make sure you always bring one with you. I like apple’s adapters as they’re sleek and are 100% compatible with your device.
Bluetooth speaker
Again, if you’re giving a presentation in a meeting room and need to play music/video, be aware that your ipad’s speakers will probably not be strong enough to fill the whole room. This super compact wireless speaker hooks up incredibly easily to your ipad or iphone with no software or app necessary, and provides really high quality sound for the price.
iPhone/iPad stand
Although the iphone and ipad are designed to be light and portable, carrying them around throughout a presentation, especially if you’re moving around a room, can be a bit cumbersome. Keep your device upright and in front of you with this no-frills stand. It will fit just about any device.
Disclosure: please note that some of the links below are affiliate links, and at no additional cost to you, we will earn a commission if you decide to make a purchase. Please understand that we have experience with all of these companies, and we recommend them because they are helpful and useful, not because of the small commissions we make if you decide to buy something. Please do not spend any money on these products unless you feel you need them or that they will help you achieve your goals.
FINALLY…PowerPoint on our tablet! Down with the laptop and the desktop! Not so fast…
Although it is EXCITING to finally have PowerPoint on the iPad….there are MANY more versions to come before it can replace the desktop PowerPoint environment.
Until then, PowerPoint on your iPad is best thought of as an “extension” of the desktop experience, not as a replacement.
Yes, with each new PowerPoint for iPad update, you do get some new features, but the vast majority of REAL work that you do in PowerPoint (in our humble opinion) should still be done on your desktop.
Why? Because it’s just plain faster!
Yes, we are biased…we live, die and breath shortcuts on our keyboard AND we use LOTS of tips and tricks that haven’t come onto the iPad (yet)….so it’s okay to disagree with us.
With all that said, this is a GREAT step forward and we are PSYCHED for all the future updates and the new Office 2015.
We hope this guides helps make PowerPoint on your iPad a little bit, if not A LOT, easier for you to figure out.
This guide is organized according to the different Views in the app, and then according to each element within those Views. You can access all of these pieces using the tables of contents bar on the left.
If you want a fast way to find a command, simply hit Ctrl + F on your keyboard to search this page.
Account Settings
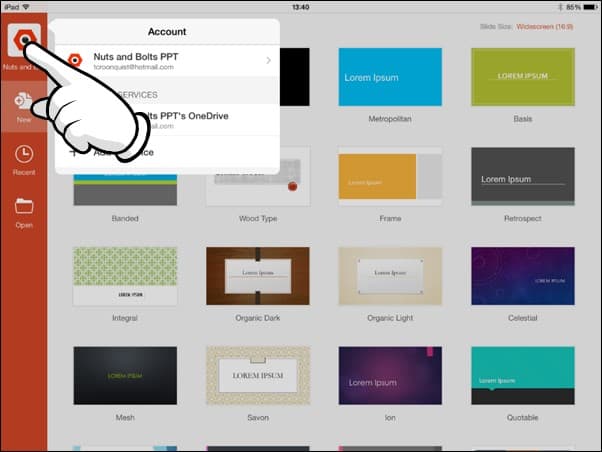
In this section, we look at the different things you can do in the Account Settings, such as signing out, signing in, and how to add multiple OneDrive accounts. To do any of these, you’ll have to go into the File View. In the top left hand corner, you have your Account Settings icon (with or without your account picture).

Signing out
Pro Tip: Instead of signing out of your account, you can add multiple OneDrive services to the same account so that you can access your business and personal files.
If you accidentally get signed out, here’s a step-by-step guide for how to sign back into your account. To sign into your account, follow these 4 steps (click to open gallery & instructions):

Microsoft Account: Sign in with the account you use for OneDrive, Xbox, LIVE, Outlook.com or other Microsoft services.
Organizational Account: Sign in with the account provided by your work, school or university.
Adding a service

Pro Tip: Your Office 365 account starts with a OneDrive service attached to it (whether or not you have anything in it). If you have multiple OneDrive accounts, you can add them to your account (home or office accounts), allowing you to access those files directly on your iPad.
Note: Only Microsoft OneDrive, SharePoint, and Dropbox are currently supported on Office for iPad.
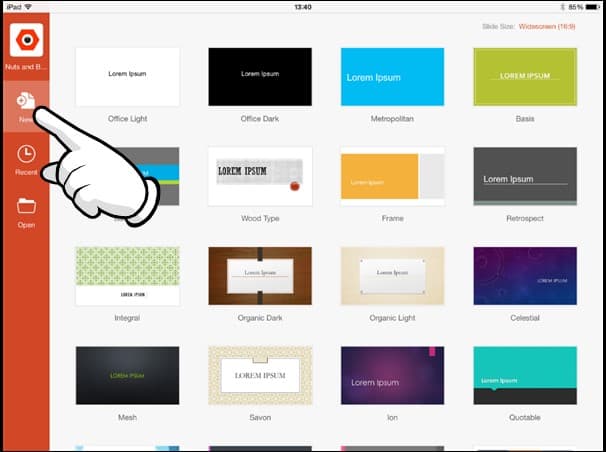
In this section, you will learn how to create a new file/presentation, from scratch, as well as some key tips to keep in mind. To create a new presentation, follow these 2 steps (click to open gallery & instructions):

Recent files
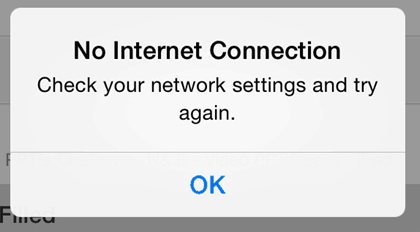
- If you have an internet connection, the most recent version of the file will be downloaded from your OneDrive and will open on your iPad.
- If you do not have an internet connection BUT have previously opened the document on your iPad before, the document will open, but it will not reflect any recent changes made to the version on your OneDrive (if you’ve made any changes from your desktop).
- If you do not have an internet connection and have never opened the document before on your iPad. You will receive a ‘No Internet Connection’ dialog box (below).
- Email as Link: Creates a “View Only” link or a “View and Edit” link of your file and launches the Mail App.
- Email as Attachment: Attaches the presentation to an email, the recipient can open and edit the document natively.
- Copy Link: Creates a “View Only” link or a “View and Edit” link of your file that you can paste into other documents or emails.
Move to Cloud: Allows you to move a presentation stored locally on your iPad onto your OneDrive. This option is only available when working with a file that is stored locally on your iPad.
Remove from Recent: Removes a file from this Recent menu here on your iPad AND on your desktop. This is not the same as deleting a file, it merely removes it from the Recent files list. To delete a file, you’ll have to go into Properties in the Open menu.
Discard Changes: Still not really clear what this does. If you figure it out, let us know.
Properties: Shows you additional properties about your file including filename, location, type, size, author, created, last modified, modified by and company.
Note: You can only create links for files stored on your OneDrive. If you have a locally stored file that you want to share a link to, you first need to move it to your OneDrive before you can create and share a link.
Note: You cannot edit any of these properties from your iPad, you must do so from your desktop version of PowerPoint. However, there are work arounds that will allow you to change the file name from your iPad. To see how that works, check out the section on renaming and duplicating your files.
Sharing: Below the file name, you can see if the document is being shared with anyone else.
Reloading Your Files: If you don’t see a file that you have recently saved to the OneDrive, push and drag down with your finger to reload the file menu. Sometimes there is some lag time depending on the speed of your internet connection.
- To Pin a file: Simply select a non-colored pin
- To Unpin a file: Simply reselect the colored pin
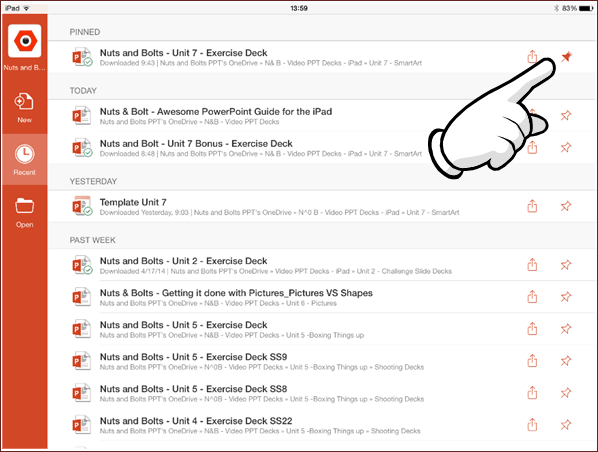
Pro Tip: Keep in mind that pinned documents’ names do not update in this recent list if you change their file name. If you try and open a pinned file that has been renamed, you will receive an error message. So if you pin files and rename them, you will need to do some pin-maintenance either on your iPad or desktop version of PowerPoint.
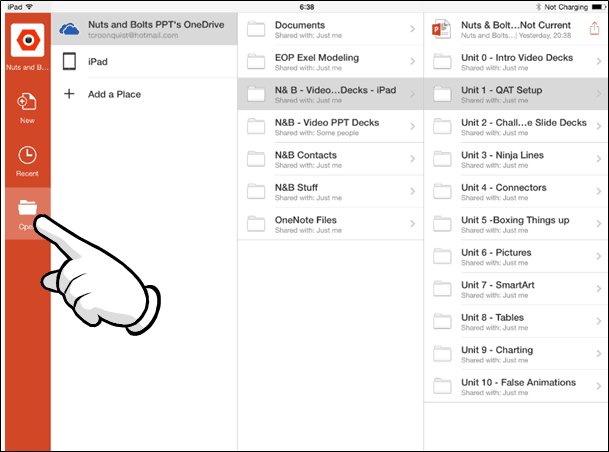
The ‘Open’ area of the File View is where you will find all of the documents on your OneDrive services, as well as those saved on your iPad. So in this section, we’ll cover how to go about opening your files, as well as some EXTREMELY handy Pro Tips about sharing your documents and editing their properties.
- Email as Link: Creates a “View Only” link or a “View and Edit” link of your file and launches the Mail App.
- Email as Attachment: Attaches the presentation to an email, the recipient can open and edit the document natively.
- Copy Link: Creates a “View Only” link or a “View and Edit” link of your file that you can paste into other documents or emails.
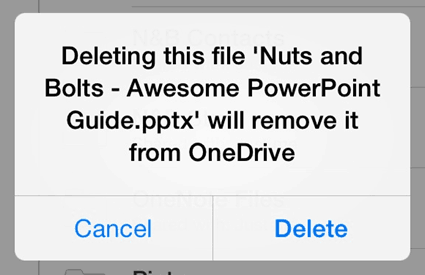
Delete: This is the only place where you can delete files from your different OneDrive accounts or from your iPad.
Properties: Shows you additional properties about your file, including: filename, location, type, size, author, created, last modified, modified by and company.
The Normal View

Navigation buttons

1. Back Button

The undo and redo commands are the iPad keyboard of the CTRL + Z and CTRL + Y keyboard shortcuts on the desktop version of PowerPoint. Similar to the desktop version, you are given 15 commands in both directions, you can undo undo up to 15 actions, or redo 15 actions.
Note: The Navigation Bar is fixed as is. You currently cannot add other commands to it like you can on a Windows based version of PowerPoint with the Quick Access Toolbar. We hope to see this updated in a later version!
4. Autosave
The AutoSave command controls whether or not changes to your presentation are automatically saved and synced with OneDrive. By default, PowerPoint for your iPad is set to AutoSave, which occurs:
- Periodically as you are working within your presentation
- Immediately when you hit the back button to return to the file menu view
Don’t make the same mistake I made – save your presentation!

This might sound obvious, but before closing PowerPoint on your iPad, hit the Back Button to return to the file menu view to ensure that the latest edits to your presentation are saved.
If you close the PowerPoint app by double-clicking the Apple button and swiping up (thus closing the app), you can lose the latest changes to your presentation…not fun!
So to ensure you save your latest changes, hit the button BEFORE closing the PowerPoint app.

If you choose this mode, to save your presentation, you need to either:
- Open the file menu and hit the green save button
- Hit the back button to return to file menu view to launch the Save dialog box
The Name command allows you to edit the name of a newly created AND unsaved PowerPoint presentation. As 90% of the presentations you work on your iPad will not be newly created or unsaved, this option will likely always be greyed out.
For example, if you create a new presentation on your iPad and have not saved it, the name command option is available. That said, as soon as you save the file with a name, this option becomes greyed out (forever).
How do you rename a file on your iPad?
To rename a presentation (or other office file) on your iPad, you either have to:
#1: Duplicate the presentation and save it with a new name. This will create a brand new document, so if you don’t want the older document, you will need to navigate to where it is saved on your iPad, or on your OneDrive and delete it. Painful, I know!
#2: Use the OneDrive app to rename your document (see our blog post on how to rename files in your OneDrive app).
6. Duplicate
The duplicate command creates a new copy of your current presentation and takes you to the File Menu View to rename your presentation (the same is true for the other Microsoft Office apps on your iPad). This is the Save As equivalent, or F12 keyboard shortcut on your desktop version of PowerPoint.
Note: Duplicating a presentation will not overwrite the original presentation, it will only create a new presentation with the new name you give it.
How to move my Presentation from OneDrive to my iPad:
To move a file from OneDrive to your iPad, you need to open the file, duplicate it and then select your iPad as the storage device. There is currently not a “move to iPad” command like there is a “move to cloud” command.
Note: Files stored on your iPad open faster than their OneDrive equivalents as they do not need to download the latest version.

The restore command gives you a options for reverting back to an earlier version of your PowerPoint presentation.
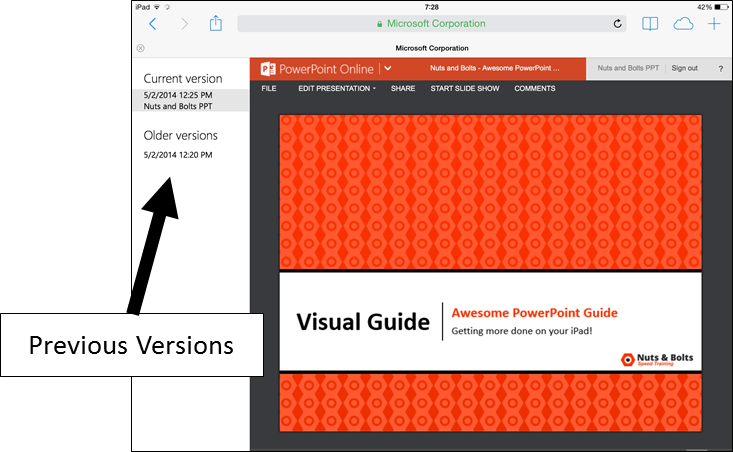
You can either:
- Back to the original you started with: Revert back to when it was last opened (PowerPoint will give you the specific time that it was opened). Doing so you get a warning indicating at what time the file was opened, so you get a sense of how far back you are going. Note: If this option is greyed out, it means there is currently nothing to revert back to.
- Back to an online saved version of your presentation: Can revert back to an online saved version of your presentation. This option assumes that the file is saved on OneDrive and that you have an internet connection. Selecting this option launches safari and takes you to OneDrive. Log in with your Microsoft account and you will see all of the previous versions of your file by date on the left (assuming you have some) and allows you to revert back to that specific date.
9. Properties
Shows you the properties of your PowerPoint presentation including:
- Last modified
- Modified by
Note: File Properties (other than Name) are only editable on the desktop version of PowerPoint. To modify a presentation’s name, you can duplicate the presentation and save it as a new name, or use the OneDrive app for PowerPoint to edit the presentation’s name on your OneDrive. To learn more about this, check out our article on using the OneDrive App .
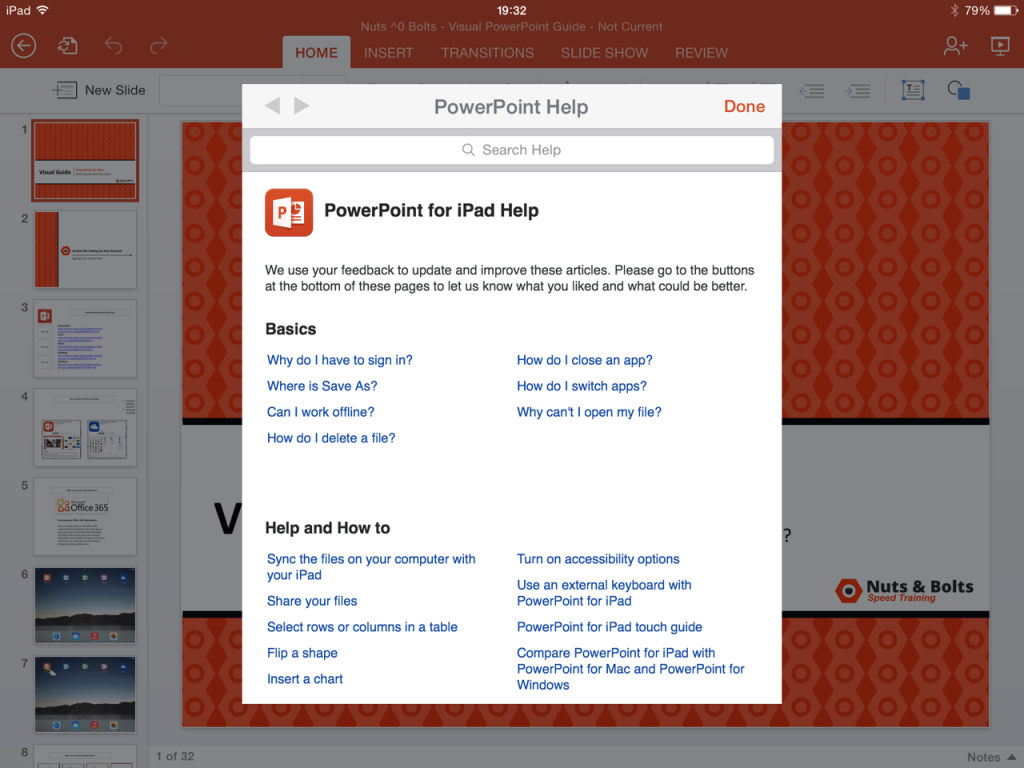
The Help and Support button launches basic help, support and tutorials for PowerPoint on your iPad. This menu is not extensive, but does offer solutions to simple questions you might have.
Note: You do need an internet connection to launch this dialog box.
The Home tab
1. New slide

This opens the PowerPoint slide gallery and allows you to pick from the available layouts within your presentation.
The five slide layouts shown in the picture are the standard layouts we use at Nuts & Bolts Speed Training for 99% of all of our PowerPoint presentations, you might have more or less slides layouts depending on your setup.
The Price of iPad Portability
Limited to Inserting Slides Only: You are limited to inserting slides layouts on your iPad. The Slide Master View is currently unavailable for PowerPoint on your iPad.
Changing a Slide’s Layout: You are limited to inserting new slides on your iPad, you cannot push a layout onto an existing slide.
To move an existing slide onto an new layout, you either need to wait until you are on your desktop version of PowerPoint, or insert a new slide layout, and copy and paste the different objects onto the new slide layout….kind of sucks, but that’s the price of portability.
2. Font styles
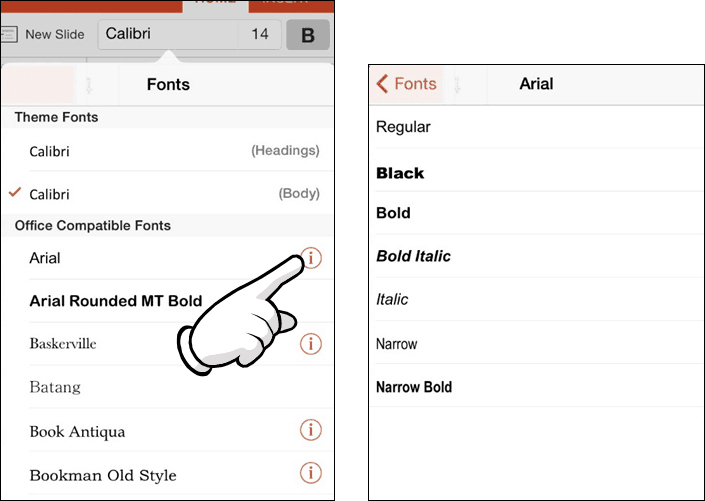
Copying and Pasting Style: If you are simply trying to match the font style of an object, it is often faster to copy and paste the font style you are trying to match, rather than identifying the font style, and then changing the font elsewhere
Microsoft Account: Sign in with the account you use for OneDrive, Xbox, LIVE, Outlook.com or other Microsoft services.
3. Font size

The font size dropdown in PowerPoint for iPad gives you three different ways to change the font size of your text:
#1 Pre-set Sizes: Select a preset size in the dropdown menu
#2 Clicker: You can use the plus and minus signs to select a font size
#3 Manually: You can double-tab the number between the plus sign and minus sign, and manually type in your desired font size
4. Bold / italics / underline
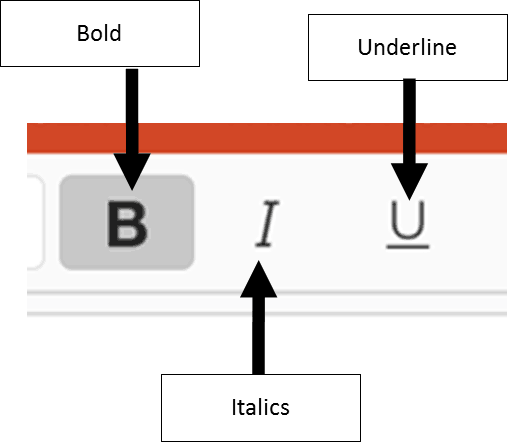
- Bold: Creates bold text for highlighting information, often used in titles.
- Italics: Creates italicized text for highlighting information, often used in subtitles and quotes.
- Underline : Creates an underline text for highlight information, often used in titles and subtitles.
Note: There is no way to make a double underline in PowerPoint for your iPad. Pro Tip: Don’t overdo it
If everything is important, nothing is important. Use text highlighting sparingly to better emphasize your points.
5. Formatting

- Strikethrough: Creates a strikethrough effect to emphasize that something should be removed
- Subscript & Superscript : Creates the -25% offset subscript and +30% offset superscript formatting. These are typically used in formulas, mathematical expressions and specifications for chemicals and isotopes

Includes the basic theme colors for your PowerPoint presentation, and their resulting gradients (which you cannot manually set).
Automatic: The automatic color is determined by the “Windows Text” color set in Control Panel Display Appearance. Changing this color will affect text color in all Windows applications.
Editing Your Presentation’s Theme: Currently you are not allowed to change or edit your PowerPoint presentation’s theme on your iPad. All theme editing or updating must be done on your desktop version of PowerPoint.
Setting Your Presentation’s Defaults on Your Desktop: You can set the default formatting for your objects on your desktop version of PowerPoint and those defaults will carry over into PowerPoint for your iPad.
6b. More colors

#1 More Colors: Selecting more colors gives you a dialog box with standard colors to choose from.
#2 Recent Colors: If you use the Custom Color option to create your own colors within your presentation, this second row of recent colors populates.
#3 Custom Color: Allows you to select your own color from a color grid (which is not very useful as you cannot get a precise color).
Advanced Color Formatting: Currently there are no options to input RGB or HSL codes to create specific custom colors or apply transparencies in PowerPoint for your iPad. The eyedropper tool is also not available.
To copy a custom color style (font color, shape fill or shape outline) into your recent colors to reuse somewhere else, see our blog post on using custom colors in PowerPoint on your iPad. 7. Text styles

Includes standard WordArt styles you can apply to highlight your message.
Style Note: WordArt is often distracting and hard to read and should be used sparingly if at all. See the example of Aqua, Accent 1, Reflection below the font styles gallery I created.
Note: You do not have the Text Fill, Text Outline and Text Effect options that you have on your desktop version of PowerPoint. You are currently limited to these 20 styles.
Left / Center / Right / Justify: Dictates the horizontal text alignment for text within a given PowerPoint object.
Top / Middle / Bottom: Dictates vertical text alignment for text within a given PowerPoint object.
Horizontal / Rotate Clockwise / Rotate Counterclockwise / Stacked: Dictates the rotation of your text within a given PowerPoint object. See next page for examples of each.
Columns: Controls how many columns of text are within an object. This is often used for objects with lots of text to visually break up the text.
Note: Notice that the alignment drop down stays open so that you can make multiple selections at the same time while working in your presentation…very handy!

Allows you to select bullet and numbers options for your lists in PowerPoint, but there are number of limitations that you should be aware of:
Limitation #1 : The Ruler – As you cannot access the ruler in PowerPoint for your iPad, you are stuck with the default bullet and numbering tab spacing
Limitation #2: Custom Bullets – You cannot create custom bullets like you can on your desktop version. That said, custom bullets and numbering created on the desktop version of PowerPoint does carry over into PowerPoint for your iPad, but you are not allowed to use it outside of the shape that it is currently set in.
Limitation #3: Numbers Start at 1 – All numbers on the iPad start at 1. You cannot adjust the starting number.
10. List level increase / list level decrease

Decrease List Level: SHIFT + TAB equivalent on the desktop version of PowerPoint. Moves a bullet or numbering backwards one indent level
Increase List Level: TAB equivalent on the desktop version of PowerPoint. Moves a bullet or numbering forward one indent level.
11. Text box
Inserts a text box into the middle of your PowerPoint slide.
Note: All inserted objects always start in the middle of your slide. There is currently no setting to manually place/draw your objects in after you have selected them.
12. Shapes gallery

Opens the shapes gallery and allows you to pick a shape to insert into the middle of your PowerPoint slide.
Shapes Always Default to the Center of Your Slide: Whenever you insert an object, it always defaults to the center of your slide.
You will need to manually drag it around and position it. To make sure your shapes are the same size, either copy and paste an existing shape on your slide, or line it up next to your shape, and resize it using your SmartGuides.
The Insert tab
Inserting a table immediately gives you a default 3 by 3 table in the center of your PowerPoint slide and opens the Table Tab on the Ribbon. See Table Tab for Table Options.
3. Pictures

Selecting pictures opens the Photo Gallery. Currently, you are only allowed to insert pictures that are stored locally on your iPad (in your Camera Roll, Photo Streams, etc.).
If you have company pictures on your computer that you want to access on your iPad, you can share those pictures wireless through the iCloud service so that you can access them in PowerPoint on your iPad.
Check out Apple’s step-by-step walk-through of the iCloud service .

Opens the shapes gallery and adds the Shape Tab on the Ribbon.
Default Your Shapes on Your Desktop: To avoid clumsy formatting in PowerPoint for your iPad, I highly recommend setting default formatting on the desktop version of PowerPoint for your specific decks as it carries over onto your iPad.
To set the default formatting on your desktop version of PowerPoint, simply right-click the shape you want to default the formatting for, and in the right-click menu, select set as default shape (line or text box, depending on what you are defaulting).
5. Text boxes

Inserts a text box into the middle of your PowerPoint slide and opens the Shapes tab on the Ribbon.
Pro Tip: Insert rectangles instead of text boxes to avoid the default “resize shape to fit text” setting. All text boxes start with this default setting and there is no way to un-select or change this formatting option in PowerPoint for your iPad.
The Transitions tab
1. Transition effect
Represents the 39 different types of transitions you can apply to your PowerPoint slides on your iPad.

32 of the 39 transition effects have effect options associated with them which changes the direction of the transition. These variations are often from left to right, or from top to bottom. For the style effects to be active, a transition with effects has to first be applied to a slide.
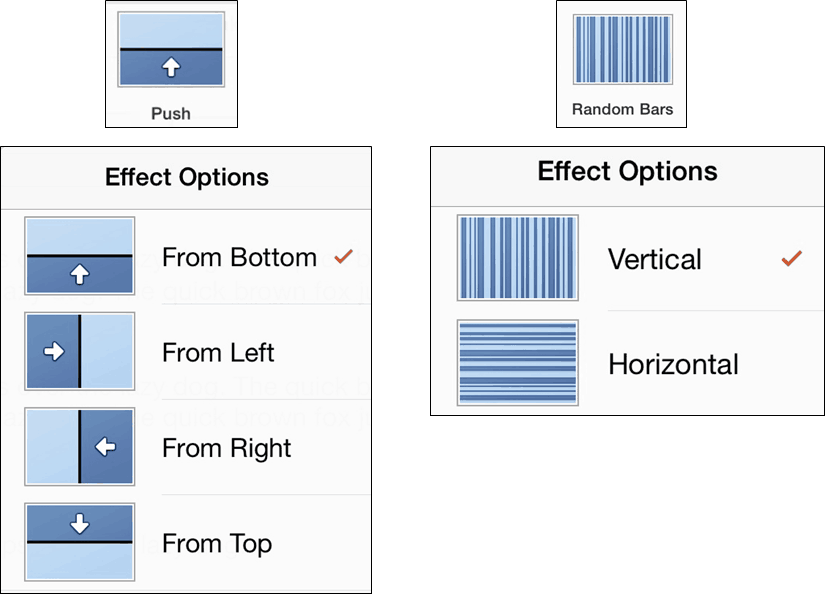
To change the effect options, simply select the alternative transition effect you would like for your slide.
Style Note: As transitions are often distracting when giving a presentation, I highly recommend using them sparingly (if at all) within your presentations.

Previewing a Transition: To preview your transition, hit the “from current” icon in the upper right hand corner of your screen to start the presentation form the current slide. Once in presentation mode, swipe right once to move to the previous slide, and then swipe left to preview the transition you just set for your slide.
Transitions without effects:
- The Flash, Curtains

3. Apply to all styles

The Review tab
1. Show comments

Allows you to turn comments on or off in your PowerPoint presentation. Comments appear either in the upper left hand corner of the slide, or on the specific objects they have been added to.
Note: Comments can be only be viewed on the iPad, there is currently no support for editing, adding or removing comments from a presentation.

2. Previous

Cycles backwards to the previous com ment within your presentation, starting from your current slide

The Picture tab
1. Picture styles
Represents the 28 different preset picture styles you can apply to your pictures in PowerPoint.

2. Picture shadows
Represents the 23 different preset picture shadows you can apply to your pictures in PowerPoint.

4. Re-order
All objects on a PowerPoint slide exist in a stacking or layering order based on when they were inserted onto the slide.

- Bring Forward: Brings an object forward, one layer.
- Bring to Front: Brings an object to the front layer of all the other objects on the slide
- Send Backward: Sends an object backwards one layer.
- Send to Back: Sends an object all the way to the back layer behind all the other objects on the slide.
Pro Tip 2: The Bring to Front and Send to Back commands are the fastest and easiest commands to use, as you know exactly where your objects will go. Best practice is to use these first, and then readjust any other objects that you want behind or in front of your other objects.
Note: More than one object has to be present on the slide for this command to be active.
The Shapes tab

1. Text Styles

The Text Styles gallery includes the 20 standard WordArt text styles that you can use to bring emphasis to or highlight the text within your presentation.
Are text styles worth using? Typically not, but it really depends on what you are trying to accomplish.
For example, for corporate presentations, WordArt is distracting and hard to read and should be used sparingly, if at all. That said, if you are using PowerPoint as a medium for creating a poster or a graphic for a website, the WordArt text styles could be useful.
Missing Text Styles Options: In PowerPoint for your iPad, the Text Fill, Text Outline and Text Effect formatting options are not available, you can currently only play with these options on your desktop version of PowerPoint.
2. Shape Styles

The Shapes Styles represent the 42 different default shape formatting styles you can apply to your shapes in PowerPoint. Now although these are tempting to use, keep in mind that anyone who has PowerPoint has access to these shape styles, so simply using these default formatting styles will result in a very default looking PowerPoint presentation.
Can I change the default shapes styles in the gallery? Yes, the shape styles are dictated by your PowerPoint theme settings, so manipulating or building a corporate theme will change these default formatting styles.
3. Shape fill
Allows you to change the shape outline color in PowerPoint.

- Bring Forward: Brings an object forward, one layer
- Bring to Front: Brings an object to the front layer of all the other objects on the slide
- Send Backward: Sends an object backwards one layer
- Send to Back: Sends an object all the way to the back layer behind all the other objects on the slide

The Table tab
- Single tap a table: Get the standard object edit menu.
- Double tap a cell within a table: Get the table specific edit menu.
- Cut: Cuts the text out of the selected cell.
- Copy: Copies the text in the selected cell.
- Paste: Pastes in your last copied text or object. Note that you cannot copy and paste formatting between tables.
- Clear: Clears the contents of the cell.
- Delete: Opens an additional menu allowing you to either delete the column or row you are currently in.
- Insert: Allows you to insert a column to the left of the current cell, or a row above your current cell.
- AutoFit: Collapses the column width to fit the text within it.

- Header Row: Formats the first row in your table as a header row
- Total Row: Formats the last row in your table as a total
- Banded Row: Adds a rotating fill color to the horizontal rows of your table
- First Column: Highlights the first column in a table
- Last Column: Highlights the last column in a table
- Banded Columns: Adds a rotating fill color to the vertical columns of your table

Note: As you make table selections, the style gallery will populate with a live preview of those options for the different table styles.
2. Table styles

From a formatting perspective, I highly recommend starting with a pre-formatted table style that gets you closest to your end result, and then manually tweaking the table from there.
Lists the different default table styles you can apply to your tables in PowerPoint.
Note: The Styles Options (discussed above) that you have selected, will be shown within the Table Styles Gallery making it easier to pick the default style that get you closest to your end goal.
Style Note: Use the formatting / highlighting sparing to increase the effectiveness of your table.
Tapping the fill colors opens the theme colors drop down, which you can use to manually override any of the Table Styles you have already applied to your table.

Pro Tip: To reverse the banding of your rows or columns, first, manually format the first row or column with a fill color, and then toggle on or off the header row option or the first column option.
Note: You are not able to change the outline weights or colors of a table or cells within a table in PowerPoint on your iPad. All table border formatting will have to wait until you are on your desktop of PowerPoint.
Gives you options to insert rows above or below the current cell you have selected within your table, or columns to the left or right of the current cell you have selected.

How can I insert multiple rows or columns at the same time? To insert multiple rows or columns within your table, first select multiple rows or columns within your table. With multiple rows or columns selected, when you click insert, the same number of rows or columns will be added to your table.
Deletes the row, column or table that you currently have selected.

How do I AutoFit multiple columns at the same time? First select the individual columns (or the entire table) before selecting AutoFit.
7. Alignment

The Text Alignment command changes the horizontal text alignment (Left, Center, Right) or the vertical text alignment (Top, Middle, Bottom) of a cell within the selected cell in your table (similar to using the Text Alignment tool on your shapes or other PowerPoint objects).
The Reorder command allows you to change the layering of the objects on your PowerPoint Slide. All objects on your slide exist in a stacking or layering order (one on top of the other) based on when they were inserted on to the slide.
- Bring Forward: Brings an object forward, one layer
- Bring to Front: Brings an object to the front layer of all the other objects on the slide
- Send Backward: Sends an object backward one layer
- Send to Back: Sends an object all the way to the back layer behind all the other objects on the slide

Pro Tip: When using the reorder command on a busy PowerPoint slide with lots of objects, the Bring to Front and Send to Back commands are the fastest and easiest to use, as you know exactly where your objects will end up.
Why is the reorder command grayed out? More than one PowerPoint object has to be present on your slide for the Reorder command to be active.
The Notes pane
1. Opening the Notes pane To open the Notes Pane, tap in the lower right-hand corner of your screen where it says ‘Notes’.

How do I best use the Notes pane on your iPad? I find the notes pane useful for quickly reviewing notes prior to your presentation, as the automatic full screen mode makes it easy to both review the notes for a particulate slide, and see the thumbnail of that particular slide, outlined in orange on the left side of the screen. The notes pane will also conveniently stay open on your iPad until you manually close it.
2. Closing the Notes pane
To close the Notes Pane in PowerPoint on your iPad, simply click the notes icon in in the upper right-hand corner of the slide, and you will return to the Normal View of your presentation.

Share & Slide Show View
These are the options for sharing your documents:
- Email as Link: Creates a “View Only” link or a “View and Edit” link of your file and launches the Mail App.
- Email as Attachment: Attaches the presentation to an email, the recipient can open and edit the document natively.
- Copy Link: Creates a “View Only” link or a “View and Edit” link of your file that you can paste into other documents or emails.
The Slide Show icon starts your presentation in slide show mode starting form the current slide. Besides running your presentation, this is great for spot checking your content and for reviewing any transitions you have applied as there is no “live preview” for them on your iPad.
The Slide Show icon is the equivalent of hitting the F5 keyboard shortcut on your desktop version of PowerPoint.
Help us keep this article updated
We hope you’ve found this PowerPoint for iPad guide helpful.
If you’ve see something that we’ve missed, PLEASE let us know and we’ll do our best to update this guide ASAP.
Oh, and we hope you’ve paid special attention to the pro tips and tricks we’ve sprinkled through the guide to help you avoid major errors, or to help you troubleshoot issues.
What’s next?
Related articles.
- What is a broken link chart in PowerPoint (and how to fix it)?
- Bar chart trick: Right aligning categories (PPT, Word, and Excel)
- PowerPoint settings: program level vs. presentation level
- What is a linked Excel chart in PowerPoint?
- Set Up Slide Show: Customize how your PPT presentations run
About The Author

Popular Tutorials
- How to Strikethrough Text (l̶i̶k̶e̶ ̶t̶h̶i̶s̶) in Word, Excel & PowerPoint
- How to Make Animated Fireworks in PowerPoint (Step-by-Step)
- Strikethrough Shortcut (l̶i̶k̶e̶ ̶t̶h̶i̶s̶) for Word, Excel & PowerPoint
- How to Create a Flash Card Memory Game in PowerPoint (Like Jeopardy)
- Keyboard Shortcuts Not Working: Solved
PowerPoint Tutorial Categories
- Strategies & Opinions
- Shortcuts & Hacks
- Presentation Design
- Pictures, Icons, Videos, Etc.
- New Features
- Charts & Data Viz
We help busy professionals save hours and gain peace of mind, with corporate workshops, self-paced courses and tutorials for PowerPoint and Word.
Work With Us
- Corporate Training
- Presentation & Template Design
- Courses & Downloads
- PowerPoint Articles
- Word Articles
- Productivity Resources
Find a Tutorial
- Free Training
- For Businesses
We help busy office workers save hours and gain peace of mind, with tips, training and tutorials for Microsoft PowerPoint and Word.
Master Critical PowerPoint Shortcuts – Secure Your FREE Training Module and Save Valuable Time!
⌛ Master time-saving expert techniques.
🔥 Create powerful presentations.
🚀 Propel your career to new heights.
We value your privacy – we keep your info safe.
Discover PowerPoint Hacks Loved by Industry Giants - KKR, AmEx, HSBC!
Over 114,880 professionals in finance, marketing and sales have revolutionized their PPT skills with our proven methods.
Gain FREE access to a full module of our premium PowerPoint training program – Get started today!
We hate spam too and promise to keep your information safe.
You are currently viewing a placeholder content from Facebook . To access the actual content, click the button below. Please note that doing so will share data with third-party providers.

Microsoft 365 Life Hacks > Presentations > Six tips for recording a presentation
Six tips for recording a presentation
Your latest presentation is filled with crucial information and key concepts your colleagues need to remember. Record and archive it for easy reference and absorption.

How to record your presentation
Whether you’re recording a presentation for work, a webinar or school, both you and your colleagues will greatly appreciate having it available to reference. You can absorb information at your pace, ensuring that you retain pertinent information, without having to rely solely on your notes. While the method of recording depends on the virtual meeting platform or whether its in person, here are some guidelines on how to record you presentation:

Tell your story with captivating presentations
Powerpoint empowers you to develop well-designed content across all your devices
1. Choose the right equipment
High-quality recording equipment is essential for producing professional-looking and sounding presentations. Laptops are equipped with microphone and a high-resolution webcam, but it’s always a good idea to consider investing in higher quality recording equipment.
2. Test Your equipment
Before starting your presentation, it’s crucial to test your recording equipment to ensure everything is working properly. Check the audio levels, video quality, and any additional accessories you may be using, such as lighting or a green screen. Conducting a test run will help identify any technical issues that need to be addressed. Review the virtual meeting platform you are using to ensure that the recording feature is enabled, so you won’t have to search for it when the presentation time rolls around.
3. Optimize your environment
Choose a quiet, well-lit environment for recording your presentation. Minimize background noise and distractions to ensure clear audio and video quality. Consider using a neutral background or a virtual background to maintain a professional appearance. Natural lighting is ideal, but if that’s not possible, invest in good quality lighting equipment to ensure your face is well-lit and visible.
4. Organize your presentation contents
Organize your presentation materials in a logical order to facilitate smooth delivery. Create an outline or script to guide your presentation, making sure to include key points, transitions, and visual aids. Practice your presentation multiple times to become familiar with the contents and ensure a confident delivery. If you have multiple presenters, solidify the speaking order and designate one person to facilitate the presentation.
5. Engage with Your Audience
Even though you’re recording your presentation, it’s essential to engage with your audience as if they were present in the room with you. Encourage interaction by asking questions, prompting viewers to think critically, and inviting them to share their thoughts or experiences in the comments section. Respond to comments and questions promptly to foster a sense of community and connection with your audience.
6. Monitor Your Time
Keep track of time during your presentation to ensure that you stay within the allotted timeframe. Plan your presentation carefully, allocating sufficient time to cover each topic or section. If you find yourself running out of time, prioritize the most critical points and consider saving less crucial information for a follow-up or supplementary material.
For more ways to improve presentation skills, like calming presentation anxiety and connecting with a virtual audience , learn more presentation tips .
Get started with Microsoft 365
It’s the Office you know, plus the tools to help you work better together, so you can get more done—anytime, anywhere.
Topics in this article
More articles like this one.

How to introduce yourself in a presentation
Gain your audience’s attention at the onset of a presentation. Craft an impressionable introduction to establish tone, presentation topic, and more.

How to add citations to your presentation
Conduct research and appropriately credit work for your presentation. Understand the importance of citing sources and how to add them to your presentation.

How to work on a group presentation
Group presentations can go smoothly with these essential tips on how to deliver a compelling one.

How to create a sales presentation
Engage your audience and get them interested in your product with this guide to creating a sales presentation.
Everything you need to achieve more in less time
Get powerful productivity and security apps with Microsoft 365

Explore Other Categories
Keynote User Guide for iPad
- What’s new in Keynote 14.1
- Intro to Keynote
- Intro to images, charts, and other objects
- Create a presentation
- Choose how to navigate your presentation
- Open a presentation
- Save and name a presentation
- Find a presentation
- Print a presentation
- Prevent accidental editing
- Undo or redo changes
- Quick navigation
- Change the working view
- Customize the toolbar
- Copy text and objects between apps
- Basic touchscreen gestures
- Use Apple Pencil with Keynote
- Create a presentation using VoiceOver
- Add or delete slides
- Add and view presenter notes
- Reorder slides
- Group or ungroup slides
- Skip or unskip a slide
- Change the slide size
- Change a slide background
- Add a border around a slide
- Show or hide text placeholders
- Show or hide slide numbers
- Apply a slide layout
- Add and edit slide layouts
- Change a theme
- Add an image
- Add an image gallery
- Edit an image
- Add and edit a shape
- Combine or break apart shapes
- Save a shape to the shapes library
- Add and align text inside a shape
- Add 3D objects
- Add lines and arrows
- Add and edit drawings
- Add video and audio
- Record video and audio
- Edit video and audio
- Add live video
- Set the movie and image formats
- Position and align objects
- Use alignment guides
- Place objects inside a text box or shape
- Layer, group, and lock objects
- Change object transparency
- Fill shapes and text boxes with color or an image
- Add a border to an object
- Add a caption or title
- Add a reflection or shadow
- Use object styles
- Resize, rotate, and flip objects
- Add linked objects to make your presentation interactive
- Select text
- Copy and paste text
- Format a presentation for another language
- Use phonetic guides
- Use bidirectional text
- Use vertical text
- Change the look of text
- Use text styles
- Change text capitalization
- Add drop caps
- Make characters superscript or subscript
- Format fractions automatically
- Format dashes and quotation marks
- Format Chinese, Japanese, or Korean text
- Set tab stops
- Format text into columns
- Adjust line spacing
- Format lists
- Add mathematical equations
- Add borders and rules (lines) to separate text
- Add or delete a table
- Select tables, cells, rows, and columns
- Add or remove rows and columns
- Move rows and columns
- Resize rows and columns
- Merge or unmerge cells
- Change the look of table text
- Show, hide, or edit a table title
- Change table gridlines and colors
- Use table styles
- Resize, move, or lock a table
- Add and edit cell content
- Format dates, currency, and more
- Highlight cells conditionally
- Format tables for bidirectional text
- Alphabetize or sort table data
- Add or delete a chart
- Change a chart from one type to another
- Modify chart data
- Move, resize, and rotate a chart
- Change the look of data series
- Add a legend, gridlines, and other markings
- Change the look of chart text and labels
- Add a chart border and background
- Use chart styles
- Animate objects onto and off a slide
- Animate objects on a slide
- Change build order and timing
- Add transitions
- Present on your iPad
- Present on a separate display
- Present on iPad over the internet
- Use a remote
- Make a presentation advance automatically
- Play a slideshow with multiple presenters
- Rehearse on your device
- Play a recorded presentation
- Check spelling
- Look up words
- Find and replace text
- Replace text automatically
- Set your author name for comments
- Highlight text
- Add and print comments
- Send a presentation
- Intro to collaboration
- Invite others to collaborate
- Collaborate on a shared presentation
- See the latest activity in a shared presentation
- Change a shared presentation’s settings
- Stop sharing a presentation
- Shared folders and collaboration
- Use Box to collaborate
- Create an animated GIF
- Post your presentation in a blog
- Use iCloud Drive with Keynote
- Export to PowerPoint or another file format
- Restore an earlier version of a presentation
- Move a presentation
- Delete a presentation
- Password-protect a presentation
- Create and manage custom themes
- Transfer files with AirDrop
- Transfer presentations with Handoff
- Transfer presentations with the Finder
- Keyboard shortcuts
- Keyboard shortcut symbols
Record video and audio in Keynote on iPad
You can record video on your device and add it directly to a slide. You can also add an audio recording to an individual slide, which is useful when people are viewing your presentation remotely.
To learn how to add an existing video and audio file to a slide or presentation, see Add video and audio in Keynote on iPad .
Record a video
On the slide where you want to add the video, do one of the following:
Do one of the following:
Insert the video: Tap Use Video.
Take the video again: Tap Retake.
Cancel and return to the presentation: Tap Retake, then tap Cancel.
Drag any blue dot to resize the video.
Note: You can’t edit the video in Keynote. The video is available in the Photos app on your device, where you can edit it.
Record audio
Note: After you record, you insert the recording wherever you want in the presentation.
While you record, you can scroll, zoom, and view different slides.
Go to the slide where you want to add the recording, tap Insert or Done at the top of the screen, then drag the recording to move it.
Recorded audio appears as an object on the slide when you’re editing the presentation, but isn’t visible when you present.
You can also share your recording as an audio file. Tap the recording on the slide, then tap Share.
To learn more about timing video and audio in your presentation, see Edit video and audio in Keynote on iPad .
How to Play a PowerPoint Presentation on an iPad: A Step-by-Step Guide
Playing a PowerPoint presentation on an iPad is simple and straightforward. Just ensure you have the Microsoft PowerPoint app installed, and you’re good to go. You’ll be presenting in no time!
After following the steps, your PowerPoint presentation will be up and running on your iPad. Whether it’s for a business meeting or a classroom presentation, you’ll be able to engage your audience effectively.
Step by Step Tutorial on How to Play a PowerPoint Presentation on an iPad
Playing a PowerPoint presentation on an iPad involves a few simple steps that will get your slides up and ready for viewing. Let’s dive in!
Step 1: Download the PowerPoint app
First thing’s first – download the PowerPoint app from the Apple App Store.
The PowerPoint app is free to download but may require a Microsoft Office 365 subscription for full functionality. Make sure you’re signed in to your Microsoft account after downloading the app.
Step 2: Open the app and find your presentation
Open the app and locate the presentation you want to play.
You can access your presentations from cloud storage services like OneDrive or Dropbox, or you can transfer files directly to your iPad using iTunes or email.
Step 3: Open your presentation
Once you’ve found your presentation, tap to open it.
Your PowerPoint slides will appear just as they would on a computer. At this point, you can make any last-minute edits or go straight to presenting.
Step 4: Play your presentation
To start your presentation, tap the “Play” icon.
Your iPad will switch to presentation mode, displaying your slides full-screen. Swipe left or right to navigate through the slides.
Step 5: Use additional features as needed
Take advantage of PowerPoint’s features like highlighting or drawing on slides during your presentation.
These features can be accessed by tapping the pen icon on the screen. They add an interactive element to your presentation and can help emphasize key points.
Tips for Playing a PowerPoint Presentation on an iPad
- Make sure your iPad is charged or plugged in; you don’t want it dying mid-presentation!
- Familiarize yourself with the app’s interface before the presentation to avoid any hiccups.
- Use a stylus for more precise highlighting or drawing on slides.
- If you’re presenting to a group, connect your iPad to a larger screen using AirPlay or an adapter.
- Practice navigating through your slides on the iPad to ensure a smooth presentation.
Frequently Asked Questions
Can i edit my powerpoint presentation on the ipad.
Yes, the PowerPoint app allows you to edit presentations directly on your iPad.
Can I play a presentation without an internet connection?
Yes, once the presentation is downloaded to your device, you do not need an internet connection to play it.
Can I use my iPad as a remote for the presentation?
Yes, with the right setup, you can use your iPad as a remote control to navigate through your slides.
Are animations and transitions supported on the iPad?
Most animations and transitions in PowerPoint are supported on the iPad app.
Can I add notes to my presentation on the iPad?
Yes, you can add and view presenter notes in the PowerPoint iPad app.
- Download the PowerPoint app from the Apple App Store.
- Open the app and locate your presentation.
- Open your presentation.
- Play your presentation using the “Play” icon.
- Use additional features like highlighting or drawing as needed.
Playing a PowerPoint presentation on an iPad is a breeze once you know the steps. With the portability and convenience of the iPad, you’re no longer tethered to your laptop for presentations. The ability to edit on the go, use interactive features, and present without a hitch makes the iPad a powerful tool for anyone needing to share information visually.
Remember to download the PowerPoint app, familiarize yourself with its features, and practice beforehand to ensure your presentation goes smoothly. And don’t forget, a well-charged iPad is a happy iPad! So, the next time you need to play a PowerPoint presentation, consider using your iPad and impress your audience with your tech-savviness.

Matthew Burleigh has been writing tech tutorials since 2008. His writing has appeared on dozens of different websites and been read over 50 million times.
After receiving his Bachelor’s and Master’s degrees in Computer Science he spent several years working in IT management for small businesses. However, he now works full time writing content online and creating websites.
His main writing topics include iPhones, Microsoft Office, Google Apps, Android, and Photoshop, but he has also written about many other tech topics as well.
Read his full bio here.
Share this:
Join our free newsletter.
Featured guides and deals
You may opt out at any time. Read our Privacy Policy
Related posts:
- How to Save Powerpoint as PDF with Notes
- Can I Convert My Powerpoint to Google Slides?
- How to Drag Slides From One PowerPoint to Another: A Step-by-Step Guide
- How to Make a Powerpoint Slide Vertical in Powerpoint 2013
- How to Set Time for Slides in Powerpoint
- Can You Create a PowerPoint on an iPad? Here’s How!
- How to Insert Slides from Another Presentation in Powerpoint 2010
- How to Check Word Count on Powerpoint 2010
- How to Unhide a Slide in Powerpoint 2013
- How to Loop a Slideshow on Powerpoint 2013
- How to Change the Font on All Slides in Google Slides
- How to Change Hyperlink Color in Powerpoint 2010 (An Easy 5 Step Guide)
- How to Use a Mac With PowerPoint: A Step-by-Step Guide
- How to Email a PowerPoint Slideshow: A Step-by-Step Guide
- How to Download a Google Slides Presentation as a Powerpoint File
- How Is Microsoft PowerPoint Used in Business: A Comprehensive Guide
- How to Convert a PowerPoint to Word and Edit with Ease
- How to Insert Check Mark in Powerpoint for Office 365
- How to Prepare a PowerPoint Presentation for Job Interview Success
- How to Delete Multiple Slides in Google Slides
- Skip to primary navigation
- Skip to main content

8 Things I’ve Learned Using an iPad for Presentations
I love using my iPad for travel to conferences, and not just because it’s so lightweight and its battery lasts all day. For one thing, with the LTE version I’m not beholden to conference Wi-Fi; while some conferences have good connectivity, I never want to count on it. With the iPad I can nearly always get online.
But the iPad isn’t convenient only for attending conferences. It’s a good tool for presentations, too-or at least an excellent backup for a dedicated computer. I can easily be ready to present if I have a last-minute computer replacement.
Still, I had some things to learn the hard way about using an iPad for presentations. Perhaps I can save you a few steps.
The Basics of Getting Started
Learn the differences between “desktop” keynote and the ipad version.
While I present nearly exclusively from an iPad, I usually build my initial presentation on a Mac. I build all of my presentations in Keynote, and store them in iCloud. I can (and do) make tweaks to a presentation on-site via the iPad version of Keynote, but it always feels as though I’m slightly fighting with the software.
Keynote supports a customizable presenter display in both versions. On the Mac desktop version, you can pick three ways to give yourself that during-the-talk cheat sheet, instructing it to show you the current slide, next slide, and presenter notes. On the iPad, the presenter display options only give you a “two out of three” option, between current slide, next slide, and presenter notes. I begrudgingly pick Next Slide and Presenter Notes, and then I hope the venue has a confidence monitor that shows me what’s on the projector behind me.
Some folks prefer to use Powerpoint or Google Slides. This distills down to religion, and I can confidently state that those people are wrong. Both tools offer iPad versions as well, but I’m not well versed in them. Deckset doesn’t offer an iPad version, and I’ve not had much patience for the swath of custom JavaScript-based presentation tools that render Markdown inside of browsers. I want to like them, but I can’t quite get there yet. As a result, use Keynote; you’ll be happier. As an added bonus, the presentations live in iCloud; with a bit of notice you can grab a copy on someone’s Mac, iPhone, or iPad and be back in business should calamity befall your iPad.
Do be aware that this means that if your presentation requires a demo in a terminal or a web browser, you either get to do some awkward transitions—or accept that presenting from an iPad isn’t right for this talk. I still haven’t found a good way to give my “Terrible Ideas in Git” talk from an iPad due to its live demos…
Invest in a presentation remote
A presentation remote is a necessity, unless you enjoy being trapped behind the podium. I treated myself to a little luxury with the Logitech Spotlight .
This device does it all. It speaks its own wireless protocol via a USB-A dongle that plugs into most laptops, but the Spotlight also speaks Bluetooth with a great range. Its battery charges using a built-in USB-C port that hides behind the dongle, and a single charge lasts for months.
I freely accept that most folks find the idea of paying $129 for a single-purpose device a bit nutty. Those folks generally don’t give double-digit numbers of presentations a year. A word of caution: Don’t leave it behind at the podium after your talk. It’s expensive enough to buy the first time. Please don’t ask me how I know.
Pay attention to fonts and typefaces
I have a condition I jokingly refer to as “typeface blindness.” I can’t tell the difference between most fonts unless I stare at them and actively work out what I’m seeing. I’m told this is atypical, and whenever I forget this fact I get reminded on Twitter. “Well, that’s the fifth talk so far today that uses Helvetica (the system default)” always makes me facepalm. As a result, I make it a point to not use system default fonts.
Contrary to what many folks believe, you can use custom fonts on iOS, but the process is a bit arcane. Do yourself a favor and drop the $2 for AnyFont . This magic app streamlines an otherwise incredibly painful process.
Lessons I’ve Learned
I’m conservative here; while you can save money by buying third party adapters, I find that minimizing the risk of screwing up a presentation in front of 400 people is worth the extortionate rate that Apple charges for first party adapters. You’ll want both HDMI and VGA adapters. Both of these are available in Lightning and USB-C flavors, depending upon which generation of iPad you’re using. Note that this is less of a concern with USB-C than it is with Lightning adapters—just make certain you test all of your adapters before you leave home.
Save time; don’t bother looking for DVI adapters. The iPad officially doesn’t support it, Apple doesn’t sell them for Lightning, and I’ve only ever encountered it on the speaking circuit once. Your test a few hours before your talk will validate that you’ll be okay.
You can never be too rich, too thin, or have a big enough battery pack
Grab a beefy battery pack, and you can go days without finding a power outlet. You don’t want to discover that the podium power strip is full, the extension cord is a trip hazard, or that you don’t have the right adapter for the country you’re in when it’s time to give a talk. Having a battery pack that can borderline jump-start a car means you’re fine so long as your iPad battery level is anywhere about roughly 3%. (Too much lower and the tablet won’t boot at all.)
I like Anker products for this, but your mileage may vary. I soundly endorse finding reputable brands. Saving a few bucks on chargers, cables, or batteries that (a) plug into a very expensive electronic device and (b) have a propensity to include “sets the building on fire” in their list of failure modes just never seemed worth the trade-off to me.
Note: If you need to give away something at a booth, don’t use branded USB battery packs or chargers, as swag. At best, they’re cheap and feel flimsy. At worst, something with your logo on it started a fire.
Spend extra for an LTE connection
You can tether your iPad to a mobile device or ride on conference Wi-Fi. However, if you’re presenting frequently it’s worth the extra money to get an iPad version that can speak to the cell networks. Suddenly you no longer care what the conference Wi-Fi password is, whether you remembered to charge your phone, or if the captive portal login page is going to expire and pop up again mid-presentation.
Speaking of which…
Before the presentation, turn on both “Do Not Disturb” and “Airplane Mode”
In presentation mode, Keynote swears that it blocks pop-ups, reminders, incoming calls, and other distractions. To its credit, I’ve never seen it do otherwise.
That said, I always enable Do Not Disturb on my iPad. I put the device in airplane mode. And only then do I plug in the projector. Perhaps I’m paranoid, but you’re also not seeing horrible screenshots from my talks that feature embarrassing notifications, either.
Update nothing before your presentation
If a new iOS version or a Keynote update comes out the same week as your presentation, fine. But resist the upgrade. It can wait a day.
There have been enough regressions in software over the years that I’m extremely hesitant to trust that everything will “just work” an hour before I go on stage.
These are the sometimes-hard-won lessons I’ve learned after spending a year giving talks solely from an iPad.

Corey is the Chief Cloud Economist at The Duckbill Group, where he specializes in helping companies improve their AWS bills by making them smaller and less horrifying. He also hosts the "Screaming in the Cloud" and "AWS Morning Brief" podcasts; and curates "Last Week in AWS," a weekly newsletter summarizing the latest in AWS news, blogs, and tools, sprinkled with snark and thoughtful analysis in roughly equal measure.
More Posts from Corey

“Apparently I Stuttered: A Compute Optimizer Clarification”
There have been some noises about this week’s newsletter issue in which I criticized the release of AWS Compute Optimizer offering RDS recommendations…Let me clarify my position and commentary on this feature announcement.

Changing of the Guard: “AWS Appoints Matt Garman as CEO”
This morning’s announcement that Adam Selipsky would be stepping down as AWS CEO, with longtime Amazonian Matt Garman stepping into the role, feels like a natural correction. Garman has long been seen as the heir apparent to AWS’s leadership. When Selipsky was named CEO in the last succession, my initial reaction was a baffled, “I’m sorry, who?”

AWS’s (de)Generative AI Blunder
AWS has been very publicly insecure about the perception that it’s lagging behind in the Generative AI space for the past year. Unfortunately, rather than setting those perceptions to rest, AWS’s GenAI extravaganza at re:Invent 2023 seemed to prove them true. Of the 22 GenAI-related announcements, half of them are still in preview. Many were […]
Get the newsletter!
Stay up to date on the latest AWS news, opinions, and tools, all lovingly sprinkled with a bit of snark.
How to Create Pro-level PowerPoint Videos with Audio
Senior Marketing Manager at Loom

The power of a presentation lies in its ability to educate and inspire.
But why limit access to inspiring ideas because of the time slot in which they were presented? Microsoft PowerPoint, Google Slides, and Keynote slides have become the go-to formats for delivering supporting content to help audiences from classrooms to boardrooms engage with ideas. But once the content is complete, what happens to it?
Getting used to the sound of your own voice can take some time, but the benefits of using Loom to record PowerPoint presentations are worth it.
Depending on the content and intended audience, a few will be published, stored, or made available on a marketplace. However, many will be lost, all your hard work never to be seen again. PowerPoint slides that aren't accompanied by a presentation are incomplete and don't do a sufficient job of expressing the author's ideas.
If you want to get ahead of the curve and preserve the integrity of your hard work, learn how to record a presentation by recording your screen .
Loom is one of the most popular choices for recording a video presentation—and for a good reason. The user interface is straightforward and easy to use. Mastering it requires little effort.
The benefits of presenting a PowerPoint in video
There are several reasons someone would want to learn how to record a PowerPoint presentation. Whether they’re explaining the quarterly statistics in a sales meeting , creating a webinar as a marketing tool , or recording training sessions for onboarding new hires, communicating ideas clearly and succinctly via video becomes more crucial every day.
With Loom, you can engage directly with your audience, allowing you to interact with a large group of people in a small, intimate environment. Let's look at some advantages of knowing how to record slide show presentations and the procedure for doing so.
Scheduled attendance is not guaranteed
Unless your presentation is a mandatory work meeting or you're teaching a paid course, many individuals will drop out before or during the presentation. However, by providing a presentation recording for them, you can still interact with those people, and they’ll feel supported by your accessibility.
Provides on-demand access to your presentation
Using Loom's video recording capabilities, you provide access to your material long after you've presented it. Giving your audience access to resources is one of the best ways to build trust and support.
Enhances your search engine optimization (SEO)
If you don't want to make your recorded presentations available on-demand but want to reap the benefits of SEO-driven traffic, you may post all or part of it on YouTube as a free resource in the future to attract new prospects.
Practice makes perfect
Another reason to learn how to record a presentation is that you can review your work before showing it to a live audience. By recording yourself before a meeting or lecture, you can review the footage to ensure you cover every aspect of the topic, make improvements, and eliminate those pre-performance jitters.
Tips for video recording yourself presenting a PowerPoint
While technology and practice are your two best allies in confidently presenting PowerPoint video presentations, a few extra tips can make yours even more effective and professional. Consider following these best practices:
Choose the right equipment
Video communications technology has flourished in the last few years. There are more options than ever to record presentations and deliver them digitally to a worldwide audience. A tool like Loom makes it easy to record webcam videos, screen captures, and recorded narration quickly and easily. This lets you present your PowerPoint or any other content to a digital audience without extensive and time-consuming video editing.
Include direct-to-camera (DTC) content
Personalization is the heart of every good video—nothing builds a personalized experience like a friendly face. Use a simultaneous webcam and screen capture to record yourself explaining the slides and information on the screen. Adding picture-in-picture DTC elements creates rapport and trust with your audience and ensures they stay engaged with your presentation.
Slide text: Less is more
Text is great for outlining the major themes of a presentation and adding context to discussions, but with a PowerPoint presentation, treat text as the seasoning in a recipe. Use what you need to enhance the experience, but don’t overwhelm.
Build your slides as an outline for each discussion topic and a home for visual elements like charts, infographics, and embedded video clips. But you, as the presenter, should do most of the talking. Building your presentation this way keeps viewers focused and engaged instead of hurrying to keep up with the reading.
Structure your presentation
Well-structured content is vital to the flow and digestibility of your presentation. When building your slides and video script, organize your information similarly to a blog post or an ebook. Start with an introduction to share your personal info and a general topical overview. Create segments that logically lay out each point or step in the process. Wrap things up with a conclusion and (if needed) a call to action that invites the viewer to take the next step—booking a call, downloading a resource, or signing up for a service.
Keep videos concise and skimmable
Digital fatigue is real. With so many videos and messages competing for our attention, creating a streamlined presentation results in longer view duration . The average view duration of a YouTube video may be as short as 40 seconds, with the median watch time averaging just over a minute and a half .
Another trick to increase viewability is to make it easy for viewers to skim. A well-structured presentation offers natural segments to help viewers zero in on the information they need. YouTube offers a Chapters feature that lets you insert a linkable outline so viewers can easily skip to specific timestamps.
Basic recording in PowerPoint
Microsoft offers basic tools to start recording your PowerPoint presentation. Here’s a quick step-by-step guide to recording a simple presentation:
Step 1: From PowerPoint, open the slide with which you want to start your presentation.
Step 2: Select Record from the upper right hand corner of the PowerPoint window.
Step 3: Make sure your recording and voice settings are set properly, then click the round Record button. Begin your presentation.
Step 4: Click through your slide presentation and record your audio. Be sure to pause during slide transitions, as PowerPoint will not record audio during slide changes.
Step 5: Save your finished PowerPoint video to your local device and share it through email or upload it to sharing platforms like Vimeo, YouTube, etc.
An important note: PowerPoint’s native recording features offer some editing and highlight features. You’ll need a screen recorder app like Loom to film direct-to-camera or make substantial edits.
How to use Loom’s presentation recording software
It's simple to record yourself and your screen presentation side-by-side using only your laptop, a built-in camera, a mic, and Loom. Using Loom to record presentations on a computer is a fantastic way to save time and guarantee that your presentation goes precisely as planned. Loom's basic version is free to use and provides users with different options to meet their unique needs best. You may record the material on your screen and even take a video of yourself presenting alongside your screen capture.
Loom is available as a PC screen recorder , Mac screen recorder , iOS screen recorder , and Android screen recorder . The two primary methods are through the Desktop Client or the Chrome Screen Recorder . The desktop versions offer a higher recording resolution (4k compared to 1080p in the Chrome extension) and additional features like camera frames and backgrounds.
In either case, learning to record a presentation is simple with Loom’s easy-to-use presentation recorder. Here’s some information to help you get started.
You can create a Loom account using a variety of methods. Users may log in with their Google account information, or connect their Slack account information, email address, password, and name. You must first complete the registration process to have access to the program.
What is the Loom desktop client, and how can I use it?
Search for Loom in the Windows search box or click the red pinwheel Loom logo to launch the Loom Desktop Client. After you've opened it, choose the type of video recording you wish to make. Cam Only, Screen Only, and Screen + Cam are the three possibilities for the basic Loom version. As their names suggest, Cam Only and Screen Only allow you to record the material on your screen or yourself through a camera. Screen + Cam will enable you to make a presentation recording with both yourself and the information in real time, allowing others to watch your reactions to the material and connect with you as the presenter.
If you wish to record your screen, the presentation recorder has three options for defining the parameters of your video: Full Screen, Window, and Custom Size.
Full Screen captures everything on your monitor or display, allowing others to watch and follow along.
You may use the Window option to record a single computer application if you want to construct a more restricted lesson without interruptions.
Custom Size is exclusively available to Pro account holders, allowing users to build custom windows to capture particular areas of their screen.
To record your Loom videos, use the built-in webcam and microphone on your smartphone or computer or additional devices as needed. Loom recommends using high-quality microphones for better audio.
Using the Loom Google Chrome Extension to capture videos
First, download and install the Loom Google Chrome Extension from the Chrome Web Store. Then launch the extension's user interface by clicking on the red pinwheel Loom logo in the browser's top right corner. You can choose Cam Only, Screen Only, and Screen + Cam, the same as the desktop client. Unfortunately, users of the Google Chrome Extension can only record their entire screen or the contents of a single tab.
The Video Control menu differs from the desktop extension, appearing in the bottom left corner of the browser window. Users may only utilize three buttons: Start/End Recording, Pause Recording, and Delete Recording.
Using the Loom desktop client to record videos
Each option lets you use Loom's camera bubble , which allows you to see and record yourself as well as a video. There is no set limit on the duration of the video, but Loom will provide you alerts to ensure you don't keep recording by accident. Once you've decided on your selections, go to the four-button Video Control menu on the left side of your screen. To start your video, press the Recording button at the top of the menu. This button has two purposes: When the button is red, it indicates that you’re currently recording, and it stops the recording when clicked a second time.
The Pause button is located beneath the Recording button and is used to pause your video. However, depending on your computer, you may alternatively use Alt + Shift + P or Option + Shift + P . The Delete option is represented by a garbage can icon, which pauses the recording and completely deletes the video once you confirm your decision via a dialog box.
How to use the speaker notes feature
Loom makes presentations easier with speaker notes , an on-screen cue card feature visible only to you. Speaker notes are bullet points or full scripts written by you and activated during recording. These prompts allow you to deliver your message with confidence, without the need to remember your whole script or utilize physical note cards.
From the desktop app, open Loom and click Speaker Notes. Use the pop-up window to type in your notes, then resize the notes window to suit your needs before recording. Speaker notes are always presented on top, so there’s no need to switch windows during your presentation.
How AI-generated chapters work
Want your viewers to be able to skip to the most useful portion of a presentation? The AI-generated chapter feature allows viewers to select important topics within your presentation and navigate to them easily. These time-stamped chapters also allow users to link and respond to content.
How to use the drawing tool
Finally, the drawing tool , symbolized by a pen icon and available with the Pro subscription, can assist you in focusing on certain facts and numbers. Using this button, which includes picking a preset color, lets you make graphics that will draw your viewer's attention to key information.
Preserve your ideas with Loom’s Presentation Recorder
If you’re just starting out, learning to record a presentation with Loom is an excellent tool for creating quality content. As the world continues to move towards remote work environments, the ability to give an online presentation (and record it for posterity) becomes more essential every day.
Loom is free, so don’t wait to see how you can enhance your video presentation with video capture software.
Jan 8, 2024
Featured In:
Share this article:.
Jeong Lee works in Marketing at Loom.
| | | | |

This is easiest and fastest way to record professional video slide presentations right on your iPad:
Step 1: Import slides as PDF. Step 2: Tap Record and flip through the pages. Step 3: Everything you say is recorded in sync with the screen.
Increase Engagement with Personalized Videos
The next time an important client wants some information, why not walk them through it with a custom-tailored video presentation? You and your business are sure to stand out.
Here's how easy it is to record a Keynote Deck:
Create HD Videos from Keynote & PowerPoint Slides
Import slides directly from Keynote, or open any PDF file. Present them just as you would to a live audience. Your voice is recorded in-sync with the screen, and you can call things out using a virtual laser pointer.
Share Securely or Broadcast to the World, Subscription Free
Everyone's concerned about privacy these days. So are we.
Unlike with online presentation services, you retain 100% control over your slides and videos. Your content never leaves your iPad, unless you choose to share it or backup to iCloud. Email videos directly to only your colleagues, or upload them to the service of your choice.
Even better, there are no monthly fees or services to be tied to. Purchase once, and use Presentation Recorder forever.
Optionally Edit Videos in iMovie (available separately)
Presentation Recorder produces clear, high-definition 720p Quicktime videos that you can edit in iMovie and elsewhere. If you recently bought an iPad, you can probably download it free from Apple.
For All Your Presentation Needs
Presentation Recorder is a flexible and powerful tool. Use it for: Sales presentations, training videos, remote collaboration, and more.
- Open exported PDF decks (or any PDF file) from Keynote, PowerPoint, or 3rd party Apps (note that slide transitions are not preserved in PDF files).
- Supports standard 4:3 or widescreen slides (pages of any dimensions really).
- Produces 720p HD Quicktime videos.
- Virtual laser pointer.
- Record using the iPad's built-in mic, or an external one.
- Page picker to jump directly to any page.
- Project organizer with customizable color categories.
- Publish directly to YouTube, Facebook, or Vimeo from the Photos App.
- Upload to Dropbox and other services by exporting videos to 3rd party Apps.
- No monthly fees or service requirements.
Video: Run a slideshow in PowerPoint for iPad

Other tutorial videos for PowerPoint for iPad:
Open files from the cloud . Open files from OneDrive for Business (for your work or school stuff), OneDrive.com (for your personal stuff), or from a Dropbox account.
Open email attachments . Open, edit, and send back email attachments using PowerPoint for iPad.
How saving works in PowerPoint for iPad . PowerPoint for iPad automatically saves your work every time you make even a small change. In most cases, you don’t have to do anything at all to save your document. Watch this training video to learn about AutoSave.
Type in PowerPoint for iPad . Typing in PowerPoint for iPad can be tricky at first, especially if you’re used to a physical keyboard. This training video shows you some typing tips.
Select stuff in PowerPoint for iPad . Select text and pictures expertly with your finger in PowerPoint for iPad. This training video helps you move from the mouse to the touchscreen.
How to print in PowerPoint for iPad . You tap the File button to print in PowerPoint for iPad. Watch this video to learn how. At this time, you can only print to an AirPrint compatible printer.
Run a slideshow in PowerPoint for iPad. (You are here!) There are some special finger gestures you can use to advance, go back, and end a slideshow. You can even use a laser pointer and ink pen, with the touch of your finger.
Projecting your slideshow to a screen . If you want to project a slideshow from your iPad to a screen or TV, then watch this video. It will show you how to hook up an adaptor. You can also use AirPlay.
Looking for more training?
Check out the training course for Excel for iPad.
Check out training courses for the rest of the Office programs .

Need more help?
Want more options.
Explore subscription benefits, browse training courses, learn how to secure your device, and more.

Microsoft 365 subscription benefits

Microsoft 365 training

Microsoft security

Accessibility center
Communities help you ask and answer questions, give feedback, and hear from experts with rich knowledge.

Ask the Microsoft Community

Microsoft Tech Community

Windows Insiders
Microsoft 365 Insiders
Was this information helpful?
Thank you for your feedback.
IMAGES
VIDEO
COMMENTS
Select Add next to Screen Recording. Presenting and Recording Your Slide Show. Use the following steps to set up your iPhone or iPad to record your slideshow. Background recording: iPad Screen Recording with PowerPoint. In PowerPoint, go to the slide you wish to begin presenting. Tap the Play button. From the top right of the screen, slide your ...
To record your presentation in PowerPoint on iPad, first open the PowerPoint app and select the presentation you want to record. Then, tap on the "Recording" tab and select "Record Slideshow.". You will be prompted to choose between "Record from Beginning" or "Record from Current Slide.".
Open the slide you want to start recording from. Near the upper right corner of the PowerPoint window, select Record. When you're ready, select the round, red Record button, wait for the countdown, then start speaking. To record from a specific slide, go to it, and then select Record. Note: Narration isn't recorded while the transition between ...
In the Options dialog box, click the Customize Ribbon tab on the left. Then, in the right-hand box that lists the available ribbon tabs, select the Recording check box. Click OK. To get ready to record, select Record on either the Recording tab or the Slide Show tab of the ribbon.
You can record your PowerPoint presentation—or just a single slide—and capture voice, ink gestures, and your video presence. The completed recording is like any other presentation. You can play it for your audience in Slide Show or you can export it as a video file. So instead of just handing the deck to someone, people can see your ...
In this video tutorial from Microsoft, you will learn how to record your PowerPoint presentation.You can record your PowerPoint presentation—or a single slid...
Learn how to record a PowerPoint Presentation with audio and video simply by using the build-in PowerPoint functionalities and tools. You will learn how to...
Let's see how to record a PowerPoint presentation in front of live audiences. Step 1 - save your PowerPoint presentation in OneDrive. Step 2 - open your PowerPoint slides from PowerPoint online. Step 3 - go to Present Live from the Slideshow Ribbon tab. Step 4 - share a live link with your audience.
Pro Tip 1: All of the pre-set templates follow the "click to add text" approach.If you have your own company template you want to use, see our section on opening a file. Pro Tip 2: These templates are slightly different from those in the desktop version of PowerPoint.Pro Tip 3: All new presentations will by default, be saved locally on your iPad.
About Press Copyright Contact us Creators Advertise Developers Terms Privacy Policy & Safety How YouTube works Test new features NFL Sunday Ticket Press Copyright ...
1. Choose the right equipment. High-quality recording equipment is essential for producing professional-looking and sounding presentations. Laptops are equipped with microphone and a high-resolution webcam, but it's always a good idea to consider investing in higher quality recording equipment.
Design and edit slides. Create professional slide layouts with PowerPoint Designer. Add pictures or videos. Video and audio file formats supported in PowerPoint. Add animation effects to your presentation. Delete a slide. Apply a slide layout.
Nearly every feature is a subset of the Windows version. Since PowerPoint for iOS can't record audio, including the Record Slide Show feature would be of little use, since it's main function is to record narration. However, PowerPoint for iOS will play back audio recorded in a desktop version of PowerPoint. It can't hurt to post a suggestion to ...
Record video and audio in Keynote on iPad. You can record video on your device and add it directly to a slide. You can also add an audio recording to an individual slide, which is useful when people are viewing your presentation remotely. To learn how to add an existing video and audio file to a slide or presentation, see Add video and audio in ...
Step by Step Tutorial on How to Play a PowerPoint Presentation on an iPad. Playing a PowerPoint presentation on an iPad involves a few simple steps that will get your slides up and ready for viewing. Let's dive in! Step 1: Download the PowerPoint app. First thing's first - download the PowerPoint app from the Apple App Store.
Adding narration to a PowerPoint presentation on your iPad by screen recording
Before the presentation, turn on both "Do Not Disturb" and "Airplane Mode". In presentation mode, Keynote swears that it blocks pop-ups, reminders, incoming calls, and other distractions. To its credit, I've never seen it do otherwise. That said, I always enable Do Not Disturb on my iPad. I put the device in airplane mode.
Step 2: Select Record from the upper right hand corner of the PowerPoint window. Step 3: Make sure your recording and voice settings are set properly, then click the round Record button. Begin your presentation. Step 4: Click through your slide presentation and record your audio.
Watch this video to learn how. At this time, you can only print to an AirPrint compatible printer. Run a slideshow in PowerPoint for iPad. There are some special finger gestures you can use to advance, go back, and end a slideshow. You can even use a laser pointer and ink pen, with the touch of your finger. Projecting your slideshow to a screen.
Hi Gerry, Thank you for posting your query in our community. Based on your description, you want to record audio in PowerPoint for iOS directly. Honestly, this feature is not available yet. I do understand the inconvenience it has made and apologize for it. At the same time, we recommend that you submit requirement for this feature in this ...
About Press Copyright Contact us Creators Advertise Developers Terms Privacy Policy & Safety How YouTube works Test new features NFL Sunday Ticket Press Copyright ...
Presentation Recorder for iPad. This is easiest and fastest way to record professional video slide presentations right on your iPad: Step 1: Import slides as PDF. Step 2: Tap Record and flip through the pages. Step 3: Everything you say is recorded in sync with the screen.
You tap the File button to print in PowerPoint for iPad. Watch this video to learn how. At this time, you can only print to an AirPrint compatible printer. Run a slideshow in PowerPoint for iPad. (You are here!) There are some special finger gestures you can use to advance, go back, and end a slideshow. You can even use a laser pointer and ink ...
However, you can play back screen recordings or audio that are already in PowerPoint presentations. As a workaround If you would like to add audio to a presentation, you need to do it through PowerPoint for Windows or MAC and then use it on iPad. Mneawhile, you can make a suggestion here to add this feature to PowerPoint for iPad via Microsoft ...