
- Onsite training
3,000,000+ delegates
15,000+ clients
1,000+ locations
- KnowledgePass
- Log a ticket
01344203999 Available 24/7

What is PowerPoint: A Comprehensive Guide for Beginners
What is PowerPoint? This blog provides the essence of PowerPoint, a versatile presentation software by Microsoft. Discover its features, uses, and the art of crafting compelling slideshows. Whether you're a student, professional, or simply curious, explore the power of PowerPoint and learn how to create impactful presentations effortlessly.

Exclusive 40% OFF
Training Outcomes Within Your Budget!
We ensure quality, budget-alignment, and timely delivery by our expert instructors.
Share this Resource
- Microsoft Dynamics 365 Fundamentals (ERP) MB920
- Microsoft Access Training
- Microsoft Dynamics 365 Fundamentals (CRM) MB910
- Microsoft Word Course
- Microsoft Dynamics 365 Marketing MB220

According to Glassdoor , a PowerPoint designer's average salary in the UK is about £37,811 annually. In this blog, you will learn What is PowerPoint, its key features, its benefits, and how to use it, as well as learn some tips for creating effective presentations.
Table of contents
1) What is PowerPoint?
2) Understanding the PowerPoint Interface
3) Key Features of PowerPoint
4) How to use PowerPoint to create a presentation?
5) Benefits of PowerPoint
6) Tips for Creating Effective PowerPoint Presentations
7) Conclusion
What is PowerPoint?
PowerPoint is a versatile and popular presentation software developed by Microsoft (MS). It is a part of the Microsoft Office Suite and offers various features and tools to create visually appealing and engaging presentations. MS PowerPoint allows users to combine text, graphics, multimedia elements, and animations to convey information effectively .
Evolution of PowerPoint

Understanding the PowerPoint Interface
The PowerPoint interface provides a user-friendly environment for creating and editing presentations. Familiarising yourself with its essential components will help you navigate the software efficiently. Here's a breakdown of the MS PowerPoint interface:
1) Ribbon : The Ribbon is located at the top of the MS PowerPoint window and consists of multiple tabs, such as Home, Insert, Design, Transitions, and more.
2) Slides pane : The Slides pane is on the left side of the PowerPoint window. It displays thumbnail images of your presentation slides, allowing you to navigate and rearrange them easily. You can add, delete, duplicate, or hide slides from this pane.
3) Notes pane : The Notes pane is located below the Slides pane. It provides space for adding speaker notes or additional information related to each slide.
4) Slide area : The Slide area occupies the central part of the PowerPoint window. It displays the selected slide, where you can add and arrange content such as text, images, charts, and multimedia elements .
5) Task panes : Task panes are additional panels on the PowerPoint window's right side. They offer various functionalities such as formatting options, slide layouts, animations, etc. Task panes can be opened or closed based on your specific needs.
Understanding the MS PowerPoint interface will help you navigate the software effectively and make the most of its features. Whether you are creating slides, adding content, or applying formatting, having a good grasp of the interface ensures a smooth and productive experience .
Key Features of PowerPoint
When it comes to creating captivating and professional presentations, MS PowerPoint stands out as versatile and feature-rich software. Its array of tools and functionalities enables users to bring their imagination and ideas to life. Moreover, it also helps engage their audience effectively .

1) Slide Templates : PowerPoint provides a collection of pre-designed templates that make it easy to create visually appealing slides.
2) Slide Master : The Slide Master feature allows users to define the overall layout, font styles, and colour scheme for the entire presentation .
3) Animations and transitions : PowerPoint offers various animation effects and slide transitions to add visual interest and captivate the audience .
4) Multimedia integration : Users can embed images, videos, and audio files directly into their presentations, enhancing the overall impact .
5) Collaboration tools : MS PowerPoint allows multiple users to work on a presentation simultaneously, making it ideal for team projects and remote collaboration .
6) Presenter View : The Presenter View feature gives presenters access to speaker notes, a timer, and a preview of upcoming slides, enabling a seamless presentation experience .
These features collectively contribute to PowerPoint's versatility and make it a powerful tool for developing engaging and impactful presentations.
How to use PowerPoint to create a presentation?
Creating a presentation in PowerPoint is a straightforward process. Whether it's simple animations or explainer videos learning H ow to use PowerPoint is an extremely valuable skill. Here's a step-by-step guide on how to create a presentation:
1) Launch PowerPoint and choose a template or start with a blank slide.
2) Add slides by clicking "New Slide" or using the shortcut key (Ctrl + M).
3) Customise slide content by entering text and inserting visuals.
4) Rearrange slides for a logical flow by dragging them in the slide navigation pane.
5) Apply slide transitions for visual effects in the "Transitions" tab.
6) Add animations to objects in the "Animations" tab.
7) Preview your presentation by clicking "Slide Show".
8) Save your presentation and choose a format (.pptx or .pdf).
9) Share your presentation via email, cloud storage, or collaboration tools.
By following these steps, you can create a well-structured and visually appealing presentation in Microsoft PowerPoint. Remember to keep your content concise, use engaging visuals, and practice your presentation skills to deliver an impactful presentation .
Benefits of PowerPoint

1) Visual appeal : Microsoft PowerPoint allows you to create visually appealing presentations with its wide range of design tools and features. You can use templates, themes, and customisable layouts to make your slides visually engaging and professional .
2) Easy to use : PowerPoint has a user-friendly interface, making it accessible to users of all levels. The intuitive tools and straightforward navigation make it easy to create, edit, and deliver presentations efficiently .
3) Flexibility : PowerPoint provides flexibility in terms of content creation. You can include various types of content, such as text, images, charts, graphs, videos, and audio files, to enhance your message and engage your audience effectively.
4) Organisation and structure : PowerPoint offers features to help you organise and structure your content. You can create multiple slides, use slide masters for consistent formatting, and arrange the sequence of slides to create a logical flow .
5) Presenter tools : PowerPoint includes built-in presenter tools that aid in delivering presentations smoothly. You can use presenter view to see your notes and upcoming slides while your audience sees only the presentation. Additionally, features like slide transitions and animations add visual interest and help you control the flow of information .
6) Collaboration and sharing : PowerPoint allows for easy collaboration and sharing of presentations. Several users can simultaneously work on the same presentation, making it convenient for team projects. You can also share your presentations via email, cloud storage, or online platforms, ensuring easy access for viewers .
7) Integration with other tools : PowerPoint can seamlessly integrate with other Microsoft Office applications, such as Word and Excel. You can import data and charts from Excel or copy and paste content between different Office applications, saving time and effort .
8) Presenter-audience interaction : PowerPoint provides features that facilitate interaction between the presenter and the audience. You can include interactive elements like hyperlinks, buttons, and quizzes to engage your audience and make your presentations more dynamic.
9) Portable and accessible : PowerPoint presentations can be saved in various formats, such as .pptx or .pdf, making them easily accessible on different devices. This portability allows you to deliver presentations on laptops, tablets, or even projectors without compatibility issues .
10) Time and effort savings : PowerPoint simplifies the process of creating presentations, saving you time and effort. The pre-designed templates, slide layouts, and formatting options enable you to create professional-looking presentations efficiently .
Unleash your creativity to deliver captivating presentations that leave a lasting impact with our Microsoft PowerPoint Masterclass – Sign up now!
Tips for Creating Effective PowerPoint Presentations

1) Simplicity is key : Keep your slides clean and uncluttered. Use concise bullet points and simple visuals to convey your message effectively .
2) Visuals matter : Incorporate relevant, high-quality visuals such as images, charts, and diagrams to enhance understanding and engagement .
3) Limit text : Avoid overwhelming your audience with excessive text on slides. Use brief phrases or keywords to communicate key points .
4) Choose legible fonts : Opt for clear and readable fonts that are easy to read, even from a distance. Maintain consistency in font styles throughout your presentation .
5) Consistent design : Maintain a consistent design theme, including colours, fonts, and layout, to create a visually appealing and professional presentation.
6) Emphasise important points : Use visual hierarchy techniques, such as font size, colour, and formatting, to draw attention to essential information .
7) Use transitions and animations sparingly : Incorporate slide transitions and animations thoughtfully, focusing on enhancing content and transitions without distracting the audience .
8) S lide notes for guidance : Utilise the slide notes feature to include additional details, explanations, or reminders for a well-prepared and confident presentation.
9) Practice and time yourself : Rehearse your presentation to ensure smooth delivery and stay within the allocated time. Practice helps you refine your content and delivery.
10) Engage the audience : Encourage audience participation through interactive elements, questions, or discussions to foster engagement and make your presentation more memorable.
By implementing these tips, you can create effective MS PowerPoint presentations that capture attention, communicate information clearly, and engage your audience effectively.
Conclusion
We hope this blog has helped you understand What is PowerPoint and how it can help you. It offers powerful features with a user-friendly interface for creating visually appealing presentations. With its tools for organising information, incorporating text and visuals, and delivering impactful content, PowerPoint is a valuable tool for beginners to communicate their ideas effectively .
Master the art of effective communication and productivity and unlock your potential with our comprehensive Microsoft Office Training – Sign up now!
Frequently Asked Questions
Upcoming office applications resources batches & dates.
Thu 16th May 2024
Thu 6th Jun 2024
Thu 4th Jul 2024
Thu 8th Aug 2024
Thu 5th Sep 2024
Thu 10th Oct 2024
Thu 7th Nov 2024
Thu 5th Dec 2024
Get A Quote
WHO WILL BE FUNDING THE COURSE?
My employer
By submitting your details you agree to be contacted in order to respond to your enquiry
- Business Analysis
- Lean Six Sigma Certification
Share this course
Our biggest spring sale.

We cannot process your enquiry without contacting you, please tick to confirm your consent to us for contacting you about your enquiry.
By submitting your details you agree to be contacted in order to respond to your enquiry.
We may not have the course you’re looking for. If you enquire or give us a call on 01344203999 and speak to our training experts, we may still be able to help with your training requirements.
Or select from our popular topics
- ITIL® Certification
- Scrum Certification
- Change Management Certification
- Business Analysis Courses
- Microsoft Azure Certification
- Microsoft Excel & Certification Course
- Microsoft Project
- Explore more courses
Press esc to close
Fill out your contact details below and our training experts will be in touch.
Fill out your contact details below
Thank you for your enquiry!
One of our training experts will be in touch shortly to go over your training requirements.
Back to Course Information
Fill out your contact details below so we can get in touch with you regarding your training requirements.
* WHO WILL BE FUNDING THE COURSE?
Preferred Contact Method
No preference
Back to course information
Fill out your training details below
Fill out your training details below so we have a better idea of what your training requirements are.
HOW MANY DELEGATES NEED TRAINING?
HOW DO YOU WANT THE COURSE DELIVERED?
Online Instructor-led
Online Self-paced
WHEN WOULD YOU LIKE TO TAKE THIS COURSE?
Next 2 - 4 months
WHAT IS YOUR REASON FOR ENQUIRING?
Looking for some information
Looking for a discount
I want to book but have questions
One of our training experts will be in touch shortly to go overy your training requirements.
Your privacy & cookies!
Like many websites we use cookies. We care about your data and experience, so to give you the best possible experience using our site, we store a very limited amount of your data. Continuing to use this site or clicking “Accept & close” means that you agree to our use of cookies. Learn more about our privacy policy and cookie policy cookie policy .
We use cookies that are essential for our site to work. Please visit our cookie policy for more information. To accept all cookies click 'Accept & close'.
Wondering why PowerPoint presentations are called decks? (Now you know)
Hrideep barot.
- Presentation , Public Speaking

Why PowerPoint presentations are called decks , a question that lingered in my mind for a long time until I decided to jump on to finding out exactly why! And here I am to share all that I have learned about why PowerPoint presentations are called decks.
But before we dive deeper into understanding PowerPoint decks, it is very important to refresh our knowledge of some of the basics.
What are presentations?
Presentations are a way of conveying some information, idea, or opinion to your audience either with or without the use of visuals, in most cases PPTs .
While most of the time, we are bound to confuse presentations with PowerPoint presentations, they aren’t the same thing.
Presentations are a much wider spectrum that includes PowerPoint presentations as a part of it.
What are PowerPoint presentations?
PowerPoint presentations are slide decks created on the specific software called Microsoft PowerPoint that was released by Microsoft (duh!) in the year 1987 . PowerPoint helps create easy and effective digital slide decks; since it is so widely used, it has become synonymous with presentations at large.
It is similar to how we call photocopies Xerox!
(pst if you don’t understand the analogy, check out what we are trying to say here )
Why are PowerPoint presentations called decks?
Decks in presentations are a collection of slides (individual pages in PowerPoint) . And since PowerPoint presentations are nothing but a collection of well-laid-out slides, they are called decks.
Now to understand it better, let’s begin with the fundamental structure, shall we?
Assuming you go to PowerPoint right now, what is the first thing you’ll see?
A blank template that would prompt you to add text, right? That is a slide. As you keep adding slides to your PowerPoint, the collection of these slides, in the end, is what we call a deck.
But then again,
Why is it called a PowerPoint deck?
A PowerPoint deck is similar to a deck of cards. In a deck of cards, a deck is composed of 52 cards; Similarly, in PowerPoint, a deck or pile of slides is what is known as a PowerPoint deck.

So, does this mean that the presentation is important only in its entirety and not as individual slides?
Absolutely no!
Just like in a game of cards, the ace carries its importance and so does a card of jack; In PowerPoint decks too, each slide carries with it its unique importance . However, when separated the slides would lose their meaning.
Again, what would you do if you find a queen card lying on your room’s floor? slide it under the bed? I mean it would be ideal considering you don’t know where the rest of the cards are!
Similarly, individual slides gain their meaning when they are compiled with other slides.
This means each slide carries its own different set of information that helps in conveying an idea at the end .
When did PowerPoint presentations become decks?
PowerPoint presentations became decks on the day they came into being, that is in 1987.
Presentations had been made using stacks of papers or sheets filled with information even before digital presentations came into being.
As shocking as it may be, presentations already involved the use of decks in some form or the other from the very initial day of the specification building our communication skills.
While we started with rock paintings or carvings, we can include them as a form of presentation but not as decks.
Later came the use of sheets or paper to deliver information. This was done using flip paper cards .
There is evidence that presentations using flip charts became very common during the 1940s. These sheets or posters would be joined together with the help of metal fasteners. The speaker or presenter would then flip from one page to the other to share information.
Sounds very similar to our digital presentations, doesn’t it? Except we don’t have to tire our arms by flipping pages. We can simply click to move on to the next slide. How convenient!
Coming back to the last bit of our history of slide decks, somewhere in the 90s -2010’s PowerPoint as a software gained major attention from the public. The slide decks started to be created on PowerPoint exclusively and that is how we moved from saying slide decks to PowerPoint decks.
Going over it again
What is a slide deck in powerpoint.
A slide deck in PowerPoint is nothing but a collection of slides in Microsoft PowerPoint.
What is a PowerPoint slide deck?
It is just another way of saying Slide decks in PowerPoint!
Why are PowerPoint slides called decks??
Since PowerPoint gives you a collection of slides or a deck of slides, it is known as decks.
What is the purpose of a Slide deck in a presentation?
Slide decks help the presenter present his/her/their topic more effectively. It aids the presenter in giving the speech by providing prompts or hints to maintain a flow in their speech. On the other hand, it helps the audience visualize as they listen to the speaker.
Out of the many purposes that a slide deck can serve a presenter, here are a few that we would like to address in this article:
- To pitch new ideas or products
- To explain or introduce a concept
- To share one’s opinions or views
1. To pitch new ideas or products
Slide decks happen to be a very crucial part of making pitches to attract your clients, or to make them understand what your product/ services are all about and how they can be beneficial to them.
Some of the ways we can try to win over or convince the client/ customer to agree to your terms are by showing charts or graphs of your previous success rates or giving out statistics on the problem that your company or product provides a solution for.
2. To explain or introduce a concept
Slide decks being used to explain a concept is something that I believe we have all experienced in schools or colleges.
With smart classrooms, the blackboards have found their place in restaurants and cafes and presentations have made their way to now be a widely used way of delivering lectures.
3. To share one’s opinions or views
Be it in conferences or competitions or even in your college when you are presenting on a topic, it is mostly with the purpose of sharing your opinions, views, or findings through slide decks.
How do you create a deck in PowerPoint?
When it comes to creating decks in PowerPoint, there are two things that we need to take a look into, the technical aspects and the aesthetic ones.
When we talk about the technical aspect of creating a deck in PowerPoint, we mean ensuring that you have the software installed in your system, be it a laptop or even your phone.
Head to AppStore or play store and install it.
Though we have been taught how to create PowerPoint presentations since very early days, we still suggest you take a minute and understand the various features offered by the software like the layouts, themes, and more. Having an understanding of some of the basic features can help you in creating a basic template easily!
If, however, you are looking for ways to create a slide deck other than on PowerPont, then head to some of the most resourceful sites that provide you with a number of templates!
A few such sites are Canva , Evanto , and more
Now when we talk about the Aesthetics of creating a PowerPoint, we first need to accept and appreciate the fact that the aesthetics or look of your presentation can add extra points to your entire presentation.
We have a list of 5 tips for the same. And if you follow them, you will surely be able to find an answer to..
Why are PowerPoint presentations effective?
A few tips for creating presentations:
1. Less is more
We have all heard this one a gazillion times and more, especially when it comes to Powerpoint presentations, Less is more!
Provide very precise information in your PowerPoint. To make your points short. You can stick to using the 5 by 5 model . The model suggests that you must not add more than 5 points to a slide. And each point must contain no more than 5 words.
If you still have no idea what you should add, try adding your headings and subheadings in your PowerPoint to make it more on point.

2. Quality over quantity
Again, adding less content doesn’t mean that you compromise on the quality of information that you share through your presentation. Add short points that make sense and add value to your audience or help in putting your point across in the best way possible.
3. Keep the curiosity alive
What does it mean when we say keep the curiosity alive? We mean, try not to share your entire slide to your audience in one go. Add effects or transitions to focus only on the point you are speaking on at that point.
We can say the same in the case of adding too much information to your PowerPoint. Do not add big paragraphs as you shatter your viewer’s curiosity who thanks to you ar enow more engrossed in reading the slides than listening to your presentation.
4. Neutralize your PowerPoint
By neutralizing we mean adding complementing slides to your PowerPoint decks. If you have selected a more dark theme, try neutralizing it with light-toned slides even if it is used as a transition slide.
5. Add visuals as and when possible
Ask yourself, can the information that you have added in your PowerPoint presentation be presented in the form of a graph, a table, or a diagram? If yes, then always choose to do it. Switch to visuals as it not only makes your content crisper but also is more appealing to the viewers.
This brings us to our next point,
Why PowerPoint presentations are not effective?
There are many reasons why PowerPoint can not be very effective. We have listed down about 3 reasons here. Go over them and try to not make the same blunders if you want to be an effective presenter!
1. Tons of Content
Adding more content to your slide may indeed help you remember the content better but it might bore the audience to death.
So just as we discussed, try to add content to your presentations in the form of short pointers. Or least try to make use of keywords and avoid writing entire paragraphs about your topic on the PowerPoint presentation.
An example of what simply copy-pasting a paragraph from your speech to PowerPoint could look like.

2. Poor color/ theme
The last thing we want is for the audience to struggle reading or seeing what we are trying to show them through the presentation. And this situation can possibly happen when there was little to no thought put into either selecting the right theme or use of overlapping colors.
Check out the example below if you want to take a look at what we are talking about!

3. Poor font choice
Another way of making it difficult for your audience to understand your presentation is by using fonts like the one shown in the picture below. Such fonts may surely be a little different, and to some extent aesthetic but it requires lots of effort from the viewers to actually understand what is written on the slide!

Final words
Let us try to summarize the entire blog for you in a couple of lines.
So essentially call it decks, slide decks, or presentation decks, they all mean the same. It is simply a collection of slides. And when such a collection is made on Microsoft’s PowerPoint, what do we call it?
Yes! you guessed it right (Hopefully?)
It is called PowerPoint decks or slide decks on PowerPoint.
There are tons of ways of making a PowerPoint deck. However, focusing on the template, and theme, and adding precise and quality content can help you go a long way.
That’s about it for now! Check out Frantically Speaking for more information on similar topics.

Enroll in our transformative 1:1 Coaching Program
Schedule a call with our expert communication coach to know if this program would be the right fit for you

How to Negotiate: The Art of Getting What You Want

10 Hand Gestures That Will Make You More Confident and Efficient

Interrupted while Speaking: 8 Ways to Prevent and Manage Interruptions
- [email protected]
- +91 98203 57888
Get our latest tips and tricks in your inbox always
Copyright © 2023 Frantically Speaking All rights reserved
Kindly drop your contact details so that we can arrange call back
Select Country Afghanistan Albania Algeria AmericanSamoa Andorra Angola Anguilla Antigua and Barbuda Argentina Armenia Aruba Australia Austria Azerbaijan Bahamas Bahrain Bangladesh Barbados Belarus Belgium Belize Benin Bermuda Bhutan Bosnia and Herzegovina Botswana Brazil British Indian Ocean Territory Bulgaria Burkina Faso Burundi Cambodia Cameroon Canada Cape Verde Cayman Islands Central African Republic Chad Chile China Christmas Island Colombia Comoros Congo Cook Islands Costa Rica Croatia Cuba Cyprus Czech Republic Denmark Djibouti Dominica Dominican Republic Ecuador Egypt El Salvador Equatorial Guinea Eritrea Estonia Ethiopia Faroe Islands Fiji Finland France French Guiana French Polynesia Gabon Gambia Georgia Germany Ghana Gibraltar Greece Greenland Grenada Guadeloupe Guam Guatemala Guinea Guinea-Bissau Guyana Haiti Honduras Hungary Iceland India Indonesia Iraq Ireland Israel Italy Jamaica Japan Jordan Kazakhstan Kenya Kiribati Kuwait Kyrgyzstan Latvia Lebanon Lesotho Liberia Liechtenstein Lithuania Luxembourg Madagascar Malawi Malaysia Maldives Mali Malta Marshall Islands Martinique Mauritania Mauritius Mayotte Mexico Monaco Mongolia Montenegro Montserrat Morocco Myanmar Namibia Nauru Nepal Netherlands Netherlands Antilles New Caledonia New Zealand Nicaragua Niger Nigeria Niue Norfolk Island Northern Mariana Islands Norway Oman Pakistan Palau Panama Papua New Guinea Paraguay Peru Philippines Poland Portugal Puerto Rico Qatar Romania Rwanda Samoa San Marino Saudi Arabia Senegal Serbia Seychelles Sierra Leone Singapore Slovakia Slovenia Solomon Islands South Africa South Georgia and the South Sandwich Islands Spain Sri Lanka Sudan Suriname Swaziland Sweden Switzerland Tajikistan Thailand Togo Tokelau Tonga Trinidad and Tobago Tunisia Turkey Turkmenistan Turks and Caicos Islands Tuvalu Uganda Ukraine United Arab Emirates United Kingdom United States Uruguay Uzbekistan Vanuatu Wallis and Futuna Yemen Zambia Zimbabwe land Islands Antarctica Bolivia, Plurinational State of Brunei Darussalam Cocos (Keeling) Islands Congo, The Democratic Republic of the Cote d'Ivoire Falkland Islands (Malvinas) Guernsey Holy See (Vatican City State) Hong Kong Iran, Islamic Republic of Isle of Man Jersey Korea, Democratic People's Republic of Korea, Republic of Lao People's Democratic Republic Libyan Arab Jamahiriya Macao Macedonia, The Former Yugoslav Republic of Micronesia, Federated States of Moldova, Republic of Mozambique Palestinian Territory, Occupied Pitcairn Réunion Russia Saint Barthélemy Saint Helena, Ascension and Tristan Da Cunha Saint Kitts and Nevis Saint Lucia Saint Martin Saint Pierre and Miquelon Saint Vincent and the Grenadines Sao Tome and Principe Somalia Svalbard and Jan Mayen Syrian Arab Republic Taiwan, Province of China Tanzania, United Republic of Timor-Leste Venezuela, Bolivarian Republic of Viet Nam Virgin Islands, British Virgin Islands, U.S.
Definition of a Powerpoint Presentation

When you want to make a slideshow complete with text and multimedia content, Microsoft PowerPoint can handle whatever you throw at it. A PowerPoint presentation can share important information such as a business plan or educational lesson, or it can be useful for entertainment purposes.
Advertisement
You have a lot of control over customizing a PowerPoint presentation and can start quickly with templates and a variety of useful tools. Microsoft offers a free basic web version of PowerPoint but requires an Office 365 subscription to get the most from the powerful program.
Video of the Day
PowerPoint Presentation Description
The basic purpose of a PowerPoint presentation is to communicate information or media through a series of slides. Along with regular text, your slides can contain numerous types of content such as tables, images, drawings, charts, links, word art, videos, audio and even embedded add-ins from Microsoft. The software also has built-in editing tools that you can use to resize, position and update content without needing to open items in other applications.
Using PowerPoint
Often, you narrate a presentation when you give it live or record audio for viewers when you're sharing your presentation to a group remotely. However, you can also include all the important information in the slides themselves or in the speaker notes found below each slide. The program comes with presentation planning tools that can help you both with the narration and timing of the presentation.
PowerPoint also gives you flexibility with presentation styles. You can share your presentation online and let other users view or even edit the content. You can also use the slideshow format that you can configure to show slides at a specified time interval, set up a custom display format or add extras such as subtitles.
Popular PowerPoint Features
Some of PowerPoint's most popular features include the built-in slide designer and templates that can help you make presentations quickly without needing much knowledge of the process. For example, by opening the program's template library, you can generate a starter file with a title slide with your preferred background, layout and color scheme. You can then use the program's duplication option to generate more formatted slides easily. Even if you make a presentation from scratch, you can use a Design Ideas button that generates a list of ready-to-use slide styles to select.
Other helpful PowerPoint features include the built-in transitions and animations, text highlighter and drawing tools. The transitions and animations make your presentation look professional and interesting with effects like fading, growing and shrinking, morphing and zooming. The text highlighter and drawing tools make it easier to point out information as you give presentations. The latest PowerPoint also lets you insert 3D models that users can interact with.
Common Uses of PowerPoint
Whether you use one slide or many, you can find uses for PowerPoint in many professions and areas. Some examples of PowerPoint projects include:
- Work portfolios
- Business meetings
- Tutorials for students and workers
- Photo slideshows
- Mailing labels
- Timelines and flowcharts
- Family trees
How to Get PowerPoint
If you're comfortable with a limited version of PowerPoint that you access through your web browser or mobile device, you can use your free Microsoft account to sign in to the OneDrive version of all the Office products. This version allows for collaboration and gives you access to some templates like the paid versions do. However, you can expect some advanced editing options and features – like live narration recording – not to work.
Otherwise, you can purchase the Office 365 Personal or Office 365 Home version of Office that gives you access to the software on all platforms. You pay either monthly or yearly and gain access to all of PowerPoint's premium features along with perks such as a large amount of storage on OneDrive, technical support and access to other popular Office apps. Office 365 Home allows up to six users versus just one for Office 365 Personal, so your whole family can benefit.
- Microsoft: What Is PowerPoint?
- Microsoft: Microsoft PowerPoint
- Finepoint Design: Top 5 Uses of MS Powerpoint in Our Daily Life
- Brandon Gaille: 10 Pros and Cons of Powerpoint Presentations
- Microsoft: Buy Office
Report an Issue
Screenshot loading...
7.3 Preparing a Microsoft PowerPoint Collection for Presentation
Learning objectives.
By the end of this section, you will be able to:
- Add transitions to a presentation
- Add animations to objects and text boxes
- Use the tools in the Media command group
- Finalize your presentation for viewing
- Understand the hardware components of effective presentations
- Prepare for different types of presentations (in person, virtual, or hybrid)
You learned the basic workings of PowerPoint in Preparing Presentations . Now it’s time to learn how to turn those basic slides into a presentation that not only informs but also engages the audience. You want to create a presentation that’s seamless and easy to present from. For example, if you are giving an in-person presentation, you don’t want to have to stand by the computer and manually advance the slides. Also, since the My Life in a Snapshot presentation is a presentation about yourself, you want to convey that you are competent with PowerPoint.
Your supervisor told you today that you will need to record the presentation so that it can be shared with others at WorldCorp’s international office locations. In this section, you will acquire the skills to virtually automate your presentation while also including the key information you will need to keep you on track as you present in front of an audience.
Finally, you hope to be able to provide printed handouts to the participants in case they need the information later on. Integral to that is learning about other tabs in PowerPoint—namely, the Transitions, Animations, Slide Show, Record, and Review functions.
Transitions
The term transitions refers to the way one slide changes to the next slide. As you can see on the Transitions tab in Figure 7.20 , there are many ways to move between slides. The Transition to the Slide command group contains options such as Fade, Split, and Shape. You can use the Timing command group tools to determine the duration of the slide on the screen, or how quickly the slides move (transition) from one to the next. A sound can be used as the slide transitions, or you can simply move to the next slide using a mouse click.
There are many transitions to choose from ( Figure 7.21 ). For example, you can have a slide fade into the next slide or push one slide out of the way for the next one. You can have a slide zoom in from one side when moving to the next slide. But keep in mind that not all the options available are necessary or even professional. Overuse of distracting transitions can take away from the professionalism of a presentation. Choose a transition that works for your content and one that is not going to be too distracting to those viewing the slideshow and that is not irritating to you as the presenter. Look at the available options for slide transitions and see what they do when you advance to the next slide.
Practice with the transitions before you present in front of an audience. If a transition seems to take too much time or seems to stand out more than what you are discussing, you should select a different one. You can always choose to have no transition between the slides. This simply means when you advance the slide it will move fully to the next slide, with no special effects. You must apply the transition to each slide individually. Whatever you choose will not affect the entire presentation. To apply a transition to the current slide, simply click on the desired transition. The Preview command on the far left allows you to see how the transition works on the slide.
Stay focused on the message you are conveying, not on the way one slide transitions to the next. Always remember that just because you can do something does not mean you should. With transitions, follow the principle that less is more if you want to maintain a professional business look.
You will notice that the Transitions pane is organized by transition effect. For instance, the first command group, titled Subtle, contains Morph, Fade, Push, Wipe, Split, Reveal, and Cut. (It contains more options, but these are the most used.) A description of each is in Table 7.2 . There are two other transition command groups: Exciting and Dynamic Content. These transitions are more animated and may not be appropriate for all presentations. But for certain types of presentations, such as sports media or sharing family photos in a slideshow, these transitions might work.
For our title slide in My Life in a Snapshot , let’s choose the Wipe transition. Notice in Figure 7.22 that when you choose a transition (other than “None”), the Preview tool will be available, as well as an Effect Options menu. Again, Preview allows you to see the transition in action. The Effect Options gives you additional modifications to the transition that you can apply to the slide. Keep in mind, any modifications are only on the current slide. You will need to apply the transition and the modification to all slides if you want it to be consistent throughout the presentation.
The last command group on the Transitions tab is Timing . Timing is where you can add sound to your slideshow, as well as choose how many seconds to move from one slide to the next. The arrow gives you many choices of prerecorded audio sounds, such as Applause, Explosion, and Wind, or you can choose a sound file from your computer. When selecting a sound, consider the audience, the presentation environment, as well as the intent: Is the sound relevant to the presentation? Does it enhance the presentation, or is it a distraction? You can apply the sound to the whole slide or to an object on the slide. For example, perhaps your slideshow was created to announce the winner of a competition. You can place a picture of the winner on a slide, and as it is revealed, it is accompanied by a round of applause. Again, use this option with caution, as your audience is not expecting to hear sudden sounds. This command group lets you set the duration of the sound as well. Additionally, you can set the way the slideshow advances, by clicking the mouse or automatically after a set amount of time.
Slides and presentations as a whole can also be enhanced with the addition of animations. An animation is a special effect added to objects and elements on a slide. They will apply only to that object, shape, or other element, not the entire slide. For example, you could choose to have a picture slowly fade away or come into view during the presentation when you are discussing a current slide. This could be impactful if you want to bring the audience’s attention to a particular element on a slide. As with other additions, keep in mind that these special effects should have a purpose and be used to enhance or draw attention to something in a presentation. They should not be overused to the extent of being distracting and taking away from the key message you are trying to convey on a slide.
Let’s look at the Animations tab in more detail to see the options you can use for elements on a slide. Figure 7.23 shows the choices available. The first command group is Preview. Click on this and you can see in advance the animations you have implemented. The second command group is Animation. Six choices are shown, including None. Click on the More arrow and thirteen additional movements appear, as well as some emphasis animations.
By scrolling down, you will also see other animation options, including Exit Effects and Motion Paths ( Figure 7.24 ).
To add an animation to your presentation, click on a text box or an object, and then choose an animation from the menu. Next, in the Timing command group, click the drop-down arrow for Start. You can leave it at Start on Click, or you can choose Start With Previous or Start After Previous. You need to choose when the animation will start.
Not all animations need to be dramatic or used for emphasis. For example, you can make a bullet list appear one bullet at a time, as opposed to having the whole list appear at once. You can have the first bullet appear, talk about it, and when you are ready, click the mouse again to have the second bullet appear, and so on. This can help you control the flow of the discussion by limiting what your audience sees on the screen. For consistency, you should use the same animation for each of the bullet points in the list.
We can use this approach to add animations to the bulleted list in our My Life in a Snapshot presentation. We used a bulleted list in the Strengths & Skills slide; let’s apply an animation there.
To begin, click on the bulleted list to select it. Then go the Animations tab and choose an appropriate animation. For this example, let’s choose Appear, so that the bullet will simply appear based on the settings you choose in the Timings command group (see Figure 7.25 ). Notice when an animation is added to an object or text box, the Preview tool is available on the left of the screen, as is a numbered list to the left of each item in the bulleted list. These numbers allow you to adjust the settings for each of the bullet points in the list. When you add an animation, there are also adjustments that can be made through the Effect Options drop-down list. The list can appear as one object, all at once, or by paragraph.
You need to adjust the settings for each bullet so that one will follow the other. You can choose to have the bullet appear after a certain amount of time or when you click. For now, let’s set it up so that the bullet points will appear when you click, because you are not yet sure how long to talk about each one. For the first bullet point, “Situational awareness,” the animation will start On Click, which you choose from the drop-down menu in the Timing command group as shown in Figure 7.26 . This will be the setting for each bullet. Selecting the small number to the left of the bullet allows you to change the settings for each animation individually.
The other options in the Timing command group allow you to set the timing for the animation and the delay as you move from one animation to the next. For this example, we left those at their default values and will simply use either the mouse or the Enter key to click when we want to have the next bullet appear. Use the Preview tool to make sure the animation is working.
The remaining command groups on the Animations tab are Advanced Animations and Timing ( Figure 7.27 ). In the Advanced Animations command group, you can control the Trigger for when slides transition. It could be a click of the mouse or after a certain amount of time. In a presentation where you might be in a large room and not close to the laptop or computer, having slides automatically advance might be helpful, although you will need to be aware of how much time you have for each slide and make sure that you do not expect interruptions until the end of the presentation. In this case, you will want to ask the audience to hold all questions until you are finished with the presentation. Finally, if you are one presenter of several during a session and you have very strict time requirements, the timing tools can help keep you on track.
Clicking on the first command, Add Animation, opens the same window that you see when you click on More in the Animations group. At the bottom of the animation illustrations is a list. You can click on More Entrance Effects, More Emphasis Effects, More Exit Effects, or More Motion Paths.
Another command in this Advanced group is Animation Pane. When you select this tool, a pane opens on the right side of the screen that lists all the animations on the slide. Here you can play the animations or make changes. The other commands include Trigger and Animation Painter. Trigger governs when an animation begins, while Animation Painter is similar to Format Painter in that it copies an animation to another object.
The timer on the Animations tab refers to the timing options available for animations applied to objects or elements on a slide. The timer allows you to control when and how the animations occur during a slideshow presentation. On the far right of the Animations tab, you will find the Timing group. Select an object or element on a slide and apply an animation to it. Once selected, you can access the timer options to specify the timing and duration of the animation. Table 7.3 summarizes the options.
By adjusting these timer options, you can precisely control the timing and behavior of animations on your slides, ensuring they align with your desired presentation flow and visual effects.
While it may be fun to animate all kinds of things in your presentation, remember that it is your message that matters. Audiences can easily get distracted or fascinated by animations and not pay attention to the substance of the presentation. Therefore, it is important to use animations judiciously and purposefully to enhance, rather than distract from, your content. Animations in PowerPoint can be effective tools for emphasizing key points, guiding the audience’s focus, or adding visual interest. However, it is essential to strike a balance between engaging animations and maintaining the clarity and effectiveness of your message. Here are a few best practices to consider:
- Keep it relevant: Only use animations that directly support or enhance the content of your presentation. Avoid using excessive or flashy animations that serve no real purpose, as they can overshadow your message.
- Enhance comprehension: Use animations to aid in the understanding of complex concepts or processes. For example, you can use animations to sequentially reveal steps or demonstrate cause-and-effect relationships.
- Use sparingly: Don’t apply animations to every element on every slide. Selectively choose elements that truly benefit from animation to avoid overwhelming the audience or diluting the impact of your message.
- Prioritize readability: Ensure that animated text or objects remain easily readable and don’t become distorted or hard to follow. Consider the size, font, and colors used in your animations to maintain legibility.
- Practice timing: Fine-tune the timing of your animations to maintain a smooth flow throughout the presentation. Avoid animations that are too fast or too slow, as they can disrupt the natural pace of your delivery.
- Rehearse and gather feedback: Before delivering your presentation, rehearse with the animations to ensure they enhance your overall delivery. Seek feedback from trusted colleagues or friends to gauge if the animations effectively support your message or if they become distractions.
Remember, the primary goal of your presentation is to convey a clear and impactful message. While animations can be engaging, they should never overshadow or detract from the substance of your content. Strive for a harmonious balance between captivating visuals and a compelling message to create a memorable and effective presentation.
Media Command Group
The Media command group is used to add audio or video media to the presentation. There might be instances where you would want to add a short clip of a video or audio to enhance the presentation of a topic. For example, in your role in the marketing department at WorldCorp, you might want to share a clip of a new radio ad campaign, or a short video showing some concepts for new ads to be placed on the website for a new line of products. You can do this by embedding various media types into a slideshow presentation. The Media command group is located all the way on the right side of the Insert ribbon tab. You have three options to choose from, as shown in Figure 7.28 : video, audio, and screen recording. The screen recording option will allow you to record your computer screen and insert it into your presentation.
Let’s add a video to our kayaking slide. We have the option of adding a video that we have created ourselves, a stock video that is already available in PowerPoint, or a video that is available online, such as from YouTube. You will want to consider the source of your media, as well as how you will be presenting this material. For instance, is the media file linked to the internet? If so, you will want to ensure you have internet connectivity in order to play the video. For this example, let’s search stock videos for a kayaking video to insert into the slide. As a word of caution: do not overuse these tools. Consider only the additions that will enhance the presentation content. Not every slide should include media, and not all presentations are appropriate for media.
To add media to a slide, select the slide for the addition. In this case, insert the video on the Background slide. Go to the Insert tab and click on the Media command group. Select Video, then select Stock Videos from the menu ( Figure 7.29 ). In the search bar, type “kayak” to locate a kayaking video to insert onto the slide. Once the video is on your slide, you have the option to resize it ( Figure 7.30 ).
Once the video is inserted into the slide, it will automatically play when you get to that slide in the presentation. However, you can change this through the Playback tab that becomes available on the ribbon when the video is selected ( Figure 7.31 ). It is important to preview the video before presenting or sending the presentation to others. Previewing the video in your presentation ensures that it meets your expectations, enhances your message, and delivers a seamless viewing experience to your audience. It allows you to proactively address any issues, improve the overall quality, and ensure a successful presentation. Notice there are several options available on the Playback tab. Experiment with the settings to see which ones appeal to you most and give the slides a professional appearance.
Finalizing Your Slideshow
Before you complete your presentation, you should give it a final review so you can see exactly how it will appear to your audience. It is also important to practice your presentation and consider the other, nondigital elements involved in a presentation, such as monitoring the length of your presentation and interacting with the audience.
By accessing the Slide Show tab, as shown in Figure 7.32 , you can view the complete presentation from start to finish. The first command group in this tab is called Start Slide Show, and you can choose From Beginning or From Current Slide, and the presentation will do just that. This is a wonderful way to preview all the transitions and animations you have added, as they will appear to the audience. Next, you can choose the option to Present in Teams, which we covered in Essentials of Software Applications for Business . You need to be logged into your Microsoft account to use this option. The next command is Custom Slide Show, which allows you to choose the slides to use in the show. This is a helpful option should you need to shorten the presentation.
Next you can choose the Rehearse with Coach tool, which allows you to practice the presentation and get feedback in real time. This tool will listen for things such as using “uh” or “um” in the presentation as well as how fast you are speaking. Not only will the tool give you a summary of items related to your speaking skills, but it will also provide you with some strategies for improvement. You will need to have the microphone enabled on your computer to use this feature. This is a helpful tool as you work to develop your skills presenting in front of a group.
The next set of commands is in the Set Up command group. Rehearsing the timing, playing narration, and other options are controlled through the tools in this command group. These tools allow you to fine-tune your presentation options. Clicking on the Set Up Slide Show button, for example, opens a menu with a number of different settings, as shown in Figure 7.33 .
As you can see, you can set the Show type as either presented by a speaker in full screen mode, browsed by an individual in window mode, or browsed at a kiosk in full screen mode. The default setting is presenting full screen, where you can click through the slides as you present them. The window mode setting allows you to present with the slides in a resizable window rather than in full screen. Finally, the kiosk setting is used when you want to run the presentation continuously, such as at a company event. For example, suppose you want to have a new marketing campaign available for employees to view at an internal conference. By choosing the kiosk setting, the slideshow could run automatically and continuously until you turn it off.
The Set Up Slide Show tool also gives you the option to Hide a slide, Rehearse the timing, or Record the slideshow. Other options in this window require just checking the appropriate boxes, such as Keep Slides Updated, Play Narration, and so on.
The last command group on the Slide Show tab is Captions & Subtitles. The tools here allow you to turn on and modify the captions and/or subtitles in your slideshow. You can determine where you would like the subtitles to be placed—for example, at the top of the slide.
When adjusting the caption and subtitle preferences on a Mac, you will be directed to your operating system’s Accessibility settings.
If you need to record the presentation to send to others or even for your own viewing, you will find the tools you need in the Record tab ( Figure 7.34 ). This feature in PowerPoint allows you to capture your presentation, either from the beginning or starting from a specific slide, and customize the recording options ( Figure 7.35 ).
In Recording Options, you can choose whether to record the entire presentation from the beginning or start recording from a specific slide. This flexibility is helpful if you want to focus on specific sections or if you have already recorded part of the presentation and want to continue from where you left off. PowerPoint allows you to record audio along with your presentation. You can use a microphone to narrate your slides and explain concepts, making the recording more engaging and informative. This feature is particularly useful for online training sessions, narrated presentations, or self-paced learning materials.
In addition to audio recording, PowerPoint offers screen recording functionality. This enables you to capture actions on your screen, such as demonstrating software usage, showcasing a website, or walking through a step-by-step process. Screen recording can enhance the clarity and understanding of your presentation, especially when visual demonstrations are involved. After you complete the recording, you can export it as a video file. This video can be shared with others, uploaded to video hosting platforms, or embedded in websites or learning management systems. Exporting the recording as a video makes it more accessible and shareable across different devices and platforms. During the recording process, you can add private notes to your slides to help guide you through the presentation. These notes are only visible to you and serve as personal reminders or prompts while delivering the presentation. They are not included in the recorded presentation itself.
The Review tab, as shown in Figure 7.36 , is used primarily when you are collaborating on a presentation with someone else or incorporating feedback on your draft slides. However, this tab still offers valuable resources if you are creating your presentation on your own. The first command group in this tab is Proofing. As with any document you produce, it is essential that you proofread everything, including text, figure captions, and any handouts you may have for the participants.
The presentation and handouts should reflect your professionalism and attention to detail. But, you should not rely solely on the spell check tool to find all the errors. Among other things, spell check often does not identify spelling errors in proper names or words that are spelled correctly but used incorrectly. Additionally, errors will be much more noticeable when they are displayed on a large-format screen. It’s easy to overlook errors in our own work, so be sure to have a friend or coworker review the slides to look for errors.
All of the proofing options can be set before you begin writing. This is done by choosing File, Options, and then Proofing. These options are similar to what we covered in Essentials of Software Applications for Business .
Link to Learning
Proofreading a presentation can be much different from proofreading a document. This article on the importance of proofreading presentations addresses how to effectively proofread PowerPoint presentations.
The Thesaurus tool is helpful when you write the dialog that will accompany the slideshow, as it will offer alternatives to the words you have used in the presentation. For example, we used the word “hometown” in our background slide. When we click on that word and choose Thesaurus from the Review tab, a pane will open on the right offering alternative words that are similar to “hometown” ( Figure 7.36 ). This tool can come in handy if you find yourself using the same words multiple times in a presentation. You can vary the words used and still convey the same message.
On Mac, this command is found in the PowerPoint menu, then Preferences, then Proofing.
As in other Microsoft products, the Review tab is also where you can find tools for collaboration and commenting. (PowerPoint does not allow users to track changes.) We discuss a workaround for this in the Compare section. When working with others to produce a presentation, your colleagues have the option of adding comments to it. To do this, open the Review tab, then click on a word in the place where you want the comment to appear, and then click on New Comment. As you can see in the example slide in Figure 7.37 , the Comments pane opens to the right. After you type the comment and click Enter, a reply text box becomes available. You, or anyone else with permission to work on the presentation, can enter a reply to the comment here.
Notice that a callout symbol opens in the place where you want the comment to apply. You can move the callout symbol around on the slide without affecting the content of the comment.
Unlike Word, PowerPoint does not offer a tracking function. However, you can use the Compare command, also found under the Review tab, as a workaround to tracking changes. To use this tool, you will need to have different versions of the presentation saved. The Compare command then will look for differences between the two files, and you can either decide one by one to accept (or reject) each change or accept (or reject) all the changes/differences between the two files.
To see how the Compare command works, let’s use the presentation we created in the previous chapter, along with the updated version we have created thus far in this chapter. Here we have saved the previous chapter presentation as “version 1” and the current presentation as “version 2.” Note that the different versions of the presentations must have different names. To begin, choose the Compare command from the Review tab and find the “version 1” file you are going to use to compare to the current version ( Figure 7.38 ). Then click Open, and you will notice that you now have access to other tools available in the Compare command group on the Review tab. You can use the tools and the pane on the right of the screen to scroll through the differences between the two files and determine if you want to accept or reject the changes. You can choose to accept or reject the changes for each individual slide, or you can accept or reject them for the entire presentation as you move through the comparisons ( Figure 7.39 ).
Printing a Presentation
Sometimes, as a presenter, you may wish to print your presentation as a handout for the audience. You could provide the slides as a handout prior to the presentation so that the participants can take their own notes on the information, or offer them to participants as they exit the presentation. PowerPoint gives you many options for accomplishing this. On the File menu, click Print, and you will see a familiar pop-up menu, as shown in Figure 7.40 and Figure 7.41 .
The Print All Slides option allows you to print the whole presentation, to print just the current slide on the screen, or to selectively print only the slides you want. The Print Full Page Slides option brings up a menu of layouts so you can print anywhere from two to nine slides to a page and can indicate whether you want them to appear in a horizontal or vertical format. You may also choose to print the Notes page and the outline. These can be helpful as you rehearse your presentation.
Other Considerations Before Presenting
In addition to the practical aspects of your slideshow—such as how the slides appear to your audience, what media to include, and how to print your slides—there are other, less tangible things to consider before showing your slide collection to an audience. These include the length of your presentation, audience interaction, notetaking, and accessibility.
Presentation Length
When constructing and preparing for a presentation, you need to know how much time is allotted for the talk. Is your presentation the main component of the meeting, or will several others also be presenting? Knowing how much time you have to present will dictate how much information and, in turn, how many slides you will have in the slideshow. Keep in mind that you should not overuse slides. You are the main part of the presentation. The slides are there to enhance and support what you are saying by keeping the audience engaged and conveying the main points you want to get across. They should not contain all the content you are sharing. The optimal number of slides depends on the content you are sharing. For example, if you are sharing complicated data in an informational presentation, you will need more slides to break up the material. If you are giving an inspirational presentation, you may need fewer slides, most of which should be images rather than text.
A good strategy is to use allotted time to determine the number of slides. As a rule of thumb, each slide should be on the screen for about a minute, so a ten-minute presentation would have about ten slides. Of course, this can vary based on the type of information contained on the slides. The audience might need more than a minute to digest and understand data and graphs on a slide, whereas they may need only fifteen or twenty seconds to get the full effect of a slide consisting entirely of pictures. Practice your presentation; you may want to have someone track the time, or you can simply set a timer on your phone. You could use the timer to gauge how long you need to spend on each slide. You may even want to have this timer displayed on your laptop screen close to your speaker’s notes so it will be in your line of sight. If you run out of time before you have discussed all of the slides, you will know that you have too many slides. At that point, you can consider either removing some slides altogether or merging information on two or more slides onto a single slide.
Audience Interaction and Questions
When you give a presentation, it is likely that there will be questions from the audience ( Figure 7.42 ). During your preparation phase, brainstorm a list of questions that might be asked or areas where you think more clarification will be needed.
Consider creating a Frequently Asked Questions (FAQ) page to distribute to the audience for questions that you feel are likely to be asked. You might even have a friend or family member listen to the presentation and ask you tough questions. This exercise will not only help prepare you to answer tough questions but can also help you maintain your composure if someone challenges you in front of the group. If that happens, you should remain professional and not respond defensively to questions or challenges from participants. You may even want to encourage interaction and questions from the audience. Take a bit of time to plan ahead for how you will interact with the audience and address questions from participants. You can certainly ask the audience to hold all questions until the end of the presentation, but be aware that this often reduces engagement, and you may find that you have no questions at all at the end of the presentation—only silence. If you want to hold questions until the presentation is over, you might ask a colleague or friend to be prepared to ask a question that will get the conversation started. Sometimes participants will be more engaged after the first question, so having a “plant” in the audience to ask the first question can get things moving.
Also consider a strategy where you have audience interaction from the beginning and encourage questions during the presentation. One effective way to set the stage for having a dialog with the audience during the presentation is to start by posing a question to participants. This can be very general—“How is everyone this morning?”—or it can be something specific related to the presentation you are about to give. Amir’s introduction presentation for WorldCorp conveys his leadership skills and his passion for kayaking, so he might start by asking who in the audience enjoys water sports or what characteristics make a good leader. All of these ideas will set the stage for a more interactive presentation. Figure 7.43 outlines some other tips and strategies for handling audience questions.
Speaker’s Notes
You can convey a more professional and well-prepared appearance in front of a group if you present without holding note cards or note pages during the presentation. However, it may be helpful for you to have a few notes visible to keep you on track during the presentation or to capture details such as sales figures that you want to be sure to quote exactly. This is where speaker’s notes can come into play. In Normal view, you can see the space for notes at the bottom of the slide ( Figure 7.44 ). If you do not see the Notes section at the bottom of the slide, you can click on the Notes button from the View tab. When you add your notes, they will appear as shown below the slide ( Figure 7.45 ). Click to add the details and click Save.
When you present your slideshow, do so using Presenter’s View . Make sure you check the box found on the Slide Show ribbon. Your notes will appear on your laptop but not on the projection screen. Your audience will not see your notes.
Accessibility and Languages
An additional consideration when preparing a slide presentation is making sure the information and format of the presentation can be understood by all of your viewers. The Check Accessibility tool in PowerPoint functions in the same way that it does in Word. This feature can be set to continue running while you are creating the presentation. It will look for items that might cause accessibility issues, such as color contrast and font size, and offer suggestions for correcting the issues. For example, the tool might find that there is not enough contrast between the background color and the text color, making the text hard to read. Or it may flag text in a table as being unreadable due to it being too small. The Accessibility tool will also indicate if images have appropriate alt tags associated with them.
You may also have speakers of other languages in your audience. The Translate tool, found in the Review tab, can be helpful if you need to make the material available in a language other than the one you wrote the slideshow in. The Translate tool can be used to translate the entire presentation or just the current slide. (If you speak a language other than English yourself, you can also set the default language to be different from English when typing in content to the slides.) A word of caution for relying solely on the Translate tool: like the spell check tool, it may not be completely accurate and should be reviewed by a person. It would be beneficial to have a proficient speaker of the language review the translation for accuracy before you share the presentation. As WorldCorp operates globally, this tool can be useful when sharing information with the company’s international divisions.
Room Setup and Technology
You will likely be presenting with several types of technology, including the laptop on which you created the slideshow, monitors, audio equipment, and others. As part of your preparation process, make sure you understand the environment in which you will be presenting. If you can, visit the physical space in advance and see how the room will be set up. This may mean you will need to make time to come to the room on a day prior to your presentation or to show up early on the same day to familiarize yourself with the room and technology.
When you are there, you should be looking at how the audience will be arranged in relation to you as the speaker, as well as the setup of the technology. You will also want to know what the “speaker space” looks like. Will you have space at the front of the room to walk back and forth a bit, or will you be restricted to standing behind a podium or sitting at a computer terminal? You will also want to test the acoustics in the room. You will want to know if your voice level will be appropriate or if a microphone will be needed. Another item to consider is how you will manage printed handouts for the audience if you have incorporated these into the presentation. Will the room setup give you easy access so you can distribute the handouts, or will you need to have them available as participants enter the space? You may want to consider asking a colleague to be responsible for passing out the materials.
The point is to be prepared and know the space before giving your presentation. This will not only set your mind at ease if you are nervous, but it will convey a level of professionalism during the presentation. Coming unprepared for the layout of the room can add an unnecessary layer of stress and confusion when giving an important presentation.
It is even more advantageous if you can view your slideshow in the space you will be presenting in. Put your slides up on the display screen and go to the back of the room to see how they look. Often, how slides appear on the computer or laptop screen may not be how they show up on a large projector screen or a large monitor. By previewing the slides from the back of the room, you can determine if changes are needed to color schemes or font sizes to make the slides more readable from that distance.
Being prepared for the various technologies you will encounter is also important. Some technologies you can provide yourself, such as a slide clicker. A slide clicker , or presentation remote, is a tool that can pair with your laptop and allow you to click through your slides from a distance. Some remotes also include laser pointers , so you can point to things on your slides from a distance. If the slide clicker has a laser pointer included, make sure you know how to use the pointer and think about how you might incorporate it into your presentation. You may also have several audio options available to you. Using a lapel microphone , or a mic that clips onto your shirt, will allow you to move freely about the room. However, some spaces may only have a microphone at a podium, so you will need to stand in one place to use it. Your approach to the presentation will likely change if you have to click the slides at the computer and be at a podium for the microphone. There is more flexibility to move about the room when giving a presentation if you have a slide clicker and lapel microphone.
It is also a good idea to test each piece of equipment to make sure it is functional and that you know how to use the technology. It can be embarrassing to be in a situation where the technology is not working or you do not know how to use the devices. Many venues and companies will have a person assigned to address technology issues during presentations. This could be someone from the information technology department or someone else who is familiar with the room and the technology. It is a good idea to find out if that person will be in the room during your presentation or available quickly if needed.
Some additional technology considerations include issues of compatibility between your file and the computer available in the room. We see this often when going from a Mac to a Windows environment. Make sure your file is saved in a format that will be universally accessible. Often, saving your file in PDF format ensures it can be accessed on a variety of platforms. (You can review how to do this in Essentials of Software Applications for Business .) It is also a good idea to have your presentation file saved in multiple locations, for example, on the hard drive of your laptop, in One Drive, and on an external storage device such as a flash drive, in case the internet is inaccessible. You may also want to email yourself a copy of the file so that you can access it that way if necessary.
There is no expectation that you are a computer expert, but preparing and having a backup plan in place can help ease your mind and reduce some stress associated with giving a big presentation. Also, if you know you will have challenges with technology, be sure to let the meeting organizer know so they can be prepared to help or have someone who can assist if needed.
Types of Presentations
With the technology available today, it is likely that you will be a part of a meeting that has virtual participants. Many meetings will still be conducted fully in person with all participants in the same room, but it is becoming more common for meetings to be either fully virtual or hybrid, with some in-person participants and some online participants. Your preparation for such a meeting can vary based on the type of presentation you will be giving. Most of our discussion so far has been centered on fully in-person presentations with the speaker and the audience in the same physical space. If you will be part of a meeting where some or all will be participating virtually, there are other items to consider.
Fully Virtual Meetings
Let’s first consider a fully virtual meeting, where you as the speaker as well as the participants are online. Virtual presentations can be even more impactful and beneficial due to various web conferencing tools that can enhance the presentation, like polls and other tools. This could be using a program such as Zoom or Microsoft Teams . Each participant will join the meeting space via the internet and while being physically in their own space. If you have had online courses, you may have already experienced such a meeting and may have a good idea about some of the potential challenges and benefits. For example, a fully virtual meeting can be accessible for everyone who has the technology needed to attend. In some cases, you can also share more content in a virtual meeting than in an in-person meeting through the chat feature and other document sharing options. The chat feature also allows a bit more audience interaction, as all participants can post questions and comments in the chat. Finally, you may find an online presentation less stressful than an in-person event because you do not have to stand in front of a crowd but can be in a familiar, comfortable space such as your own office.
However, virtual presentation s also pose numerous challenges. First, it is much harder to keep the audience engaged, especially if participants do not have their cameras on. You can politely request participants keep their cameras on during the presentation, but that does not automatically mean they are more engaged or that they will comply. And this can be hard to manage as the speaker if there is a large audience. Think about times that you have participated in an online class or meeting. You may be doing other things such as checking email or dealing with issues at home during the meeting/class. One way to combat this in an online meeting is to set up breakout sessions/groups where the participants interact with one another in a small group setting. You can also use the chat feature or conduct a live poll to encourage audience participation. As the speaker, you will need to make an active effort to engage participants. This can start even before the actual presentation begins.
For example, you might send participants a questionnaire beforehand and address those questions during the presentation. Or you can survey participants to identify key topics they would like you to address. Finally, if you ask participants to pre-register, you will have a list of their names if you want to address them individually during the presentation.
Preparing for a virtual presentation is the same in many ways as preparing for a fully in-person talk. For example, preparing your slides is the same, but you may be able to include a bit more text on each slide because participants will have the slides right in front of them. You will still need to prepare and practice with the technology. Be sure you know how to mute and unmute participants and how to share your screen with the audience so they can see the slides. These settings may be different depending on the software you are using to present, whether it is Zoom, Google Meet, Webex, or another program. You need to make sure your online connectivity is dependable and that you have good sound quality as you are speaking. You will need to test the camera on your computer in the space that you will be in. Look at the lighting in the room and see how it looks on the screen. Keep your camera at eye level and examine how you are spaced in the video screen. You do not want to be either too close to the camera or too far away; either will make it harder to hear what you are saying. To reduce distractions, turn off on-screen notifications for any apps installed on your computer. (For example, make sure that participants won’t hear a “ding” every time you get an email.) Make sure your presentation environment is a quiet, professional space, with minimal distractions. You probably do not want unwanted guests, such as your cat or dog, making their appearance during the presentation. Look at the background the audience will see behind you. Many virtual presentation platforms have tools that allow you to blur and change the background for a more professional appearance. Make sure you are focused on the camera and the presentation. You do not want to give the impression that you too are distracted and not engaged, especially when you are the speaker.
Additionally, consider setting expectations for the audience at the very beginning of the presentation. Do you want participants to put their questions in the chat, or would you like them to use features such as the “raise hand” icon to indicate they have a question? Will you have breakout sessions during the talk? Ask participants to turn on their cameras and mute themselves, and then let them know if the session is being recorded. Addressing these items at the beginning of the presentation will help avoid distractions later.
Finally, decide how you are going to monitor the chat during the presentation. Will you be answering questions and comments while you are speaking? It may be a better idea to ask a colleague to be responsible for monitoring the chat and the participants for relevant questions and comments. That way, you can focus on presenting without the added stress of keeping track of the chat.
Hybrid Presentations
Hybrid presentations, where some participants are in-person and others are virtual, pose additional challenges. As much as possible, try to set the stage so that all participants have a similar experience and walk away with the same information. However, you cannot control all the nuances of a hybrid presentation , starting with the risk that online participants will feel left out of the conversation. Extra care will be needed to make sure the virtual participants are fully engaged. At the beginning of the session, acknowledge and welcome those who are online. When you are speaking to a hybrid group of participants, it is important to make eye contact with both groups. Make sure to focus attention on the virtual participants on the screen as much as those who are in the room. Again, asking participants to keep their cameras on will help keep them engaged in the meeting. Remind yourself (or a helper) to check regularly for raised hands and chat comments during the presentation. When a comment is posed in the chat by a virtual participant, read the comment aloud for the in-person audience. If you are using breakout rooms during the session, include virtual participants in the activity and combine groups so there is interaction between both in-person and virtual participants. Consider displaying the virtual participants on a large screen so the in-person audience can see them.
It is impossible to anticipate all the hiccups that can happen during a presentation. With careful planning beforehand, however, you can be prepared for many of the likely issues and feel less anxiety when speaking in front of a group, whether in person or virtual.
Creating a real-time poll during your presentation can help increase engagement during a virtual or hybrid presentation. Instructions on how to create a poll in Zoom are given on the Zoom platform.
This book may not be used in the training of large language models or otherwise be ingested into large language models or generative AI offerings without OpenStax's permission.
Want to cite, share, or modify this book? This book uses the Creative Commons Attribution License and you must attribute OpenStax.
Access for free at https://openstax.org/books/workplace-software-skills/pages/1-chapter-scenario
- Authors: Tammie Bolling, Angela Mitchell, Tanya Scott, Nyrobi Wheeler
- Publisher/website: OpenStax
- Book title: Workplace Software and Skills
- Publication date: Nov 29, 2023
- Location: Houston, Texas
- Book URL: https://openstax.org/books/workplace-software-skills/pages/1-chapter-scenario
- Section URL: https://openstax.org/books/workplace-software-skills/pages/7-3-preparing-a-microsoft-powerpoint-collection-for-presentation
© Jan 3, 2024 OpenStax. Textbook content produced by OpenStax is licensed under a Creative Commons Attribution License . The OpenStax name, OpenStax logo, OpenStax book covers, OpenStax CNX name, and OpenStax CNX logo are not subject to the Creative Commons license and may not be reproduced without the prior and express written consent of Rice University.

- Certifications
PowerPoint Slide Elements: Best Practices and Tips
- December 27, 2022
- 11 Comments

The Learning Hour* – Week 11 : PowerPoint Slide Elements
Posted by Ashish Agarwal

A PowerPoint slide is the fundamental building block of a Presentation. A PowerPoint presentation is simply a collection of different slides arranged in a logical manner to effectively communicate a story.
So then, what are the main components of building a slide? We look at the 5 most important elements which needs to be there on any slide.
1. Slide Title

Always start creating a powerpoint slide with the Slide Title. Think of it as the key message or insight that you would like to present on the slide. Ideally , there should be only 1 main message on each slide. The slide title should be crisp and concise to effectively communicate the key message. It should be written in a powerful way such that the audience understands the message without having to read the main content of the slide. The slide title should present the slide synthesis of the main so what from the content on the slide. Remember, not a summary regurgitating the same facts which are on the slide but helping the audience move from facts to the most important so what from that single slide.
2. Charts/Graphs

There are a number of data related PowerPoint charts that is in-built to represent numerical information. Use them extensively to illustrate numbers and quantitative information. You can choose from a number of chart options like Line Chart, Pie Chart, Waterfall chart, Bubble Chart, etc. Be careful to use the right chart for the right data. Using the right charts for financial data helps to enhance the visual communication of the powerpoint slide.
3. TEXT

Gone are the days where you would use a PowerPoint slide to put lots of text on it. No one reads those slides anymore. Instead, use TEXT comments sparingly to only indicate the main point. Choose a big font size of at least 24 to ensure your audience can easily read the slides. If you must use bullets, not more than 3-5 bullets on a slide. You can also use Smart-Arts to represent text based information on the slide. Ensure you follow basic presentation tips that will make the reader engaged with reading the information on your slide.
4. Images/Icons

Use Images and Icons to reinforce a point and not just to jazz up the powerpoint slide. Images are a great way to capture the attention and effectively communicate with the audience. There are a number of websites that allow you to download high quality images and icons. So, make the most of them. Sometimes you many need a paid subscription to access these images but there are lots of free websites as well that will allow you stock images for free.
5. Footnotes/Source:

Be sure to add any important footnotes or source on the slide. Footnotes and source complete a slide with any extra information that the audience should be aware of. If there is a source of information that you would want to call out on a slide, footnotes are the best place to put it. They serve to improve the authenticity of the presentation with the right attribution provided.
So as you can see, the above 5 elements are extremely crucial to make a slide in PowerPoint. These 5 elements are part of any slide and if we do each of them well, the overall slide looks compelling and helps us to convey the right piece of information to the audience.
What else do you use? Put your thoughts in the comments below.
Read more about this post on our LinkedIn page as well.
Share This Post:
11 thoughts on “powerpoint slide elements: best practices and tips”.
[…] it much more difficult for you to find specific data once you have it alphabetized. – Use conditional formatting to help highlight certain data – For example, if you track your expenses in Excel, you might […]
[…] Enhanced production value such as superior cinematography, crisp audio-engaging visuals on PowerPoint slides, and polished editing, can elevate the viewer’s experience, making your content more […]
[…] can now add any typeface that you own as an external font so that it can be used anywhere in your PowerPoint slides. Here’s […]
[…] are the most basic elements of a flowchart. These are the square boxes, arrows, circles, and other basic shapes that are used to create […]
[…] font from Times New Roman to something a little more interesting, for example, will make your whole presentation look a lot more […]
[…] example, if you have a PowerPoint slide about your company’s vision, it would be helpful to summarize what your business is trying to […]
[…] is not an easy affair.As a financial analyst, one needs to master the art of tactfully playing with powerpoint slide elements to represent his/her thoughts beautifully through the PowerPoint Presentation. Designing a […]
Magnificent website. A lot of helpful info here. I¦m sending it to a few buddies ans additionally sharing in delicious. And of course, thank you for your effort!
Excellent read, I just passed this onto a colleague who was doing some research on that. And he just bought me lunch because I found it for him smile Therefore let me rephrase that: Thank you for lunch!
The following time I learn a weblog, I hope that it doesnt disappoint me as much as this one. I imply, I do know it was my option to learn, however I actually thought youd have one thing fascinating to say. All I hear is a bunch of whining about something that you may repair for those who werent too busy looking for attention.
Add a Comment Cancel reply
Save my name, email, and website in this browser for the next time I comment.
Get A 5X Raise In Salary

Reset Password
Insert/edit link.
Enter the destination URL
Or link to existing content
Don’t Present Without These 16 PowerPoint Dos and Don’ts

Table of Contents
Have you ever struggled to hold your audience’s interest during a presentation? Painstakingly created slide after slide only to be met with bored, disengaged faces?
Even the most confident speakers can falter when it comes to crafting compelling PowerPoint decks. Without proper slide design best practices, it’s easy to lose your audience in a sea of dense text, chaotic graphics, and disorganized content.
You don’t have to suffer through presenting lackluster slides anymore. In fact, following simple PowerPoint best practices can totally transform your deck from meh to marvelous.
In this post, we’ll share 16 PowerPoint dos and don’ts to level up your presentations and captivate audiences. These tips will help you create professional, visually striking slides your viewers will remember.

16 Dos And Don’ts Of Powerpoint Presentations
Here are some important 16 presentation dos and don’ts you need to keep in mind while creating slides and presenting them.
PowerPoint Dos
Let’s start with the best practices and strategies to implement when designing PowerPoint presentations . What techniques should you use to create memorable, polished slides?
1. Keep It Simple With Minimalist Design
Let’s start with a common mistake – overcrowded, distracting slide design. We get the temptation to tart up slides with fancy backgrounds. But resist the urge! Fancy templates with complex colored patterns or photos unrelated to your content just make it harder to digest key information.
Instead, embrace the power of simplicity. Stick to minimalist templates and avoid template themes with extra decorations. Use neutral backgrounds and empty negative space to let your content shine. Remember, your audience came for your message, not for clip art kittens. Keep slides clean and attention stays where it should be.
2. Cut the Clutter – Follow the 6×6 Rule
Now for another slide buzzkill – mammoth blocks of dense text. You may be tempted to pack slides with long sentences and paragraphs. Don’t give in! Text-heavy slides are guaranteed to lose audiences fast.
For easy-to-digest nuggets, follow the handy 6×6 rule. Limit slides to just 6 lines of text maximum, with each line containing 6 words max. Anything more turns into an overwhelming wall of words.
Stick to concise phrases, short sentences, and bulleted lists. Use just keywords and supporting stats – leave nonessential info out. With this less is more approach, key points will stick better.
SlidesAI is a text-to-presentation add-on tool that converts walls of text into beautiful slides. It does this automatically generate condensed phrases and bullet points from your text ensuring clutter-free slides throughout your presentation.
3. Boost Engagement With Quality Visuals
Speaking of key points sticking better…you know what helps even more? Quality graphics and visuals!
Research shows we process images 60,000 times faster than text. So reinforce your points with strong visuals. Use high-resolution photos, charts, illustrations, and infographics. But avoid clipart or random stock photos – ensure every graphic clearly supports your narrative.
Well-designed visuals make presentations more memorable and engaging. Just remember to optimize graphics for high-resolution viewing and include alt-text (alternative text) descriptions for accessibility. Then watch those visual aids boost information retention and audience interest.
SlidesAI has a library of 1.5M high-quality premium stock images that you can select and include in your slides.
4. Create Brand Consistency With Formatting
Imagine a presentation where every slide had a totally different layout, colors, and font… no visual consistency at all. It would look sloppy and amateurish, right?
Formatting matters – big time! Brand your presentation by using consistent design elements throughout all your slides.
Pick one professional font combination and stick to it. Limit your color palette to 2-3 colors max. Maintain alignment and space elements consistently.
With unified branding, your deck will feel polished, intentional, and visually pleasing. Bonus – consistent branding also boosts memorability as the audience becomes familiar with your “look”.
SlidesAI ensures complete branding consistency across all presentation slides by applying your color schemes , fonts, etc to designs through artificial intelligence.
5. Check Accessibility Settings
Speaking of memorability, if some audience members can’t actually view your slides, they certainly won’t remember your message.
Ensure your presentation is inclusive and accessible to all by checking key settings. Use color contrast and legible fonts so those with visual impairments can still grasp the content. Optimize images with alt text descriptions. Verify videos are captioned.
It may take a bit more effort up front but making your presentation accessible opens your message to a wider audience. It also demonstrates corporate responsibility.
6. Create Custom Icons and Illustrations
Most PowerPoint templates come with generic icons. However, you can amplify brand personality and memorability by creating custom icons and simple illustrations.
Don’t just use a generic checkmark when you can insert your own branded indicator relevant to your company. Design illustrated characters to represent concepts. Even use emojis strategically to inject fun and improve recall.
Handcrafted visuals, even if basic in style, make presentations stand out and drive home key points better than generic clip art ever could.
7. Use Subtle Animations – But Not Too Many!
Animations, when used well, can help guide the audience’s eye and transition between ideas smoothly. Emphasize key points and important transitions with subtle animations.
Entrance and exit effects can focus attention while builds and motion path animations can demonstrate processes dynamically. Use sparingly and subtly for the best impact.
But avoid going animation crazy with sounds and excessive movement. That becomes more distracting than engaging. Limit animations so they enhance content rather than detract.
8. Pace Your Delivery
Creating stellar slides is an excellent start but don’t stop there. The live delivery is just as crucial. Invest time practicing your presentation with your slides.
Rehearse the flow and pace of your narrative. Refine and memorize transitions between slides . Nail your timing to keep the audience engaged. Get so comfortable delivering your content that the slides become natural visual aids.
With great slides and honed delivery skills, your audience will hang on to your every word from the introduction to a powerful conclusion.

PowerPoint Donts
Just as important as the dos are the don’ts. What pitfalls should you avoid when designing PowerPoint presentations?
9. Don’t Use Distracting Backgrounds
Remember our tip to embrace minimalism? Well, the opposite is using distracting backgrounds. Avoid loud colors, complex patterns, or images totally unrelated to your content. At best, they are distracting. At worst, they make key info harder to comprehend.
Stick to simple, neutral backgrounds. If using an image, ensure it directly reinforces your narrative. Anything extra risks your message getting visually lost. Keep backgrounds clean so content remains the focal point.
SlidesAI avoids using distracting backgrounds like crowded templates or unrelated images in the presentations. It focuses on simple, clean backgrounds to keep attention on your key content.
10. Don’t Overwhelm With Walls of Text
We covered the 6×6 text limit rule earlier. But even with 6 lines and 6 words, slides can become text walls without good visual breakdown. Big blocks of text are tiring to read and make retainment tough.
Instead, thoughtfully chunk text into concise sections. Use headers, subheaders, and bullet points to organize key bits. Align text left for easier scanning. Supplement with supporting imagery. Breaking up text improves comprehension drastically.
11. Don’t Rely On Boring Bullets
Speaking of bulleted lists, bullet overkill is another issue that turns slides into snore fests. Slides crammed with back-to-back bullet points lose audiences fast. The endless text blurs together with minimal memorability.
For memorable content, limit bullets to key takeaways only. Then reinforce each point visually – a photo, icon, chart, etc. Quality visuals boost memorability way more than a slide stuffed with 11 bullet points ever could.
12. Don’t Use Inconsistent Formatting
Remember, formatting matters! Shifting layouts, fonts, and color schemes appear disjointed and sloppy. The mismatched design screams amateur hour.
Establish a visual style and stick to it slide to slide. Use the same fonts, limit your color palette, and space elements consistently. Most importantly – maintain alignment across all slides. With unified branding, your presentation will look polished and professional.
SlidesAI ensures your presentation formatting stays consistent slide to slide by applying your preferred color palette, fonts, etc through its intelligent algorithms.
13. Don’t Include Unnecessary Animations
Animations can be great for guiding the viewer’s eye and demonstrating motion. But avoid going overboard. Excessive animations, sounds, and movement become more distracting than engaging.
Use animations subtly and intentionally . Emphasize only key points and important transitions with simple builds or entrance effects. Anything superfluous, whether flying text or whooshing sounds, pulls attention away rather than enhancing content.
Keep it simple and purposeful. Let smooth, minimal animations work behind the scenes rather than take center stage away from your narrative.
14. Don’t Use Unsupported Graphics
Only include images, photos, charts, etc that directly support the ideas and messaging in your presentation. Don’t insert fluffy visuals that have no clear tie to your content.
Every visual aid you present should clearly reinforce your narrative rather than derail tangents. Unsupported graphics quickly become distractions. They also undermine your credibility if audiences can’t grasp the connection.
Keep it focused. Be intentional about every visual you include. Remove anything superfluous that doesn’t serve a purpose.
15. Don’t Plagiarize Content
While it’s fine to find inspiration from other presentations, copying chunks of text or visuals without proper attribution is unethical. Never pass off someone else’s hard work as your own.
Always credit sources directly within your presentation if incorporating external ideas, quotes, charts, images, etc. Also, avoid violating copyright laws by inserting visuals without licensing them appropriately first.
Your presentation should showcase your unique ideas, voice, and message. Ensure you create original content or properly cite anything derived from others. Your integrity depends on it.
16. Don’t Wing Your Speech
With great slides completed, don’t just wing it on presentation day. The live delivery is just as crucial. Invest time to refine your pacing, transitions, slide timing, and flow.
Practice your speech thoroughly with the deck so your narrative and movements feel natural. Nail down transition phrases between slides. Get 100% comfortable presenting your content.
With stellar slides and a well-rehearsed delivery, your presentation is sure to wow audiences from start to finish.

There you have it – 16 PowerPoint dos and don’ts for creating memorable, professional PowerPoint presentations. Apply the dos to make high-impact slides, and avoid the don’ts for mistake-free presentations.
Put these PowerPoint best practices into play and watch your ordinary slides transform into extraordinary visual stories. Your audiences will be engaged from start to finish.
But even with these tips, crafting stunning presentations can be time-intensive. Instead, let SlidesAI do the work for you using the power of AI.
SlidesAI integrates with Google Slides and PowerPoint (coming soon) to instantly generate professional presentation decks from your content. Simply input your text – SlidesAI will turn them into visually cohesive slides designed for audience engagement.
SlidesAI saves tons of time by handling slide layouts, formats, graphic design, and branding tailored to you. The AI delivers presentation-ready slides in seconds.
Take your Presentation skills from amateur to pro – try SlidesAI for free today!
What are the dos and don’ts of PowerPoint presentations?
Key PowerPoint dos include simple designs, concise text, quality visuals, consistency, accessibility, custom icons, subtle animations, and practice. Don’ts involve distracting backgrounds, walls of text, boring bullets, inconsistent formatting, excessive animations, irrelevant graphics, plagiarism, and winging it.
What is the 5 by 5 rule in PowerPoint?
The 5 by 5 rule recommends having no more than 5 lines of text per slide and 5 words per line. This keeps each slide focused and text easy to digest. Too much text overwhelms audiences.
What is the 7 rule on a PowerPoint presentation?
The 7 rule states that your slides should have no more than 7 bullet points. Like the 5 by 5 rule, this maintains simplicity for the audience. More than 7 bulleted items become hard to retain.
What are the 5 rules of PowerPoint?
5 key rules are: don’t cram slides with too much text, minimize slides for emphasis, utilize quality visuals, stick to a consistent format, and limit animations. Following these makes presentations professional, clean, and engaging.
Frequently Asked Questions
Key PowerPoint dos include simple designs, concise text, quality visuals, consistency, accessibility, custom icons, subtle animations, and practice. Don'ts involve distracting backgrounds, walls of text, boring bullets, inconsistent formatting, excessive animations, irrelevant graphics, plagiarism, and winging it.
5 key rules are: don't cram slides with too much text, minimize slides for emphasis, utilize quality visuals, stick to a consistent format, and limit animations. Following these makes presentations professional, clean, and engaging.
Save Time and Effortlessly Create Presentations with SlidesAI

17 PowerPoint Presentation Tips to Make More Creative Slideshows [+ Templates]
Published: August 16, 2023
Creating a great PowerPoint presentation is a skill that any professional can benefit from. The problem? It’s really easy to get it wrong. From poor color choices to confusing slides, a bad PowerPoint slideshow can distract from the fantastic content you’re sharing with stakeholders on your team.

That’s why it’s so important to learn how to create a PowerPoint presentation from the ground up, starting with your slides. Even if you’re familiar with PowerPoint, a refresher will help you make a more attractive, professional slideshow. Let’s get started.
How to Make a PowerPoint Presentation
- Presentation Tips
PowerPoint Design
I like to think of Microsoft PowerPoint as a test of basic professional skills. To create a passing presentation, I need to demonstrate design skills, technical literacy, and a sense of personal style.
If the presentation has a problem (like an unintended font, a broken link, or unreadable text), then I’ve probably failed the test. Even if my spoken presentation is well rehearsed, a bad visual experience can ruin it for the audience.
Expertise means nothing without a good PowerPoint presentation to back it up. For starters, grab your collection of free PowerPoint templates below.
10 Free PowerPoint Templates
Download ten free PowerPoint templates for a better presentation.
- Creative templates.
- Data-driven templates.
- Professional templates.
You're all set!
Click this link to access this resource at any time.
Tell us a little about yourself below to gain access today.
No matter your topic, successful PowerPoints depend on three main factors: your command of PowerPoint's design tools, your attention to presentation processes, and your devotion to consistent style. Here are some simple tips to help you start mastering each of those factors, and don't forget to check out the additional resources at the bottom of this post.
A presentation is made up of multiple slides, let's delve deeper into PowerPoint's capabilities.
Getting Started
1. open powerpoint and click ‘new.’.
If a page with templates doesn‘t automatically open, go to the top left pane of your screen and click New. If you’ve already created a presentation, select Open then double-click the icon to open the existing file.


That said, you can still use fun and eccentric fonts — in moderation. Offsetting a fun font or large letters with something more professional can create an engaging presentation.
Above all, be sure you're consistent so your presentation looks the same throughout each slide. That way, your audience doesn't become distracted by too many disparate fonts. Check out this example from HubSpot’s company profile templates:
Interested in this presentation template? Download it for free here.
5. Make sure all of your objects are properly aligned.
Having properly aligned objects on your slide is the key to making it look polished and professional. You can manually try to line up your images ... but we all know how that typically works out. You're trying to make sure all of your objects hang out in the middle of your slide, but when you drag them there, it still doesn't look quite right. Get rid of your guessing game and let PowerPoint work its magic with this trick.
Here’s how to align multiple objects:
- Select all objects by holding down Shift and clicking on all of them.
- Select Arrange in the top options bar, then choose Align or Distribute .
- Choose the type of alignment you'd like.
Here’s how to align objects to the slide:
- Select Align to Slide .
- Select Arrange in the top options bar again, then choose Align or Distribute .
6. Use "Format Object" to better control your objects' designs.
Format menus allow you to do fine adjustments that otherwise seem impossible. To do this, right-click on an object and select the Format Object option. Here, you can fine-tune shadows, adjust shape measurements, create reflections, and much more. The menu that will pop up looks like this:

Although the main options can be found on PowerPoint’s format toolbars, look for complete control in the format window menu. Other examples of options available include:
- Adjusting text inside a shape.
- Creating a natural perspective shadow behind an object.
- Recoloring photos manually and with automatic options.
7. Take advantage of PowerPoint's shapes.
Many users don’t realize how flexible PowerPoint’s shape tools have become. In combination with the expanded format options released by Microsoft, the potential for good design with shapes is readily available. PowerPoint provides the user with a bunch of great shape options beyond the traditional rectangle, oval, and rounded rectangle patterns.
Today’s shapes include a highly functional Smart Shapes function, which enables you to create diagrams and flow charts in no time. These tools are especially valuable when you consider that PowerPoint is a visual medium. Paragraphing and bullet lists are boring — you can use shapes to help express your message more clearly.
8. Create custom shapes.
When you create a shape, right click and press Edit Points . By editing points, you can create custom shapes that fit your specific need. For instance, you can reshape arrows to fit the dimensions you like.
Another option is to combine two shapes together. To do so, select the two shapes you’d like to work with, then click Shape Format in the top ribbon. Tap Merge Shapes .
You’ll see a variety of options.
- Combine creates a custom shape that has overlapping portions of the two previous shapes cut out.
- Union makes one completely merged shape.
- Intersect builds a shape of only the overlapping sections of the two previous shapes.
- Subtract cuts out the overlapping portion of one shape from the other.
- Fragment will split your shape into different parts depending on where they overlap.
By using these tools rather than trying to edit points precisely, you can create accurately measured custom shapes.
9. Crop images into custom shapes.
Besides creating custom shapes in your presentation, you can also use PowerPoint to crop existing images into new shapes. Here's how you do that:
- Click on the image and select Picture Format in the options bar.
- Choose Crop , then Crop to Shape , and then choose your desired shape. Ta-da! Custom-shaped photos.
10. Present websites within PowerPoint.
Tradition says that if you want to show a website in a PowerPoint, you should just create a link to the page and prompt a browser to open. For PC users, there’s a better option.
Third party software that integrates fully into PowerPoint’s developer tab can be used to embed a website directly into your PowerPoint using a normal HTML iframe. One of the best tools is LiveWeb , a third-party software that you can install on your PowerPoint program.
By using LiveWeb, you don’t have to interrupt your PowerPoint, and your presentation will remain fluid and natural. Whether you embed a whole webpage or just a YouTube video, this can be a high-quality third party improvement. To install the add-on, simple head to the LiveWeb website and follow the instructions.
Unfortunately, Mac users don’t have a similar option. A good second choice is to take screenshots of the website, link in through a browser, or embed media (such as a YouTube video) by downloading it directly to your computer.
11. Try Using GIFs.
GIFs are looped animated images used to communicate a mood, idea, information, and much more. Users add GIFs to PowerPoints to be funny or quickly demo a process. It's easy to add GIFs to your slides. To do so, simply follow these steps:
- Download and save the GIF you want.
- Go to the slide you want the GIF on.
- Go to the Home tab, and click either Insert or Picture .
- From the Picture drop-down menu, choose Picture from File .
- Navigate to where you saved your GIF and select it. Then, choose Insert .
- It will play automatically the moment you insert it.
PowerPoint Process
12. keep it simple..
PowerPoint is an excellent tool to support your presentation with visual information, graphics, and supplemental points. This means that your PowerPoint should not be your entire presentation. Your slides — no matter how creative and beautiful — shouldn't be the star of the show. Keep your text and images clear and concise, using them only to supplement your message and authority.
If your slides have dense and cluttered information, it will both distract your audience and make it much more likely that you will lose their attention. Nothing in your slides should be superfluous! Keep your presentation persuasive by keeping it clean. There are a few ways to do this:
- Limit bullet points and text.
- Avoid paragraphs and long quotes.
- Maintain "white space" or "negative space".
- Keep percentages, graphs, and data super basic.
13. Embed your font files.
One constant problem presenters have with PowerPoint is that fonts seem to change when presenters move from one computer to another. In reality, the fonts are not changing — the presentation computer just doesn’t have the same font files installed . If you’re using a PC and presenting on a PC, then there is a smooth workaround for this issue.
Here’s the trick: When you save your PowerPoint file (only on a PC), you should click File , then Options, then open up the Save tab. Then, select the Embed fonts in the file check box under Preserve fidelity when sharing this presentation . Now, your presentation will keep the font file and your fonts will not change when you move computers.
The macOS PowerPoint version has a similar function. To embed your fonts on a Mac, do the following:
- Open up your presentation.
- On the top bar, click PowerPoint , then click Preferences .
- Under Output and Sharing , click Save .
- Under Font Embedding , click Embed fonts in the file.
14. Save your slides as a PDF file for backup purposes.
If you’re still scared of your presentation showing up differently when it’s time to present, you should create a PDF version just in case. This is a good option if you’ll be presenting on a different computer. If you also run into an issue where the presenting computer doesn’t have PowerPoint installed, you can also use the system viewer to open up the PDF. No laptop will ever give you trouble with this file type.
The only caveat is that your GIFs, animations, and transitions won’t transfer over. But since the PDF will only work as a backup, not as your primary copy, this should be okay.
To save your presentation as a PDF file, take the following steps:
- Go to File , then click Save as …
- In the pop-up window, click File Format.
- A drop-down menu will appear. Select PDF .
- Click Export .
You can also go to File , then Export , then select PDF from the file format menu.
15. Embed multimedia.
PowerPoint allows you to either link to video/audio files externally or to embed the media directly in your presentation. You should embed these files if you can, but if you use a Mac, you cannot actually embed the video (see note below). For PCs, two great reasons for embedding are:
- Embedding allows you to play media directly in your presentation. It will look much more professional than switching between windows.
- Embedding also means that the file stays within the PowerPoint presentation, so it should play normally without extra work (except on a Mac).
Note: macOS users of PowerPoint should be extra careful about using multimedia files.
If you use PowerPoint for Mac, then you will always need to bring the video and/or audio file with you in the same folder as the PowerPoint presentation. It’s best to only insert video or audio files once the presentation and the containing folder have been saved on a portable drive in their permanent folder. Also, if the presentation will be played on a Windows computer, then Mac users need to make sure their multimedia files are in WMV format. This tip gets a bit complicated, so if you want to use PowerPoint effectively, consider using the same operating system for designing and presenting, no matter what.
16. Bring your own hardware.
Between operating systems, PowerPoint is still a bit jumpy. Even between differing PPT versions, things can change. One way to fix these problems is to make sure that you have the right hardware — so just bring along your own laptop when you're presenting.
If you’re super concerned about the different systems you might have to use, then upload your PowerPoint presentation into Google Slides as a backup option. Google Slides is a cloud-based presentation software that will show up the same way on all operating systems. The only thing you need is an internet connection and a browser.
To import your PowerPoint presentation into Google Slides, take the following steps:
- Navigate to slides.google.com . Make sure you’re signed in to a Google account, preferably your own.
- Under Start a new presentation , click the empty box with a plus sign. This will open up a blank presentation.
- Go to File , then Import slides .
- A dialog box will come up. Tap Upload , then click Select a file from your device .
- Select your presentation and click Open .
- Select the slides you’d like to import. If you want to import all of them, click All in the upper right-hand corner of the dialog box.
- Click Import slides.

When I tested this out, Google Slides imported everything perfectly, including a shape whose points I had manipulated. This is a good backup option to have if you’ll be presenting across different operating systems.
17. Use Presenter View.
In most presentation situations, there will be both a presenter’s screen and the main projected display for your presentation. PowerPoint has a great tool called Presenter View, which can be found in the Slide Show tab of PowerPoint. Included in the Presenter View is an area for notes, a timer/clock, and a presentation display.

For many presenters, this tool can help unify their spoken presentation and their visual aid. You never want to make the PowerPoint seem like a stack of notes that you’re reading off of. Use the Presenter View option to help create a more natural presentation.
Pro Tip: At the start of the presentation, you should also hit CTRL + H to make the cursor disappear. Hitting the "A" key will bring it back if you need it!
Your Next Great PowerPoint Presentation Starts Here
With style, design, and presentation processes under your belt, you can do a lot more with PowerPoint than just presentations for your clients. PowerPoint and similar slide applications are flexible tools that should not be forgotten. With a great template, you can be on your way to creating presentations that wow your audience.
Editor's note: This post was originally published in September 2013 and has been updated for comprehensiveness.
![Blog - Beautiful PowerPoint Presentation Template [List-Based]](https://no-cache.hubspot.com/cta/default/53/013286c0-2cc2-45f8-a6db-c71dad0835b8.png "a power point presentation is a collection of")
Don't forget to share this post!
Related articles.
![How to Write an Ecommerce Business Plan [Examples & Template]](https://blog.hubspot.com/hubfs/ecommerce%20business%20plan.png "a power point presentation is a collection of")
How to Write an Ecommerce Business Plan [Examples & Template]
![How to Create an Infographic in Under an Hour — the 2024 Guide [+ Free Templates]](https://blog.hubspot.com/hubfs/Make-infographic-hero%20%28598%20%C3%97%20398%20px%29.jpg "a power point presentation is a collection of")
How to Create an Infographic in Under an Hour — the 2024 Guide [+ Free Templates]
![20 Great Examples of PowerPoint Presentation Design [+ Templates]](https://blog.hubspot.com/hubfs/powerpoint-presentation-examples.webp "a power point presentation is a collection of")
20 Great Examples of PowerPoint Presentation Design [+ Templates]

Get Buyers to Do What You Want: The Power of Temptation Bundling in Sales

How to Create an Engaging 5-Minute Presentation
![How to Start a Presentation [+ Examples]](https://blog.hubspot.com/hubfs/how-to-start-presenting.webp "a power point presentation is a collection of")
How to Start a Presentation [+ Examples]

120 Presentation Topic Ideas Help You Hook Your Audience
![How to Create the Best PowerPoint Presentations [Examples & Templates]](https://blog.hubspot.com/hubfs/Powerpoint%20presentation.jpg "a power point presentation is a collection of")
How to Create the Best PowerPoint Presentations [Examples & Templates]

The Presenter's Guide to Nailing Your Next PowerPoint
![How to Create a Stunning Presentation Cover Page [+ Examples]](https://blog.hubspot.com/hubfs/presentation-cover-page_3.webp "a power point presentation is a collection of")
How to Create a Stunning Presentation Cover Page [+ Examples]
Marketing software that helps you drive revenue, save time and resources, and measure and optimize your investments — all on one easy-to-use platform

- SUGGESTED TOPICS
- The Magazine
- Newsletters
- Managing Yourself
- Managing Teams
- Work-life Balance
- The Big Idea
- Data & Visuals
- Reading Lists
- Case Selections
- HBR Learning
- Topic Feeds
- Account Settings
- Email Preferences
How to Make a “Good” Presentation “Great”
- Guy Kawasaki

Remember: Less is more.
A strong presentation is so much more than information pasted onto a series of slides with fancy backgrounds. Whether you’re pitching an idea, reporting market research, or sharing something else, a great presentation can give you a competitive advantage, and be a powerful tool when aiming to persuade, educate, or inspire others. Here are some unique elements that make a presentation stand out.
- Fonts: Sans Serif fonts such as Helvetica or Arial are preferred for their clean lines, which make them easy to digest at various sizes and distances. Limit the number of font styles to two: one for headings and another for body text, to avoid visual confusion or distractions.
- Colors: Colors can evoke emotions and highlight critical points, but their overuse can lead to a cluttered and confusing presentation. A limited palette of two to three main colors, complemented by a simple background, can help you draw attention to key elements without overwhelming the audience.
- Pictures: Pictures can communicate complex ideas quickly and memorably but choosing the right images is key. Images or pictures should be big (perhaps 20-25% of the page), bold, and have a clear purpose that complements the slide’s text.
- Layout: Don’t overcrowd your slides with too much information. When in doubt, adhere to the principle of simplicity, and aim for a clean and uncluttered layout with plenty of white space around text and images. Think phrases and bullets, not sentences.
As an intern or early career professional, chances are that you’ll be tasked with making or giving a presentation in the near future. Whether you’re pitching an idea, reporting market research, or sharing something else, a great presentation can give you a competitive advantage, and be a powerful tool when aiming to persuade, educate, or inspire others.
- Guy Kawasaki is the chief evangelist at Canva and was the former chief evangelist at Apple. Guy is the author of 16 books including Think Remarkable : 9 Paths to Transform Your Life and Make a Difference.
Partner Center
Working With Slides in PowerPoint [A Complete Guide!]
By: Author Shrot Katewa
![Working With Slides in PowerPoint [A Complete Guide!]](https://artofpresentations.com/wp-content/uploads/2021/08/Featured-Image-How-to-Work-with-Slides-in-PowerPoint-Optimized.jpg "a power point presentation is a collection of")
To create a powerful presentation – the kind that resonates with your audiences, you need to create great slides! But, all this work really starts with knowing how to work with slides in PowerPoint!
In this article, I will share with you all the basic details of working with slides such as adding, deleting, duplicating slides, and much more! Plus, in the end, I will also help you understand how you can design your slides to make your presentation visually appealing with great ease!
So, let’s get started!
1. How to Add or Insert a Slide in PowerPoint?
Let’s start with the basics first. Adding or inserting a slide in your PowerPoint presentation is as easy as a click of a button.
To add a slide in PowerPoint, first, click on any slide in the slide navigation panel on the left part of your screen. Then, click on the “Home” tab, and select the “New Slide” option. A new slide will be added. Alternatively, you can also use the keyboard shortcut “Ctrl+M”.
To learn this part in further detail, make sure to check out my other article on how to add a slide in PowerPoint !
Nevertheless, the process is described below in detail –
Step-1: Place the cursor in your preferred sequence
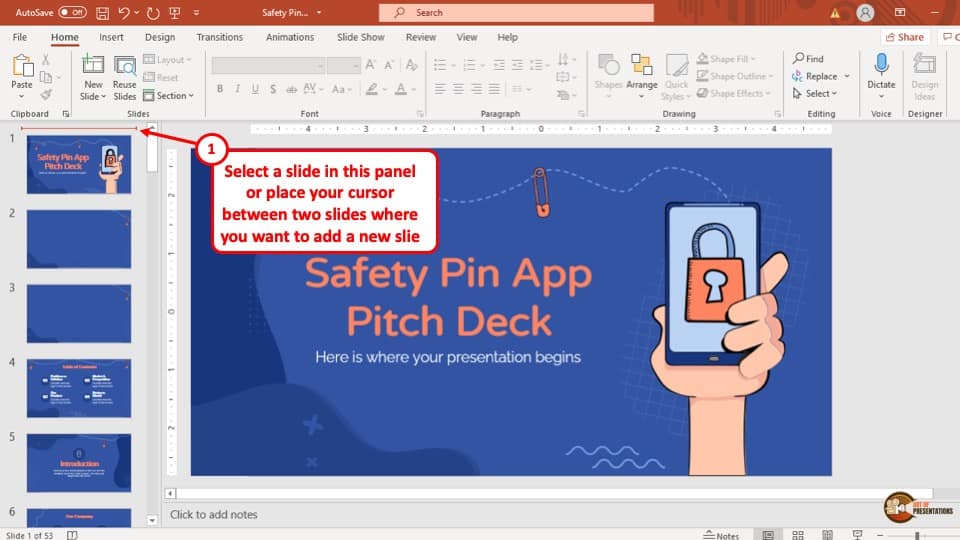
The first step is to click on your preferred sequence in the “ Slide Navigation ” bar, which is the sidebar to the left of your screen showing thumbnails of all the slides in your PowerPoint presentation. There will be an orange line indicating the selected sequence.
Step-2: Click on the “New Slides” icon
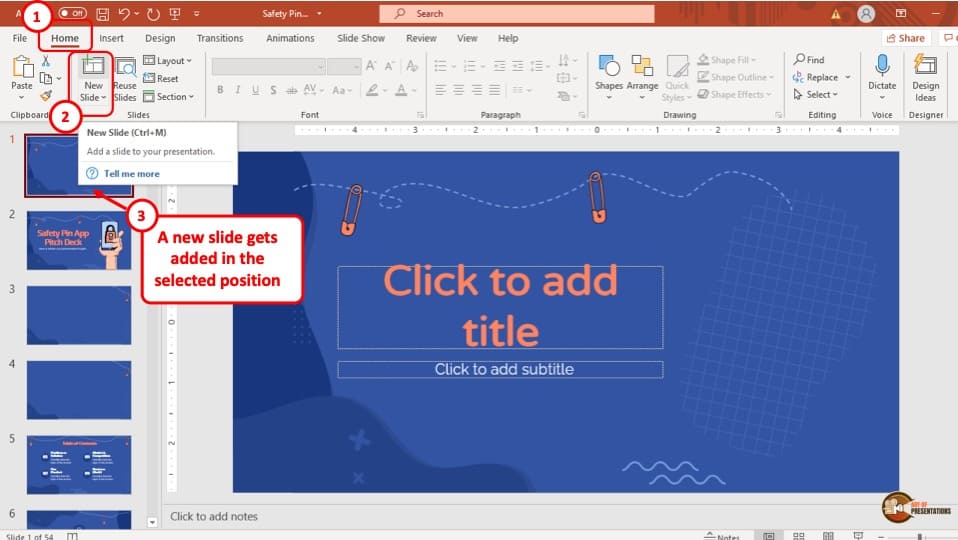
In this step, all you have to do is first click on the “ Home” tab to click on the “ New Slides ” icon. It is the icon above the button that says, “ New Slides ”. The icon looks like a plus ‘+’ sign over a square with comparative tables on it. This will immediately add a slide in the sequence of the selected area in the “ Slide Navigation ” sidebar.
2. How to Create Slides in PowerPoint?
Creating a new slide is very easy in PowerPoint. Open a new PowerPoint file and follow the two simple steps described below, to create a slide of your preferred layout in your PowerPoint presentation.
Step-1: Click on the “New Slides” button
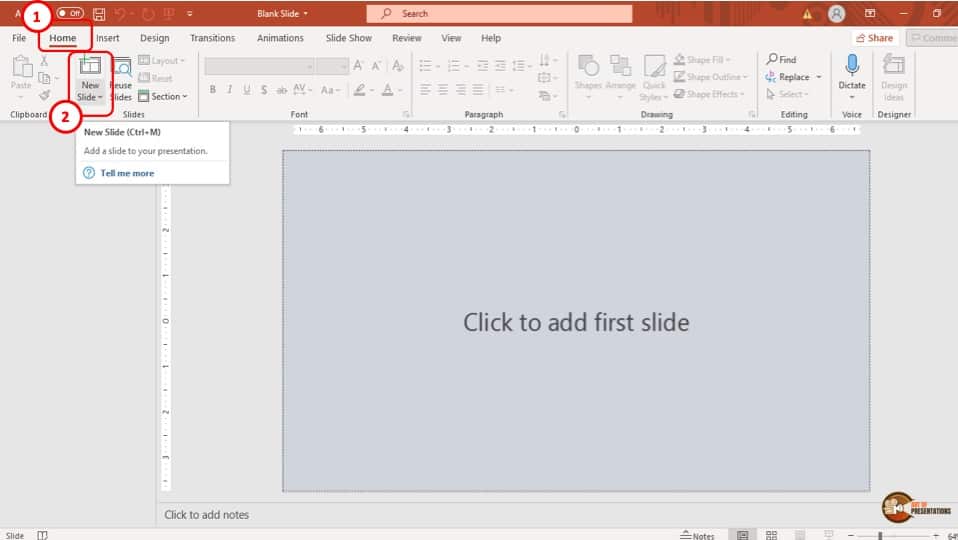
The first step of the process is to click on the “ New Slides ” button, which is below the icon that looks like a plus ‘+’ sign over a square as described in the previous step. This will open a drop-down menu.
Step-2: Select your preferred layout
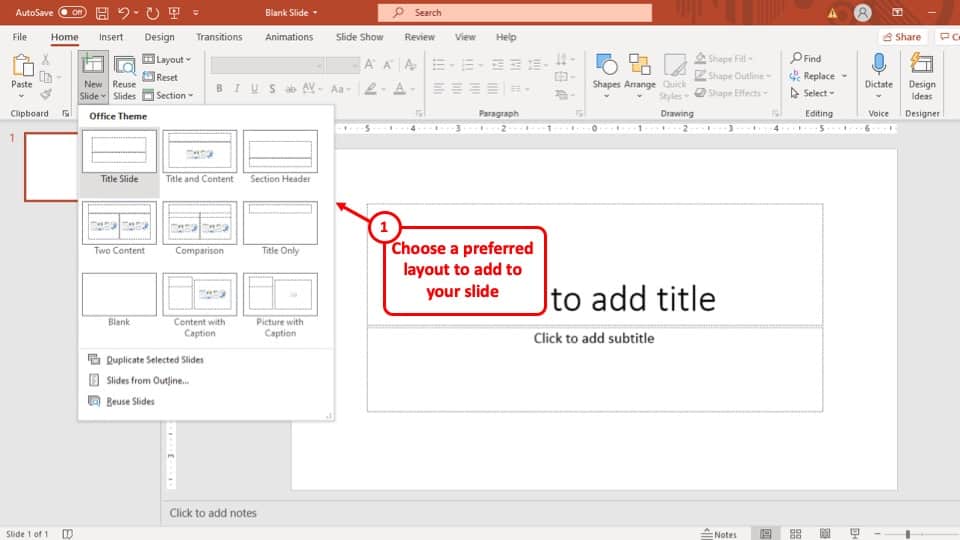
In this step, simply select your preferred layout for the new slide. Once you click on the preferred layout, the new slide will be added to your PowerPoint presentation with the selected layout.
3. How to Copy Slides in PowerPoint?
I covered this topic in complete detail in my other article on how to copy and paste in PowerPoint . You may want to check that out for more methods and secret tips!
But, in a nutshell, there are two ways in which you can copy a slide from your PowerPoint presentation. One way is to use the mouse and the other is to use the keyboard. The two methods are described below.
Method-1: Using the Mouse
You can use the mouse to copy the slide on your presentation.
Step 1 – Copy the Slide
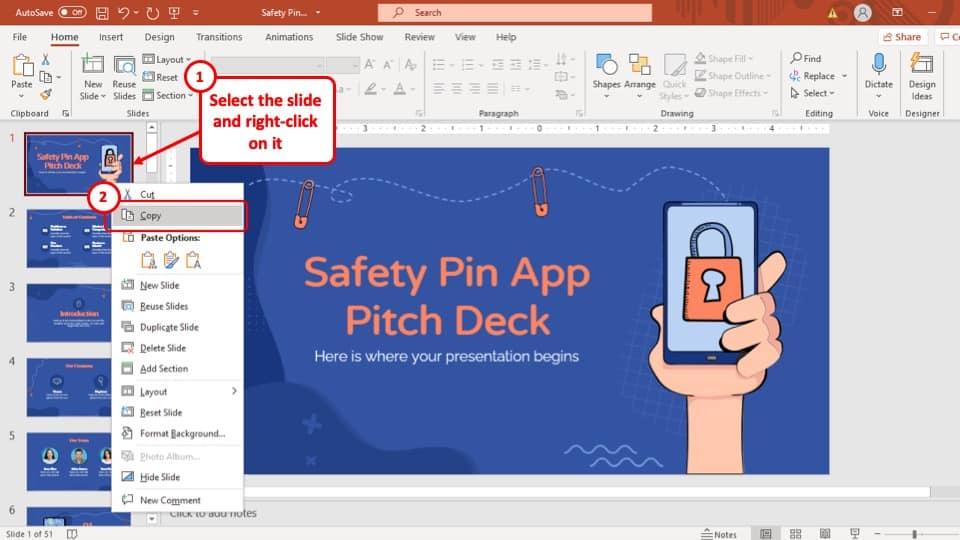
“ Right-click ” on the slide that you want to copy, and it will open the drop-down menu. From the drop-down menu, click on the “ Copy ” option.
Once you’ve clicked on the “ Copy ” option, the slide will be temporarily saved in the clipboard of your computer.
Step 2 – Paste the Slide
Just how you managed to copy a slide, you can paste the slide as well. Navigate to the location where you want to paste the slide. Then, right-click on the slide, and from the dropdown, click on “ Paste “.
Method-2: Using the keyboard
You can also use the keyboard shortcut keys to copy the slides. Let’s take a look at how it’s done.
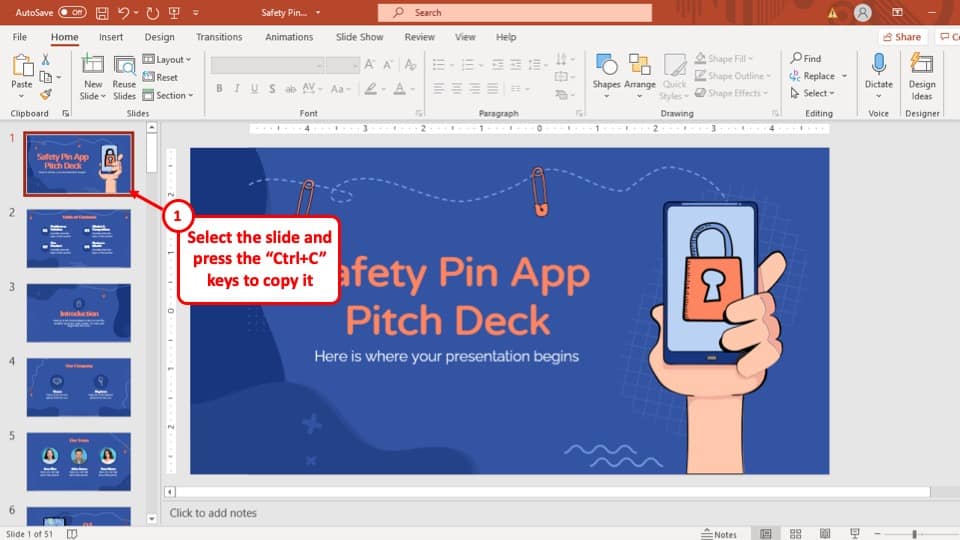
In this method, all you have to do is to select the slide that you want to copy and while the slide is selected, click on the two buttons “ Ctrl + C ” together on your keyboard.
Once you’ve copied the slide, you can paste it to a destination location. Simply use the “ Ctrl+V ” keyboard shortcut for the same.
4. How to Delete Slides in PowerPoint?
Similar to copying a slide, there are two methods that you can use to delete a slide in your PowerPoint presentation. Both of these methods are described in the section below.
Method 1: Using the Mouse
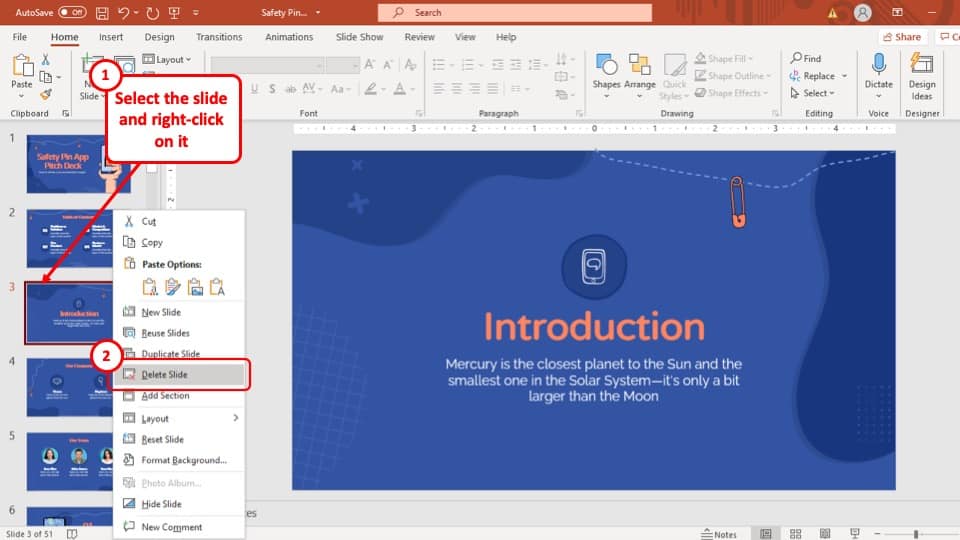
In this method, you have to “ Right Click ” on the slide that you want to remove and then select the “ Delete Slide ” option from the drop-down menu.
After you click on the “ Delete Slide ” option, the selected slide will be removed from your PowerPoint presentation.
Method-2: Using the Keyboard
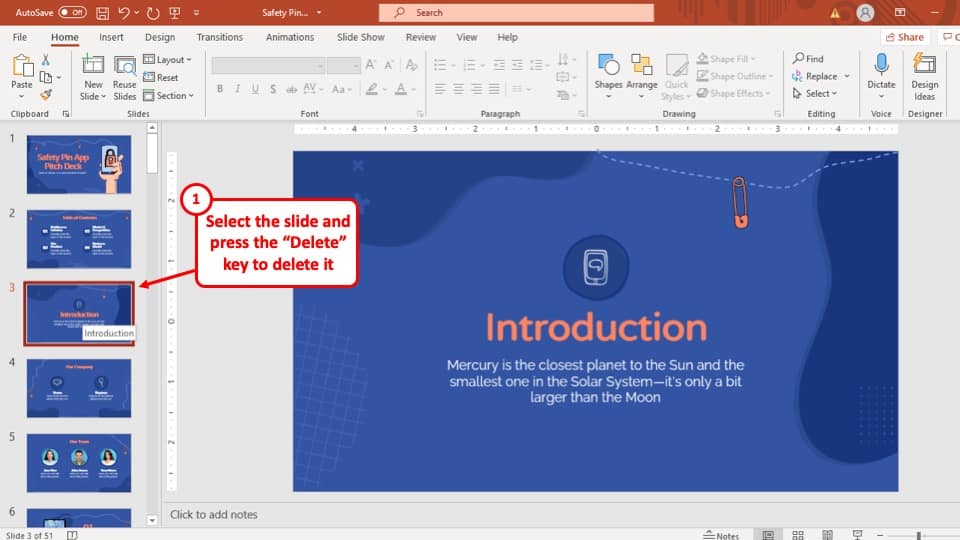
This method is simpler than using the dropdown menu. All you have to do is select the slide that you want to delete and then hit the “ Delete ” button or the “ Back Space ” button on the keyboard of your computer and the slide will be removed from your PowerPoint presentation immediately.
5. How to Group Slides in PowerPoint?
Grouping slides together is a very effective way of keeping your PowerPoint presentation organized. To group slides with different purposes into a different collection of slides, you have to add sections to the “ Slide Navigation ” sidebar.
The whole process is described in 5 easy steps below.
Step-1: “Right-click” above the first slide of the group
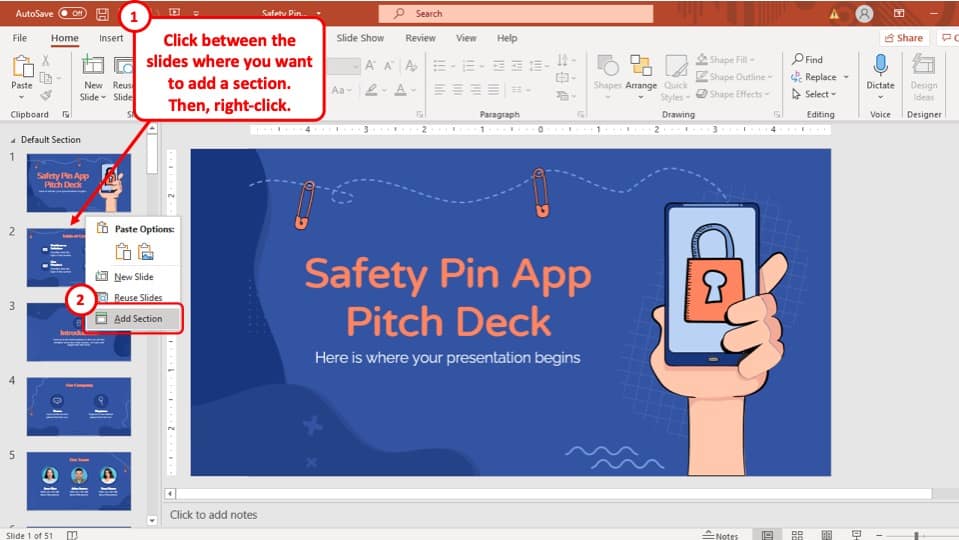
The first step is to move your cursor right above the first slide of the group that you are trying to make and then “ Right-click ” on that area. This will open a drop-down menu.
Step-2: Select the “Add Section” option
In this second step, you have to click on the “ Add Section ” option from the drop-down menu. It is the last option in that drop-down menu. After clicking on it a pop-up window will appear on your screen.
Step-3: Rename the section
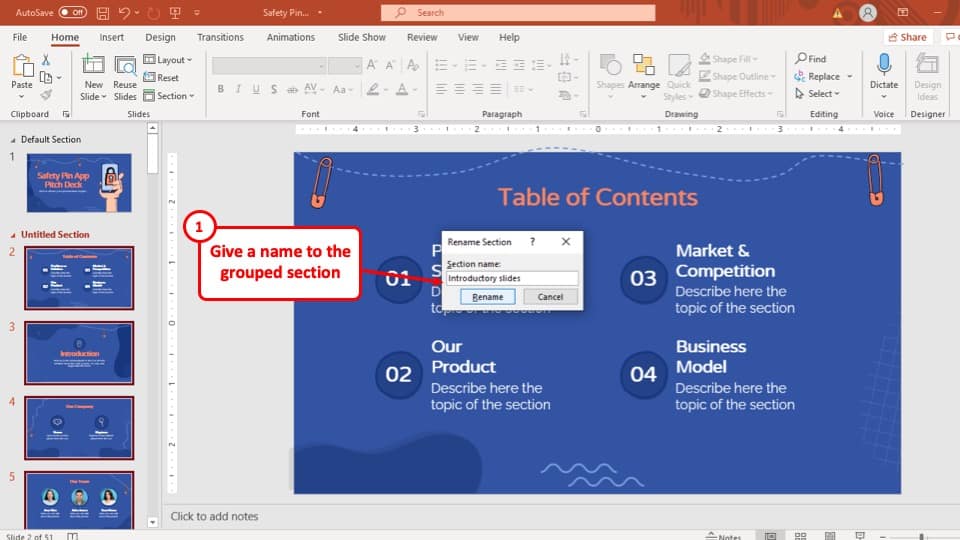
In the pop-up window, you opened in the last step, rename the group with an appropriate title, and hit the “ Rename ” button which is the button to the left of the two buttons at the bottom of the pop-up window.
This will add the starting point and the title of the group you are making.
Step-4: Make another section under the last slide of the group
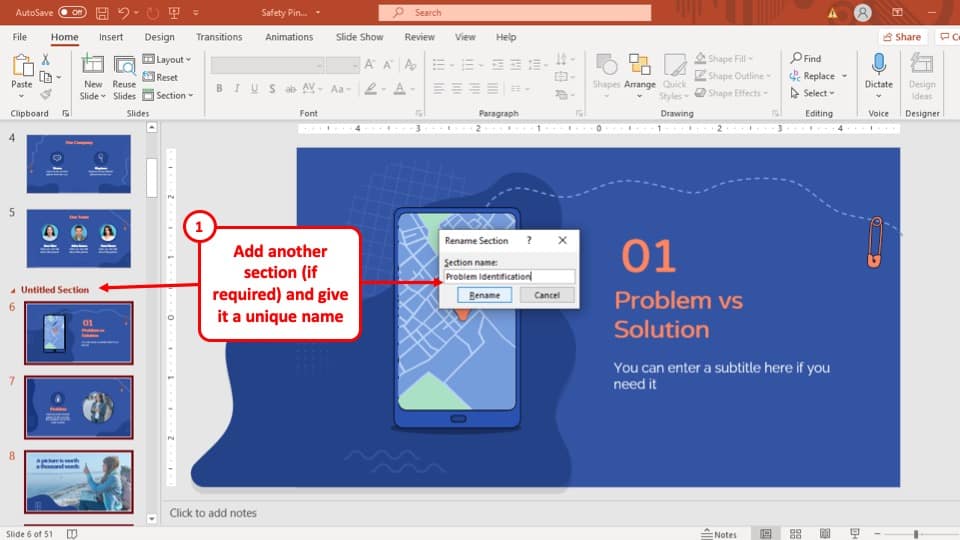
After you have created the title section of the group, make another group under the last slide of your preferred group of slides. This will set the parameter for which slides are to be grouped together.
Step-5: Collapse the group
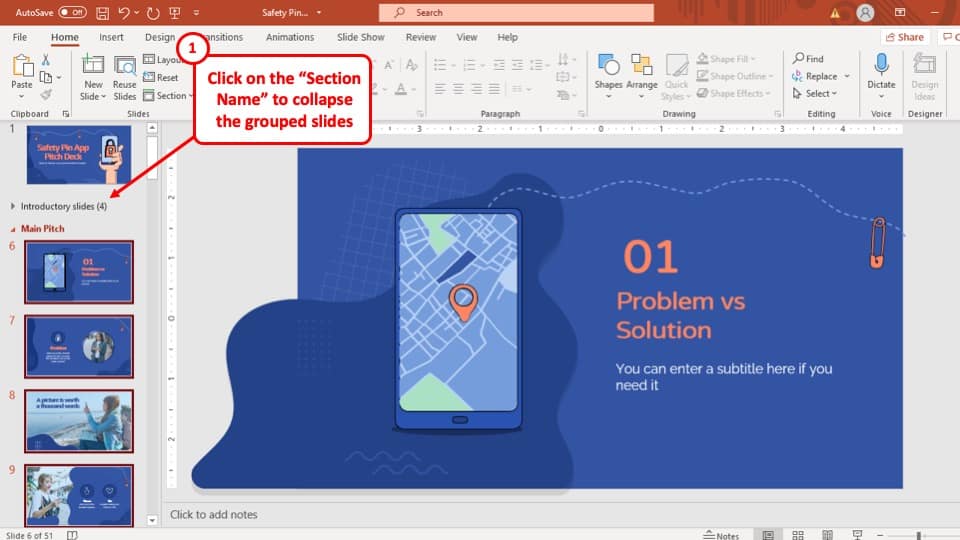
Click on the small arrow pointing to the right, just before the name of the group of slides. After you do so, you will see that the slides have been grouped together under the newly added section and the number in the bracket beside it indicates how many slides are in that group.
6. How to Hide Slides in PowerPoint?
To hide a slide in your presentation your PowerPoint presentation, you have to use the “ Slide Sorter ” view and hide the slide from there. The whole process is described step-by-step below.
Step-1: Select the “Slide Sorter” view
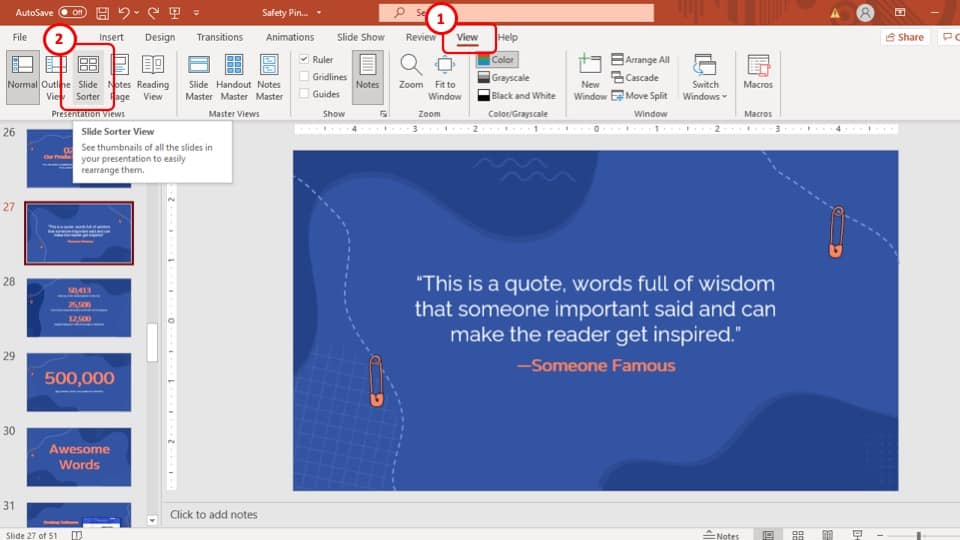
The first step of the process is to go to the “ View ” tab. In the “ View ” tab, click on the “ Slide Sorter ” view from the “ Presentation ” views of the tab. This will change the viewing mode of your PowerPoint presentation and you will be able to see all the slides in smaller thumbnails grouped together.
Step-2: “Right-click” on the slide
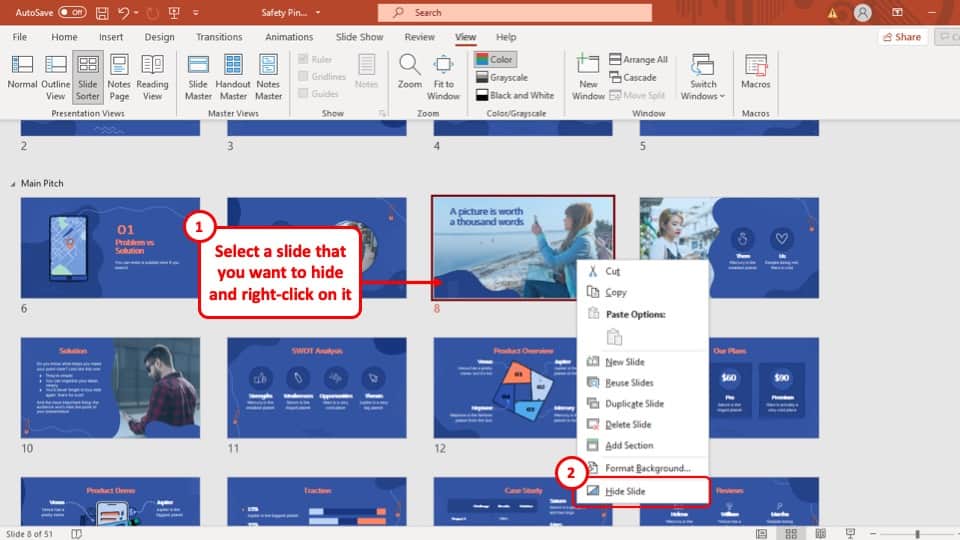
In this step, find the slide that you want to hide in the “ Slide Sorter ” view and then “ Right-click ” on it. This will open a drop-down menu.
Step-3: Select the “Hide Slide” option
After you have opened the drop-down menu, select the “ Hide Slide ” option. This will immediately hide the slide from your PowerPoint presentation. The thumbnail of the slide will be greyed out and the slide number will also be crossed, indicating that the slide is hidden.
7. How to Number Slides in PowerPoint?
To number the sequence of the slides in your PowerPoint presentation, you have to go to the “ Slide Master ” view and checkmark the slide number from the “ Header and Footer ” option. The whole process is described in easy steps below.
Step-1: Open the “Slide Master” view
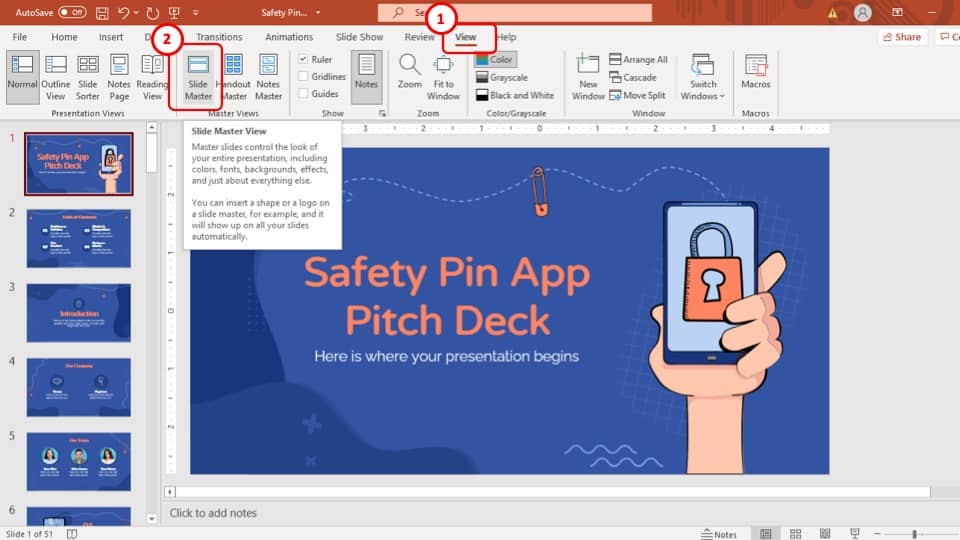
The first step is to go to the “ View ” tab which is the second to last tab of the ribbon. In the “ View ” tab, click on the “ Slide Master ” view in the “ Master Views ” section. This will change the PowerPoint view to the “ Slide Master ” view.
Step-2: Select the “Header & Footer” option
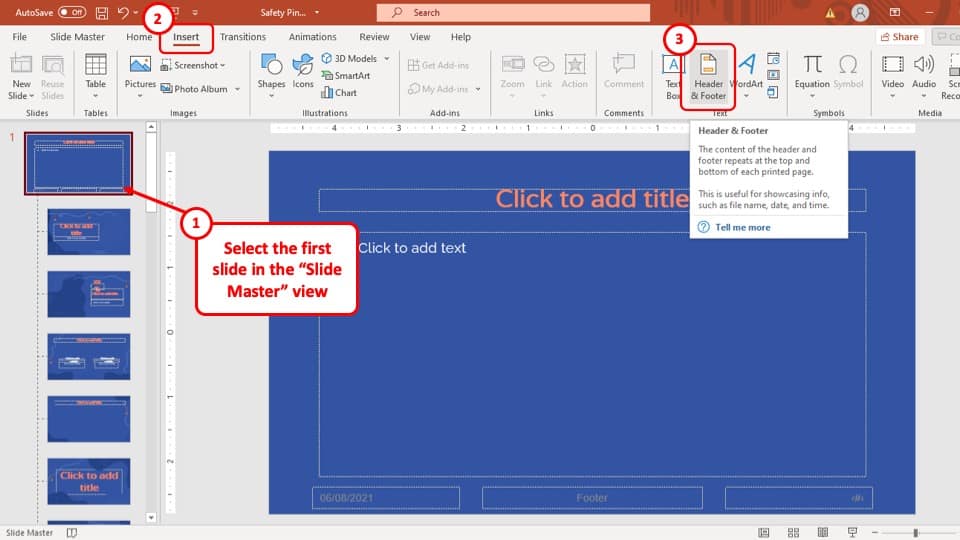
In this step, select the “ Master Slide ”. The “ Master Slide ” is the first slide in the “ Slide Master ” view and you will notice that it is the only slide that is a little bigger and to the right than the rest of the slides in the navigation bar.
After selecting the “ Master Slide ”, go to the “ Insert ” tab on the ribbon and select the “ Header & Footer ” option, which is located in the “ Text ” section of the tab. A pop-up window will appear on your screen.
Step-3: Tick mark the “Slide number” option
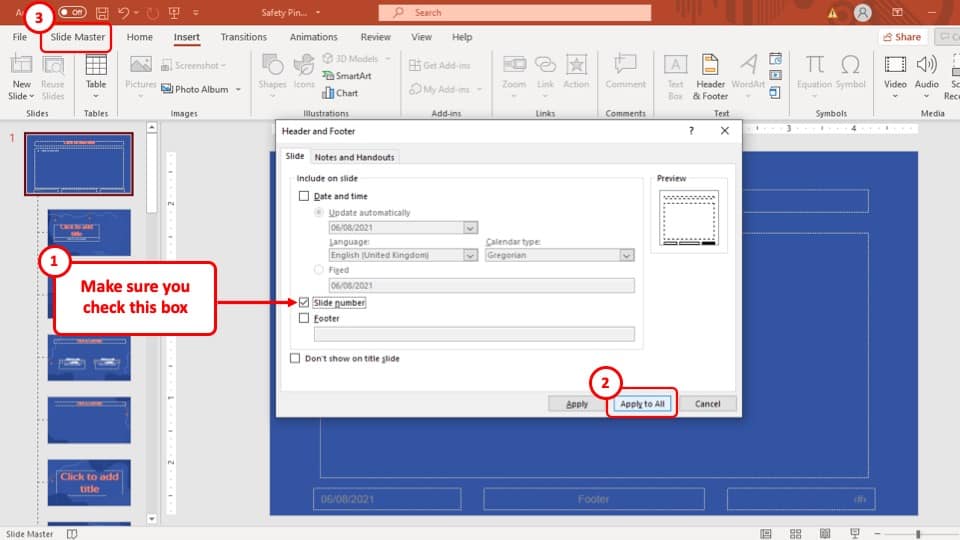
In this step, select the box of the “ Slide Number ” option and then hit the “ Apply to all ” button which is the second button of the 3 buttons at the bottom right corner of the pop-up window.
Step-4: Exit the Slide Master
Make sure that you exit the slide master. To do that, first, go back to the “ Slide Master ” tab. Then, from the ribbon, click on “ Close Slide Master “.
After that, the slide number of all the slides will be added to your PowerPoint presentation.
8. How to Link Slides in PowerPoint?
To link different slides in your PowerPoint presentation to each other, you have to type in a text, that can be hyperlinked to the slide in your PowerPoint presentation.
Type in a text that you can click to go to the linked slide and then follow the process described in easy steps below.
Step-1: Select the “Link” option
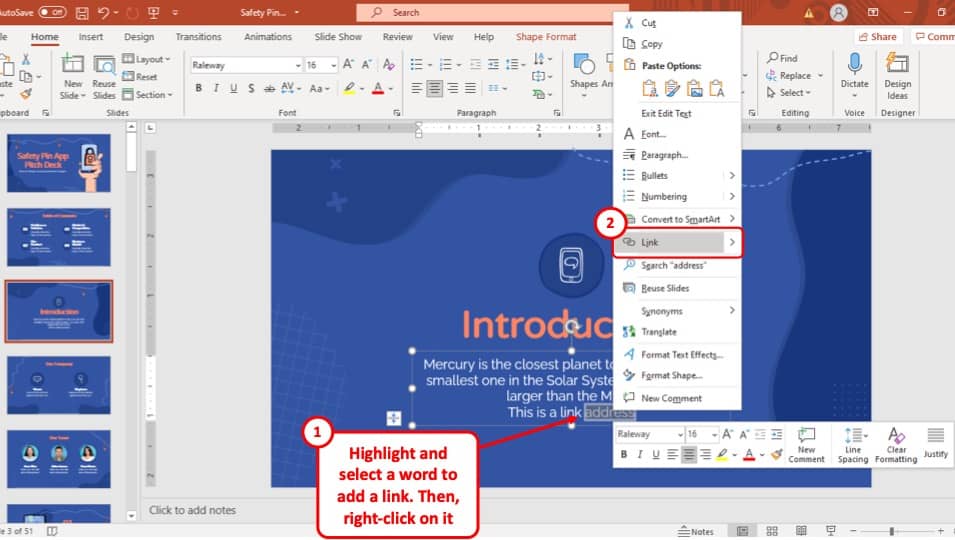
To begin, “ Right-click ” on the word that will lead you to the linked slide. A drop-down menu will appear on your screen. From the drop-down menu, select the “ Link ” option. This will open a pop-up window.
Step-2: Select the “Place in this document” option

After you have opened the “ Insert Hyperlink ” pop-up window, select the “ Place in this document ” option in the sidebar. This will take you to another page in the pop-up window.
Step-3: Select the slide you want to link
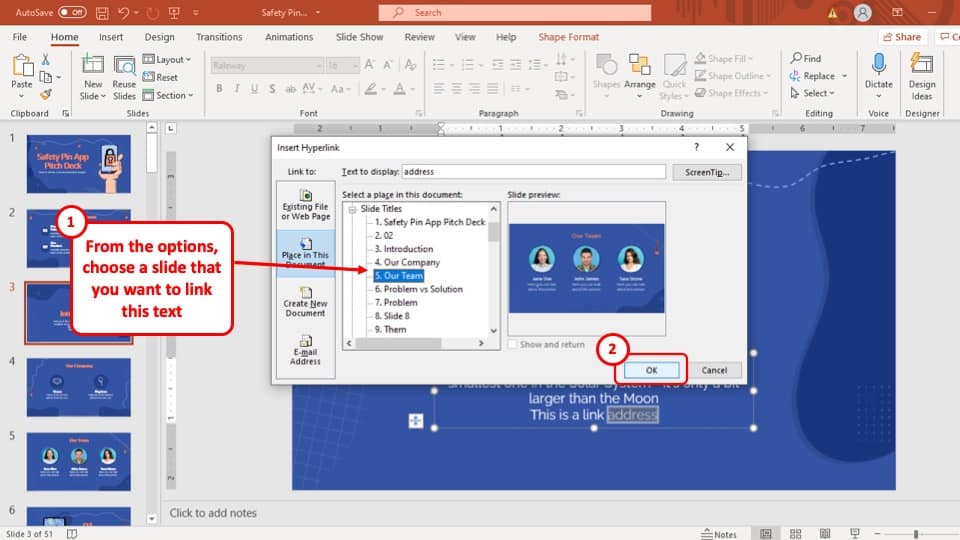
On this page of the pop-up window, select the slide that you want to link the current slide to and then hit the “ Ok ” button at the bottom right corner of your screen.
This will add a link to the word in the slide and upon clicking on the word while holding the “ Ctrl ” key on your keyboard, you will be taken to the linked slide.
9. How to Design Slides in PowerPoint?
Designing your slide to fit the theme of your message will make your presentations more engaging. There are two ways in which you can design the slides in your PowerPoint presentation. Both of the methods are explained in the following section.
9a. Using Design Ideas
By using the “ Design Ideas ” tool in Microsoft PowerPoint, you can instantly and seamlessly design slides to make them more attractive and engaging.
To use the “ Design Ideas ” tool, you have to go to the “ Design ” tab and click on the “ Design Ideas ” feature which is located in the “ Designer ” section. It is the last option in the “ Design ” tab.
I’ve covered the “Design Ideas” tool in great detail in another article where I also provide you tips on how to use it to automatically design your slides in PowerPoint! So, make sure you check out the article on how to use design ideas in PowerPoint !
However, a quick glance will remind you that these templates provided by default in PowerPoint are quite old-fashioned. I will not recommend using the built-in themes and templates in PowerPoint if you want to make your presentation look professional!
9b. Using Presentation Templates
Another method of designing a presentation is using templates.
Templates in PowerPoint are pre-designed sets of slide layouts that can be adapted to the content on your slide and make your presentation look visually appealing!
You can use the presentation templates provided by the PowerPoint software from the “ Design ” tab to instantly design the slide in your PowerPoint presentation.
Simply go to the design tab, expand the themes section and choose a theme. This will help your slides look different from the plain and simple presentation.
Instead, I would suggest choosing a platform like Envato that provides you with ton of different options that are very affordable! I personally use templates from Envato all the time. (in fact, the images that you see in this article are also from a template!)
I’ve listed some of my personal favorite templates for your presentations. Check them out in the next section!
10. Top 5 Templates for Amazing Presentations
Our recommended templates have been chosen to give you a set of all the necessary types of slide designs that you might need. These will be helpful not just to get you started, but also with multiple presentation that you may want to design later on as these templates are quite versatile.
Here is a list of our top 5 picks of templates to make your presentations amazing!
1. Startup X - Perfect Pitch Deck Template
Startup X – Perfect Pitch Deck Powerpoint Template includes all the necessary infographics, charts, icons and hundreds of slide templates that you can use to make your business pitch more elegant and professional.
2. Massive X Presentation Template
The Massive X Presentation Template v.5.5 Fully Animated includes 760 ready-to-use slide templates and more than 930 fonts and vectors. You can use this template for virtually all purposes, but it is best for business proposals, pitch decks, portfolios, agency presentations, marketing presentations, and more!
3. Business Proposal PowerPoint Template
The Business Proposal PowerPoint Template is fully focused on giving your business presentations an edge and making them look more professional. It uses attractive infographics, charts, and messages and its soft turquoise color makes it easier on the eyes.
4. Multipurpose Infographic PowerPoint Template
Multipurpose Infographics PowerPoint Template provides you with a bundle of more than 3000 designed slides with over 50 color variations to make the information in your PowerPoint presentation more engaging.
These templates are great to represent the data in a particular fashion, and you will find it extremely useful for your presentations.
5. Clean PowerPoint Template
We chose the Clean PowerPoint Template mainly for its aesthetics. The template provides over 700 very simple yet beautifully designed slides with over 5 color variations that make your PowerPoint presentation look more professional.
If you are looking for a minialistic look, go for this template!
Credit to cookie_studio (on Freepik) for the featured image of this article (further edited)

Understand the difference between PowerPoint templates and themes
Themes and templates help you create content that looks attractive and consistent while avoiding lots of manual formatting.
In this article:
What is a theme? | What is a template?

What is a PowerPoint theme?
A theme is a predefined set of colors, fonts, and visual effects that you apply to your slides for a unified, professional look.
Using a theme gives your presentation a harmonious appearance with minimal effort. For example:
When you add graphics (tables, shapes, and so on) to your slides, PowerPoint applies theme colors that are compatible with other slide elements.
Dark-colored text is shown on a light background (and vice versa), so that contrast is strong for ease of reading.
Here are four different themes applied to the same slide:

To choose a theme for your presentation
PowerPoint offers several preset themes. They are on the Design tab of the Ribbon on the left side.
Open a slide. On the Design tab, point at a Theme thumbnail to get a preview of how it would affect the look of your slide.
To see the full gallery of themes, click the More button:

When you find a theme you want, click its thumbnail to apply it to all slides in your presentation.
To customize a theme, see Create your own theme in PowerPoint .
What is a PowerPoint template?
A template is a theme plus some content for a specific purpose—such as a sales presentation, a business plan, or a classroom lesson.
So a template has design elements that work together (colors, fonts, backgrounds, effects) along with sample slides and boilerplate content that you augment to tell your story.
You can create your own custom templates and store them, reuse them, and share them with others. See Create and save a PowerPoint template .
You can also find hundreds of different types of free templates for PowerPoint that you can apply to your presentation:
Get pre-built PowerPoint templates at create.microsoft.com
Create.Microsoft.com also has templates for other Office apps. Here are some examples of the free templates available there:
Here is an example of a one-slide template for an award certificate:
A template like this can include:
1 Subject-specific content, such as "Certificate of Achievement," "Soccer," and the soccer ball image. Generally this text or content is only editable from the slide master.
2 Background formatting, such as pictures, texture, gradient or solid fill color, and transparency. This example shows the light blue solid fill background.
3 Color, fonts, effects (3-D, lines, fills, shadows, etc.), and theme design elements (such as the color and gradient effects inside the word Soccer).
4 Text placeholders that allow people to enter unique information to customize the slide for their needs, such as "Player's name," "Name of coach," "Date of presentation," and any variable, such as the year.
Download free, pre-built templates
Create your own theme in PowerPoint
Create and save a PowerPoint template

Need more help?
Want more options.
Explore subscription benefits, browse training courses, learn how to secure your device, and more.

Microsoft 365 subscription benefits

Microsoft 365 training

Microsoft security

Accessibility center
Communities help you ask and answer questions, give feedback, and hear from experts with rich knowledge.

Ask the Microsoft Community

Microsoft Tech Community

Windows Insiders
Microsoft 365 Insiders
Was this information helpful?
Thank you for your feedback.
WHITNEY D. WALTER

PowerPoint Vs. Slide Deck, Slide Deck Meaning & More Simple Terms
Whitney D. Walter
Introduction
The terms “PowerPoint” and “slide deck” are thrown around a lot in the business world. So much so that you might be wondering if they mean the same thing or if there is something inherently different between the two.
The most significant distinction between a PowerPoint and a deck is that a “deck” is simply a collection of slides, whereas the term “PowerPoint” often refers to the final presentation which may be delivered in the form of a speech, video, or other format.
Here are a few examples of how a PowerPoint presentation can be used:
How do you make a good slide deck in powerpoint, what is a slide deck called in google slides, what is microsoft powerpoint.
Let’s start with the basics. Microsoft PowerPoint is a digital presentation tool. It’s a software application that allows users to share information and ideas with others.
- Creating an informational slideshow to share with colleagues or clients. This might include information about a new product, project details, or company updates.
- Developing a presentation to deliver at a conference or other professional event. This could include sharing research findings, pitching a business idea, or promoting a new initiative.
- Creating an educational resource, such as a lesson plan or study guide. This might include slides with information about a topic, along with accompanying questions or activities.
- Designing a sales deck to use when meeting with potential customers or clients. This could include slides outlining the features and benefits of a product or service.
PowerPoint presentations can be created using a variety of methods, including importing images, adding text, and inserting multimedia content.
Anatomy of a PowerPoint

What is a PowerPoint presentation?
You can think of a PowerPoint presentation as a vehicle to share information with others. Some people refer to a presentation as the act of actually presenting a slide deck. This can be in the form of a recorded slideshow, speech, or another delivery method.
Others may refer to presentations simply as the completed Powerpoint deck.
A typical PowerPoint presentation consists of a series of slides, each of which can contain text , images, and other multimedia content. PowerPoint also offers a variety of features, such as animations and transitions, that can help to make your presentation more engaging.
What is a PowerPoint slide deck?
A slide deck is simply a collection of slides. It can be created using PowerPoint or any other presentation software application, like Google Slides.
However, a key difference between a PowerPoint presentation and a slide deck is that a slide deck is not necessarily intended to be presented in a linear fashion. Instead, a slide deck can be used as a reference tool or resource, or it can be presented in a non-linear fashion, such as through an interactive website or app.
Why is it called a slide deck?
At this point, you might be wondering “But why are PowerPoints called decks?”. The term “slide deck” is derived from the old days of presentations when slides were physical transparencies that were loaded into a carousel and projected onto a screen.
These physical slides would be shuffled around to create the presentation, much like a deck of cards. Thus, the term “slide deck” was born.
In modern times, slide decks are usually presented electronically, either as a PowerPoint presentation or as a PDF. However, the term slide deck has stuck and is still used to refer to a presentation, even though there may not be any physical slides involved.
Why should you use PowerPoint slide decks?
A slide deck is an important tool for any presenter. It allows you to organize your thoughts and present them in a visually appealing way.
A well-designed slide deck can engage your audience and help you deliver your message effectively.
Is a deck the same as a PowerPoint?
Honestly, you will hear the terms “deck”, “presentation”, and “PowerPoint” used interchangeably in business settings.
The key difference between a presentation and a deck is that a deck is a collection of slides and a PowerPoint presentation could be given in the form of a speech, video, or other formats.
What is a PowerPoint slide?
A PowerPoint slide is a digital version of a traditional slide that is used to convey information during a presentation.
Unlike a traditional slide, which is typically created using a physical projector and an overhead transparency, a PowerPoint slide is created using software such as Microsoft PowerPoint or Apple Keynote. PowerPoint slides can be shared electronically with others via email or through
Simply put, consider each slide to be a digital page in your overall story.
What is the difference between a slide and a slide deck?
A slide is an individual page in a presentation deck while a slide deck is an entire presentation.
Each slide typically contains one main idea that contributes to the overall message presented with the slide deck.
At this point, you might be wondering how to make a good slide deck.
Here are a few quick tips:
- Start with a strong title slide that will grab attention and set the tone for the rest of the presentation.
- Be sure to include an agenda slide so your audience knows what to expect during the presentation. This helps with audience engagement.
- Use clean slide designs that are easy to read and understand.
- Try to limit each slide to one main point. Use images and graphics to support these points and tell the story.
- End with a strong conclusion that recaps what you covered, includes a call-to-action, provides relevant resources, and leaves your audience with a positive impression.
Creating a great slide deck takes time and effort, but it’s worth it. A well-designed slide deck can help you deliver a powerful presentation that will inform your audience and inspire them to take action.
Other Frequently Asked Questions
What’s the difference between a slide deck and a slide show.
A slide deck is a collection of slides that are typically used to give a presentation, while a slide show is may include media like images and video instead of traditional slides.
Slide decks are often created using PowerPoint or other presentation software, while slide shows can be created using a multitude of other multimedia programs.
There are many similarities between slide decks and slide shows, but there are also some important differences.
One key difference between slide decks and slide shows is that slide decks are usually static, while slide shows are often dynamic.
This means that slide decks typically don’t change much from one presentation to the next, while slide shows can be changed or customized for each individual presentation.
Slide decks are also usually shorter than slide shows, and they typically only include the most important information.
What’s the difference between a slide deck and pitch deck?
As we discussed, a slide deck is a collection of slides. The topic of these slides can be nearly anything under the sun.
A pitch deck is also a collection of multiple slides but the main difference is that all the slides are meant to serve a very specific business-related purpose.
The main idea behind pitch decks is typically to gain interest from investors. This is done by showcasing the potential of your business idea and/or product.
So while a slide deck can be about anything, a pitch deck will always cover information that will be of interest to potential business stakeholders.

The term “slide deck” is also used in reference to other presentation software like Google Slides and Apple’s Keynote .
Now that you know the difference between a PowerPoint presentation and a slide deck, you know that they are powerful tools that can be used to deliver effective presentations and engage your audience.
What tips do you have for creating effective slide decks? How have you used slide decks in your own presentations or business communications? Leave a comment and let me know!

Whitney is a recognized Professional Development Expert, professional speaker, and the founder of Harness Your Power. She holds a Master’s in Business Administration from Florida State University and a Microsoft PowerPoint Specialist certification. She has been featured in Yahoo Finance, AOL, Authority Magazine, Business Insider, Fox and more. Read more.
Similar Posts

Tips for Quick Slide Design
“I’m not creative at all” is one of the most common complaints I hear when discussing PowerPoint design. There’s a misconception going around that you need to be Michelangelo to create good-looking presentations. The ironic thing is that you don’t need to create works of art to make an impact and drive your audience to…

Solved: How to Add Slide Numbers in PowerPoint
This article provides a step-by-step guide for how to add slide numbers to PowerPoint, as well as how to format and remove slide numbers.

Everything You Need To Know: Add Fonts to PowerPoint
Microsoft PowerPoint has been the classic go-to for creating all sorts of presentations – whether you’re a business professional presenting to potential clients or just a university student presenting a project. PowerPoint boasts a number of customizations, so you are able to create a presentation exactly the way you want – from an extensive list…

PowerPoint Agenda Slide: What It Is & Easy Ways to Make One
If you’ve been creating Microsoft PowerPoint presentations for a while, you already know the benefits of starting with a good agenda. As a presenter, it allows you to take control of the conversation from the very beginning. You’ll also have the ability to eliminate audience distractions by clarifying the meeting objective and pointing out when…

How to Reduce Text on Your PowerPoint Slides
The human brain is a beautiful thing. We can recall distant memories, harness deductive reasoning, and empathize with our fellow humans in a matter of seconds. The funny thing is… It’s also an “ooh squirrel” type of thing. If we find ourselves listening to or looking at something less than interesting we can very quickly…

Answered! How To Compress A Video In PowerPoint
Including video and audio files to your PowerPoint is a great way to add interest and excitement to your presentation. It can also help to engage your audience and keep their attention focused on your message. By adding video, you can also add another layer of information and meaning to your presentation. But if you’ve…
Privacy Overview
Power Point presentation is a collection of

Power Point presentation is a collection of ________
A. Slides and Handouts
B. Speaker’s notes
C. Outlines
D. All of the above
Answer: Option D
This Question Belongs to Computer Fundamentals >> Power Point
Join The Discussion
Related Questions on Power Point
Which tab is not available on left panel when you open a presentation?
D. All of above are available
Which of the following statements is not true?
A. You can type text directly into a PowerPoint slide but typing in text box is more convenient.
B. From Insert menu choose Picture and then File to insert your images into slides.
C. You can view a PowerPoint presentation in Normal, Slide Sorter or Slide Show view.
D. You can show or hide task pane from View >> Toolbars.
To start Microsoft PowerPoint application
A. Click on Start > Programs > All Programs > Microsoft PowerPoint
B. Hit Ctrl + R then type ppoint.exe and Enter
C. Click Start > Run then type powerpnt then press Enter
D. All of above
Which of the following section does not exist in a slide layout?
D. Animations
More Related Questions on Power Point
Read More: MCQ Type Questions and Answers
- Arithmetic Ability
- Competitive Reasoning
- Competitive English
- Data Interpretation
- General Knowledge
- State GK
- History
- Geography
- Current Affairs
- Banking Awareness
- Computer Fundamentals
- Networking
- C Program
- Java Program
- Database
- HTML
- Javascript
- Computer Science
- Electronics and Communications Engineering
- Electrical Engineering
- Mechanical Engineering
- Civil Engineering
- Chemical Engineering
- Automobile Engineering
- Biotechnology Engineering
- Mining Engineering
- Commerce
- Management
- Philosophy
- Agriculture
- Sociology
- Political Science
- Pharmacy
The Definition of a Slide (or Slides) in a PowerPoint Presentation
 in a PowerPoint Presentation 2")
A PowerPoint slide is a single page or screen within a presentation. A presentation consists of multiple slides arranged in a sequence. Each slide typically focuses on one key point and contains related visuals and text.
What is a Slide?
A slide is the basic building block of a PowerPoint presentation. It is a single page that you view during a slideshow. Collectively, all the slides together form the presentation.
Some key things to know about slides:
- A slide contains visual elements like text, images, charts, and more to communicate information to your audience.
- You typically have one key message or talking point per slide.
- Slides appear one at a time during the presentation. You can transition between them manually or automatically.
Types of Slides
There are a few common slide types you’ll use in most presentations:
Title Slide
The title slide introduces your presentation and yourself. It includes:
- Presentation title
- Your name and contact info
- Company name or logo
Agenda Slide
The agenda outlines what you will cover in the presentation. It helps the audience know what to expect.
Content Slides
Content slides make up the bulk of your presentation. They deliver the key information to your audience. Text, images, charts, and other visuals support your verbal presentation.
Summary Slide
The summary slide recaps the key takeaways you want your audience to remember. It reinforces the core message.
Thank You Slide
The thank you slide wraps up your presentation and provides contact details for follow up.
Anatomy of a Slide
Though content varies widely, most slides contain some standard elements:
Slide Layout
Slide layouts in PowerPoint contain placeholders for things like titles, text, images, charts and more. They provide structure.
The theme applies color schemes, fonts, and effects consistently across all the slides.
Titles clearly state the main point of the slide. They are short phrases or sentences.
Visuals like images, charts, diagrams, and icons reinforce your verbal message.
Text gives essential details and context to support the title and visuals. Use concise bullet points rather than paragraphs.
The footer can display useful details like slide numbers, date, branding, etc.
Creating Slides in PowerPoint
PowerPoint makes creating professional slides simple. Here is the basic process:
- Open PowerPoint and select a template Templates contain pre-designed slide layouts, themes, and sample content. They give you a running start on your presentation.
- Add a new slide Click the “New Slide” button on the Home tab. Choose a layout that suits your content.
- Modify the slide layout and theme Customize the theme colors, fonts, and effects. Adjust layout element positions if needed.
- Insert titles, text, and visuals Type in short, descriptive titles. Add concise text and supporting visuals like charts, tables, or images.
- Add slide transitions Transitions create motion effects as you move between slides. They should be simple and consistent.
Presentation Slides vs Presentation Decks
The terms “slide” and “deck” are sometimes used interchangeably, but there is a difference:
- Slide – A single page within a presentation.
- Deck – The entire collection of slides that make up a presentation.
So a presentation deck consists of individual slides, just like a deck of playing cards is made up of separate cards.
Key Takeaways
- A PowerPoint slide is an individual screen within a presentation containing visuals and text to present one key point.
- Several slides make up a complete presentation deck.
- There are common slide types like title, agenda, content, summary, and thank you slides.
- Slides typically have elements such as titles, text, visuals, themes, and layouts.
- PowerPoint makes it simple to create professional, branded slides using templates, themes, and layouts.
Using well-designed slides helps you effectively convey information to your audience during a presentation. Mastering slide creation is an essential presentation skill for any professional.
About The Author
Vegaslide staff, related posts.

How to Save a PowerPoint as a PDF on Mac in 3 Easy Ways

Projecting PowerPoint Presentations

How to Broadcast a PowerPoint Presentation Online

How to Remove Gridlines in PowerPoint Slide

30 Presentation Terms & What They Mean
Delivering a captivating presentation is an art that requires more than just confidence and oratory skills. From the design of your slides to the way you carry yourself on stage, every little detail contributes to the overall effectiveness of your presentation. For those who wish to master this art, getting familiar with the associated terminology is a great place to start.
In this article, we’ll explore “30 Presentation Terms & What They Mean,” shedding light on the key terms and concepts in the world of presentations. Whether you’re a professional looking to refine your skills, a student aiming to ace your next presentation, or just someone curious about the subject, this guide is sure to provide you with valuable insights.
Dive in as we explore everything from slide decks and speaker notes to body language and Q&A sessions.
Each term is elaborated in depth, giving you a comprehensive understanding of their meanings and applications. This knowledge will not only make you more comfortable with presentations but will also empower you to deliver them more effectively.
2 Million+ PowerPoint Templates, Themes, Graphics + More
Download thousands of PowerPoint templates, and many other design elements, with a monthly Envato Elements membership. It starts at $16 per month, and gives you unlimited access to a growing library of over 2,000,000 presentation templates, fonts, photos, graphics, and more.

Animated PPT Templates
Fully animated.

Business PPT Templates
Corporate & pro.

BeMind Minimal Template

Maximus Template

Mystify Presentation

Explore PowerPoint Templates
Table of Contents
- Speaker Notes
- White Space
- Aspect Ratio
- Grid System
- Master Slide
- Infographic
- Data Visualization
- Call-to-Action (CTA)
- Color Palette
- Negative Space
- Storyboarding
- Bullet Points
- Eye Contact
- Body Language
- Q&A Session
1. Slide Deck
A slide deck, in its most basic sense, is a collection of slides that are presented in sequence to support a speech or presentation. The slides typically contain key points, graphics, and other visual aids that make the presentation more engaging and easier to understand.
Beyond merely displaying information, a well-crafted slide deck can tell a story, create an emotional connection, or illustrate complex concepts in a digestible way. Its design elements, including the choice of colors, fonts, and images, play a significant role in how the presentation is received by the audience.
2. Speaker Notes
Speaker notes are a feature in presentation software that allows presenters to add notes or cues to their slides. These notes are only visible to the presenter during the presentation. They can include additional information, reminders, prompts, or even the full script of the speech.
While the audience sees the slide deck, the speaker can use these notes as a guide to ensure they cover all necessary points without memorizing the entire speech. It’s essential to use speaker notes strategically – they should aid the presentation, not become a script that hinders natural delivery.
A template is a pre-designed layout for a slide deck. It typically includes a set design, color scheme, typefaces, and placeholders for content like text, images, and graphs. Templates can significantly reduce the time and effort required to create a professional-looking presentation.
While templates can be incredibly helpful, it’s important to choose one that aligns with the theme, purpose, and audience of the presentation. Customizing the template to match your brand or topic can further enhance its effectiveness.
4. Transition
In the realm of presentations, a transition refers to the visual effect that occurs when you move from one slide to the next. Simple transitions include fade-ins and fade-outs, while more complex ones might involve 3D effects, wipes, or spins.
Transitions can add a touch of professionalism and dynamism to a presentation when used correctly. However, overuse or choosing flashy transitions can be distracting and detract from the content. The key is to use transitions that complement the presentation’s tone and pace without overshadowing the message.
5. Animation
Animation is the process of making objects or text in your slide deck appear to move. This can involve anything from making bullet points appear one by one, to having graphics fly in or out, to creating a simulation of a complex process. Animation can add interest, emphasize points, and guide the audience’s attention throughout the presentation.
While animations can make a presentation more engaging, they must be used judiciously. Excessive or overly complex animations can distract the audience, complicate the message, and look unprofessional. As with transitions, animations should support the content, not detract from it.
6. Multimedia
Multimedia refers to the combination of different types of media — such as text, images, audio, video, and animation — within a single presentation. Incorporating multimedia elements can make a presentation more engaging, cater to different learning styles, and aid in explaining complex ideas.
However, it’s important to ensure that multimedia elements are relevant, high-quality, and appropriately scaled for the presentation. Additionally, depending on the presentation venue, technical considerations such as file sizes, internet speed, and audio quality need to be taken into account when using multimedia.
7. White Space
In the context of presentation design, white space (or negative space) refers to the unmarked portions of a slide, which are free of text, images, or other visual elements. Despite its name, white space doesn’t necessarily have to be white — it’s any area of a slide not filled with content.
White space can give a slide a clean, balanced look and can help draw attention to the most important elements. It can also reduce cognitive load, making it easier for the audience to process information. Good use of white space is often a key difference between professional and amateur designs.
8. Aspect Ratio
Aspect ratio is the proportional relationship between a slide’s width and height. It’s typically expressed as two numbers separated by a colon, such as 4:3 or 16:9. The first number represents the width, and the second represents the height.
The choice of aspect ratio can affect how content fits on the screen and how the presentation appears on different displays. For instance, a 16:9 aspect ratio is often used for widescreen displays, while a 4:3 ratio may be more suitable for traditional computer monitors and projectors.
9. Grid System
The grid system is a framework used to align and layout design elements in a slide. It’s comprised of horizontal and vertical lines that divide the slide into equal sections or grids.
The grid system aids in creating visual harmony, balance, and consistency across slides. It can guide the placement of text, images, and other elements, ensuring that they’re evenly spaced and aligned. It’s an important tool for maintaining a professional and organized appearance in a presentation.
10. Readability
Readability refers to how easy it is for an audience to read and understand the text on your slides. It involves factors such as font size, typeface, line length, spacing, and contrast with the background.
Ensuring good readability is crucial in presentations. If your audience can’t easily read and understand your text, they’ll be more likely to disengage. Large fonts, simple language, high-contrast color schemes, and ample white space can enhance readability.
11. Infographic
An infographic is a visual representation of information, data, or knowledge. They’re used in presentations to communicate complex data in a clear, concise, and engaging way. Infographics can include charts, graphs, icons, pictures, and text.
While infographics can effectively communicate complex ideas, they must be designed carefully. Too much information, confusing visuals, or a lack of a clear hierarchy can make an infographic difficult to understand. It’s important to keep the design simple and focus on the key message.
To embed in a presentation context means to incorporate external content, such as a video, a document, or a website, directly into a slide. When an object is embedded, it becomes part of the presentation file and can be viewed or played without leaving the presentation.
Embedding can be a useful tool to incorporate interactive or supplementary content into a presentation. However, it’s important to remember that it can increase the file size of the presentation and may require an internet connection or specific software to function correctly.
13. Palette
A palette, in terms of presentations, refers to the set of colors chosen to be used throughout the slide deck. This can include primary colors for backgrounds and text, as well as secondary colors for accents and highlights.
The right color palette can help convey the mood of a presentation, reinforce branding, and increase visual interest. It’s important to choose colors that work well together and provide enough contrast for readability. Tools like color wheel or color scheme generators can be helpful in choosing a harmonious palette.
14. Vector Graphics
Vector graphics are digital images created using mathematical formulas rather than pixels. This means they can be scaled up or down without losing quality, making them ideal for presentations that may be viewed on different screen sizes.
Vector graphics often have smaller file sizes than their pixel-based counterparts (raster graphics), which can help keep your presentation file manageable. Common types of vector graphics include logos, icons, and illustrations.
15. Mood Board
A mood board is a collection of images, text, colors, and other design elements that serve as visual inspiration for a presentation. It helps establish the aesthetic, mood, or theme of the presentation before the design process begins.
Creating a mood board can be a valuable step in the presentation design process. It can help you visualize how different elements will work together, communicate your design ideas to others, and maintain consistency across your slides.
16. Hierarchy
In design, hierarchy refers to the arrangement of elements in a way that implies importance. In presentations, visual hierarchy helps guide the viewer’s eye to the most important elements first.
Hierarchy can be created through the use of size, color, contrast, alignment, and whitespace. Effective use of hierarchy can make your slides easier to understand and keep your audience focused on the key points.
17. Stock Photos
Stock photos are professionally taken photographs that are bought and sold on a royalty-free basis. They can be used in presentations to add visual interest, convey emotions, or illustrate specific concepts.
While stock photos can enhance a presentation, it’s important to use them judiciously and choose images that align with your presentation’s tone and content. Overuse of generic or irrelevant stock photos can make a presentation feel impersonal or unprofessional.
18. Sans Serif
Sans serif refers to a category of typefaces that do not have small lines or strokes attached to the ends of larger strokes. Sans serif fonts are often used in presentations because they’re typically easier to read on screens than serif fonts, which have these small lines.
Some popular sans serif fonts for presentations include Helvetica, Arial, and Calibri. When choosing a font for your slides, readability should be a primary consideration.
19. Hyperlink
A hyperlink, or link, is a clickable element in a slide that directs the viewer to another slide in the deck, a different document, or a web page. Hyperlinks can be used in presentations to provide additional information or to navigate to specific slides.
While hyperlinks can be useful, they should be used sparingly and appropriately. Links that direct the viewer away from the presentation can be distracting and disrupt the flow of your talk.
PDF stands for Portable Document Format. It’s a file format that preserves the fonts, images, graphics, and layout of any source document, regardless of the computer or software used to create it. Presentations are often saved and shared as PDFs to ensure they look the same on any device.
While a PDF version of your presentation will maintain its appearance, it won’t include interactive elements like animations, transitions, and hyperlinks. Therefore, it’s best used for distributing slide handouts or when the presentation software used to create the deck isn’t available.
21. Raster Graphics
Raster graphics are digital images composed of individual pixels. These pixels, each a single point with its own color, come together to form the full image. Photographs are the most common type of raster graphics.
While raster graphics can provide detailed and vibrant images, they don’t scale well. Enlarging a raster image can lead to pixelation, where the individual pixels become visible and the image appears blurry. For this reason, raster images in presentations should be used at their original size or smaller.
22. Typeface
A typeface, often referred to as a font, is a set of characters with the same design. This includes letters, numbers, punctuation marks, and sometimes symbols. Typefaces can have different styles and weights, such as bold or italic.
The choice of typeface can significantly impact the readability and mood of a presentation. For example, serif typefaces can convey tradition and authority, while sans serif typefaces can appear modern and clean. The key is to choose a typeface that aligns with the purpose and audience of your presentation.
23. Visual Content
Visual content refers to the graphics, images, charts, infographics, animations, and other non-text elements in a presentation. These elements can help capture the audience’s attention, enhance understanding, and make the presentation more memorable.
While visual content can enhance a presentation, it’s important not to overload slides with too many visual elements, as this can confuse or overwhelm the audience. All visual content should be relevant, clear, and support the overall message of the presentation.
24. Call to Action
A call to action (CTA) in a presentation is a prompt that encourages the audience to take a specific action. This could be anything from visiting a website, signing up for a newsletter, participating in a discussion, or implementing a suggested strategy.
A strong CTA aligns with the goals of the presentation and is clear and compelling. It often comes at the end of the presentation, providing the audience with a next step or a way to apply what they’ve learned.
25. Thumbnails
In presentations, thumbnails are small versions of the slides that are used to navigate through the deck during the design process. They provide an overview of the presentation’s flow and can help identify inconsistencies in design.
Thumbnails are typically displayed in the sidebar of presentation software. They allow you to easily move, delete, or duplicate slides, and can provide a visual check for overall consistency and flow.
26. Aspect Ratio
27. interactive elements.
Interactive elements are components in a presentation that the audience can interact with. These could include hyperlinks, embedded quizzes, interactive infographics, or multimedia elements like audio and video.
Interactive elements can make a presentation more engaging and memorable. However, they require careful planning and should always be tested before the presentation to ensure they work as intended.
28. Placeholders
In the context of presentations, placeholders are boxes that are included in a slide layout to hold specific types of content, such as text, images, or charts. They guide the placement of content and can help ensure consistency across slides.
Placeholders can be especially useful when working with templates, as they provide a predefined layout to follow. However, they should be used flexibly – not every placeholder needs to be used, and additional elements can be added if necessary.
29. Master Slide
The master slide is the top slide in a hierarchy of slides that stores information about the theme and slide layouts of a presentation. Changes made to the master slide, such as modifying the background, fonts, or color scheme, are applied to all other slides in the presentation.
Master slides can help ensure consistency across a presentation and save time when making global changes. However, it’s important to note that individual slides can still be modified independently if necessary.
In presentations, a layout refers to the arrangement of elements on a slide. This includes the placement of text, images, shapes, and other elements, as well as the use of space and alignment.
Choosing the right layout can make your slides look organized and professional, guide the viewer’s eye, and enhance your message. Most presentation software offers a variety of pre-defined layouts, but these can usually be modified to better suit your content and design preferences.

The big SlideLizard presentation glossary
Look up definitions & meanings of terms
Impromptu Speech
A speech that is given without any preparation, notes, or cards, is called an impromptu speech. It is often delivered at private events (e.g., weddings or birthdays) or for training presentation skills.
Manuscript Speech
For a manuscript speech, the speaker has an entire manuscript to read from. The benefit is that, as every single word is scripted, no important parts will be missed. However, speeches that are fully written down often seem unnatural and may bore the audience.
Declamation Speech
A declamation speech describes the re-giving of an important speech that has been given in the past. It is usually given with a lot of emotion and passion.
Extemporaneous Speech
An extemporaneous speech is a speech that involves little preparation, as the speaker may use notes or cards to give his talk. It is important that speakers will still use their own words and talk naturally. .
Eulogy Speech
A eulogy speech is given at a funeral. It is given by familiy members or friends of the deceased. The aim is to say goodbye and pay tribute to the person who has passed away.
Valedictory Speech
A valedictory speech is given in order to say goodbye, usually at graduation. It should inspire listeners and functions as a send-off into "real life".
.ppt file extension
A .ppt file is a presentation which was made with PowerPoint, that includes different slides with texts, images and transition effects.
.potx file extension
A .potx file is a file which contains, styles, texts, layouts and formatting of a PowerPoint (.ppt) file. It's like a template and useful if you want to have more than one presentation with the same formatting.
.pot file extension
They are used to create more PowerPoint files with the same formatting and later got replaced by .potx files.
.odp file extension
.odp files are similar to .ppt files. It's a presentation which was created with Impress and contains slides with images, texts, effects and media.
.ppsx file extension
A ppsx file is a presentation file. When you open the file the slide show opens and not the editing mode like in ppt files.
.pps file extension
A .pps file is a slide show. They are similiar to .ppt files but they open as a slide show if you double-klick them. They later got replaced by .ppsx files.
.pptm file extension
A .pptm file is a macro-enabled presentation created by MS PowerPoint which contains slides with layout, images, texts and embedded macros.
.potm file extension
A .potm file is a template for macro-enabled presentations. They are used for creating more .pptm files with the same macro settings and the same formatting.
.ppsm file extension
A .ppsm file includes one or more macro-enabled slides. They are used to show presentations with embedded macros, but not for editing them.
Learning on Demand
Learning on Demand means that the content is available extactly when it's needed by the learner
Microlearning
Microlearning means learning in small quantities. It is especially used in E-Learning.
Learning Chunk
Learning Chunk means, like Microlearning, learning in small quantities. The learning content is really small and can be absorbed quickly.
Massive Open Online Course (MOOC)
Massive Open Online Courses (MOOC) are digital courses (online) with many participants (massive) that are available for free.
Web-Based-Training (WBT)
Web-Based-Training (WBT) is an older term for learnmethods that can be accessed over the internet.
A webinar is a seminar that takes place in a specific digital location at a specific time. It's a seminar that combines live and online formats.
Hybrid Learning
Hybrid learning means that one group of students are in class at school. Another group of students takes part in class from home at the same time. They both get taught at the same time.
Flipped Classroom
Flipped Classroom means that students work out the subject matter themselves at home through tasks such as reading, videos, etc. Interactive learning activities and exercises then take place in class.
Live Online Training (LOT)
In live online training, participants and teachers are not in the same physical room but in the same virtual room. This is usually possible through an online platform or a software system.
Break-out-Room
In live online training, it is sometimes useful to divide the students into small groups for certain exercises, as it would be impossible to have conversations at the same time. Break-out-rooms are used so that people can talk to each other without disturbing the others. When the exercise is over, they are sent back to the main room.
mLearning means mobile learning, which comes from "Mobile Telephone". You can access the learning material over your mobile phone anywhere, which makes learning mobile.
Asynchronous Learning
Asynchronous Learning means that the learning is time-shifted. The communication between student and teacher are time-delayed.
Tutorials are videos with instructions that show how for example a product or a software works.
A podcast is an audio or video contribution that can be listened to or viewed via the Internet. Podcasts can be used for information on specific topics but also for entertainment.
Computer Based Training (CBT)
Computer Based Traing (CBT) means digital learning programs, which work without internet. Exercises can be downloaded over the internet or can be distributed via storage media like a USB stick or a CD.
Virtual Reality
With Virtual Reality people can practice situations and important processes in a virtual room by putting on special digital glasses. They can influence what happens themselves.
Blended Learning
Blended Learning is a teaching / learning method that includes both in-person and online instruction. The technique has gained a lot of popularity, as it combines the benefits of teaching live and online, which makes it very successful, according to several studies.
Game-based Learning
Game-based learning is a popular approach where the instrument for a learning process is a game. Game-based learning scenarios are often found online - they are often favored because they engage learners in a way that few other learning methods do.
WWTBAM is an acronym for "Who wants to be a Millionaire", which is a famous quiz show that airs in several countries.
An e-lecture is a lecture that is held online. Many schools and universities offer e-lectures as technical opportunities improve.
Open Educational Resources (OER)
Open Educational Resources are free learning and teaching materials provided on the web. They have an open license (e.g., Creative Commons), which allows anyone to use and benefit from these resources.
Learning Management System (LMS)
Learning Management Systems (LMS) are online platforms that provide learning resources and support the organisation of learning processes.
Student Response System (SRS)
With Student Response Systems (SRS) it is possible to get live student feedback in the classroom. Questions and answers can usually be asked and given anonymously, which increases participation and engagement. An SRS may be used for any grade, including university.
Classroom Communication System (CCS)
A Classroom Communication System allows students and teachers to communicate efficently online. It improves students' engagement as they are animated to ask questions, give feedback and take notes. There are various companies that offer CCS solutions.
Personal Response System (PRS)
A Personal Response System (PRS) provides lecturers, presenters or teachers with the opportunity to ask a group of students or their audience questions. The questions are usually in a multiple choice format. PRS increase student engagement and provide an opportunity to receive instant feeback.
Informative Presentations
An information presentation is created when no solution is currently available. Facts, data and figures or study results are presented and current processes are described.
Instructive Presentations
Instructive Presentations are similar to informative presentations, but it's more than just giving informations. People attend instructive presentations to learn something new and to understand the topic of the presentation better.
Persuasive Presentations
A persuasive presentation is made, for example, to introduce an amendment. There are usually several options to choose from. It is particularly important to provide good arguments and reasons.
Solution Presentation
A solution has already been found during a solution presentation. The only thing that remains is to find a solution on how to realize the decision.
Concept Presentation
In a concept presentation, you have to give general information as well as try to convince the audience with good arguments and deliver a solution concept.
Motivational Presentation
A motivational presentation is meant to inspire people. In a company, for example, you could tell the company's story in a motivational presentation.
Screen presentation
A screen presentation is a graphic support and accompaniment to a spoken presentation. A popular programme for creating screen presentations is PowerPoint.
TOK Presentation
The Theory of knowledge (TOK) presentation is an essential part of the International Baccalaureate Diploma Program (IB). The TOK presentation assesses a student's ability to apply theoretical thinking to real-life situations.
A pitch is a short presentation that is given with the intention of persuading someone (a person or company) to buy or invest. There are various forms of pitches, depending on the goal and intended outcome.
Audience Demographics
Audience Demographics are the characteristics of listeners like age, gender, cultural backgrounds, group affiliations and educational level. The speaker has to consider all these characteristics when adapting to an audience.
Audience Dynamics
Audience Dynamics means the motivations, attitudes, beliefs and values, which influence the listener's behaviour.
Internal Summary
Internal summary means to remind listeners about the major points which were already presented in a speech before coming to new ideas.
Internal Preview
An Internal Preview is a statement, which is made in the body of the speech, so that the audience knows what the speaker is going to discuss next.
Multimedia Presentation
A multmedia presentation is a speech in which several types of visual and audio aids are combined in the same speech with the help of computer software. .
Hybrid Audience
A mix between in-person and virtual participants for an event or a lecture is called a hybrid audience. Working with a hybrid audience may be challenging, as it requires the presenter to find ways to engage both the live and the virtual audience.
Distributed Audience
A Distributed Audience means that the audience you are trying to reach is spread over long distances.
Virtual Audience
A virtual audience consist of people who join an event / a meeting / a presentation via an electronic device (computer or smartphone) over the Internet. Each member may be located in a different place while an event takes place. Virtual audiences are becoming increasingly important as the amount of events held online is rising.
Co-located Audience
Co-located Audience means that the speaker talks to the audience in person. It is used verbal and non-verbal methods to communicate a message. The speaker makes gestures with their hands, changes their face expression and shows images.
Audience Response System (ARS)
Audience Response Systems (ARS) are technical solutions that are used in presentations in order to increase the interaction between the presenter and the audience. There are various forms of ARS that offer different features.
Glossophobia
Glossophobia means the strong fear of public speaking.
Slide Master
To create your own Template in PowerPoint it is best to use the Slide Master. After updating the Slide Master with your design, all slides (fonts, colours, images, …) adapt to those of the Slide Master.
PowerPoint Online
PowerPoint Online is the web version of PowerPoint. You can present and edit your PowerPoint presentation with it, without having PowerPoint installed on your computer. It's only necessary to have a Microsoft - or a Microsoft 365 account.
Normal view (slide view)
The normal view or slide view is the main working window in your PowerPoint presentation. You can see the slides at their full size on screen.
Outline view
The outline view in PowerPoint shows a list with the whole text of all slides on the left of the screen. There are no images and graphics displayed in this view. It's useful for editing the presentation and can also be saved as a Word document.
Slide Sorter view
The Slide Sorter view in PowerPoint shows thumbnails of all your slides in horizontal rows.The view is useful for applying global changes to several slides at once. Also it's useful for deleting and rearranging slides.
Notes Page view
The Notes Page view in PowerPoint shows a smaller version of the slide with a small area for notes underneath. In the presentation every slide has it's own space for notes. During the presentation the notes do not appear on screen. They are just visible in the presentation mode.
Master view
In the master view in PowerPoint you can edit the Slide Master.
Slide Layouts
PowerPoint has different types of Slide Layouts. Depending on which type of presentation you make, you will use more or less different slide layouts. Some Slide Types are: title slides, section heading slides, picture with caption slides, blank slides.
Slide transitions
Slide transitions are visual effects which appear in PowerPoint when one slide moves to the next. There are many different transitions, like for example fade and dissolve.
Animations in PowerPoint
Animations in PowerPoint are visual effects that are applied to different items like graphics, title or bullet points, instead of the slides. There are many different animations like: Appear, Fade, Fly in.
Effect Options
In the effect options in PowerPoint, further details can be specified for the selected effect.
Display duration
Under display duration in PowerPoint, the start of the animation, the duration, repetition and delay can be controlled.
Keynote is a programme which, like PowerPoint, is used to create digital screen presentations. It is mainly used by Apple users.
SmartArts are diagrams that convey processes, connections or hierarchies. They can also be edited individually and easily be added to your presentations.
Animated GIF
An animated GIF enables images to be played in a specific order. It is created when several individual images are saved in a GIF file.
Title Slide
The title slide is the first slide of a presentation. It usually contains a title and a subtitle.
Verbal Communication
Communication is verbal if it includes talking with other people. This can be face-to-face but also over the telephone or via Skype
Nonverbal Communication
Nonverbal communication means that the communication is based on someone's voice and body instead on the use of words.
Panel Discussion
A panel discussion is a structured conversation in front of an audience on a given topic between several people.
Vocalized pause
A vocalized pause means the pause when the silence between words is filled by the speaker with vocalizations like "um", "uh" and "er".
Vocal distractions
In vocal distractions filler words like um, er, and you know are used during a pause.
Body language
Body language is communication through movements, hand gestures and body posture.
To interview somebody means to ask a person different questions. An interview is often done by journalists.
Face-to-face
If you are talking to someone face-to-face you are directly facing each other.
Interpersonal communication
Interpersonal communication is face-to-face communication. It means that people exchange information and feelings through verbal and non-verbal messages.
Written Communication
The goal of written communication is to spread messages clear and explicit. Written Communication can be: emails, a contract, a memo, a text message or a Facebook Post.
Visual Communication
If there are used images or videos for communication, it is visual communication. Visual Communication is almost used everywhere like on television, posts on social media (Instagram, Facebook), advertisement.
Listening is a very important part of communication. To be good in communication you need to be a good listener. That doesn't mean just hearing what the other person is saying. But you need to listen active, engage your mind and intently focus on what your talking partner is saying.
Formal Communication
formal communication should be used for speeches or at work
Informal Communication
informal communication can be used when talking to your friends or your family
Online Communication
Online communication is communication over the internet. Online communication is often anonymous and over social media platforms you can communicate with people around the world.
Vertical Communication
Vertical communication means that information is passed from one person to the next according to a linear system based on their titles. This type of communication is used when a company follows a hierarchical structure or for important, sensitive information.
Horizontal Communication
Horizontal communication is the exchange of information between people, departments or units within the same level of an organisational hierarchy of a company.
Diagonal Communication
Diagonal communication means that the employees of a company communicate with each other regardless of their function and their level in the organisational hierarchy and regardless of their department within the company.
Internal Communication
Internal communication is particularly important for corporate communication. It communicates important information from leadership to staff so that they can do their jobs in the best possible way and work processes run well.
External Communication
External communication is the exchange of information between two organisations. For example, it can be an exchange with customers, clients or traders. Feedback from a customer also counts as external communication.
Closed Questions
Closed questions are followed by a short, clear answer. There are several answer options from which you can choose one or more.
Open Questions
In contrast to closed questions, the answer to open questions can be more detailed and creative. You can convey more information.
Leading Questions
Leading questions subconsciously make the respondent think in a certain direction.
Recall Questions
With recall questions, you have to remember something or something has to be recalled. Example: A teacher asks his students a question so that they remember the material from the last lesson.
Process Questions
Process questions are similar to recall questions but they need some deeper thoughts and maybe also analysis.
Hybrid Event
When an event consist of both virtual and in-person parts, this is called a hybrid event. This type of event is popular as it combines the benefits of both online and live events.
Virtual Event
Virtual events take place entirely online. They are very convenient as anyone may join from wherever they are via a smartphone or computer.
Corporate Events
A corporate event is an event organised by a company and intended for employees, stakeholders, customers, a charity event or public. The audience depends on the goal of the event.
Social Events
Social events in companys can be to celebrate an anniversary or to bond better as a team. They should address the personal interests of employees and revolve around things like entertainment and food.
Fundraising Events
The aim of fundraising events is to raise funds for a specific organisation. They are often organised by charities and non-profit organisations.
Community Events
Community events are about bringing people together, creating positive change and making new friends.
Pop-up Events
Pop-up events only last for a short period of time, such as only for one night or one month. An example: Another location of a shop is opened for only one month to extend the reach.
B2B means Business to Business. B2B events are between at least two companys. They help to build interpersonal relationships, which are important for a successful company.
B2C means Business to Customer. A B2C event is hosted by a company for its customers. It's important for gaining new customers and for satisfieing regular clients.
Be the first to know!
The latest SlideLizard news, articles, and resources, sent straight to your inbox.
- or follow us on -

Get started with Live Polls, Q&A and slides
for your PowerPoint Presentations
We use cookies to personalize content and analyze traffic to our website. You can choose to accept only cookies that are necessary for the website to function or to also allow tracking cookies. For more information, please see our privacy policy .
Cookie Settings
Necessary cookies are required for the proper functioning of the website. These cookies ensure basic functionalities and security features of the website.
Analytical cookies are used to understand how visitors interact with the website. These cookies help provide information about the number of visitors, etc.
Power Point presentation is a collection of ________________.
Correct option is d. all of the above.
The collection is a set or not a set ? The collection of all the points of a circle.
The collection of all points in a plane which is equidistant from a fixed point is a

How To Get Free Access To Microsoft PowerPoint
E very time you need to present an overview of a plan or a report to a whole room of people, chances are you turn to Microsoft PowerPoint. And who doesn't? It's popular for its wide array of features that make creating effective presentations a walk in the park. PowerPoint comes with a host of keyboard shortcuts for easy navigation, subtitles and video recordings for your audience's benefit, and a variety of transitions, animations, and designs for better engagement.
But with these nifty features comes a hefty price tag. At the moment, the personal plan — which includes other Office apps — is at $69.99 a year. This might be the most budget-friendly option, especially if you plan to use the other Microsoft Office apps, too. Unfortunately, you can't buy PowerPoint alone, but there are a few workarounds you can use to get access to PowerPoint at no cost to you at all.
Read more: The 20 Best Mac Apps That Will Improve Your Apple Experience
Method #1: Sign Up For A Free Microsoft Account On The Office Website
Microsoft offers a web-based version of PowerPoint completely free of charge to all users. Here's how you can access it:
- Visit the Microsoft 365 page .
- If you already have a free account with Microsoft, click Sign in. Otherwise, press "Sign up for the free version of Microsoft 365" to create a new account at no cost.
- On the Office home page, select PowerPoint from the side panel on the left.
- Click on "Blank presentation" to create your presentation from scratch, or pick your preferred free PowerPoint template from the options at the top (there's also a host of editable templates you can find on the Microsoft 365 Create site ).
- Create your presentation as normal. Your edits will be saved automatically to your Microsoft OneDrive as long as you're connected to the internet.
It's important to keep in mind, though, that while you're free to use this web version of PowerPoint to create your slides and edit templates, there are certain features it doesn't have that you can find on the paid version. For instance, you can access only a handful of font styles and stock elements like images, videos, icons, and stickers. Designer is also available for use on up to three presentations per month only (it's unlimited for premium subscribers). When presenting, you won't find the Present Live and Always Use Subtitles options present in the paid plans. The biggest caveat of the free version is that it won't get any newly released features, unlike its premium counterparts.
Method #2: Install Microsoft 365 (Office) To Your Windows
Don't fancy working on your presentation in a browser? If you have a Windows computer with the Office 365 apps pre-installed or downloaded from a previous Office 365 trial, you can use the Microsoft 365 (Office) app instead. Unlike the individual Microsoft apps that you need to buy from the Microsoft Store, this one is free to download and use. Here's how to get free PowerPoint on the Microsoft 365 (Office) app:
- Search for Microsoft 365 (Office) on the Microsoft Store app.
- Install and open it.
- Sign in with your Microsoft account. Alternatively, press "Create free account" if you don't have one yet.
- Click on Create on the left side panel.
- Select Presentation.
- In the PowerPoint window that opens, log in using your account.
- Press Accept on the "Free 5-day pass" section. This lets you use PowerPoint (and Word and Excel) for five days — free of charge and without having to input any payment information.
- Create your presentation as usual. As you're using the desktop version, you can access the full features of PowerPoint, including the ability to present in Teams, export the presentation as a video file, translate the slides' content to a different language, and even work offline.
The only downside of this method is the time limit. Once the five days are up, you can no longer open the PowerPoint desktop app. However, all your files will still be accessible to you. If you saved them to OneDrive, you can continue editing them on the web app. If you saved them to your computer, you can upload them to OneDrive and edit them from there.
Method #3: Download The Microsoft PowerPoint App On Your Android Or iOS Device
If you're always on the move and need the flexibility of creating and editing presentations on your Android or iOS device, you'll be glad to know that PowerPoint is free and available for offline use on your mobile phones. But — of course, there's a but — you can only access the free version if your device is under 10.1 inches. Anything bigger than that requires a premium subscription. If your phone fits the bill, then follow these steps to get free PowerPoint on your device:
- Install Microsoft PowerPoint from the App Store or Google Play Store .
- Log in using your existing Microsoft email or enter a new email address to create one if you don't already have an account.
- On the "Get Microsoft 365 Personal Plan" screen, press Skip For Now.
- If you're offered a free trial, select Try later (or enjoy the free 30-day trial if you're interested).
- To make a new presentation, tap the plus sign in the upper right corner.
- Change the "Create in" option from OneDrive - Personal to a folder on your device. This allows you to save the presentation to your local storage and make offline edits.
- Press "Set as default" to set your local folder as the default file storage location.
- Choose your template from the selection or use a blank presentation.
- Edit your presentation as needed.
Do note that PowerPoint mobile comes with some restrictions. There's no option to insert stock elements, change the slide size to a custom size, use the Designer feature, or display the presentation in Immersive Reader mode. However, you can use font styles considered premium on the web app.
IMAGES
VIDEO
COMMENTS
PowerPoint (or PPT for short) is a staple program in the Microsoft Office software suite and comes packaged with Microsoft Word and Excel. You can use PPT on both Mac and PC, or any other computer operating system via the cloud-based Microsoft Office 365.
Benefits of PowerPoint. PowerPoint is a very popular presentation software and for a good reason. It offers numerous benefits for users, from easy collaboration to ease of use. These are some of the key benefits of PowerPoint. 1) Visual appeal: Microsoft PowerPoint allows you to create visually appealing presentations with its wide range of ...
To explain or introduce a concept. To share one's opinions or views. 1. To pitch new ideas or products. Slide decks happen to be a very crucial part of making pitches to attract your clients, or to make them understand what your product/ services are all about and how they can be beneficial to them.
The basic purpose of a PowerPoint presentation is to communicate information or media through a series of slides. Along with regular text, your slides can contain numerous types of content such as tables, images, drawings, charts, links, word art, videos, audio and even embedded add-ins from Microsoft. The software also has built-in editing ...
Each presentation that you create is saved on your computer's hard drive as a separate file. PowerPoint 2019 presentations have the special extension .pptx added to the end of their filenames. For example, Sales Conference.pptx and History Day.pptx are both valid PowerPoint filenames. When you type the filename for a new PowerPoint file, you ...
If you need to record the presentation to send to others or even for your own viewing, you will find the tools you need in the Record tab (Figure 7.34). This feature in PowerPoint allows you to capture your presentation, either from the beginning or starting from a specific slide, and customize the recording options (Figure 7.35).
Under Drawing Tools, choose Format. Do one of the following: To change the color of your text, choose Text Fill, and then choose a color. To change the outline color of your text, choose Text Outline, and then choose a color. To apply a shadow, reflection, glow, bevel, 3-D rotation, a transform, choose Text Effects, and then choose the effect ...
The Learning Hour* - Week 11 : PowerPoint Slide Elements. Posted by Ashish Agarwal. A PowerPoint slide is the fundamental building block of a Presentation. A PowerPoint presentation is simply a collection of different slides arranged in a logical manner to effectively communicate a story. So then, what are the main components of building a slide?
A PowerPoint presentation is a collection of slides used to inform an audience on a particular topic. Professionals often use PowerPoint presentations for business or educational purposes. Slides within the PowerPoint include text, images, graphics and other elements that help illustrate the subject matter. It's important to create an effective ...
Create a presentation. Open PowerPoint. In the left pane, select New. Select an option: To create a presentation from scratch, select Blank Presentation. To use a prepared design, select one of the templates. To see tips for using PowerPoint, select Take a Tour, and then select Create, . Add a slide.
There you have it - 16 PowerPoint dos and don'ts for creating memorable, professional PowerPoint presentations. Apply the dos to make high-impact slides, and avoid the don'ts for mistake-free presentations. Put these PowerPoint best practices into play and watch your ordinary slides transform into extraordinary visual stories.
Getting Started. 1. Open PowerPoint and click 'New.'. If a page with templates doesn't automatically open, go to the top left pane of your screen and click New. If you've already created a presentation, select Open then double-click the icon to open the existing file. Image Source.
A strong presentation is so much more than information pasted onto a series of slides with fancy backgrounds. Whether you're pitching an idea, reporting market research, or sharing something ...
Step-1: Click on the "New Slides" button. The first step of the process is to click on the " New Slides " button, which is below the icon that looks like a plus '+' sign over a square as described in the previous step. This will open a drop-down menu. Step-2: Select your preferred layout.
What is a PowerPoint theme? A theme is a predefined set of colors, fonts, and visual effects that you apply to your slides for a unified, professional look.. Using a theme gives your presentation a harmonious appearance with minimal effort. For example: When you add graphics (tables, shapes, and so on) to your slides, PowerPoint applies theme colors that are compatible with other slide elements.
PowerPoint presentations can be created using a variety of methods, including importing images, adding text, and inserting multimedia content. ... The key difference between a presentation and a deck is that a deck is a collection of slides and a PowerPoint presentation could be given in the form of a speech, video, or other formats.
You can show or hide task pane from View >> Toolbars. View Answer. To start Microsoft PowerPoint application. A. Click on Start > Programs > All Programs > Microsoft PowerPoint. B. Hit Ctrl + R then type ppoint.exe and Enter. C. Click Start > Run then type powerpnt then press Enter. D. All of above. View Answer.
A PowerPoint slide is an individual screen within a presentation containing visuals and text to present one key point. Several slides make up a complete presentation deck. There are common slide types like title, agenda, content, summary, and thank you slides. Slides typically have elements such as titles, text, visuals, themes, and layouts.
A slide deck, in its most basic sense, is a collection of slides that are presented in sequence to support a speech or presentation. The slides typically contain key points, graphics, and other visual aids that make the presentation more engaging and easier to understand. ... Microsoft PowerPoint (PPT) is the go-to choice for creating ...
PowerPoint document that helps deliver a dynamic, professional looking message to an audience. Also known as a Slide Show. ... A collection of slides in a presentation, commonly resembling a deck of cards stacked on top of each other, that is used to enhance an oral presentation.
Get started with Live Polls, Q&A and slides. The SlideLizard presentation glossary is a large collection of explanations and definitions of terms in the area of presentations, communication, speaking, events, PowerPoint and education.
Terms in this set (19) The _____ is a collection of drawings, photographs, sounds, videos, and other media files shared with other Microsoft Office applications. The _____ provides consistency in design and color throughout the entire presentation by setting the color scheme, font, and font size, and layout of the presentation. Study with ...
A line is a collection of . View Solution. Click here:point_up_2:to get an answer to your question :writing_hand:power point presentation is a collection of.
This is a data collection and processing ppt powerpoint presentation infographic template graphics pictures. This is a four stage process. The stages in this process are data collection and processing, marketing, strategy, management, planning. Slide 1 of 5.
Click on "Blank presentation" to create your presentation from scratch, or pick your preferred free PowerPoint template from the options at the top (there's also a host of editable templates you ...
Scale Large Systems, Scale Great Performance. Great networking performance starts at the processor where Intel® Gaudi® 3 accelerator integrates 24200 Gigabit Ethernet ports on chip, enabling more efficient scale up in the server and massive scale out capacity for cluster-scale systems that support blazing-fast training and inference of models—large and small.